Images help technical writers explain how to complete a task or what outcome the reader will achieve after following the guidelines. Images and other visual representations are more popular than text and help the reader quickly understand an otherwise complex set of steps.
Using Images in Document360
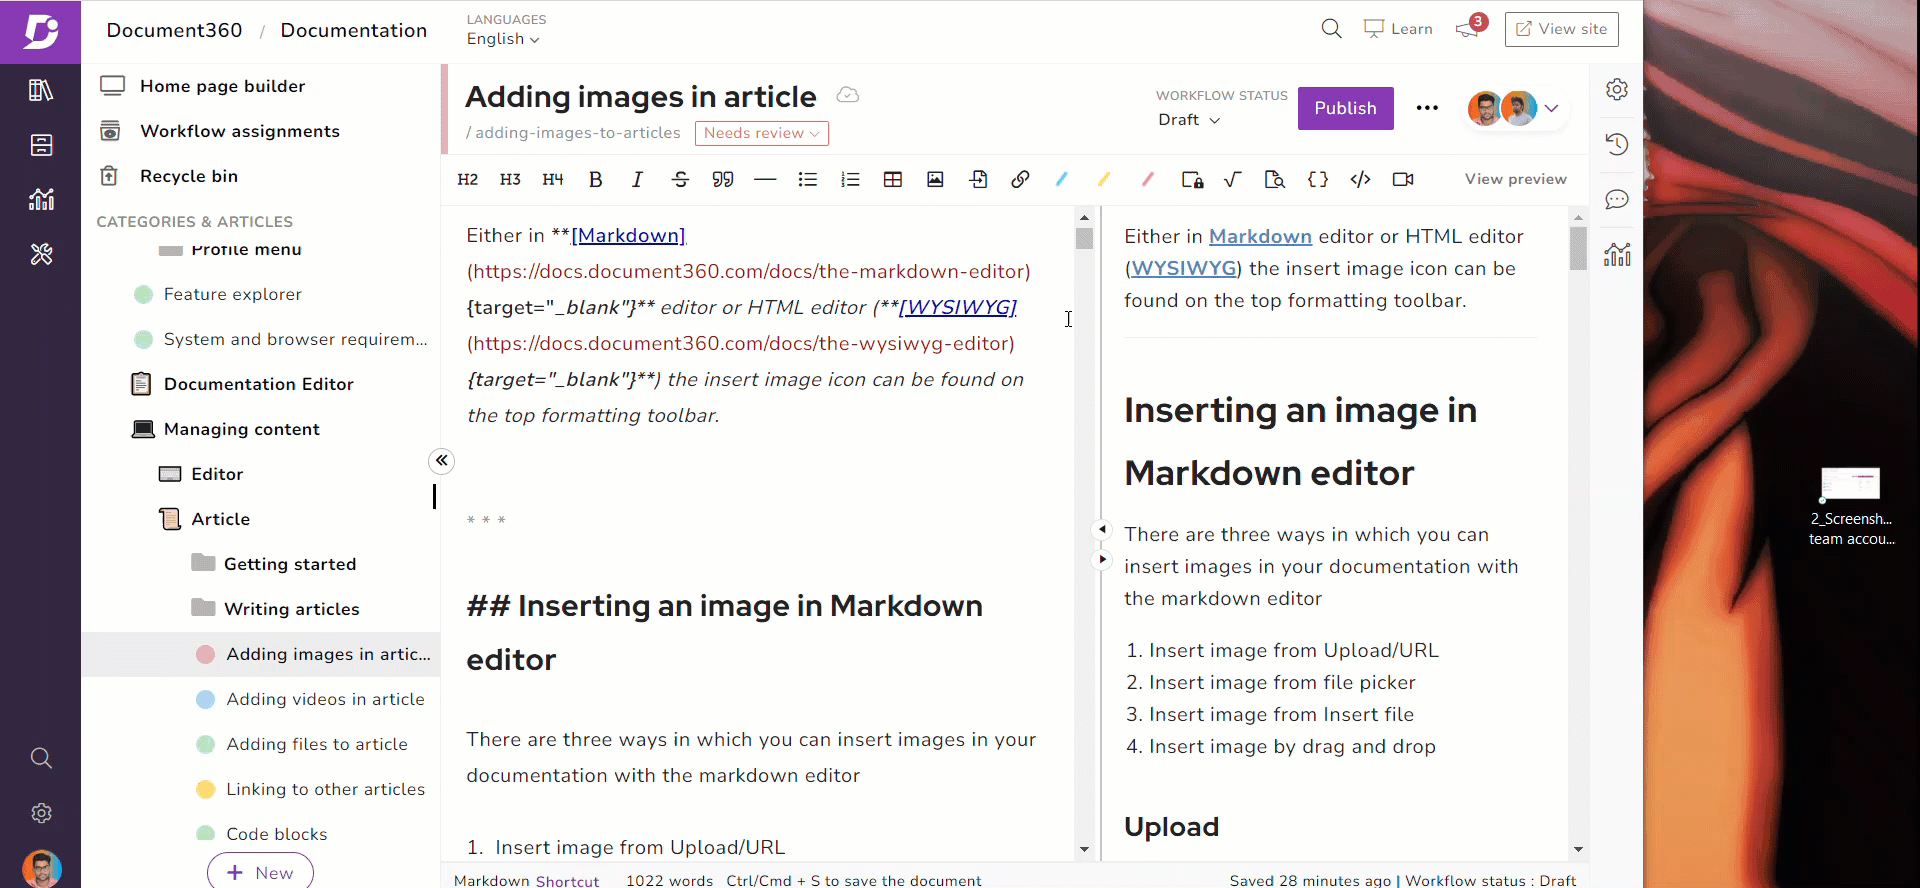
Either in Markdown editor or HTML editor (WYSIWYG) you can find the insert image icon on the top formatting toolbar.
![]()
Inserting an image - Markdown editor
You can insert images in your documentation with the Markdown editor in four ways.
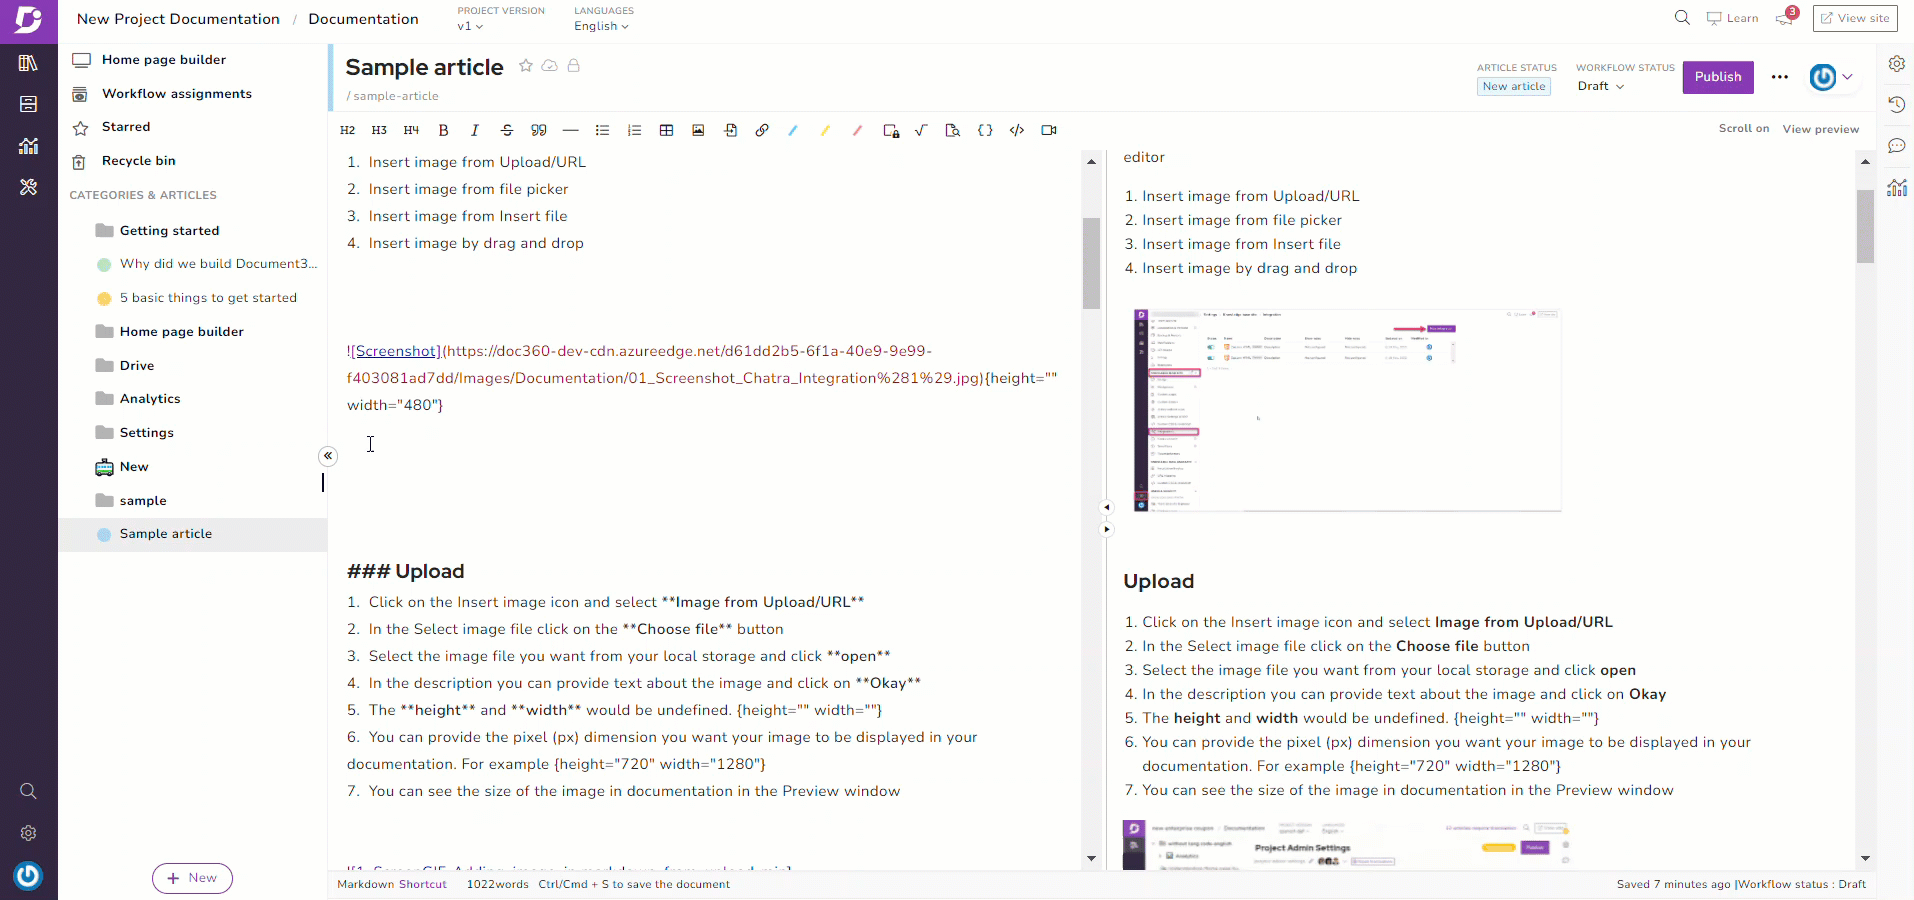
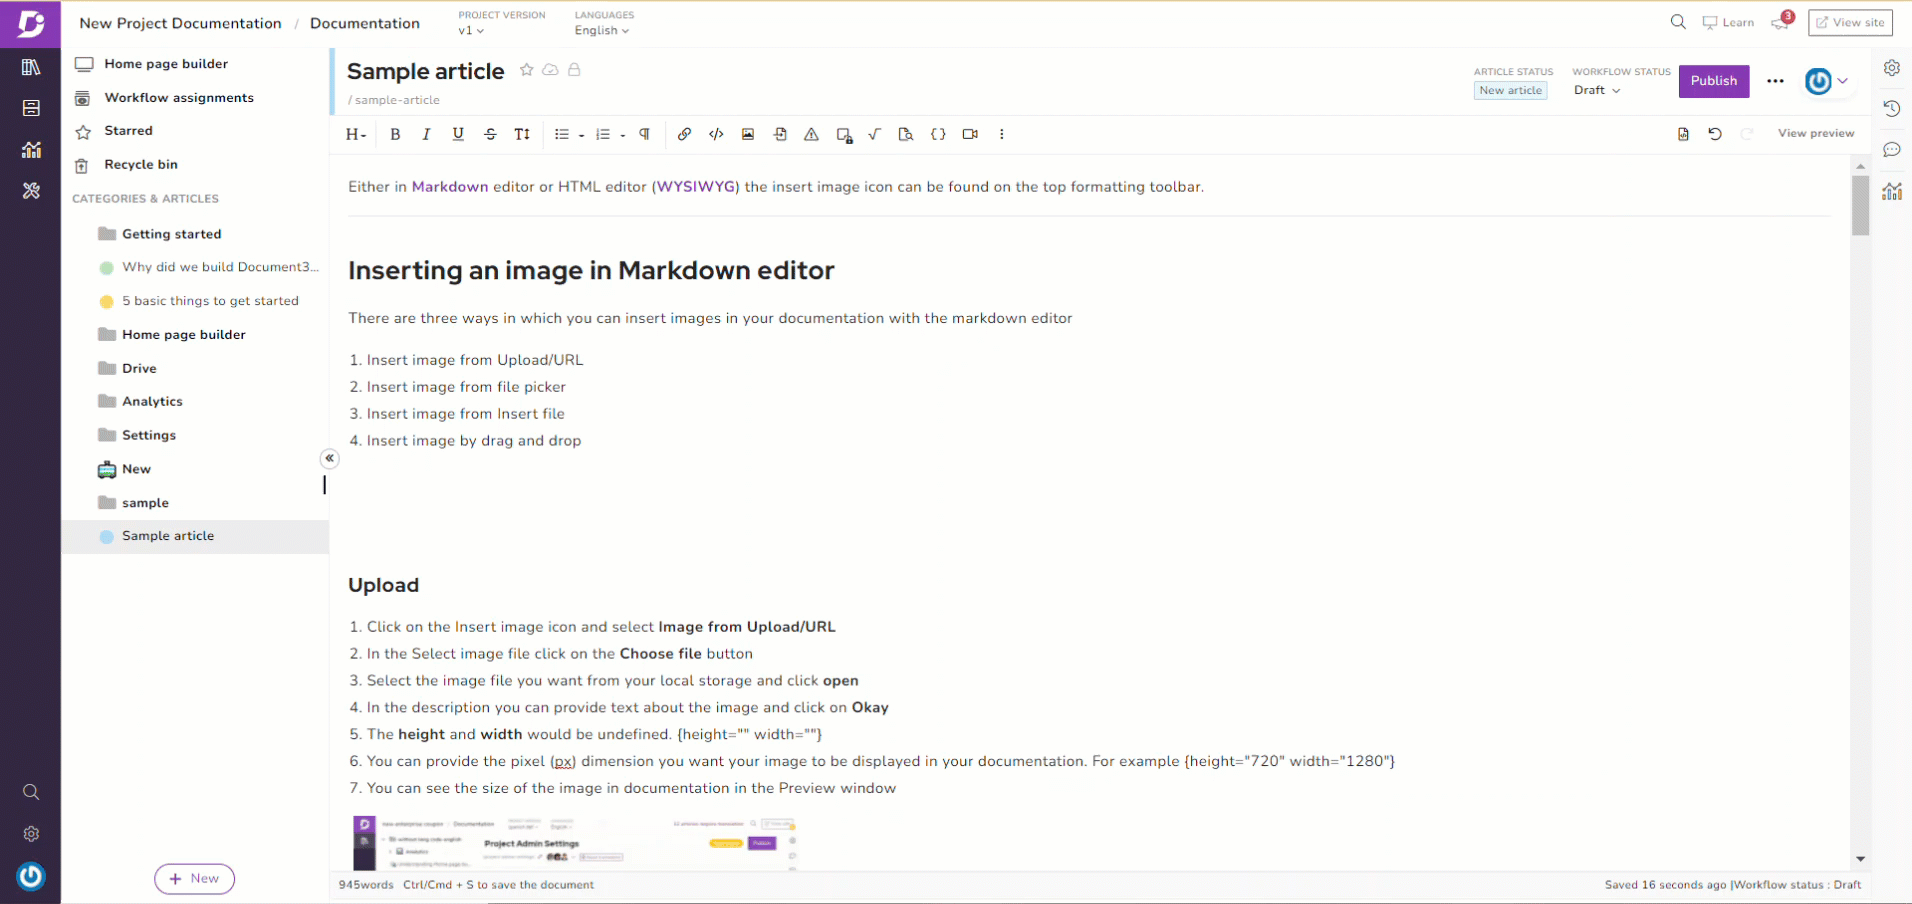
1. Insert image from Upload/URL
2. Insert image from file picker
3. Insert image using Insert file
4. Insert image by drag and drop
1. Insert image from Upload/URL
1.1 Using the upload
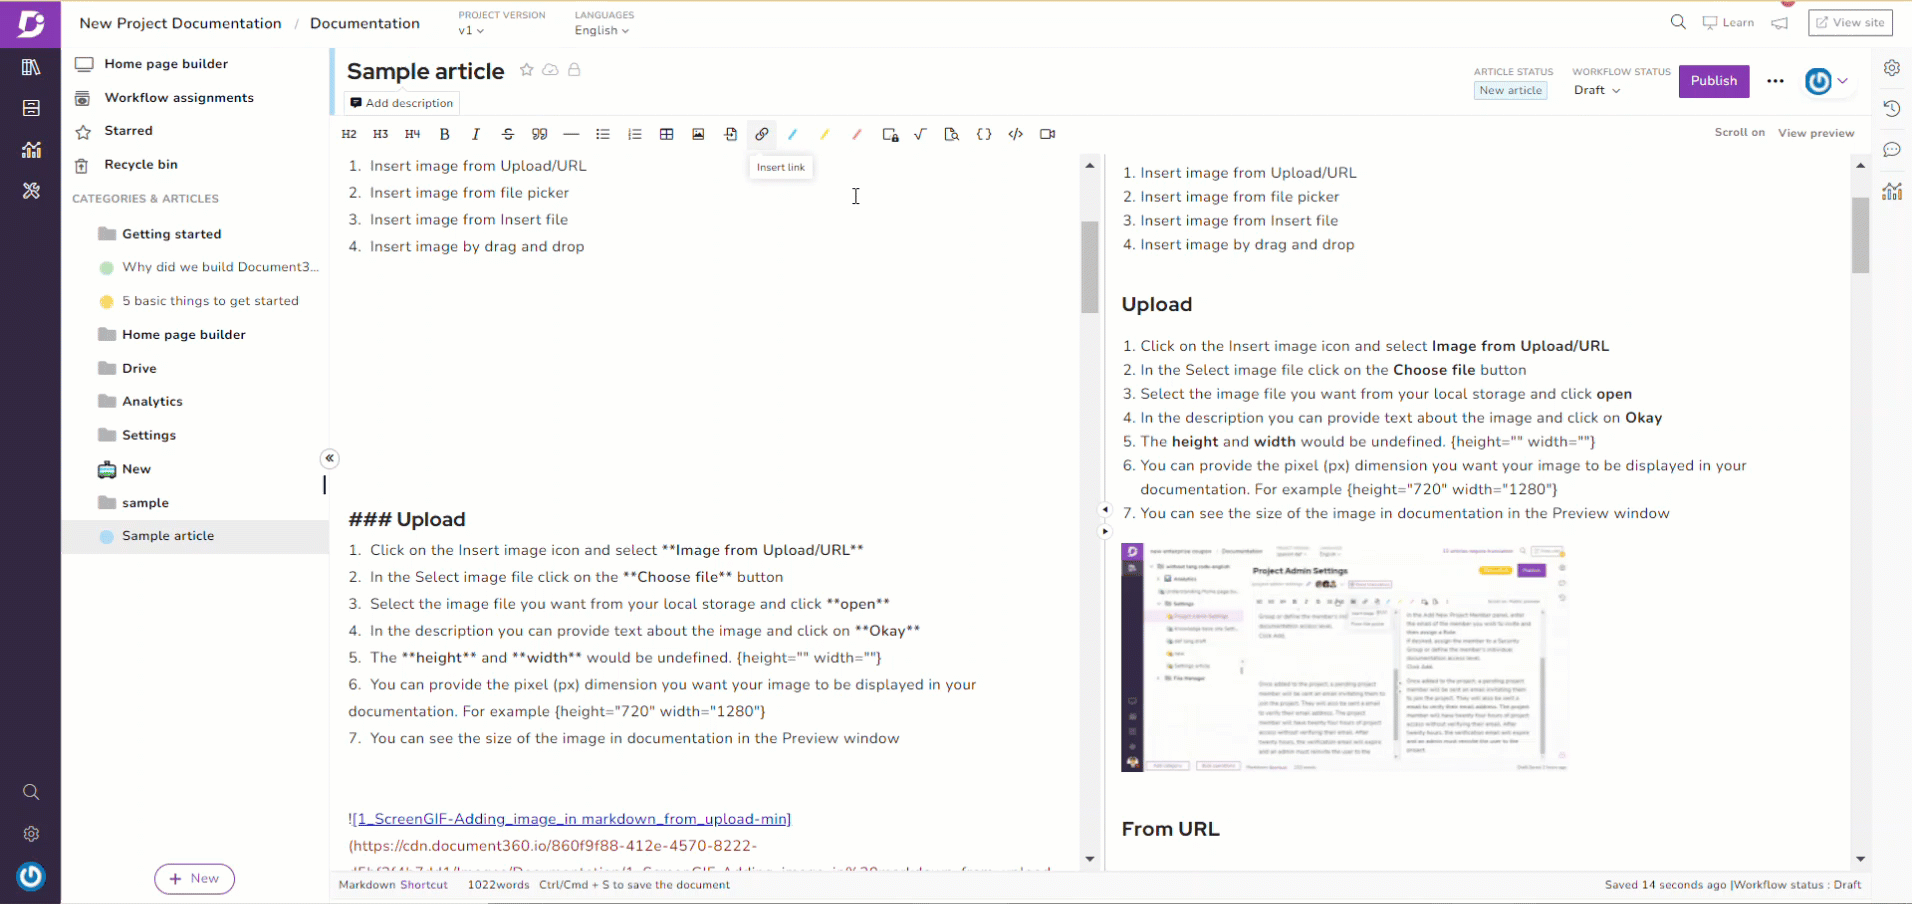
- Click the Insert image icon
- Select Image from Upload/URL → File
- Click the Choose file button
- Select the image file you want from your local storage and click Open
- In the Description field, type in a description for the image
- Click the OK button
- The image will be inserted into the article where the cursor is placed
The image's height and width will be undefined by default. {height="" width=""}
- If required, you can provide the pixel (px) dimension you want your image displayed in your documentation.
For example, {height="720" width="1280"}
- You can see the size of the image in the documentation in the Preview window
1.2 From URL
- Click the Insert image icon
- Select From Upload/URL → URL
- In the Image URL field, paste the desired URL of the image
- In the Description field, type in a description for the image
- The image will be inserted into the article where the cursor is placed
The image's height and width will be undefined by default. {height="" width=""}
- If required, you can provide the pixel (px) dimension you want your image displayed in your documentation.
For example, {height="720" width="1280"}
- You can see the size of the image in the documentation in the Preview window
Adding images in Document360 Drive and inserting them inside articles is always recommended. If you add an image from a URL and if in the future it is removed or renamed, it would appear as broken in the Knowledge base.
2. Insert the image from the file picker
- Click the Insert image icon
- Select From file picker
- The Drive window appears with only files in the image formats
You can insert any number of images in one go. The multiple image selection is available only on Markdown and Block editors.
- Navigate to the desired folder where the image you wish to upload is available
- Select the desired image and click Insert
- The image will be inserted into the article where the cursor is placed
The image's height and width will be undefined by default. {height="" width=""}
- If required, you can provide the pixel (px) dimension you want your image displayed in your documentation.
For example, {height="720" width="1280"}
- You can see the size of the image in the documentation in the Preview window
3. Insert an image using the Insert file
- Click on the Insert file icon
- The Drive window appears
- Navigate to the desired folder where the image you wish to upload is available
- Select the desired image and click Insert
- The image will be inserted into the article where the cursor is placed
The image's height and width will be undefined by default. {height="" width=""}
- If required, you can provide the pixel (px) dimension you want your image displayed in your documentation.
For example, {height="720" width="1280"}
- You can see the size of the image in the documentation in the Preview window
4. Insert an image by drag and drop
You can add an image to the editor by dragging it from your local system to your editor.
The images you insert in an article through drag and drop will be saved automatically in the Document360 Drive. The changes in your local file will not affect the inserted image.
Can I change the alignment of an image in Markdown?
Yes, you can change the image alignment in Markdown.
For more information, visit the article How to align the image in Markdown?
Inserting an image - WYSIWYG (HTML) editor
You can insert images in your documentation with the WYSIWYG editor in four ways.
1. Insert image from Upload/URL
2. Insert image from file picker
3. Insert image using Insert file
4. Insert image by drag and drop
1. Insert image from Upload/URL
From Upload
- Click on the Insert image icon and drop area with Drop image (or click) appears
- You can click, drag, and drop an image from your local storage
(or) you can click on the Drop image, and your local storage file explorer will be launched (in the case of Windows OS) - Select the image and click on Open
- The image will be inserted into the article where the cursor is placed
Only the image file format will be displayed in the selection module. Also, you cannot choose multiple image files in one go.
By URL

- Click on the Insert image icon and select the URL tab
- Paste or type in the URL of the image
- Click on the Insert button
- The image will be inserted into the article where the cursor is placed
Adding images in Document360 Drive and inserting them inside articles is always recommended. If you add an image from a URL and if in the future it is removed or renamed, it would appear as broken in the Knowledge base.
2. Insert the image from the file picker
- Click on the Insert image icon and select From picker tab
- The Drive window appears with only files in the image formats
You can insert only one image at a time.
- You can navigate through your folder and select the intended image file
- Click on the Insert button
- The image will be inserted into the article where the cursor is placed
3. Insert an image using the Insert file
- Click on the Insert file icon
- The Drive window appears
You can insert only one image at a time.
- Search or navigate through and select the intended image and click Insert
- The image will be inserted into the article where the cursor is placed
4. Insert an image by drag and drop
You can add an image to the editor just by dragging it from your local system storage to your editor.
The images you insert in an article through drag and drop will be saved automatically in the Document360 Drive. The changes in your local file will not affect the inserted image.
Formatting images in HTML (WYSIWYG) editor
Unlike the Markdown editor, the WYSIWYG editor offers different image formatting options. You can access the image formatting options when you click on an image you wish to edit.
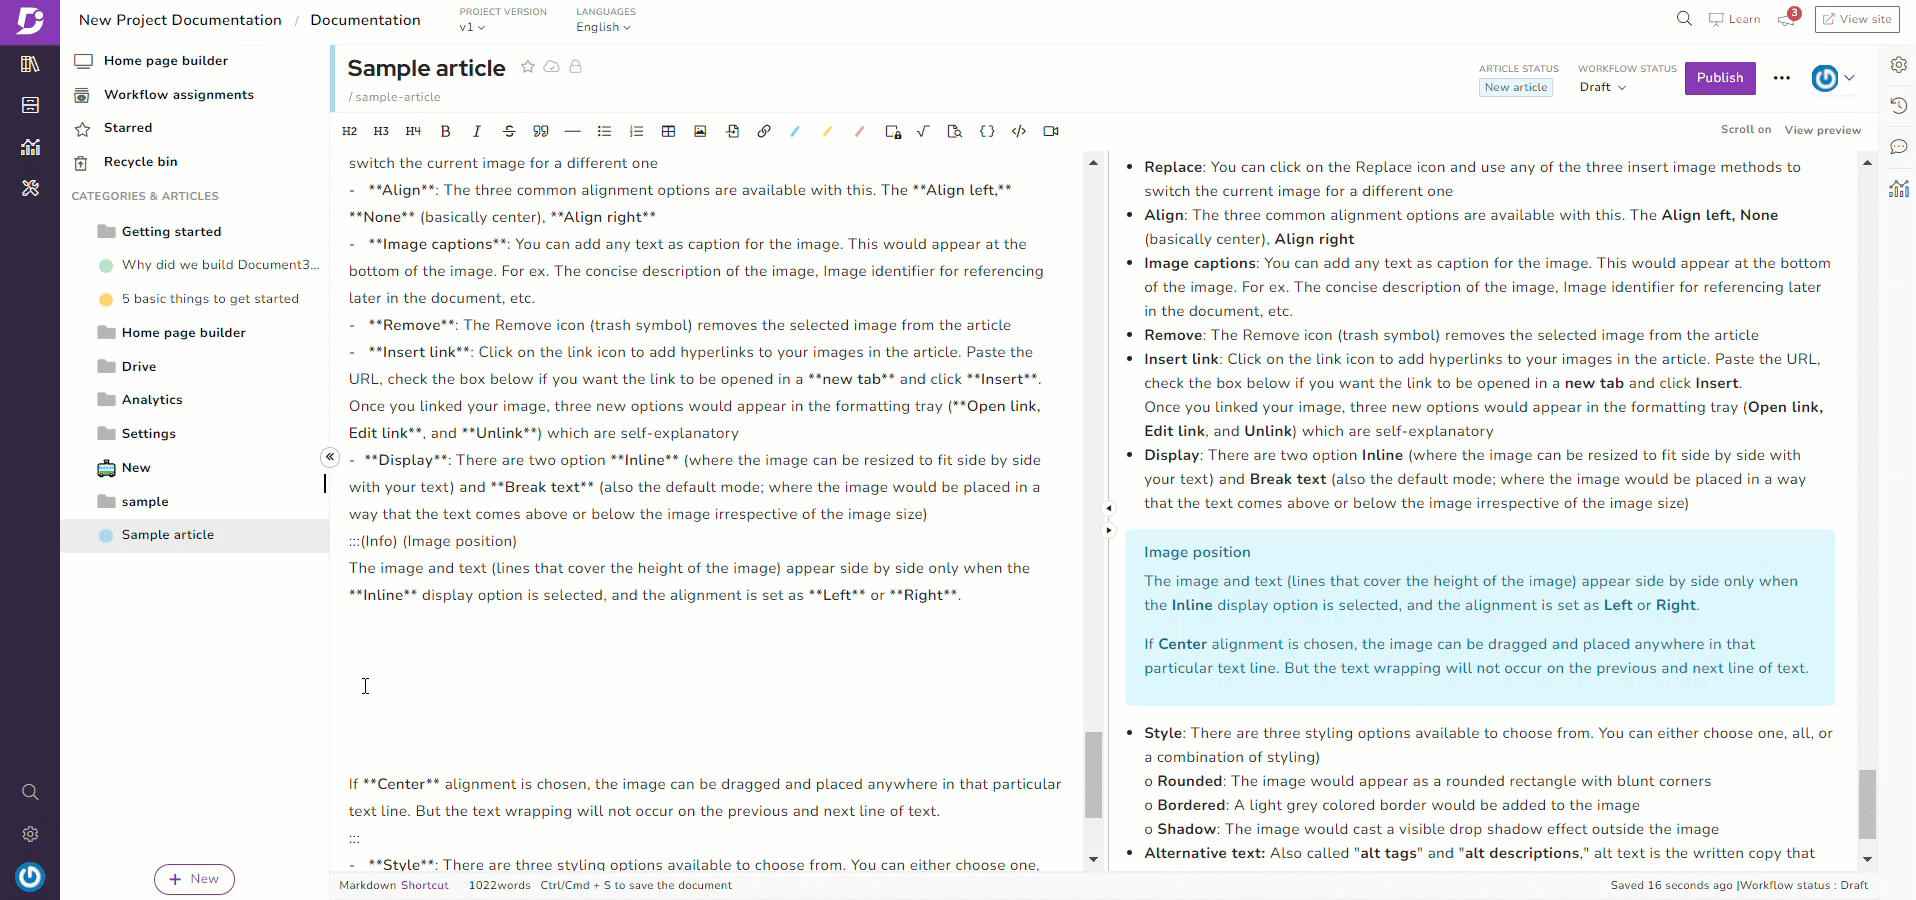
- Resize: To resize the image, you can use the mouse pointer to click and drag the image corners.
You can also click on the Change size icon (Ruler icon) from the image formatting options tray. Type in the intended width and height in pixels
- Replace: You can click on the Replace icon and use any of the three insert image methods to switch the current image for a different one
- Align: This has three common alignment options. The Align left, None (basically center), Align right
- Image caption: You can add any text as a caption for the image. It appears at the bottom of the image
For example, The concise description of the image, Image identifier for referencing later in the document, and more.
- Remove: The Remove icon (trash symbol) removes the selected image from the article
- Insert link: Click on the link icon to add hyperlinks to your images in the article. Paste the URL, check the box below if you want the link to be opened in a new tab, and click Insert.
Once you link your image, three new options will appear in the formatting tray (Open link, Edit link, and Unlink), which are self-explanatory
- Display: There are two options Inline (where the image can be resized to fit side by side with your text) and Break text (also the default mode; where the image would be placed in a way that the text comes above or below the image irrespective of the image size)
The image and text (lines that cover the height of the image) appear side by side only when the Inline display option is selected. The alignment is set as Left or Right.
If Center alignment is chosen, the image can be dragged and placed anywhere in that particular text line. But the text wrapping will not occur on the previous and subsequent lines.
- Style: There are three styling options available. You can either choose one, all, or a combination of styling)
o Rounded: The image would appear as a rounded rectangle with blunt corners
o Bordered: A light grey colored border will be added to the image
o Shadow: The image would cast a visible drop shadow effect outside the image
- Alternative text: Also called "alt tags" and "alt descriptions". Alt text is the written copy that appears in place of an image on a webpage if the image fails to load on a user's screen.
Type in the alternative text for the image in the field and click on Update.
This text helps screen-reading tools describe images to visually impaired readers and allows search engines to crawl better and rank your knowledge base
- Change size - Add the desired width and height for the image. Click Change size → Add the desired width and height → Update
- Advanced edit - To crop, add text, and rotate.
- Crop - Click Crop → Choose the desired crop option below the image, and crop the image. Once you're done, click Save
- Text - Click Text and add the desired texts. Text formatting options such as Bold, Italic, Underline, Color, and Size are available. Once you're done, click Save
- Rotate - Click Rotate and spin the image as desired with the options below the image. Once you're done, click Save