O HTML personalizado permite que você incorpore qualquer ferramenta ou script de terceiros no seu site de base de conhecimento do Document360 adicionando código diretamente à sua página. Enquanto o Document360 oferece integrações nativas para muitas ferramentas populares, o HTML Personalizado está disponível para todo o resto. Qualquer widget, chatbot, script de análise, pixel de rastreamento ou botão personalizado que não tenha integração dedicada pode ser adicionado dessa forma. Você gerencia trechos personalizados de HTML a partir de Conexões () > Integrações () no seu portal de base de conhecimento.
Por que usar HTML personalizado
As integrações nativas no Document360 abrangem uma ampla variedade de ferramentas, mas nem todo serviço de terceiros possui uma. HTML personalizado preenche essa lacuna. Use quando quiser:
- Adicione uma ferramenta de terceiros que não tenha integração nativa com o Document360, como um chatbot personalizado, um widget de feedback ou um script de análise de nicho.
- Incorpore pixels de rastreamento ou scripts de eventos personalizados para plataformas de publicidade ou marketing.
- Adicione botões personalizados ou elementos de interface ao seu site de base de conhecimento usando HTML e JavaScript.
- Execute vários scripts diferentes no seu site sem precisar de uma integração nativa separada para cada um.
O HTML personalizado é aplicado no nível do projeto e roda em todos os workspaces. Não é possível adicionar HTML ou JavaScript separados para espaços de trabalho individuais. Se você precisar de comportamento específico de cada workspace (por exemplo, diferentes scripts de chatbot por workspace), verifique com seu provedor de ferramentas se eles suportam configuração baseada em URL.
Antes de começar
- Você deve ter acesso de administrador ao seu portal de base de conhecimento do Document360.
- Tenha seu trecho de código de terceiros pronto para colar. Isso normalmente é fornecido pela ferramenta que você está incorporando (por exemplo, uma tag de script da sua plataforma de análise ou um código de instalação de widget de um provedor de chat).
Como adicionar HTML personalizado
- No portal Document360, navegue até Conexões () > Integrações () na barra de navegação esquerda.
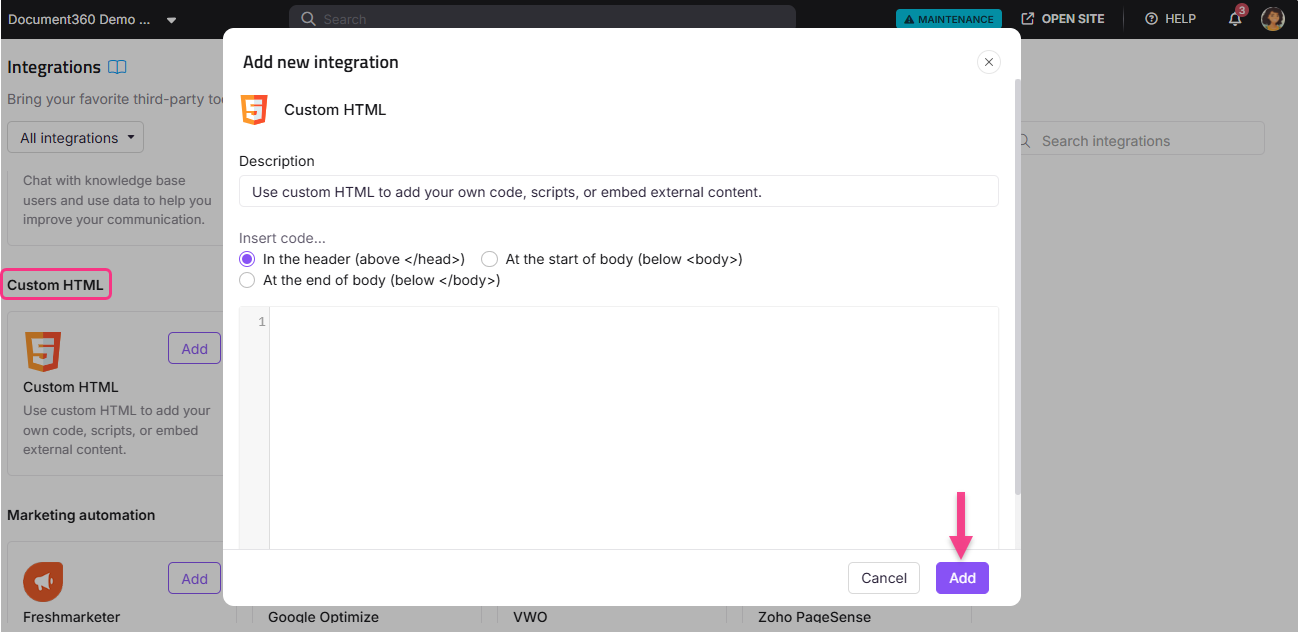
- Em HTML Personalizado, clique em Adicionar.
- Insira uma Descrição para identificar esse trecho (por exemplo, "Widget de chat ao vivo" ou "Script de rastreamento de Analytics").
- Escolha onde inserir o código na sua página:
- No cabeçalho (acima):
</head>para scripts que precisam carregar antes do conteúdo da página, como rastreamento analítico ou bibliotecas de fontes. - No início do corpo (abaixo
<body>): para scripts que devem ser executados o mais cedo possível no corpo da página. - No final do corpo (abaixo
</body>): para scripts que podem carregar após o conteúdo da página, como widgets de chat ou ferramentas de feedback. Essa é a escolha mais comum para widgets de terceiros.
- No cabeçalho (acima):
- Cole seu trecho de código no campo do editor de código.
- Clique em Adicionar.
Seu trecho agora está ativo e aparece na lista de integrações instaladas na página de visão geral de Integrações.
Gerenciar um trecho HTML personalizado
Para editar um trecho:
- Na página de visão geral de Integrações, passe o mouse sobre a entrada HTML Personalizada e clique no ícone Editar ().
- Atualize a Descrição, posição de inserção ou código conforme necessário.
- Clique em Atualizar para salvar as alterações.
Para remover um trecho:
- Passe o mouse sobre a entrada HTML Personalizada e clique no ícone Delete ().
- Clique em Excluir no prompt de confirmação.
Melhores práticas
- Adicione uma descrição clara para cada trecho. Se você gerencia múltiplas entradas HTML personalizadas (por exemplo, uma para um widget de chat e outra para um script de rastreamento), um rótulo descritivo facilita a identificação e o gerenciamento de cada uma.
- Use o Corpo Terminal para a maioria dos widgets de terceiros. Colocar scripts no final do corpo faz com que eles carreguem após o conteúdo da sua página, o que mantém seu site de conhecimento rápido para os leitores.
- Use o posicionamento do cabeçalho para análises e scripts de acompanhamento. Ferramentas como gravadores de mapas de calor ou análises de sessão frequentemente precisam ser inicializadas o mais cedo possível para capturar dados precisos.
- Teste cada trecho depois de adicioná-lo. Abra seu site de base de conhecimento em uma nova aba e verifique se a ferramenta ou widget está carregando como esperado antes de anunciar para sua equipe.
- Use condições de inclusão/exclusão de código para limitar o escopo. Se um script só deve rodar para certos endereços IP, espaços de trabalho ou idiomas, use o recurso de inclusão e condição de exclusão de código para controlar onde ele é executado.
- Verifique primeiro com seu provedor para integrações nativas. Se existir uma integração nativa com o Document360 para a ferramenta que você quer adicionar, use essa em vez disso. Integrações nativas são mais simples de gerenciar e menos propensas a erros do que trechos manuais de código.
FAQ
Posso adicionar HTML personalizado apenas em espaços de trabalho específicos?
Não. O HTML personalizado é aplicado no nível do projeto e roda em todos os workspaces. Para limitar em quais páginas um script roda, use o recurso de inclusão/exclusão de código para filtrar por workspace ou idioma. Veja Código de inclusão e condições de exclusão para detalhes.
Onde devo colocar scripts para widgets de chat ou ferramentas de feedback?
A maioria dos widgets de chat e ferramentas de feedback deve ser colocada no final do corpo (abaixo </body>). Isso garante que carreguem após o conteúdo da página e não atrasam seu site de conhecimento para leitores.
Quantos trechos de HTML personalizados posso adicionar?
Você pode adicionar vários trechos de HTML personalizados. Cada uma aparece como uma entrada separada na lista de integrações instaladas e pode ser ativada ou desativada separadamente.
Qual é a melhor abordagem para adicionar um script de analytics?
Se existir uma integração nativa para sua ferramenta de análise (como Mixpanel, Hotjar ou Amplitude), use essa em vez disso. Para ferramentas sem integração nativa, cole o script em HTML personalizado e coloque-o na posição Cabeçalho para que ele se inicialize antes do carregamento do conteúdo da página.
Posso adicionar chatbots de terceiros diferentes para cada espaço de trabalho?
Não. O HTML personalizado roda no nível do projeto, então se aplica a todos os workspaces. Essa configuração atualmente não é suportada no Document360. Consulte seu provedor de chatbot para ver se eles oferecem configurações baseadas em URL que possam diferenciar comportamentos por URL do workspace.