Sobald ein Ausschnitt erstellt wurde, können Sie ihn mit drei Methoden in jeden Artikel oder jede Kategorieseite einfügen: die Mergecode-Syntax (Markdown-Editor), die Symbolleiste (Markdown-Editor) oder den Schrägstrichbefehl (Advanced WYSIWYG Editor). Schnipsel können auch so übersetzt werden, dass beim Lesen Ihrer Artikel in einer anderen Sprache die Ausschnittinhalte übereinstimmen.
Füge einen Ausschnitt in einen Artikel ein
Wählen Sie die Methode, die zu Ihrem Editor passt.
Verwendung von Mergecode-Syntax
Gib den Merge-Code direkt im Markdown-Editor ein. Am besten, wenn du den Merge-Code-Wert des Snippets schon kennst.
Erfahren Sie mehr →Verwendung der Werkzeugleiste
Durchsuchen oder suchen Sie nach Ausschnitten über das Inhaltswerkzeug-Symbol in der Symbolleiste. Funktioniert im Markdown-Editor.
Erfahren Sie mehr →Verwendung des Schrägstrich-Befehls
Geben Sie /snippets im Advanced WYSIWYG-Editor ein, um den Snippet-Picker inline zu öffnen, ohne die Tastatur zu verlassen.
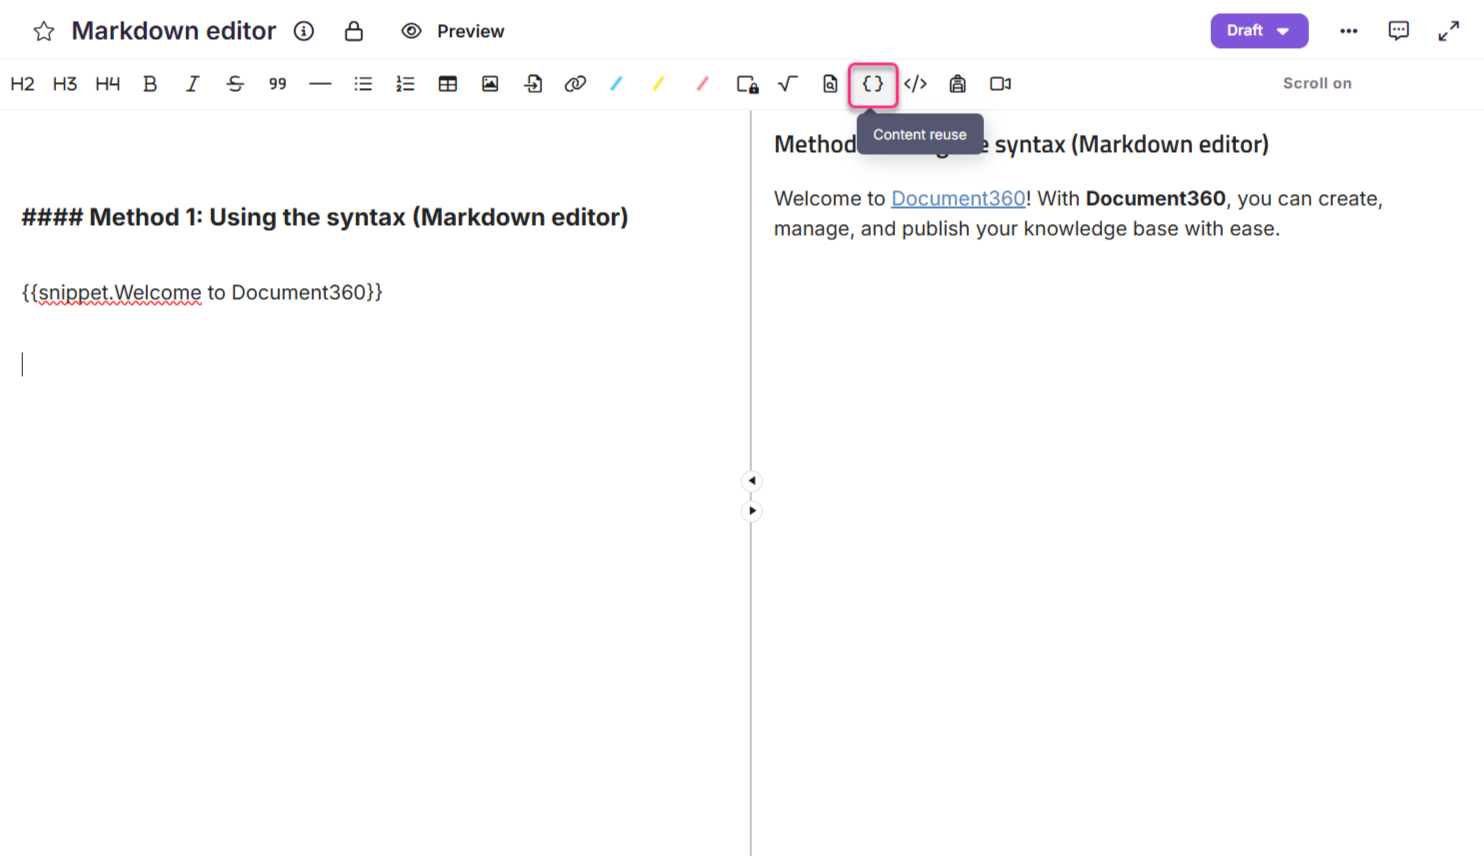
Erfahren Sie mehr →Verwendung von Mergecode-Syntax (Markdown-Editor)
Im Markdown-Editor geben Sie den Mergecode-Wert des Snippets direkt in die doppelten Lockenklammern ein.
Beispiel: {{snippet.snippet name}}
Der Merge-Code muss exakt übereinstimmen, einschließlich Großschreibung und Rechtschreibung. Ein einzelner Zeichenunterschied verhindert, dass der Ausschnitt gerendert wird.
Die Syntax des Merge-Codes funktioniert nur im Markdown-Editor. Wenn du den erweiterten WYSIWYG-Editor benutzt, füge Ausschnitte mit der Symbolleiste oder dem Schrägstrichbefehl ein.
Verwendung der Werkzeugleiste (Markdown-Editor)
- Im Artikeleditor klicken Sie auf das Symbol Content Tools () in der Symbolleiste.
- Wählen Sie den Ausschnitt aus oder nutzen Sie die Leiste für Suchschnipsel , um sie nach Namen einzugrenzen.
- Wähle den Ausschnitt aus, um ihn einzufügen.
Wenn der Schalter "Als lokales Kopieren einfügen " aktiviert ist, bleibt der zum Artikel hinzugefügte Ausschnitt unverändert, selbst wenn der Quellausschnitt in Zukunft geändert oder entfernt wird.
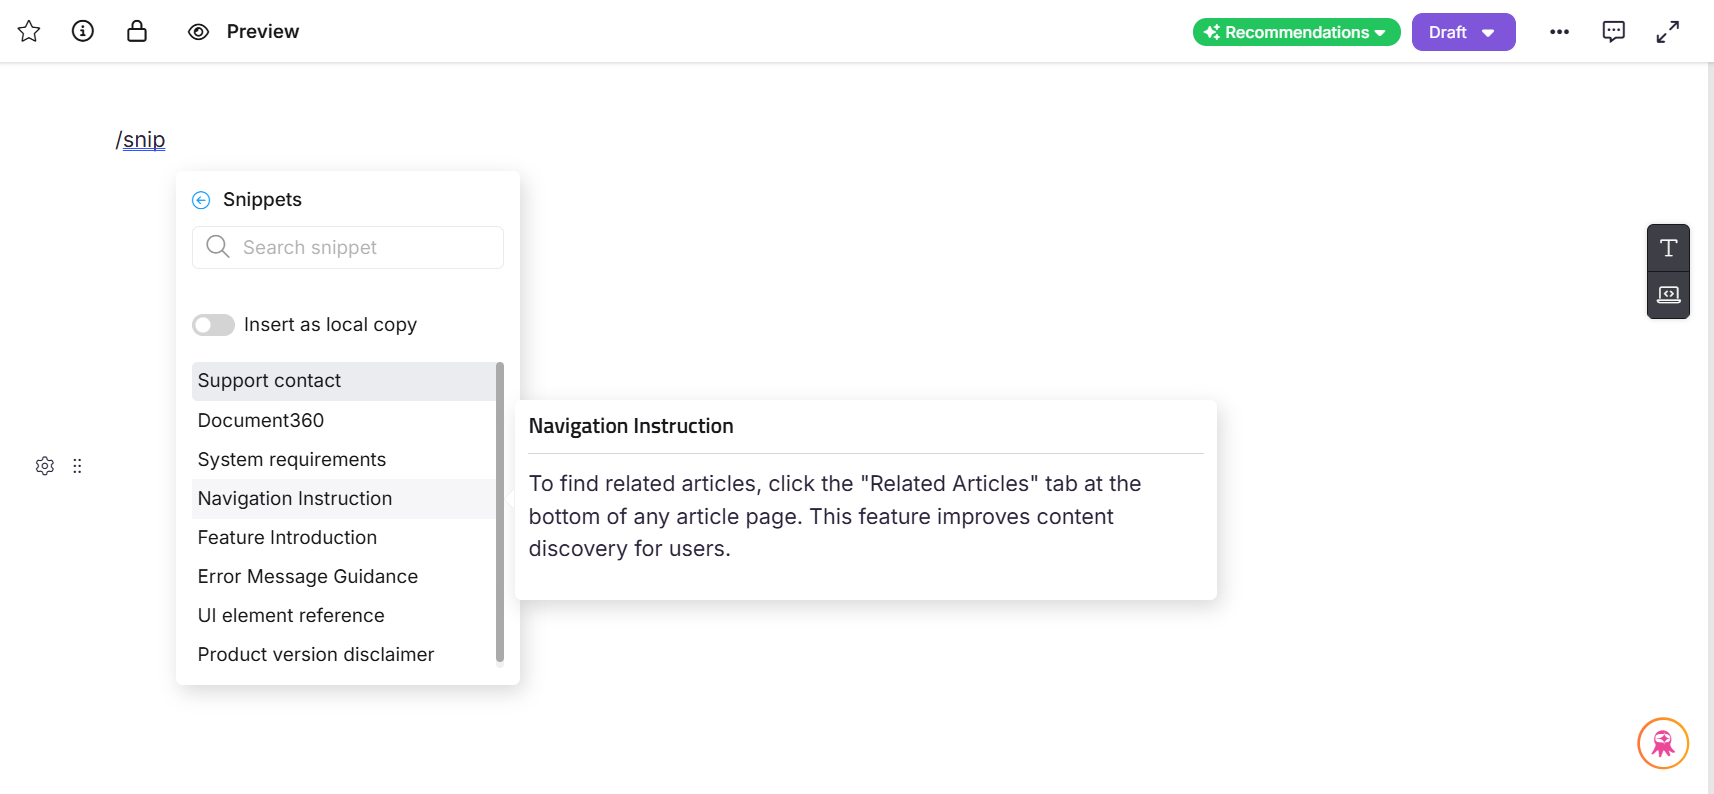
Verwendung des Schrägstrichbefehls (Erweiterter WYSIWYG-Editor)
- Im erweiterten WYSIWYG-Editor tippen
/snippetsSie, um das Snippets-Tool im Schrägstrichmenü zu öffnen. - Benutze die Suchleiste , um den Ausschnitt zu finden, den du einfügen möchtest.
- Fahr mit der Maus über einen Ausschnitt, um den vollständigen Inhalt vorzusehen.
- Klicken Sie auf den Ausschnitt, um ihn einzufügen. Der Inhalt wird in einen Inhaltsblock eingefügt, der mit einer gepunkteten Gliederung markiert ist, um ihn vom Rest des Artikels zu unterscheiden.
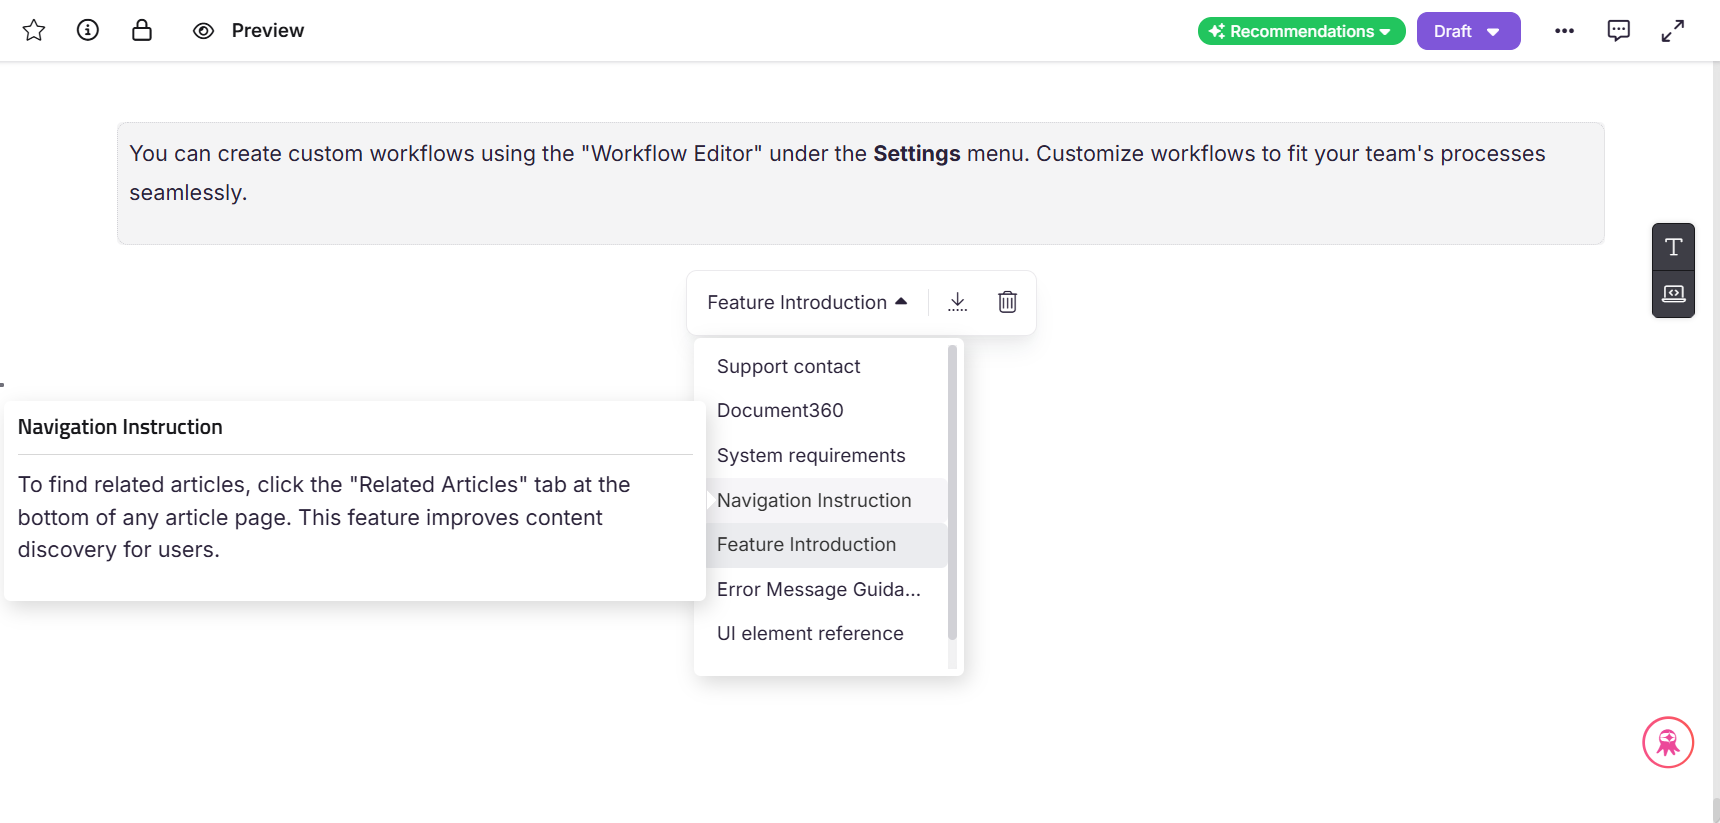
- Klicken Sie im Snippet-Block, um das Blasenmenü zu öffnen.
| Option | Beschreibung |
|---|---|
| Dropdown | Wechsle zu einem anderen Ausschnitt. |
| Als Text einfügen | Wandelt den Ausschnitt in statischen Inhalt um. Das Snippet-Tag wird durch den aktuellen Text ersetzt und zukünftige Aktualisierungen des Snippets gelten nicht mehr. |
| Löschen | Entfernt den Snippet-Block aus dem Artikel. |
Ausschnitte übersetzen
Sie können Schnipsel in mehreren Sprachen erstellen, sodass beim Lesen Ihrer Artikel in einer bestimmten Sprache der passende übersetzte Ausschnitt angezeigt wird.
Globale Schnipsel können nicht übersetzt werden. Nur Schnipsel mit einem bestimmten Sprachumfang unterstützen Übersetzungen.
Übersetze einen neuen Ausschnitt
- Navigiere zu Content-Tools () > Inhaltsressourcen > Snippets.
- Klicken Sie auf Erstellen.
- Im Dialogfeld "Neuen Ausschnitt erstellen " geben Sie den Namen des Ausschnitts ein, wählen Sie die Sprache aus und wählen Sie Ihren Editor. Klicken Sie auf Erstellen.
- Im Dropdown-Menü Sprache oben im Editor wählen Sie die Sprache für den Ausschnitt aus.
- Geben Sie den Inhalt in dieser Sprache ein.
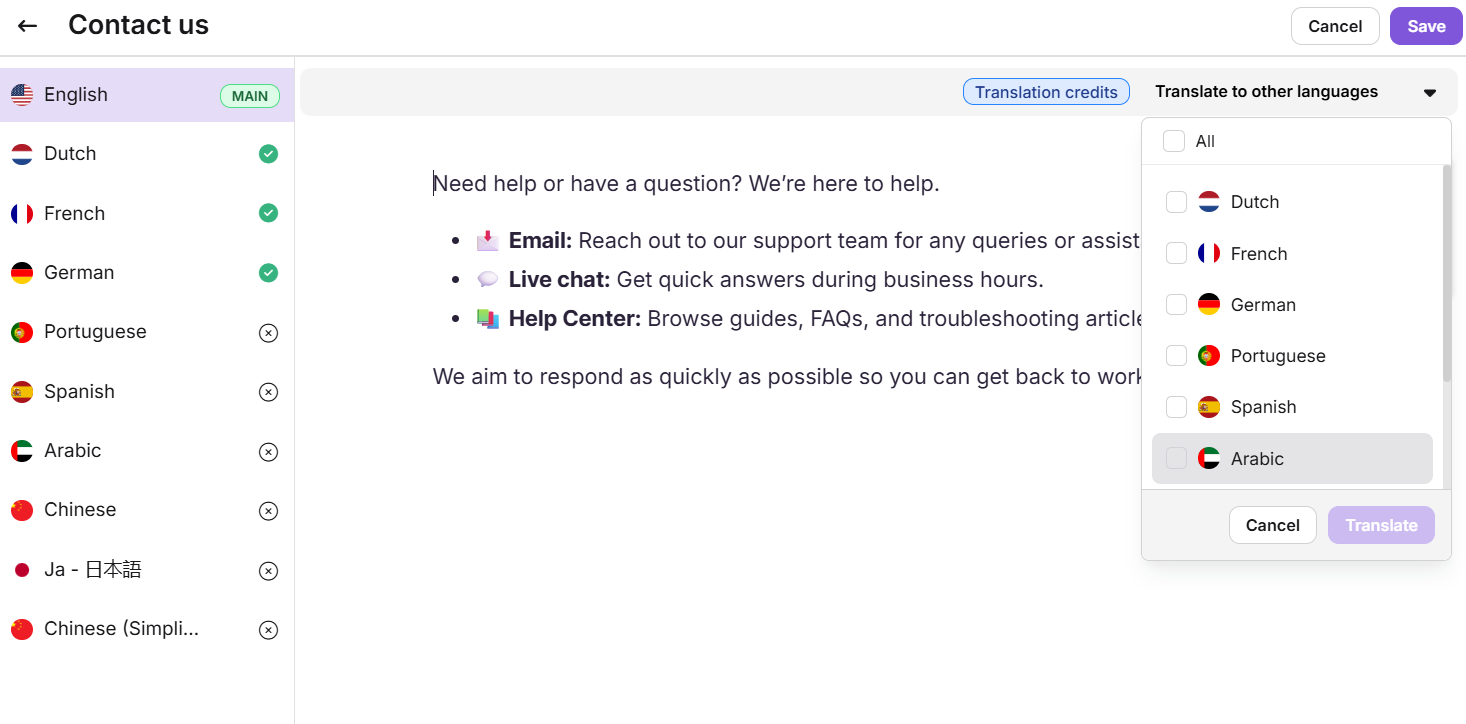
- Klicken Sie auf das Dropdown-Menü "In andere Sprachen übersetzen ", wählen Sie die Sprachen aus, in die Sie übersetzen möchten, und klicken Sie auf Übersetzen.
Die Standardsprache ist als Hauptsprache markiert. Übersetzte Sprachen zeigen ein grünes Häkchen, sobald die Übersetzung abgeschlossen ist. Du kannst manuell zu unübersetzten Sprachen wechseln und bei Bedarf Übersetzungen hinzufügen.
- Klicken Sie auf Speichern , um mit allen Übersetzungen zu speichern.
Übersetze einen bestehenden Ausschnitt
- Auf der Seite 'Schnipsel' klickt man auf den Namen des Ausschnitts, den man übersetzen möchte.
- Navigiere zu Übersetzen in andere Sprachen, wähle die Sprache aus und klicke auf Übersetzen.
- Um in weitere Sprachen zu übersetzen, wählen Sie jede einzelne aus und klicken Sie auf Übersetzen.
- Um eine bestehende Übersetzung zu überschreiben, klicken Sie erneut auf Übersetzen.
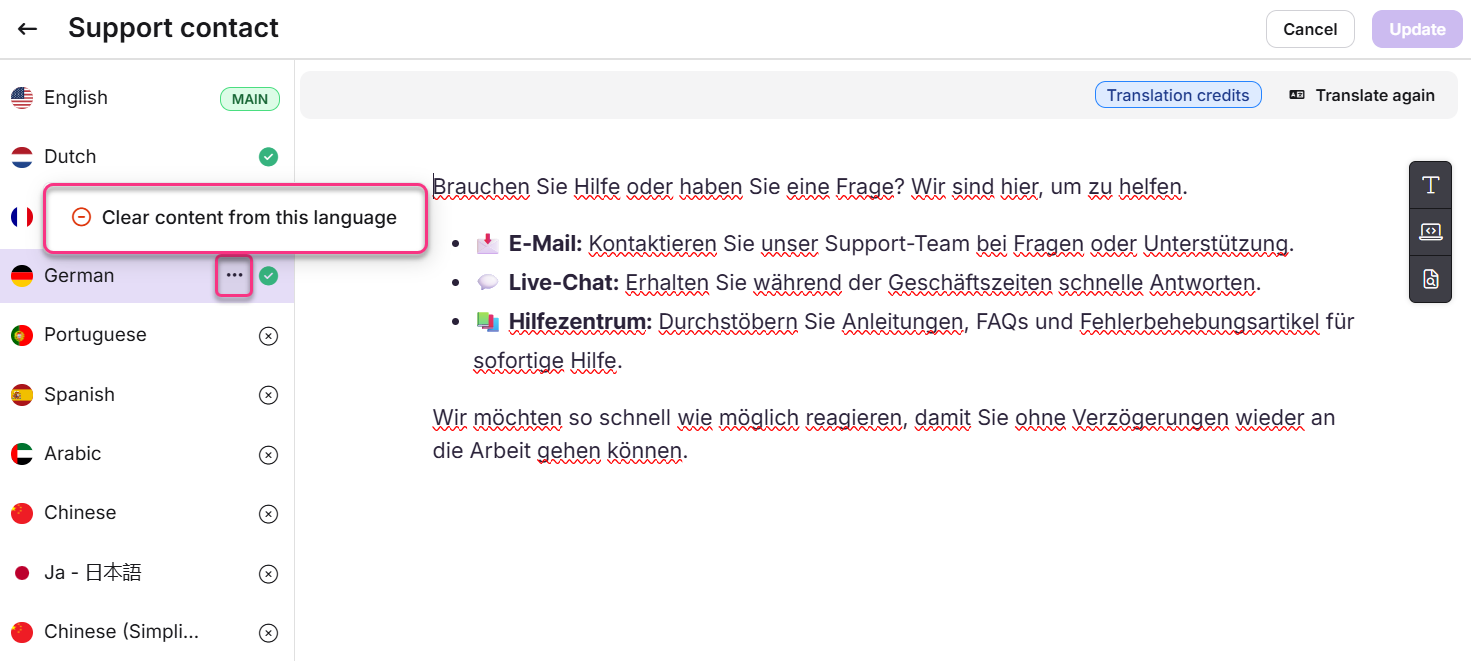
- Um eine Übersetzung für eine bestimmte Sprache zu entfernen, klicken Sie auf das Symbol Mehr () und wählen Sie Inhalte aus dieser Sprache löschen.
- Klicken Sie auf Aktualisieren , um zu speichern.
Best Practices
- Vorschau vor dem Einfügen. Im erweiterten WYSIWYG-Editor fahren Sie mit der Maus über einen Ausschnittname im Schrägstrichmenü, um den vollständigen Inhalt vorzusehen, bevor Sie einfügen.
- Verwenden Sie Einfügen als Text mit Bedacht. Die Umwandlung eines Snippets in statischen Text unterbricht den Link zum Quellcode. Zukünftige Aktualisierungen des Snippets gelten für diese Instanz nicht mehr.
- Übersetze vor der Veröffentlichung. Wenn dein Wissensstand mehrsprachig ist, füge Übersetzungen für neue Ausschnitte hinzu, bevor du Artikel veröffentlichst, die sie verwenden. Eine fehlende Übersetzung kann den Lesern inkonsistente oder Rückfall-Inhalte anzeigen.
- Benutze den Schrägstrich-Befehl für schnellere Einfügung. Im erweiterten WYSIWYG-Editor
/snippetsist das oft schneller als die Navigation in der Symbolleiste, besonders wenn man einen Teil des Snippet-Namens kennt.
FAQ
Kann ich Variablen in Snippets verwenden?
Nein. Die Verwendung von Variablen in Snippets wird nicht unterstützt. Wenn du eine Variable in einen Snippet einfügst, wird sie in der Editor-Vorschau oder in exportierten Ausgaben wie PDF nicht korrekt wiedergegeben.
Warum wird ein Ausschnitt immer in eine neue Zeile eingefügt?
Schnipsel sind als Inhaltsblöcke gestaltet, die mehrere Zeilen enthalten können. Sie beginnen immer mit einer neuen Zeile, um Struktur und Klarheit im Artikel zu bewahren.
Gibt es ein Zeichenlimit für Snippet-Inhalte?
Nein. Es gibt keine Zeichenbegrenzung für den Inhalt des Snippet-Körpers. Sie können so viel Text, Formatierung, Bilder, Tabellen oder andere unterstützte Elemente wie nötig hinzufügen. Die einzige Zeichenbegrenzung ist das Namensfeld , das maximal 50 Zeichen umfasst.
Kann ich den Namen eines Ausschnitts ändern, nachdem er erstellt wurde?
Nein. Der Name des Snippets kann nach der Erstellung nicht mehr geändert werden. Du kannst den Inhalt eines Ausschnitts jederzeit bearbeiten.
Wie viele Schnipsel kann ich in einem Projekt erstellen?
Du kannst bis zu 200 Schnipsel pro Projekt erstellen. Zusätzliche Schnipsel können als Add-on erworben werden.