En Document360, el estado del flujo de trabajo rastrea en qué punto se encuentra un artículo en tu ciclo de documentación, desde el borrador inicial hasta las etapas de revisión y la publicación. Puedes actualizar el estado del flujo de trabajo, asignar revisores, establecer fechas de entrega y añadir comentarios desde dos lugares: directamente en el editor de artículos para actualizaciones de un solo artículo, o desde la página de Tareas para actualizaciones masivas en varios artículos.
Los estados del flujo de trabajo se definen y configuran en el diseñador del flujo de trabajo. Los cambios que hagas a nivel de artículo, como añadir o eliminar asignados, solo se aplican a ese artículo y no afectan a la configuración del diseñador del flujo de trabajo.
Referencia rápida
| Acción | Dónde hacerlo | Mejor para |
|---|---|---|
| Actualizar el estado del flujo de trabajo de un solo artículo | Editor de artículos > botón de estado del flujo de trabajo | Actualizaciones enfocadas y contextuales durante la edición |
| Asigna un revisor, añade una fecha límite o deja un comentario | Editor de artículos > diálogo de flujo de trabajo | Comunicar contexto o instrucciones a un revisor |
| Consulta la historia completa del recorrido de flujo de trabajo de un artículo | Editor de artículos > icono de Historial en el estado del flujo de trabajo | Auditorías, entregas y resolución de disputas sobre el estatus |
| Actualizar el estado del flujo de trabajo para varios artículos | Página de tareas > seleccionar artículos > Actualizar el estado del flujo de trabajo | Planificación de sprints, preparación de lanzamientos, entregas en lote |
| Haz un seguimiento de qué revisores han completado su reseña | Página de tareas > Asignadas a la columna | Seguimiento de la revisión del progreso en un equipo |
| Marca tu reseña como completa | Página de tareas > Más opciones o acciones de casillas de verificación | Señalar la finalización de la revisión individual sin cambiar el estado |
Métodos de gestión
En el editor del artículo
Actualiza el estado, asigna revisores, establece fechas de entrega, añade comentarios y consulta el historial de flujo de trabajo de un solo artículo mientras lo estás editando activamente.
Más información →Desde la página de Tareas
Actualiza el estado del flujo de trabajo de varios artículos a la vez, revisa el contenido asignado y marca tu reseña como completa sin abrir cada artículo individualmente.
Más información →Gestionar el estado del flujo de trabajo en el editor de artículos
El botón de estado de flujo de trabajo en la esquina superior derecha del editor de Documentación es el control central para todas las acciones del flujo de trabajo en un solo artículo.
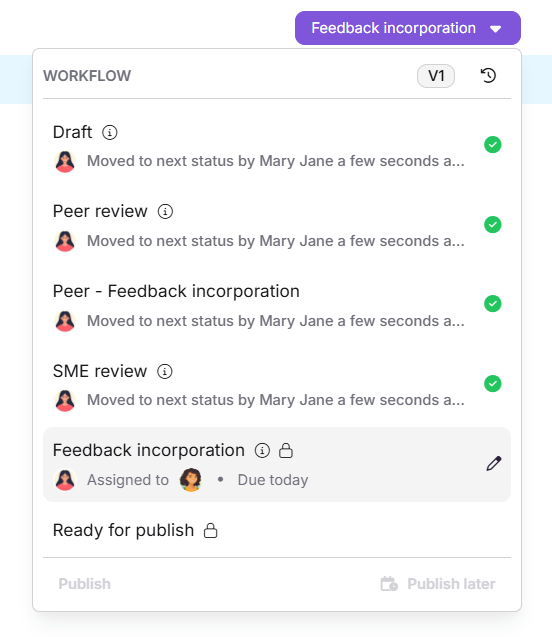
El botón muestra los siguientes indicadores:
| Indicador | Descripción |
|---|---|
| Información () | Haz clic para ver la descripción del estado actual del flujo de trabajo. |
| Cerradura () | Indica que el estado del flujo de trabajo está en modo solo lectura. Los artículos en estado de solo lectura no pueden publicarse directamente. |
| Marca verde () | Indica un estado de completado. Si el artículo se publica, todos los estados muestran una marca de verificación verde. |
| Versión del artículo | Muestra la versión actual del artículo. |
| Historia () | Haz clic para ver el historial completo del flujo de trabajo del artículo. |
Actualizar el estado del flujo de trabajo
- Haz clic en el botón de estado de flujo de trabajo en la esquina superior derecha del editor. Se abre el diálogo de flujo de trabajo .
- Selecciona el siguiente estado del flujo de trabajo de la lista, por ejemplo, revisión por pares o revisión de expertos expertos.
- Opcionalmente, asigna revisores, establece una fecha límite o añade un comentario usando las opciones siguientes.
- Haz clic en Publicar para publicar el artículo directamente, o haz clic en Establecer estado para guardar el estado y cerrar el diálogo.
.png)
Tras actualizar, la etiqueta del botón muestra el estado asignado actualmente.
Asignar revisores
En el campo Asignado , selecciona o busca uno o más usuarios o grupos de usuarios.
Cuando un artículo pasa a un nuevo estado de flujo de trabajo, cualquier asignación automática a los usuarios configurada para ese estado en el diseñador de flujos de trabajo se aplica automáticamente. Los asignados del estado anterior no se mantienen a menos que también estén configurados en el nuevo estado.
También verás dos opciones adicionales:
- Establecer asignados automáticos: Aplica los usuarios predefinidos o grupos de usuarios configurados en el diseñador de flujo de trabajo para ese estado. Cualquier asignado existente es reemplazado.
- Dejar sin asignar: Elimina a todos los asignados para ese estado de flujo de trabajo.
Si no se configura ningún asignado por defecto para el estado del flujo de trabajo seleccionado, se selecciona Dejar no asignado por defecto. Los cambios realizados a los asignados a nivel de artículo solo se aplican a ese artículo y no modifican la configuración del diseñador de flujo de trabajo.
Cuando se añaden varios asignados, sus avatares de perfil se muestran en el indicador de estado del flujo de trabajo. Si se asignan más de tres usuarios, la interfaz muestra el nombre de pila seguido de un indicador +X . Cada asignado recibe una notificación por correo electrónico.
Para eliminar a un asignado, haz clic en el icono Cerrar () junto a su nombre.
Fija una fecha límite
En el campo de fecha de vencimiento , selecciona una fecha desde el selector de calendario. Para eliminar una fecha de entrega, haz clic en el icono de la x junto a la fecha seleccionada. Haz clic en Establecer estado si lo configuras por primera vez, o en Actualizar para modificar un estado existente.
Añadir un comentario
En el campo de Comentario , introduce notas o instrucciones para el siguiente asignado. Los comentarios pueden llegar a 250 caracteres. Úsalo @ para etiquetar y notificar a los miembros del equipo.
Ver historial de flujos de trabajo
Haz clic en el icono Historial () en el botón de estado del flujo de trabajo. El diálogo de historial de flujo de trabajo muestra todos los estados por los que ha pasado el artículo, con los asignados y las fechas de entrega de cada etapa. Cada versión de una revisión de artículo tiene su propio historial de flujo de trabajo.

Gestionar el estado del flujo de trabajo desde la página de Tareas
La página de Tareas te ofrece una vista dedicada de todos los artículos que se te asignan a lo largo del ciclo de documentación. Desde aquí puedes actualizar el estado del flujo de trabajo de uno o más artículos a la vez y marcar tu reseña como completa sin abrir cada artículo individualmente.
Accede a la página de Tareas
Navega hasta el icono de Inicio () en la barra de navegación izquierda y haz clic en Tareas. Alternativamente, desde la página de Resumen, busca la tarjeta Tareas y haz clic en Ver todo.
Por defecto, la página de Tareas muestra los artículos asignados a ti. La página tiene tres pestañas:
- Flujo de trabajo: Los artículos asignan un estado de flujo de trabajo.
- Comentarios: Feedback del lector asignado por el gestor de comentarios.
- Recordatorio de la reseña: Artículos marcados como Necesitan revisión para los que tú colaboras.
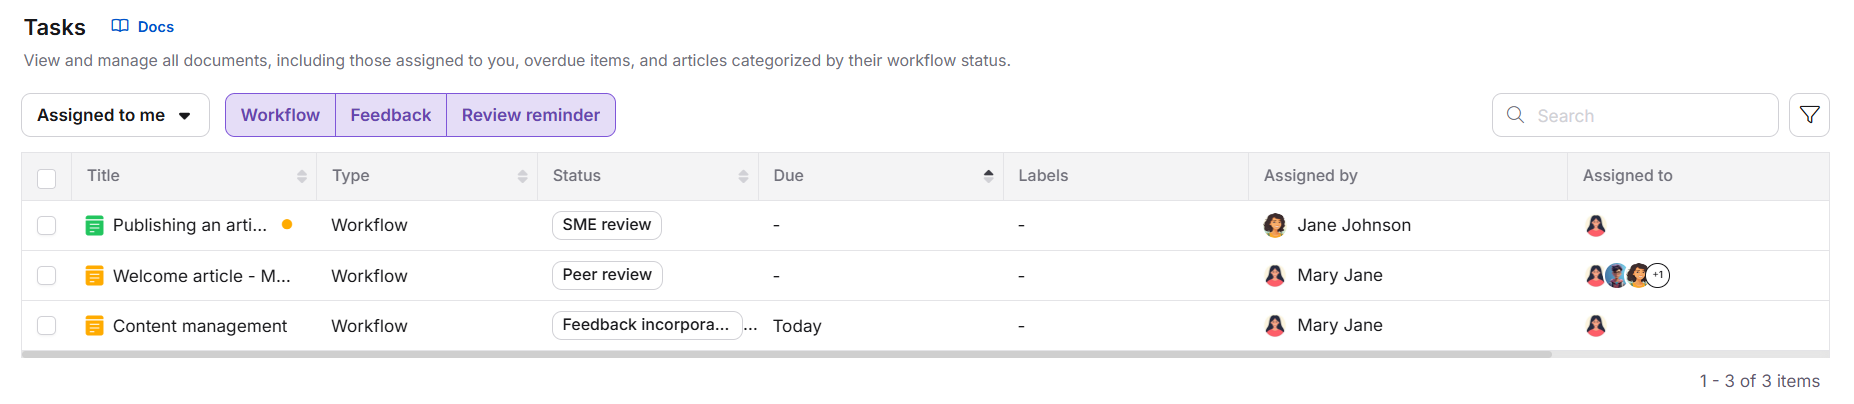
Selecciona la pestaña Flujo de trabajo para centrarte en los artículos de tu ciclo de revisión.
Actualizar el estado del flujo de trabajo
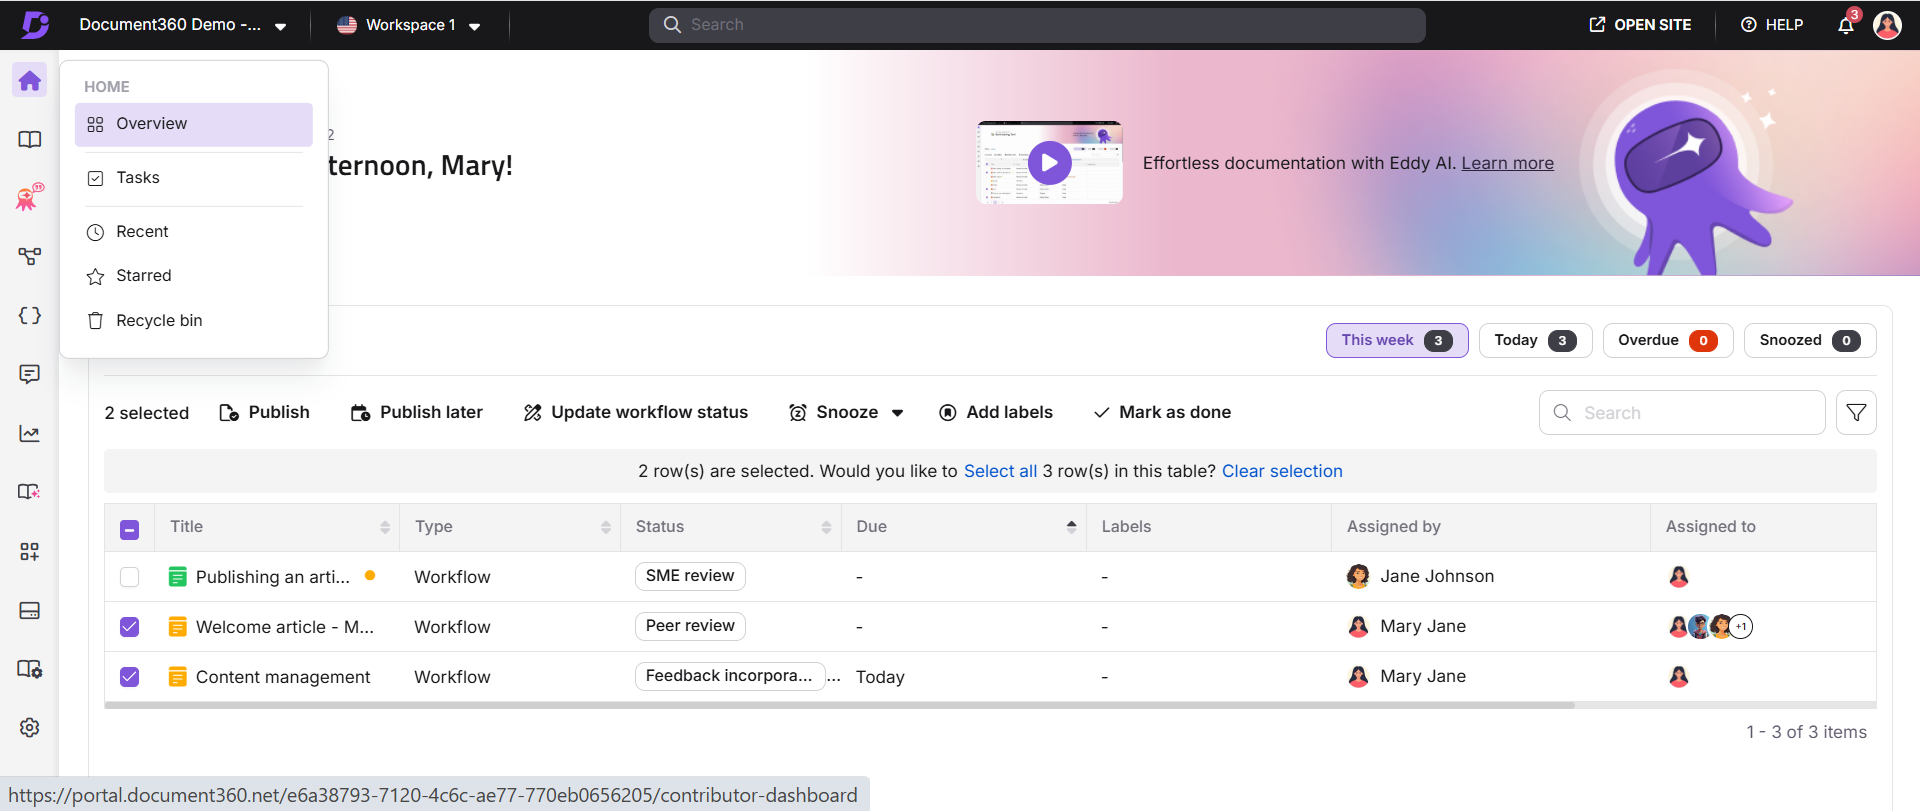
- En la página de Tareas , selecciona uno o más artículos de la lista.
- Haz clic en Actualizar estado del flujo de trabajo () desde la barra de herramientas en la parte superior.
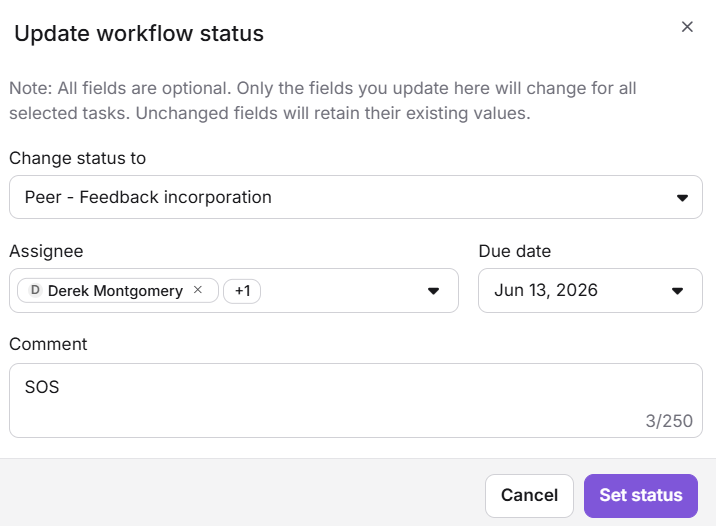
- Usa el desplegable de Cambiar estado para seleccionar el nuevo estado del flujo de trabajo. Cuando varios artículos se mueven a un nuevo estado de flujo de trabajo, cualquier asignación automática a usuarios configurada en el diseñador de flujo de trabajo para ese estado se aplica automáticamente a todos los artículos seleccionados.
- En el desplegable de Asignados , selecciona uno o más usuarios o grupos de usuarios. También puedes hacer clic en Establecer asignados automáticos para aplicar los asignados por defecto configurados, o seleccionar Dejar sin asignar para eliminar a todos los asignados.
- En el campo Fecha de entrega , selecciona una fecha límite desde el selector de calendario (opcional).
- En el campo de comentarios , añade un mensaje si es necesario. Úsalo
@para etiquetar a los compañeros (opcional). - Haz clic en Establecer estado.
También puedes actualizar el estado del flujo de trabajo desde la página Todos los artículos () seleccionando uno o más artículos y haciendo clic en Actualizar estado del flujo de trabajo desde la barra de herramientas.
Revisa los artículos asignados y marca como completados
Cuando te asignan un artículo, aparece en tu página de Tareas. Tras completar tu revisión, marca el artículo como terminado para señalar que tu parte está completa.
Para marcar un solo artículo como hecho:
- En la página de Tareas , localiza el artículo asignado.
- Haz clic en el icono de Más opciones () al final de la fila del artículo.
- Selecciona Marcar como hecho.
Para marcar varios artículos como hechos a la vez:
- Selecciona uno o más artículos usando las casillas de verificación.
- Haz clic en Marcar como hecho desde la barra de herramientas de acciones en la parte superior.
.png)
Una vez marcado como hecho, el artículo se elimina de tu lista de tareas y aparece una marca verde junto a tu nombre en la columna Asignado a . Otros revisores asignados al mismo artículo pueden hacer clic en la columna Asignado para ver quién ha completado su revisión.
Marcar un artículo como hecho solo indica que tu revisión individual está completa. No cambia automáticamente el estado del flujo de trabajo. El estado del flujo de trabajo debe actualizarse manualmente cuando se complete la fase completa de revisión.
Mejores prácticas
- Actualiza el estado en cuanto termines tu parte. Dejar un artículo en estado más largo del necesario retrasa todo el ciclo de revisión.
- Siempre añade un comentario al entregar el paso. Dile al siguiente revisor qué has cambiado, qué sigue necesitando atención o en qué centrarte. Reduce el vaivén y acelera las reseñas.
- Fija fechas de entrega para cada trabajo. Las fechas de entrega hacen que el ciclo de revisión sea previsible y generan visibilidad para los responsables de proyecto que supervisan el progreso.
- Usa la página de Tareas para entregas en lote. Cuando termina un sprint o un ciclo de lanzamiento, selecciona todos los artículos relevantes y muévelos al siguiente estado en una sola acción en lugar de abrir cada artículo individualmente.
- Marca como terminado en cuanto termines. Marcar tu revisión como completada de inmediato da a los responsables del proyecto una visibilidad precisa sobre quién ha completado su parte.
- Utiliza el historial de flujo de trabajo para resolver disputas. Si hay alguna duda sobre qué pasó con un artículo, quién lo revisó o cuándo, el historial del flujo de trabajo es el registro autorizado.
Preguntas frecuentes
¿Puedo publicar un artículo directamente desde el botón de estado de Flujo de trabajo sin pasar por todas las etapas?
Sí. Haz clic en el botón Estado del flujo de trabajo y haz clic en Publicar directamente sin seleccionar estados intermedios. Ten en cuenta que si el artículo está en estado de flujo de trabajo de solo lectura, no puede publicarse directamente.
¿Marcar un artículo como hecho cambia su estado de flujo de trabajo?
No. Marcar un artículo como terminado solo indica que tu revisión individual está completa. El estado del flujo de trabajo debe actualizarse manualmente para avanzar el artículo a la siguiente etapa.
¿Actualizar a los asignados a nivel de artículo cambia la configuración del diseñador de flujo de trabajo?
No. Los cambios realizados a nivel de artículo, añadiendo o eliminando asignados, solo se aplican a ese artículo. La configuración del diseñador de flujo de trabajo permanece sin cambios.
¿Cómo puedo asegurarme de que los asignados reciban notificaciones por correo electrónico cuando asigno un estado de flujo de trabajo?
Los asignados deben tener activados los eventos de notificación del flujo de trabajo correspondientes. Navega a Configuración () > Notificaciones > Mapeo de notificaciones y expande el editor de Documentación acordeón. Activa el estado del flujo de trabajo del artículo actualizado, la fecha de vencimiento del flujo de trabajo del artículo actualizada y el asignado del flujo de trabajo del artículo actualizado.
¿Puedo asignar diferentes estados de flujo de trabajo a un artículo en distintos idiomas dentro de un espacio de trabajo?
Sí. Puedes asignar un estado de flujo de trabajo diferente a cada versión lingüística de un artículo dentro del mismo espacio de trabajo.