In Document360, workflow status tracks where an article is in your documentation cycle, from initial draft through review stages to publication. You can update workflow status, assign reviewers, set due dates, and add comments from two places: directly in the article editor for single-article updates, or from the Tasks page for bulk updates across multiple articles.
Workflow statuses are defined and configured in the Workflow designer. Changes you make at the article level, such as adding or removing assignees, apply only to that article and do not affect the Workflow designer configuration.
Quick reference
| Action | Where to do it | Best for |
|---|---|---|
| Update a single article's workflow status | Article editor > Workflow status button | Focused, in-context updates during editing |
| Assign a reviewer, add a due date, or leave a comment | Article editor > Workflow dialog | Communicating context or instructions to a reviewer |
| View the full history of an article's workflow journey | Article editor > History icon in Workflow status | Audits, handoffs, and resolving disputes about status |
| Update workflow status for multiple articles | Tasks page > select articles > Update workflow status | Sprint planning, release preparation, batch handoffs |
| Track which reviewers have completed their review | Tasks page > Assigned to column | Monitoring review progress across a team |
| Mark your review as complete | Tasks page > More options or checkbox actions | Signalling individual review completion without changing status |
Managing methods
In the article editor
Update status, assign reviewers, set due dates, add comments, and view workflow history for a single article while you are actively editing it.
Learn more →From the Tasks page
Update workflow status for multiple articles at once, review assigned content, and mark your review as complete without opening each article individually.
Learn more →Manage workflow status in the article editor
The Workflow status button in the top-right corner of the Documentation editor is the central control for all workflow actions on a single article.
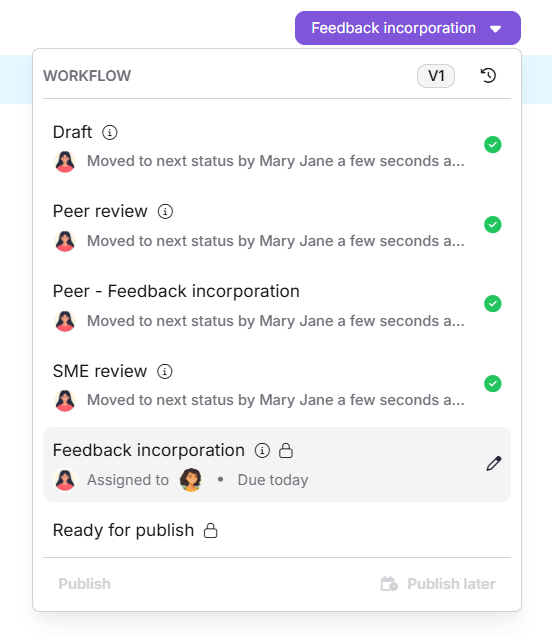
The button displays the following indicators:
| Indicator | Description |
|---|---|
| Information () | Click to view the description of the current workflow status. |
| Lock () | Indicates the workflow status is in read-only mode. Articles in a read-only state cannot be published directly. |
| Green check mark () | Indicates a completed status. If the article is published, all statuses display a green check mark. |
| Article version | Displays the current version of the article. |
| History () | Click to view the complete workflow history of the article. |
During a collaborative editing session,
- If the article is moved to a read-only workflow status, all active collaborators can only view the article. A message indicates that the current workflow status is read-only.
- If the article is moved to any other workflow status, you can continue working on it. You’ll see a Workflow status modified message, and the workflow status updates automatically.
Collaborative editing is rolled out in phases, so if you don’t see it yet, it’s on its way.
Update workflow status
- Click the Workflow status button at the top right of the editor. The Workflow dialog opens.
- Select the next workflow status from the list, for example, Peer review or SME review.
- Optionally, assign reviewers, set a due date, or add a comment using the options below.
- Click Publish to publish the article directly, or click Set Status to save the status and close the dialog.
.png)
After updating, the button label displays the currently assigned status.
Assign reviewers
In the Assignee field, select or search for one or more users or user groups.
When an article transitions to a new workflow status, any Auto assign to users configured for that status in the Workflow designer are automatically applied. Assignees from the previous status are not retained unless they are also configured in the new status.
You will also see two additional options:
- Set auto assignees: Applies the predefined users or user groups configured in the Workflow designer for that status. Any existing assignees are replaced.
- Leave unassigned: Removes all assignees for that workflow state.
- If no default assignee is configured for the selected workflow status, Leave unassigned is selected by default. Changes made to assignees at the article level apply only to that article and do not modify the Workflow designer configuration.
- When you assign someone to a workflow status, they are responsible for the article only while it remains in that status. If you move the article to a later status before they update the status, the assigned status is skipped. The workflow history only shows who changed the article's status and when.
When multiple assignees are added, their profile avatars are displayed in the workflow status indicator. If more than three users are assigned, the interface shows the first name followed by a +X indicator. Each assignee receives an email notification.
To remove an assignee, click the Close () icon next to their name.
Set a due date
In the Due date field, select a date from the calendar picker. To remove a due date, click the x icon next to the selected date. Click Set Status if setting for the first time, or Update to modify an existing status.
Add a comment
In the Comment field, enter notes or instructions for the next assignee. Comments can be up to 250 characters. Use @ to tag and notify team members.
View workflow history
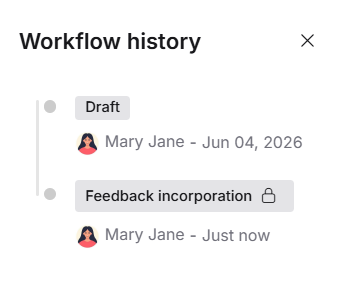
Click the History () icon in the Workflow status button. The Workflow history dialog shows all statuses the article has passed through, with assignees and due dates for each stage. Each version of an article revision has its own workflow history.
Manage workflow status from the Tasks page
The Tasks page gives you a dedicated view of all articles assigned to you across the documentation cycle. From here you can update workflow statuses for one or more articles at once and mark your review as complete without opening each article individually.
Access the Tasks page
Navigate to the Home () icon in the left navigation bar and click Tasks. Alternatively, from the Overview page, find the Tasks card and click View all.
By default, the Tasks page shows articles assigned to you. The page has three tabs:
- Workflow: Articles assigned a workflow status.
- Feedback: Reader feedback assigned to you from the Feedback manager.
- Review reminder: Articles marked as Needs review for which you are a contributor.
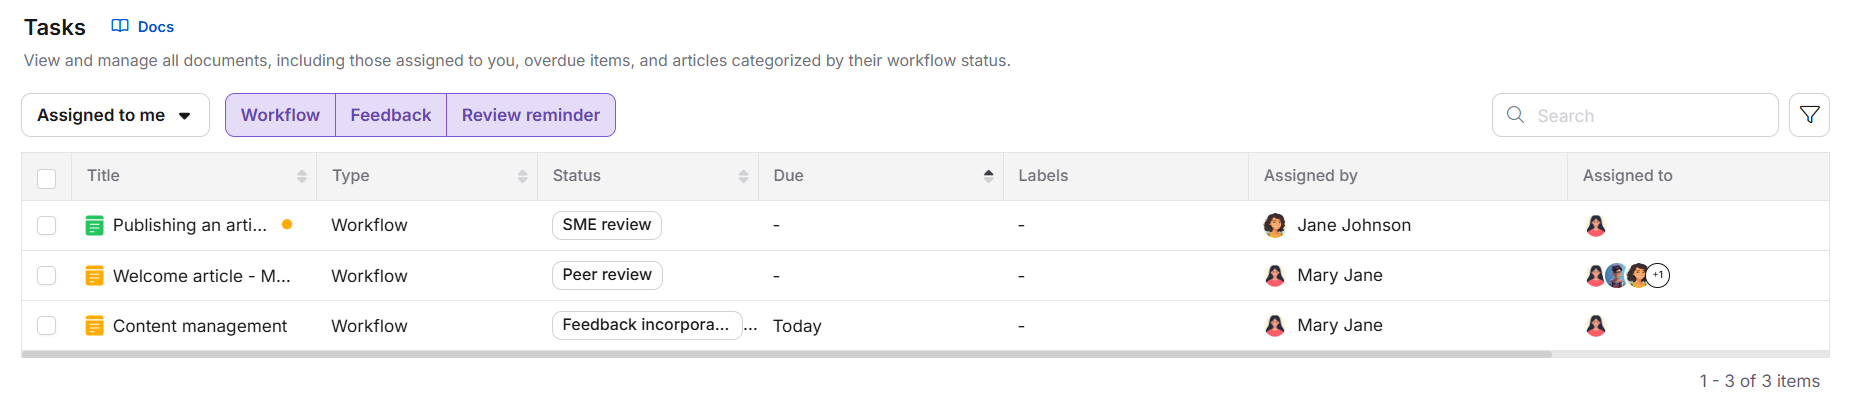
Select the Workflow tab to focus on articles in your review cycle.
Update workflow status
- On the Tasks page, select one or more articles from the list.
- Click Update workflow status () from the toolbar at the top.
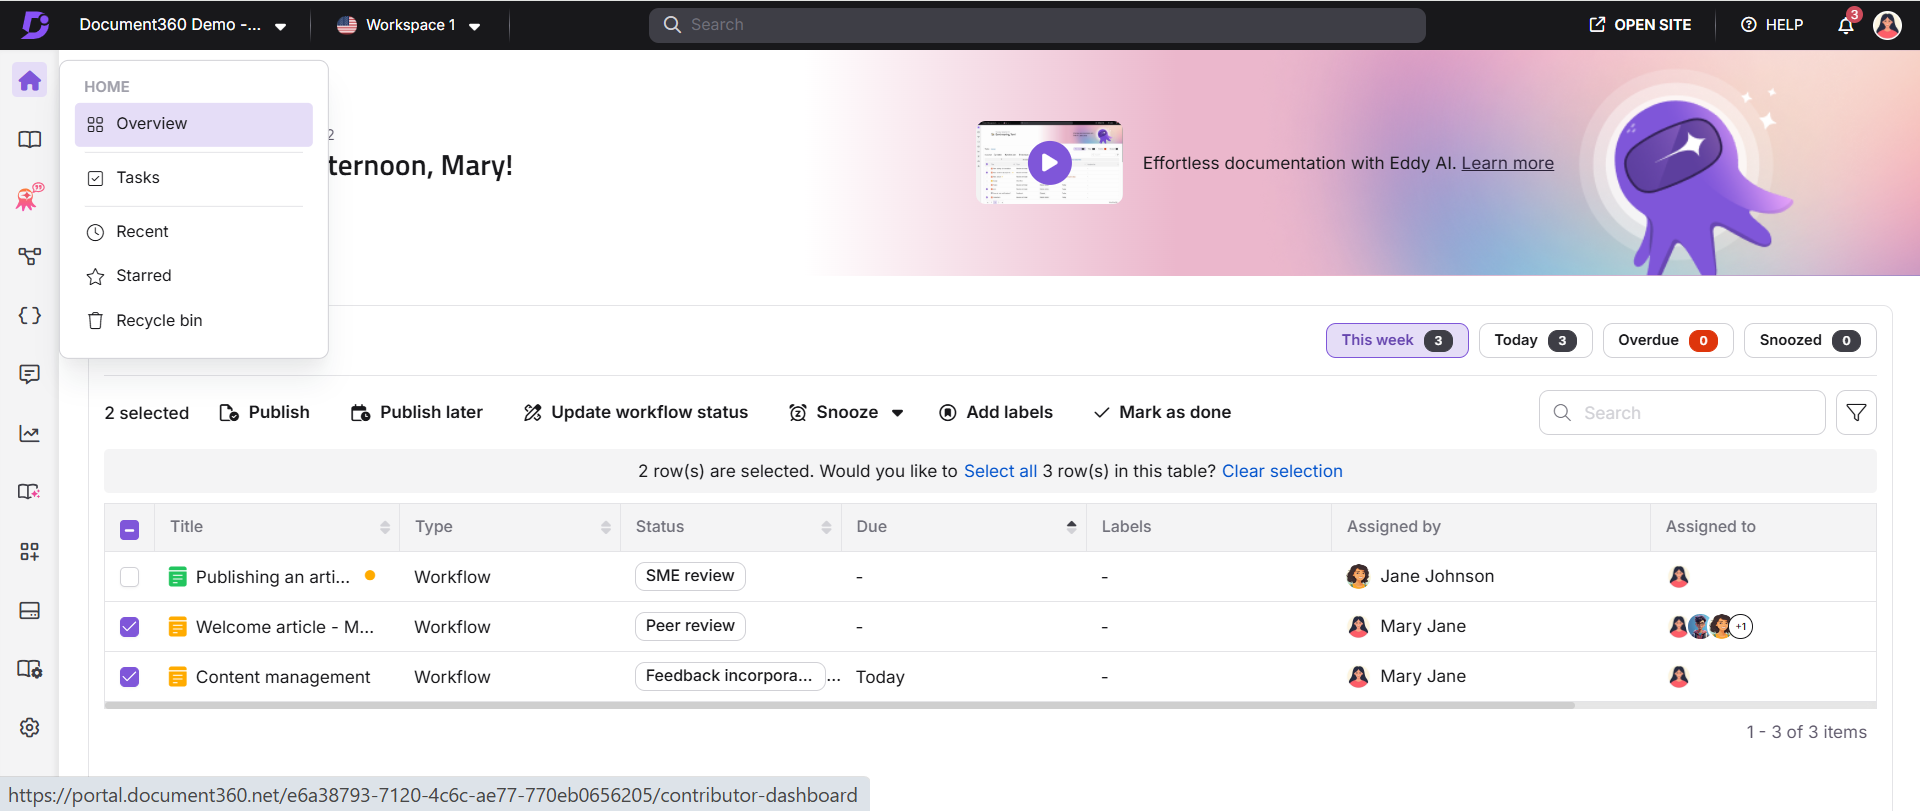
- Use the Change status to dropdown to select the new workflow status. When multiple articles are moved to a new workflow state, any Auto assign to users configured in the Workflow designer for that status are automatically applied to all selected articles.
- In the Assignee dropdown, select one or more users or user groups. You can also click Set auto assignees to apply the configured default assignees, or select Leave unassigned to remove all assignees.
- In the Due date field, select a deadline from the calendar picker (optional).
- In the Comment field, add a message if needed. Use
@to tag teammates (optional). - Click Set status.
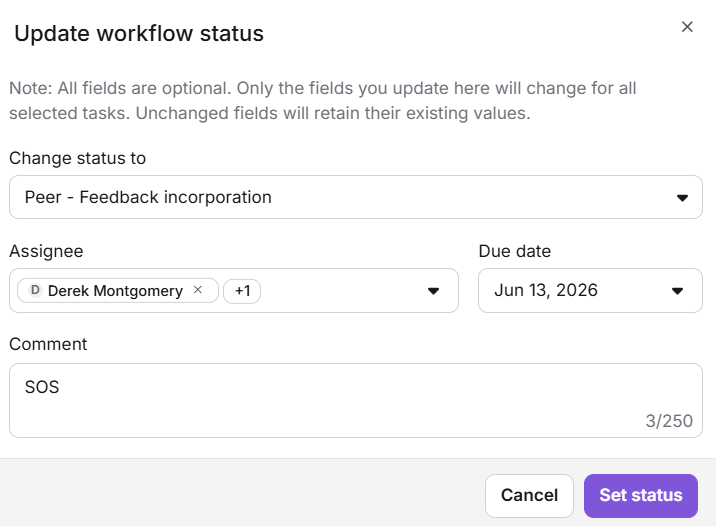
You can also update workflow status from the All articles () page by selecting one or more articles and clicking Update workflow status from the toolbar.
Review assigned articles and mark as completed
When an article is assigned to you, it appears on your Tasks page. After completing your review, mark the article as done to signal that your part is complete.
To mark a single article as done:
- On the Tasks page, locate the assigned article.
- Click the More options () icon at the end of the article row.
- Select Mark as done.
To mark multiple articles as done at once:
- Select one or more articles using the checkboxes.
- Click Mark as done from the action toolbar at the top.
.png)
Once marked as done, the article is removed from your Tasks list and a green check mark appears next to your name in the Assigned to column. Other reviewers assigned to the same article can click the Assigned to column to see who has completed their review.
Marking an article as done only indicates your individual review is complete. It does not automatically change the workflow status. The workflow status must be updated manually when the full review stage is complete.
Best practices
- Update the status the moment you finish your part. Leaving an article in a status longer than needed delays the entire review cycle.
- Always add a comment when handing off. Tell the next reviewer what you changed, what still needs attention, or what to focus on. It reduces back-and-forth and speeds up reviews.
- Set due dates on every assignment. Due dates make the review cycle predictable and create visibility for project leads monitoring progress.
- Use the Tasks page for batch handoffs. When a sprint or release cycle ends, select all relevant articles and move them to the next status in one action instead of opening each article individually.
- Mark as done as soon as you finish. Marking your review complete immediately gives project leads accurate visibility into who has completed their part.
- Use the Workflow history to resolve disputes. If there is any question about what happened to an article, who reviewed it, or when, the Workflow history is the authoritative record.
FAQ
Can I publish an article directly from the Workflow status button without going through all stages?
Yes. Click the Workflow status button and click Publish directly without selecting intermediate statuses. Note that if the article is in a read-only workflow state, it cannot be published directly.
Does marking an article as done change its workflow status?
No. Marking an article as done only signals that your individual review is complete. The workflow status must be updated manually to move the article to the next stage.
Does updating assignees at the article level change the Workflow designer configuration?
No. Changes made at the article level, adding or removing assignees, apply only to that article. The Workflow designer configuration remains unchanged.
How do I ensure assignees receive email notifications when I assign a workflow status?
Assignees must have the relevant workflow notification events enabled. Navigate to Settings () > Notifications > Notification mapping and expand the Documentation editor accordion. Turn on Article Workflow Status Updated, Article Workflow Due Date Updated, and Article Workflow Assignee Updated.
Can I assign different workflow statuses to an article in different languages within a workspace?
Yes. You can assign a different workflow status to each language version of an article within the same workspace.