Custom domain mapping in Document360 lets you replace the default project-name.document360.com URL with a domain that belongs entirely to your organization, such as help.yourcompany.com. Mapping a custom domain strengthens your brand identity and gives readers a consistent, branded experience when they visit your Knowledge base site. Document360 automatically provisions an SSL certificate for your mapped domain, so the site stays secure without extra setup.
When to use custom domain mapping
Use custom domain mapping when you want your Knowledge base site to live under your own brand rather than a Document360-provided subdomain.
- You want readers to access support content at a URL like
help.yourcompany.cominstead of a Document360 subdomain. - You need Google Search Console verification for your Knowledge base site, which is supported only on a custom domain.
- You want a shorter, more memorable web address for marketing or support materials.
Before you begin
- A Document360-provided domain and a custom domain cannot coexist — mapping a custom domain replaces the default one.
- You need access to your domain registrar's DNS settings (for example, GoDaddy, Namecheap, or Cloudflare) to add TXT and CNAME records.
- Document360 currently supports only one custom domain per project.
How to edit the default domain
Every new Document360 project is automatically assigned a default domain in the format project-name.document360.com. You can personalize this default address before or instead of mapping a fully custom domain.
- Navigate to Settings () > Knowledge base site > Custom domain.
- Click Edit domain in the Document360 provided domain field. The Edit subdomain dialog appears.
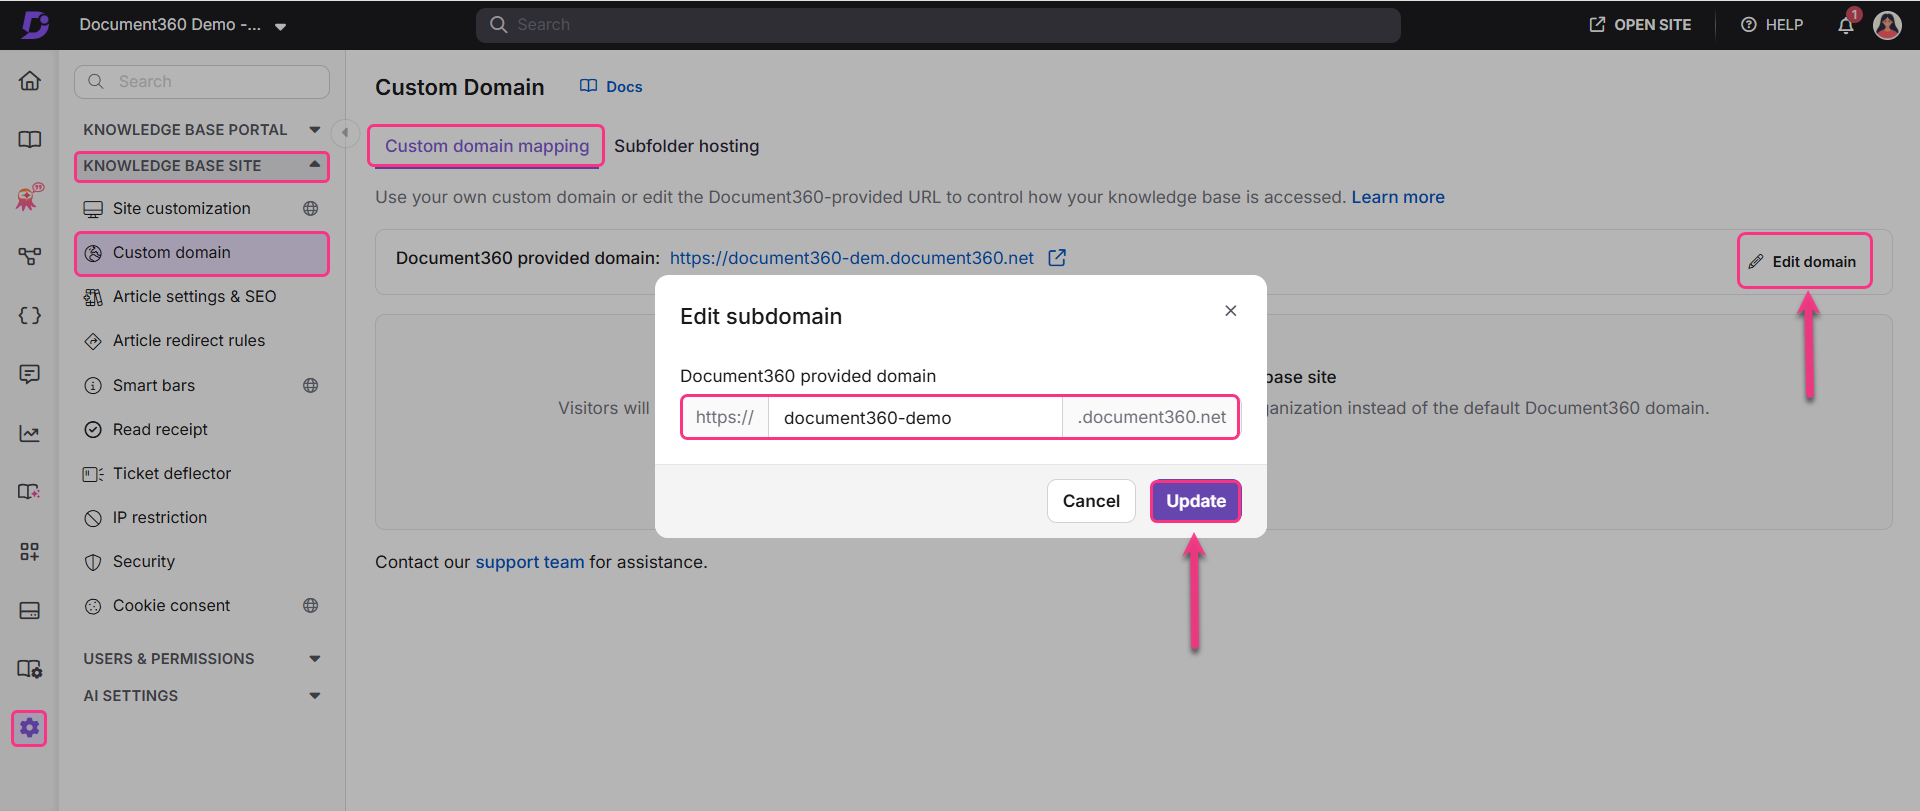
- Enter your preferred domain in the field. The Update button stays inactive if the domain is unavailable or already in use, and becomes active once you enter an available domain.
- Click Update to update your Knowledge base site's web address.
How to map a custom domain
Mapping a custom domain involves three stages: adding the domain in Document360, configuring DNS records with your registrar, and verifying the configuration.
Add the custom domain in Document360
- Navigate to Settings () > Knowledge base site > Custom domain.
- Click Add domain.
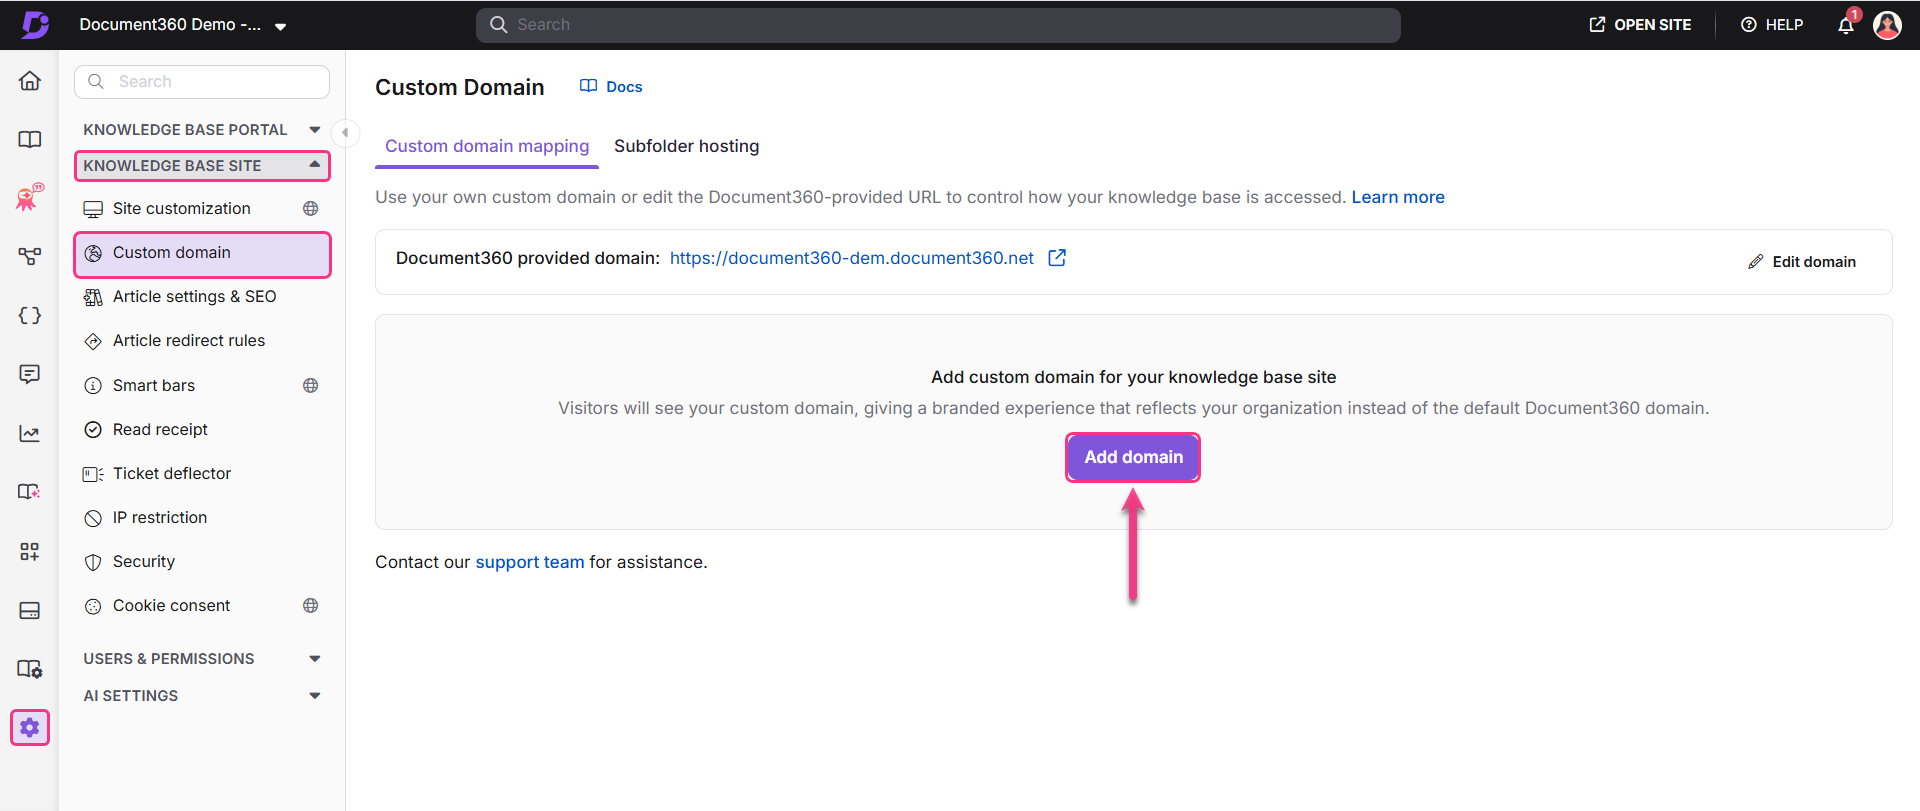
- Enter your custom domain name in the Enter your custom domain field and click View configuration.
Your custom domain is now added to Document360.
Configure DNS with Document360
.png)
Configure the TXT record in your domain registrar
- Log in to your domain registrar (for example, GoDaddy, Namecheap, or Google Domains).
- Navigate to DNS settings and click Add new record.
- Select TXT Record as the Record type.
- Enter the Host and Value/Target details from Document360 into your domain registrar.
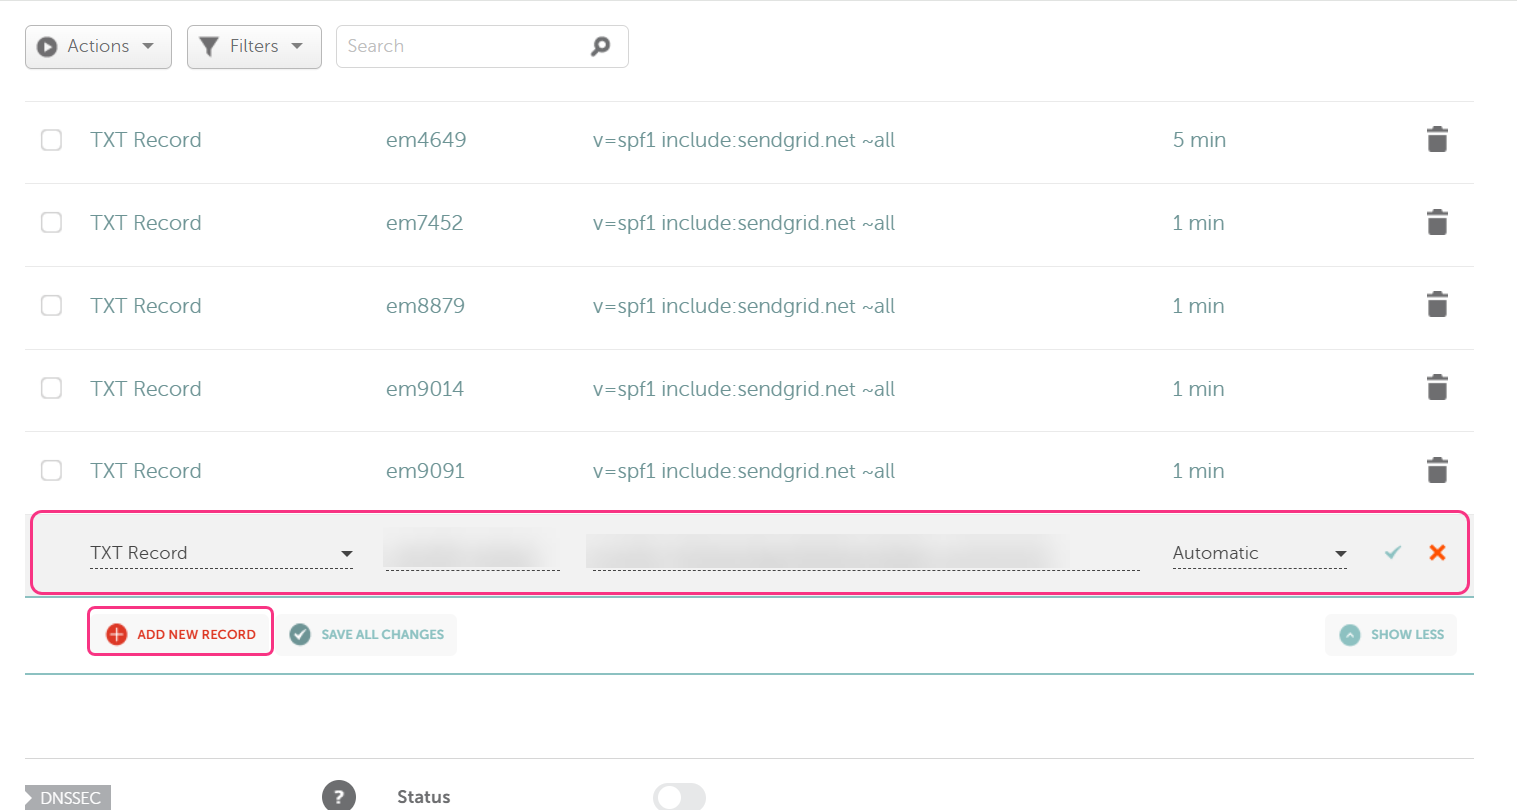
- Click the Tick icon to save the changes.
- In Document360, click Verify. The TXT record status changes from Pending to Verified.
DNS record verification in Document360 may take some time to complete.
Configure the CNAME record in your domain registrar
- Click Add new record and select CNAME Record as the Record type.
- Enter the Host and Value/Target details from Document360 into your domain registrar.
.png)
- Click the Tick icon to save the changes. In Document360, the CNAME record status changes from Pending to Verified.
Verify DNS configuration
Document360 automatically provisions an SSL certificate once DNS verification completes; this may take some time to finish.
- Click Retry verification.
- Once verified, a success message appears and your custom domain becomes accessible.
.png)
- Click Go to your knowledge base site to view the change in the site URL.
Your custom domain is now mapped and accessible to readers.
How to configure an Apex domain
An Apex domain (also called a root domain) is a domain without a subdomain, such as abc.com rather than www.abc.com. Configuring an Apex domain requires extra DNS steps compared to a standard subdomain.
DNS flattening lets you use a CNAME record at the Apex level, but not all domain registrars support it. If your registrar doesn't support DNS flattening — GoDaddy, for example — you can switch to a DNS provider that does, such as Cloudflare, which offers DNS flattening on its free plan.
For more detail, see Cloudflare's documentation on CNAME flattening.
Using a custom SSL certificate
Document360 provides an SSL certificate for your domain automatically, with seamless renewal. If you prefer to install your own certificate instead, provide the following details:
| Field | Description |
|---|---|
| Common Name (CN) | The fully qualified domain name for the certificate. |
| Organization (O) | The legal name of your organization. |
| Organizational Unit (OU) | The department or division within your organization. |
Custom SSL certificates are typically valid for 90 days. Renew your certificate on time and provide the updated certificate so it can be reinstalled on your domain.
How to upgrade the load balancer
A load balancer distributes incoming traffic evenly across multiple servers, keeping your Knowledge base site fast and reliable during high-traffic periods and preventing any single server from becoming overloaded.
- Navigate to Settings () > Knowledge base site in the left navigation bar of the Knowledge base portal.
- Navigate to Custom domain > Custom domain mapping.
- Click Upgrade.
- Verify the custom domain mapping configuration in Document360.
- Copy the CNAME record generated in Document360.
- Set up the CNAME record in your domain registrar.
- Verify the custom domain mapping configuration in Document360 again. The status changes from Pending to Verified.
This upgrade does not cause downtime, though we recommend performing it during off-business hours. Contact Document360 support for assistance.
The load balancer is now upgraded for your Knowledge base site.
Limits
| Limit | Value | Notes |
|---|---|---|
| Custom domains per project | 1 | A second domain isn't supported; set up a redirect from one domain to the other instead. |
| Per-version domains | Not supported | Each version uses a customizable path within the same domain, not a separate domain. |
| Custom SSL certificate validity | 90 days | Renew and resubmit the certificate before it expires. |
| Google Search Console verification | Custom domain required | Verification isn't supported on a Document360-provided subdomain. |
Best practices
- Use relative links (for example,
/docs/article-name) instead of full URLs in your content, so links don't break if you change your domain later. - If you're configuring an Apex domain and your registrar doesn't support DNS flattening, move to a provider that does, such as Cloudflare, rather than working around the limitation.
- Schedule load balancer upgrades during off-business hours, even though the process doesn't cause downtime, to minimize any risk during the change.
- Renew custom SSL certificates ahead of their 90-day expiration to avoid a lapse in secure access.
Common domain registrars
| Registrar | Reference |
|---|---|
| NameCheap | Support article |
| Domain.com | Support article |
| Google Domains | Support article |
| Dreamhost | Support article |
| Hover | Support article |
| GoDaddy | Support article |
| Cloudflare | Support article |
| Bluehost | Support article |
FAQ
Do I need an SSL certificate to configure a custom domain?
No. Document360 automatically provides an SSL certificate when you map your custom domain. If you prefer to use your own certificate instead, contact support@document360.com.
Will the custom domain URL reflect in the invitation email sent to readers?
Yes. Invitation emails sent after the custom domain is successfully mapped will use the custom domain in their links.
What do I do if the CNAME is not verified after updating the DNS?
Remove the current custom domain configuration, re-add the custom domain, update the CNAME on your DNS, and confirm it verifies successfully.
Can I configure two custom domains for a single Knowledge base site?
No, but you can set up a redirect from one domain to another so visitors to the first domain land on the second.
What is a naked domain?
A naked domain doesn't include the "www" prefix — for example, example.com is naked, while www.example.com is not. Most domains include "www" by default.
What is a domain registrar?
A domain registrar is the company where you purchase and manage your domain name, such as GoDaddy, Namecheap, or Google Domains. You'll update your custom domain settings there to connect it to Document360.
What is a CNAME record?
A CNAME record is a DNS setting that connects your custom domain, such as help.yourcompany.com, to another address, like the default domain Document360 provides. It ensures readers reach your Knowledge base site when they type your custom domain.
Why do I need to upgrade to the new load balancer?
The new load balancer implements SSL offloading at the load balancer level to reduce server load and improve security, includes a web application firewall against common attacks like SQL injection and cross-site scripting, and uses dynamic traffic management for better performance.
Is it possible to create a separate domain for each version of my project?
No. Each version uses a customizable path within the existing domain rather than a separate domain.
Will changing the custom domain affect the widget or existing article links?
No. The widget authenticates using an API token, so it keeps working after a domain change. Article links in Document360 are usually relative (for example, /docs/article-name), so they won't break either. If you've used full URLs instead, review and update them manually — using relative links is the best practice to avoid this.
Why am I seeing the Cloudflare Error 1014 – CNAME Cross-User Banned while setting up my custom domain?
This happens when both Document360 and your domain are hosted on Cloudflare, since Cloudflare blocks CNAME records across different accounts. On a paid Cloudflare account, check whether "Also prevent subdomains" (zone hold) is enabled — temporarily disable it, let the domain verify, then re-enable it. On a free account, zone hold is off by default; ensure your CNAME records propagate within 7 days of generating them in Document360, and if verification still fails, remove and reconfigure the custom domain. If issues persist, contact Cloudflare support, since the cause may be billing-related.
Does adding a custom domain change my Document360 portal link?
No. Your portal URL stays the same — the custom domain applies only to the Knowledge base site, not the admin portal.
Can I customize the structure of my knowledge base URLs?
No, the URL structure is fixed. You can configure a custom domain or modify an article slug, but core components like project version, language, and system-defined paths (for example, /docs/) can't be changed.
How can I get a cleaner or more user-friendly URL for my knowledge base?
The URL format itself is fixed, but you can make it cleaner by editing the default subdomain (via Settings > Custom domain > Edit domain), configuring a custom domain to fully replace the Document360 subdomain, or renaming your project to a shorter name, which also updates the default subdomain. Removing the language code from the URL isn't supported, and article-level redirection can't change the URL format itself.
Why is Google Search Console verification not working for my knowledge base site?
Google Search Console verification only works on a custom domain. If your site is on a Document360 subdomain, verification fails regardless of method, since Document360 subdomains share the platform's root domain and verifying them could conflict with Document360's own branding and SEO. Configure a custom domain first, then complete verification using any supported method.
Will changing the Document360-provided subdomain affect my SSO or SCIM configuration?
No. Changing the Document360-provided subdomain doesn't affect existing SSO authentication or SCIM configuration, though users signing in via SSO will need to use the updated subdomain afterward.