Plans supporting this feature: Enterprise
Configuring a custom email domain in Document360 allows your organization to send notifications from a branded email address, improving recognition and trust among your readers while reinforcing your branding strategy.
By default, notification emails are sent from support@document360.com to users and readers. To make customer notifications more personalized, you can set up emails to be sent from an address like support@yourcompany.com, making it easier for recipients to identify and trust the sender.
To enable this feature, you’ll need to configure your DNS entries with your provider to point to Document360.
Prerequisites
Ensure you have access to a DNS provider such as GoDaddy, Hostinger, Namecheap, etc.
This custom email domain feature is available only in the Enterprise plan.
Configuring a Custom Email domain
To configure a custom email domain, follow these steps:
Navigate to Settings () > Knowledge base portal in the left navigation bar in the Knowledge base portal.
In the left navigation pane, navigate to Notifications.
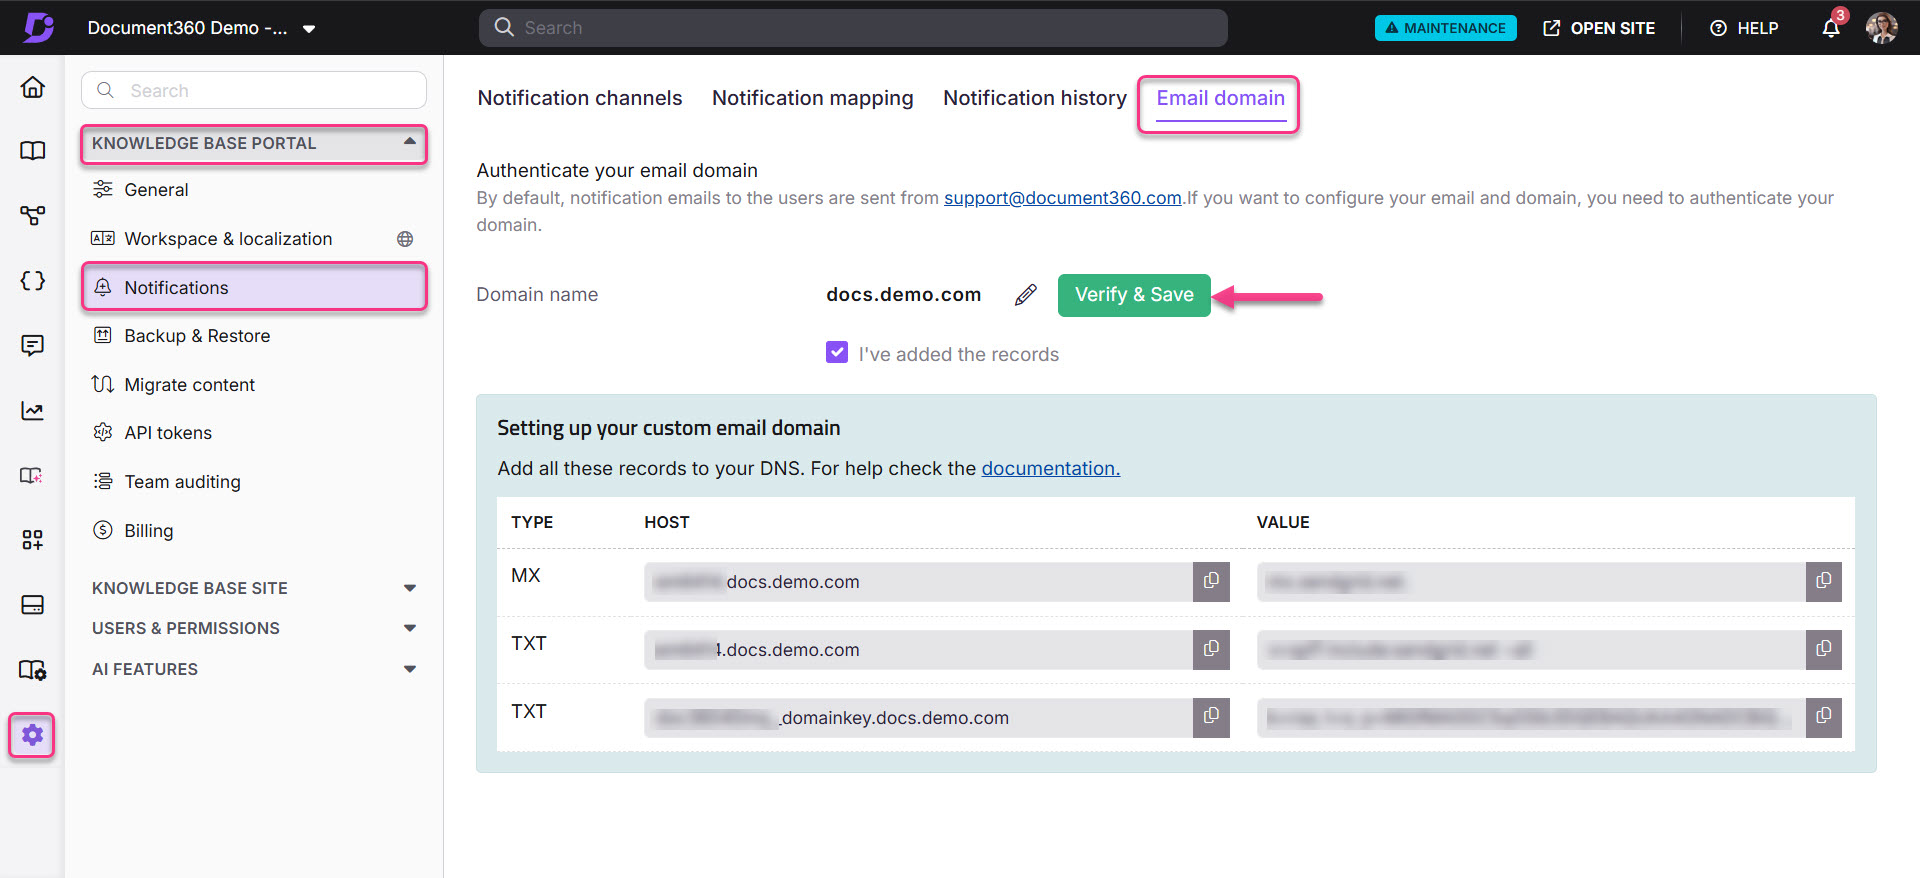
Click the Email Domain tab.
In the Domain name field, enter your custom email domain (e.g.,
yourcompany.com).Click Add Domain. This will generate the DNS records needed for configuration.
Adding DNS records
Open your DNS provider’s website in a separate tab to add the required MX and TXT records.
NOTE
Ensure you add the DNS records provided by Document360 to your domain registrar (e.g., GoDaddy, Hostinger). Adding these records will not override existing MX records.
Copy the configuration details from the Setting up your custom email domain section in Document360 and paste them into your DNS provider’s settings.
Return to the Email domain page in Document360.
Select the I’ve added the records checkbox, then click Verify & Save.
Once the MX and TXT records are verified, an Email Domain Verified message will appear.
After verification, enter your custom sender information:
Email field: Enter the desired “From” email address (e.g.,
support@yourcompany.com).Name field: Enter the sender name (e.g.,
Your Company Support).
After setup, emails will be sent from the configured domain with the specified “From” email address and sender name.

Troubleshooting
If your custom email domain configuration is still inactive after 24 hours, try the following steps:
Verify that the MX and TXT records were saved on the domain host.
Ensure the MX and TXT information on the domain host matches the records provided by Document360.
If issues persist, delete the records on the domain host and re-add them.
For further assistance, please contact us at support@document360.com.
FAQ
What is the purpose of MX records, and how do they work?
MX (Mail Exchange) records are DNS entries that route emails sent to your domain to the correct mail servers. They define the mail servers responsible for handling your email and their priority order. For example, if one mail server is unavailable, emails are sent to the next server in line based on priority (a lower number indicates higher priority).
Example:
If your domain has the following MX records:
10 mail1.example.com20 mail2.example.com
Emails are routed first to mail1.example.com and then to mail2.example.com if the primary server is down.
How are TXT records used in email authentication?
TXT (Text) records are DNS entries that store text-based information linked to a domain. They serve multiple purposes, such as verifying domain ownership, setting up email security policies like SPF, DKIM, and DMARC, and providing general domain-related information.
Example: SPF (Sender Policy Framework), a TXT record specifies which mail servers are authorized to send emails on behalf of your domain, helping to prevent spoofing.
SPF Example Record: v=spf1 include:_spf.google.com ~all
By implementing TXT records, you can protect your domain from phishing, spoofing, and unauthorized email usage.