Plans supporting this feature: Professional Business Enterprise
Snippets is a predefined set of content blocks that the content manager or author uses as reusable content. The Snippet's content can vary from simple text or phrases to lengthy paragraphs, tables, images, and more. In Document360, the snippets are stored in a library, and you can easily insert them into articles during editing with just a click of a button.
NOTE
The Snippet will appear as regular content to the reader on the Knowledge base site. The reader will not know that the content was rendered through Snippet.
Accessing the Snippets page
You can view, edit, or delete a snippet from the Snippets page.
Navigate to Content tools (
 ) in the left navigation bar in the Knowledge base portal.
In the left navigation pane, navigate to Content resources > Snippets.
The Snippets page displays a list of all snippets that have been added to your project.
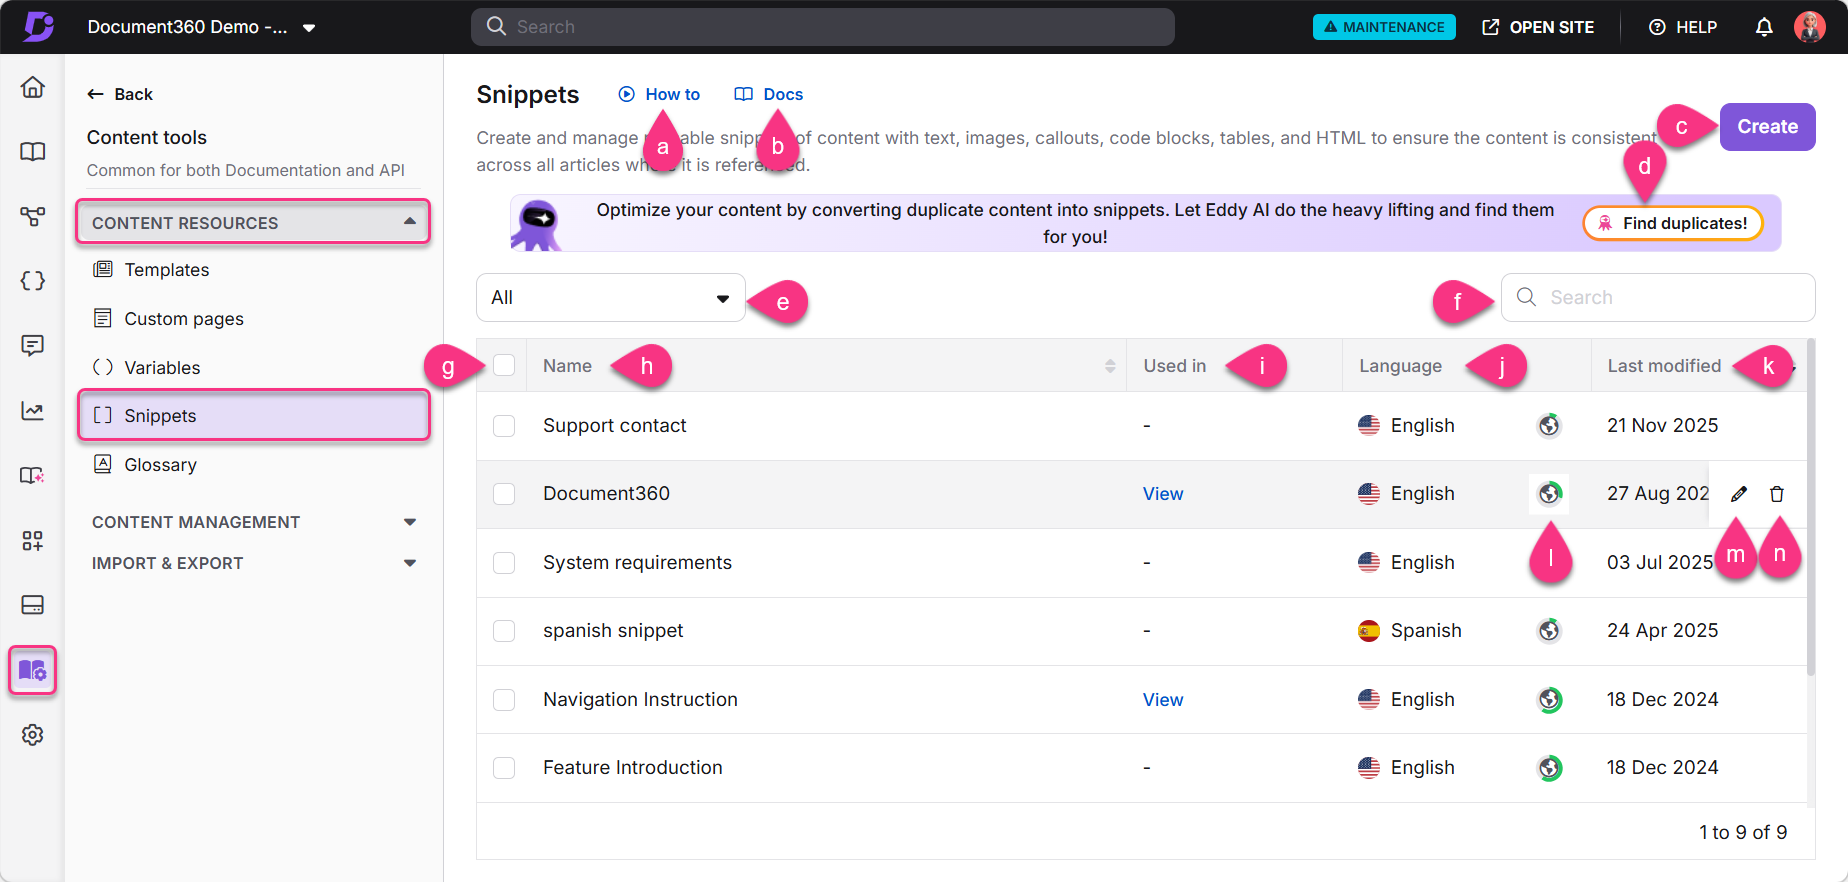
How to: View a tutorial on how to use snippets.
Docs: Open the documentation article about snippets.
Create: Create a new snippet.
Duplicate content detection: Identify and manage duplicate text across your documentation and convert them into snippets.
Languages: Filter the snippet list by Global or a specific language.
Search snippets: Search for snippets by name.
Selection box: Select one or more snippets to perform bulk delete action.
Name: Click the snippet name to preview its content.
Used in: Shows where the snippet is used.
If the snippet is unused, the field shows a dash
-.If the snippet is used, click View to see the articles or category pages where it has been inserted.
Language: Indicates the language of the snippet.
Last modified: Displays the date and time the snippet was last updated.
Translation status: View the translation status of the snippet. Click the globe () icon next to each snippet. A indicates that the snippet has been translated into that language, while the icon indicates it has not yet been translated.
Edit (): Edit the snippet content.
Delete (): Click to delete a snippet. To delete multiple snippets in a single instance, select the desired checkboxes and click Delete at the top.
Duplicate content detection banner
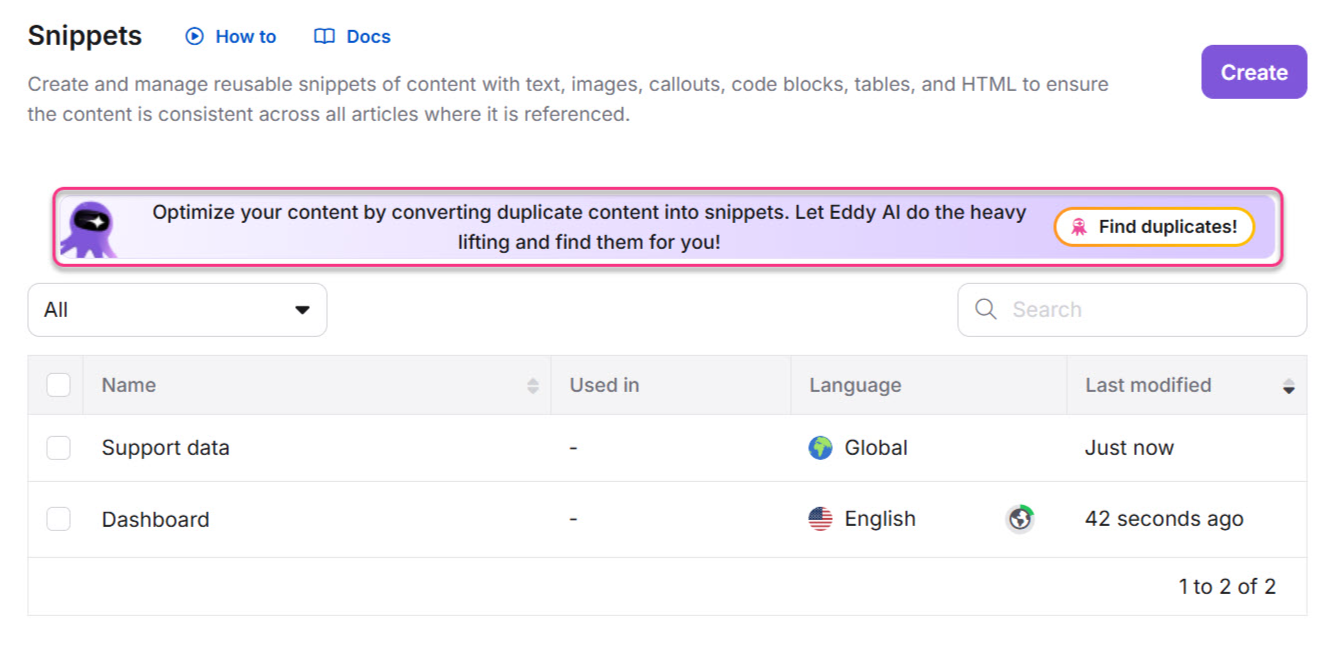
To help identify and manage duplicate text across your documentation, a new Duplicate content detection banner is available at the top of the Snippets page.
This feature, powered by Eddy AI, is available only for Enterprise plan customers. It scans your project for paragraphs that appear multiple times across articles. Once the scan is complete, the system generates a detailed report showing where duplicate content exists and suggests converting it into reusable snippets.
Detecting duplicate content
Click Find duplicates on the banner to start scanning your project for duplicate content.
Once the scan is completed, the total number of duplicate text blocks detected will be displayed.
If a scan has already been performed, click Scan again to re-run the process.
Click Review suggestions to open the Duplicate Content Detection report and review the findings.
NOTE
For more information read the article on Duplicate content detection.
Creating a snippet
To create a new snippet:
Navigate to Content tools (
 ) in the left navigation bar in the Knowledge base portal.
In the left navigation pane, navigate to Content resources > Snippets.
The Snippets page appears. If you have added any snippets earlier, you can see them listed here.
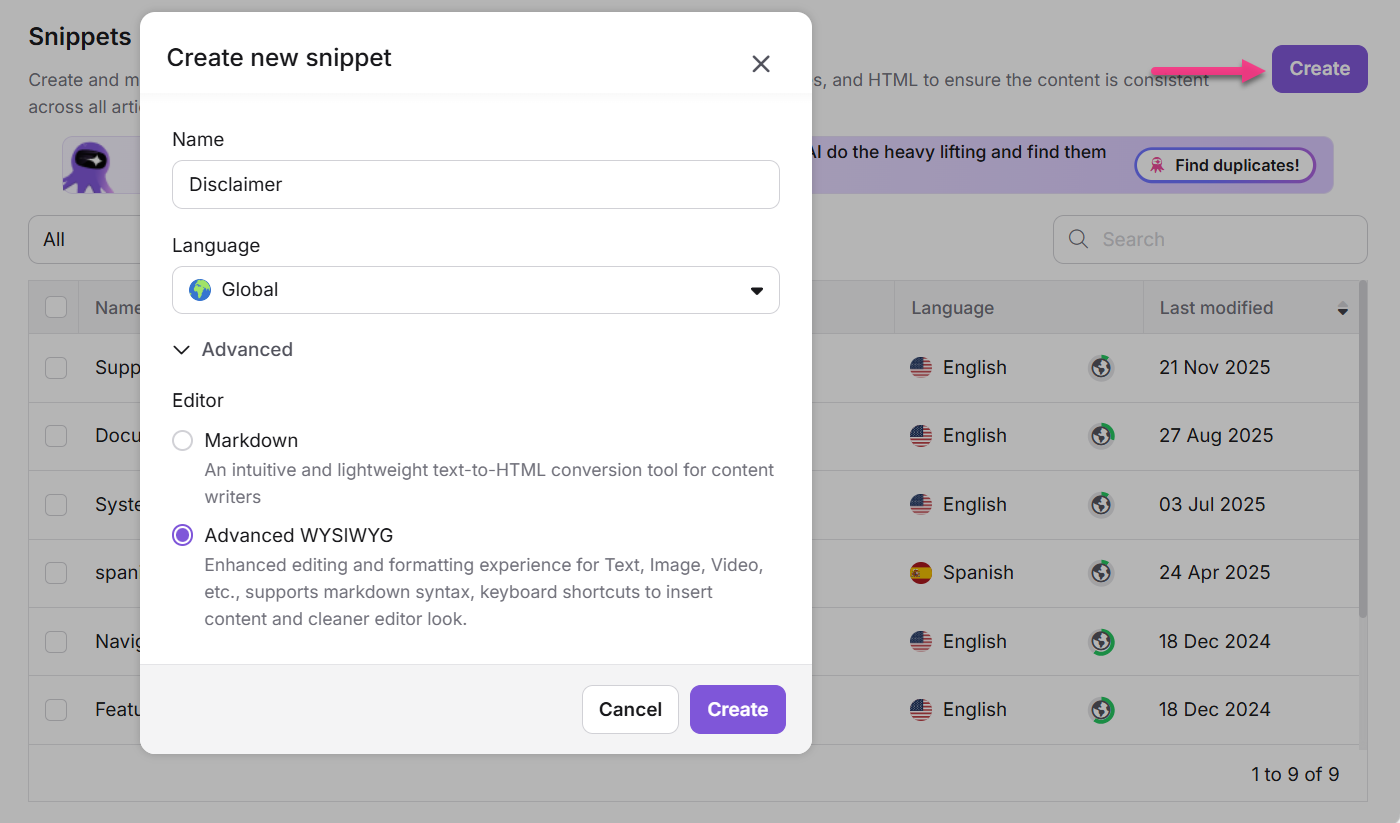
Click Create at the top right.
In the Create new snippet dialog:
Enter a Name (up to 50 characters). You can use letters, numbers, hyphens, and underscores.
Choose a Language (default is Global). You can select a specific language if needed.
Expand the Advanced dropdo
wn and choose your editor (Markdown or Advanced WYSIWYG). The default editor is based on your general project settings.
Click Create.
Once created:
Use the selected editor to enter your snippet content.
If using Markdown, the Markdown editor appears.
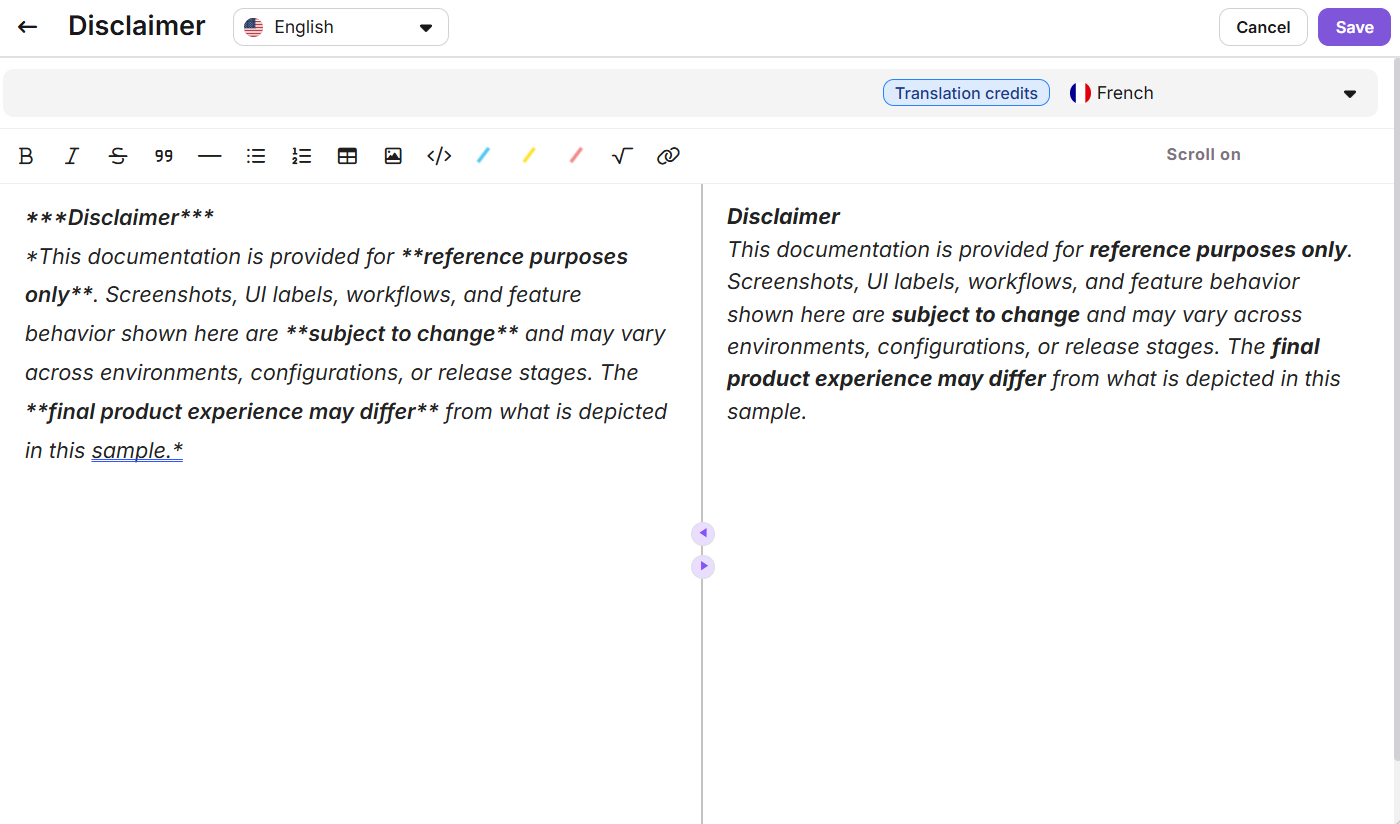
If using Advanced WYSIWYG, the editor toolbar, code view, Eddy AI summary generator, and Eddy AI FAQ generator are available.
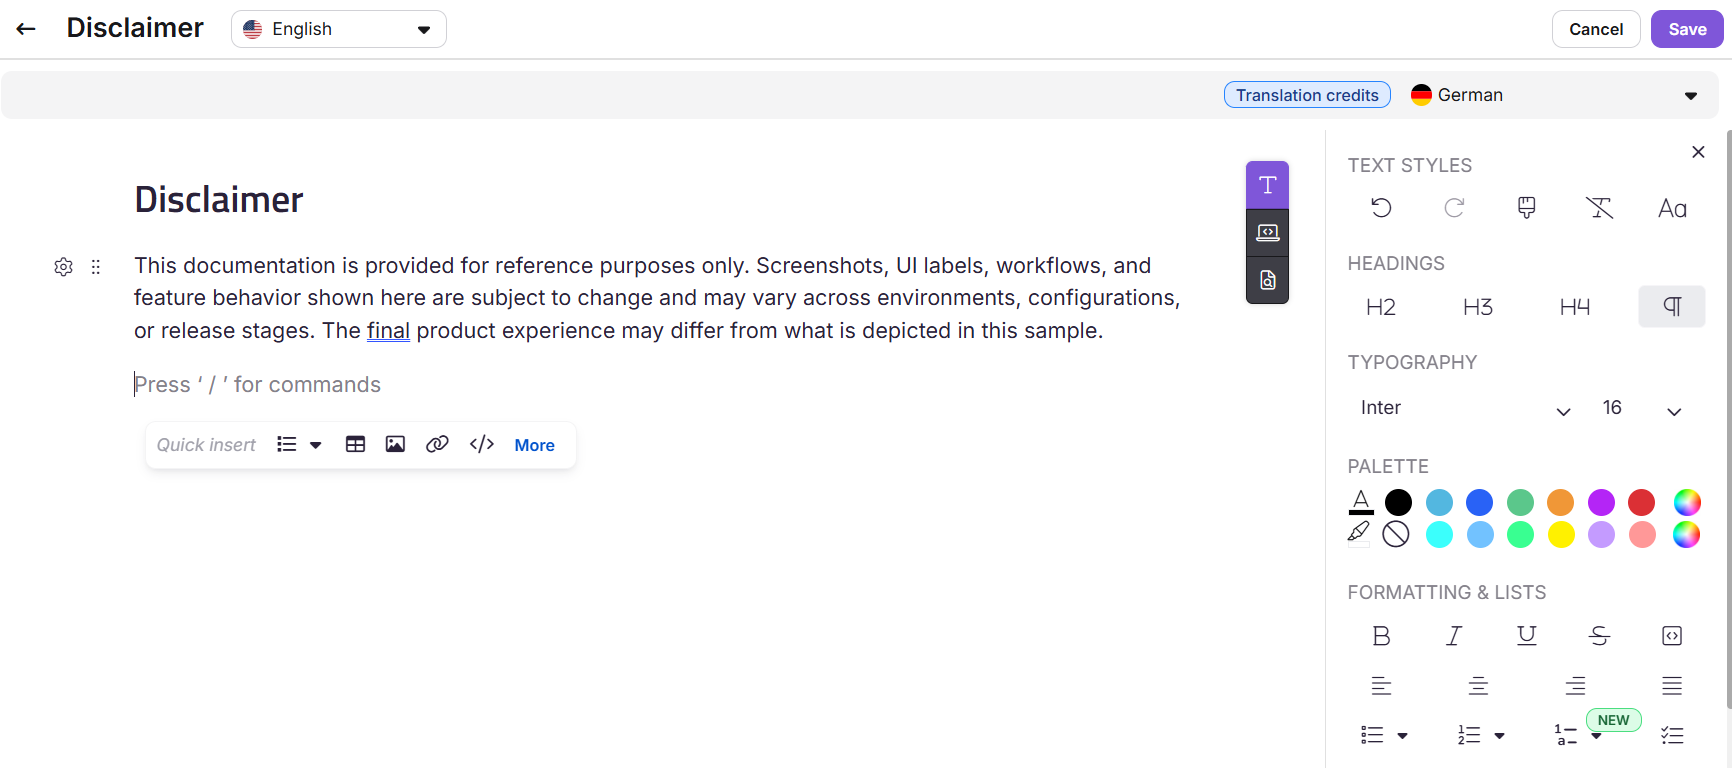
NOTE
Once you select the Advanced WYSIWYG editor, you cannot switch back to Markdown.
If you start with Markdown, you can convert to Advanced WYSIWYG for translation purposes (as Markdown doesn't support machine translation). Then you cannot change back to Markdown.
You can switch language from the language dropdown at the top.
After drafting your snippet, click Save or press
Ctrl+Sto use the shortcut.
NOTE
Formatting options
You can apply formatting to your snippet content using the toolbar:
Markdown editor: For formatting help, read the article on the Markdown editor.
Advanced WYSIWYG editor: For a complete list of features, read the article on the Advanced WYSIWYG editor.
You can use custom HTML in the Code views. However, unsupported tags will be sanitized automatically.
Selecting the Advanced WYSIYWG editor, you can use the Slash menu in the Snippet editor to access formatting tools such as Heading 2, Heading 3, Heading 4, Numbered list, Multi-level list, Bullet list, Checklist, Inline code, and Code block, and you can also insert elements like Image, Video, Link, Table, Divider, Accordion, Callout, Tabs, FAQs, LaTeX, and Emoji.
Using Eddy AI in Snippet content
While drafting a snippet, you can hover over the desired content and use Eddy AI to make the text longer or shorter, improve it, change the tone, convert speech, change the voice, split sentences, or generate elements such as tables, pie charts, and flowcharts.
From the bottom-right corner, you can also access Eddy AI’s Generator FAQ and Generator summary (the summary option is available only for English-language snippets).
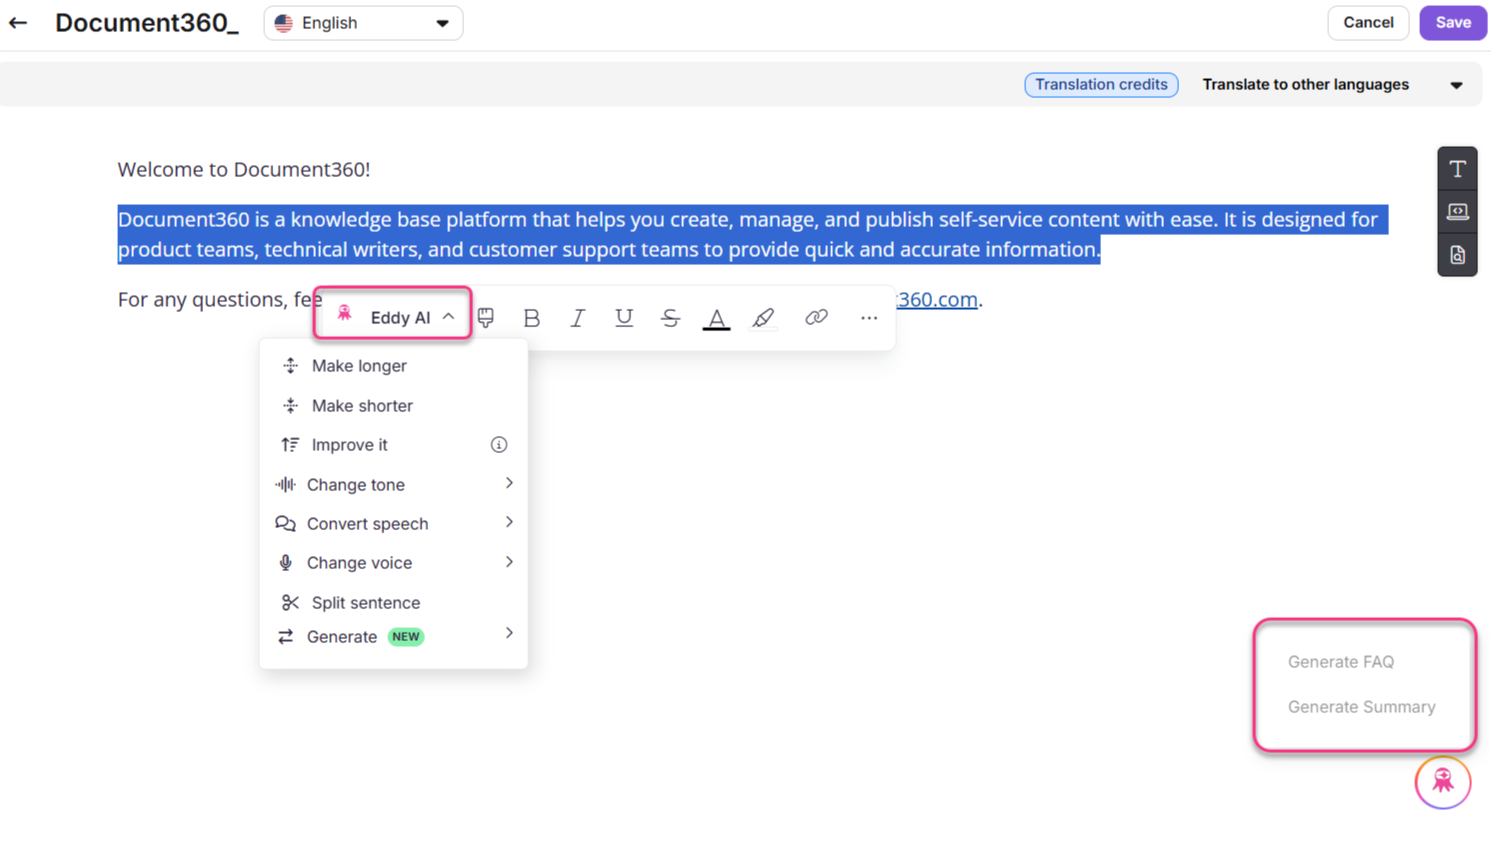
Inserting a snippet in the article
You can insert a snippet in the articles in two ways:
Method 1: Using the syntax (Markdown editor)
Method 2: Using the toolbar (Markdown and WYSIWYG)
Method 3: Using the Slash menu (Advanced WYSIWYG editor)
In the Markdown editor, type a snippet.MergeCodeValue between closed double curly brackets.
Example: {{snippet.snippet name}}
You must know the exact merge code value to add the desired snippet. The snippet will not work even if a single letter changes.
NOTE
Typing in snippet.Merge_Code_Value will only work in the Markdown editor. If you are using Advanced WYSIWYG editor, you can insert snippet using the toolbar.
To insert a snippet from the editor toolbar:
Click the Content reuse () icon for Markdown and WYSIWYG editor.
Select the snippet or use the Search snippets bar to narrow down the snippet name.
Select the intended snippet to insert.
NOTE
If the Insert as local copy toggle is on, the snippet content added to the article will remain unchanged. The snippet in the article will not be affected if the selected snippet's content is modified or removed in the future.
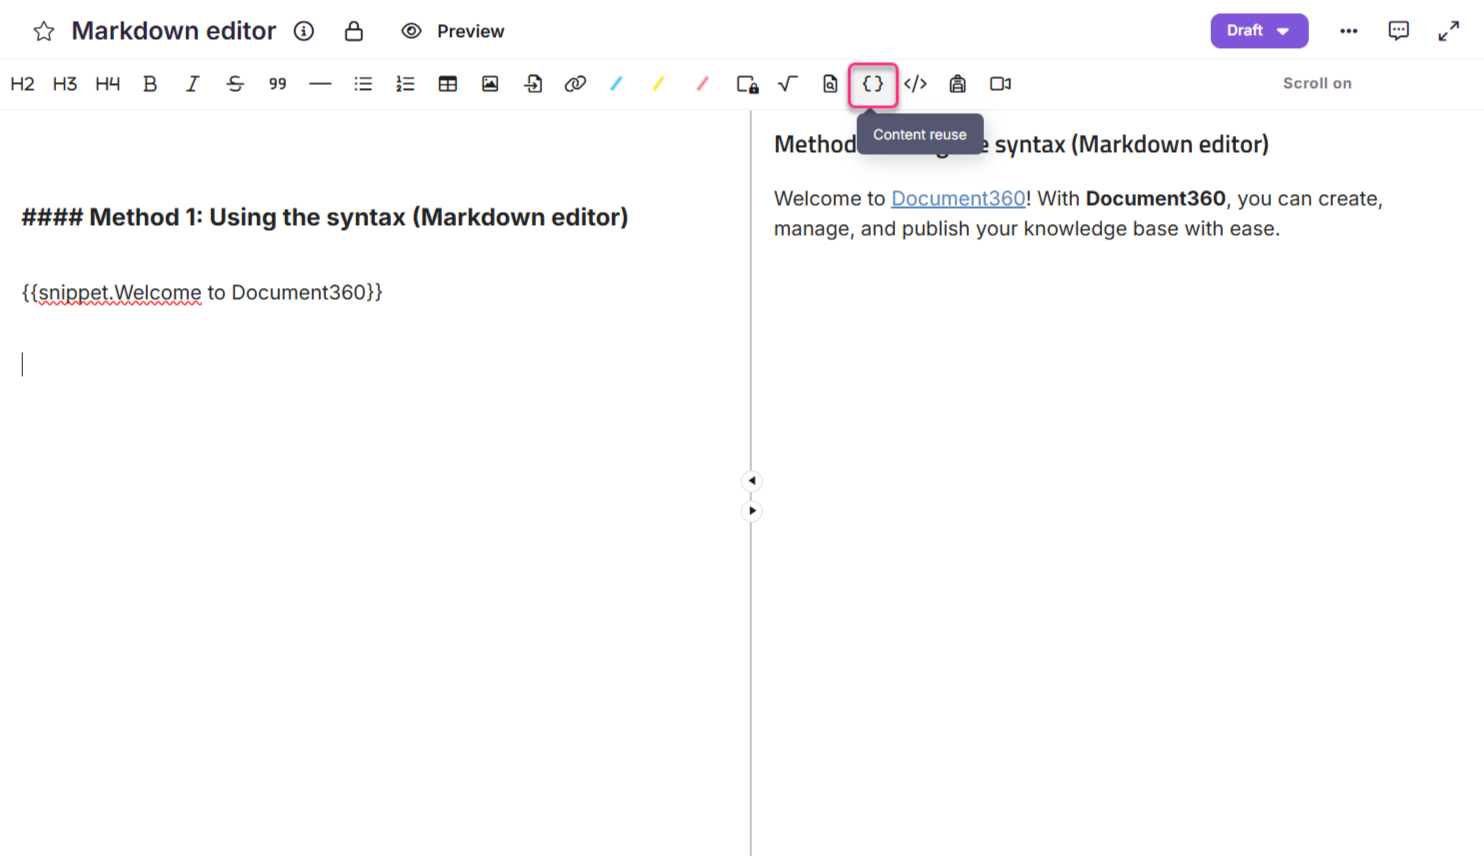
To insert a snippet from the slash menu:
Use the slash command
/snippetsto open the Snippets tool in the slash menu.Use the Search snippet bar to find the snippet you want to insert.
Hover over a snippet name to preview its full content.
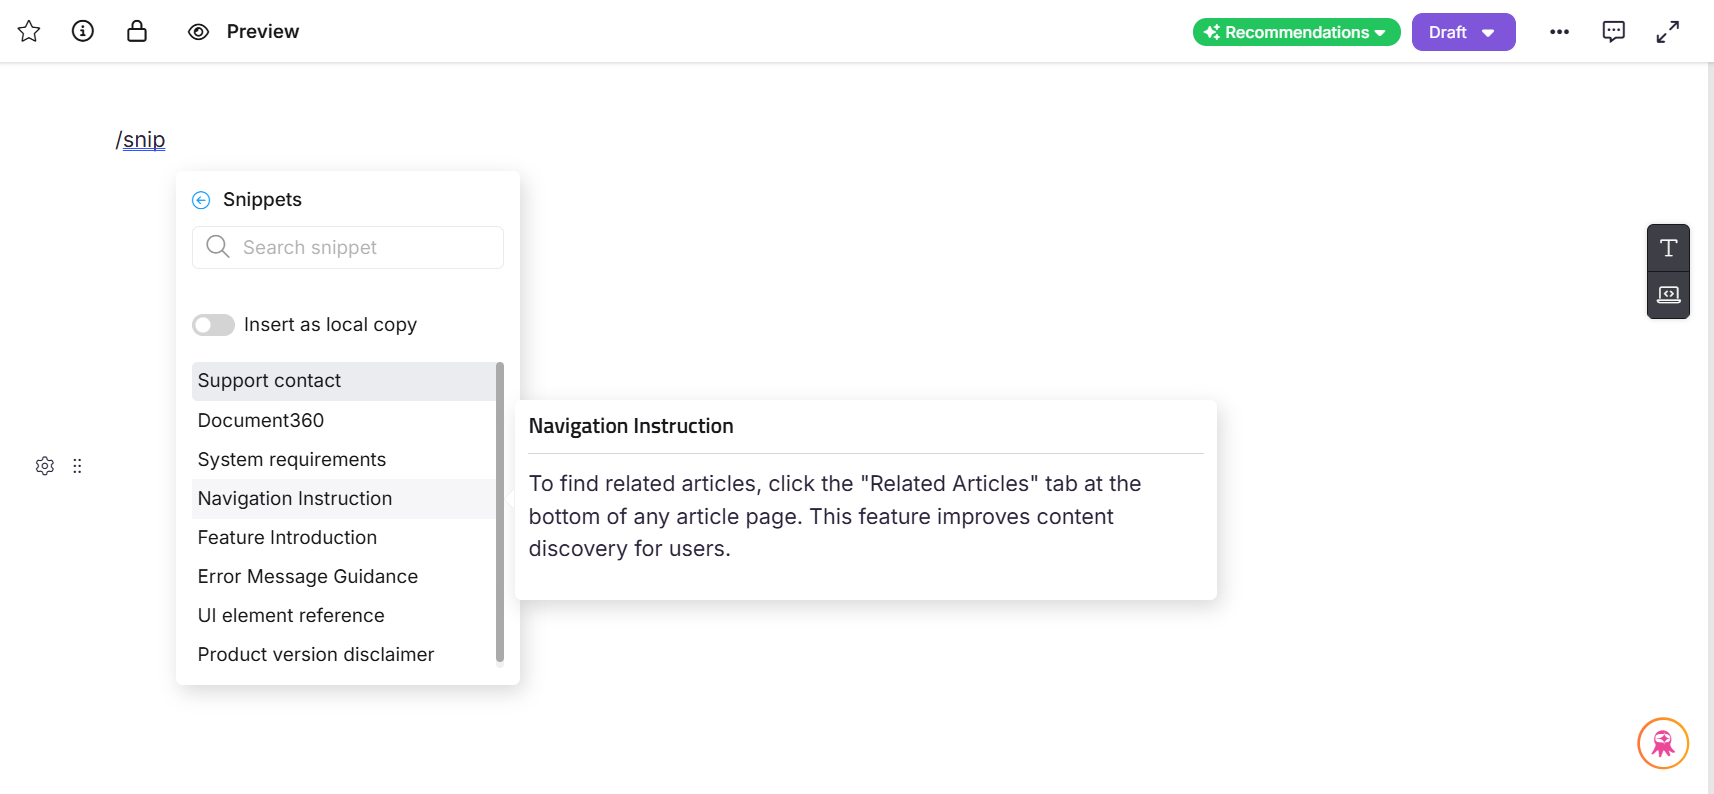
Click the snippet to insert it into the article.
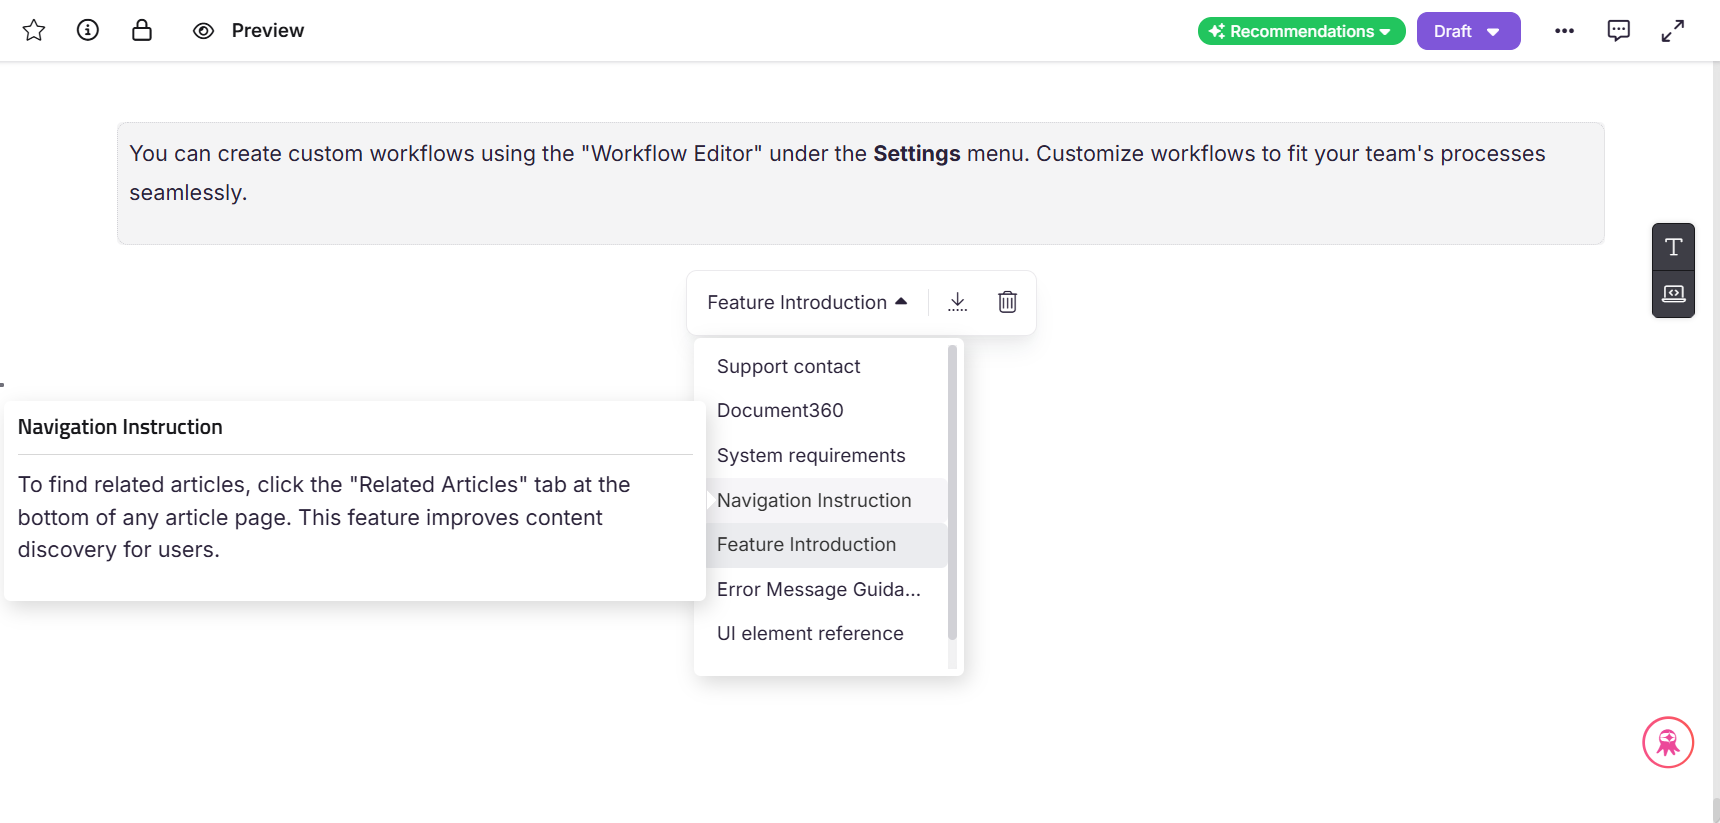
The content of the snippet will be directly inserted inside the editor within a content block highlighted with a dotted outline. This helps distinguish the content of the snippet from the rest of the article.
Click inside the snippet block to open the bubble menu:
Use the dropdown to switch to a different snippet.
Click Insert as text to convert the snippet into static content.
Click the Delete () icon to remove the snippet block from the article.
Viewing snippet usage (article/category dependency)
To view where a snippet is used:
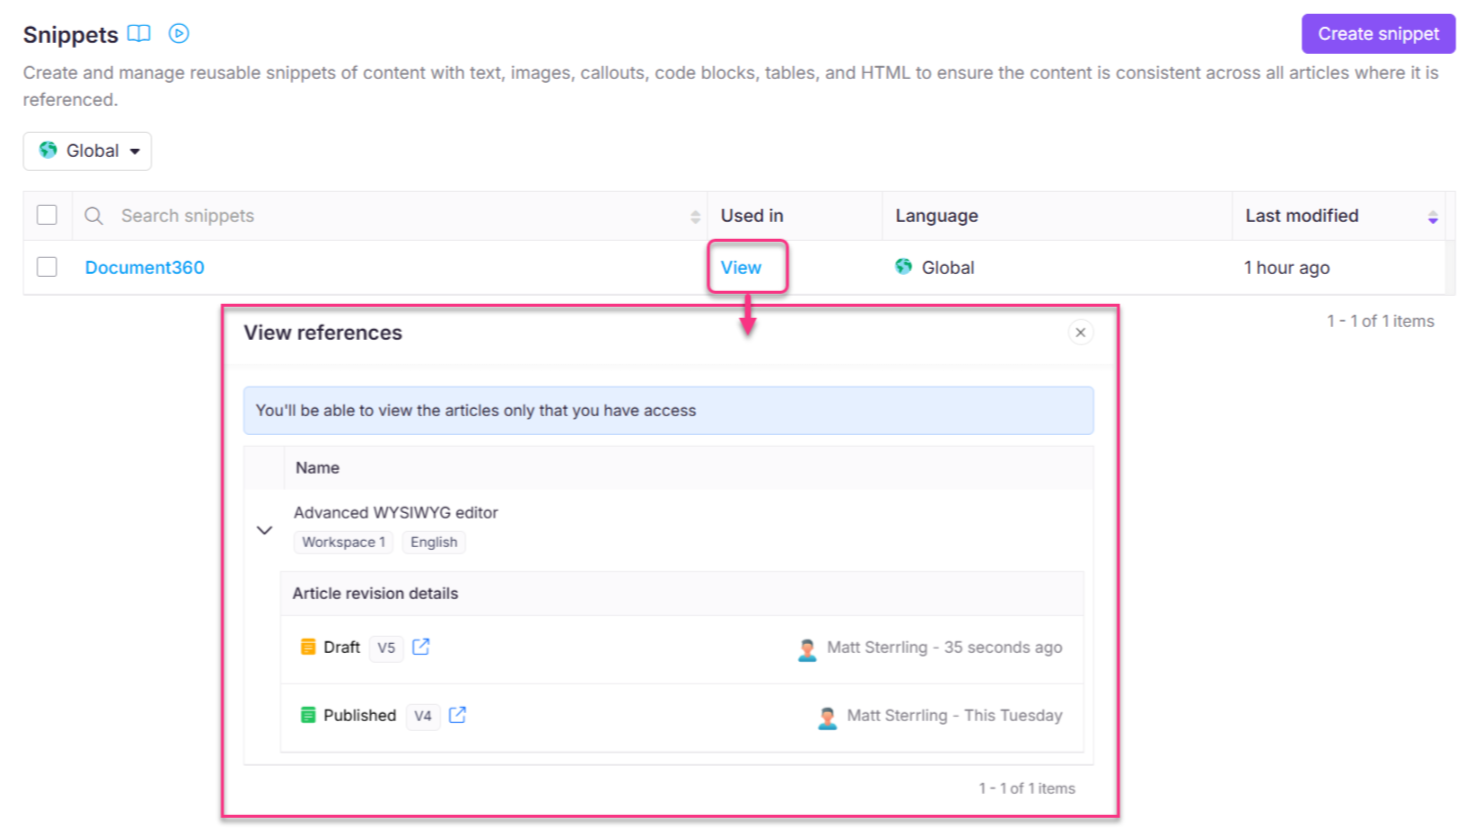
In the Used in column, click View.
The View references panel appears. You’ll see:
The article version.
The project workspace and language.
The user name and profile picture of the user who added the snippet.
The article states (Draft and Published).
The time/date information when the snippet was inserted in the article/category page.
Click the icon to open the same article version in a new tab.
Editing a snippet
To edit a snippet:
Navigate to Content tools (
 ) in the left navigation bar in the Knowledge base portal.
In the left navigation pane, navigate to Content resources > Snippets.
The Snippets page appears. You can find the list of snippets you have already added.
Hover over the snippet you want to edit and click the Edit () icon.
Update the content as needed.
Click Update.
NOTE
When you update a snippet, the changes are automatically reflected in all articles and category pages where it’s used, including published ones, without needing to republish them.

Deleting a snippet
To delete a snippet:
Navigate to Content tools (
 ) in the left navigation bar in the Knowledge base portal.
In the left navigation pane, navigate to Content resources > Snippets.
The Snippets page will appear. You can find the list of snippets you have already added.
Hover over the desired snippet and click the Delete () icon.
Click Yes in the Delete confirmation dialog.
To bulk delete multiple snippets, select multiple intended snippets from the Snippets page and click the Delete () option at the top of the list.
NOTE
When you delete a snippet, it is removed from all articles where it is referenced.
The article retains its current version.
On the knowledge base site, the surrounding content adjusts so no empty space is left where the snippet was removed.
In the portal, a loading symbol appears in the content block where the snippet was removed. You can select this block to insert another snippet or delete the block manually.

Translating snippets
You can create snippets in multiple languages to ensure localization across your Knowledge base.
NOTE
Global snippets cannot be translated.
Translating new snippets
To translate a new snippet while creating:
Navigate to Content tools (
 ) in the left navigation bar in the Knowledge base portal.
In the left navigation pane, navigate to Content resources > Snippets.
Click Create.
In the Create new snippet dialog, enter the snippet name, select the desired language, and choose your preferred editor.
Click Create.
In the Language dropdown, select the intended language for the snippet.
Enter the content in your desired language.
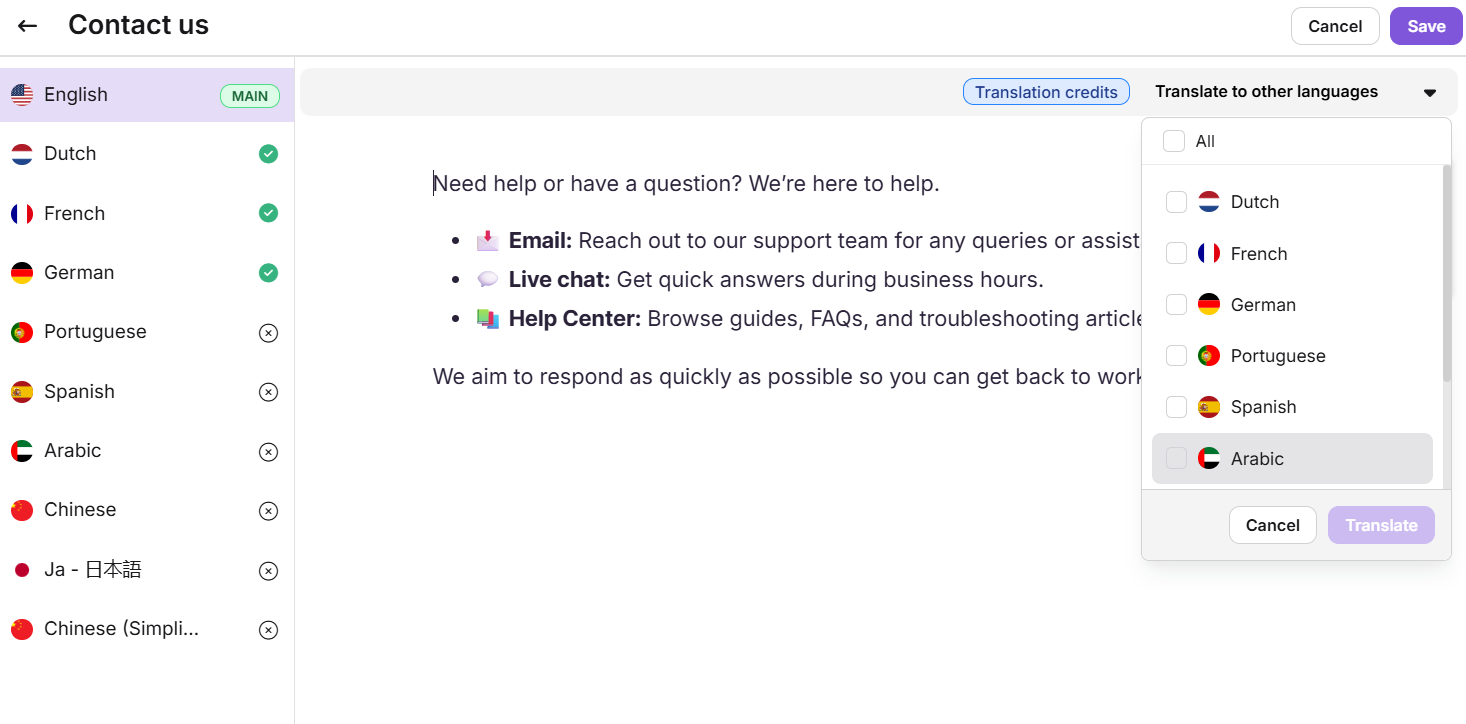
To translate the content into other languages, click the Translate to other languages dropdown.
Select the desired languages from the list and click Translate.
NOTE
The default language will be marked as Main.
Translated languages will show a green tick (✔) once translation is complete.
You can manually switch to untranslated languages and add translations as needed.
Click Save to save it with all translations.
For example, if you create a snippet for a welcome message in English, you can use the translation feature to add the same message in French, Spanish, Dutch, etc.
Translating existing snippets
From the Snippets page, click the desired existing snippet you wish to translate.
Navigate to Translate to other languages and select the desired language that the snippet needs to be translated.
Click Translate.
If needed, you can navigate to other languages and again translate into those languages.
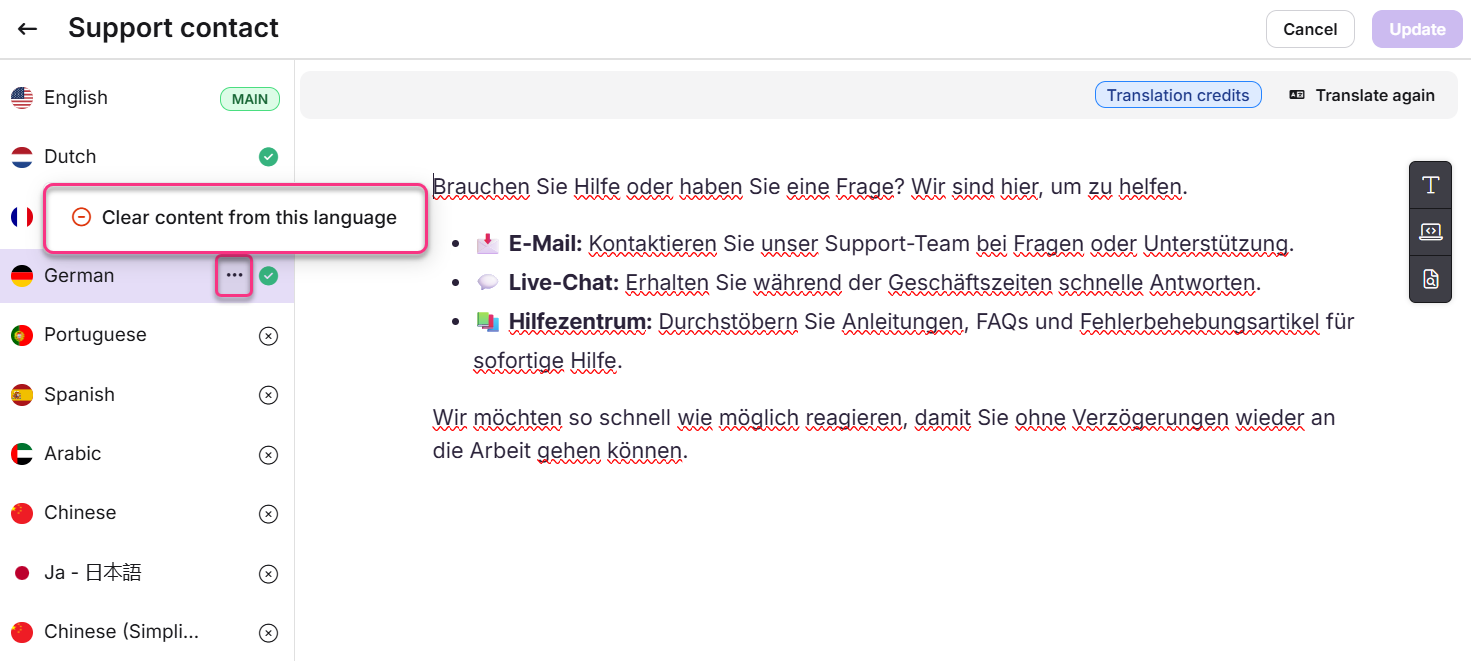
To translate the content again, click Translate again. This will overwrite the existing translation with a new one.
If you need to remove the translated snippet for a specific language, click the More () icon and select Clear content from this language.
You can retranslate the content at any time if needed.
Troubleshooting
Snippets are not appearing in the editor menu
This issue typically occurs when a snippet is created in one language but used in an article written in a different language. In Document360, snippets are language-specific unless created under the Global language setting.
Steps to resolve:
Ensure the snippet is created in the same language as the article you're working on.
If the snippet was created in a different language, use the Translate to other languages option available in the Content reuse section.
Once translated, switch to the desired language in the article editor. The snippet should now appear when you try to insert it into the article.
NOTE
Snippets created under a specific language will only appear in articles written in that same language.
If the snippets are still not appearing after following the above steps, please contact support@document360.com with the following details:
A screenshot of the snippet in the Content reuse section.
A screenshot showing the snippet not appearing in the article editor..
FAQ
How many snippets can be created in one project?
You can create up to 200 snippets in a single project. If you need more, additional snippets can be purchased as an add-on.
Can I change the name of a snippet after it has been created?
While you can edit the contents of a snippet, its name cannot be changed after creation.
Why is a snippet inserted in a new line?
Snippets are designed as new blocks of content, allowing for multiple lines to be added within them. As such, they will always start from a new line to maintain structure and clarity.
Can I use variables inside snippets?
Currently, using variables inside snippets is not supported in Document360. If you insert a variable within a snippet, it will not render correctly either in the editor preview or in exported outputs (such as PDF).