Offres prenant en charge cette fonctionnalité : Entreprise
Configurer un domaine email personnalisé dans Document360 permet à votre organisation d’envoyer des notifications depuis une adresse email de marque, améliorant ainsi la reconnaissance et la confiance de vos lecteurs tout en renforçant votre stratégie de branding.
Par défaut, les emails de notification sont envoyés vers support@document360.com les comptes d’équipe et les lecteurs. Pour rendre les notifications clients plus personnalisées, vous pouvez configurer des e-mails pour qu’ils soient envoyés depuis une adresse comme support@yourcompany.com, ce qui facilite l’identification et la confiance de l’expéditeur par les destinataires.
Pour permettre cette fonctionnalité, vous devrez configurer vos entrées DNS auprès de votre fournisseur pour pointer vers Document360.
Prérequis
Assurez-vous d’avoir accès à un fournisseur DNS comme GoDaddy, Hostinger, Namecheap, etc.
Cette fonctionnalité personnalisée du domaine email est disponible uniquement dans le forfait Entreprise.
Configuration d’un domaine de messagerie personnalisé
Pour configurer un domaine de messagerie personnalisé, suivez ces étapes :
Naviguez dans () > Knowledge base portal dans la barre de navigation de gauche du portail de la base de connaissances.
Dans le panneau de navigation de gauche, Notifications.
Cliquez sur l’onglet Domaine de messagerie .
Dans le champ Nom de domaine , saisissez votre domaine de messagerie personnalisé (par exemple,
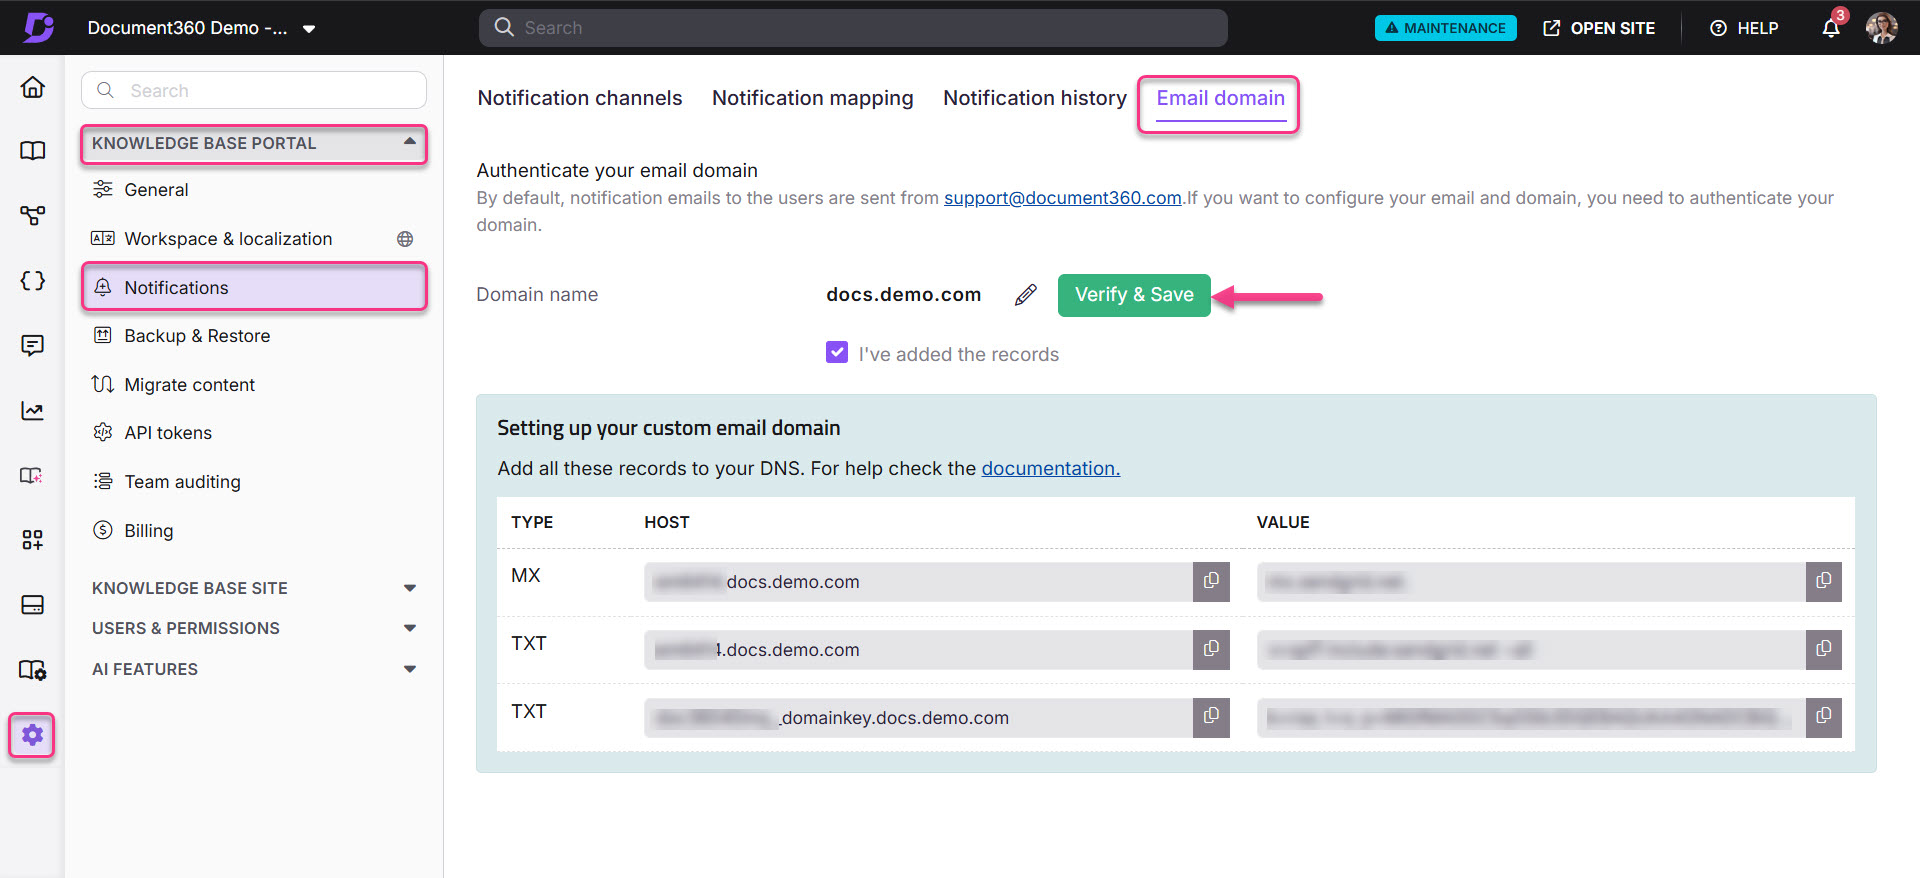
yourcompany.com).Cliquez sur Ajouter un domaine. Cela générera les enregistrements DNS nécessaires à la configuration.
Ajout d’enregistrements DNS
Ouvrez le site web de votre fournisseur DNS dans un onglet séparé pour ajouter les enregistrements MX et TXT requis.
NOTE
Assurez-vous d’ajouter les enregistrements DNS fournis par Document360 à votre registraire de domaine (par exemple, GoDaddy, Hostinger). Ajouter ces enregistrements ne supprimera pas les enregistrements MX existants.
Copiez les détails de configuration de la section Configuration de votre domaine email personnalisé dans Document360 et collez-les dans les paramètres de votre fournisseur DNS.
Retourner à la page du domaine Email dans Document360.
Sélectionnez la case « j’ai ajouté » les dossiers , puis cliquez sur Vérifier & Enregistrer.
Une fois les enregistrements MX et TXT vérifiés, un message Email Domain Verified apparaîtra.
Après vérification, saisissez vos informations personnalisées d’expéditeur :
Champ email : Saisissez l’adresse e-mail « De » souhaitée (par exemple,
support@yourcompany.com).Champ de nom : Saisissez le nom de l’expéditeur (par exemple,
Your Company Support).
Après configuration, les emails seront envoyés depuis le domaine configuré avec l’adresse e-mail « De » et le nom de l’expéditeur spécifiés.

Dépannage
Si votre configuration personnalisée de domaine email est toujours inactive après 24 heures, essayez les étapes suivantes :
Vérifiez que les enregistrements MX et TXT ont été sauvegardés sur l’hôte du domaine.
Assurez-vous que les informations MX et TXT sur l’hôte du domaine correspondent aux enregistrements fournis par Document360.
Si les problèmes persistent, supprimez les enregistrements sur l’hôte du domaine et réajoutez-les.
Pour toute assistance complémentaire, veuillez nous contacter à support@document360.com.
FAQ
Quel est le but des disques MX, et comment fonctionnent-ils ?
Les enregistrements MX (Mail Exchange) sont des entrées DNS qui dirigent les emails envoyés à votre domaine vers les bons serveurs de messagerie. Ils définissent les serveurs de messagerie responsables de la gestion de vos emails et leur ordre prioritaire. Par exemple, si un serveur de messagerie n’est pas disponible, les emails sont envoyés au serveur suivant en ligne selon la priorité (un nombre plus bas indique une priorité plus élevée).
Exemple :
Si votre domaine possède les enregistrements MX suivants :
10 mail1.example.com20 mail2.example.com
Les emails sont d’abord acheminés vers mail1.example.com et ensuite vers mail2.example.com si le serveur principal est hors service.
Comment les enregistrements TXT sont-ils utilisés dans l’authentification des e-mails ?
Les enregistrements TXT (texte) sont des entrées DNS qui stockent des informations textuelles liées à un domaine. Ils remplissent plusieurs fonctions, telles que la vérification de la propriété du domaine, la mise en place de politiques de sécurité des e-mails telles que SPF, DKIM et DMARC, ainsi que la fourniture d’informations générales liées au domaine.
Exemple : SPF (Sender Policy Framework), un enregistrement TXT spécifie quels serveurs de messagerie sont autorisés à envoyer des emails au nom de votre domaine, aidant ainsi à prévenir l’usurpation d’identité.
Exemple d’enregistrement SPF : v=spf1 include:_spf.google.com ~all
En implémentant des enregistrements TXT, vous pouvez protéger votre domaine contre le phishing, l’usurpation et l’utilisation non autorisée des e-mails.