Você pode usar o recurso Importar usuários para adicionar mais de cinco contas de equipe ao seu projeto ao mesmo tempo. Os usuários são adicionados enviando um arquivo CSV contendo seus endereços de e-mail e nomes, com funções e acessos atribuídos antes da confirmação da importação.
Por que importar usuários
Ao integrar uma equipe grande, adicionar usuários um a um via a janela de diálogo Adicionar usuário é demorado — suporta no máximo 5 endereços de e-mail por operação. O recurso Importar usuários remove essa restrição permitindo que você prepare uma lista de até 500 usuários em um arquivo CSV e faça upload de todos em uma única operação. Essa é a abordagem correta quando você está:
- Adicionando mais de cinco usuários ao mesmo tempo.
- Incorporando uma nova equipe, departamento ou grupo de colaboradores.
- Migrando usuários de outro sistema para o Document360.
Antes de começar
- Você deve ter as funções de Proprietário ou Administrador do projeto.
- Tenha os endereços de e-mail, primeiros nomes e sobrenomes dos usuários que você quer adicionar prontos.
Como importar usuários
-
Navegue até Configurações () > Usuários e segurança na barra de navegação à esquerda do portal da base de conhecimento.
-
No painel de navegação esquerdo, navegue até Usuários e grupos > Usuários.
-
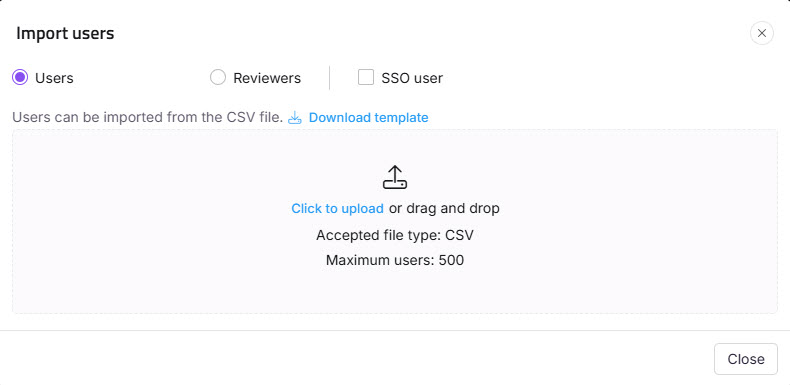
Clique em Adicionar > Importar usuários para abrir o painel Importar usuários.
-
Selecione a caixa de seleção de usuário SSO para adicionar os usuários como usuários SSO.
-
Se você selecionou a caixa de seleção de usuário SSO , selecione uma configuração de SSO no menu suspenso Selecionar SSO .
-
Baixe o modelo de arquivo CSV clicando na opção Download template .
-
Abra o arquivo CSV baixado em um aplicativo local como o MS Excel.
-
Digite os e-mails da nova conta e nomes de nome e sobrenome.
-
Salve o arquivo CSV, depois clique em Click to upload na diálogo. Você também pode arrastar e soltar o arquivo no quadro de drop designado.
Os dados serão validados, e os e-mails Válidos e Inválidos serão listados na tabela resumo de Validação .
-
Clique na caixa de seleção Pular o convite se você não quiser que seus novos usuários recebam um e-mail de convite.
-
Atribua os papéis de Portal, Conteúdo de Conteúdo, Acesso de Conteúdo e Grupo para os usuários importados usando os respectivos dropdowns.
-
Clique em Importar.
NOTA
Para adicionar menos de seis usuários ao mesmo tempo, use a opção Adicionar usuário .
Melhores práticas
- Sempre use o modelo CSV baixado. Enviar um arquivo com cabeçalhos de coluna ou formatação diferentes causará erros de validação.
- Revise o resumo da Validação antes de confirmar a importação. Corrija linhas de e-mail inválidas no CSV e faça o upload novamente se necessário.
- Todos os usuários em um único lote de importação recebem o mesmo papel no portal, papel de conteúdo e acesso ao conteúdo. Se você precisar de funções diferentes para usuários diferentes, divida-as em operações de importação separadas.
- Use Pular o convite apenas quando planejar notificar os usuários por outro canal — os usuários não podem fazer login até receberem e agirem sobre o convite.