Zendesk ist eine Kundensupport-Plattform, die Teams bei der Verwaltung von Fragen, Beschwerden und anderen Serviceanfragen unterstützt.
Die Integration der Document360 mit Zendesk ermöglicht es Support-Agenten:
Suchen und teilen Sie Artikel direkt in Zendesk , ohne die Tabs zu wechseln.
Erstellen Sie neue Knowledge Base-Artikel, ohne die Zendesk zu verlassen.
Nutze KI-gestützte Antworten und Artikelvorschläge mit Eddy AI.
Voraussetzungen
Document360 und Zendesk zu integrieren, benötigen Sie
Ein Zendesk Enterprise- oder Enterprise Plus-Konto für föderierte Suche.
Ein Document360 mit Administratorzugriff.
API-Token-Zugriff auf beiden Plattformen.
Installiere die Document360 auf Zendesk
Installieren Sie die Document360 in Ihrer Zendesk , damit Sie Ihre Wissensdatenbank direkt in Zendesk anschließen und auf Artikel zugreifen können.
Melden Sie sich in Ihrer Zendesk-Support-Konsole an.Zendesk
Gehe zum Zendesk Marketplace und klicke auf Apps.
Im neu geöffneten Marketplace-Tab geben Sie Document360 im Feld Filter-Apps ein.
Klicken Sie auf Document360.
Klicken Sie auf den Reiter "Wie installieren Sie ", um die Anweisungen anzusehen und alle Vorinstallationsaufgaben zu erledigen.
Klicke oben rechts auf Installieren .
Wenn du mehrere Konten hast, wähle das vorgesehene Konto aus und klicke auf Installieren.
Um die Installation abzuschließen, müssen Sie die Details zu Titel, Token und Einschränkungen in den jeweiligen Feldern eingeben.
Wenn Sie fertig sind, klicken Sie auf Installieren.
Document360 mit Zendesk
Um ein API-Token von Document360 zu erhalten, folgen Sie den folgenden Schritten.
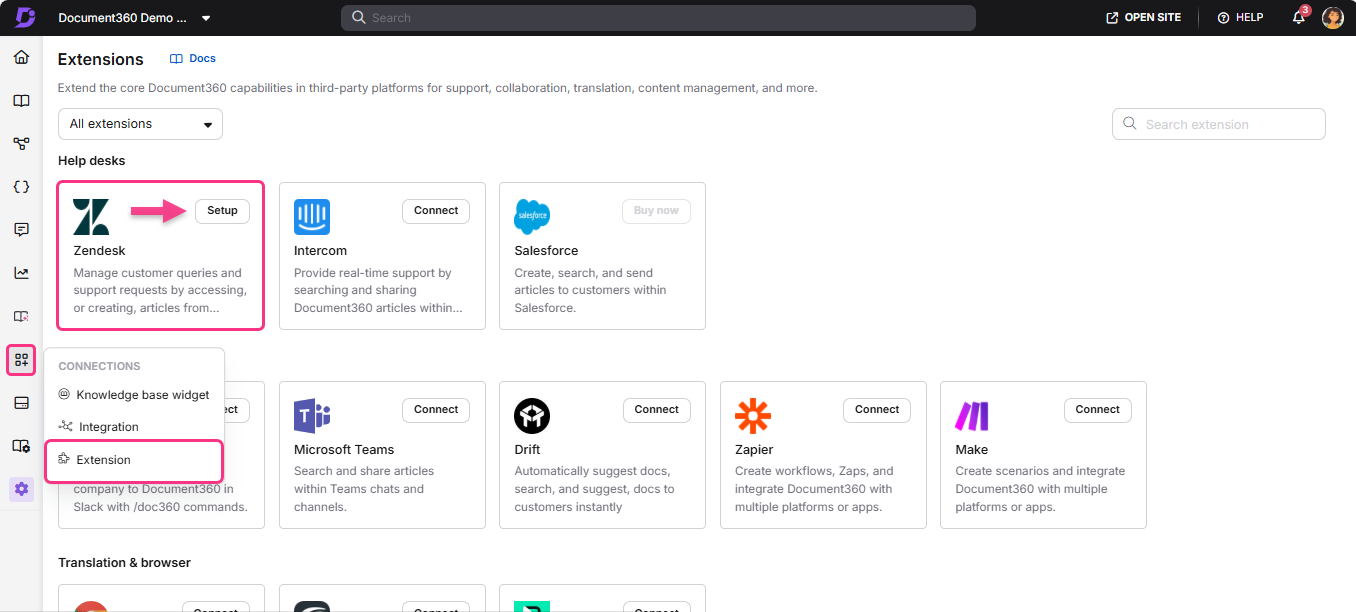
Navigiere in der linken Navigationsleiste im Knowledge Base-Portal zu Connections () > Erweiterungen.
Im Help desks klicken Sie Zendesk.
Klicken Sie auf Einrichten.
In der Option API-Token generieren klicken Sie auf Generieren. Klicken Sie auf Token aktualisieren , um das Token neu zu generieren.
Der Dialog "Erweiterungstoken generieren " erscheint.
Klicke Ja.
Der Dialog "Mit Zendesk verbindenZendesk" erscheint, in dem dein Token angezeigt wird.
Klicken Sie auf das Copy ()-Symbol, um das Token zu kopieren.
Klicken Sie auf Schließen.
Gehe zur Zendesk und fülle das Titelfeld aus.
Im Token-Feld fügen Sie das kopierte API-Token aus Document360 ein.
Fügen Sie Ihre bevorzugten Einschränkungseinstellungen hinzu. Standardmäßig ist diese Option deaktiviert.
Klicken Sie auf Installieren.
Zendesk Suche in Document360 konfigurieren
Befolgen Sie diese Schritte, um Zendesk in Document360 zu konfigurieren:
Zugriff Zendesk in Document360
Zendesk über das Knowledge Base-Portal einzurichten, folgen Sie den folgenden Schritten:
Navigiere in der linken Navigationsleiste im Knowledge Base-Portal zu Connections () > Erweiterungen.
Im Bereich Helpdesk klicken Sie Zendesk.
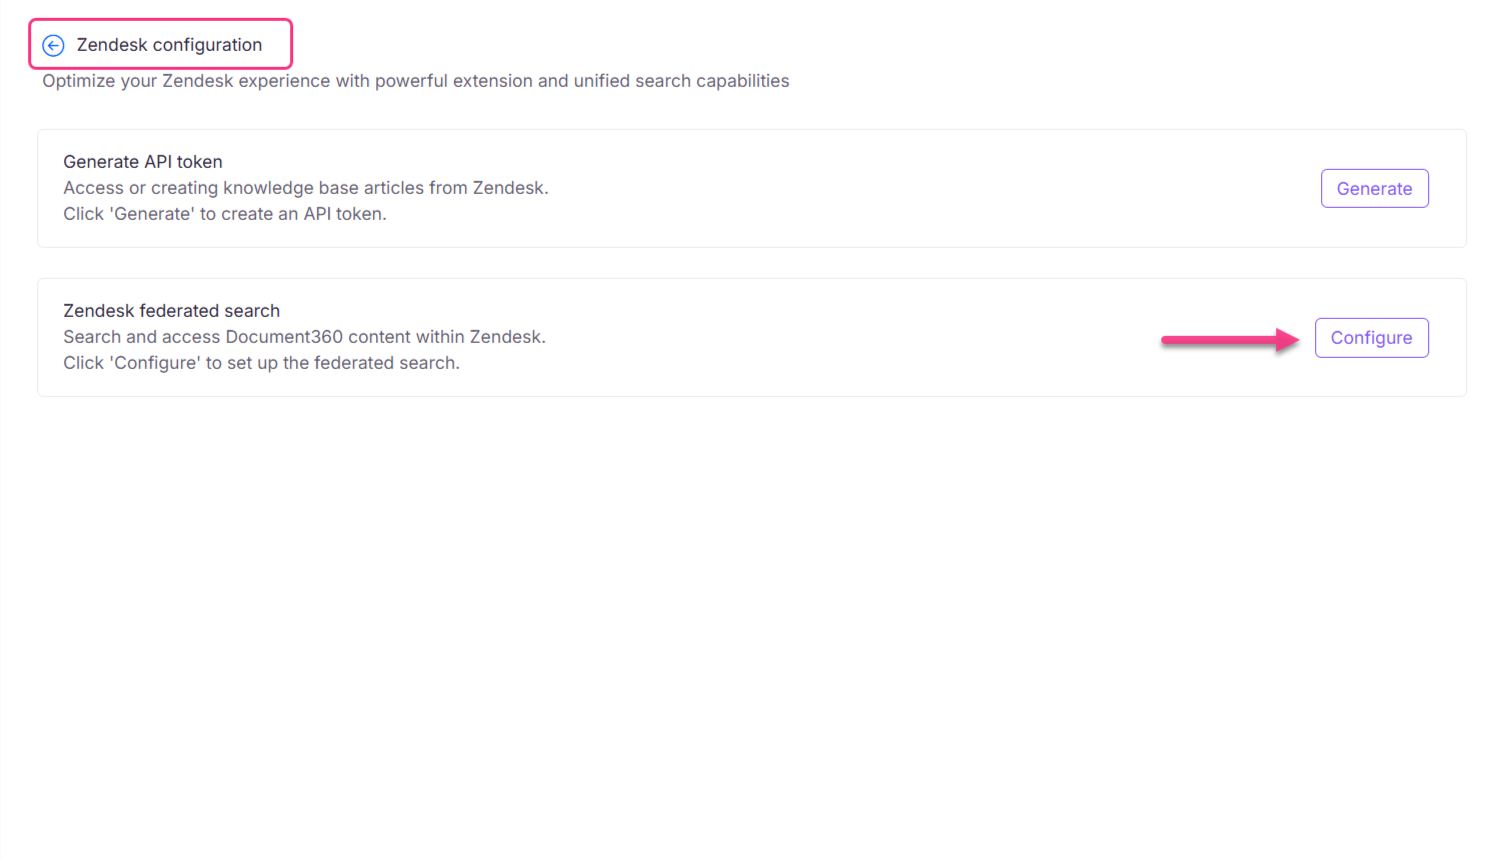
Klicken Sie auf Einrichten, um die Zendesk-Konfigurationsseite zu öffnen.Zendesk
Auf der Zendesk klicken Sie in der Zendesk-Federated-Sucheinstellung auf Konfigurieren.Zendesk
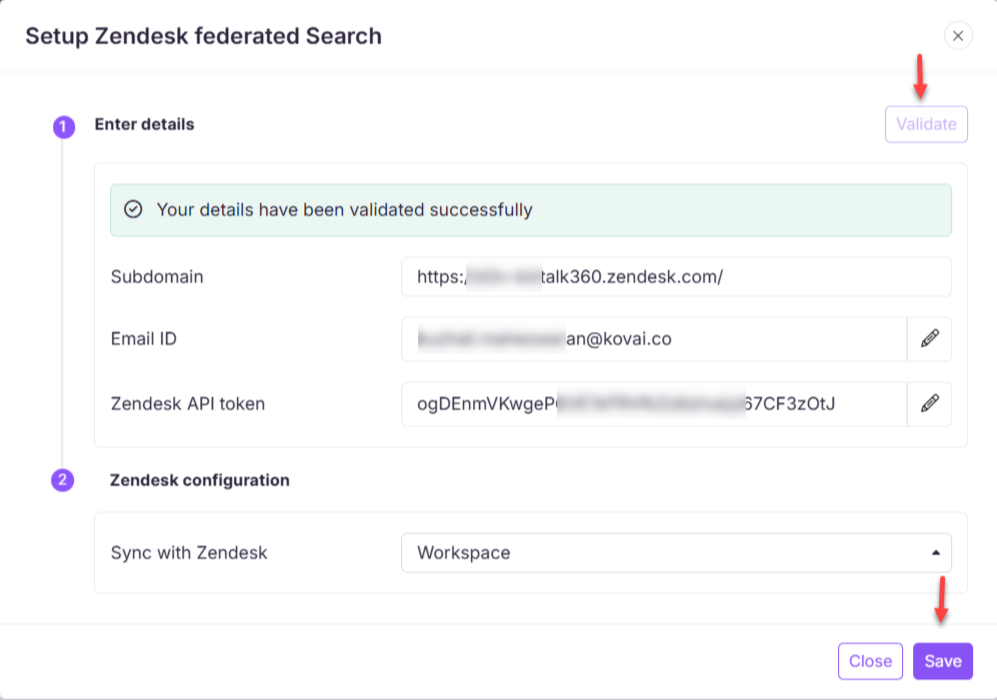
Der federierte Suchdialog Setup Zendesk erscheint.
Geben Sie folgende Details auf der Zendesk-Plattform an:
Unterdomäne:
Kopiere die Subdomain von deiner Zendesk .
Beispiel: Für die URLhttps://kovaico3776.zendesk.com/admin/apps-integrations/apis/zendesk-api/settings/tokens/ist die Subdomainhttps://kovaico3776.zendesk.com.E-Mail-ID:
Gehe zur Zendesk-Übersichtsseite, klicke auf Einstellungen (), und wähle Zu Admin-Zentrum gehen.Zendesk
In der linken Navigationsleiste gehen Sie zu Kanälen und klicken Sie auf E-Mail , um die E-Mail-Konfigurationen anzuzeigen.
Im Bereich Support-Adressen finden Sie die Admin-E-Mail-Adresse Ihres Zendesk .
Zendesk API Token:
Klicken Sie auf der Zendesk-Übersichtsseite auf Einstellungen () und wählen Sie "Zu Admin-Zentrum gehen".Zendesk
In der linken Navigationsleiste gehen Sie zu Apps und Integrationen > Zendesk API.
Klicken Sie auf API-Token hinzufügen und kopieren Sie das generierte Token.
Klicken Sie auf Validieren , um die von Ihnen eingegebenen Angaben zu bestätigen.
Im Dropdown-Menü "Synchronisieren mit Zendesk " wählen Sie den gewünschten Arbeitsbereich und die Sprache in Ihrem Document360-Projekt aus.
Sobald die Konfiguration abgeschlossen ist, klicke auf Speichern.
Sie können jetzt Ihre Document360-Artikel als externe Quelle innerhalb der Zendesk suchen und darauf zugreifen.
HINWEIS
Um eine nahtlose Synchronisation zu gewährleisten, müssen die Sprachcodes zwischen der Zendesk-Ticketing-Plattform und Document360 übereinstimmen.
Aktivierung von KI-Funktionen für Zendesk über das Knowledge Base-Portal
Die Aktivierung der KI-Assistenzsuche für die Zendesk ermöglicht es Agenten, KI-gestützte Antworten nahtlos aus Ihrer Wissensdatenbank abzurufen, ohne die Zendesk zu verlassen, was die Effizienz und Reaktionsgenauigkeit verbessert. Um KI-Assistenzsuche einzurichten,
Navigiere in der linken Navigationsleiste im Knowledge Base-Portal zu Connections () > Erweiterungen.
Im Bereich Helpdesk klicken Sie Zendesk.
Klicken Sie auf Einrichten, um die Zendesk-Konfigurationsseite zu öffnen.Zendesk
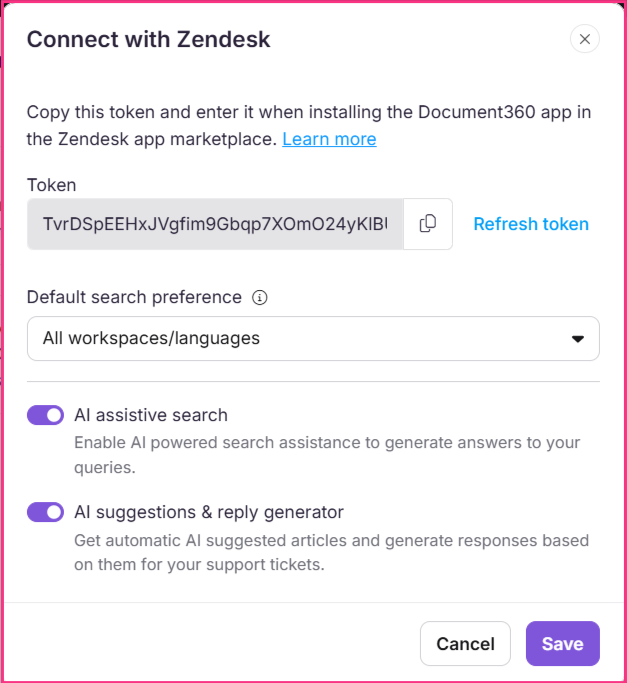
Klicken Sie in der Einstellung API-Token generieren auf Ändern. Der Dialog "Mit Zendesk verbinden" erscheint.
Gib das generierte Token im Zendesk ein.
Wählen Sie im Feld Standard-Sucheinstellungen die Option aus, Suchergebnisse in Zendesks Document360-App abzurufen. Die Optionen sind:
Standard-Arbeitsbereich/-sprache – Erlaube Eddy-KI, Ergebnisse aus dem Standardarbeitsbereich oder der Standardsprache abzurufen.
Alle Arbeitsbereiche/Sprachen – erlauben Sie Eddy AI, Ergebnisse aus allen Arbeitsbereichen und Sprachen in der Wissensdatenbank abzurufen.
Aktivieren Sie den KI-Schalter für die unterstützende Suche , um Zugriff auf die KI-Suche in der Zendesk zu ermöglichen.
HINWEIS
Um die KI-Assistenzsuche für Zendesk zu aktivieren, müssen Sie die unterstützende Suche nach KB-Widget und Erweiterungen in den Wissensdatenbank-Einstellungen aktivieren. Wenn Sie die Einstellungen nicht aktiviert haben, bleibt der KI-Schalter für die unterstützende Suche deaktiviert.
Aktivieren Sie den KI-Vorschläge- und Antwortgenerator-Schalter , um automatische KI-vorgeschlagene Artikel zu erhalten und basierend auf diesen Antworten für Ihre Support-Tickets zu generieren.
Das macht die Bearbeitung von Support-Tickets auf der Zendesk einfach und bequem.
Wenn du fertig bist, klicke auf Speichern.
Zendesk: Finden Sie vorgeschlagene Artikel und Entwurf von Antworten mit Eddy AI
Sobald Sie sicherstellen, dass die KI-Suche für die Zendesk aktiviert ist,
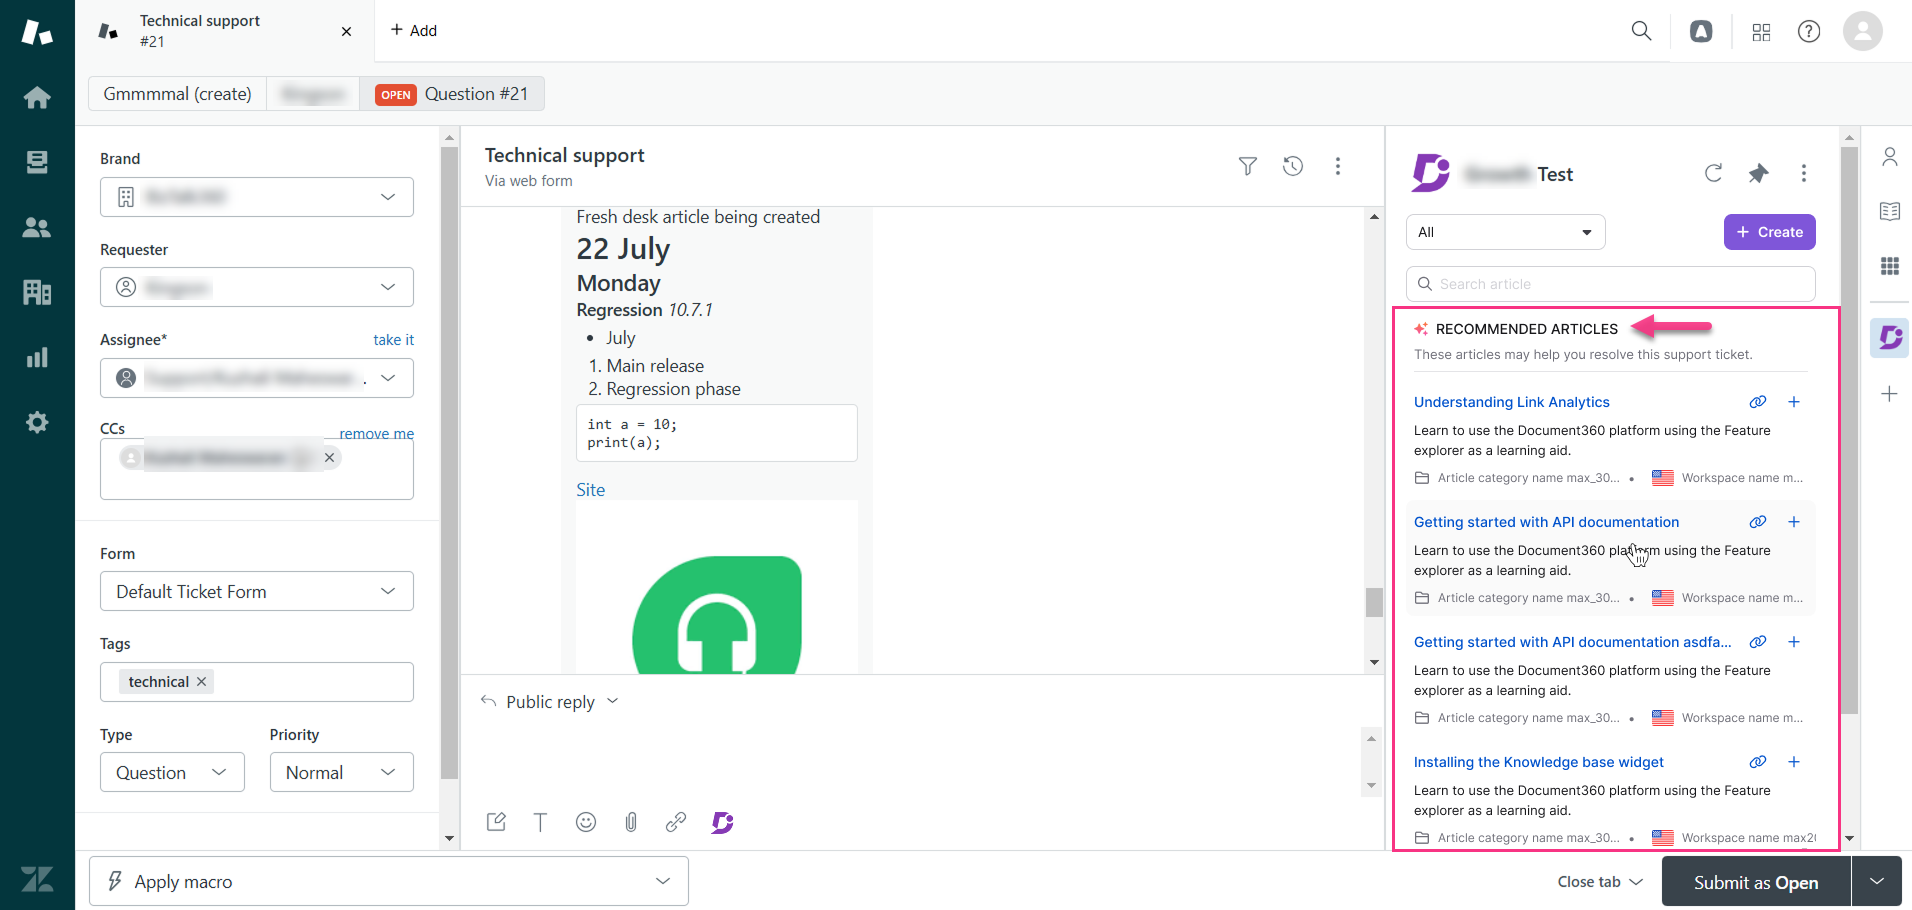
Klicken Sie auf das angepinnte Document360-Symbol in der Zendesk oder öffnen Sie es in der Seitenleiste.
Die von Eddy AI empfohlenen Artikel laden im Document360-Panel.
Im Document360-Panel wird Sie beim Tippen in die Suchleiste aufgefordert, die Wissensdatenbank mit Eddy AI zu durchsuchen.
HINWEIS
Eddy AI Assistive Search Analytics wird für diese Erweiterung erfasst. Sie können die Analysen filtern, indem Sie die Zendesk-Erweiterung als Quelle auswählen.
Die Arbeitsflächen- und Sprachfilter erscheinen basierend auf der Inhaltszugriffskonfiguration, die in der Erweiterung gesetzt ist.
Klicken Sie auf das Document360-Symbol im Antwortfenster, um die beiden untenstehenden Optionen zu finden:
Eine Antwort mit Eddy AI entwerfen
Beim Klicken auf diese Option wird basierend auf dem Kontext des Support-Tickets eine vorgeschlagene Antwort generiert.
Wenn die Eddy-KI sich bei der Antwort unsicher ist, gibt sie eine Rückfalllösung.
Die entworfene Antwort wird in derselben Sprache wie das Gespräch generiert.
HINWEIS
Wenn KI-Benachrichtigungen zur Kreditnutzung in den Benachrichtigungskarten-Einstellungen aktiviert sind, erhalten Sie E-Mail-Benachrichtigungen, wenn der Kreditverbrauch 80 %, 90 % und 100 % erreicht.
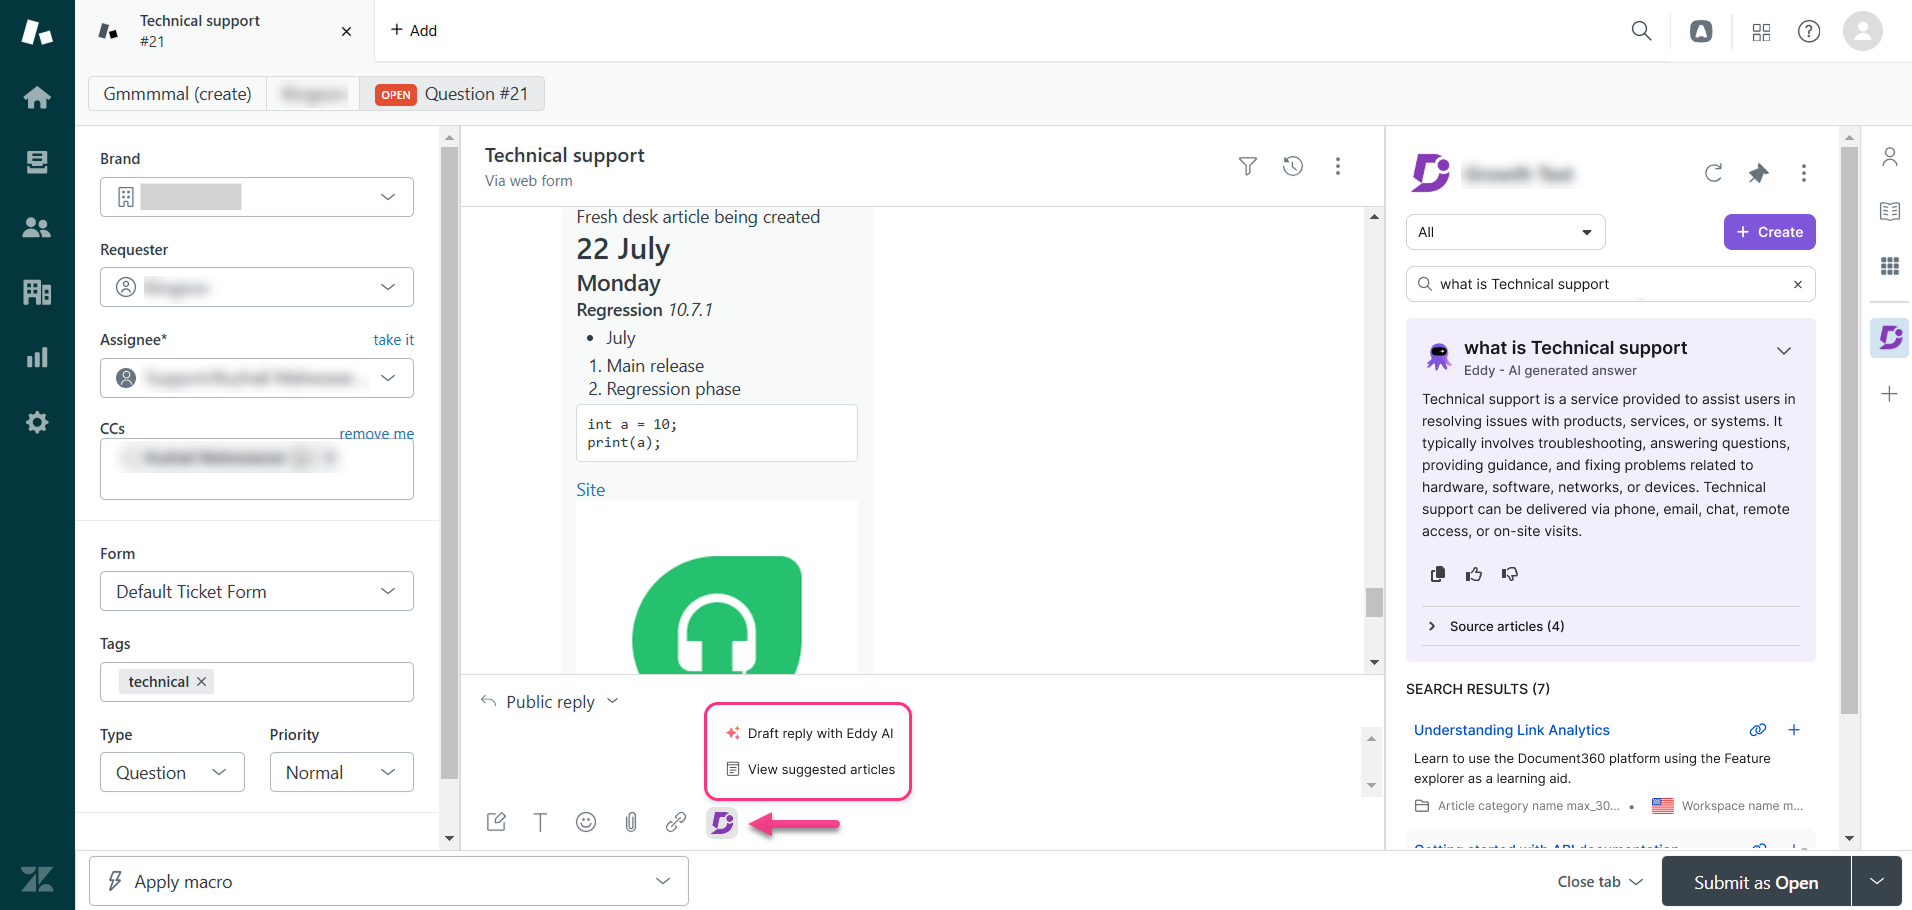
Ansicht vorgeschlagener Artikel
Beim Klicken auf diese Option öffnet sich der Dialogfeld Knowledge Base mit von Eddy AI empfohlenen Artikeln.
Maximal 5 Artikel werden angezeigt.
Beim Abrufen von Artikeln berücksichtigt Eddy AI den angewandten Arbeitsbereichsfilter.
Zu Ihrer Information
Bei der Nutzung der Messaging-API von Zendesk erscheinen neue Nachrichten möglicherweise nicht sofort. Um alles reibungslos am Laufen zu halten, verarbeitet Zendesk manchmal Nachrichten in Chargen, besonders bei viel Aktivität. Diese Verzögerung betrifft nur die Messaging-API. Tickets von Formularen, Live-Chat oder anderen Methoden verzögern sich nicht. Deshalb können Funktionen wie Entwurf und vorgeschlagene Artikel anzeigen etwas länger dauern, um mit den neuesten Daten aktualisiert zu werden.
Suche und Teilen von Artikeln zu Ticketantworten
Während Sie auf Support-Tickets antworten, können Sie die installierte Document360-App nutzen, um Kunden zu beantworten. Sie können direkt auf die Knowledge Base in der Zendesk zugreifen.
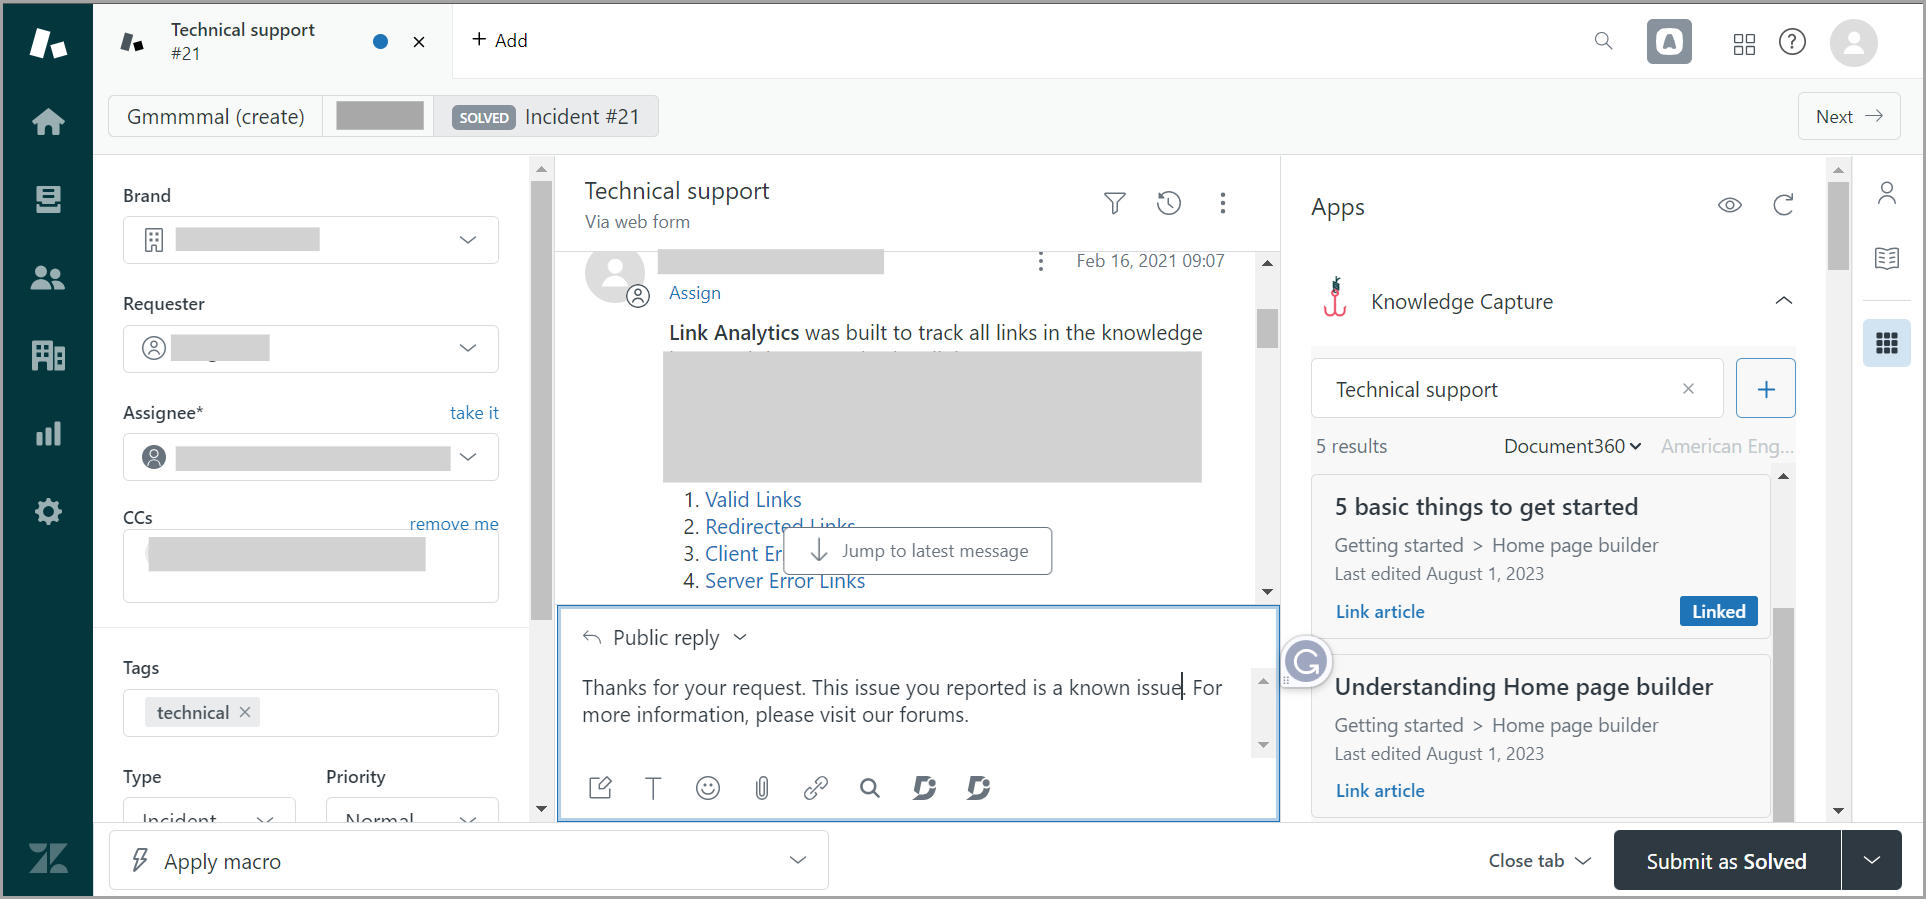
Die installierte App ist auf der rechten Seite des offenen Ticket-Antwortfelds verfügbar.
Klicken Sie auf die Document360 .
Während der Document360 geladen wird, sucht Zendesk automatisch nach Artikeln basierend auf dem Titel des Support-Tickets.
Sie können immer den Suchbegriff im Feld eingeben, und die relevanten Artikel werden unten aufgeführt.
Klicken Sie auf den Link des Artikels , den Sie anhängen möchten.
Sie können den Artikel auch vorschauen, indem Sie auf Vorschau klicken.
Im Vorschaumodus gibt es drei Optionen:
Öffne Document360 – Der Artikel öffnet sich in einem neuen Tab.
Linkartikel – Fügen Sie den Artikellink in Ihre Antwortnachricht ein.
Inhalt einfügen – Füge den gesamten Inhalt des Artikels zu deiner Antwortnachricht hinzu.
Dadurch ist es für Agenten einfacher und sofortiger möglich, auf Kunden zu reagieren, da sie nicht zwischen den Paper360- und Zendesk navigieren müssen.
Sobald du einen Artikel mit einer Antwort verknüpft hast, ist das Label Verlinkt nicht mehr in der Artikelliste. Das hilft Ihnen, den Artikel zu identifizieren, der bereits mit dem Gespräch verlinkt ist.
Erstellung eines Artikels auf der Knowledge Base von Zendesk
Auf der Zendesk können Sie Artikel in Ihrer Wissensdatenbank erstellen, ohne zusätzliche Teamkonten benötigen zu müssen.
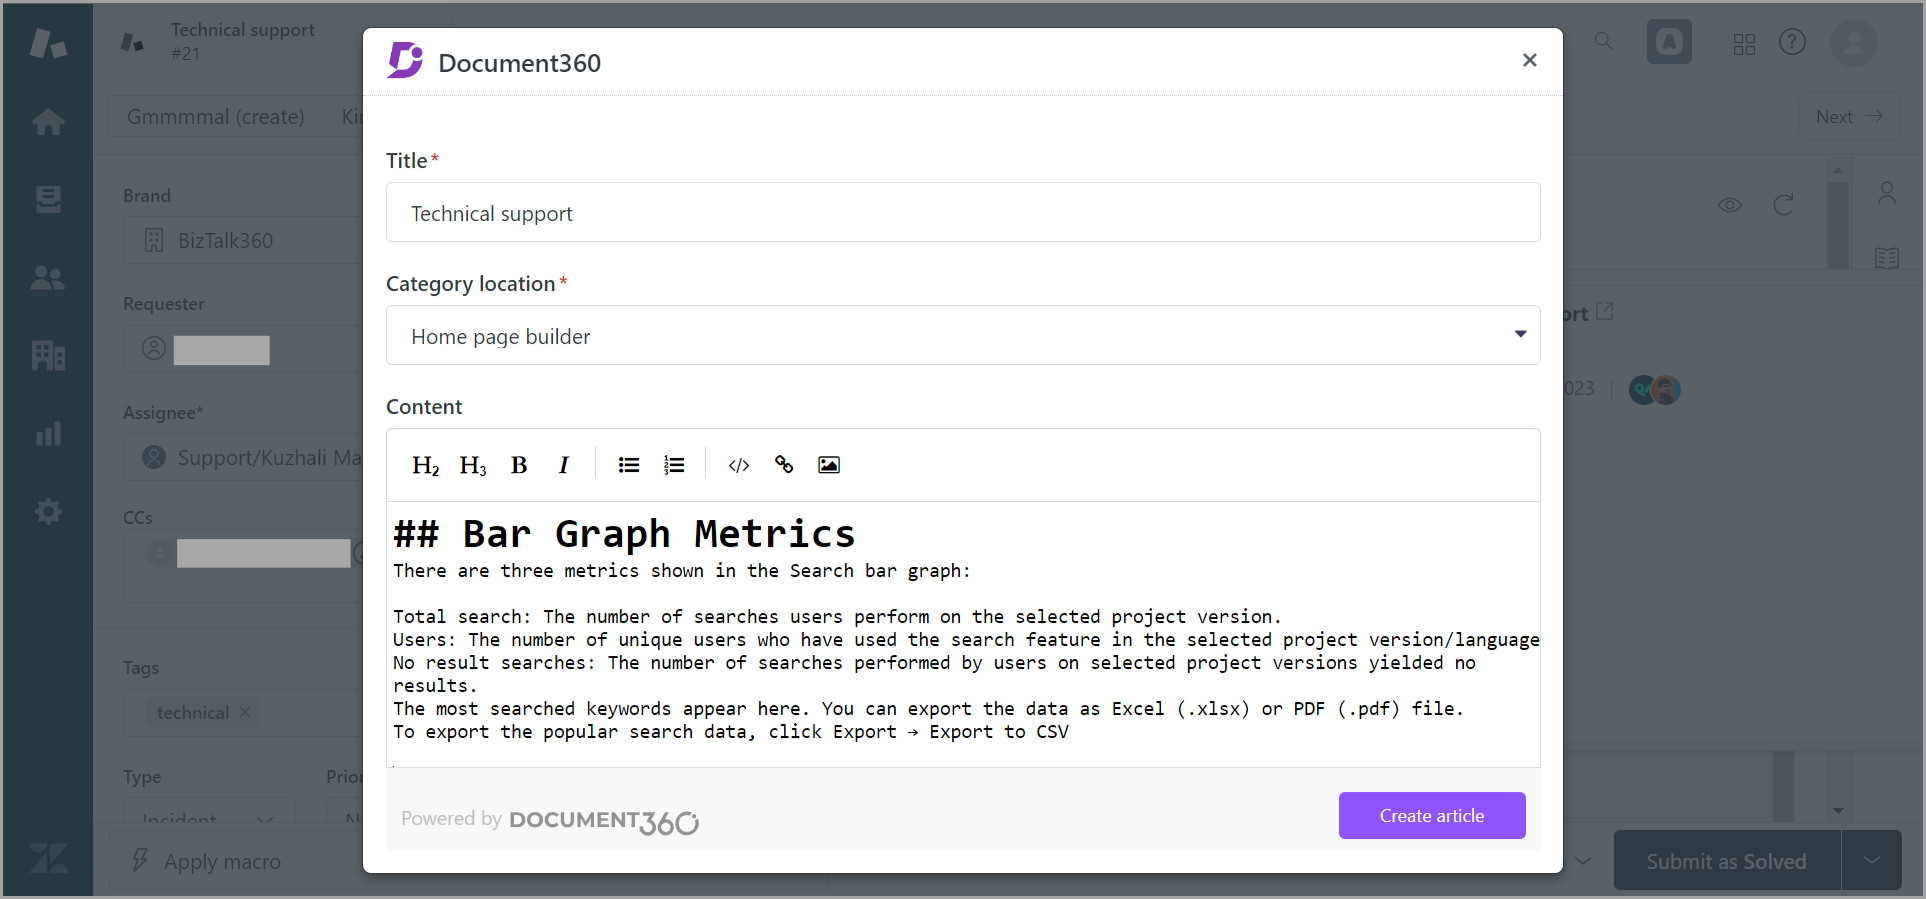
Klicken Sie im Document360 auf Artikel erstellen oder auf das Plus-(+)-Symbol.
Fügen Sie den Titel des Artikels hinzu und wählen Sie die Kategorie oder Unterkategorie aus, in die Sie den neuen Artikel einordnen möchten.
HINWEIS
Du kannst Root-Level-Kategorien und Unterkategorien in deiner Zendesk aus erstellen.
Sie können den Inhalt Ihres Artikels im Markdown-Editor verfassen.
Im Artikel-Body-Editor stehen grundlegende Textformatierungen wie Überschriften (H2 und H3), Fett, Kursiv, Geordnete Liste und Ungeordnete Liste sowie Einfügungsoptionen wie Codeblock, Hyperlink und Bild zur Verfügung.
Wenn Sie fertig sind, klicken Sie auf Erstellen.
Der Artikel wird im Entwurfszustand erstellt, sodass Ihre Redakteure ihn vor der Veröffentlichung in der Knowledge Base überprüfen und verbessern können.
Document360 Schnellstart im Antwortfeld
Klicken Sie in den Chat-Steuerungen unten auf das Document360 , das durch das D-Symbol dargestellt wird, um das Modul zu öffnen.
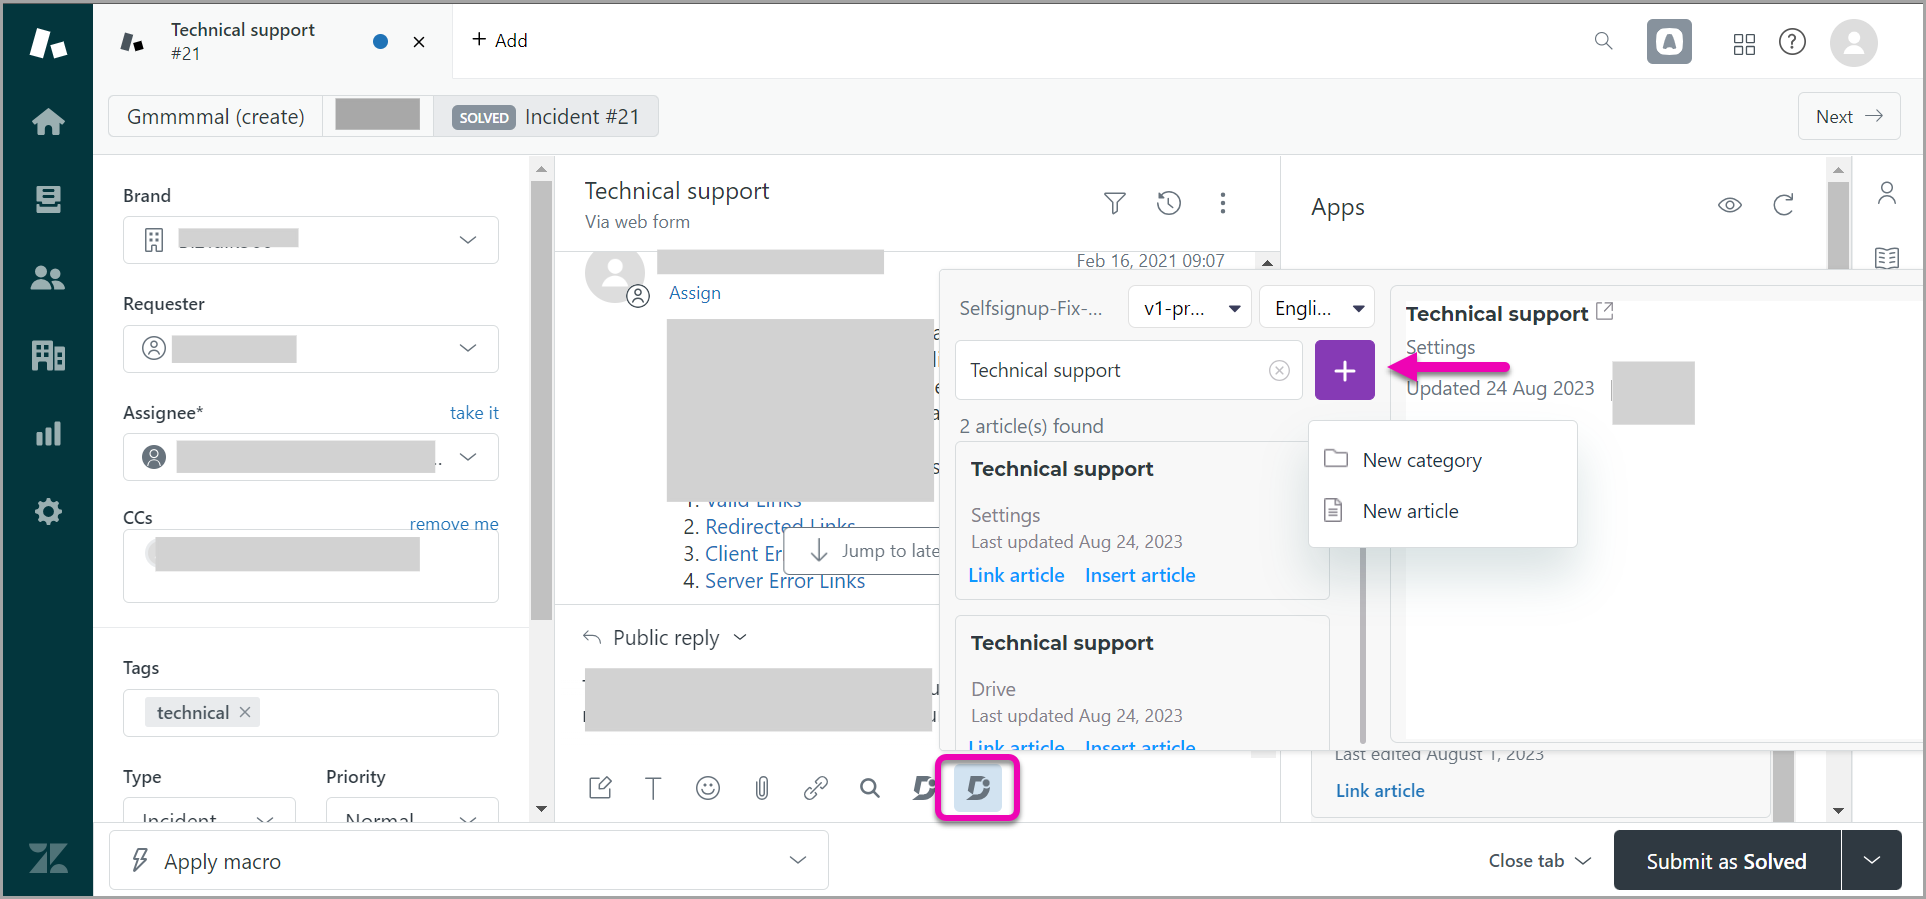
Wählen Sie den Document360 und die Sprache aus, auf die Sie sich beziehen möchten.
Die relevanten Artikel erscheinen, wenn Sie die Suche verwenden.
Aus diesem Panel können Sie entweder:
Linkartikel – um die Document360-URL des Artikels zu teilen.
(oder)
Artikel einfügen – um den Inhalt des Artikels in die Antwort einzufügenKlicken Sie auf das Plus-(+)-Symbol, um Artikel für Ihre Document360-Wissensdatenbank von Zendesk zu erstellen.
Document360 aus Zendesk
Um eine konfigurierte Document360-Anwendung von Zendesk zu deinstallieren, folgen Sie den folgenden Schritten:
Auf der Zendesk navigieren Sie vom linken Navigationsfenster aus zu Apps und Integrationen > Apps > Zendesk Support-Apps.
Die Seite "Meine Apps " erscheint.
Du findest die Liste der derzeit installierten Apps.
Fahre mit der Maus über die Document360 .
Klicken Sie auf das Einstellungssymbol () und klicken Sie dann auf Deinstallieren.
Im Prompt-Panel " App deinstallieren " klicke auf App deinstallieren.
Fehlerbehebung
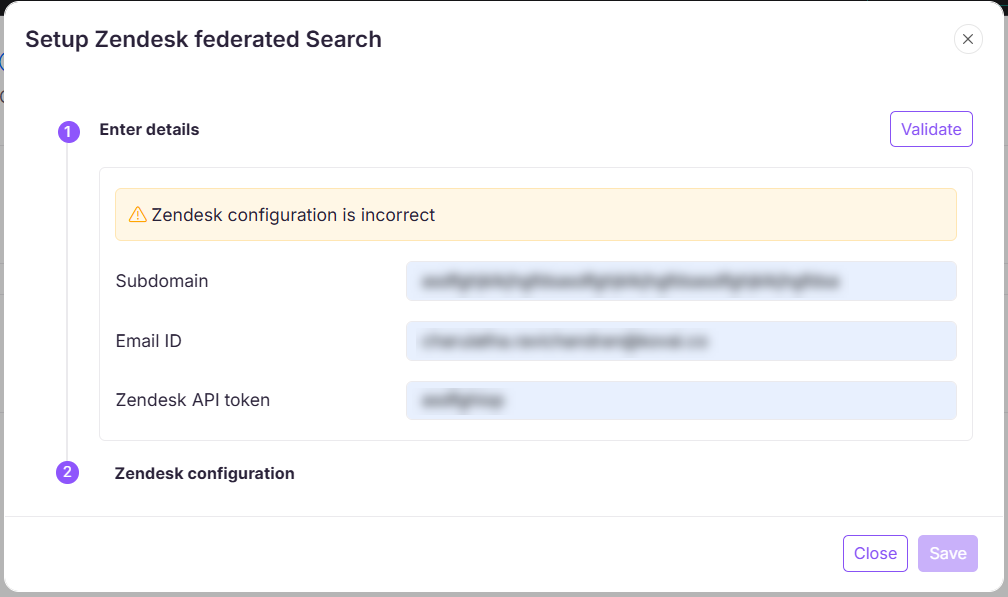
Zendesk federierte Suchkonfigurationsfehler
Fehler: Zendesk ist falsch
Dieser Fehler kann auftreten, wenn Ihr Zendesk keine föderierte Suche unterstützt oder wenn das API-Token, die E-Mail-ID oder die Subdomain falsch konfiguriert ist. Die föderierte Zendesk ist nur für Zendesk Enterprise und Enterprise Plus verfügbar. Stellen Sie sicher, dass Ihr Tarif diese Funktion unterstützt, indem Sie Ihr Zendesk überprüfen.
Schritte zur Lösung:
Verifizieren Sie Ihren Zendesk: Wenn Sie kein Enterprise-Nutzer sind, aktualisieren Sie Ihr Zendesk, um auf federierte Suche zugreifen zu können.
Überprüfen Sie die Konfigurationsdetails: Stellen Sie sicher, dass API-Token, E-Mail-ID und Subdomain gemäß der Zendesk korrekt eingegeben sind.
Wenn Sie ein Enterprise-Tarif-Nutzer sind und weiterhin Probleme haben, wenden Sie sich bitte an den Document360-Support mit folgenden Details:
Ein Screenshot der Subdomain, der sowohl in Document360 als auch Zendesk hinzugefügt wurde.
Die HAR-Datei protokolliert, um Anfragedetails zu erfassen. Lesen Sie den Artikel über das Erstellen einer HAR-Datei für weitere Informationen.
Häufig gestellte Fragen
Kann ich mehrere Artikel gleichzeitig von Zendesk zu Document360 verschieben?
Du kannst Artikel von Document360 übertragen, aber der Prozess besteht darin, Artikel einzeln einzeln zu pushen.