Dans Document360, l’état du flux de travail suit où se trouve un article dans votre cycle de documentation, du premier brouillon aux étapes de revue jusqu’à la publication. Vous pouvez mettre à jour le statut du flux de travail, attribuer des évaluateurs, fixer des dates d’échéance et ajouter des commentaires depuis deux endroits : directement dans l’éditeur d’articles pour les mises à jour d’un seul article, ou depuis la page Tâches pour des mises à jour massives sur plusieurs articles.
Les statuts du workflow sont définis et configurés dans le concepteur de workflow. Les modifications que vous effectuez au niveau de l’article, comme l’ajout ou la suppression de personnes assignées, ne s’appliquent qu’à cet article et n’affectent pas la configuration du designer de workflow.
Petite référence
| Action | Où le faire | Le meilleur pour |
|---|---|---|
| Mettre à jour le statut du flux de travail d’un seul article | Éditeur d’articles > Bouton d’état du flux de travail | Mises à jour ciblées et contextuelles pendant le montage |
| Assignez un évaluateur, ajoutez une date d’échéance ou laissez un commentaire | Éditeur d’article > Dialogue de workflow | Communiquer le contexte ou les instructions à un évaluateur |
| Consultez l’historique complet du parcours de travail d’un article | Éditeur d’article > icône Historique dans le statut du flux de travail | Audits, transferts et résolution des différends concernant le statut |
| Mettre à jour le statut du flux de travail pour plusieurs articles | Page Tâches > sélectionner les articles > Mettre à jour le statut du flux de travail | Planification de sprint, préparation des sorties, remises de lots |
| Suivez quels évaluateurs ont terminé leur évaluation | Page des tâches > Assignée à la colonne | Suivi de l’évaluation des progrès au sein de l’équipe |
| Marquez votre avis comme terminé | Page des tâches > Plus d’options ou d’actions à cocher | Signaler la fin de l’examen individuel sans changer de statut |
Méthodes de gestion
Dans l’éditeur d’article
Mettez à jour le statut, assignez des relecteurs, fixez des dates d’échéance, ajoutez des commentaires et consultez l’historique du flux de travail d’un seul article pendant que vous l’éditez activement.
En savoir plus →Depuis la page Tâches
Mettez à jour le statut du flux de travail pour plusieurs articles simultanément, examinez le contenu assigné et marquez votre évaluation comme complète sans ouvrir chaque article individuellement.
En savoir plus →Gérer le statut du flux de travail dans l’éditeur d’articles
Le bouton d’état du flux de travail en haut à droite de l’éditeur de documentation est le contrôle central pour toutes les actions du flux de travail sur un seul article.
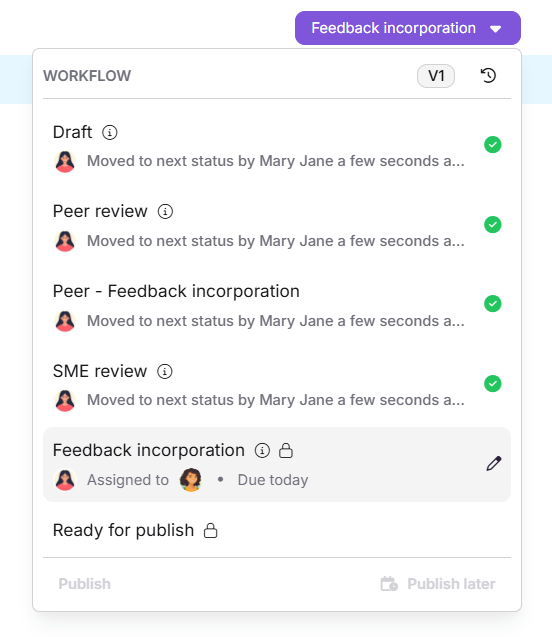
Le bouton affiche les indicateurs suivants :
| Indicateur | Description |
|---|---|
| Information () | Cliquez pour voir la description de l’état actuel du flux de travail. |
| Serrure () | Indique que le statut du workflow est en mode lecture seule. Les articles en lecture seule ne peuvent pas être publiés directement. |
| Coche verte () | Indique un statut complété. Si l’article est publié, tous les statuts affichent une coche verte. |
| Version de l’article | Affiche la version actuelle de l’article. |
| Histoire () | Cliquez pour consulter l’historique complet du flux de travail de l’article. |
Mise à jour de l’état du flux de travail
- Cliquez sur le bouton d’état du flux de travail en haut à droite de l’éditeur. La boîte de dialogue Workflow s’ouvre.
- Sélectionnez le statut suivant du flux de travail dans la liste, par exemple, Revue par les pairs ou revue PME.
- Éventuellement, assignez des évaluateurs, fixez une date limite ou ajoutez un commentaire en utilisant les options ci-dessous.
- Cliquez sur Publier pour publier directement l’article, ou cliquez sur Définir le statut pour enregistrer le statut et fermer la boîte de dialogue.
.png)
Après mise à jour, l’étiquette de bouton affiche le statut actuellement attribué.
Assigner les évaluateurs
Dans le champ Assigné , sélectionnez ou recherchez un ou plusieurs utilisateurs ou groupes d’utilisateurs.
Lorsqu’un article passe à un nouveau statut de workflow, toute assignation automatique aux utilisateurs configurée pour ce statut dans le concepteur de workflow est automatiquement appliquée. Les assignés du statut précédent ne sont pas conservés à moins qu’ils ne soient également configurés dans le nouveau statut.
Vous verrez également deux options supplémentaires :
- Définir les assignés automatiques : Applique les utilisateurs prédéfinis ou groupes d’utilisateurs configurés dans le concepteur de workflow pour cet état. Tous les assignés existants sont remplacés.
- Laisser non assigné : Supprime tous les assignés pour cet état de workflow.
Si aucun assigné par défaut n’est configuré pour le statut du workflow sélectionné, Leave unassigned est sélectionné par défaut. Les modifications apportées aux assignés au niveau de l’article ne s’appliquent qu’à cet article et ne modifient pas la configuration du concepteur de workflow.
Lorsque plusieurs assignés sont ajoutés, leurs avatars de profil sont affichés dans l’indicateur de statut du workflow. Si plus de trois utilisateurs sont assignés, l’interface affiche le prénom suivi d’un indicateur +X . Chaque assigné reçoit une notification par e-mail.
Pour retirer un assigné, cliquez sur l’icône Fermer () à côté de son nom.
Fixez une date d’échéance
Dans le champ Date d’accouchement , sélectionnez une date dans le sélecteur de calendrier. Pour supprimer une date d’échéance, cliquez sur l’icône x à côté de la date sélectionnée. Cliquez sur Définir le statut si c’est la première fois que vous le configurez, ou sur Mettre à jour pour modifier un statut existant.
Ajouter un commentaire
Dans le champ Commentaire , saisissez des notes ou des instructions pour le prochain assigné. Les commentaires peuvent atteindre jusqu’à 250 caractères. Utilisez-les @ pour taguer et notifier les membres de l’équipe.
Voir l’historique des flux de travail
Cliquez sur l’icône Historique () dans le bouton d’état du flux de travail. La boîte de dialogue Historique des flux de travail affiche tous les statuts que l’article a traversés, avec les destinataires et les dates d’échéance pour chaque étape. Chaque version d’une révision d’article possède son propre historique de flux de travail.

Gérer l’état du flux de travail depuis la page Tâches
La page Tâches vous offre une vue dédiée de tous les articles qui vous sont assignés tout au long du cycle de documentation. À partir de là, vous pouvez mettre à jour les statuts du flux de travail pour un ou plusieurs articles à la fois et marquer votre évaluation comme terminée sans ouvrir chaque article individuellement.
Accéder à la page Tâches
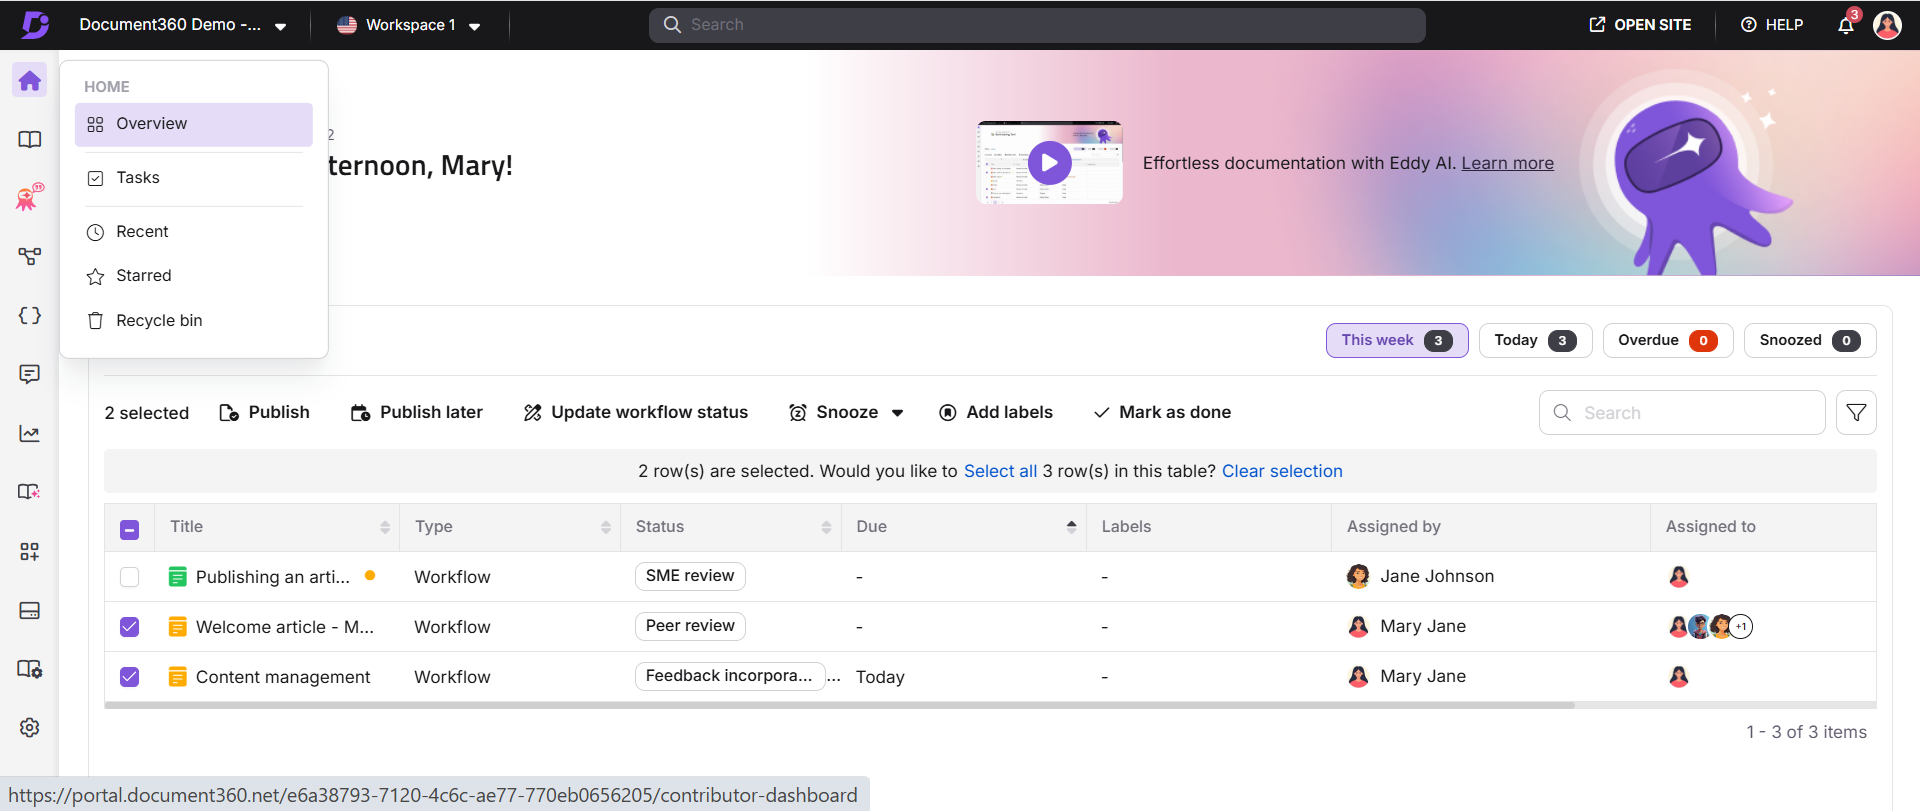
Naviguez jusqu’à l’icône Accueil () dans la barre de navigation de gauche et cliquez sur Tâches. Sinon, depuis la page Aperçu, trouvez la carte Tâches et cliquez sur Voir tout.
Par défaut, la page Tâches affiche les articles qui vous sont assignés. La page comporte trois onglets :
- Flux de travail : Les articles attribuent un statut de workflow.
- Retour : Retour des lecteurs qui vous est attribué par le gestionnaire des retours.
- Rappel de critique : Les articles marqués comme Nécessite une revue pour lesquels vous contribuez.
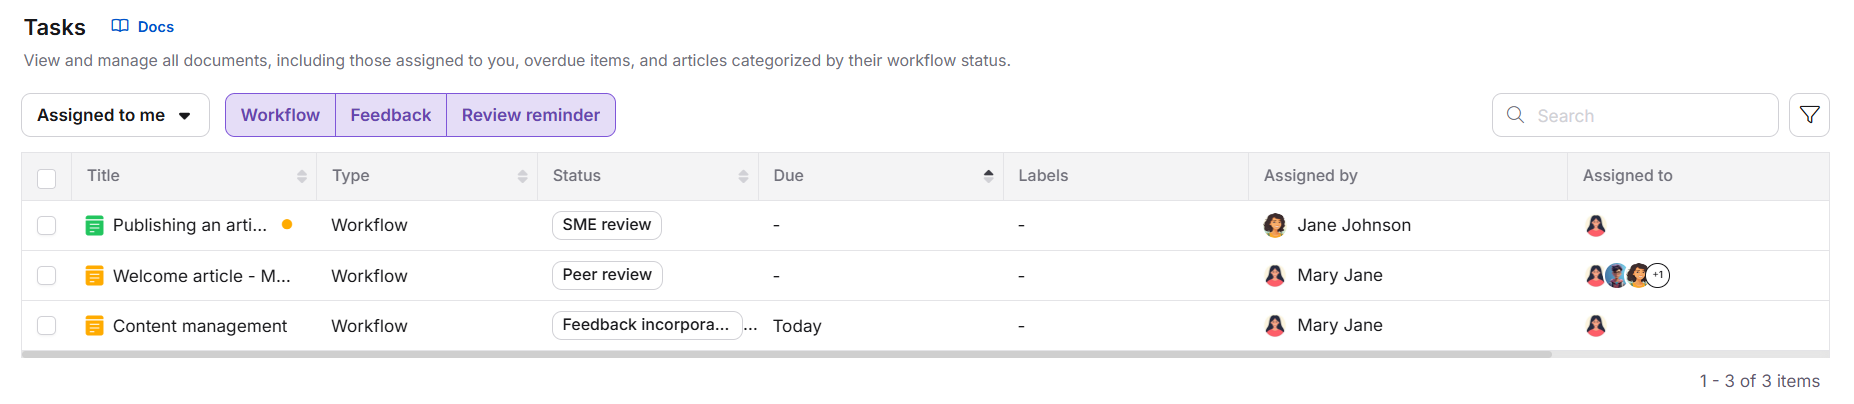
Sélectionnez l’onglet Flux de travail pour vous concentrer sur les articles de votre cycle de révision.
Mise à jour de l’état du flux de travail
- Sur la page Tâches , sélectionnez un ou plusieurs articles de la liste.
- Cliquez sur Mettre à jour l’état du workflow () depuis la barre d’outils en haut.
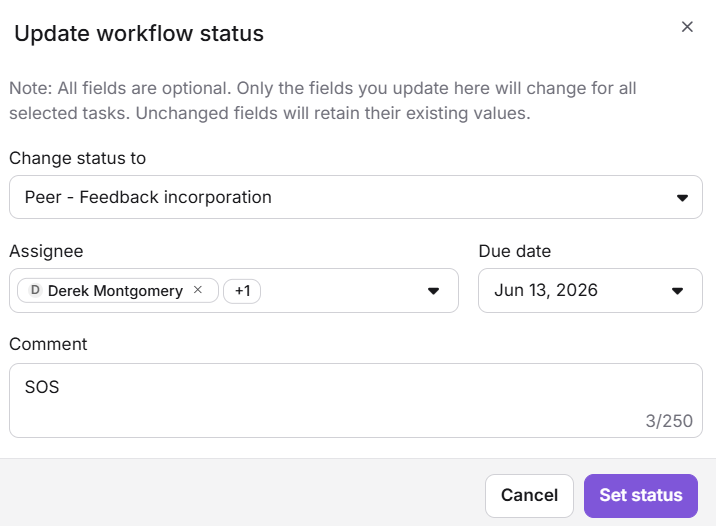
- Utilisez le menu déroulant de Modifier l’état pour sélectionner le nouveau statut de workflow. Lorsque plusieurs articles sont déplacés vers un nouvel état de workflow, toute assignation automatique aux utilisateurs configurée dans le concepteur de workflow pour ce statut est automatiquement appliquée à tous les articles sélectionnés.
- Dans le menu déroulant Assigné , sélectionnez un ou plusieurs utilisateurs ou groupes d’utilisateurs. Vous pouvez également cliquer sur Définir les assignés automatiques pour appliquer les assignés par défaut configurés, ou sélectionner Laisser non assigné pour supprimer tous les assignés.
- Dans le champ Date d’échéance , sélectionnez une date limite depuis le sélecteur de calendrier (optionnel).
- Dans le champ Commentaires , ajoutez un message si besoin. Utilisez-le
@pour taguer des coéquipiers (optionnel). - Cliquez sur définir le statut.
Vous pouvez également mettre à jour le statut du flux de travail depuis la page Tous les articles () en sélectionnant un ou plusieurs articles et en cliquant sur Mettre à jour le statut du flux de travail depuis la barre d’outils.
Révisez les articles assignés et notez comme complétés
Lorsqu’un article vous est assigné, il apparaît sur votre page Tâches. Après avoir terminé votre revue, marquez l’article comme terminé pour signaler que votre partie est terminée.
Pour marquer un seul article comme terminé :
- Sur la page Tâches , localisez l’article assigné.
- Cliquez sur l’icône Plus d’options () à la fin de la ligne de l’article.
- Sélectionnez « Marquer comme terminé ».
Pour indiquer plusieurs articles comme terminés en même temps :
- Sélectionnez un ou plusieurs articles à l’aide des cases à cocher.
- Cliquez sur Marquer comme fait depuis la barre d’actions en haut.
.png)
Une fois marqué comme terminé, l’article est retiré de votre liste Tâches et une coche verte apparaît à côté de votre nom dans la colonne Assigné à . Les autres évaluateurs affectés au même article peuvent cliquer sur la colonne Assigné pour voir qui a terminé leur évaluation.
Marquer un article comme terminé signifie seulement que votre revue individuelle est terminée. Cela ne change pas automatiquement le statut du flux de travail. Le statut du flux de travail doit être mis à jour manuellement une fois la phase complète de révision terminée.
Meilleures pratiques
- Mettez à jour le statut dès que vous avez terminé votre pièce. Laisser un article dans un état plus long que nécessaire retarde tout le cycle de relecture.
- Ajoutez toujours un commentaire lors de la transmission. Dites au prochain critique ce que vous avez changé, ce qui nécessite encore de l’attention ou sur quoi vous concentrer. Cela réduit les allers-retours et accélère les avis.
- Fixez des dates limites pour chaque devoir. Les dates d’échéance rendent le cycle d’évaluation prévisible et créent une visibilité pour les chefs de projet qui suivent l’avancement.
- Utilisez la page Tâches pour les transferts en lot. Lorsqu’un sprint ou un cycle de publication se termine, sélectionnez tous les articles pertinents et déplacez-les au statut suivant en une seule action au lieu d’ouvrir chaque article individuellement.
- Marque comme terminé dès que tu as fini. Marquer votre évaluation comme terminée immédiatement donne aux responsables de projet une visibilité précise sur qui a accompli sa part.
- Utilisez l’historique du flux de travail pour résoudre les litiges. S’il y a la moindre question sur ce qu’il est advenu d’un article, qui l’a examiné ou quand, l’historique du flux de travail est le document faisant autorité.
FAQ
Puis-je publier un article directement depuis le bouton de statut du flux de travail sans passer par toutes les étapes ?
Oui. Cliquez sur le bouton État du flux de travail et cliquez sur Publier directement sans sélectionner les statuts intermédiaires. Notez que si l’article est en mode lecture seule, il ne peut pas être publié directement.
Le fait de marquer un article comme terminé change-t-il son statut de flux de travail ?
Non. Marquer un article comme terminé signifie seulement que votre revue individuelle est terminée. Le statut du flux de travail doit être mis à jour manuellement pour passer l’article à l’étape suivante.
Est-ce que la mise à jour des assignés au niveau de l’article modifie la configuration du concepteur de workflow ?
Non. Les modifications apportées au niveau de l’article, en ajoutant ou en retirant des assignés, ne s’appliquent qu’à cet article. La configuration du concepteur de workflow reste inchangée.
Comment puis-je m’assurer que les bénéficiaires reçoivent des notifications par email lorsque j’attribue un statut de workflow ?
Les assignés doivent avoir activés les événements de notification de flux de travail pertinents. Naviguez dans Paramètres () > Notifications > Notification et développez l’éditeur de documentation accordéon. Activez le statut du flux de travail de l’article mis à jour, la date d’échéance du flux de travail de l’article mise à jour, et l’assigné du flux de travail de l’article mis à jour.
Puis-je attribuer différents statuts de flux de travail à un article dans différentes langues au sein d’un espace de travail ?
Oui. Vous pouvez attribuer un statut de flux de travail différent à chaque version linguistique d’un article dans le même espace de travail.