You can customize each knowledge base widget to improve the user experience.
Editing a widget
Log in to the Knowledge base portal and select your desired project.
Navigate to Connections () > Knowledge base widget in the left navigation bar. You will see a list of existing widgets.
Hover over the desired widget and click the Edit () icon.
.png)
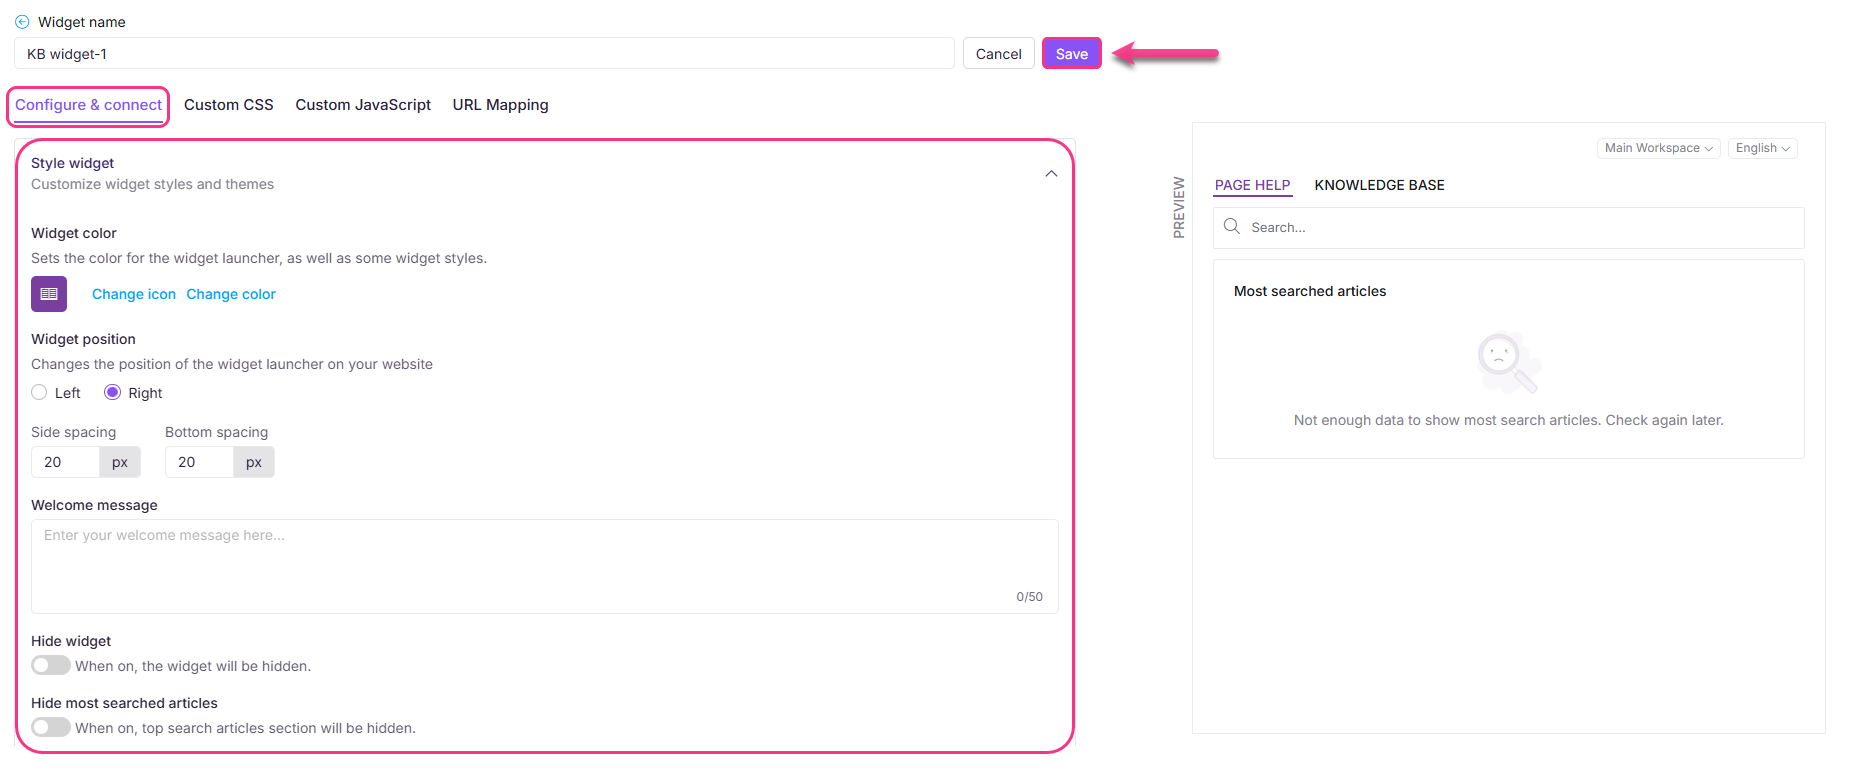
Styling the Widget
In the Configure & connect tab, expand the Style widget accordion.
The following widget customization options are available:
Widget color
You can choose a theme color for the widget, which also sets the icon color.
Click Change color to open the color palette.
Select a color using the picker, or enter a hex, RGB, or HSL code.
Widget icon
Similarly, under the widget color section, you can replace the icon with an image or an available icon.
Click the Change icon.
Choose from the Icon set tab or insert an image under Insert image:
From URL: Paste the image link and click Insert.
From device: Click Upload an image and select a file.
Click Default to revert to the original icon.
Widget position
Control where the widget appears on your site:
Choose Left or Right.
Set the Side spacing and Bottom spacing values to position the widget.
Welcome message
Add a short message to greet readers before they interact with the widget. The message appears as a chat bubble above the widget icon and helps them notice the widget and access help content easily.
NOTE
The welcome message has a limit of 50 characters.
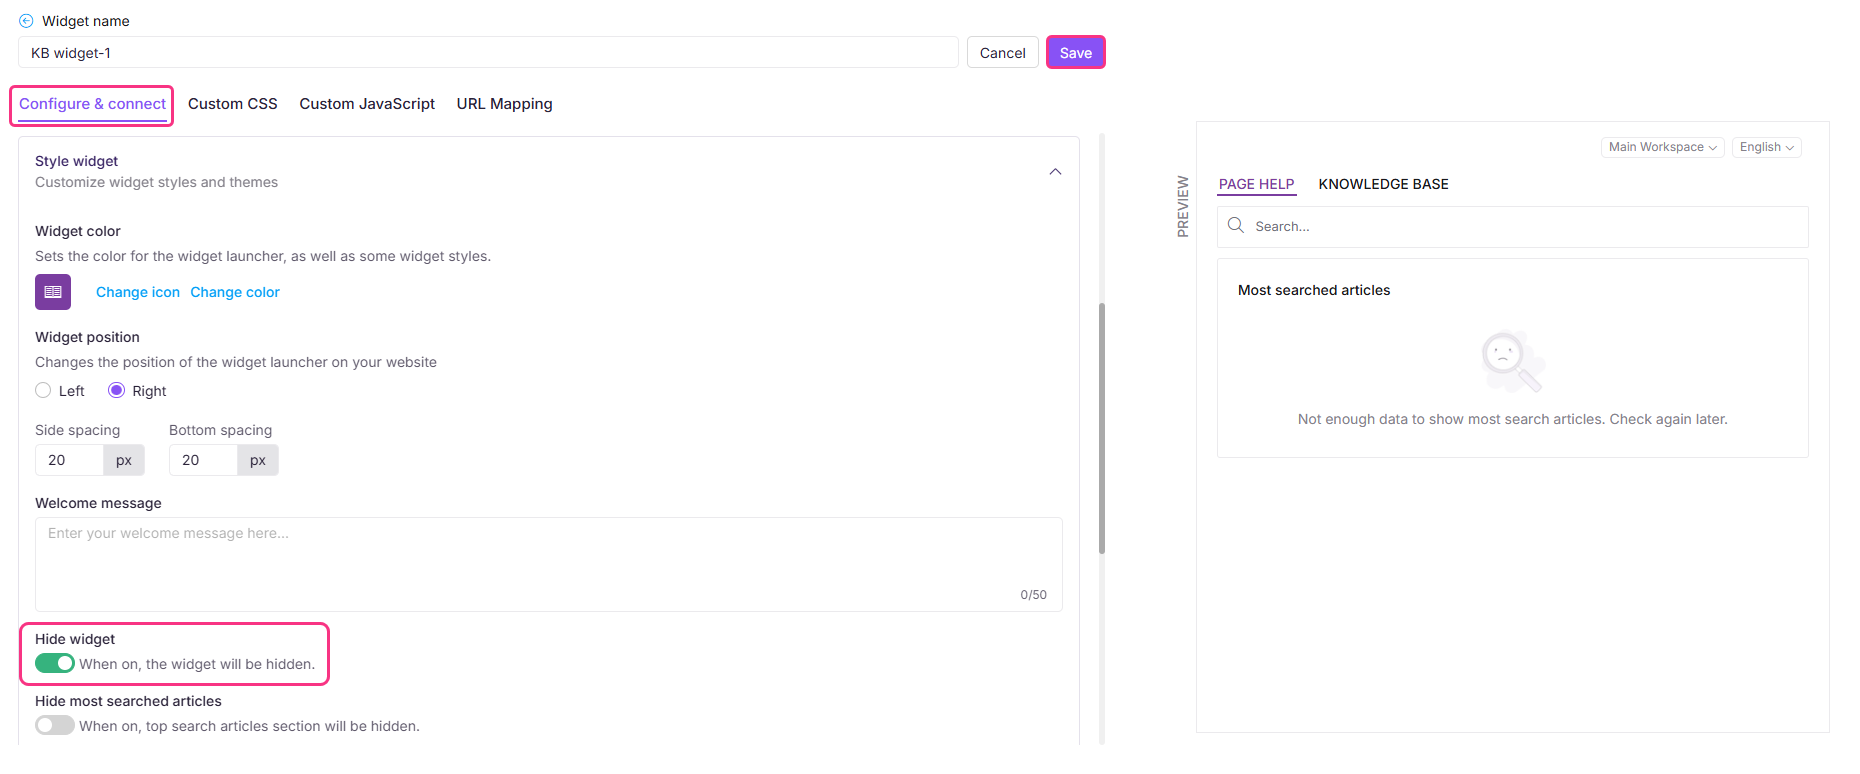
Hide widget
By default, the Hide widget toggle is turned off, so the Knowledge base widget remains visible on the site. To hide the widget, simply enable the Hide widget toggle.
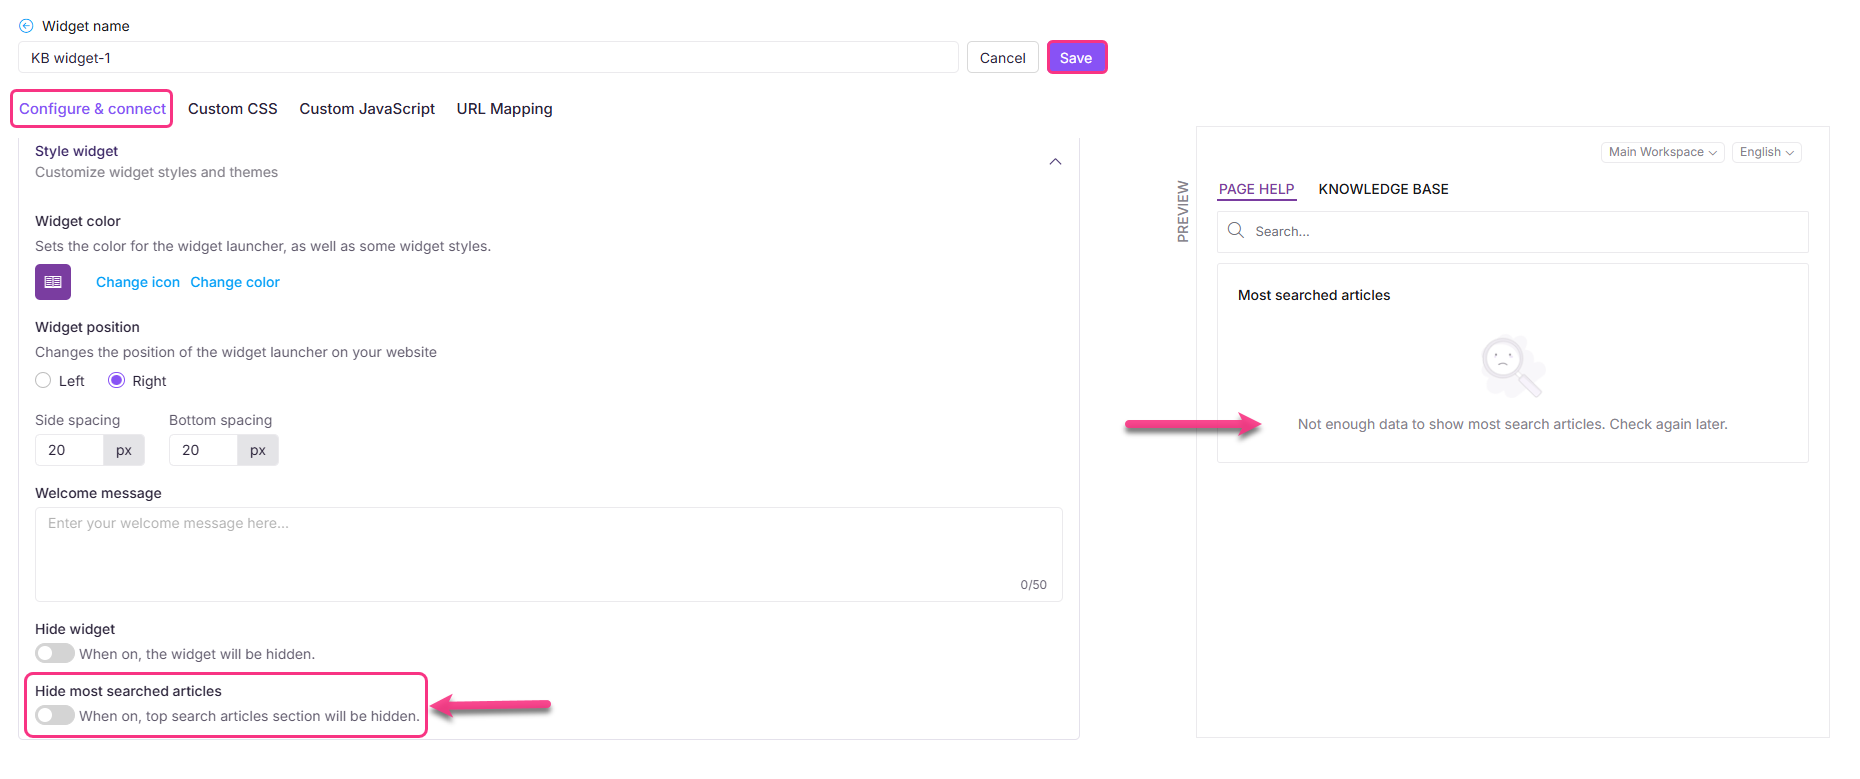
Hide most searched articles
Turn on the Hide most searched articles toggle to hide the top search articles.
NOTE
Enabling the Hide most searched articles toggle will disable URL mapping for the widget.
Once your changes are made, click Save next to the Widget name field.
NOTE
The autosave option is available for navigation between the Knowledge base widget tabs.
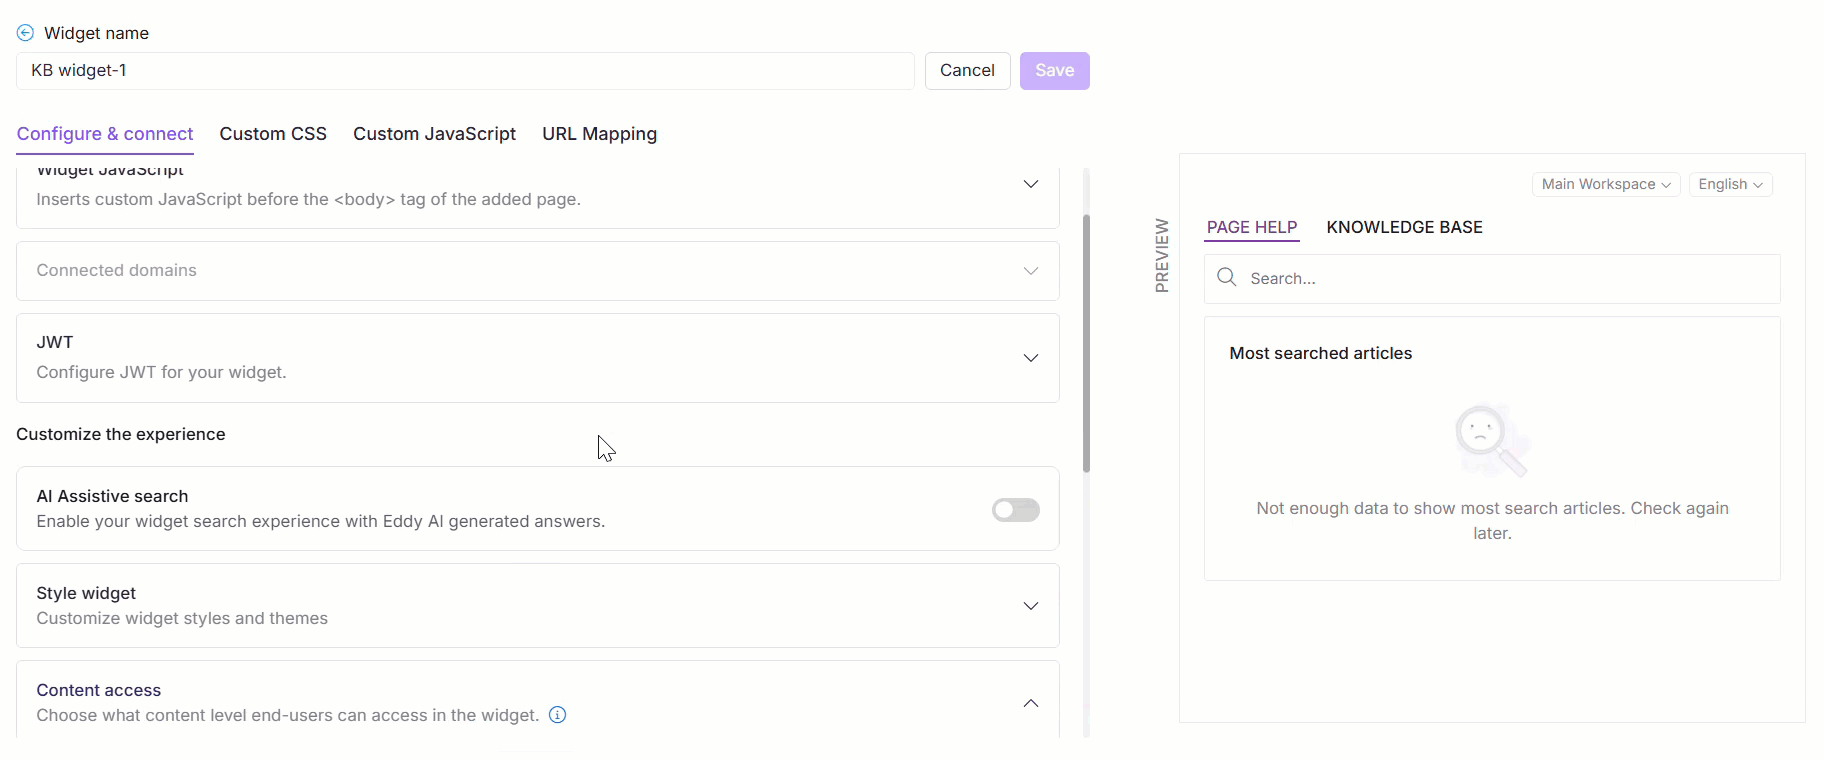
Content access for the knowledge base widget
You can configure content access in your knowledge base widget even when JWT is enabled for the widget. This gives you more flexibility in controlling what your end users can see.
To configure content access with JWT enabled:
Navigate to Connections () > Knowledge base widget in the left navigation bar.
Hover over the desired widget and click the Edit () icon.
In the Configure & connect tab, expand the Content access section.
The filter levels available are:
Project
Workspace
Category
Choose the desired workspaces, languages, and categories to display in the widget.
Click Done, then click Save to apply the changes.
Validating reader group content permissions
When a reader logs in, the system will validate whether their reader group permissions match the widget’s content access filters. Only the intersecting permissions between the widget-level settings and the reader group settings will be considered for validation.
This ensures that users see only the articles they are authorized for, in both widget-level and reader group permissions.
The same validation is applied when readers click internal links that target to any article or category links inside the widget. The widget checks the configured content access filters, workspace scope, and reader group permissions before loading the destination content. If the linked content falls outside the allowed scope, the widget displays a restricted access state instead of rendering the article.
CAUTION
Changes made to content access will directly impact your URL mapping.
If you modify the filter settings of the widget, the existing URL mapping may be removed, leading to broken links.
Example 1:
You have set the filter widget content at the Project level and configured a URL mapping that includes a list of articles from Category A in Workspace V1. If you update the filter settings to show only Categories B and C in the same workspace, the previous URL mapping becomes invalid—because the originally mapped articles from Category A are no longer available in the widget.You can only configure URL mappings using articles included in the current Filter widget content.
Example 2:
If the widget is filtered to display content only from Workspace V1, you cannot create a URL mapping for an article located in Workspace V2.
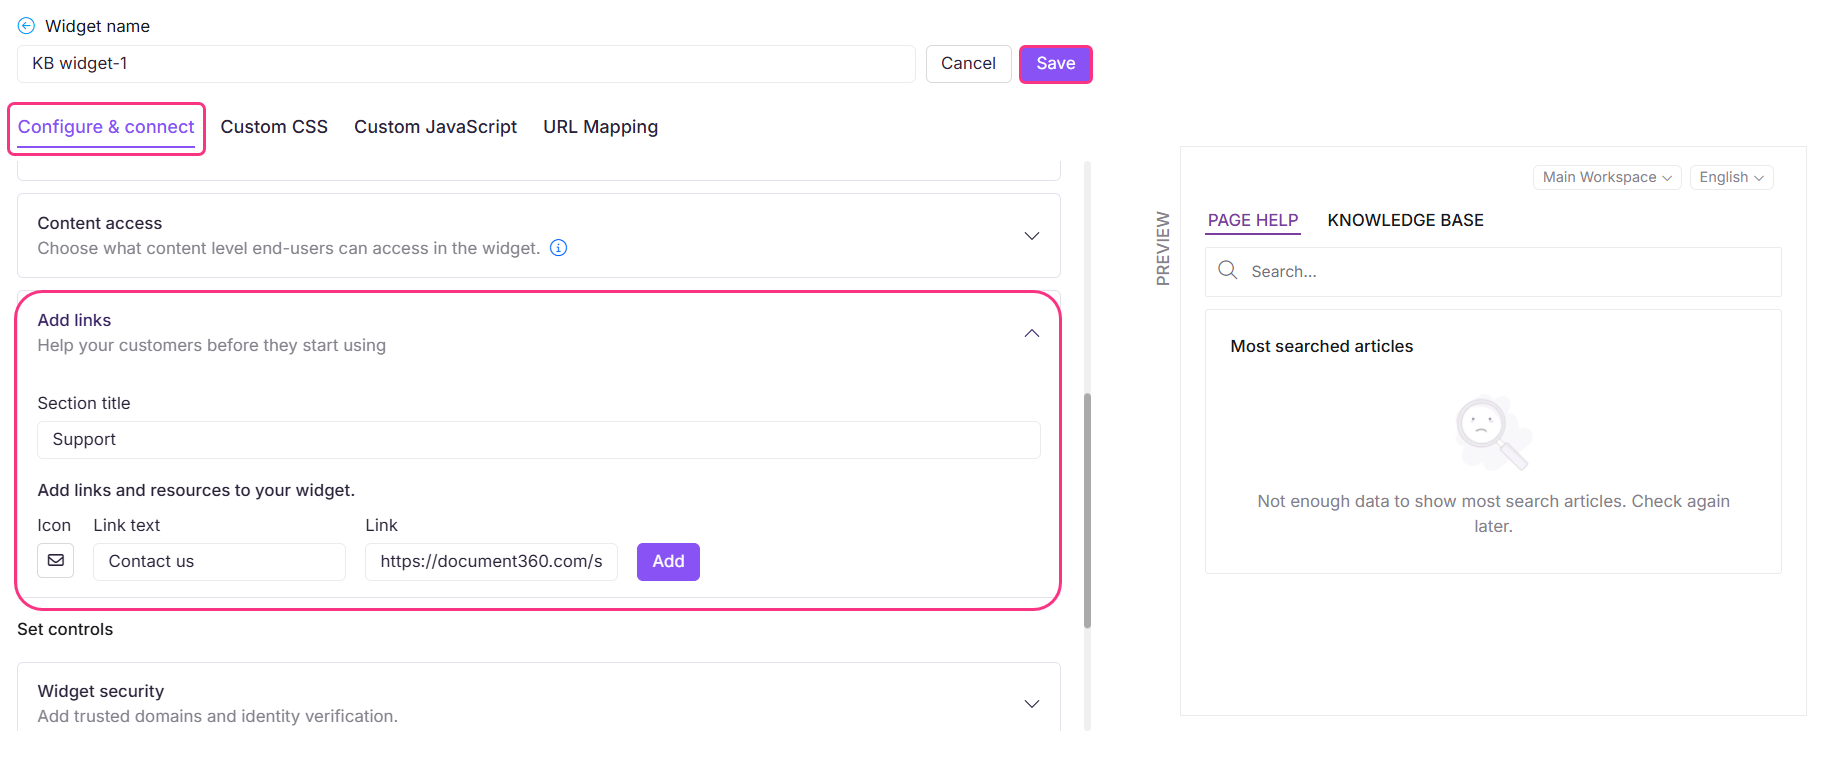
Adding custom links
You can add custom links to the Knowledge base widget. The links will appear in the order they were created. Use this option to direct end users to specific pages or resources. All links opened from the widget will always open in a new browser tab.
NOTE
Internal article and category links follow widget navigation rules based on workspace type, content access scope, and reader group permissions. See the FAQ section for details.
To add a custom link:
Navigate to Connections () > Knowledge base widget in the left navigation bar.
Hover over the desired widget and click the Edit () icon.
In the Configure & connect tab, expand the Add links accordion
In the Section title field, enter the desired title for that section. This will appear in the widget.
Under the Section title, for each link, choose the desired icon, link text (which will appear in the widget), and the destination link.
Example:
Icon:
Link text: Contact us
Link:
support@document360.com
NOTE
You can use a
mailto:in the link field. For example: mailto:<youremail@somedomain.com>Click Add, and the link will be added. Repeat the steps to add additional links.
To edit, click the Edit () icon. Click to save and to discard.
Click the Delete () icon next to the links to delete them.
Once done, click Save to save the changes.
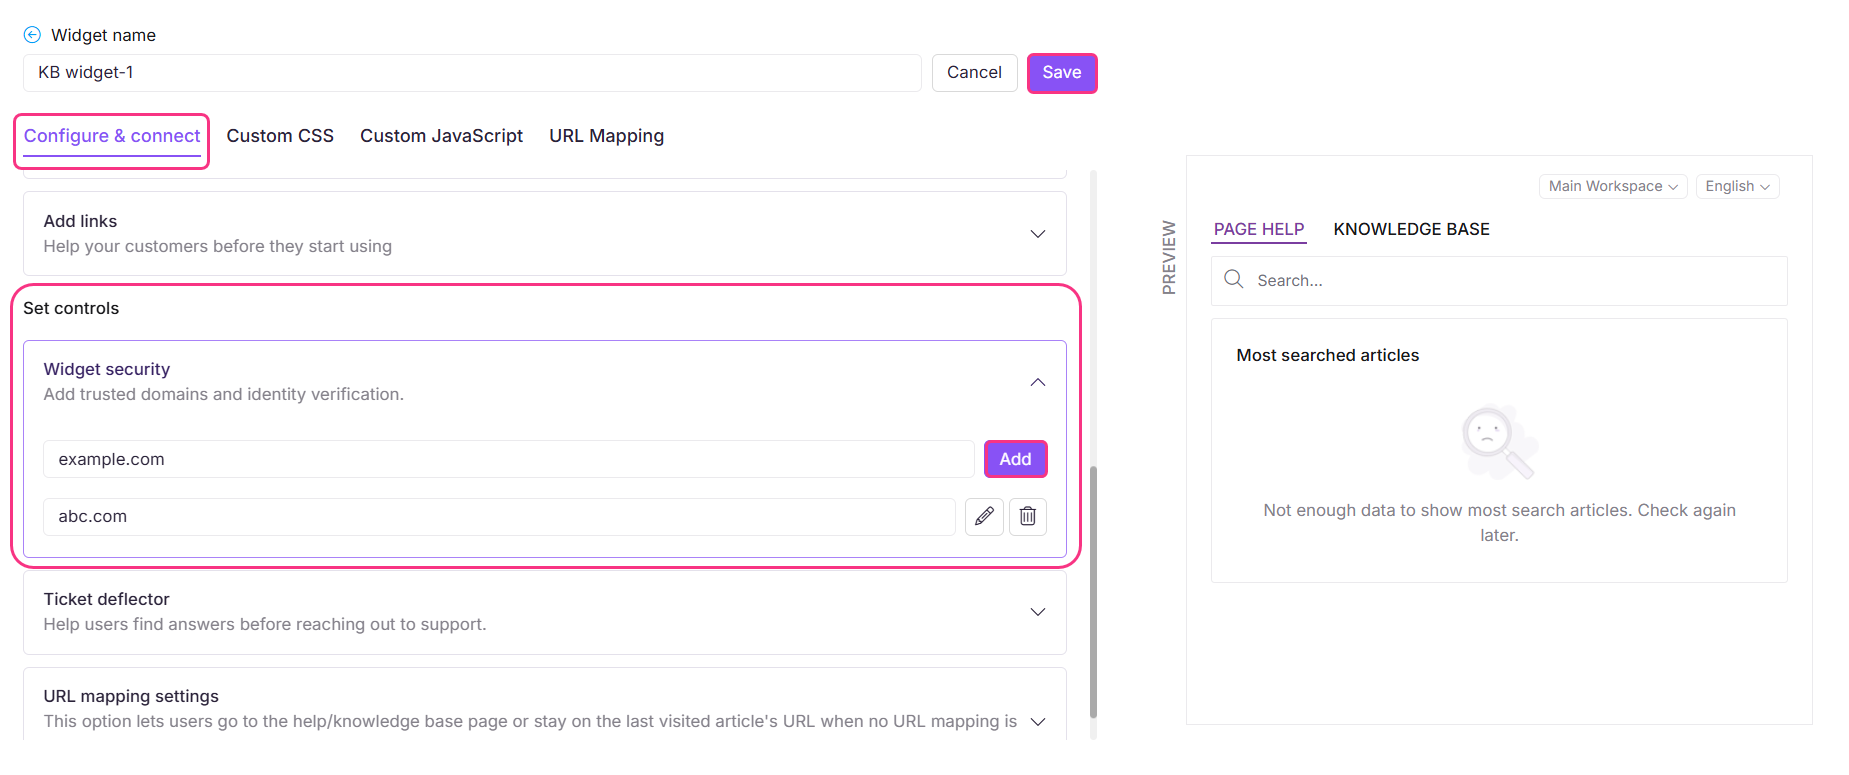
Domain restriction
Document360 lets you restrict the Knowledge base widget to specific domains. Once a domain is added to the widget security list, any project member who wants to install the Knowledge base widget on a different domain must add that domain to the Widget security section.
If no domains are added to the list, the Knowledge base widget can be embedded into any SaaS application or public website without restriction.
NOTE
The Knowledge base widget API key is visible in plain text within the widget JavaScript code and cannot be encrypted. Configuring trusted domains is the recommended way to prevent unauthorized use of your widget. Once domains are added, the widget will only load on those specified domains, any attempt to embed it on an unlisted domain will be blocked. If no trusted domains are configured, the widget can be embedded on any domain, increasing the risk of unauthorized use.
Restrict the Knowledge base widget to a specific domain
To restrict your knowledge base widget to a specific domain,
Navigate to Connections () > Knowledge base widget in the left navigation bar.
Hover over the desired widget and click the Edit () icon.
In the Configure & connect tab, expand the Widget security accordion. You can find the list of domains previously added (if added).
Enter the domain where you want the Knowledge base widget to be displayed.
Click Add and click Save to apply changes.
NOTE
The "www" is not a valid part of your domain. Only add what comes after the www. in your URL.
Example:
document360.com
Wildcard notation is not supported. You cannot use *.domain.com to allow all subdomains at once.
URL paths are not supported. Entries like
domain.com/path/pageare not valid.Adding the parent domain is sufficient. If you add group.docuware.cloud, all subdomains under it (e.g., team1.group.docuware.cloud) will be allowed automatically without needing to be added individually.
Leaving the list empty allows the widget to be embedded on any domain or subdomain without restriction.
Adding a ticket deflector in the Knowledge base widget
You can integrate a Ticket Deflector to help deflect support queries. To add a ticket deflector to your knowledge base widget, follow the steps below:
Navigate to Connections () > Knowledge base widget in the left navigation bar.
The list of widgets will appear.
Hover over the desired widget and click the Edit () icon.
In the Configure & connect tab, expand the Ticket deflector accordion.
Turn on the Show ticket deflector toggle.
Select the desired ticket deflector from the dropdown.
If required, edit the Menu name field.
Click Save to apply changes.
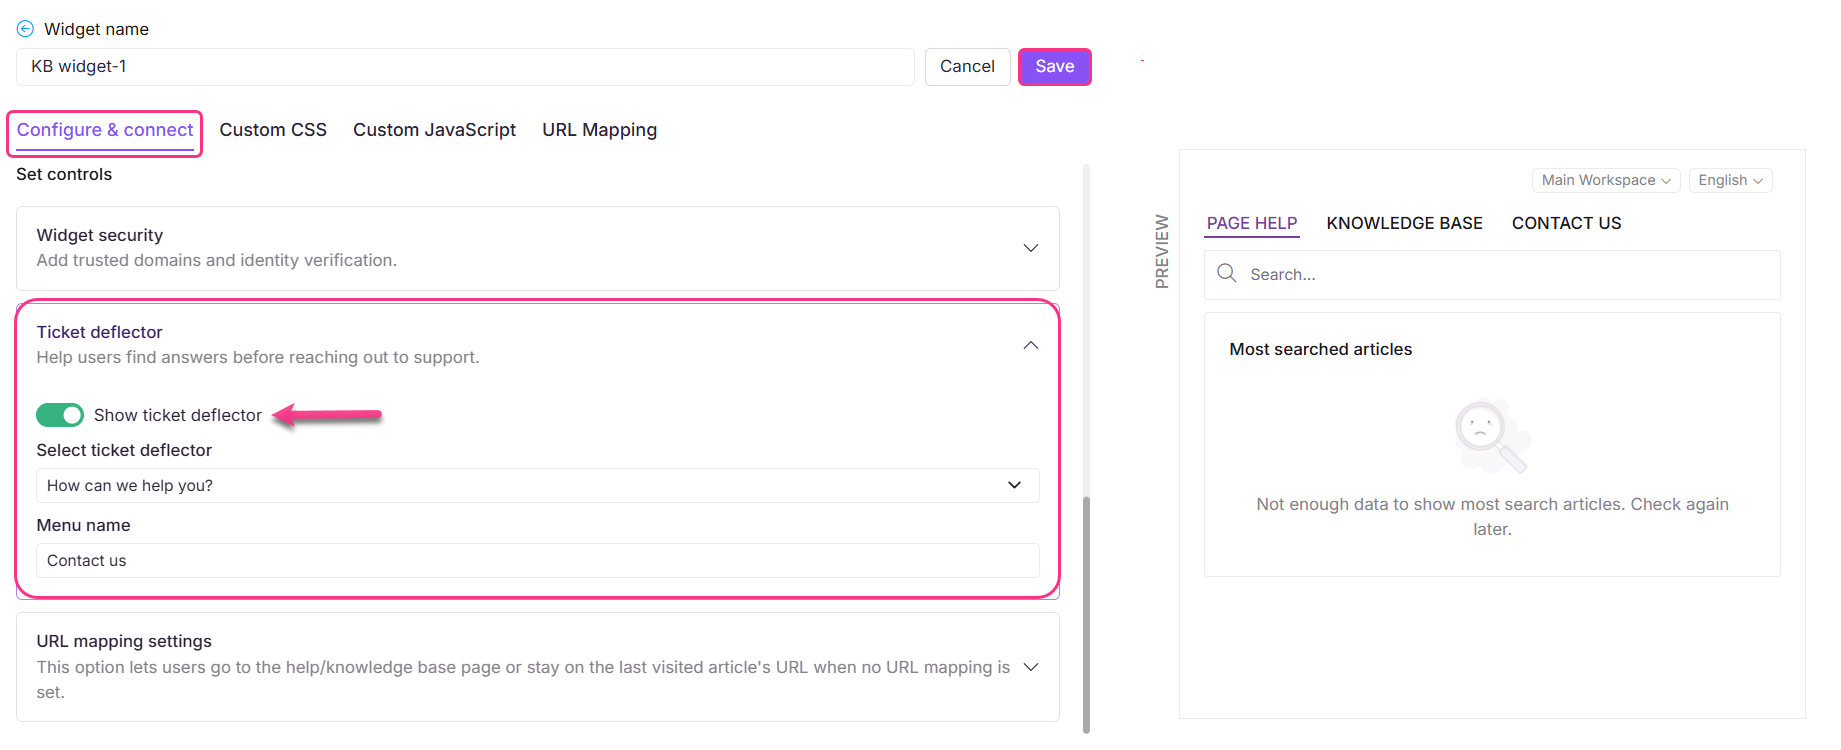
The widget now includes the selected Ticket deflector.
Troubleshooting
This section provides step-by-step guidance to address common challenges that you may encounter while managing or accessing your knowledge base widget.
Widget icon is visible even after mapping to a button
Even after mapping the Knowledge base widget to a custom button, the default widget icon continues to appear on the Knowledge base site. This happens because the widget script includes the default icon display, and it doesn’t automatically get hidden when using a button trigger.
Steps to resolve:
Navigate to Connections () > Knowledge base widget in the left navigation bar and a list of created widgets will appear.
Hover over the desired widget and click the Edit () icon.
In the Configure & connect tab, expand the Style widget accordion.
Locate the Hide widget toggle and ensure it is turned on.
Click Save to apply the changes.
Refresh your knowledge base site to see the changes.
Once done, the widget icon will no longer be visible on the site, but it will still function as expected when triggered via your custom button.
NOTE
If you're also using URL mappings to control widget visibility, refer to Customizing the Knowledge base widget using Custom CSS/JavaScript for advanced hiding options. and a l
"Most searched articles" section is not visible on the Knowledge base site
The Most searched articles section and the mapped list of articles for a specific URL are not appearing in the Knowledge base widget.
This issue typically occurs when the Hide most searched articles toggle is enabled in the widget style settings. Enabling this option hides both the Most searched articles section and any mapped article list associated with a specific URL.
Steps to resolve:
Hover over the desired widget and click the Edit () icon.
In the Configure & connect tab, expand the Style widget accordion.
Locate the Hide most searched articles toggle and ensure it is turned off.
Click Save to apply the changes.
Refresh the Knowledge base site and verify that the Most searched articles and the mapped articles list are now visible.
NOTE
If the issue persists even after disabling the toggle, double-check the article-to-URL mappings and review other display settings within the widget configuration.
Article links in the widget are redirecting users to the KB website instead of opening within the widget
Article links inside the widget follow navigation behavior based on the destination content type and the widget’s access scope.
Internal links to articles in standard workspaces open inside the widget.
Internal links to articles in other standard workspaces also open inside the widget when the destination workspace, language, and category are included in the widget’s content access filters.
Links to API documentation always open in a new browser tab.
If the destination article is restricted by reader group permissions or widget filters, the widget displays a restricted access state.
If the destination link cannot be resolved, the widget shows a fallback state without exposing raw errors.
NOTE
The widget does not honor the Open in new tab setting for same-domain links. They will always open within the widget.
FAQ
Why are some categories missing from the Knowledge base widget?
This issue may occur if category-level access has not been properly configured for the widget. To ensure your categories are visible in the widget:
Verify that the user or reader has permission to view the specific categories/articles in the Knowledge base widget.
Check whether category-level access is configured for the widget. If it is, you need to manually add the desired category in the content access section during widget configuration.
To add the category to the widget:
Navigate to Connections () > Knowledge base widget in the Knowledge base portal.
Hover over the desired widget and click the Edit () icon.
In the Configuration & connect tab, expand the Content access accordion.
Select Category and choose the desired category to appear in the widget.
Click Save to apply the changes.
How to hide the Knowledge base widget?
Go to the Installation & Setup tab of the desired Knowledge base widget (Knowledge base widget > Edit).
In the Style your widget section, enable the Hide widget toggle.
Click the Save button at the top.
How do I remove the Knowledge base widget icon from an article?
Go to the URL mapping tab of the desired Knowledge base widget (Knowledge base widget > Edit).
Create a new URL mapping with the Hide action for the desired article.
The Knowledge base widget is not loading on the Knowledge base site. How can I fix this issue?
The Knowledge base widget may not load on your knowledge base site if the API key is outdated. Updating the API key should resolve the issue and restore the widget functionality.
Why does an article link open inside the widget instead of a new tab?
The knowledge base widget determines link behavior based on the destination workspace type and access eligibility.
The Open in a new tab setting configured in the editor is not supported in the widget. Internal links within the same domain always open inside the widget, regardless of the selected setting.
Articles in standard workspaces open inside the widget.
Articles in other standard workspaces also open inside the widget when they are included in the widget’s content access configuration.
API documentation links always open in a new browser tab.
External domain links always open in a new browser tab.
If the destination content is restricted, the widget displays a restricted access state.
If the destination cannot be resolved, the widget displays a fallback state.
Why is an internal article link showing restricted access inside the widget?
This happens when the linked article is outside the widget’s configured content access scope or the reader does not have permission through their assigned reader group.
Verify that:
The destination workspace is included in the widget configuration.
The linked category is within the allowed filter scope.
The reader has access through the assigned reader group.
If the destination content is outside the allowed scope, the widget intentionally displays a restricted access state.
How do I apply custom styling to text displayed in the knowledge base widget?
To customize the appearance of specific text in your knowledge base widget, you can use inline HTML styling. Here's a sample HTML code snippet:
<div style="font-family:Arial, sans-serif;font-size:14px;color:#333333;line-height:1.6;">
  <p>
    The <strong>test line</strong>
  </p>
</div>
How do you change the position of the Knowledge base widget icon on your website?
Go to the Installation & Setup tab of the desired Knowledge base widget (Knowledge base widget > Edit).
In the Style your widget section, you can find the widget position.
Select the Left or Right button to change the icon position to left or right.
Enter the desired spacing values in the Side spacing and Bottom spacing fields to position the icon.
Click the Save button at the top.
How do you turn off the top search in the Knowledge base widget?
Go to the Installation & Setup tab of the desired Knowledge base widget (Knowledge base widget > Edit).
In the Style your widget section, enable the Hide top search toggle.
Click the Save button at the top.
How do I set my desired logo as a widget icon?
Go to the Installation & Setup tab of the desired Knowledge base widget (Knowledge base widget > Edit).
In the Style your widget section, you can find the widget icon.
Click the Change icon button.
Choose/upload the desired icon.
Click the Save button at the top.
Can I add custom links in the Knowledge base widget?
Yes, you can add custom links in the Knowledge base widget.
How do you enable the ticket deflector in the knowledge base widget?
Go to the Installation & Setup tab of the desired Knowledge base widget (Knowledge base widget > Edit).
Enable the Show ticket deflector toggle.
Click the Save button at the top.
What is the default language behavior of the Knowledge base widget?
The Knowledge base widget will now open in the default browser language by default. If the default browser language is not available in the Knowledge base widget, the default language of the Knowledge base will appear.
How do I restrict the Knowledge base widget to a specific domain?
Go to the Installation & Setup tab of the desired Knowledge base widget (Knowledge base widget > Edit).
In the Style your widget section, you can find the Keep your widget secure.
Enter the domains where you want the Knowledge base widget to display.
Click Add > Save.
NOTE
Configuring domain restriction is also recommended as a security measure because the KB widget API key is visible in plain text in the widget JavaScript code. Restricting the widget to trusted domains ensures the API key cannot be misused on unauthorized websites even if it is exposed in the code.
Can I hide the Workspace and Language dropdown?
The Workspace and Language dropdowns are visible by default and cannot be hidden or removed.
Is it possible to localize or customize the text in the widget on the knowledge base site?
Yes. You can localize or customize the text displayed in the knowledge base widget using the Localization variables feature. This allows you to translate the default text into other languages. To update this text,
Navigate to Settings () in the left navigation bar in the Knowledge base portal.
In the left navigation pane, navigate to Knowledge base portal > Workspace & localization.
In the Localization variables tab, expand the Widget accordion.
You can update elements such as Page help, Top Searched Article, and There is no top search article found.NOTE
By default, the system localizes variables to the respective language.
Click Save.