Snippets ist eine vordefinierte Sammlung von Inhaltsblöcken, die der Content Manager oder Autor als wiederverwendbare Inhalte verwendet. Der Inhalt des Snippets kann von einfachen Texten oder Phrasen bis hin zu langen Absätzen, Tabellen, Bildern und mehr reichen. In Document360 werden die Snippets in einer Bibliothek gespeichert, und Sie können sie während des Bearbeitens einfach mit einem Klick in Artikel einfügen.
HINWEIS
Der Snippet wird dem Leser als regulärer Inhalt auf der Knowledge Base-Seite angezeigt. Der Leser wird nicht wissen, dass der Inhalt durch Snippet gerendert wurde.
Zugriff auf die Snippets-Seite
Sie können einen Ausschnitt auf der Snippets ansehen, bearbeiten oder löschen.
Navigiere zu Content tools (
 ) in der linken Navigationsleiste im Knowledge base portal.
Im linken Navigationsfenster navigieren Sie zu Content resources > Snippets.
Die Snippets zeigt eine Liste aller Snippets, die Ihrem Projekt hinzugefügt wurden.
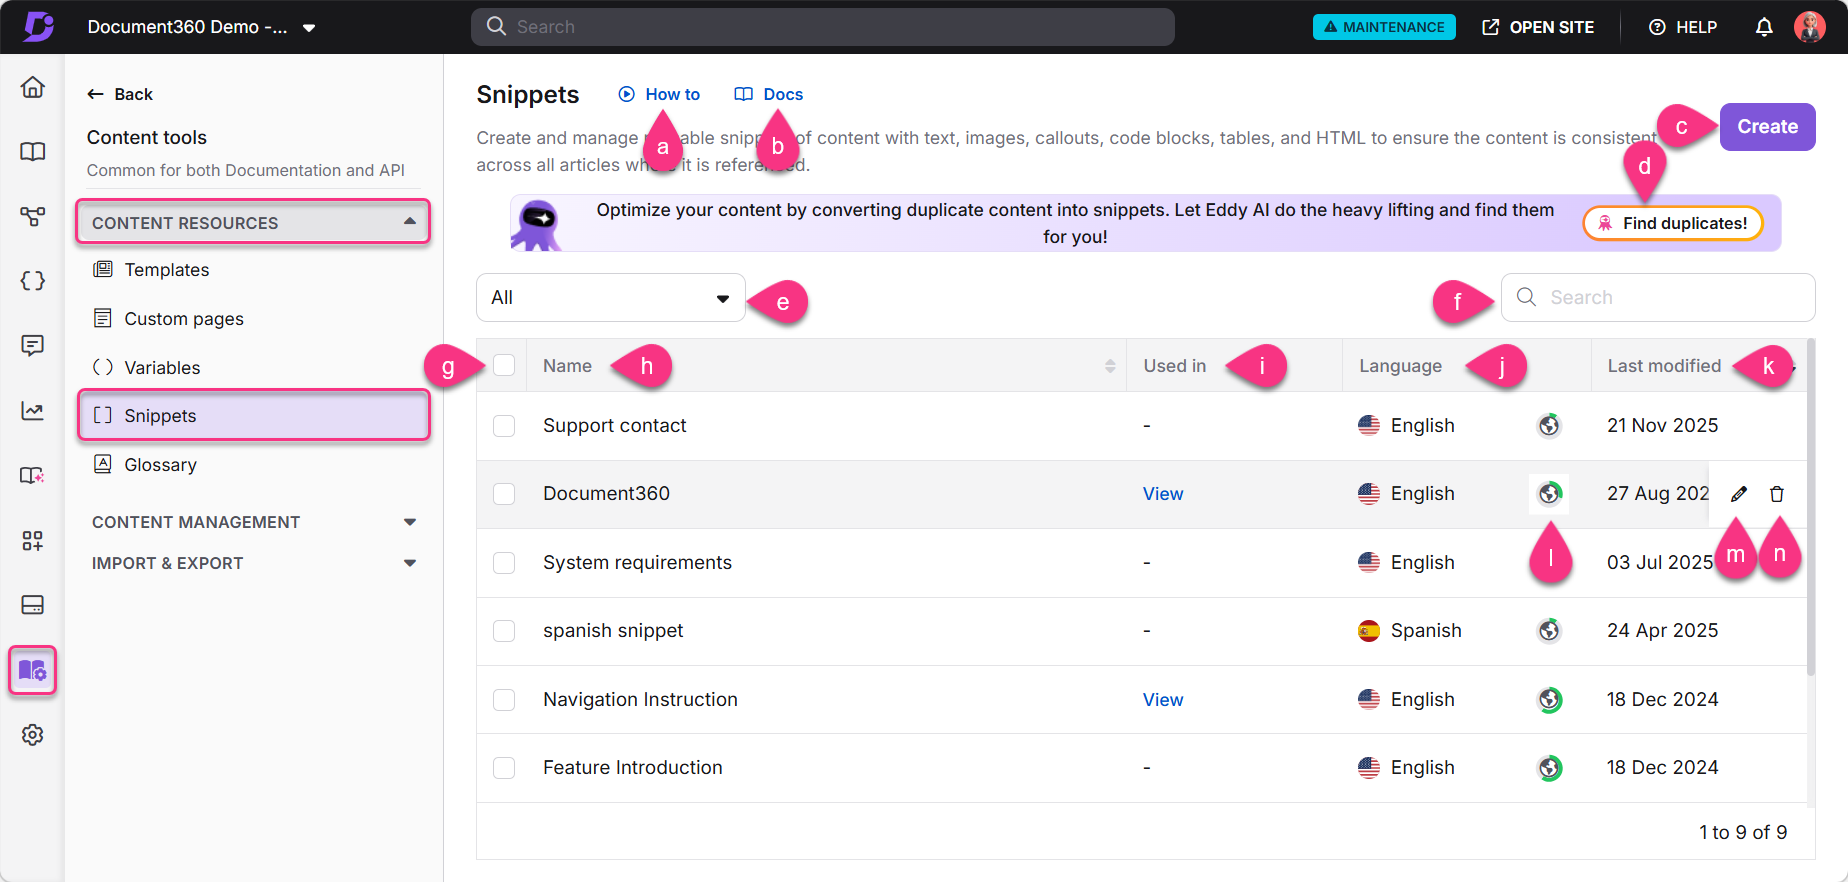
Anleitung: Sieh dir ein Tutorial an, wie man Schnipsel verwendet.
Dokumentation: Öffnen Sie den Dokumentationsartikel über Ausschnitte.
Erstellen: Erstellen Sie einen neuen Ausschnitt.
Erkennung von doppelten Inhalten: Identifizieren und verwalten Sie doppelten Text in Ihrer Dokumentation und wandeln Sie sie in Ausschnitte um.
Sprachen: Filtern Sie die Ausschnittliste nach Global oder einer bestimmten Sprache.
Suchschnipsel: Suche nach Ausschnitten nach Namen.
Auswahlbox: Wählen Sie einen oder mehrere Schnipsel aus, um eine Massenlöschaktion durchzuführen.
Name: Klicken Sie auf den Namen des Ausschnitts, um die Inhalte vorzusehen.
Verwendet in: Zeigt, wo der Ausschnitt verwendet wird.
Wenn der Ausschnitt nicht verwendet wird, zeigt das Feld einen Strich
-an.Wenn der Ausschnitt verwendet wird, klicken Sie auf Ansicht, um die Artikel oder Kategorieseiten zu sehen, auf denen er eingefügt wurde.
Sprache: Gibt die Sprache des Ausschnitts an.
Zuletzt geändert: Zeigt das Datum und die Uhrzeit der letzten Aktualisierung des Snippets an.
Übersetzungsstatus: Sehen Sie sich den Übersetzungsstatus des Ausschnitts an. Klicken Sie auf das Globussymbol () neben jedem Ausschnitt. A zeigt an, dass der Ausschnitt in diese Sprache übersetzt wurde, während das Symbol anzeigt, dass er noch nicht übersetzt wurde.
Bearbeitung (): Bearbeite den Ausschnitt-Inhalt.
Löschen (): Klicken Sie darauf, einen Ausschnitt zu löschen. Um mehrere Ausschnitte in einer Instanz zu löschen, wählen Sie die gewünschten Kontrollkästchen aus und klicken Sie oben auf Löschen .
Banner zur Erkennung doppelter Inhalte
Um doppelten Text in Ihrer Dokumentation zu identifizieren und zu verwalten, ist oben auf der Snippets-Seite ein neues Banner zur Erkennung von doppelten Inhalten verfügbar.
Diese Funktion, betrieben von Eddy AI, ist nur für Enterprise-Pläne verfügbar. Sie scannt Ihr Projekt nach Absätzen, die mehrfach in den Artikeln vorkommen. Nach Abschluss des Scans erstellt das System einen detaillierten Bericht, der zeigt, wo doppelte Inhalte vorhanden sind, und schlägt vor, diese in wiederverwendbare Ausschnitte umzuwandeln.
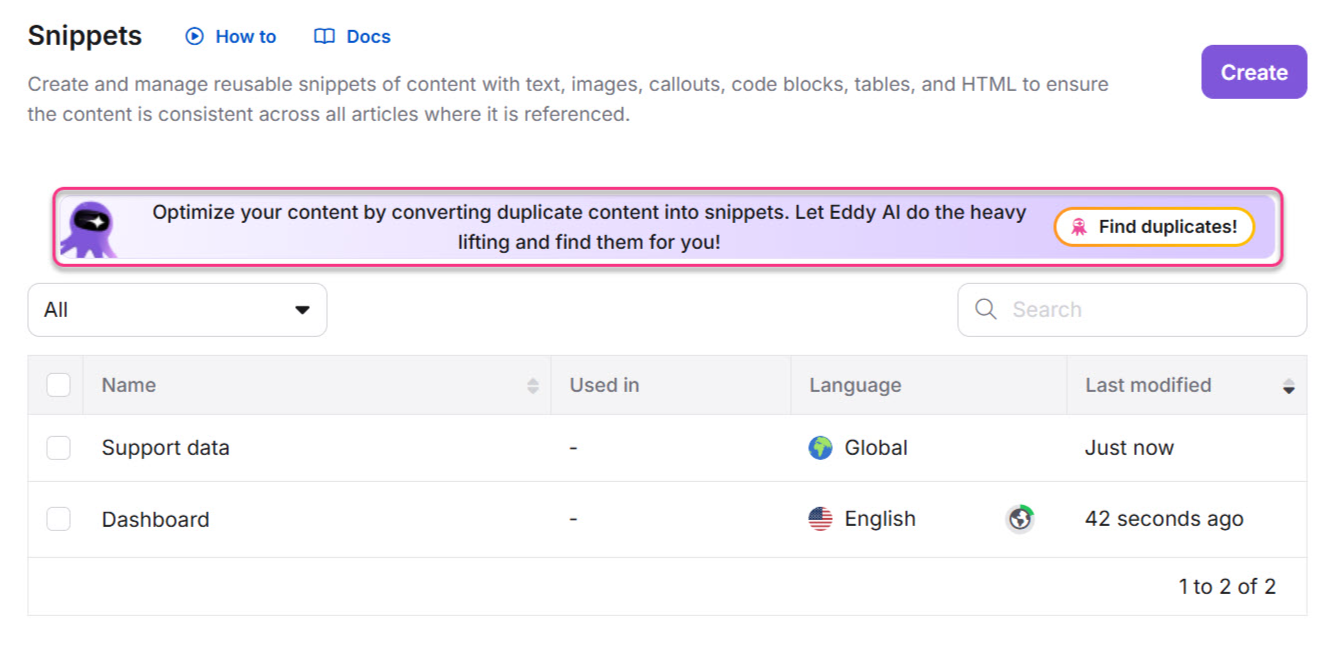
Erkennung von doppeltem Inhalt
Klicken Sie auf " Duplikate finden " auf dem Banner, um Ihr Projekt nach doppelten Inhalten zu scannen.
Sobald der Scan abgeschlossen ist, wird die Gesamtzahl der erkannten doppelten Textblöcke angezeigt.
Wenn bereits ein Scan durchgeführt wurde, klicken Sie erneut auf Scannen , um den Vorgang erneut durchzuführen.
Klicken Sie auf "Vorschläge überprüfen ", um den Bericht zur Erkennung doppelter Inhalte zu öffnen und die Ergebnisse zu überprüfen.
HINWEIS
Für weitere Informationen lesen Sie den Artikel zur Erkennung von doppelten Inhalten.
Erstellung eines Ausschnitts
Um einen neuen Ausschnitt zu erstellen:
Navigiere zu Content tools (
) in der linken Navigationsleiste im Knowledge base portal.Im linken Navigationsfenster navigieren Sie zu Content resources > Snippets.
Die Snippets erscheint. Wenn Sie zuvor Ausschnitte hinzugefügt haben, können Sie sie hier sehen.
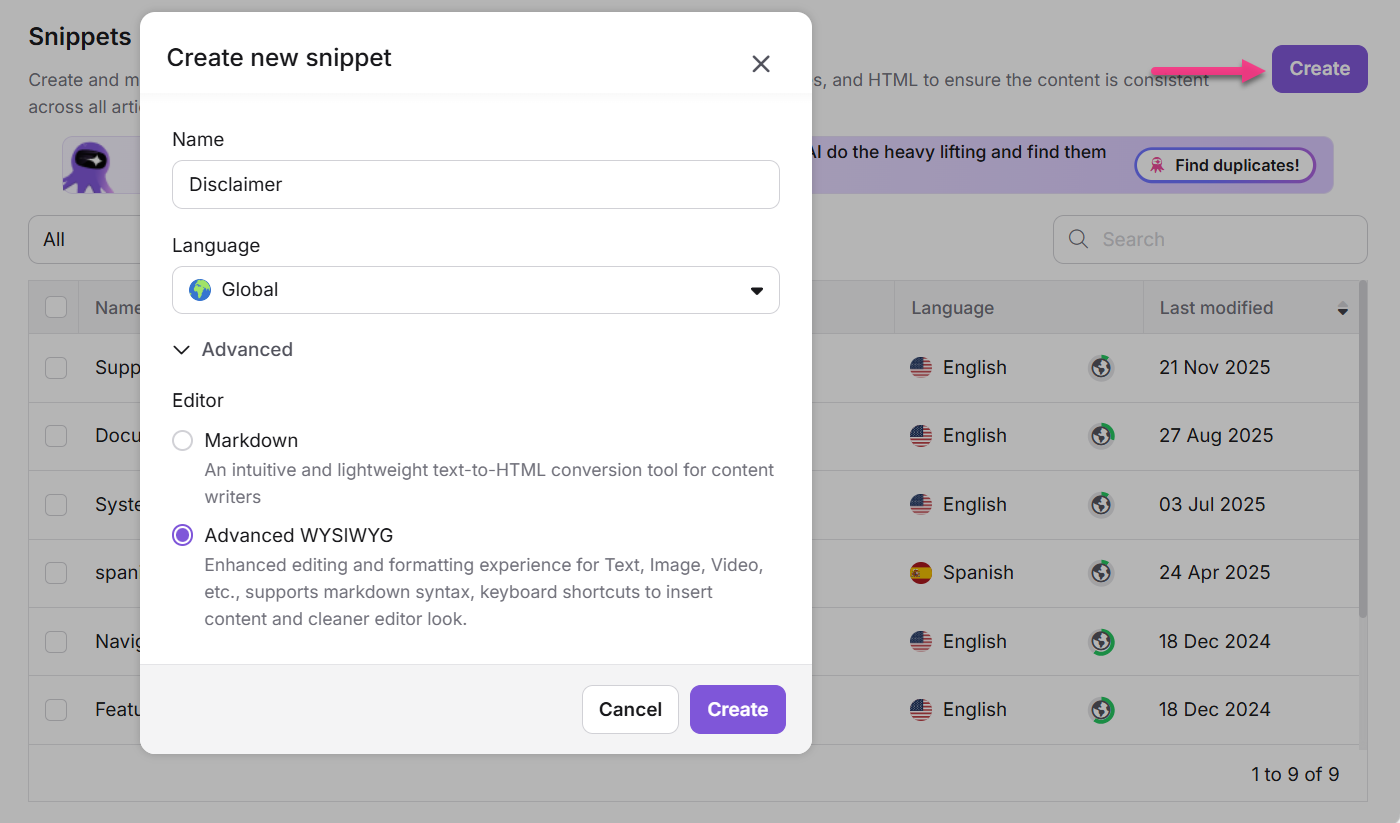
Klicken Sie oben rechts auf Erstellen .
Im Dialog "Neuen Ausschnitt erstellen ":
Gib einen Namen ein (bis zu 50 Zeichen). Du kannst Buchstaben, Zahlen, Bindestriche und Unterstriche verwenden.
Wähle eine Sprache (standardmäßig ist Global). Du kannst bei Bedarf eine bestimmte Sprache auswählen.
Erweitern Sie den fortgeschrittenen Dropdo
wn und wähle deinen Editor (Markdown oder Advanced WYSIWYG). Der Standard-Editor basiert auf deinen allgemeinen Projekteinstellungen.
Klicken Sie auf Erstellen.
Nach der Erstellung:
Verwenden Sie den ausgewählten Editor, um Ihren Snippet-Inhalt einzugeben.
Wenn Markdown verwendet wird, erscheint der Markdown-Editor.
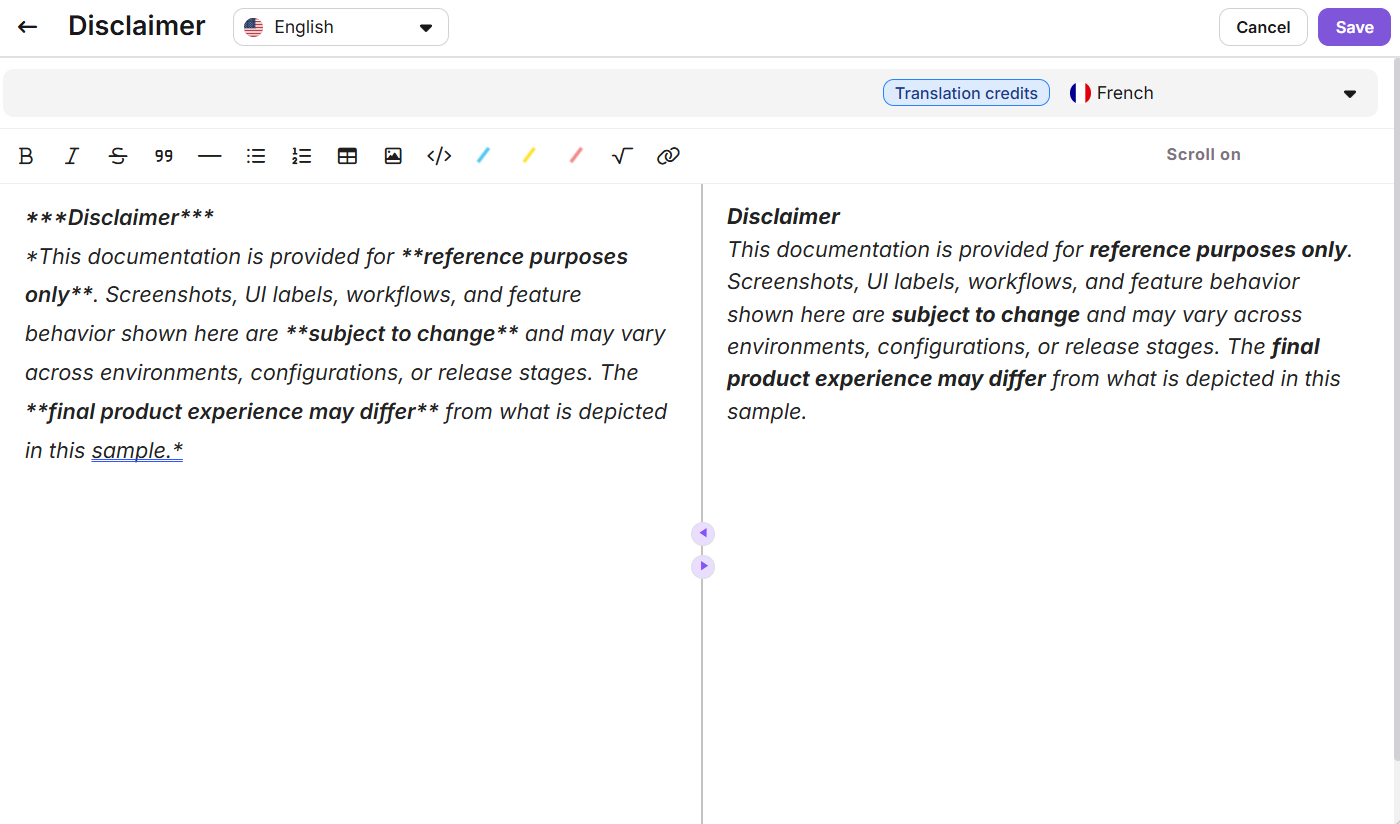
Wenn Sie Advanced WYSIWYG verwenden, sind die Editor-Toolbar, die Codeansicht, der Eddy AI Summary Generator und der Eddy AI FAQ Generator verfügbar.
HINWEIS
Sobald du den erweiterten WYSIWYG-Editor ausgewählt hast, kannst du nicht mehr zurück zu Markdown wechseln.
Wenn du mit Markdown startest, kannst du für Übersetzungszwecke in Advanced WYSIWYG konvertieren (da Markdown Translate mit Eddy AI nicht unterstützt). Dann kannst du nicht mehr zurück zu Markdown wechseln.
Du kannst die Sprache über das Sprach-Dropdown oben wechseln.
Nachdem du deinen Ausschnitt entworfen hast, klicke auf Speichern oder drücke,
Ctrl+Sum die Verknüpfung zu verwenden.
HINWEIS
Formatierungsoptionen
Du kannst die Formatierung auf deinen Snippet-Inhalt mit der Werkzeugleiste anwenden:
Markdown-Editor: Für Formatierung lesen Sie den Artikel im Markdown-Editor.
Fortgeschrittener WYSIWYG-Editor: Für eine vollständige Liste der Funktionen lesen Sie den Artikel im Advanced WYSIWYG Editor.
Du kannst benutzerdefiniertes HTML in den Code-Ansichten verwenden. Allerdings werden nicht unterstützte Tags automatisch bereinigt.
Mit der Auswahl des Erweiterten WYSIYWG-Editors kannst du das Schrägstrichmenü im Snippet-Editor nutzen, um auf Formatierungswerkzeuge wie Überschrift 2, Überschrift 3, Überschrift 4, Nummerierte Liste, Mehrebenenliste, Aufzählungsliste, Checkliste, Inline-Code und Codeblock zuzugreifen, und du kannst auch Elemente wie Bild, Video, Link, Tabelle, Teiler, Akkordeon, Callout, Tabs, FAQs, LaTeX und Emoji einfügen.
Verwendung von Eddy-KI in Snippet-Inhalten
Während Sie einen Ausschnitt entwerfen, können Sie mit der Maus über den gewünschten Inhalt fahren und mit Eddy AI den Text länger oder kürzer machen, verbessern, den Ton ändern, Sprache konvertieren, die Stimme ändern, Sätze aufteilen oder Elemente wie Tabellen, Kreisdiagramme und Flussdiagramme generieren.
Unten rechts kannst du auch auf die Generator-FAQ und Generator-Zusammenfassung von Eddy AI zugreifen (die Zusammenfassungsoption ist nur für englischsprachige Ausschnitte verfügbar).
Einen Ausschnitt in den Artikel einfügen
Sie können einen Ausschnitt auf zwei Arten in die Artikel einfügen:
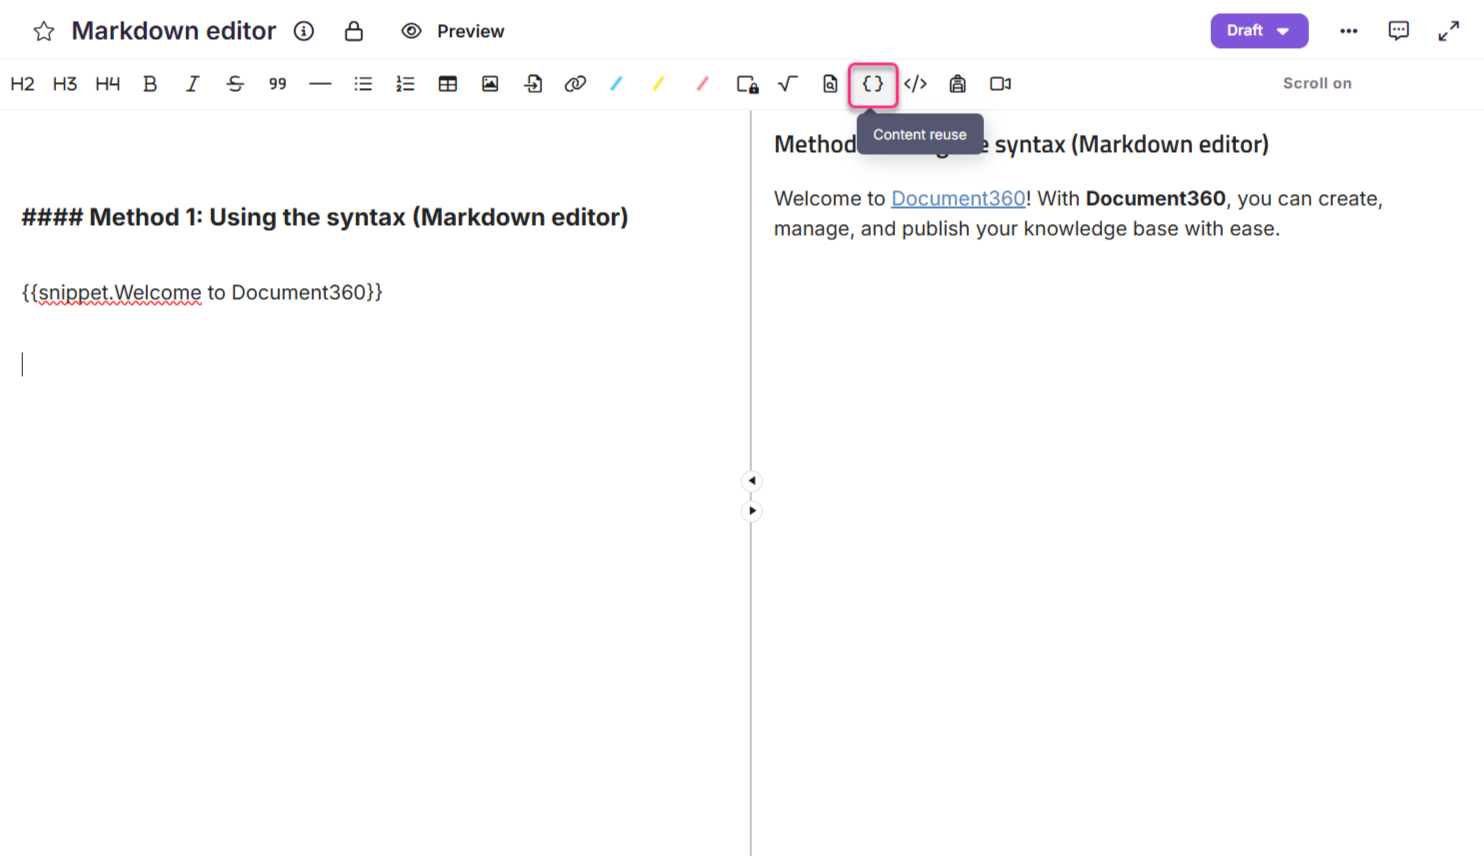
Methode 1: Verwendung der Syntax (Markdown-Editor)
Methode 2: Verwendung der Werkzeugleiste (Markdown und WYSIWYG)
Methode 3: Verwendung des Schrägstrichmenüs (Erweiterter WYSIWYG-Editor)
Geben Sie im Markdown-Editor einen Ausschnitt ein. MergeCodeValue zwischen geschlossenen doppelten Schleifenklammern.
Beispiel: {{snippet.snippet name}}
Du musst den genauen Wert des Merge-Codes kennen, um den gewünschten Snippet hinzuzufügen. Der Snippet funktioniert nicht, selbst wenn sich ein einziger Buchstabe ändert.
HINWEIS
Tippen des Ausschnitts. Merge_Code_Value funktioniert nur im Markdown-Editor. Wenn du Advanced WYSIWYG editor benutzt, kannst du den Ausschnitt über die Werkzeugleiste einfügen.
Um einen Ausschnitt aus der Editor-Werkzeugleiste einzufügen:
Klicken Sie auf das Symbol Content Reuse () für Markdown und den WYSIWYG-Editor.
Wählen Sie den Snippet aus oder nutzen Sie die Leiste für Suchsnippets, um den Namen einzugrenzen.
Wählen Sie den vorgesehenen Ausschnitt aus, den Sie einfügen möchten.
HINWEIS
Wenn der Schalter "Als lokales Kopieren einfügen " aktiviert ist, bleibt der zum Artikel hinzugefügte Ausschnitt unverändert. Der Ausschnitt im Artikel wird nicht beeinflusst, wenn der Inhalt des ausgewählten Ausschnitts in Zukunft geändert oder entfernt wird.
Um einen Ausschnitt aus dem Schrägstrichmenü einzufügen:
Benutze den Schrägstrich-Befehl
/snippets, um das Snippets-Tool im Schrägstrichmenü zu öffnen.Benutze die Suchleiste , um den Ausschnitt zu finden, den du einfügen möchtest.
Fahre mit der Maus über einen Ausschnitt, um den vollständigen Inhalt vorzusehen.
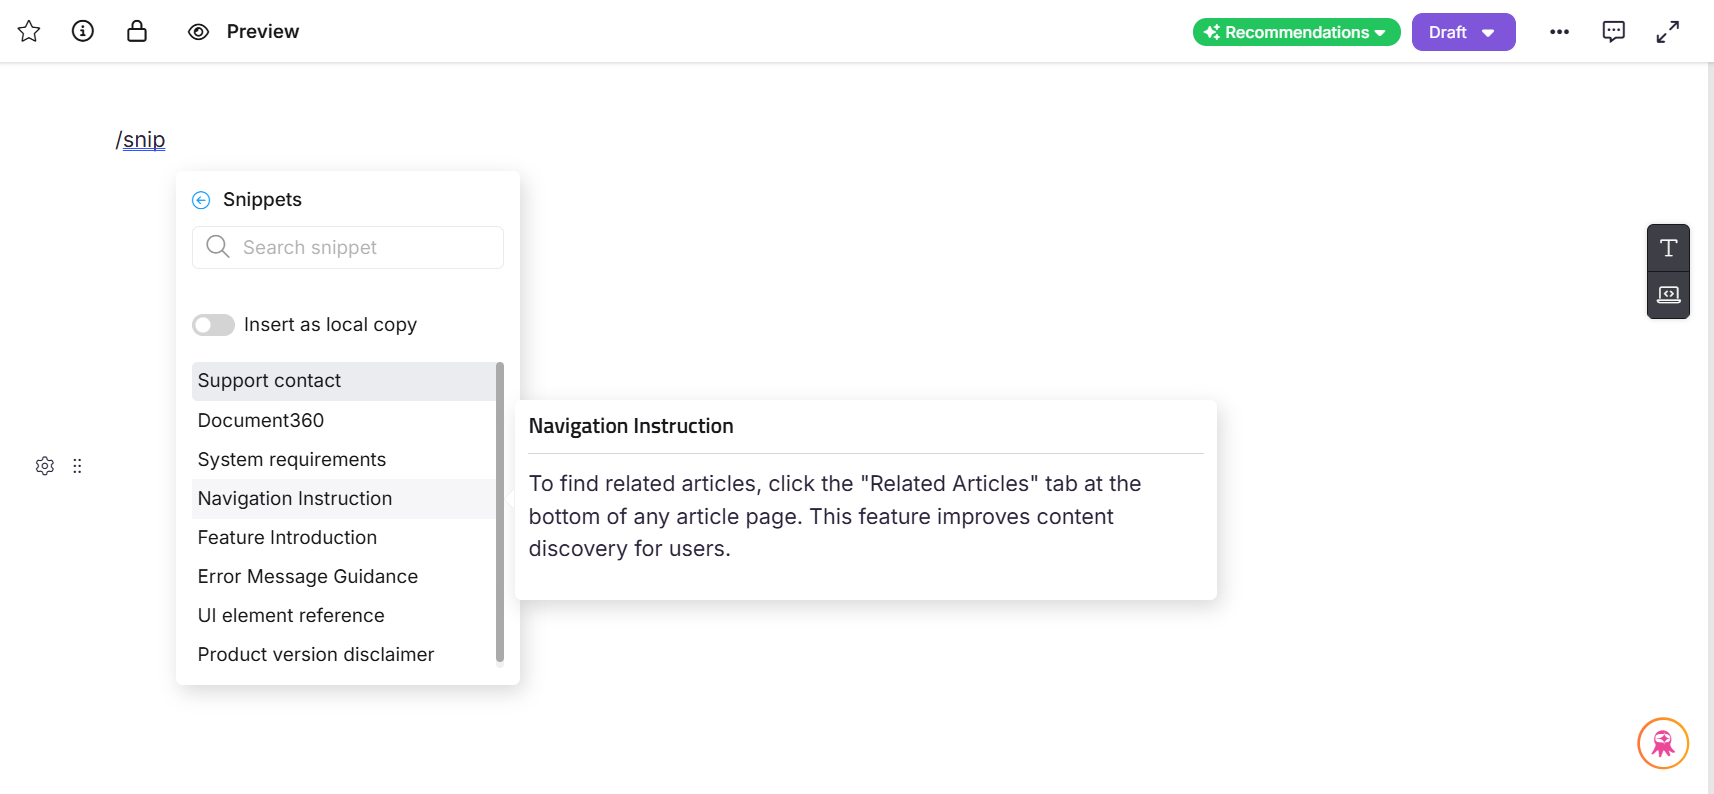
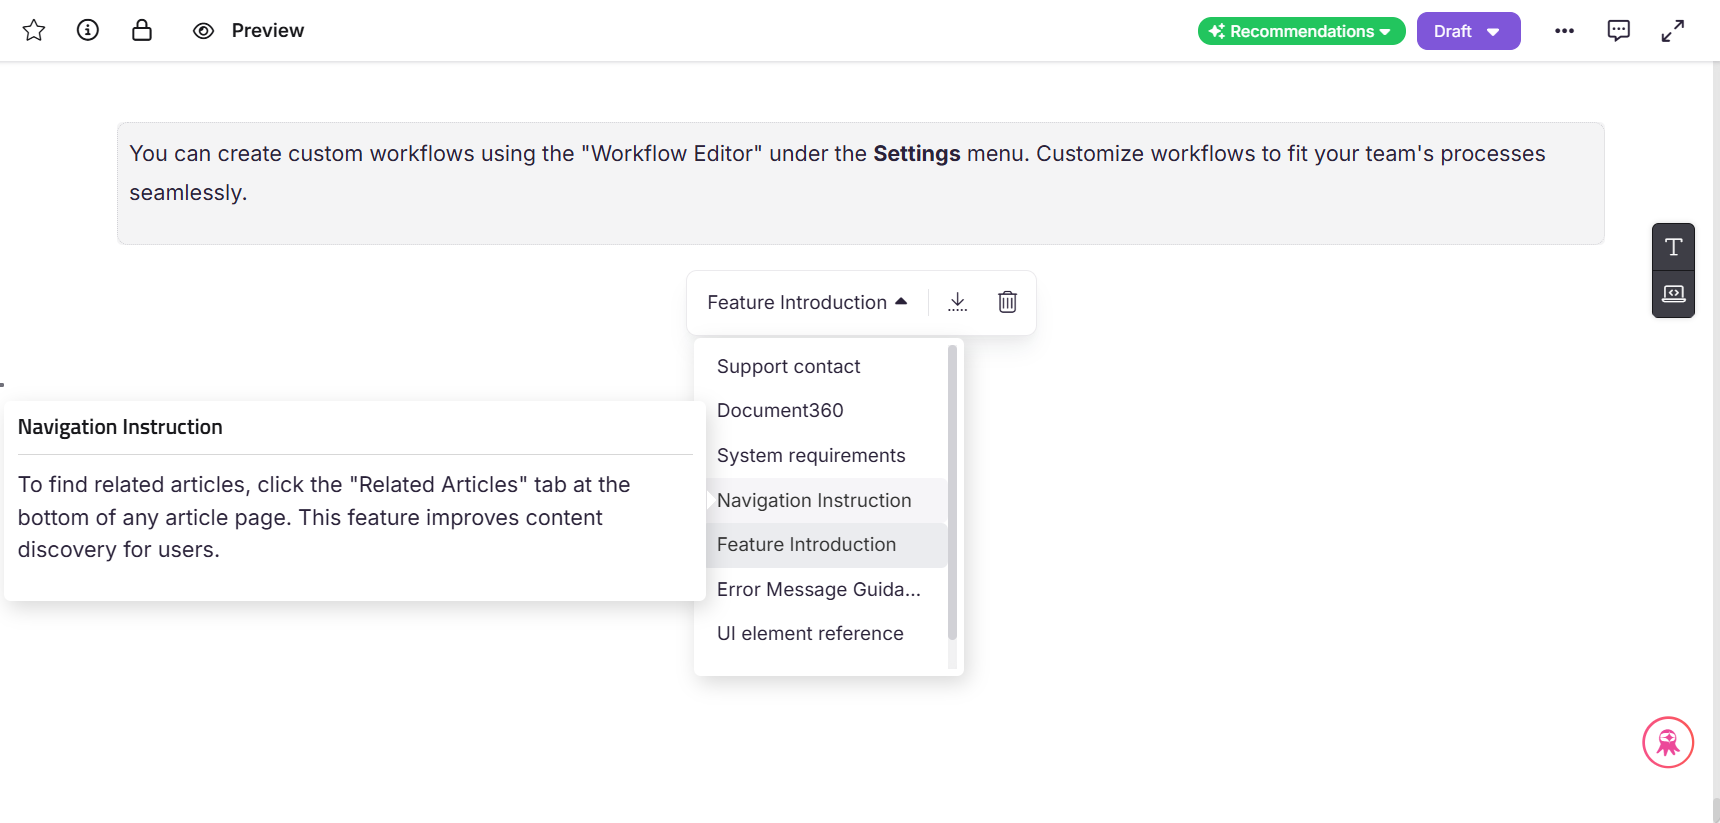
Klicken Sie auf den Ausschnitt, um ihn in den Artikel einzufügen.
Der Inhalt des Ausschnitts wird direkt im Editor in einem mit einer gepunkteten Gliederung markierten Inhaltsblock eingefügt. Dies hilft, den Inhalt des Ausschnitts vom Rest des Artikels zu unterscheiden.
Klicken Sie im Snippet-Block, um das Blasenmenü zu öffnen:
Nutze das Dropdown-Menü , um zu einem anderen Ausschnitt zu wechseln.
Klicken Sie auf "Als Text einfügen ", um den Ausschnitt in statische Inhalte umzuwandeln.
Klicken Sie auf das Löschen ()-Symbol, um den Snippet-Block aus dem Artikel zu entfernen.
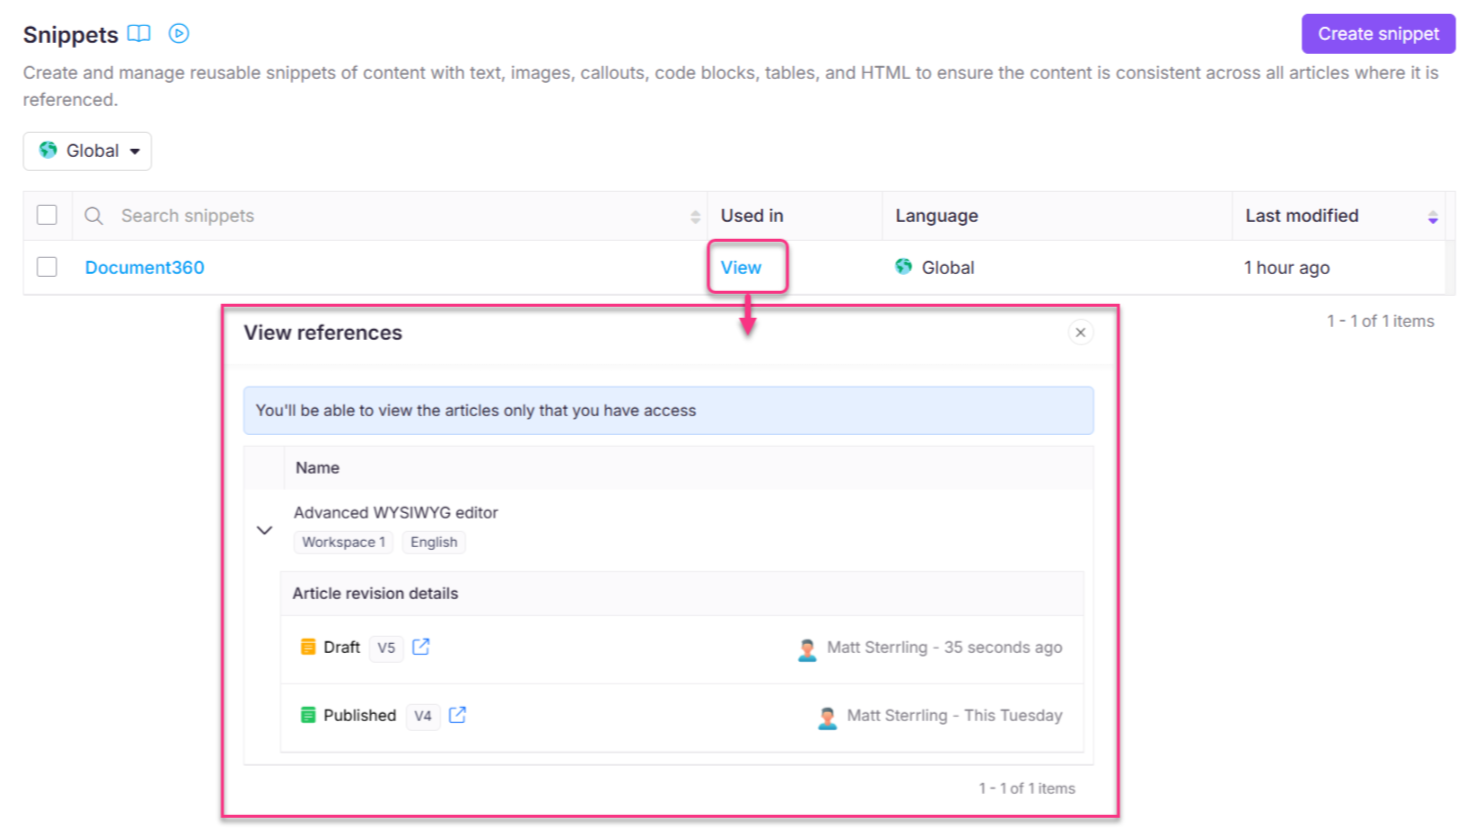
Anzeige der Verwendung von Snippets (Artikel-/Kategorieabhängigkeit)
Um zu sehen, wo ein Ausschnitt verwendet wird:
Klicken Sie in der Spalte "Verwendet " auf Ansicht.
Das Referenzanzeigen-Panel erscheint. Sie werden sehen:
Die Artikelversion.
Der Projektarbeitsbereich und die Sprache.
Der Benutzername und das Profilbild des Nutzers, der den Ausschnitt hinzugefügt hat.
Im Artikel heißt es (Entwurf und veröffentlicht).
Die Zeit-/Datuminformation, wann der Ausschnitt auf der Artikel-/Kategorieseite eingefügt wurde.
Klicken Sie auf das Symbol , um dieselbe Artikelversion in einem neuen Tab zu öffnen.
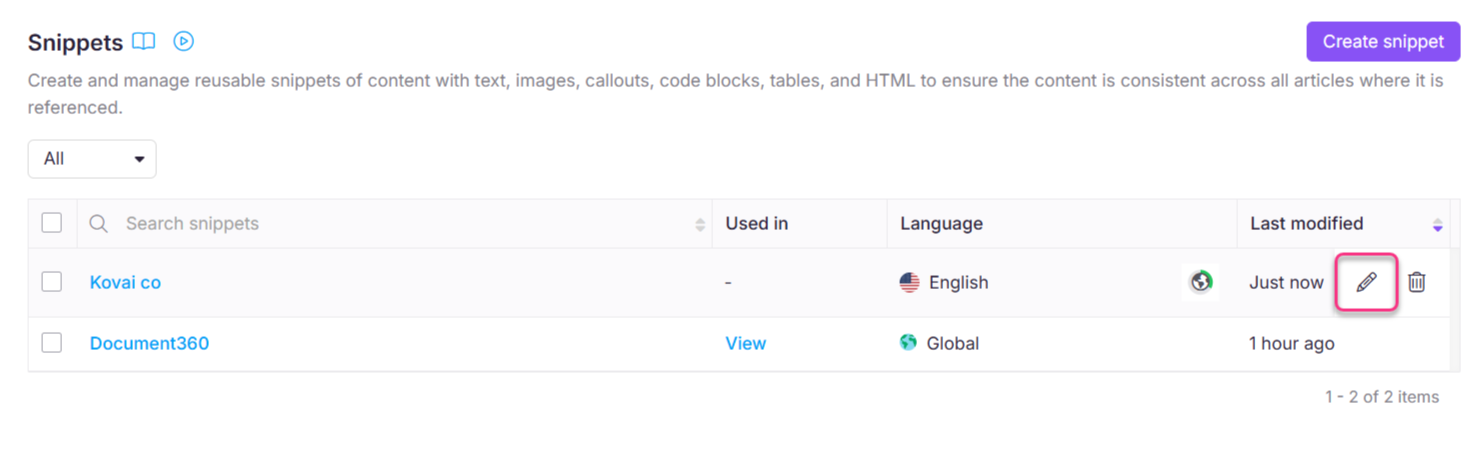
Bearbeitung eines Ausschnitts
Um einen Ausschnitt zu bearbeiten:
Navigiere zu Content tools (
) in der linken Navigationsleiste im Knowledge base portal.Im linken Navigationsfenster navigieren Sie zu Content resources > Snippets.
Die Snippets " erscheint. Du findest die Liste der bereits hinzugefügten Snippets.
Fahre mit der Maus über den Ausschnitt, den du bearbeiten möchtest, und klicke auf das Symbol Bearbeiten ().
Aktualisieren Sie den Inhalt nach Bedarf.
Klicken Sie auf Aktualisieren.
HINWEIS
Wenn du einen Ausschnitt aktualisierst, werden die Änderungen automatisch in allen Artikeln und Kategorieseiten angezeigt, auf denen er verwendet wird, einschließlich veröffentlichter, ohne dass du sie erneut veröffentlichen musst.
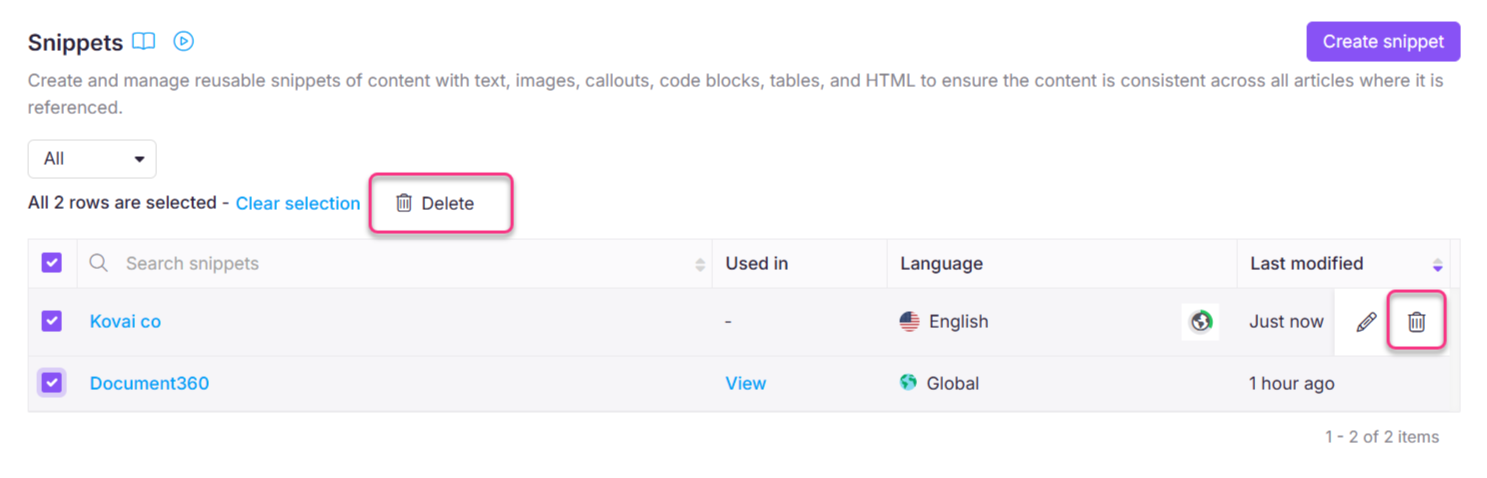
Löschen eines Ausschnitts
Um einen Ausschnitt zu löschen:
Navigiere zu Content tools (
) in der linken Navigationsleiste im Knowledge base portal.Im linken Navigationsfenster navigieren Sie zu Content resources > Snippets.
Die Seite mit den Ausschnitten erscheint. Du findest die Liste der bereits hinzugefügten Ausschnitte.
Fahre mit der Maus über den gewünschten Ausschnitt und klicke auf das Löschen ()-Symbol.
Klicken Sie im Dialogfeld "Löschen" auf Ja.
Um mehrere Schnipsel massenhaft zu löschen, wählen Sie mehrere beabsichtigte Ausschnitte auf der Seite "Schnipseln" aus und klicken Sie oben in der Liste auf die Option "Löschen ()".
HINWEIS
Wenn du einen Ausschnitt löschst, wird er aus allen Artikeln entfernt, in denen er referenziert wird.
Der Artikel behält seine aktuelle Version bei.
Auf der Knowledge Base-Seite passt sich der umgebende Inhalt an, sodass kein leerer Platz bleibt, wo der Ausschnitt entfernt wurde.
Im Portal erscheint ein Ladesymbol im Inhaltsblock, in dem der Ausschnitt entfernt wurde. Du kannst diesen Block auswählen, um einen weiteren Ausschnitt einzufügen oder den Block manuell zu löschen.
Übersetzung von Ausschnitten
Sie können Ausschnitte in mehreren Sprachen erstellen, um eine Lokalisierung in Ihrer Wissensdatenbank sicherzustellen.
HINWEIS
Globale Schnipsel können nicht übersetzt werden.
Neue Ausschnitte übersetzen
Um einen neuen Ausschnitt während der Erstellung zu übersetzen:
Navigiere zu Content tools (
) in der linken Navigationsleiste im Knowledge base portal.Im linken Navigationsfenster navigieren Sie zu Content resources > Snippets.
Klicken Sie auf Erstellen.
Im Dialog "Neuer Ausschnitt erstellen " geben Sie den Namen des Ausschnitts ein, wählen die gewünschte Sprache und wählen Sie Ihren bevorzugten Editor.
Klicken Sie auf Erstellen.
Im Dropdown-Menü Sprache wählen Sie die gewünschte Sprache für den Ausschnitt aus.
Geben Sie den Inhalt in Ihrer gewünschten Sprache ein.
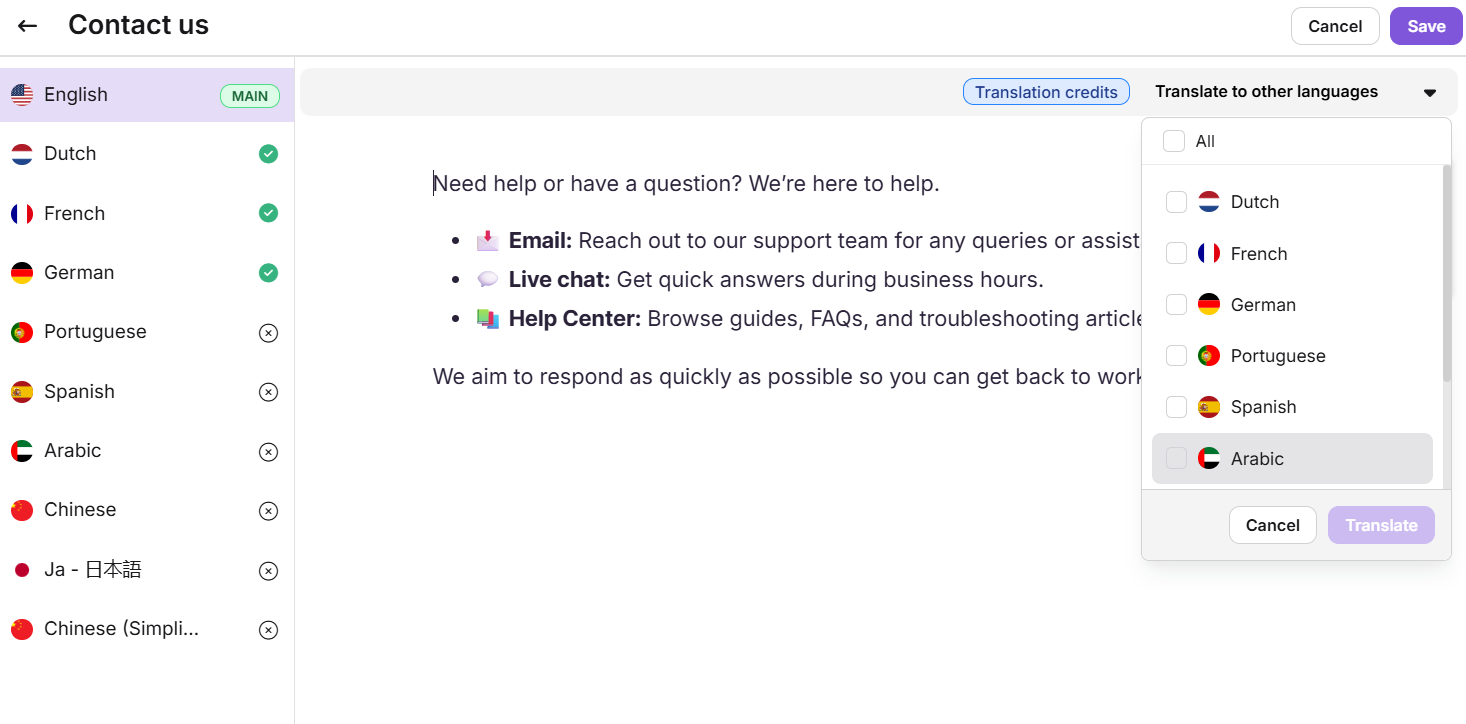
Um den Inhalt in andere Sprachen zu übersetzen, klicken Sie auf das Dropdown-Menü "In andere Sprachen übersetzen ".
Wählen Sie die gewünschten Sprachen aus der Liste und klicken Sie auf Übersetzen.
HINWEIS
Die Standardsprache wird als Hauptsprache markiert.
Übersetzte Sprachen zeigen nach Abschluss der Übersetzung ein grünes Häkchen (✔) an.
Du kannst manuell zu unübersetzten Sprachen wechseln und bei Bedarf Übersetzungen hinzufügen.
Klicken Sie auf Speichern , um alle Übersetzungen zu speichern.
Wenn du zum Beispiel einen Ausschnitt für eine Begrüßungsnachricht auf Englisch erstellst, kannst du die Übersetzungsfunktion nutzen, um dieselbe Nachricht auf Französisch, Spanisch, Niederländisch usw. hinzuzufügen.
Übersetzung bestehender Ausschnitte
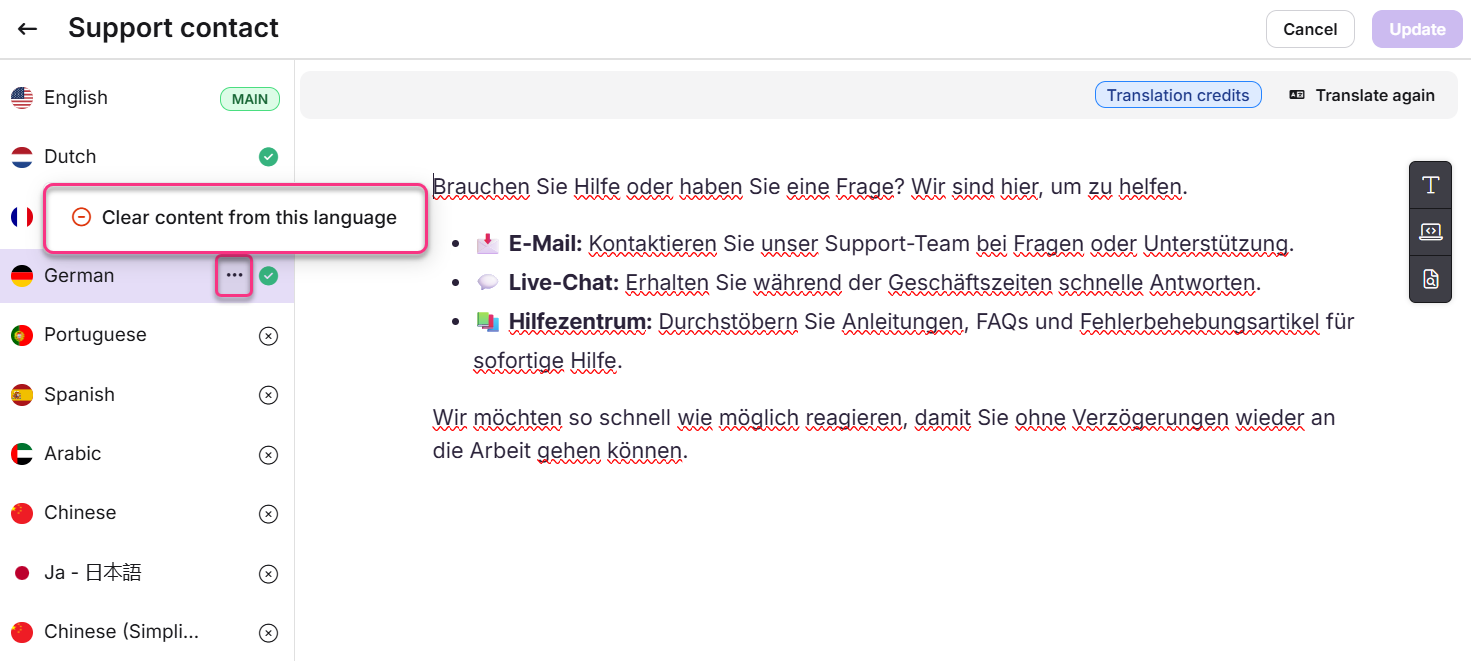
Klicken Sie auf der Seite Snippets auf den gewünschten vorhandenen Snippet, den Sie übersetzen möchten.
Navigiere zu Übersetzen in andere Sprachen und wähle die gewünschte Sprache aus, die der Ausschnitt übersetzt werden muss.
Klicken Sie auf Übersetzen.
Falls nötig, kannst du in andere Sprachen navigieren und erneut in diese übersetzen.
Um den Inhalt erneut zu übersetzen, klicken Sie erneut auf Übersetzen. Dadurch wird die bestehende Übersetzung durch eine neue überschrieben.
Wenn Sie den übersetzten Ausschnitt für eine bestimmte Sprache entfernen müssen, klicken Sie auf das Symbol More () und wählen Sie Inhalte aus dieser Sprache löschen.
Du kannst den Inhalt jederzeit neu übersetzen, falls nötig.
Fehlerbehebung
Schnipsel erscheinen nicht im Editor-Menü
Dieses Problem tritt typischerweise auf, wenn ein Ausschnitt in einer Sprache erstellt, aber in einem Artikel in einer anderen Sprache verwendet wird. In Document360 sind Ausschnitte sprachspezifisch, sofern sie nicht unter der Globalsprachen-Einstellung erstellt werden.
Schritte zur Lösung:
Stellen Sie sicher, dass der Ausschnitt in derselben Sprache wie der Aufsatz verfasst ist, an dem Sie arbeiten.
Wenn der Ausschnitt in einer anderen Sprache erstellt wurde, verwenden Sie die Option Übersetzen in andere Sprachen , die im Bereich Inhaltswiederverwendung verfügbar ist.
Nach der Übersetzung wechseln Sie im Artikeleditor zur gewünschten Sprache. Der Ausschnitt sollte jetzt erscheinen, wenn Sie versuchen, ihn in den Artikel einzufügen.
HINWEIS
Schnipartikel, die unter einer bestimmten Sprache erstellt werden, erscheinen nur in Artikeln, die in derselben Sprache verfasst sind.
Wenn die Ausschnitte nach den obigen Schritten immer noch nicht erscheinen, kontaktieren Sie support@document360.com bitte mit den folgenden Details:
Ein Screenshot des Ausschnitts im Bereich Wiederverwendung von Inhalten.
Ein Screenshot, der zeigt, dass der Ausschnitt nicht im Artikeleditor erscheint..
FAQ
Wie viele Schnipsel können in einem Projekt erstellt werden?
Du kannst bis zu 200 Schnipsel in einem einzigen Projekt erstellen. Wenn du mehr brauchst, können zusätzliche Schnipsel als Add-on gekauft werden.
Kann ich den Namen eines Ausschnitts ändern, nachdem er erstellt wurde?
Obwohl man den Inhalt eines Ausschnitts bearbeiten kann, kann der Name nach der Erstellung nicht mehr geändert werden.
Warum wird ein Ausschnitt in eine neue Zeile eingefügt?
Schnipsel werden als neue Inhaltsblöcke gestaltet, sodass mehrere Zeilen hinzugefügt werden können. Daher beginnen sie immer mit einer neuen Zeile, um Struktur und Klarheit zu bewahren.
Kann ich Variablen in Snippets verwenden?
Derzeit wird die Verwendung von Variablen in Snippets in Document360 nicht unterstützt. Wenn man eine Variable in einen Snippet einfügt, wird sie weder in der Editor-Vorschau noch in exportierten Ausgaben (wie PDF) korrekt wiedergegeben.