


Pläne, die den Einsatz von Editoren unterstützen
| Professional | Business | Enterprise |
|---|---|---|
Die Verwendung des Texteditors in Document360 ist für die effiziente Erstellung und Verwaltung von Wissensdatenbankartikeln unerlässlich.
Mit Document360 können Sie Artikel in drei vielseitigen Editoroptionen erstellen:
Mit der Markdown editor können Autoren Syntax und HTML verwenden, um Artikel anzupassen.
Der WYSIWYG -Editor (What You See Is What You Get) verwendet Rich-Text-Formatierung und enthält eine umfangreiche Formatierungssymbolleiste. Sie können jedoch keinen benutzerdefinierten Code in Artikeln verwenden.
Der Advanced WYSIWYG editor ist die neueste Ergänzung der Editoroptionen in Document360 und fungiert als Hybrid zwischen dem Markdown- und dem WYSIWYG-Editor.
Document360 sorgt für eine benutzerfreundliche Erfahrung, die die Klarheit, Konsistenz und Interaktion von Inhalten verbessert.
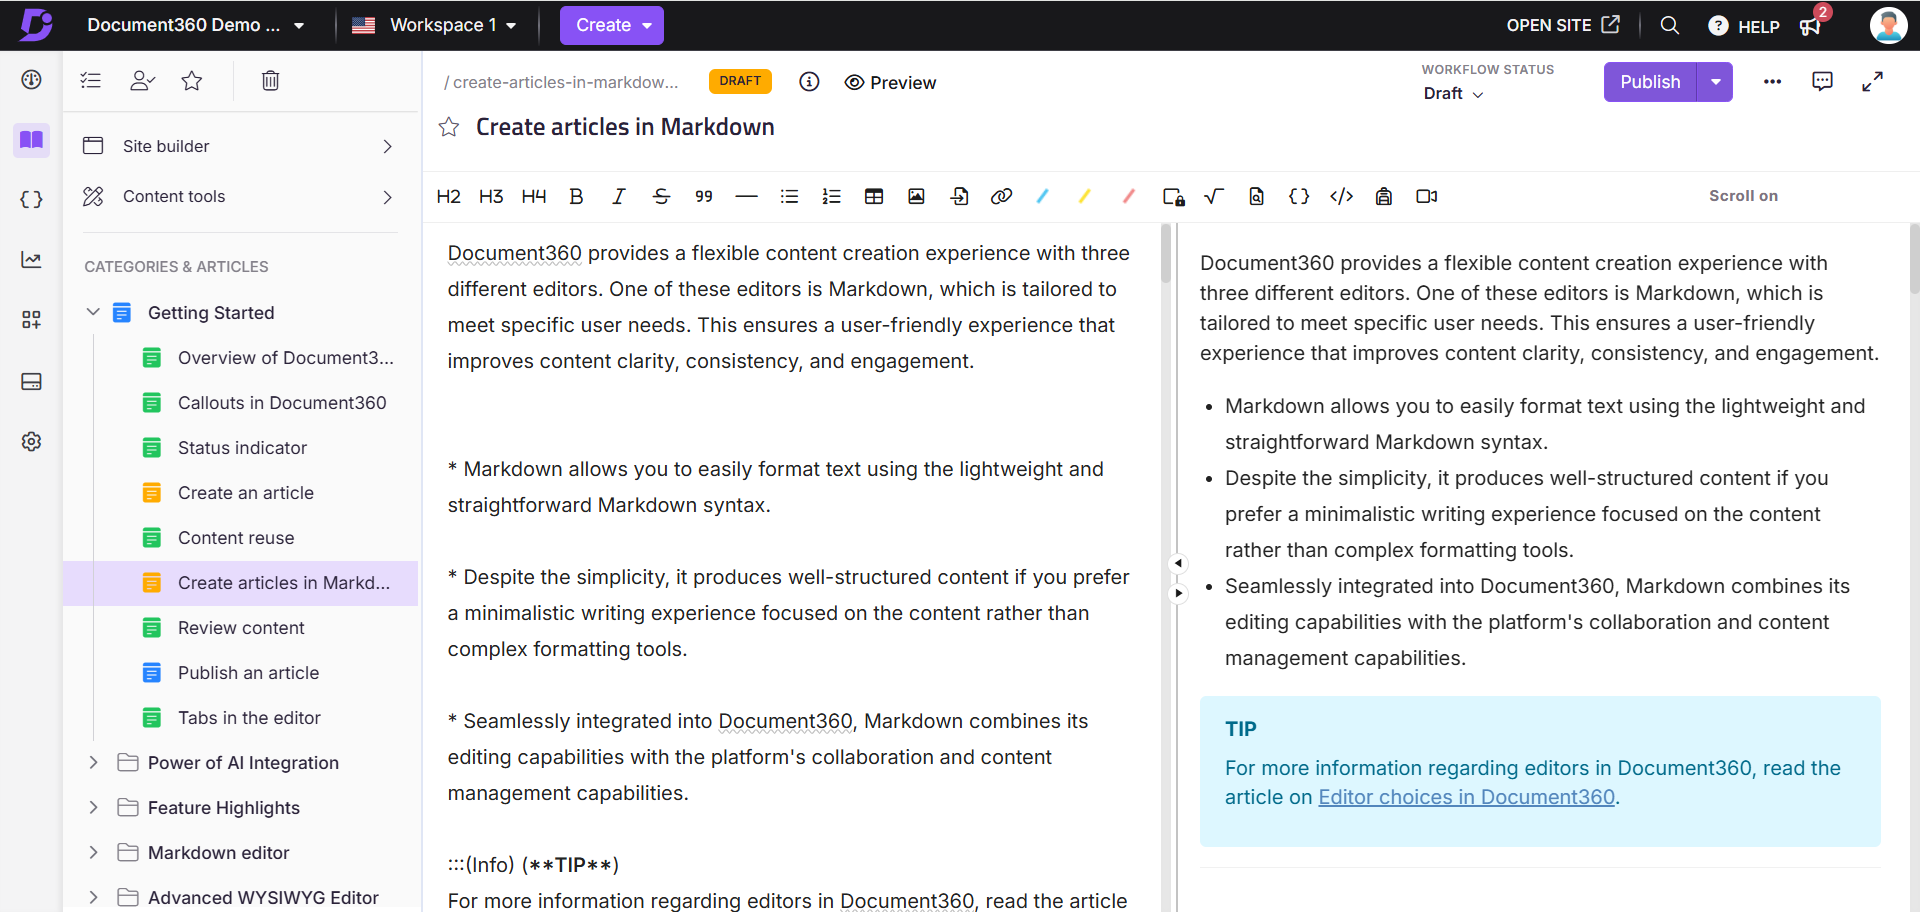
Markdown-Editor
Der Markdown-Editor verfügt über einen Arbeitsbereich mit geteiltem Bildschirm und Funktionen, mit denen Sie einen Artikel während des Schreibens verwalten können.
Auf der linken Seite des Bildschirms können Sie die Markdown-Syntax eingeben und anwenden.
Auf dem Vorschaubildschirm auf der rechten Seite können Sie vor der Veröffentlichung sehen, wie Ihr Artikel aussehen wird.
Scroll on zeigt an, dass beide Abschnitte gleichzeitig gescrollt werden. Klicken Sie auf Scroll on , um den automatischen Bildlauf zu deaktivieren.
Klicken Sie auf Vorschau , um zu sehen, wie Ihr Beitrag auf der Wissensdatenbank-Website angezeigt wird.
Nach der Veröffentlichung finden Sie das Symbol Link kopieren () in der Nähe des Symbols In Wissensdatenbank anzeigen ().
Verwenden Sie die Pfeile auf der Trennlinie, um eines der Fenster des Editors zu reduzieren.
Szenarien, in denen der Markdown-Editor empfohlen wird
Der Markdown-Editor bietet Flexibilität bei der Erstellung und Anpassung von Artikeln und erzwingt einen einheitlichen Schreibstil und eine einheitliche Formatierung in der gesamten Dokumentation. Diese Konsistenz ist entscheidend für ein professionelles Erscheinungsbild in der Produktdokumentation.
Sie können z. B. Bilder mithilfe der Symbolleiste einfügen, die das folgende Markdown einfügt:
![Image Alt Text] (Image URL){height="" width=""}.Sie können die Bildgröße anpassen, indem Sie die gewünschten Werte hinzufügen (z. B. height="600px" width="400px"). Erweiterte Formatierungen, wie z. B. Schatten und Rahmen, können mit HTML-Anpassungsausschnitten erreicht werden.
ANMERKUNG
Weitere Informationen finden Sie in den Artikeln zum Markdown editor und Markdown basics.
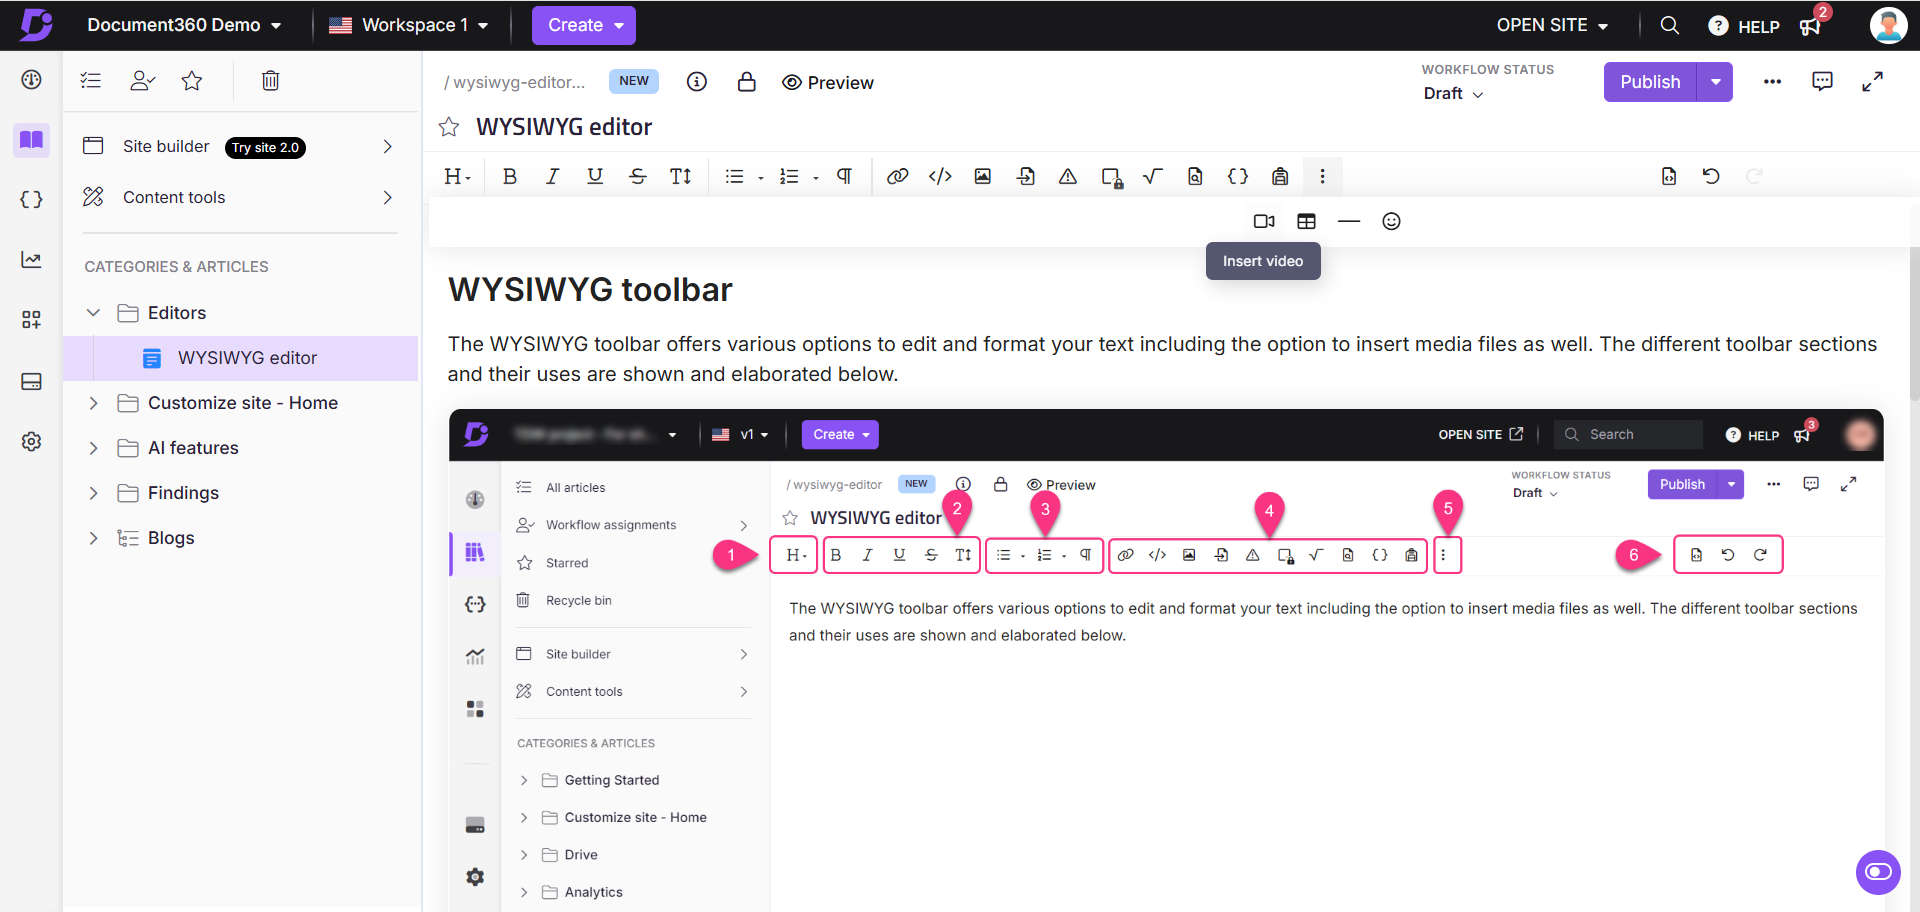
WYSIWYG-Editor
Der WYSIWYG, was für What You See Is What You Get steht, ist ein HTML-basierter Editor, der sich vom Markdown-Editor unterscheidet. Es ermöglicht Ihnen, die tatsächliche Formatierung des Beitrags anzuzeigen, während Sie Inhalte eingeben oder einfügen.
Szenarien, in denen der WYSIWYG-Editor empfohlen wird
Wenn Teammitglieder, die zu Artikeln beitragen, mit HTML-basierten Editoren wie WordPress vertraut sind, ist dieser Editor relativ einfach zu bedienen. Wenn Ihre Dokumentationsartikel viel Code und Medien enthalten, bietet der WYSIWYG-Editor außerdem umfangreiche Formatierungsoptionen für Text, Bilder, Videos und mehr.
ANMERKUNG
Weitere Informationen finden Sie im Artikel auf WYSIWYG editor.
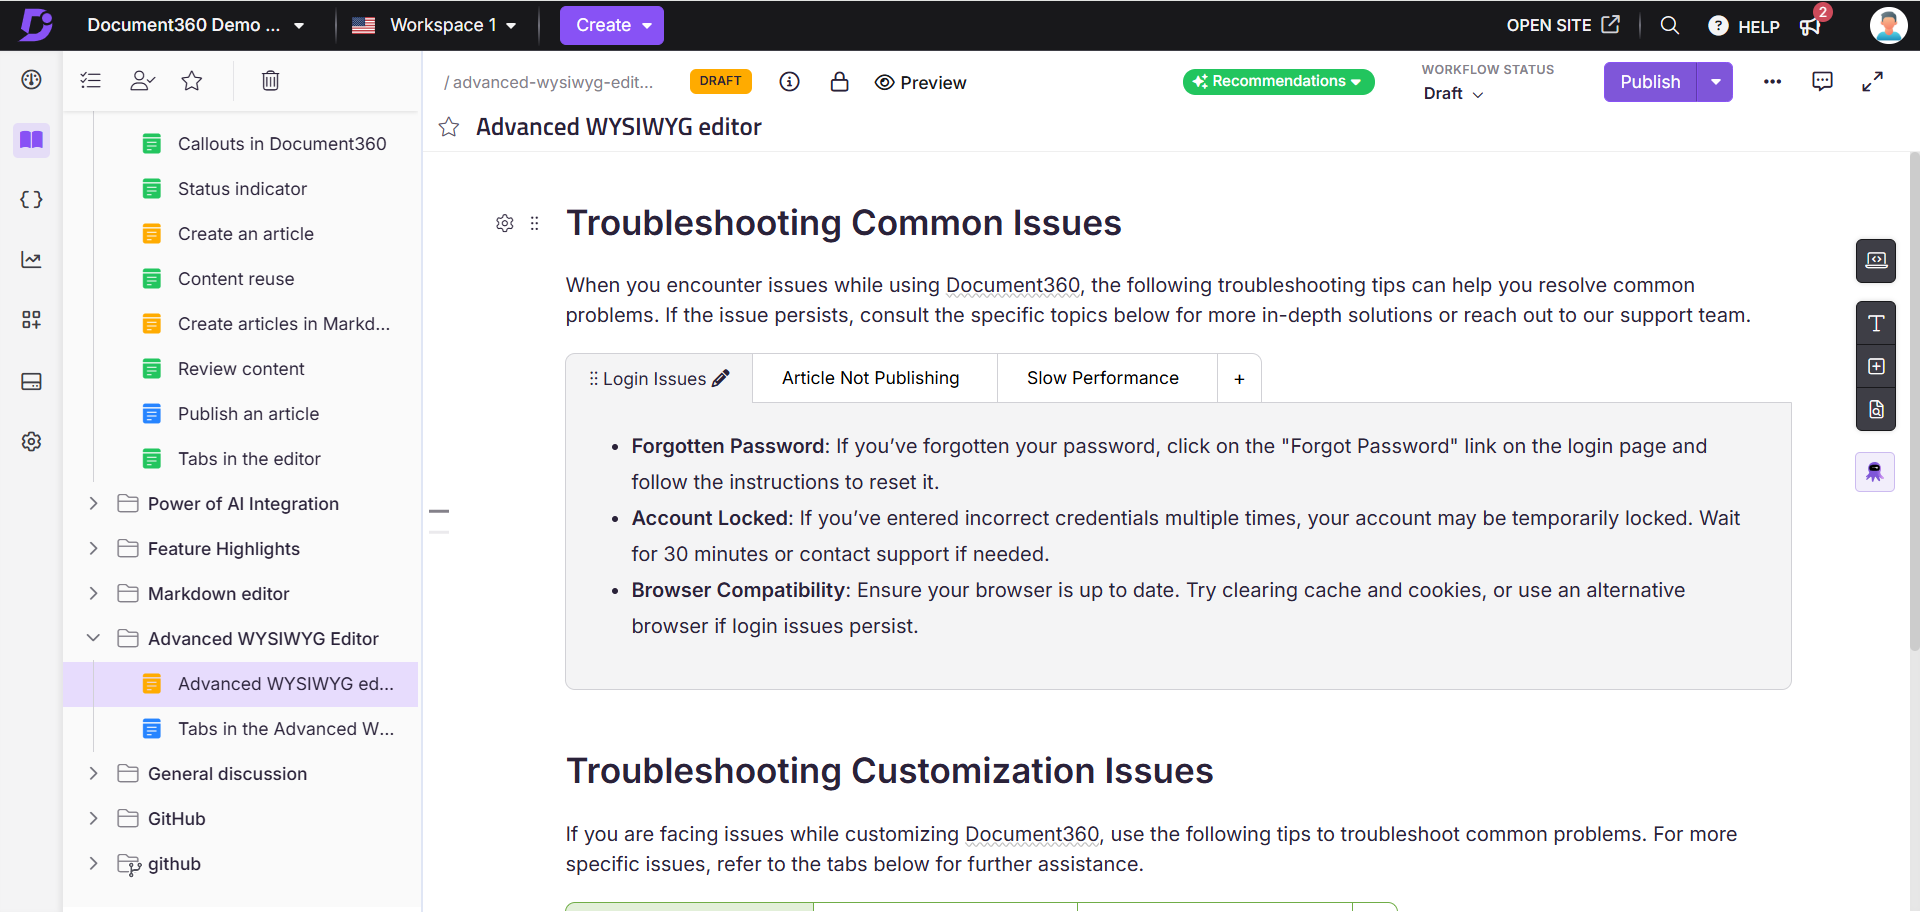
Erweiterter WYSIWYG-Editor
Der schlanke und leistungsstarke "Advanced WYSIWYG Editor" bietet Rich-Text-Bearbeitungsfunktionen und unterstützt die Markdown-Syntax, was im Vergleich zum Markdown-Editor eine visuellere und intuitivere Erfahrung bietet und gleichzeitig eine ähnliche Flexibilität wie der WYSIWYG-Editor bietet.
Geben Sie etwas in / den Editor ein, und eine Liste mit Optionen wird angezeigt. Sie können nach den Optionen suchen, indem Sie Befehlsnamen eingeben. Klicken Sie auf den gewünschten Befehl oder drücken Sie die Eingabetaste, um den Befehl auszuwählen.
Szenarien, in denen der erweiterte WYSIWYG-Editor empfohlen wird
Angenommen, Sie verfügen über Wissensdatenbankartikel mit textzentrierten, codelastigen und medienintensiven Artikeln. In solchen Fällen ist der Advanced WYSIWYG-Editor eine flexible Alternative zu Markdown und WYSIWYG. Dies ermöglicht eine schnelle syntaxbasierte Bearbeitung, ähnlich wie bei Markdown, und umfangreiche Text- und Bildformatierungsoptionen wie der WYSIWYG-Editor.
ANMERKUNG
Weitere Informationen finden Sie im Document360-Hilfeartikel zu Advanced WYSIWYG editor.
Ändern des Standardeditors auf Projektebene
So legen Sie den WYSIWYG/Advanced WYSIWYG-Editor als Standardeditor fest:
Navigieren Sie im Wissensdatenbank-Portal zu Einstellungen () > Wissensdatenbank-Portal > Allgemein .
Wählen Sie im Abschnitt Editor den gewünschten Editor aus.
Klicken Sie auf Speichern.

ANMERKUNG
Wenn Sie den Standard-Editor Ihres Projekts ändern, können Sie für alle neuen Artikel, die Sie erstellen, den jeweiligen Editor auswählen.
Wechseln zwischen Markdown - WYSIWYG - Erweiterter WYSIWYG-Editor
Der Markdown-Editor ist der Standardeditor für alle neuen Projekte und Artikel in Document360. Wenn Sie den WYSIWYG-Editor oder den erweiterten WYSIWYG-Editor verwenden möchten, können Sie auf Projekt- oder Artikelebene zu diesem Editor wechseln.
Editorwechsel auf Artikelebene
Möglich |
|
Nicht möglich |
|
Um den Editor auf einer einzelnen /category-Seite zu wechseln, führen Sie die folgenden Schritte aus
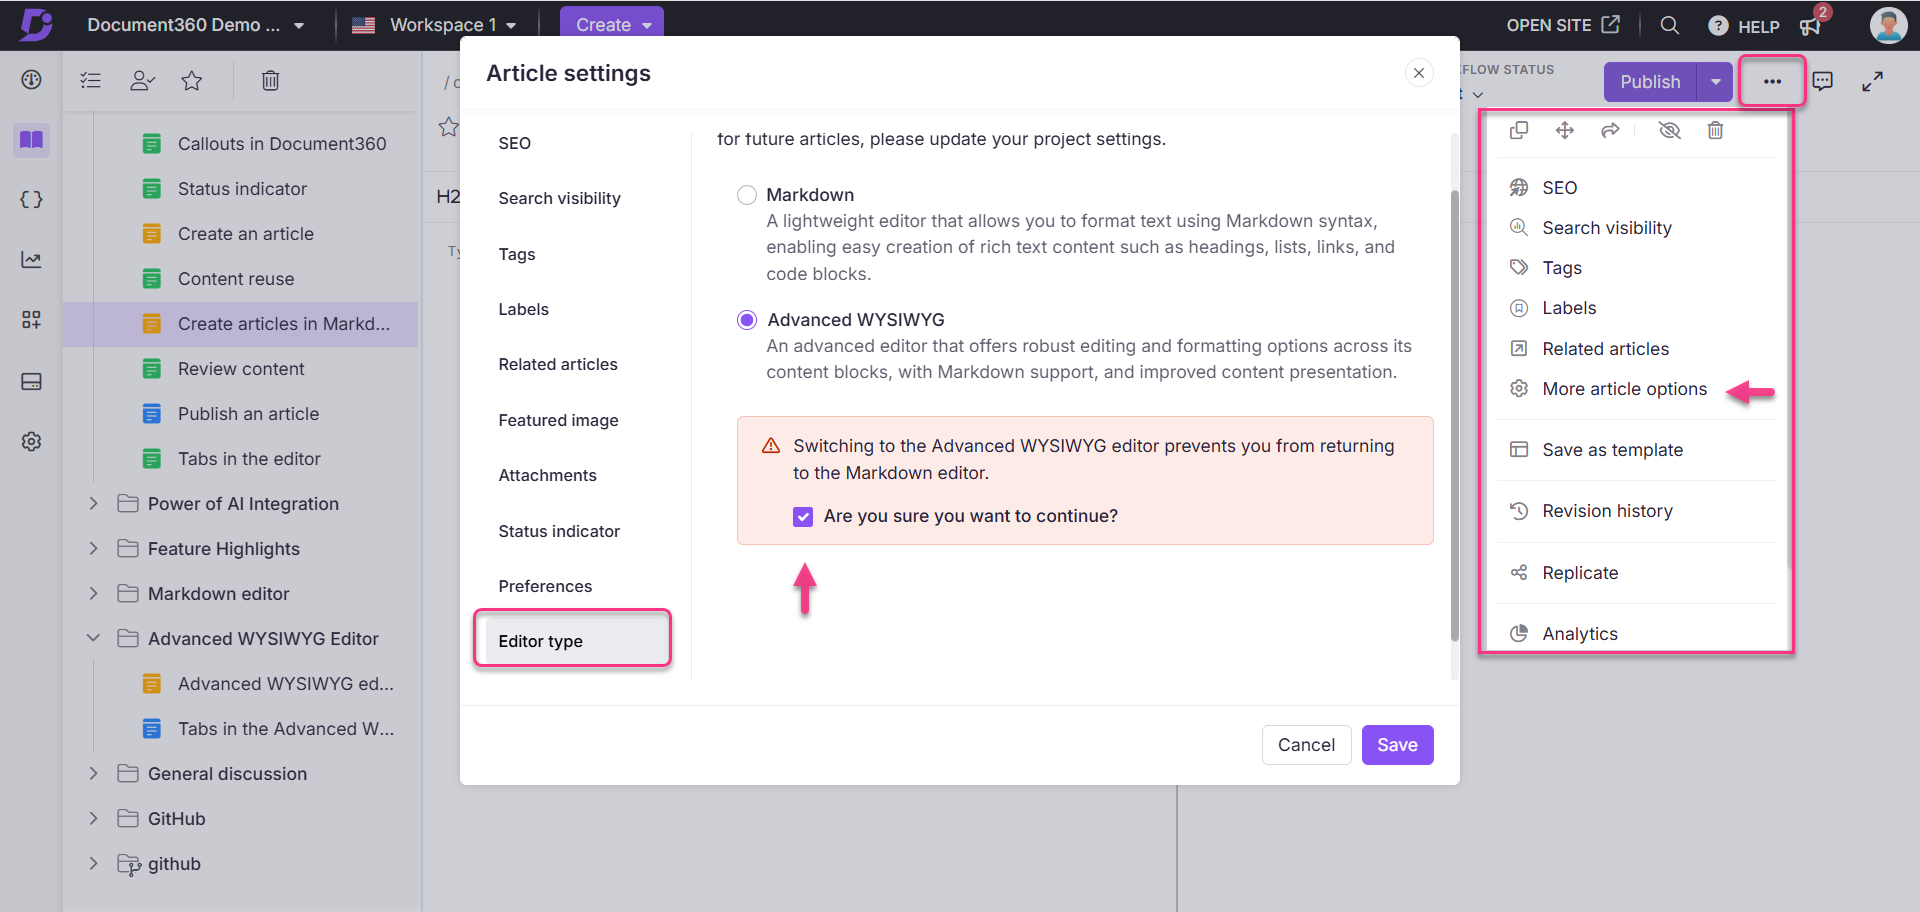
Klicken Sie auf der Artikel-/Kategorieseite auf das Symbol Mehr (•••) und wählen Sie Weitere Artikeloptionen aus.
Das Fenster "Artikeleinstellungen " wird angezeigt.
Wählen Sie auf der Registerkarte Editor den gewünschten Editor aus.
Aktivieren Sie das Kontrollkästchen Sind Sie sicher, dass Sie fortfahren möchten.
Klicken Sie auf Speichern.
Die gleichen Schritte gelten für die API-Dokumentation.
5_Screenshot-Switching_editors
ANMERKUNG
Nachdem Sie auf Beitragsebene zum erweiterten WYSIWYG-Editor gewechselt haben, können Sie den Editortyp für diesen bestimmten Artikel nicht mehr zurücksetzen. Für zukünftige Artikel kann der Benutzer mit der Berechtigung "Projekteinstellungen - Aktualisieren" jedoch den Standard-Editor über "Einstellungen" > Wissensdatenbank-Portal > "Allgemeiner >-Editor" festlegen.
Umgang mit nicht unterstützten HTML-Tags und -Attributen im erweiterten WYSIWYG-Editor
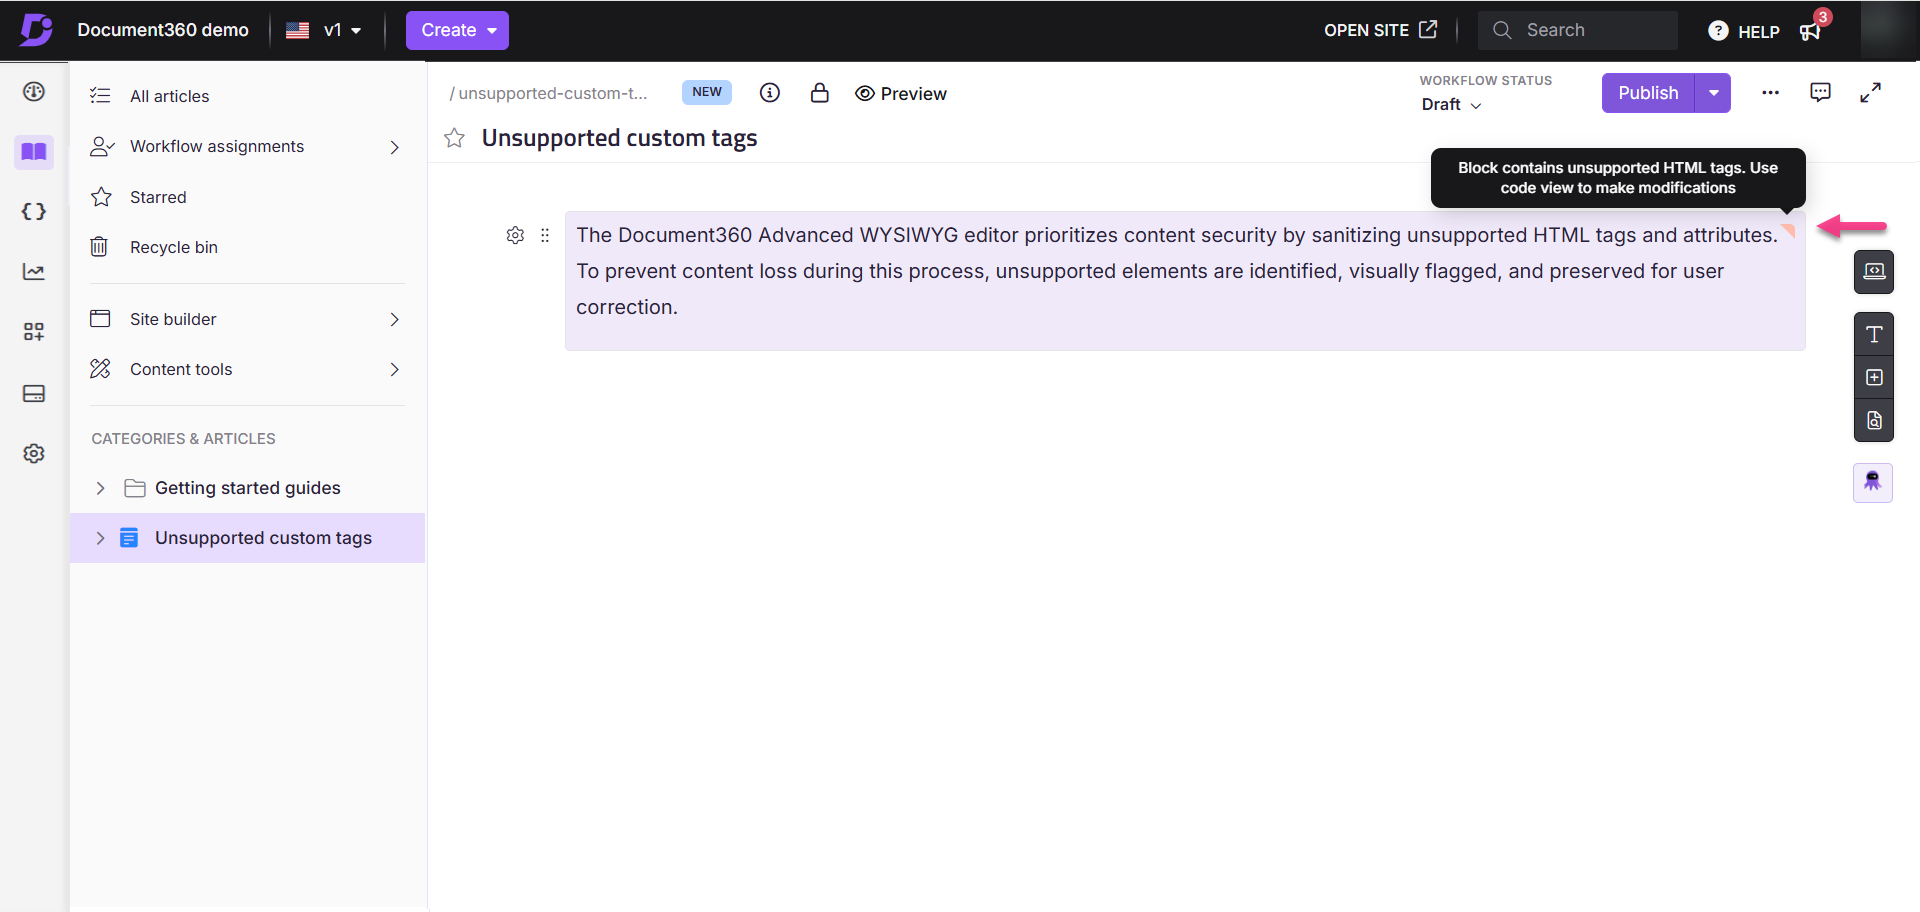
Der erweiterte WYSIWYG-Editor in Document360 gewährleistet die Inhaltssicherheit, indem er nicht unterstützte HTML-Tags und -Attribute verwaltet. Anstatt sie zu entfernen, markiert der Editor diese Elemente und behält sie bei, damit Benutzer sie überprüfen und korrigieren können.
Wann ist das der Fall?
Migrieren von WYSIWYG zum erweiterten WYSIWYG-Editor
Beim Wechsel zwischen den Editoren werden nicht unterstützte Inhalte automatisch identifiziert und gekennzeichnet, damit Benutzer potenzielle Probleme beheben können.
Bearbeiten von Inhalten im erweiterten WYSIWYG-Editor
Wenn nicht unterstützte Tags oder Attribute in der Codeansicht hinzugefügt werden, werden sie vom Editor erkannt, gekennzeichnet und visuell zur Korrektur markiert.
Was passiert, wenn nicht unterstützte Elemente erkannt werden?
Der Editor erkennt während des Parsens nicht unterstützte HTML-Tags (z. B
<marquee>. ,<blink>) und Attribute (z. Bonmouseover. ,style="text-decoration:blink").Diese Elemente werden innerhalb des Inhalts mithilfe von benutzerdefinierten Indikatoren wie QuickInfos und Blockhervorhebungen visuell gekennzeichnet, ohne die Inhaltsstruktur zu stören.
Im Editor können Sie den Block des gewünschten, nicht unterstützten Elements nicht bearbeiten. Benutzer können jedoch mit gekennzeichneten Elementen interagieren und Optionen zum Ändern, Entfernen oder Korrigieren in der Codeansicht erhalten.
Unterstützte Tags im erweiterten WYSIWYG-Editor
Nachfolgend finden Sie eine Liste der Tags mit Unterstützung für benutzerdefinierte Attribute im erweiterten WYSIWYG-Editor:
Tags zur Textformatierung
Tags, die die Darstellung von Text definieren oder ändern:
Abkürzung: Steht für Abkürzungen oder Akronyme.
Blockquote: Zeigt zitierte Inhalte an.
Überschrift: Stellt Überschriften dar (z. B.
<h1>,<h2>).Absatz: Definiert einen Textabsatz.
Sub & Super Scripts: Wird für tiefgestellt (
<sub>) und hochgestellt (<sup>) verwendet.Inlinecode: Stellt einen kurzen Codeausschnitt innerhalb einer Textzeile dar.
Tags auflisten
Tags, die Inhalte als Listen strukturieren:
Aufzählung: Stellt ungeordnete Listen dar (
<ul>).Geordnete Liste: Stellt geordnete Listen dar (
<ol>).Aufgabenliste: Wird für interaktive oder visuelle Checklisten verwendet.
Listenelemente: Stellt einzelne Listenelemente dar (
<li>).
Formular- und interaktive Tags
Tags, die zum Erstellen von Formularen und interaktiven Elementen verwendet werden:
Eingabe: Definiert Eingabefelder.
Beschriftung: Beschriftungen, die mit Formularelementen verknüpft sind.
Textbereich: Ermöglicht die Eingabe von mehrzeiligem Text.
Link- und Medien-Tags
Tags zum Verknüpfen oder Einbetten von Medien:
Link: Definiert Hyperlinks (
<a>).Bild: Bettet Bilder ein (
<img>).Video: Bettet Videos ein (
<video>).Objekt: Bettet externe Ressourcen ein (z. B. Flash).
Iframe: Bettet Inline-Frames ein (
<iframe>).
Zusätzliche Tags
Zusätzliche Tags mit einzigartigen Zwecken:
Div: Ein generischer Container zum Gruppieren von Inhalten.
Kbd: Stellt die Tastatureingabe dar.
Details: Erstellt ein Offenlegungs-Widget zum Ein- oder Ausblenden von Inhalten.
Zusammenfassung: Stellt eine Zusammenfassung für das
<details>Tag bereit.
Häufig gestellte Fragen
Was ist ein Texteditor in der Wissensdatenbank von Document360?
Ein Tool, mit dem Teamkonten Inhalte für ihre Artikel und Kategorieseiten erstellen, bearbeiten und formatieren können. Jede Editor-Option bietet eine benutzerfreundliche Oberfläche, um die Erstellung von Inhalten innerhalb des Wissensdatenbank-Portals zu erleichtern.
Was sind die wichtigsten Funktionen eines Texteditors für die Dokumentation?
Texteditoren mit Kontext zu Wissensdatenbanken bieten in der Regel Funktionen wie grundlegende Textformatierung (fett, kursiv, unterstrichen, durchgestrichen), Texttypformatierung (Überschriften, Legendenlisten, Tabellen), Medieneinbettung (Bilder, Videos), Dateianhänge, Codeformatierung und vor allem eine einfach zu bedienende Oberfläche.
Kann ich Bilder und Videos direkt im Texteditor einbetten?
Ja, alle in Document360 verfügbaren Texteditoren unterstützen das Einbetten von Medien. Benutzer können Bilder, Videos und andere Multimedia-Elemente ganz einfach direkt in ihre Artikel einfügen, um eine bessere visuelle Attraktivität zu erzielen.
Kann ich zwischen verschiedenen Texteditor-Optionen wechseln?
Sie haben die Möglichkeit, den Editor auszuwählen, der Ihren Vorlieben und Bedürfnissen auf Projektebene am besten entspricht. Sie können die Editoren auch einmal auf Artikelebene wechseln, aber der Wechsel zurück hat einige Einschränkungen. Bitte beachten Sie den Abschnitt Switching editor in diesem Artikel.
Funktionieren die Tastenkombinationen in den verschiedenen Document360-Editoren?
Ja, jeder der drei Editoren (Markdown-, WYSIWYG- und erweiterter WYSIWYG-Editor) verfügt über eine Sammlung von Tastenkombinationen. Die meisten herkömmlichen Tastenkombinationen, die in Tools wie Microsoft Word und Google Docs universell verwendet werden, sind mit den Document360-Editoren verfügbar.
ANMERKUNG
Es gibt viele Verknüpfungen im erweiterten WYSIWYG-Editor, klicken Siehere, um mehr zu erfahren.
Wie helfen Tastenkombinationen im Editor bei der Dokumentation?
Die Tastenkombination verbessert, wie der Name schon sagt, die Effizienz beim Schreiben, indem sie die Notwendigkeit minimiert, die Maus zu verwenden, um bestimmte Aktionen auszuführen und auf die Werkzeuge im Artikel zuzugreifen, ohne dass Ihre Finger die Tastatur des Geräts verlassen.
Wie wähle ich die richtige Texteditor-Option für meine Wissensdatenbank aus?
Berücksichtigen Sie die folgenden Faktoren, bevor Sie den Editor auf Projekt- oder Artikelebene auswählen
Benutzerfreundlichkeit
Art der Dokumentation, die Sie erstellen
Verwendung von Mediendateien
Vertrautheit des Autors mit dem Editor
Sind die bestehenden Artikel von der Änderung des Standardeditors betroffen?
Bestehende Artikel verwenden weiterhin denselben Editor wie zuvor, während nur die neu erstellten Artikel den neu ausgewählten Standard-Editor verwenden.