Gmail is een veelgebruikte e-maildienst die integreert met Google Drive, Agenda en andere tools waar je team al op vertrouwt. Wanneer nieuwe artikelen in uw Document360-kennisbank worden gepubliceerd, moet u mogelijk externe leveranciers, belanghebbenden of teamleden op de hoogte stellen van de update. Door Document360 en Gmail via Zapier te verbinden, kun je dit automatiseren: telkens wanneer een nieuw artikel in Document360 wordt gepubliceerd, stuurt Zapier automatisch een aangepaste e-mail via Gmail naar de door jou opgegeven ontvangers — zodat iedereen zonder handmatige inspanning op de hoogte blijft.
Wanneer deze integratie te gebruiken
- Je publiceert regelmatig nieuwe kennisbasisartikelen en moet externe belanghebbenden, klanten of leveranciers op de hoogte stellen van updates zonder elke keer handmatig e-mails te sturen.
- Je beheert een documentatieworkflow waarbij specifieke teams gewaarschuwd moeten worden wanneer nieuwe content live gaat, zodat ze erop kunnen reageren — bijvoorbeeld een supportteam, een trainingscoördinator of een contentreviewgroep.
- Je wilt een lichtgewicht notificatiesysteem dat Document360-publicatiegebeurtenissen verbindt met je e-mailcommunicatie zonder dat je een speciale nieuwsbrieftool nodig hebt.
Voordat je begint
- Je moet ingelogd zijn op je Zapier-account.
- Je moet een Gmail-account hebben waarmee Zapier verbinding kan maken om e-mails te versturen.
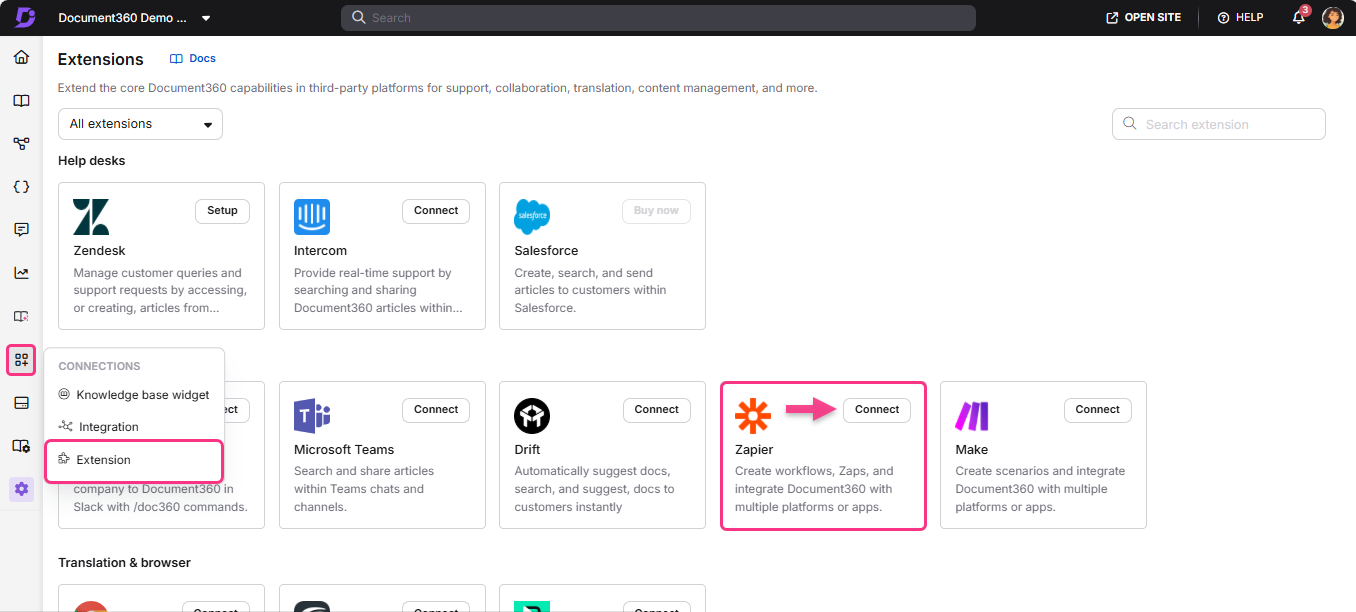
- Je moet je Document360 API-token klaar hebben. Om er een te genereren, ga je naar Connections > Extensions, zoek je de Zapier-tegel en klik je op Connect om het token te kopiëren.
Hoe de Zap op te zetten
Stap 1 — Maak een nieuwe Zap aan
- Log in op je Zapier-account.
- Klik in het linker navigatiemenu op Aanmaken en selecteer Zaps.
- Er wordt een nieuwe Zap gemaakt met een Trigger - en Actieflow .

Stap 2 — Verbind Document360 als trigger
In tegenstelling tot de meeste Zapier-gebruiksgevallen voor Document360, gebruikt deze Zap Document360 als trigger en Gmail als actie — wat betekent dat een Document360-gebeurtenis (zoals een nieuw artikel dat wordt gepubliceerd) de workflow start.
- Kies in het veld Trigger , Document360.
- Selecteer in het Setup-paneel het gewenste evenement in het Event-veld .
- Klik op het Account-veld — er verschijnt een inlogpaneel.
- Voer je inloggegevens in en klik op Toestaan.
Om het API-token te genereren vanuit Document360:
- Navigeer naar Connections > Extensions in de linker navigatiebalk van het kennisbasisportaal.
- Klik op de Zapier-extensietegel op Verbinden.
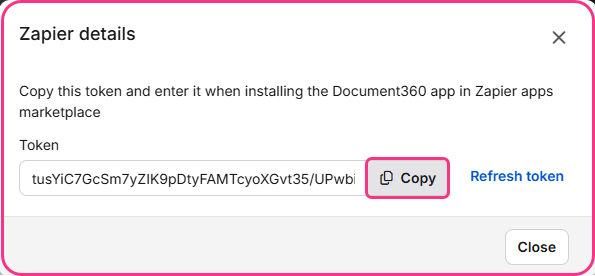
- Klik op het kopieer-icoon om het token te kopiëren.
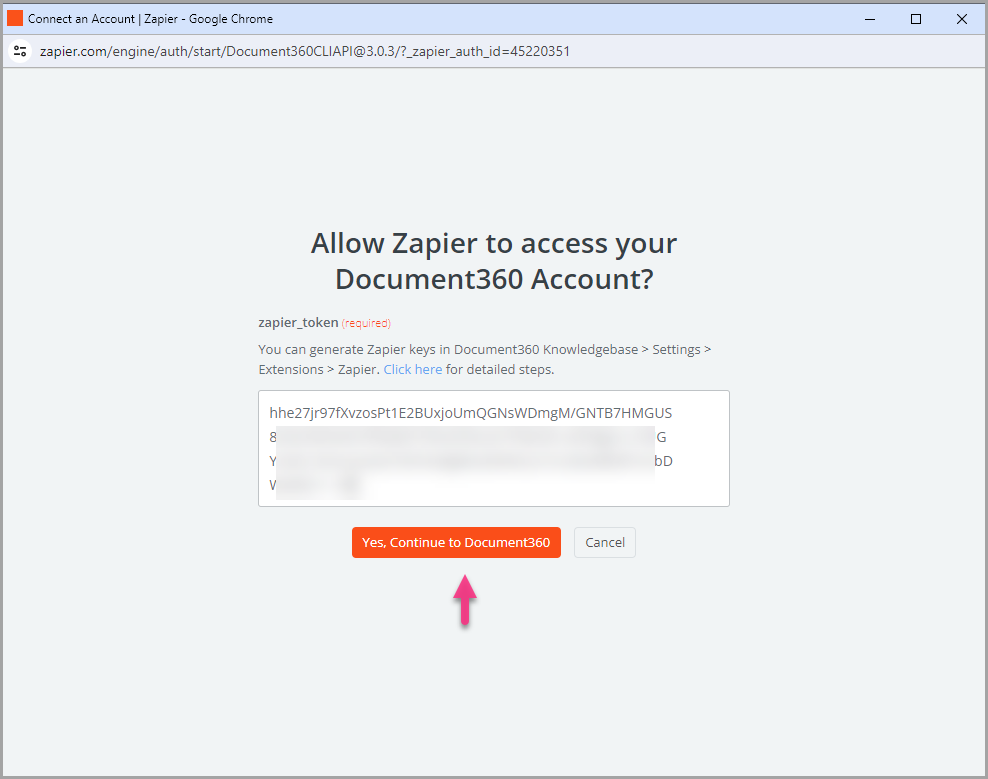
- Ga terug naar het Zapier-paneel en plak het API-token in het veld.
- Klik op ja, ga door naar document360.
- Je kunt het verbonden Document360-project vinden op de Connect Document360-accountpagina . Om later een ander account te gebruiken, klik je op Wijzigen.
- Klik op Doorgaan.
Stap 3 — Test de trigger
- Klik op Test trigger om te bevestigen dat het juiste account is gekoppeld en de trigger-setup correct is.
- Als er geen fouten worden gevonden, klik dan op Doorgaan. De Document360-trigger is nu ingesteld.
Stap 4 — Koppel Gmail als actie
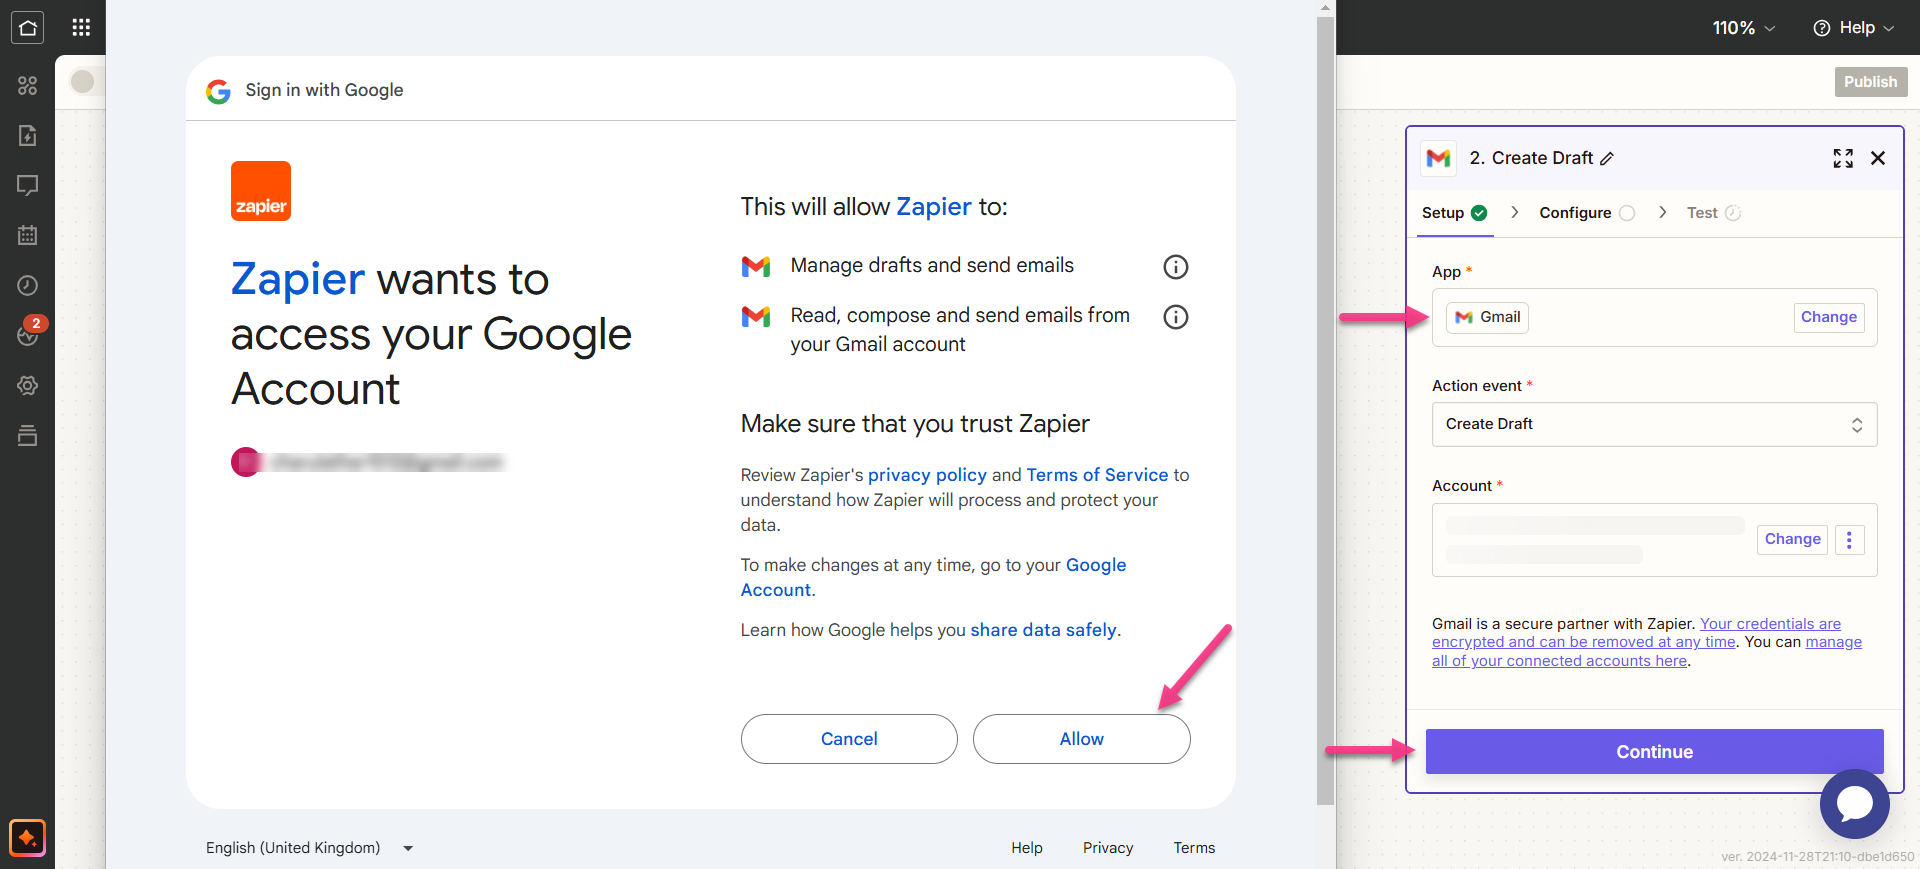
- Kies in het actieveld Gmail.
- Selecteer in het Setup-paneel het gewenste evenement in het Event-veld .
- Klik op het Account-veld — er verschijnt een inlogpaneel.
- Voer je Gmail-gegevens in en klik op Toestaan.
- Klik op Doorgaan.
Stap 5 — Koppel de e-mailvelden
- Wijs de benodigde velden toe om de e-mail te configureren die Gmail zal verzenden:
| Veld | Beschrijving |
|---|---|
| Naar | Voer het e-mailadres van de ontvanger in. Meerdere adressen kunnen afzonderlijk of als een komma-gescheiden lijst worden toegevoegd. |
| CC | Voeg e-mailadressen toe om te kopiëren in deze e-mail. Meerdere adressen kunnen afzonderlijk of als een komma-gescheiden lijst worden toegevoegd. |
| BCC | Voer e-mailadressen in om blind te kopiëren. Meerdere adressen kunnen op dezelfde manier worden toegevoegd. |
| Onderwerp | Voer de onderwerpregel van de e-mail in. |
| Van | Kies een e-mailadres of alias die gekoppeld is aan je Gmail-account. |
| Van Naam | Voer de naam van de afzender in (moet gekoppeld zijn aan het gekoppelde e-mailadres). |
| Carrosserietype | Selecteer het e-mailformaat: platte tekst of HTML. |
| Carrosserie | Schrijf de hoofdinhoud van de e-mail. |
| Standaard handtekening toevoegen | Voeg optioneel een standaardhandtekening in de e-mail op. |
| Label of brievenbus | Selecteer een waarde voor label of mailbox. |
| Bijlagen | Voeg bestanden toe door een daadwerkelijk bestand te selecteren of een publieke URL op te geven. |
Velden die als vereist (*) zijn gemarkeerd, moeten worden ingevuld voordat de Doorgaan-knop wordt ingeschakeld.
- Klik op Doorgaan.
Stap 6 — Test en publiceer de Zap
- Klik in de testsectie op Teststap.
- Als het lukt, krijg je het bericht dat er een concept naar Gmail is gestuurd.
- Ga terug naar het Zapier-setuppaneel en klik op Volgende, en klik vervolgens op Publiceren.
- Bekijk of bewerk de trigger- en actie-instellingen indien nodig. Je zult een succesbericht zien: je Zap staat aan. Klik op Beheer je Zap om naar de Zap-overzichtspagina te gaan.
Zap overzicht
Zodra het actief is, kun je de Zap bekijken en beheren vanuit het Zapier-dashboard. De overzichtspagina toont de trigger, actie en loopgeschiedenis van de Zap.
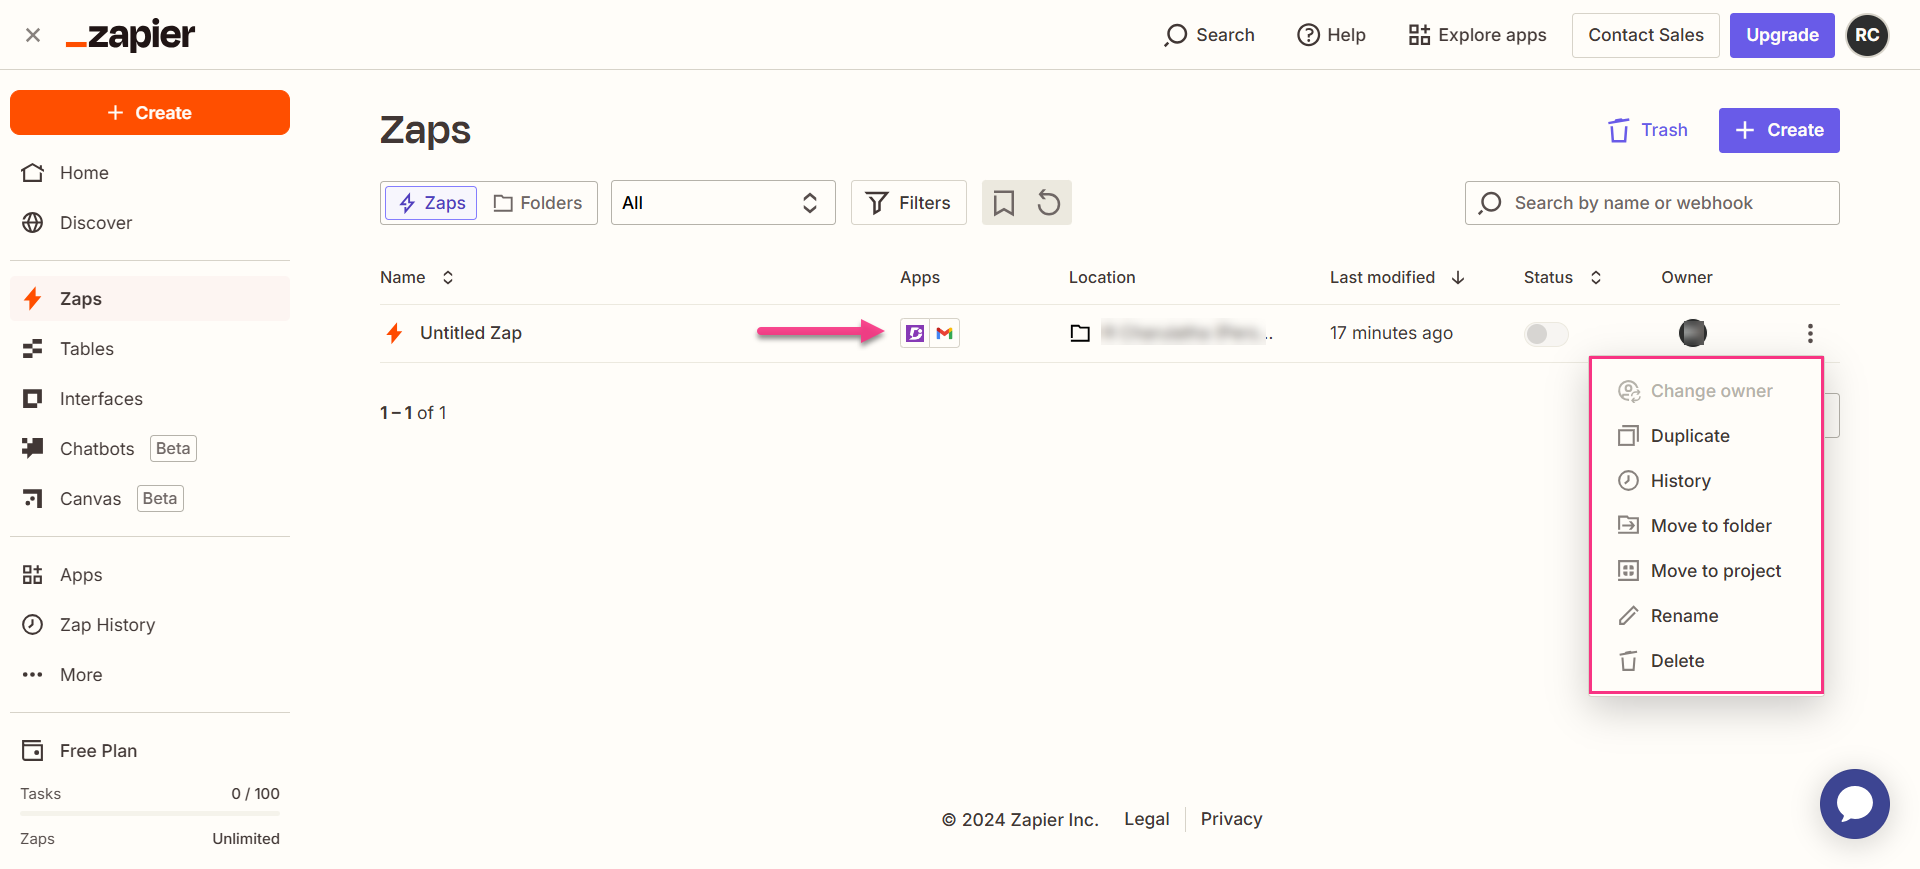
Hoe verwijder je een Zap
- Navigeer naar het Zapier-dashboard. Een lijst van alle bestaande Zaps wordt weergegeven op de overzichtspagina.
- Klik op het Zap-acties () icoon rechts van de Zap die je wilt verwijderen en klik op Verwijderen. De Zap is permanent verwijderd.
Best practices
- Voeg de artikeltitel en URL op in de e-mailtekst door de triggergegevensvelden van Document360 toe te wijzen aan het Body-veld. Dit geeft ontvangers directe context en een link naar de nieuwe inhoud zonder dat ze ernaar hoeven te zoeken.
- Gebruik de Cc- of Bcc-velden voor stakeholderverdelingslijsten in plaats van elke keer individuele adressen in het Aan-veld in te voeren. Dit maakt de Zap makkelijker te onderhouden — je hoeft alleen de distributielijst bij te werken, niet de Zap zelf.
- Kies HTML als het Body-type als je opgemaakte e-mails met koppen, links en styling wilt versturen. Platte tekst werkt goed voor eenvoudige meldingen, maar HTML geeft je meer controle over hoe de e-mail eruitziet voor ontvangers.