A private link lets you share any article with someone who does not have access to your knowledge base portal or site. The link is unique to the article and can be generated, copied, and deleted at any time. You can choose whether a link never expires or set an expiry date when you create it and also edit that expiry later if required. This is useful for sharing draft or restricted articles with reviewers, stakeholders, or external collaborators without publishing the content or granting portal access.
This feature works the same way for regular articles, page categories, API documentation articles, and custom pages.
When to use private links
- Share a draft article with a stakeholder or subject matter expert for review before publishing.
- Share a restricted article with an external collaborator who is not a user in your Document360 project.
- Provide temporary, time-boxed access to content without adding the recipient as a reader or user.
Before you begin
- You must have the Editor content role, or a custom role with View, Update and Delete access to the Share link permission, to create, edit, or stop sharing a private link.
- With only View access to Share link, you can see whether an article has an active link, but you can't create, edit, or delete one.
- Content roles are managed under Settings > Users & Permissions > Roles & permissions > Content role.
Create a private link
- Navigate to the article in the knowledge base portal.
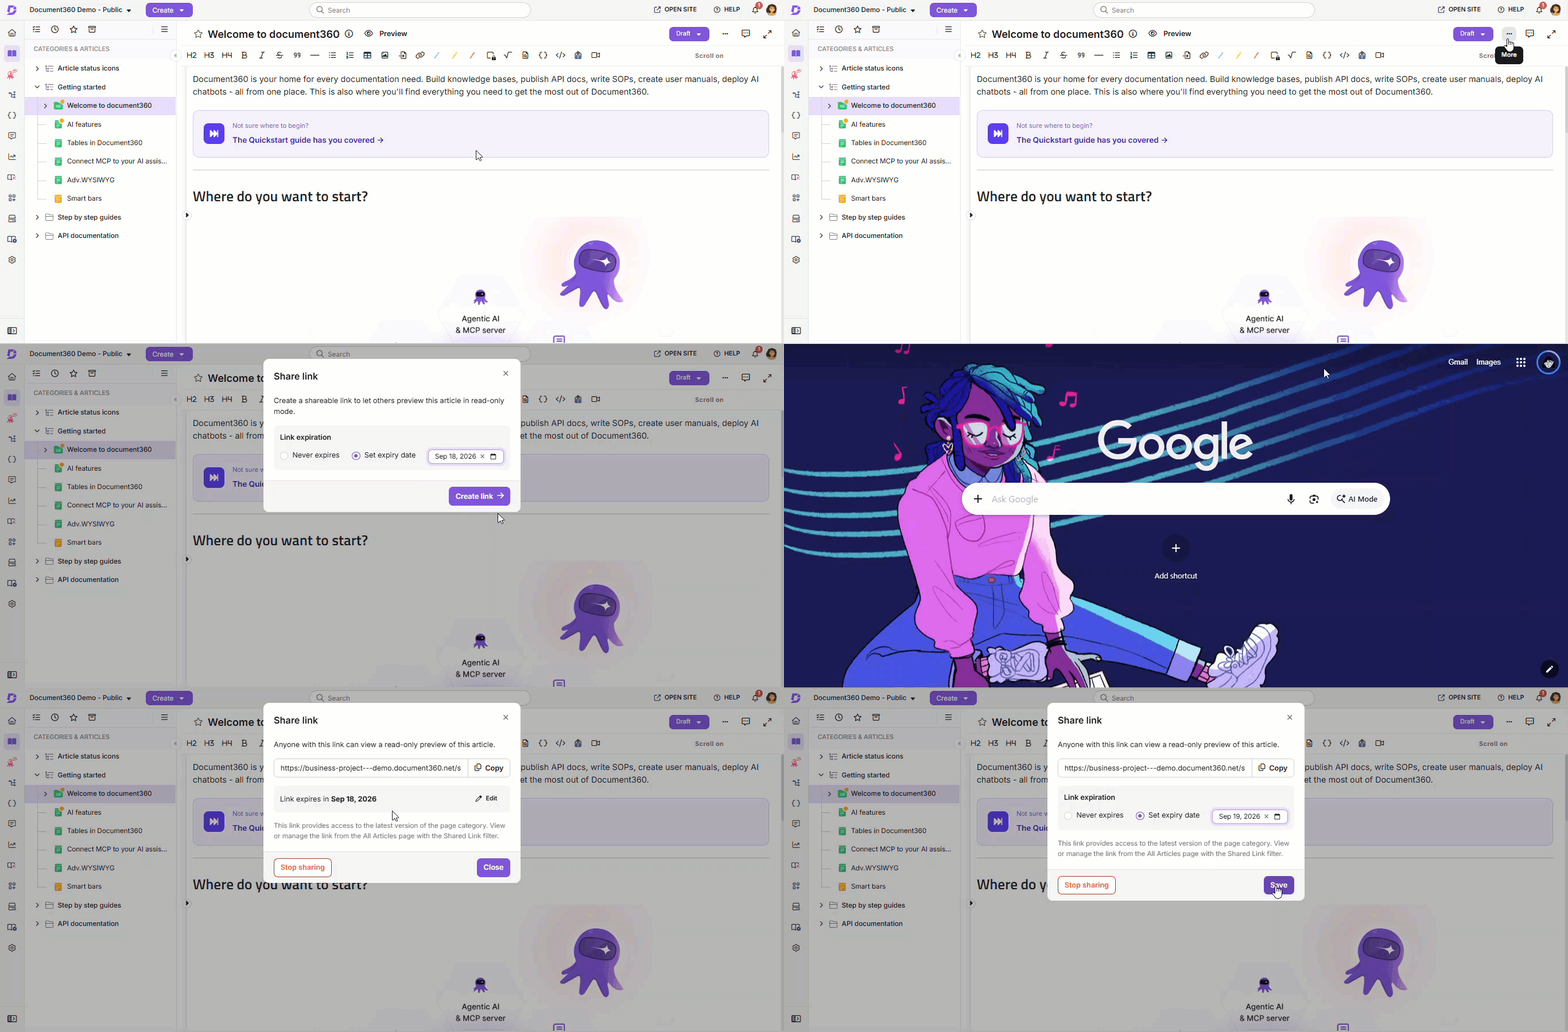
- Click the More () icon in the article header, or click the More icon next to the article name in the category tree.
- Click the Share link () icon. This icon turns green () whenever the article already has an active link.
- In the Share link panel, choose the link's expiration:
- Never expires (default), or
- Set expiry date, then pick a date from the calendar. Past dates cannot be selected.
- Click Create link.
- Once created, click Copy next to the link to copy it, and share it with the recipient.
Change a link's expiry
You can change an existing link's expiry at any time, in either direction, without changing the link itself.
- Open the Share link panel for the article (see steps 1 to 3 above).
- Click Edit next to the current expiry status.
- Choose Never expires or Set expiry date (with a new date).
- Click Save. This button stays disabled until you actually change the value.
Changing a link's expiry does not change its URL. Anyone who already has the link continues to use the same URL.
Manage a private link
Once a private link has been generated, you can manage it from the same Share link panel, from the article's info panel on the All articles page, or from the All articles Shared link column (see Find shared articles below).
| Action | How to |
|---|---|
| Copy the link | Click Copy in the Share link panel. |
| Change the expiry | Click Edit, choose Never expires or Set expiry date, then click Save. |
| Stop sharing | Click Stop sharing and confirm. The link becomes immediately invalid for anyone it was shared with, and it will be considered as the link is permanently deleted. |
| Create a new link after stop sharing | Click Create link again. This generates a new URL; the previous link will be deleted and not available. |
How private links behave
- A private link grants access only to the specific article it was created for. If the article contains links to other articles, clicking those links prompts the recipient to log in.
- A link with an expiry date stops working as soon as that date passes. An expired link behaves exactly like a stopped link: the recipient cannot tell the difference, and there is no partial or "expiring soon" state visible to them.
- To share an expired article again, create a new link. The original URL does not become active again.
- If the article is deleted, the private link will not display the article content. If the article is later recovered from the recycle bin or restored from a backup, the same link will work again (subject to its expiry).
- Links that existed before expiry support was introduced are treated as Never expires. Nothing was retroactively expired.
- Custom JavaScript and HTML integrations are not supported in private link previews.
Find shared articles
Use the All articles page to see every article that currently has an active private link, and manage them from one place.
- Navigate to Documentation () in the left navigation bar.
- Click All articles () in the left navigation pane.
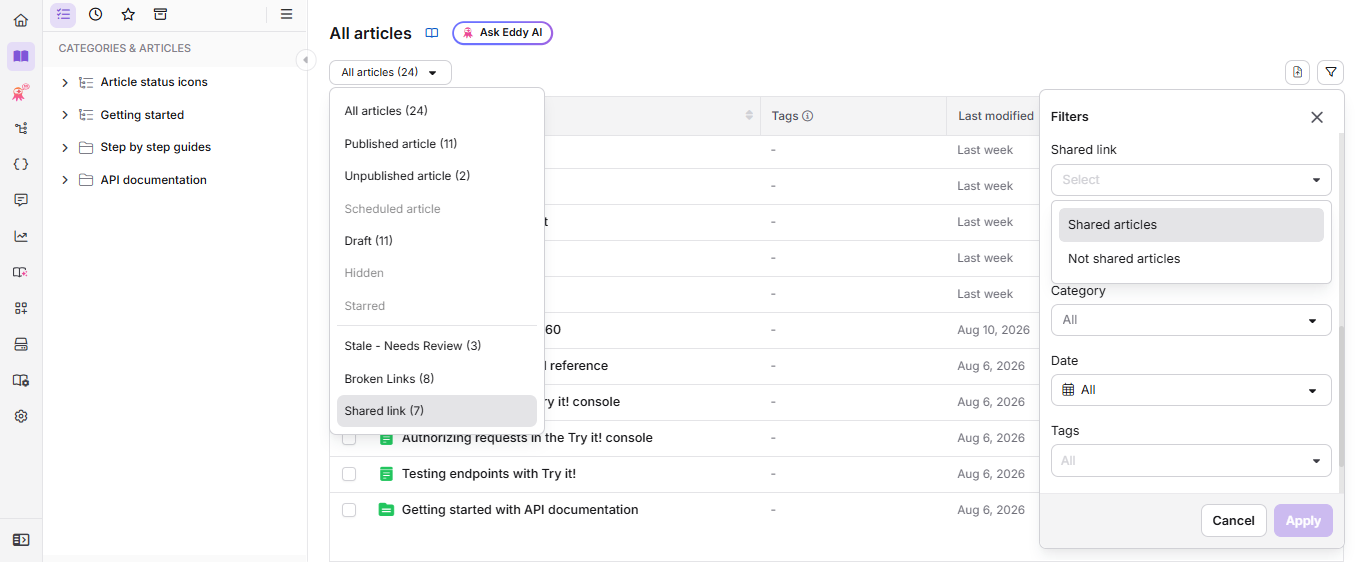
- Use the quick filter dropdown at the top left to select the Shared link, or click the Filter () button and set the Shared link filter. To know more, read Filter articles.
Shared link filter
Filters articles by whether they currently have an active private link.
| Option | What it shows |
|---|---|
| Shared articles | Articles that currently have an active private link. |
| Not shared articles | Articles that do not have an active private link. |
The Shared link quick filter in the dropdown applies the same filter, and shows the current count next to it, for example Shared link (21).
With the filter applied, the grid adds a Shared link column showing each link's status: Expires <date>, Expires today, or No expiry. Hover over a row to reveal Copy link, so you can copy that article's link without opening it.
An article drops out of this filtered view as soon as its link is stopped or expires.
If you export the All articles list to CSV, the export includes two additional columns: Shared link and Expiry date.
Stop sharing in bulk
From the Shared link filtered view, select multiple articles and click Stop sharing in the bulk-select toolbar. Confirm the action to stop sharing all selected links at once.
Best practices
- Set an expiry date at creation for anything time-boxed, so the link closes itself out without you having to remember to stop sharing it.
- Stop sharing a link once a review is complete, even if it has an expiry date, to prevent access before that date.
- Generate a separate private link for each article if you need to share multiple articles with the same recipient.
- Check the All articles Shared link filter periodically to see what's currently exposed outside your project.
- Use private links for draft review rather than publishing a draft to a restricted reader group. It is faster and does not require adding the recipient as a reader.
FAQ
Can I share an unpublished article with someone who is not a user in my project?
Yes. Private links work for both published and unpublished articles. The recipient does not need to be a user or reader in your Document360 project to access the article via the link.
Does a private link expire automatically?
Only if you set an expiry date. By default, a new link never expires, but you can set an expiry date when you create it, or add one later from the Share link panel.
What happens when a private link expires?
It stops working immediately, the same as a stopped link. The recipient cannot tell whether a link expired or was stopped manually. They will be redirected to 404 error page if they tried to access the expired link. To share the article again, create a new link; the expired link's URL does not come back.
Can I stop sharing more than one article at a time?
Yes. From the All articles Shared link filtered view, select multiple articles and click Stop sharing in the bulk-select toolbar.
Can the recipient access other articles linked within the shared article?
No. A private link grants access only to the specific article it was created for. Clicking links to other articles within the content will prompt the recipient to log in. Generate and share separate private links for each article if multiple articles need to be accessible.
Why does custom JavaScript not appear in the shareable link preview?
Custom JavaScript and HTML integrations are not supported in private link previews to ensure consistent performance and security when content is accessed externally. Custom CSS is supported and will be applied in the preview. To test JavaScript or HTML customisations, publish the article and access it from the knowledge base site, or use a Sandbox project for testing.