Plans supporting this feature: Professional Business Enterprise
The API documentation feature in Document360 makes it easy to create clear, interactive documentation by uploading your API specification files. This process automatically builds detailed documentation that covers everything from API endpoints to methods and responses, helping developers understand and use your API more effectively.

Generating API documentation
There are three methods to generate API documentation in Document360:
From a URL
From a JSON/YAML/YML file
With a CI/CD flow
NOTE
Document360 supports OpenAPI 2.0, OpenAPI 3.0, OpenAPI 3.1, and Postman API specifications.
Generating API documentation from an API specification file
To generate API references from an API specification file (JSON/YAML/YML),
Navigate to the desired project in the Knowledge base portal.
Select API documentation ({ }) from the left navigation bar.
Click the Create dropdown in the top navigation bar and select New API. This will display the New API reference window.
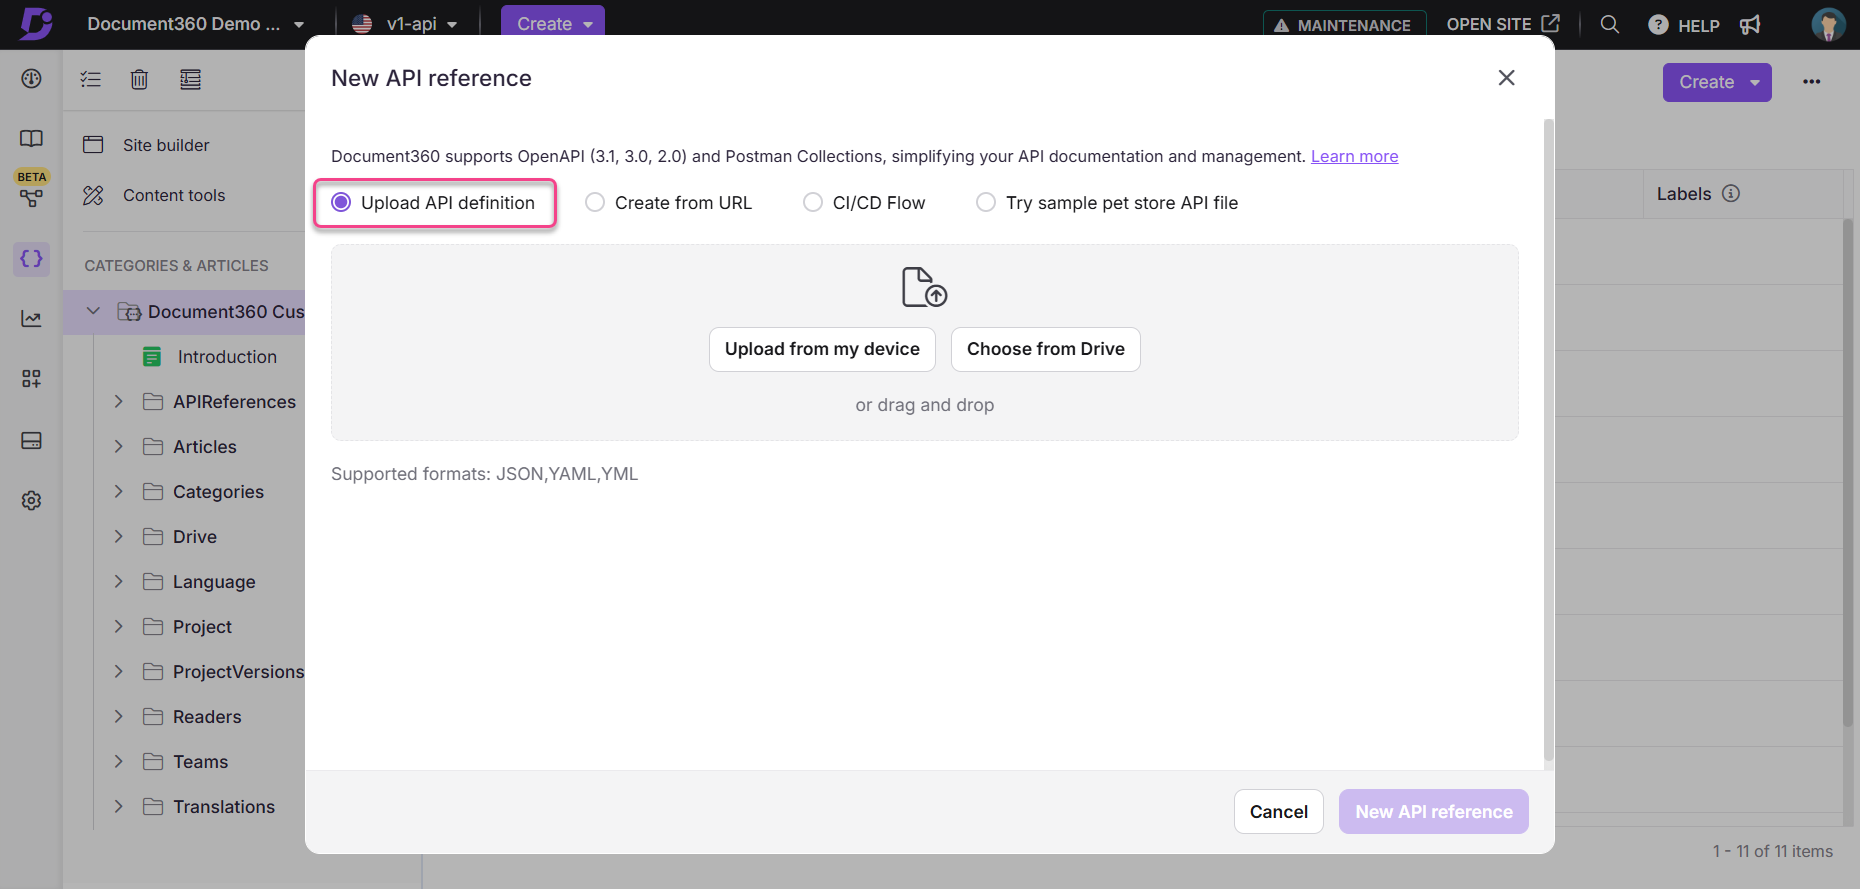
Select the Upload API definition option in the New API reference window.
Click either Upload from my device or Choose from Drive to select the file from your device or Document360 Drive, respectively. You can also drag and drop your file directly into the New API reference window.
NOTE
The API documentation import process supports second-level subcategories using the
>symbol in OpenAPI tags (e.g.,Pets > Details). This allows for cleaner, nested organization of endpoints, preserves the structure during resync, and ensures proper display and navigation in the left panel of the API reference.
If your uploaded file has any associated alerts or warnings, you can view them by expanding the Alerts and Warnings dropdowns, which appear in the New API reference window.
Click New API reference to navigate to the Publish confirmation window. You will see a success message in the window, along with the number of categories and articles that have been created.
Click Publish to generate your API documentation.
NOTE
To review your documentation before publishing, click Close to return to the Documentation screen. Your draft will be visible in the Categories & Articles pane.
Generating API documentation from a URL
To upload the API specification file as a URL to Document360,
Navigate to the desired project in the Knowledge base portal.
Select API documentation ({ }) from the left navigation bar.
Click the Create dropdown from the top navigation bar and select New API or click the New API button from the top right corner. This will display the New API reference panel.
In the Choose source screen, select the Create from URL radio button, and click Next.
In the Source settings screen, enter the URL for your API specification file in the URL field.
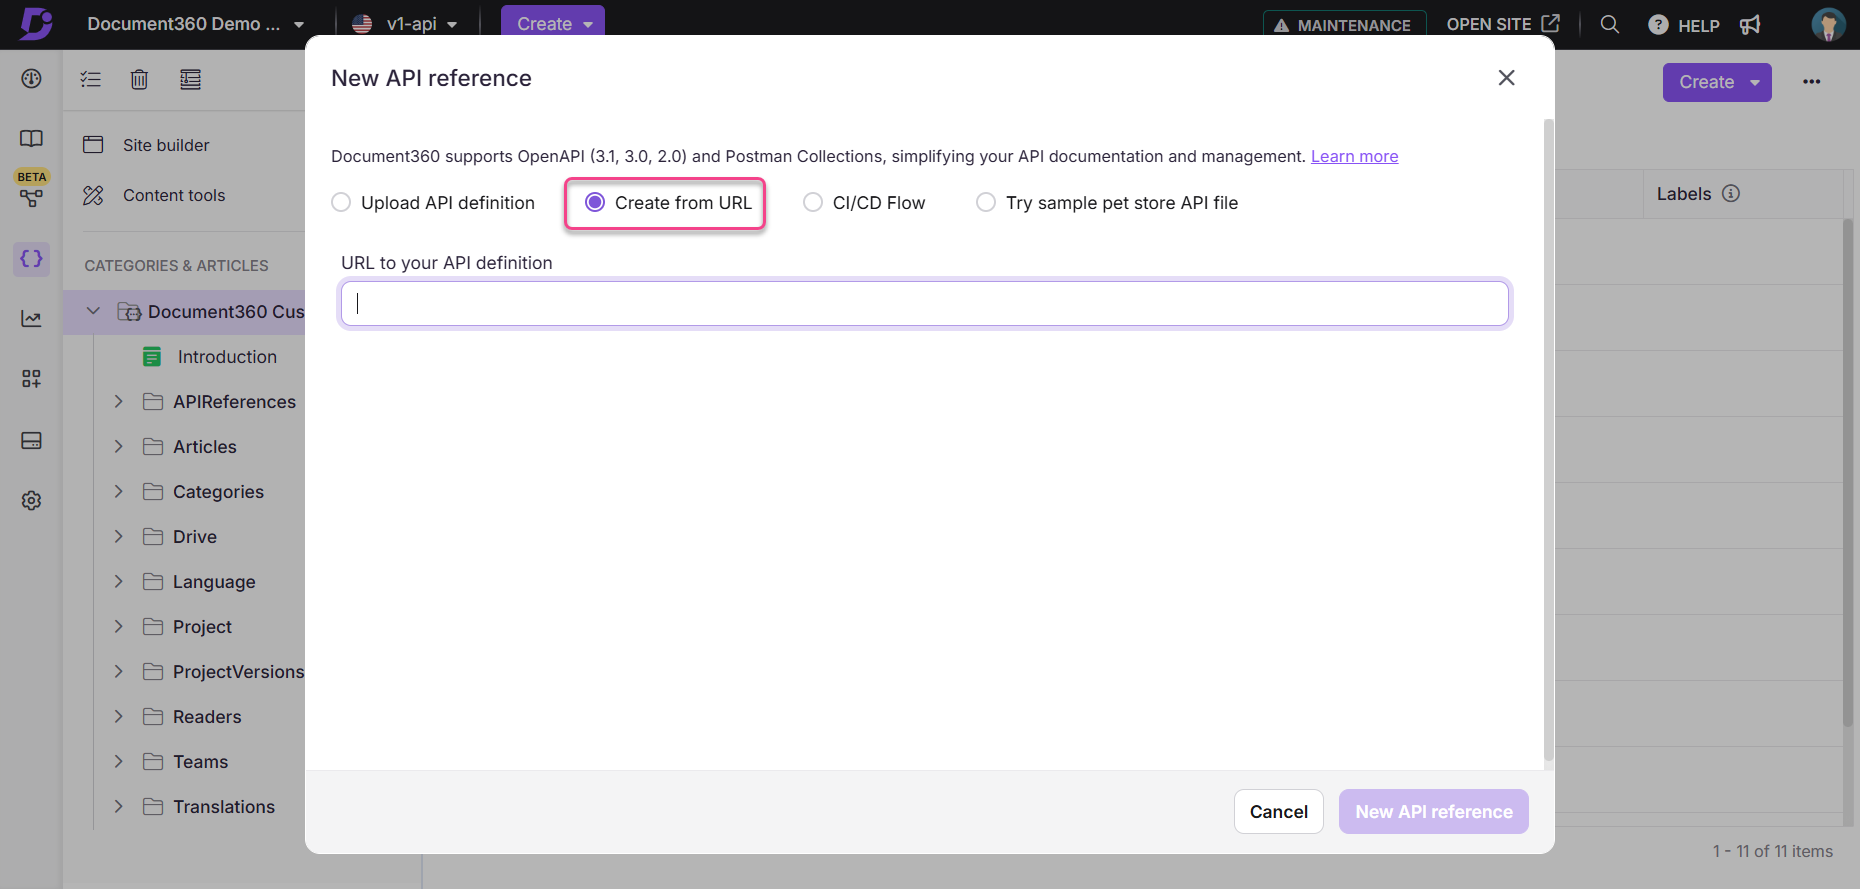
Click Add API reference to navigate to the Finish screen.
On the Finish screen, you will be able to see the number of categories and articles that have been created for your API specification file.
Click Publish to generate your API documentation.
Generating API documentation with a CI/CD flow
Before you upload an API specification file with a CI/CD flow, ensure that the latest version of Node.js is installed on your system. If you are unfamiliar with Node.js, refer to this guide for installation instructions.
To upload the API specification file with a CI/CD flow,
Navigate to the desired project in the Knowledge base portal.
Select API documentation ({ }) from the left navigation bar.
Click the Create dropdown in the top navigation bar and select New API. This will display the New API reference popup.
In the Choose source screen, select the CI/CD Flow radio button, and click Next.
Copy the full CLI command shown from the New API reference popup.
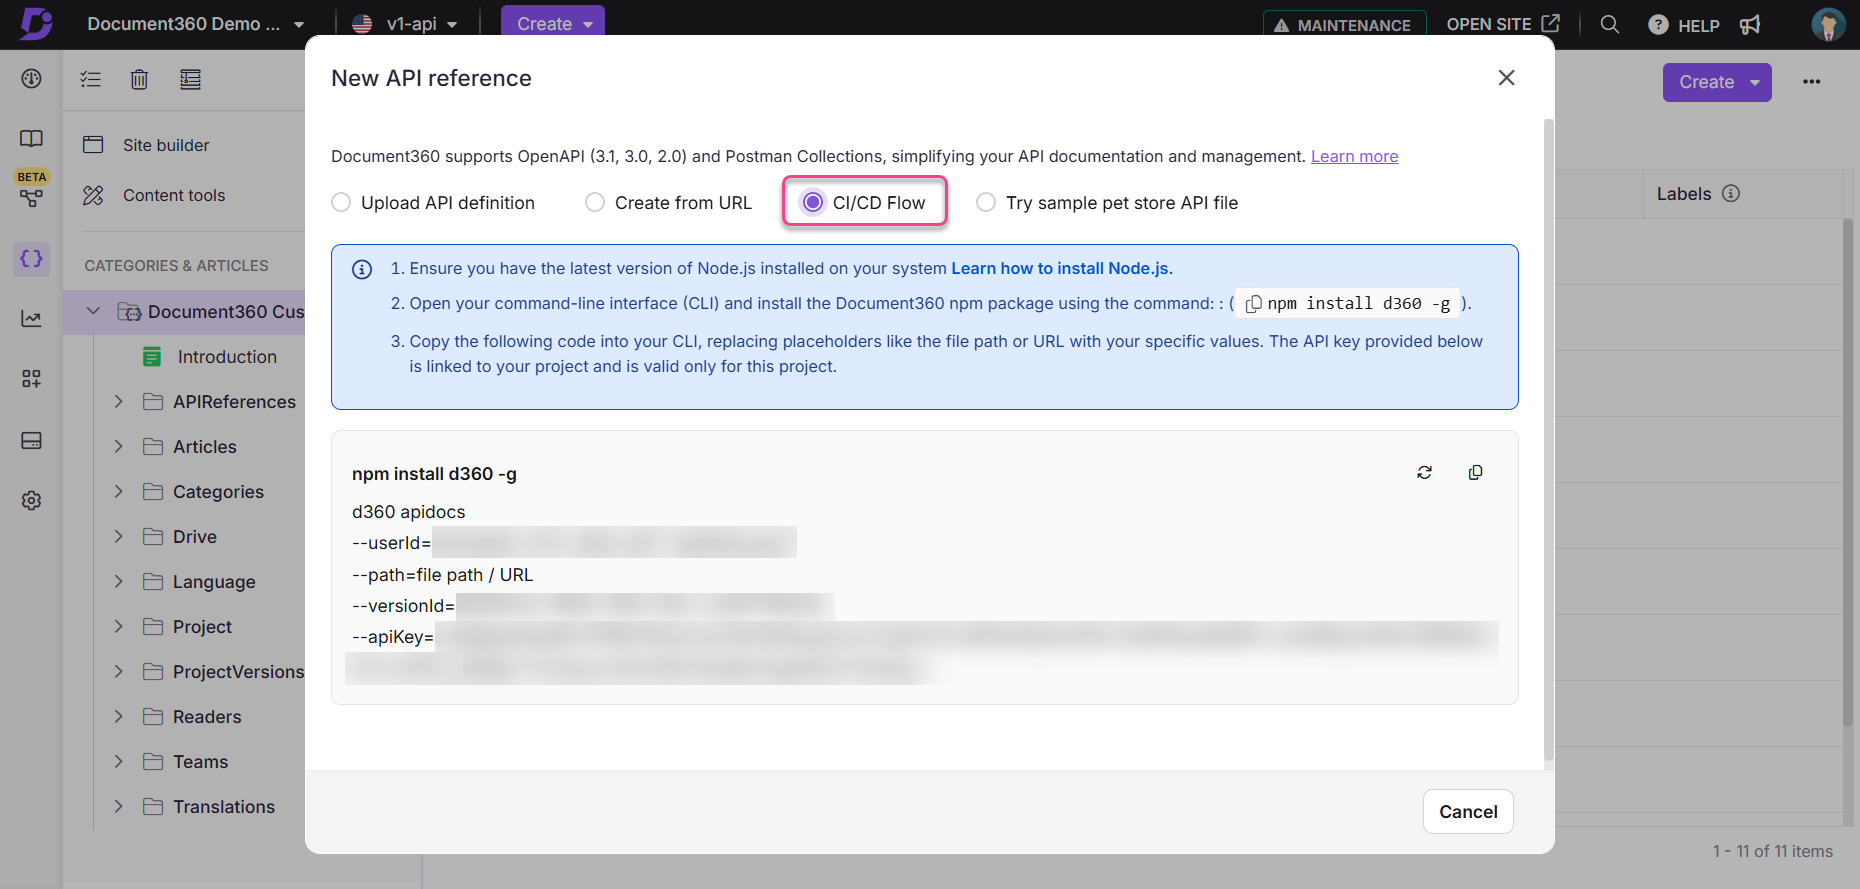
In the copied command, update the
--pathvalue with:The full path to your local JSON/YAML/YML spec file. For example,
--path=/Users/yourname/projects/api/openapi.yamlA valid URL pointing to your API spec file. For example,
--path=https://example.com/api/openapi.yaml
Paste the updated command in your terminal and press Enter.
Your API specification file will be uploaded, and API documentation will be generated.
NOTE
The first line (
npm install d360 -g) installs the Document360 CLI tool. You only need to run it the first time. If it's already installed, you can skip that line.If you regenerate the API key by clicking the () icon in the UI, you must update the
--apiKeyvalue in your CLI command before running it again. The old key will no longer be valid.
Managing webhooks (events)
When your OpenAPI 3.1 spec includes webhooks, Document360 imports them and shows an event icon next to each webhook. The page displays the payload schema and example. If the spec does not include an example, a default example and a sample payload are shown. Try it is not available for webhooks. Webhooks are included in resync operations, and your custom content is retained after regeneration.
Regenerate API documentation
If you make any changes to your API, such as adding new endpoints, you do not need to update your API documentation in Document360 manually. You can regenerate your API documentation, and any changes to your API will be automatically reflected in the updated documentation.
NOTE
Any custom content you add to your API documentation will be retained when you regenerate your API documentation.
Regenerate API documentation from URL
Navigate to the desired project in the Knowledge base portal.
Select API documentation ({ }) from the left navigation bar.
Click API docs reference from the left navigation list pane.
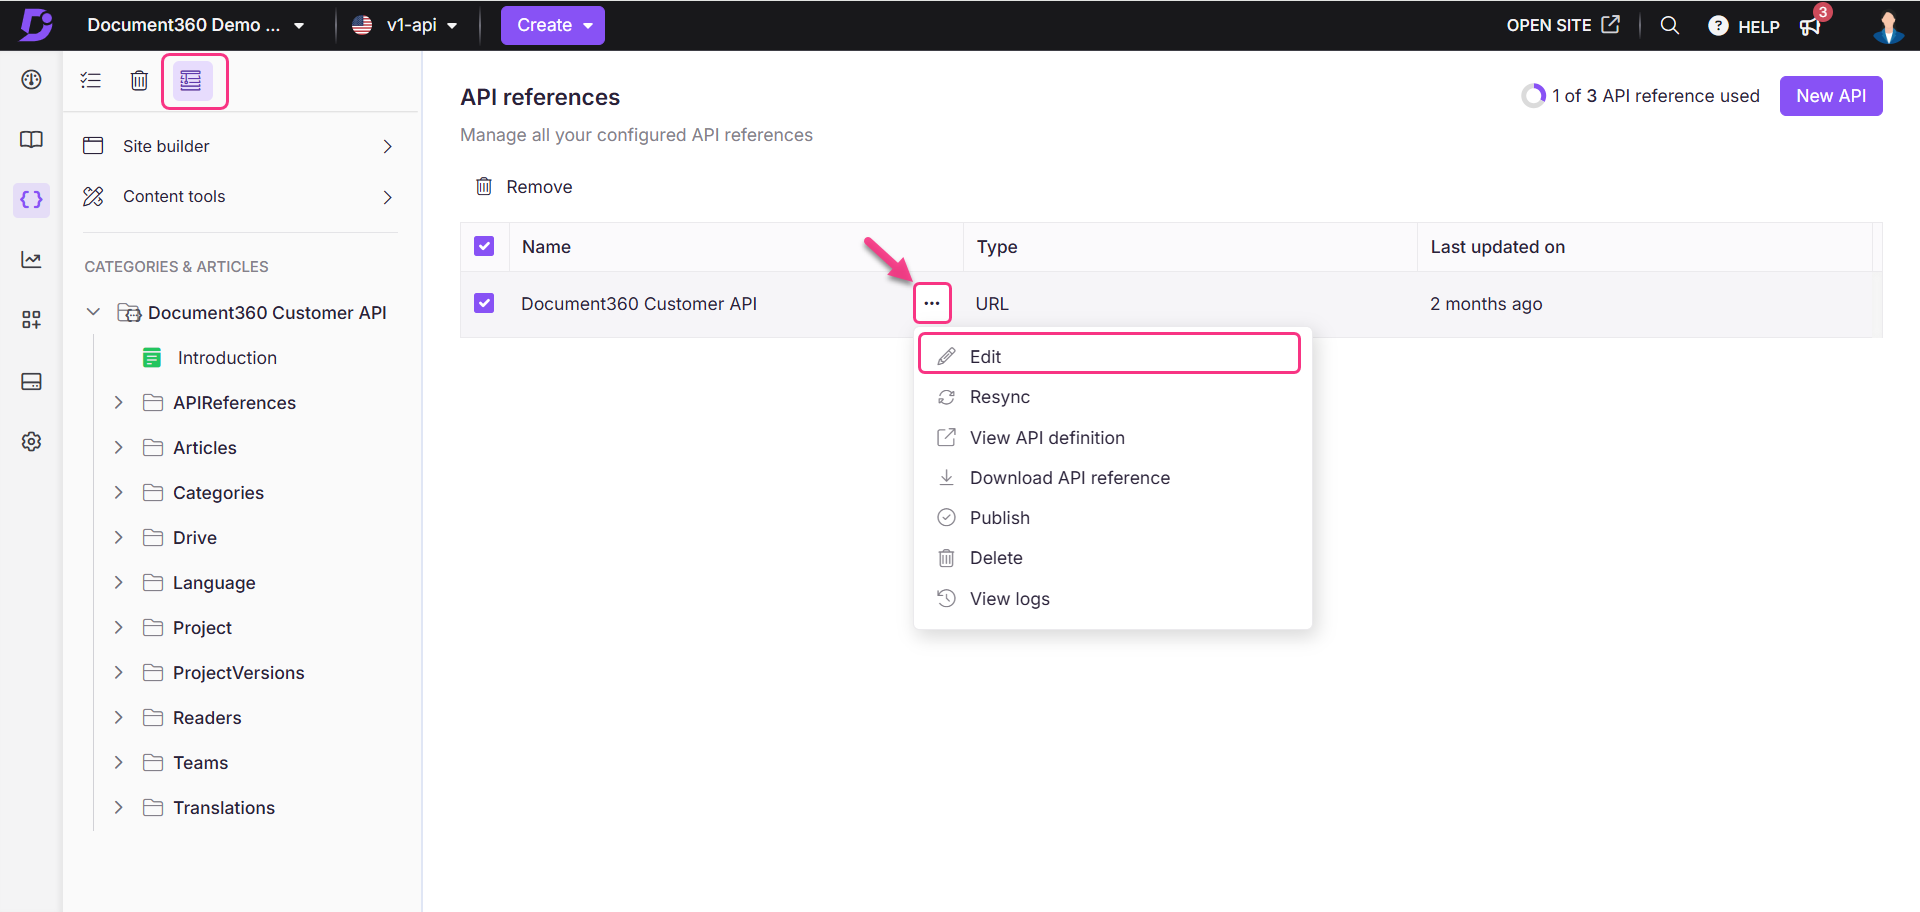
Click the More () icon next to the desired API reference for which you want to regenerate the API documentation.
To regenerate API documentation from the existing URL:
Click Resync.
The API documentation will be regenerated as per the latest API specification file.
To regenerate API documentation with a new URL:
Click Edit.
Enter the new URL in the URL field.
Click Update.
The API documentation will be regenerated according to the API specification file at the new URL.
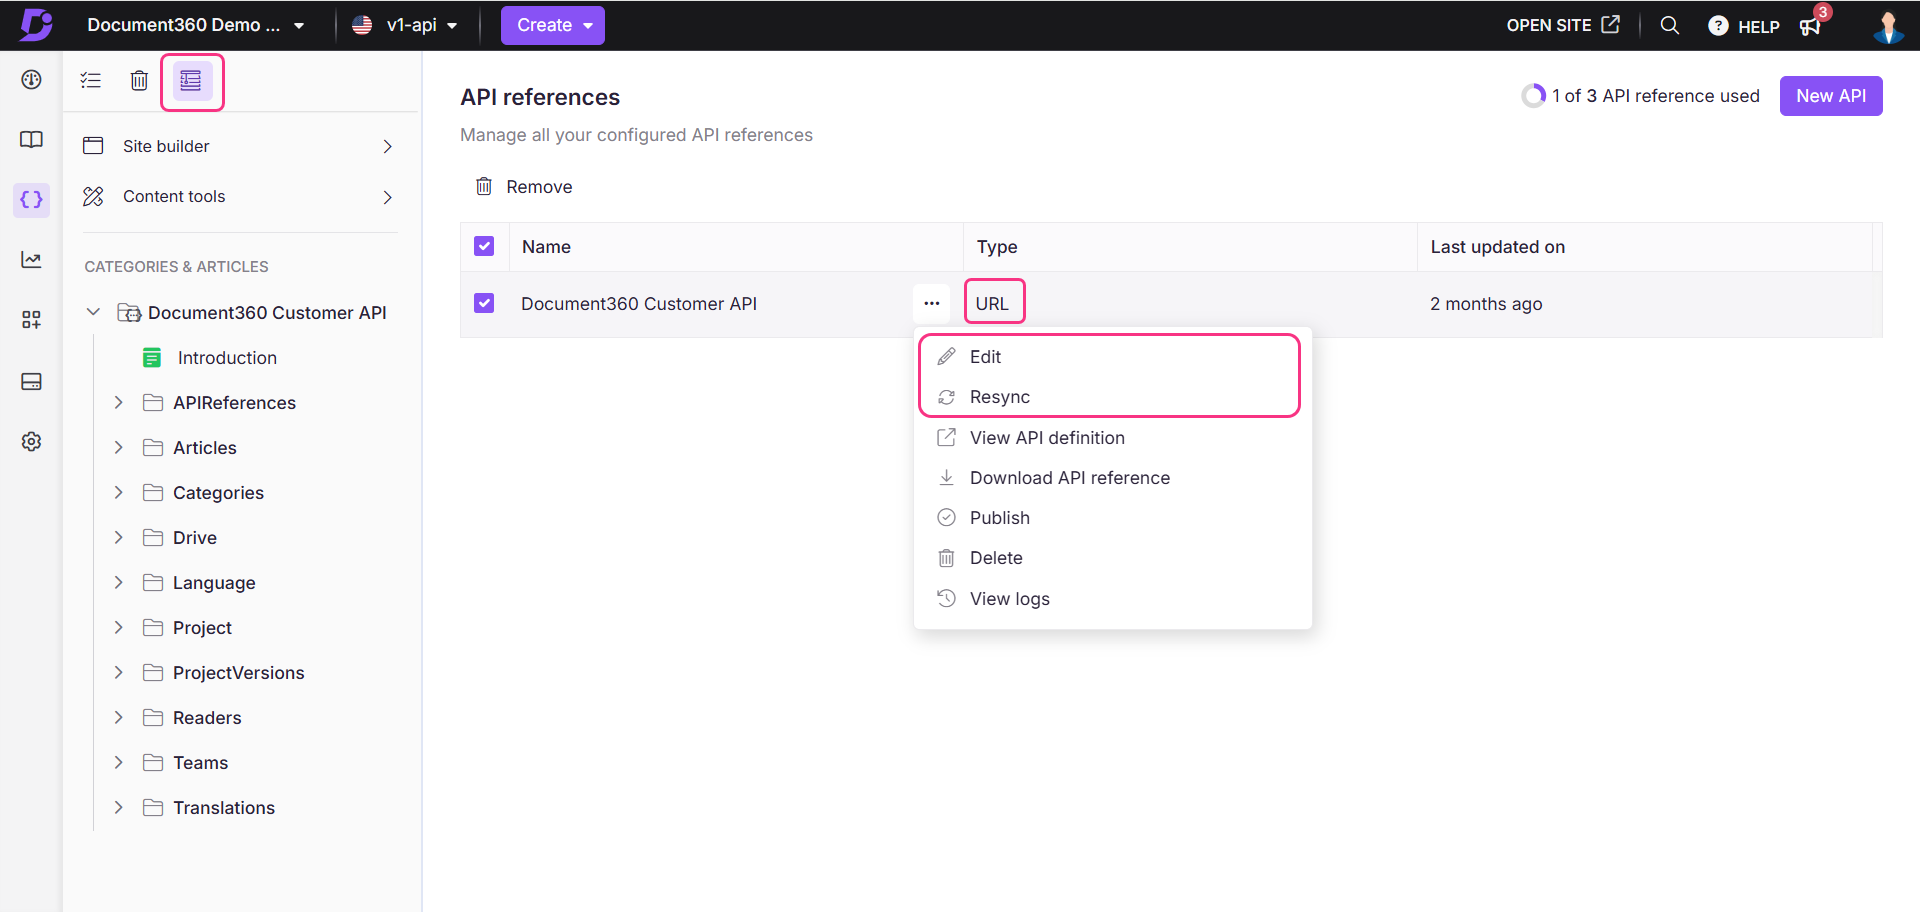
Regenerate API documentation from an API specification file
Navigate to the desired project in the Knowledge base portal.
Select API documentation ({ }) from the left navigation bar.
Click API docs reference from the left navigation list pane.
Click the More () icon next to the desired API reference for which you want to regenerate the API documentation.
Click Edit.
Upload the latest API specification file in JSON/YAML/YML format.
Click Update. The API documentation will be regenerated as per the latest API specification file.
Regenerate API documentation integrated with CI/CD flow
You can resync the API reference in your CI/CD pipelines with the help of your d360 npm packages. D360 is the command line tool that helps you set up workflows that sync your API docs to Document360.
You can also perform the resync manually using the command below.
d360 apidocs:resync
                    --apiKey=API_key_value
                    --userId=user_id_value
                    --apiReferenceId=API_reference_value
                    --path=Spec_file_path
Download API reference
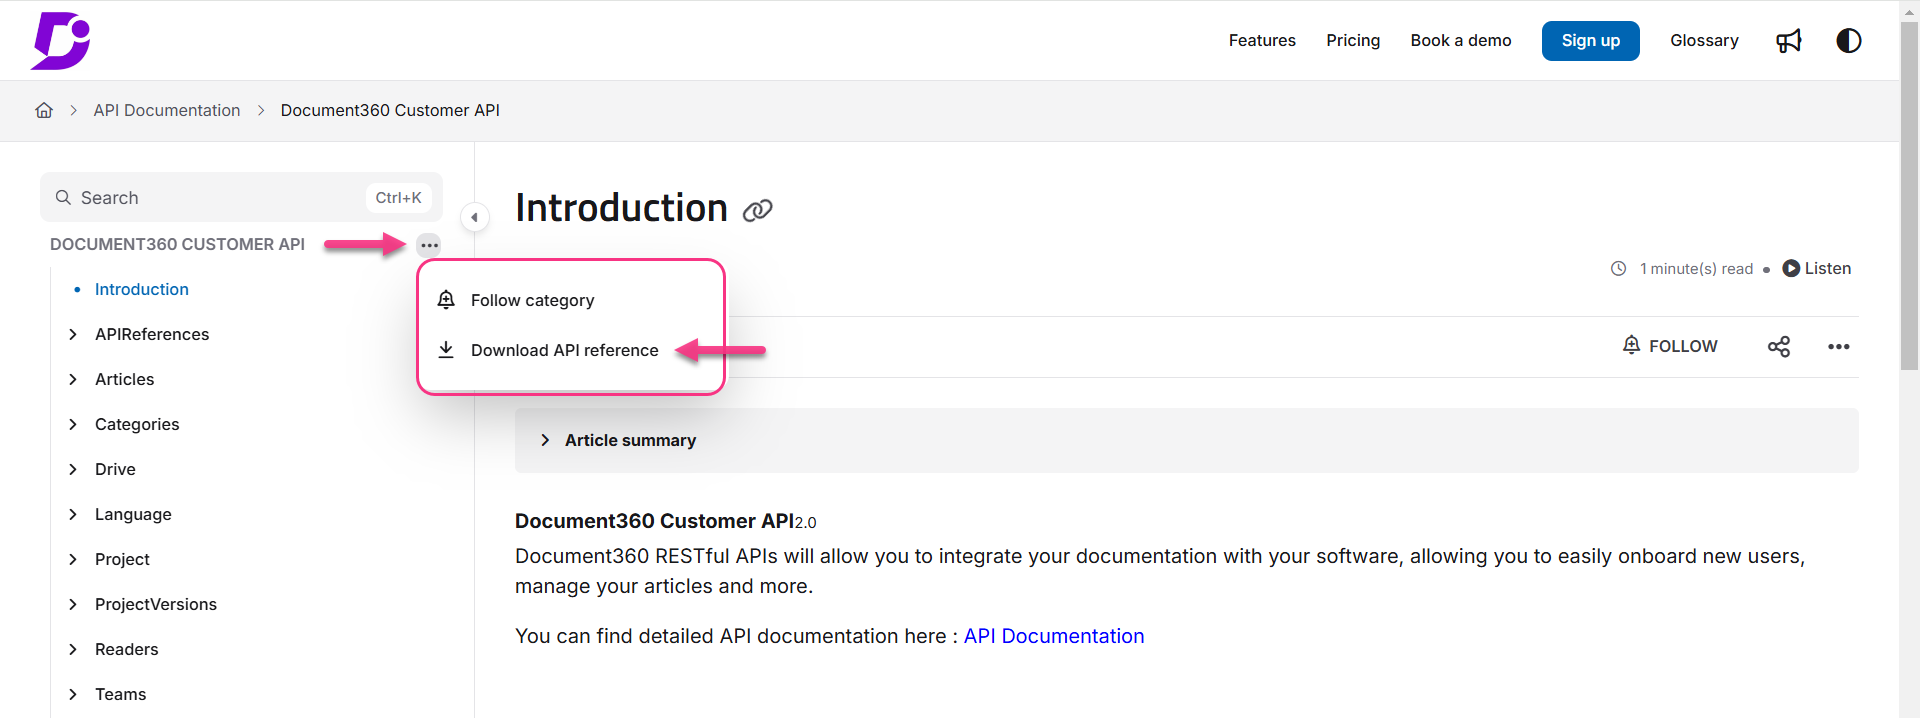
To download your API reference file from the Knowledge base site, follow the steps below:
On the API documentation Knowledge base site, from the left navigation pane, click the More () icon next to the desired API reference for which you want to regenerate the API documentation.
Click Download API reference.
It will be downloaded in a standard format such as .json or .yaml.
The Download API Reference option is accessible for all upload types, including:
File upload
CI/CD flow
URL upload
To download your API reference file from the Knowledge base portal, follow the steps below:
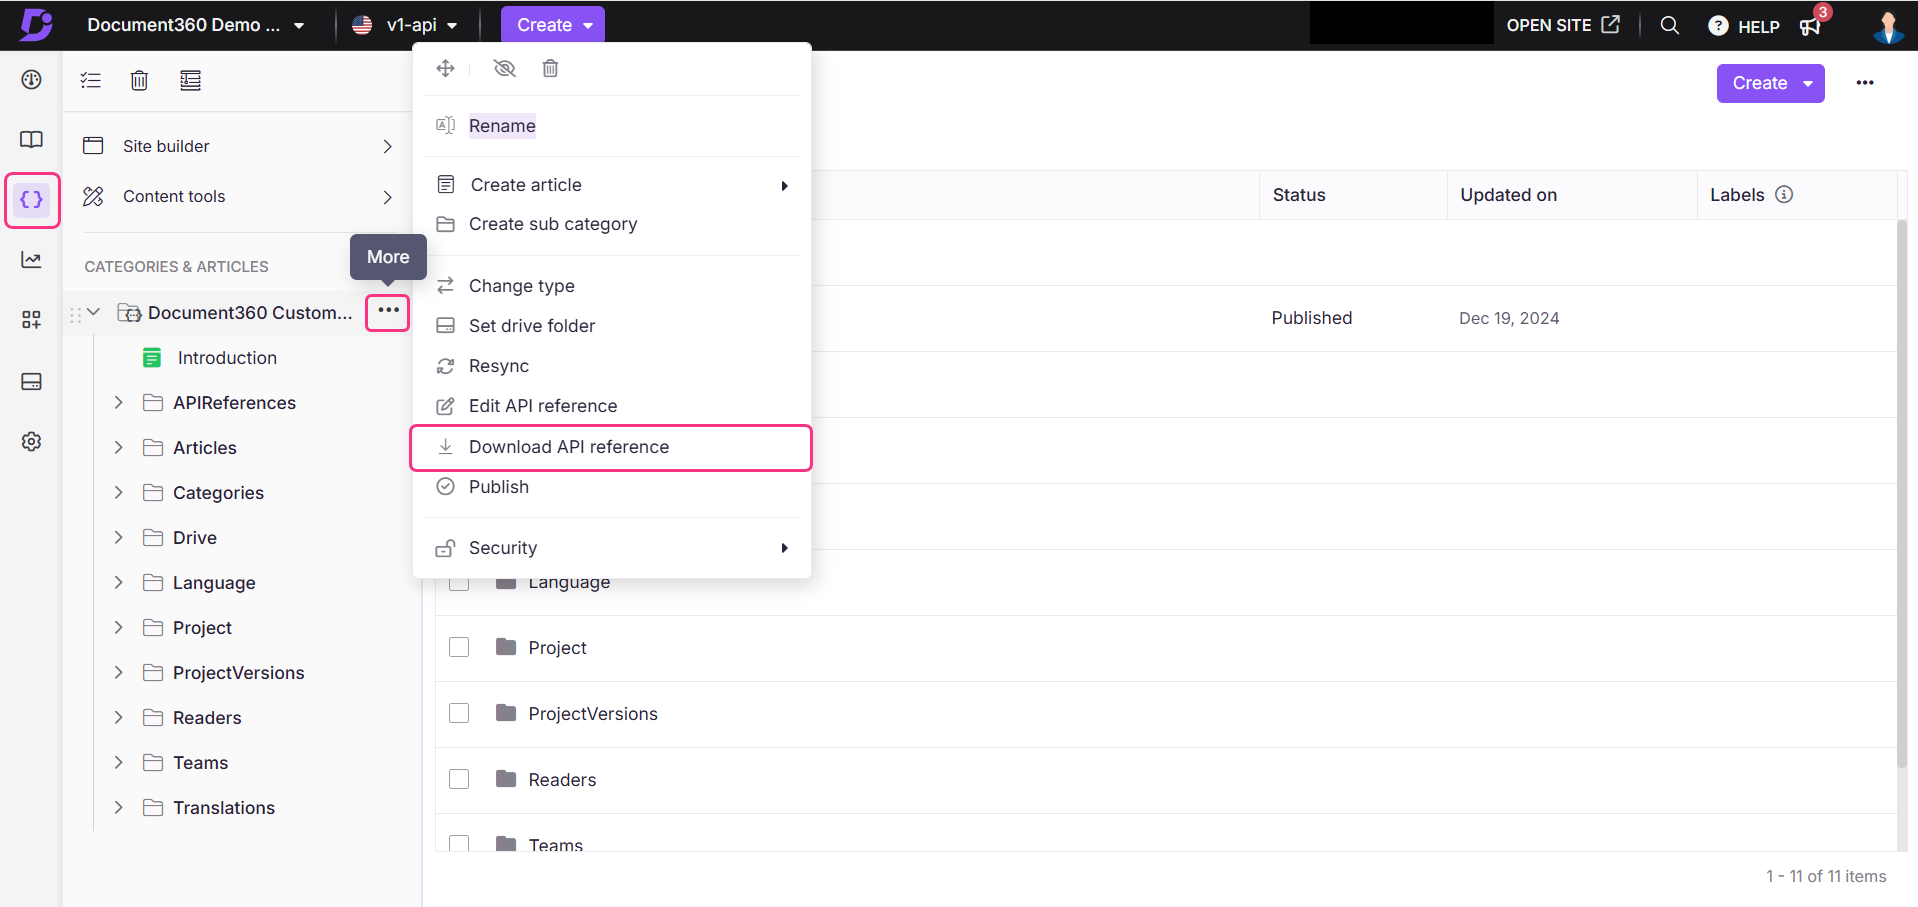
Navigate to the desired project in the Knowledge base portal.
Click the More () icon next to the desired API reference from the left navigation pane for which you want to download the API reference.
Click Download API reference.
The latest version of the API reference file will be downloaded to your local storage.
Alternatively,
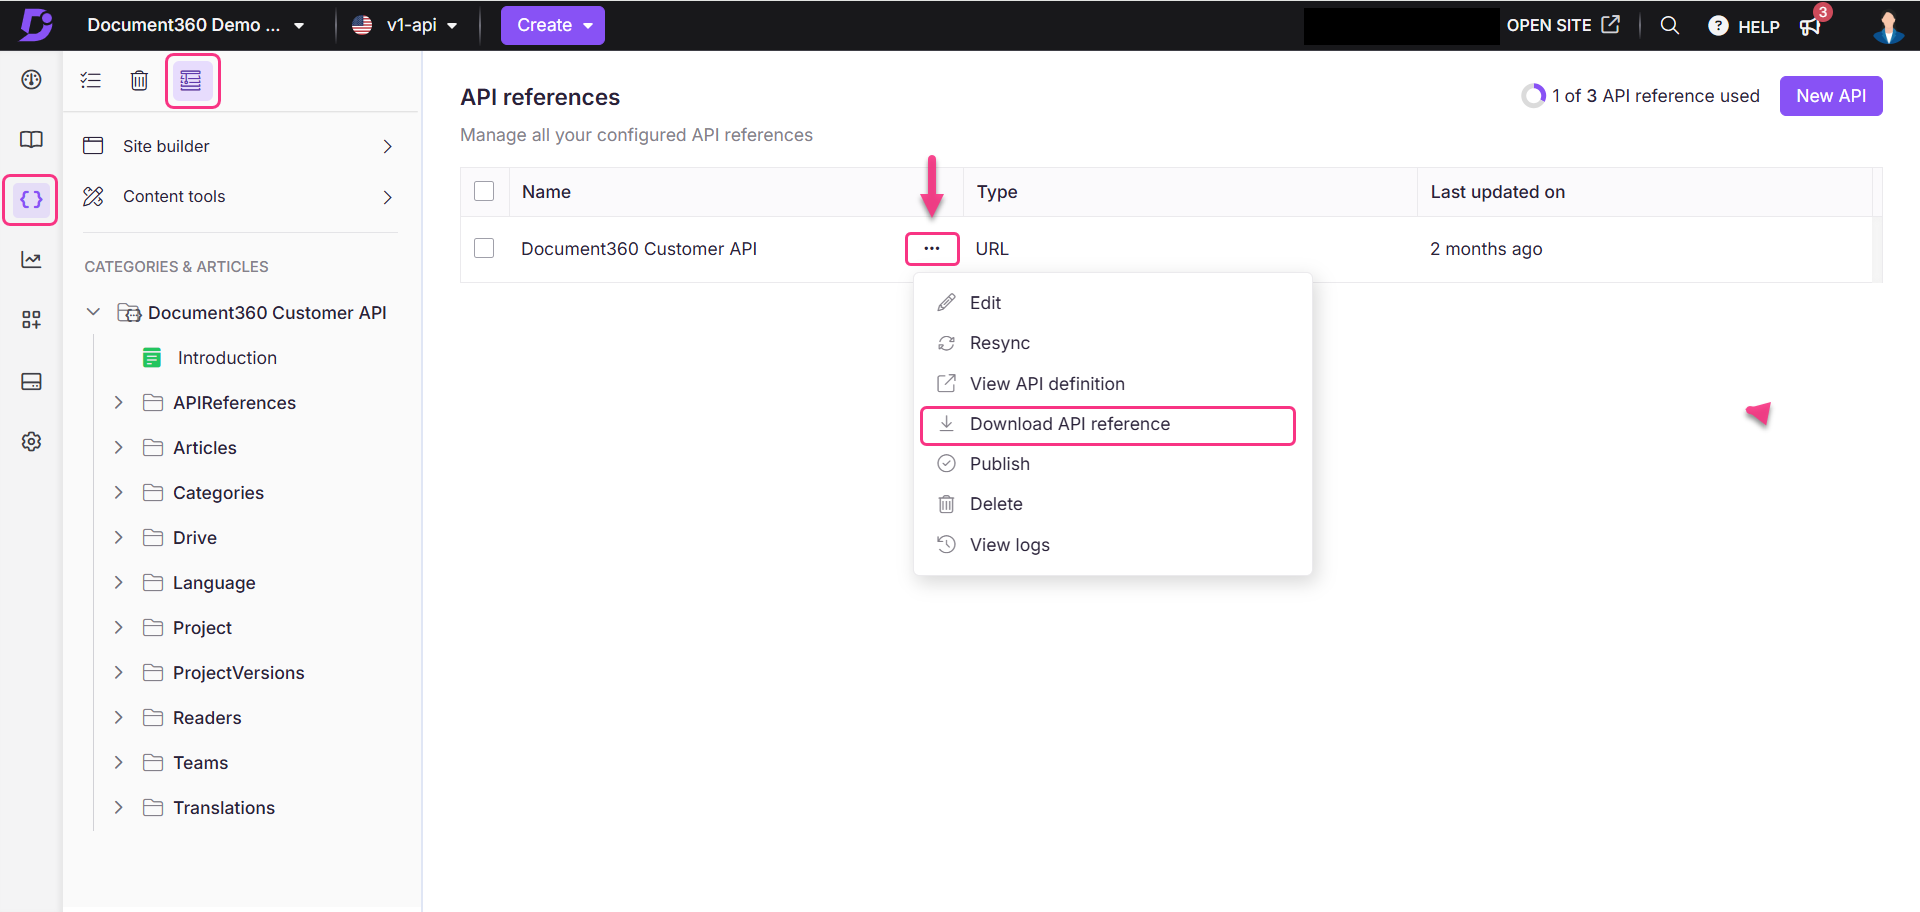
Click API docs reference from the left navigation pane.
From the configured API references listed, click the more () icon next to the desired API reference for which you want to download the API reference.
Click Download API reference.
The latest version of the API reference file will be downloaded to your local storage.
NOTE
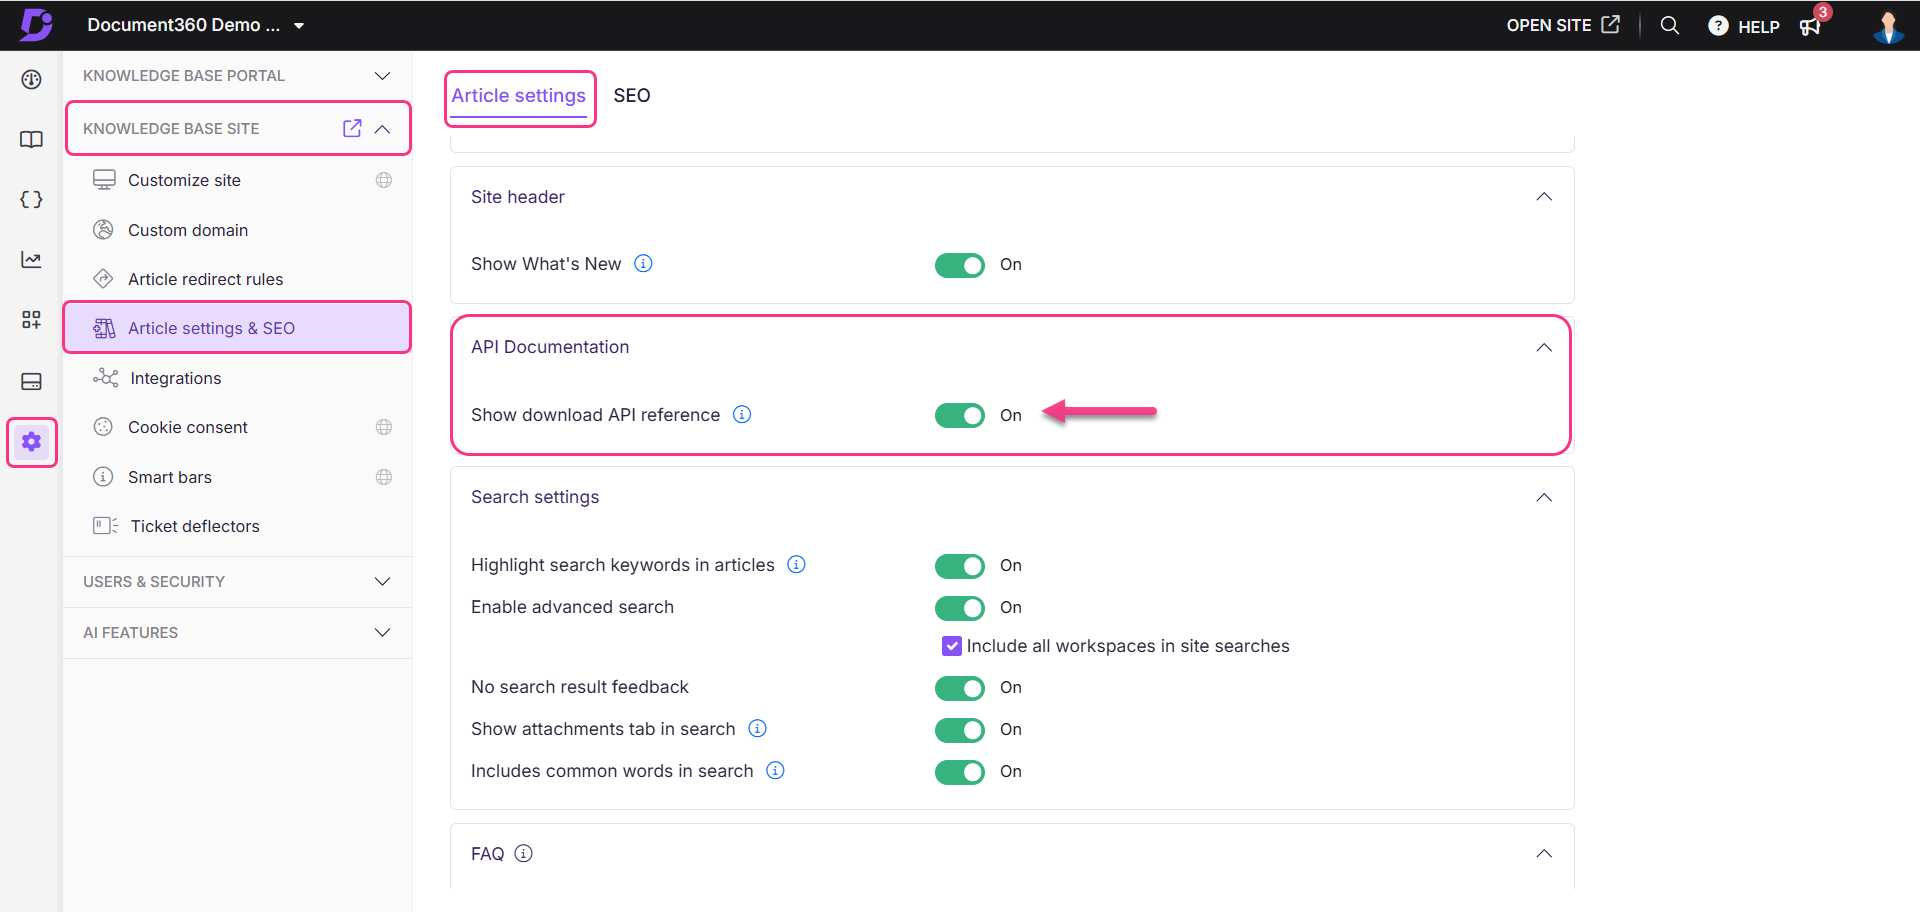
To download the API files, ensure that the Show download API reference toggle in the Knowledge base portal settings is turned on.
Troubleshooting
Missing or incorrect server URL in OpenAPI
Error: This error occurs when the server URL is missing or incorrectly configured in the OpenAPI specification. As a result, API users do not know where to send API requests, and the "Try it" button may be unavailable in the API documentation. The root cause is typically a missing or incorrect servers section in the OpenAPI spec.
Steps to resolve
To resolve this issue, ensure that the OpenAPI specification includes the correct server URL:
Define the server URL in the OpenAPI specification:
servers:
  - url: https://apihub.document360.io
    description: Main API hub
For region-based APIs, define multiple server URLs:
servers:
  - url: https://apihub.document360.io
    description: Global API hub
  - url: https://apihub.us.document360.io
    description: US region API hub
Ensure that all API clients (e.g., Postman, cURL) use the correct server URL when making requests.
NOTE
The above URLs are examples. Please refer to your specific API configuration for the correct server URL.
Example:
YAML example for missing servers section:
paths:
  /users:
    get:
      summary: Retrieve a list of users
      responses:
        '200':
          description: A list of users
          content:
            application/json:
              schema:
                type: array
                items:
                  type: object
                  properties:
                    userId:
                      type: integer
                    userName:
                      type: string
To avoid this issue, ensure the servers section is properly defined in the OpenAPI specification to prevent API consumers from having to construct API request URLs manually.
401 unauthorized error from incorrect server URL
Error: This error occurs when API requests return a 401 unauthorized response. It typically happens when the incorrect server URL is used in API requests. For example, using https://apihub.document360.io instead of https://apihub.us.document360.io causes authentication failures.
Steps to resolve:
To resolve this issue, follow these steps to ensure correct server URL usage and proper authentication:
Ensure that API requests use the correct region-based endpoint.
Confirm that the correct client ID and client secret are being used.
Example of a correct API request:
GET https://apihub.us.document360.io/v2/Articles/{article_id}/en?appendSASToken=trueNOTE
The above URL is an example. Please refer to your specific API configuration for the correct server URL.
Ensure the authentication token is correctly included in the request headers.
Missing server URL in API documentation
Error: This issue occurs when API consumers are unsure which base URL to use for their requests. This typically happens when the documentation does not clearly state the server URL, even though it might be correctly configured in the OpenAPI specification.
Steps to resolve:
To prevent confusion and ensure API consumers know the correct base URL:
Specify the base URL explicitly in the API documentation.
Examples:
Comparison table: server URL present vs. missing
Scenario | Behavior | Example |
|---|---|---|
Server URL is present | API requests work normally |
|
Server URL is missing | Clients must manually configure |
|
NOTE
The above URLs are examples. Please refer to your specific API configuration for the correct server URL.
To avoid this issue, ensure the API documentation clearly specifies the server URL to avoid any confusion.
403 error when using the “Try it” feature with an OAS file
Error:
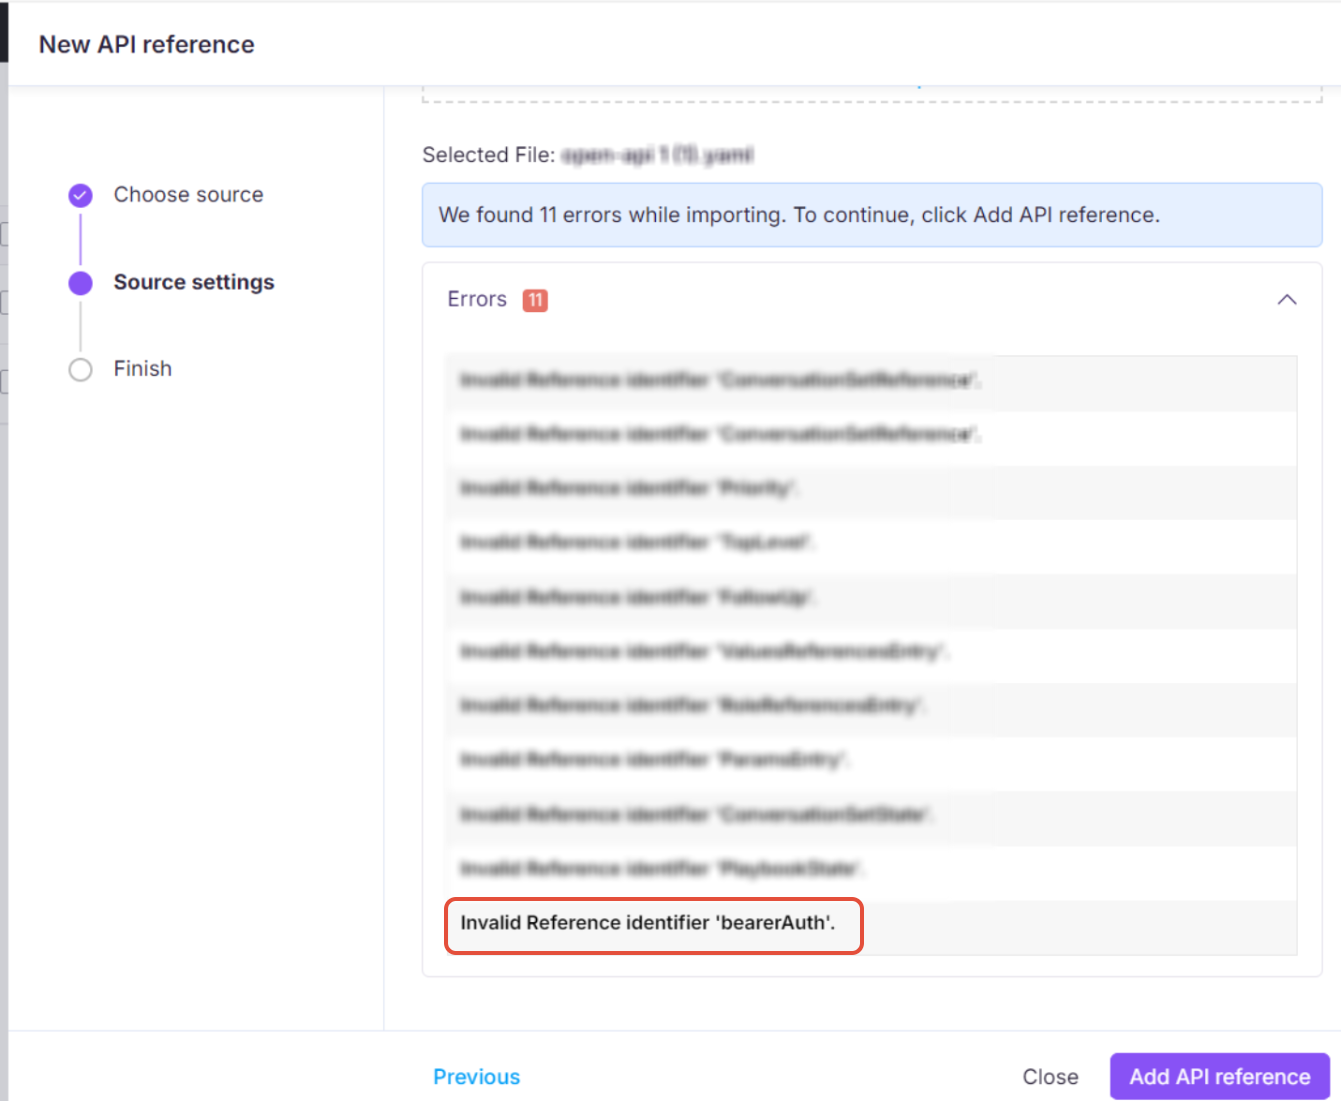
After successfully uploading an OAS file, clicking on the Try it feature results in a 403 error. This error occurs when the OAS file is missing a definition for the BearerAuth security mechanism.
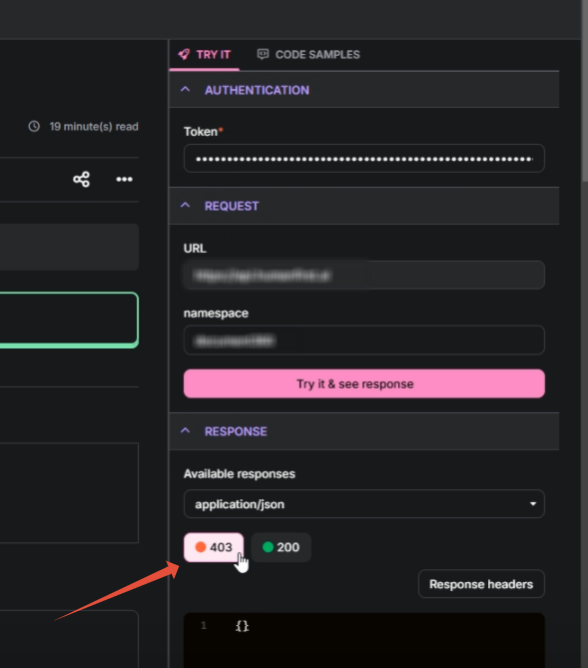
Steps to resolve:
To resolve the 403 error, follow these steps:
Check if the BearerAuth security definition is present in your OAS file.
If the BearerAuth definition is missing, include the BearerAuth security definition in the OAS file and reupload it.
During the import process, verify if any alerts related to Bearer Authentication are triggered and address them accordingly.
Incorrect HTML styling in API response
When retrieving an article’s HTML content through an API, the response is formatted in JSON, which uses escaping (\") to handle certain characters safely. This escaping alters characters like quotes, backslashes, and newlines to prevent data transmission errors. However, if the escaped characters are not converted back (unescaped), the HTML structure may break, leading to styling issues when rendered.
For example, a simple HTML paragraph:
<p>This is a "sample" paragraph.</p>Might appear in the JSON response as:
"<p>This is a \"sample\" paragraph.</p>"
The escaped double quotes (\") ensure the JSON remains valid, but if not unescaped, the HTML might not render correctly.
Steps to resolve
Retrieve the HTML content via the API and inspect the response.
Look for escaped characters in the JSON response, such as:
\"(escaped double quotes)\\(escaped backslashes)\n(newline)\t(tab)
Unescape the JSON content before rendering it. This will restore the original HTML structure.
Verify the styling after unescaping to ensure the content appears correctly.
If the issue persists, check if additional modifications in your code are altering the API response.
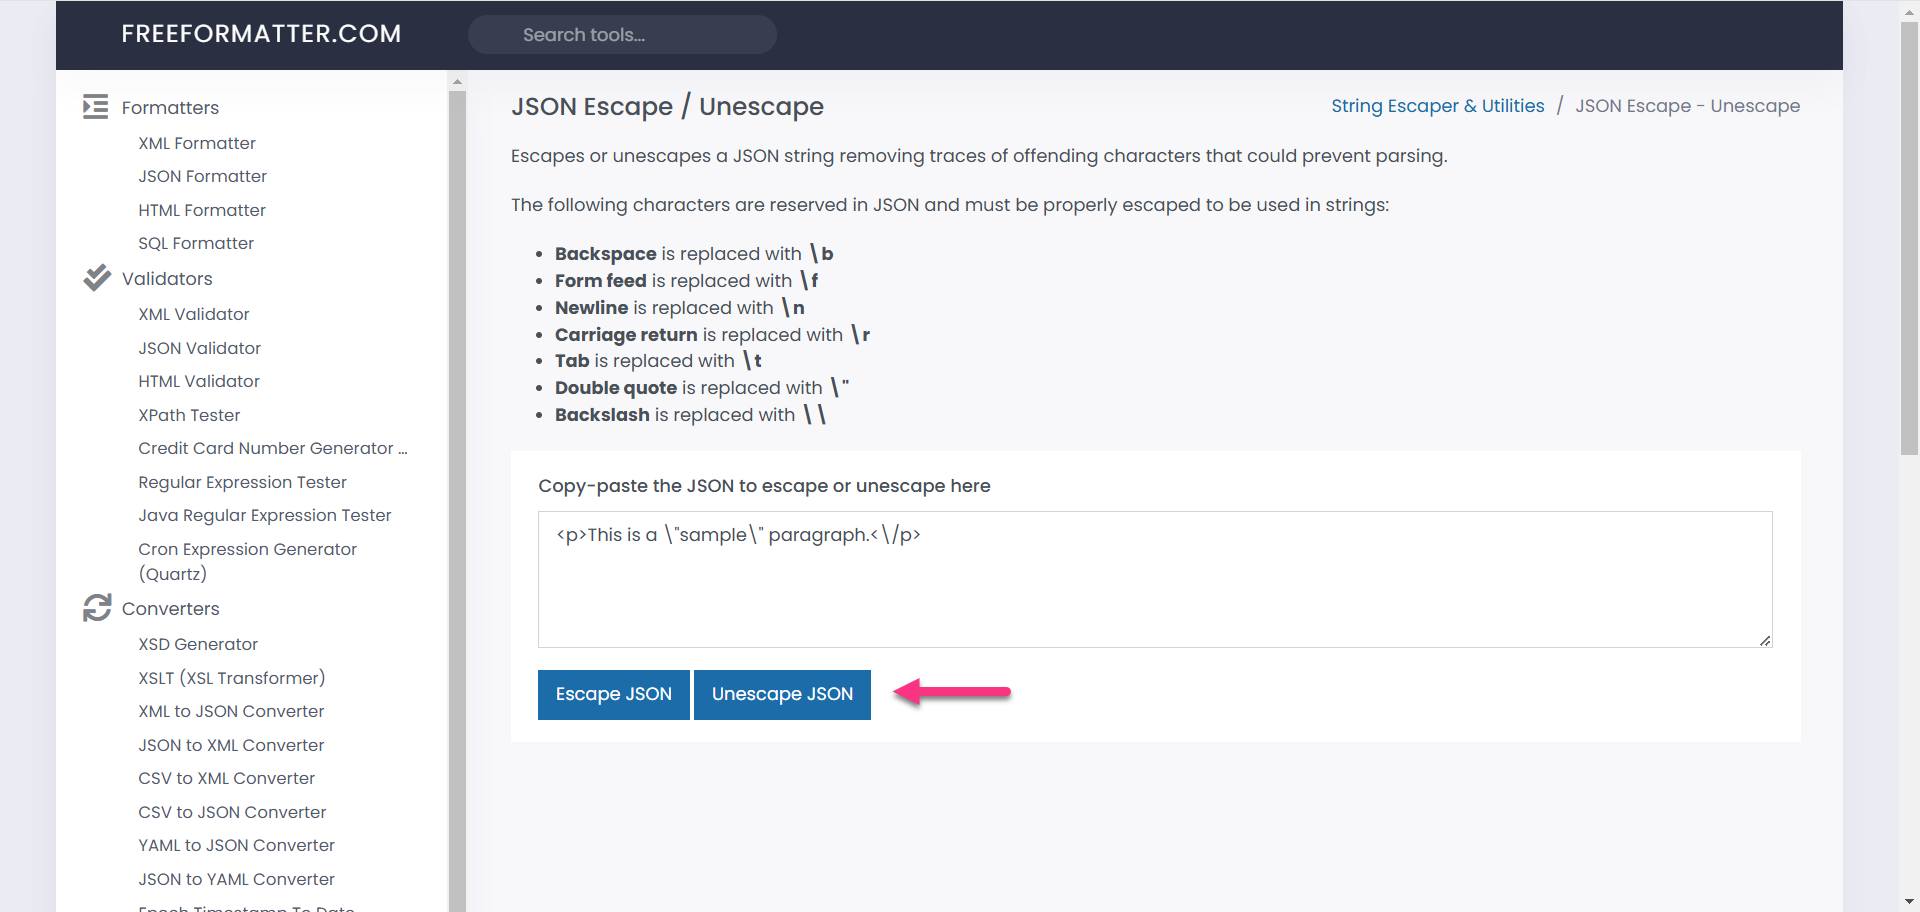
Once unescaped properly, the HTML will display as expected, preventing styling discrepancies.
Variables and Snippets not rendering in API response
When retrieving article content via the API, variables and snippets may appear unprocessed (e.g., {{variable.UserName}} instead of actual values). This typically happens when the "isForDisplay" parameter is not set correctly.
If
"isForDisplay" = true, the API will return the article content with all variables and snippets fully rendered. This means the placeholders are replaced with actual values, making the content suitable for display to end-users.If
"isForDisplay"= false(or not set), the API response will contain unprocessed variables and snippets, which may not be useful for direct display.If the issue persists after following these steps, please contact the Document360 support team for further assistance: Contact Document360 Support
Article content in the Knowledge base:
Welcome, {{variable.UserName}}! Here’s how to use {{variable.ProductName}}.API response without "isForDisplay":
"Welcome, {{variable.UserName}}! Here’s how to use {{variable.ProductName}}."The variables remain unprocessed, making it unsuitable for direct display.
API response with "isForDisplay"=true:
"Welcome, John! Here’s how to use Document360."Steps to resolve:
Retrieve the article content via API and inspect the response.
Check if variables or snippets appear unprocessed in the response.
Ensure the API request includes the
"isForDisplay"parameter. If missing, modify the request to include"isForDisplay": true.Send the modified API request. Example request:
{
  "articleId": "12345",
  "isForDisplay": true
}
Verify if the API response now displays the correctly rendered variables and snippets.
If the issue persists, ensure that the system processing the API response handles and displays the rendered content properly.
When updating articles via the API, do not pass fully rendered content to avoid replacing dynamic placeholders with static values.
Empty body shown in API documentation due to missing schema type
The API documentation displays an empty body. The possible cause for this error could be that the OpenAPI schema is missing the “type": "object” attribute in one or more object definitions.
Steps to resolve:
Ensure that every object definition in your OpenAPI specification includes “type": "object”. This attribute clearly specifies that the defined structure is an object, helping maintain clarity and consistency in your API documentation. It allows API documentation tools to accurately render request body parameters, response schemas, and other object definitions, making it easier for developers to understand and interact with your API.
Issue in adding an API reference
Error: Unable to add API reference. This operation can’t be completed. Please ensure that you have given a valid specification file.

The possible cause might be that the uploaded specification file (YAML) may be malformed and not a valid OpenAPI 3.0 YAML. This often happens when the file is copied or exported from a rich-text editor, introducing formatting issues.
Steps to resolve:
Validate your spec file: Open your YAML file in a tool like Swagger Editor or a code editor to check for errors or formatting issues.
Look for unwanted formatting characters: Check for characters like
\f0\fs24or trailing backslashes\that may have been introduced during copy-paste from a rich-text source. These can break the YAML format.Clean up the file: Use a plain text or code editor to remove any special formatting characters. Avoid using word processors when editing or saving YAML files.
Re-upload the file: After cleaning the file and ensuring it’s a valid OpenAPI 3.0 YAML, try uploading it again.
If the issue persists after following these steps, please contact the Document360 support team for further assistance: Contact Document360 Support
FAQs
Can I keep the generated API documentation in the draft state?
After uploading the API reference file, if you click Close instead of Publish, all the generated API documentation articles are kept in the draft state.
Can I move a specific API endpoint article from one API reference folder to another in Document360?
No, it is not possible to move a specific API endpoint article from one API reference folder to another. However, you can move API endpoint articles between subfolders within the same API reference folder.
Can an article from the API documentation have the same URL as a Knowledge base article?
No, a knowledge base article and an API documentation article cannot have the same URL. However, you can keep them under the same subdomain.
How often is an API reference file resynced?
If you generated your API documentation from a URL or a JSON, YAML, or YML file, the API reference file is not resynced automatically and will need to be updated manually. To have the API reference file resynced automatically, it is recommended to integrate it with the CI/CD flow.
Why am I getting a 403 error when posting details through the API endpoint?
A 403 error occurs when you attempt to post details through the API endpoint. This happens when the API token used does not have the required permission to make a POST request. Ensure that the API token has the necessary permissions for POST requests. Update the token settings and try again.
How many levels of categories are supported in an API documentation workspace?
The API documentation workspace supports up to three levels of subcategories. If your API specification includes more than three levels, any additional levels will be added and displayed at the third level to maintain a consistent structure.
Can I create nested folders in my API documentation automatically from the spec file?
Yes, the API documentation spec file allows you to create nested folders (second-level subcategories) using the > symbol in the tags specified within the OpenAPI spec file (e.g., Pets > Details). This enables a well-organized, hierarchical structure of your API endpoints, maintains the hierarchy during resync, and ensures proper display and navigation in the left panel of the API reference.
Can I download articles as PDFs using the API?
Currently, there is no option to download articles as PDFs through the API endpoints.