If your knowledge base is private or restricted to specific users, you can use JWT (JSON Web Tokens) to securely control access to the embedded Document360 widget. This setup ensures that only authenticated users can view articles through the widget, without requiring them to sign in separately.
With JWT authentication, your system handles login and token generation. The widget then uses that token to fetch content based on each user's access level.
How JWT authentication works for the widget
JWT is the recommended approach when your knowledge base visibility is set to Private or Mixed. In these cases, readers must be authenticated before the widget can display content. JWT handles this silently. Readers never see a separate login screen.
Use JWT for the widget when:
- Your knowledge base is restricted to specific users or reader groups.
- You want single sign-on access to the widget without a separate login prompt.
- You need to control which content each reader sees based on their group membership.
Authentication flow overview
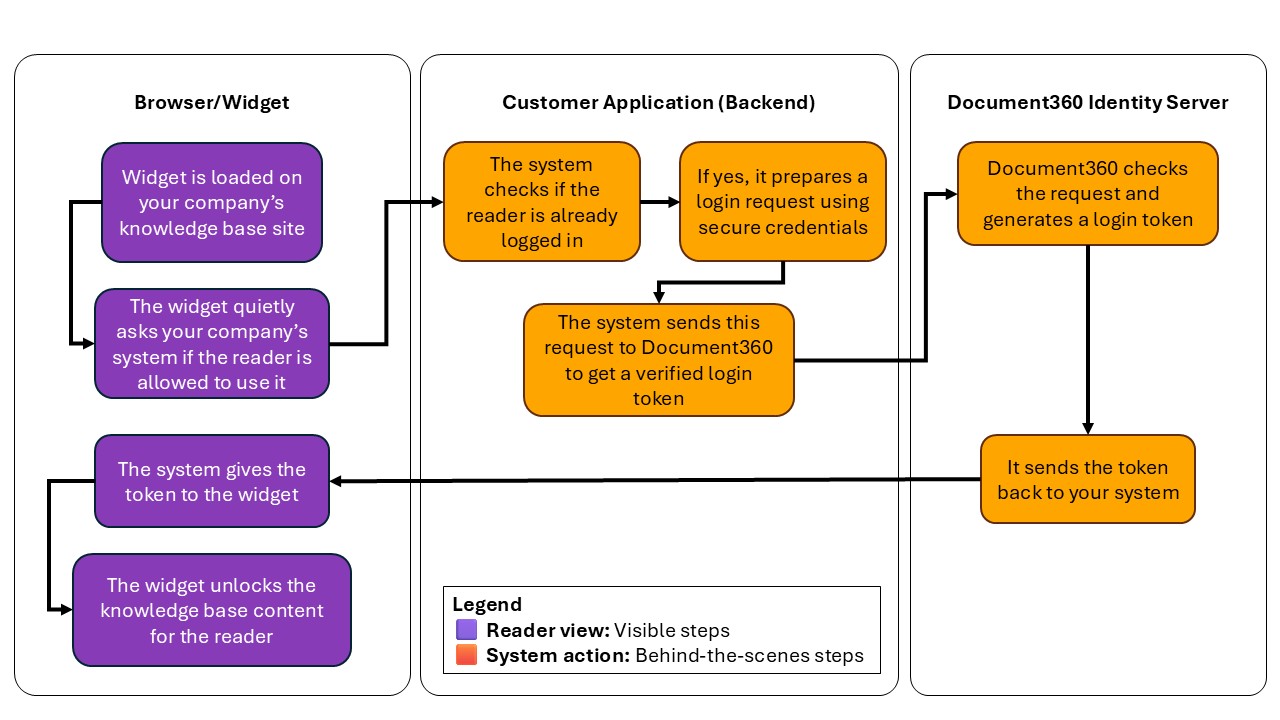
The flow diagram above shows what happens when a user loads a widget on your website. The Document360 widget communicates with your system to get a secure token before displaying content.
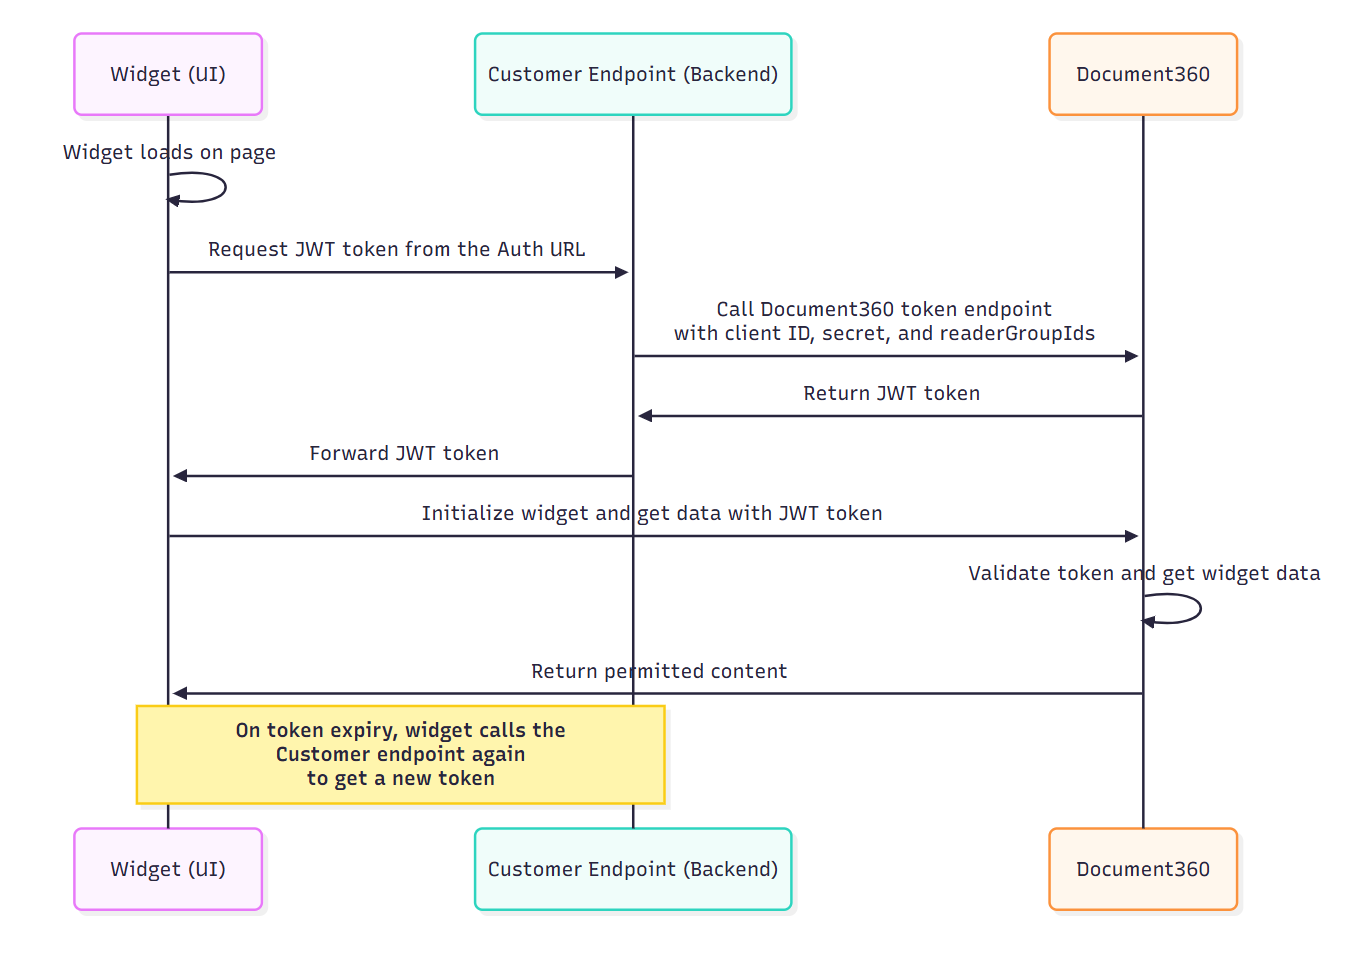
The sequence diagram above outlines the technical flow between the user's browser, your backend, and Document360's identity server to generate and validate the JWT token.
The steps below explain the complete JWT authentication flow:
- User visits your website, where the Document360 widget is embedded.
- The widget sends a silent request to your authentication endpoint (token endpoint) configured in the widget settings.
- Your backend sends a request to Document360 with the required credentials (client ID, client secret) and reader details.
- Document360 validates the request and returns a signed JWT to your backend.
- Your backend sends the token back to the widget.
- The widget uses this token to fetch and display articles that the reader has access to.
- When the token expires, the widget automatically requests a new one (if configured to do so).
The above flow happens behind the scenes. Readers never see a login screen for the widget.
Before you begin
- You must have a Project Owner or Admin role in Document360.
- At least one knowledge base widget must already exist. If not, create one first from Connections > Knowledge base widget. Learn more at Adding a widget.
- Your knowledge base project visibility must be set to Private or Mixed. JWT is not required for public projects.
- You must have access to your backend server to implement the authentication endpoint. The code example in this article uses C#, but the same principles apply to any server-side language.
- At least one reader group must be configured in your project. The widget requires at least one valid reader group ID to render content. Learn more about JWT reader groups.
Step 1: Enable and configure JWT for the widget
-
Navigate to Connections () > Knowledge base widget in the left navigation bar.
The list of widgets appears.
-
Hover over the widget you want to configure and click the Edit () icon.
-
In the Configure & connect tab, navigate to the JWT accordion and turn on the Enable toggle.
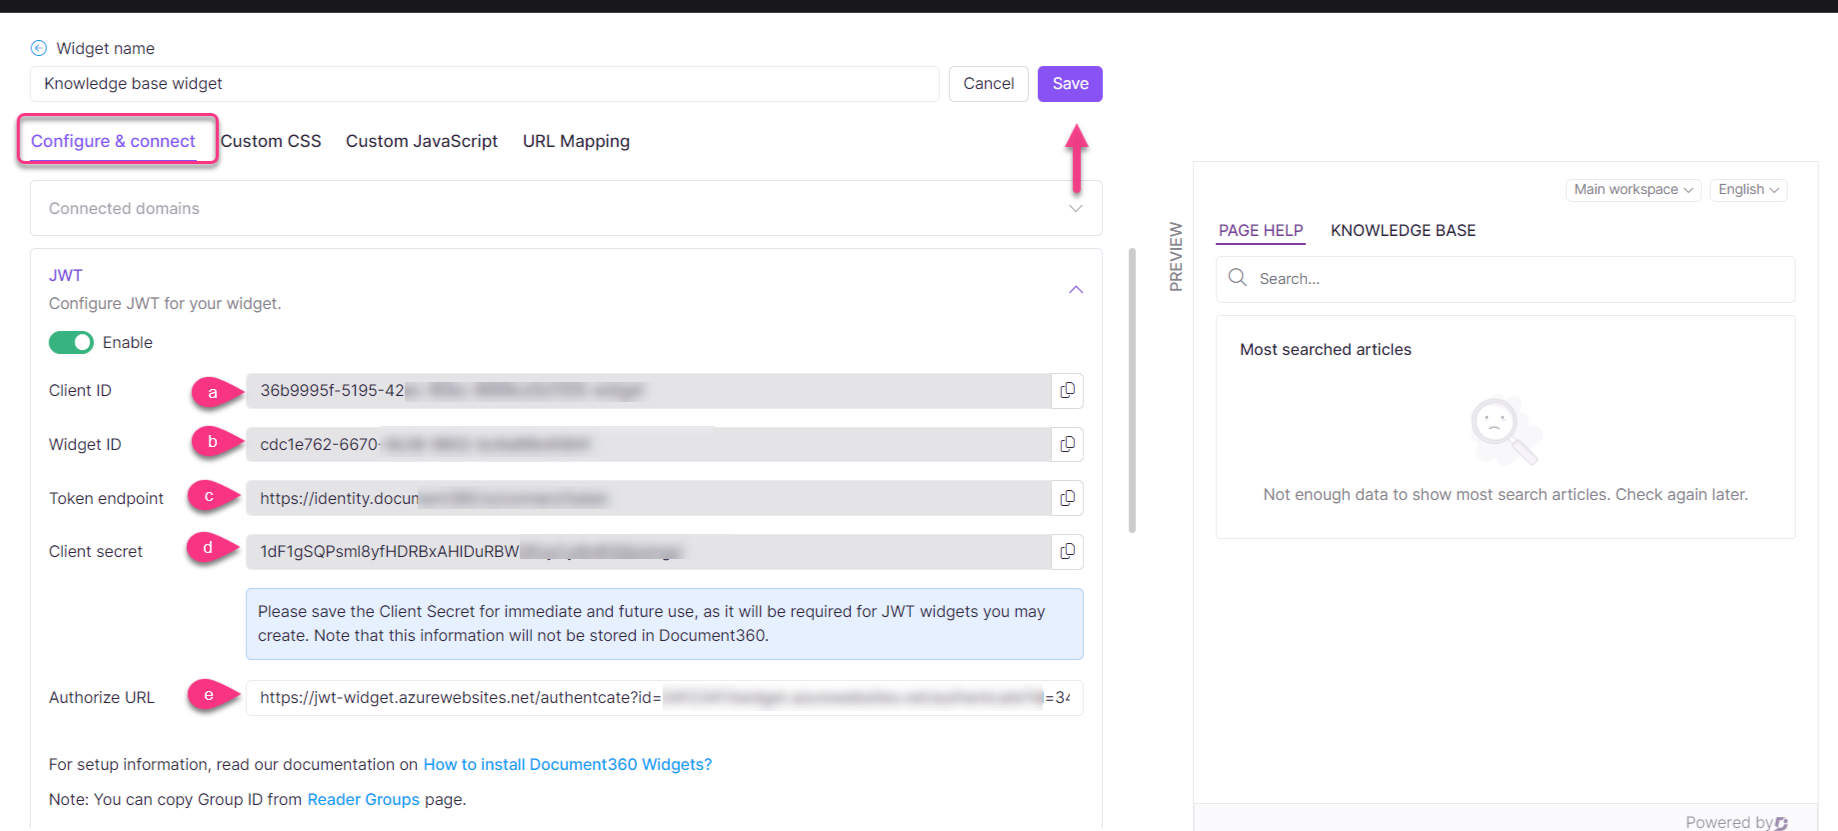
The following fields are displayed:
| Field | Description |
|---|---|
| Client ID | Your project's ID, auto-generated by Document360. |
| Widget ID | A unique identifier for this specific widget. Used to distinguish between multiple widgets in the same project. |
| Token endpoint | An HTTP endpoint that allows you to obtain an access token given an authorization code. |
| Client secret | Click Regenerate to generate the client secret. Save this value securely as it applies to all JWT-enabled widgets in the project. |
| Authorize URL | Paste the authorized URL from your knowledge base widget webpage. |
The client secret is shared across all JWT-enabled widgets and chatbots in the project. If you regenerate the secret, you must update the new secret in all JWT-configured widgets and applications to prevent authentication failures. The client secret is shown only during generation and is not stored in Document360, so save it securely.
- Click Save to apply the changes.
Embed the authorized URL within your code and paste it into the script section of your webpage. This implements a secure, authenticated widget that prevents unauthorized third-party access.
Enabling JWT removes the API token from the widget script. If JWT is subsequently disabled, a new API token is automatically regenerated and restored to the widget script.
Step 2: Implement the authentication endpoint
After configuring JWT in the portal, set up an authentication endpoint in your backend application. This endpoint receives a request from the widget and returns a valid token in response.
This endpoint is specific to the widget authentication flow. For the knowledge base site JWT authentication endpoint, see Configure JWT in Document360.
The example below shows how to implement the endpoint in C#. The same logic applies to other server-side languages such as Node.js or Python.
/// <summary>
/// Endpoint to authenticate a user, generate a JWT token from Document360,
/// and return it to the widget.
/// </summary>
[HttpGet]
[Route("authenticate")]
public async Task<IActionResult> WidgetAuthentication(string id)
{
    // Ensure the user is authenticated in your application
    if (!HttpContext.User.Identity.IsAuthenticated)
    {
        return Unauthorized(new { message = "User is not authenticated." });
    }

    // Define configuration values
    var clientData = new ClientDetails
    {
        ClientId = "{Client ID}",                // Replace with your project's client ID
        Secret = "{Client secret}",              // Replace with your generated client secret
        TokenEndpoint = "{Token endpoint}",      // Replace with the token endpoint URL from Document360
        WidgetId = "{Widget ID}",                // Replace with your widget ID
        SecurityGroupIds = "group1,group2",      // Replace with comma-separated reader group IDs
        TokenValidity = 900                      // Token validity in seconds (300–86400)
    };

    // Return 404 if configuration is missing
    if (clientData == null)
    {
        return NotFound(new { message = "Client configuration not found." });
    }

    // Convert the comma-separated reader group IDs into a list
    List<string> readerGroupIds = null;
    if (!string.IsNullOrEmpty(clientData.SecurityGroupIds))
    {
        readerGroupIds = clientData.SecurityGroupIds
            .Split(',')
            .Select(c => c.Trim())
            .ToList();
    }

    // Prepare the payload with user and configuration details
    var payload = new
    {
        username = "{Username}",
        firstName = "{First name}",
        lastName = "{Last name}",
        emailId = "{Email address}",
        readerGroupIds = readerGroupIds,
        tokenValidity = clientData.TokenValidity,
        widgetId = clientData.WidgetId,
        projectId = clientData.ClientId
    };

    var payloadString = JsonConvert.SerializeObject(payload);

    try
    {
        // Send request to Document360 token endpoint
        var result = await client.RequestTokenAsync(new TokenRequest
        {
            Address = clientData.TokenEndpoint,
            ClientId = clientData.ClientId,
            ClientSecret = clientData.Secret,
            GrantType = "Widget",
            Parameters =
            {
                { "payload", payloadString },
                { "id", clientData.ClientId }
            }
        });

        // Return the access token to the widget
        return Ok(new
        {
            accessToken = result.AccessToken,
            expiresIn = result.ExpiresIn
        });
    }
    catch (Exception ex)
    {
        return StatusCode(500, new
        {
            message = "Failed to generate token.",
            details = ex.Message
        });
    }
}
Token validity rules:
- The
tokenValidityvalue is set in seconds. The minimum is 300 seconds (5 minutes) and the maximum is 86,400 seconds (1440 minutes). - If you enter a value outside this range, the system automatically adjusts it to the nearest valid value. For example, setting
tokenValidityto 60 seconds increases it to 300 seconds automatically. - A value of 900 seconds (15 minutes) is a reasonable default for most use cases. Shorter values improve security but increase backend load.
The widget requires at least one valid reader group ID to render content. Include these as a comma-separated list in the readerGroupIds parameter of the JWT payload. Learn how to get reader group IDs
Step 3: Test your JWT widget configuration using Postman
After setting up JWT in the portal and implementing your backend authentication endpoint, use Postman to confirm that your configuration works as expected. This test verifies that your widget's backend endpoint returns a valid JWT token.
This test is specific to the widget authentication flow. It verifies that your backend returns a valid token to the widget. To test the knowledge base site JWT SSO flow instead, see Test your JWT configuration.
-
Launch Postman.
-
Select + New tab or click New > HTTP request.
-
Set the method to POST.
-
In the request URL field, enter the full URL of your backend endpoint.
Example:
https://yourdomain.com/authenticate -
Go to the Authorization tab.
-
Under Type, select Basic Auth.
-
Enter the following credentials:
- Username: Your Client ID from the Document360 portal.
- Password: Your Client Secret generated when you created the JWT.
-
Go to the Body tab.
-
Select raw and choose JSON from the dropdown.
-
Paste the following example JSON into the body:
{
  "username": "john.doe",
  "firstName": "John",
  "lastName": "Doe",
  "emailId": "john.doe@example.com",
  "readerGroupIds": ["group1", "group2"],
  "tokenValidity": 900,
  "widgetId": "your-widget-id",
  "projectId": "your-project-id"
}
Replace the values with actual data from your app and Document360 configuration.
- Click Send.
If the request is successful, you will receive a response like the following:
{
  "accessToken": "eyJhbGciOiJIUzI1NiIsInR5cCI6IkpXVCJ9...",
  "expiresIn": 900
}
Verify the following in the response:
- The response status is 200 OK.
- The response body contains a valid
accessToken. - The
expiresInvalue matches your expected token validity duration in seconds.
If all three are correct, your JWT widget configuration is working as intended.
Next steps
After your JWT configuration is verified and working, you can:
- Embed the widget on your website by adding the script snippet to your webpage's script section.
- Manage reader access by updating reader group assignments in Settings > Users & permissions > Readers & groups. Learn more at managing reader groups.
- Customize the widget's appearance and behavior from the Customize tab in the widget editor. Learn more about customizing the widget.
Best practices
- Store the client secret in a secure secrets manager, not in source code or environment files committed to version control.
- Set
tokenValidityas short as your use case allows. Shorter validity reduces the window of exposure if a token is intercepted. - Always test with Postman before going live to catch credential or payload issues early.
- If you regenerate the client secret, update all widgets and chatbots that share it before readers begin their next session. The secret is shared across all JWT-enabled widgets and chatbots in the project.
- Use reader group IDs to enforce content restrictions at the token level so readers only see what they are authorized to access.
FAQ
Do readers need a separate Document360 account to use the JWT widget?
No. Authentication is handled entirely through your application. An account in your application is sufficient for a reader to access the widget content.
Is the client secret shared across all widgets in my project?
Yes. The client secret is shared across all JWT-enabled widgets and chatbots in the project. If you regenerate it, you must update the new secret in every widget and application that uses it to prevent authentication failures.
What happens if JWT is disabled after being enabled?
If JWT is disabled, a new API token is automatically regenerated and restored to the widget script. Readers will need to authenticate through the standard method instead.
Can I use a language other than C# for the authentication endpoint?
Yes. The C# example in this article is illustrative. The same logic applies to any server-side language such as Node.js or Python. Adapt the HTTP client and JSON serialization libraries as needed.