Configure JSON Web Token (JWT) authentication to let readers securely sign in using tokens from your application or identity provider. This article covers the two setup steps you complete inside Document360 before connecting your application.
Only users with the Owner or Admin project role can configure JWT in Document360.
Before you begin
To access the JWT page, navigate to Settings () > Users & permissions > JWT.
.png)
New to JWT on Document360
If no JWT configuration exists in your project, complete the following steps in order:
- Configure JWT login: configure shared project-level settings.
- Create a JWT configuration: add your first JWT configuration.
- Set up your application: connect your application to Document360.
Additional JWT configurations and SSO providers (SAML or OpenID) can be added to the same project at any time without affecting existing configurations.
Existing JWT configuration
If you set up JWT before June 2026, your existing configuration appears in a read-only view. Your current JWT configuration remains active, and readers can continue signing in without interruption.
When you navigate to Settings () > Users & permissions > JWT, you can:
- Continue using the configuration: no changes required.
- Edit the configuration: click the Edit icon to update the settings.
- Delete the configuration: click the Delete icon to remove it.
To add another JWT configuration, click Create JWT and follow Step 1 and Step 2 below. A project can have up to 5 JWT configurations. After saving, the page switches to list view and displays all configured JWT entries. Your existing configuration remains unchanged.
To configure SSO alongside JWT, go to Settings () > Users & permissions > SSO Configuration and set up your SSO provider. Your JWT configuration is not affected. Both will be active at the same time and readers will see both options on the login page. See Managing JWT configurations for details on how the login page looks.
Step 1: Configure JWT login
Click Configure JWT login in the banner on the JWT page to open the configuration modal.
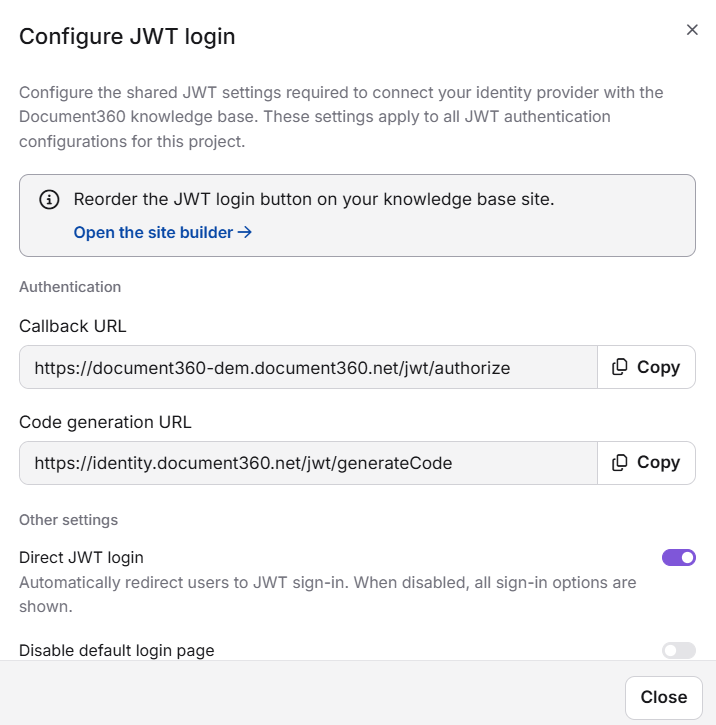
The Configure JWT login modal also lets you reorder the JWT login button on your knowledge base site. Click Open site builder to reorder login buttons directly in the site customization. To learn more, read Login button limits.
Authentication
These are read-only values generated by Document360. Copy them using the Copy button and configure them in your identity provider.
| Field | Description |
|---|---|
| Callback URL | The redirect URL where the identity provider sends readers after successful authentication. Register this in your IdP to complete the sign-in process. |
| Code generation URL | The endpoint Document360 calls to retrieve the token used to sign in readers. |
Other settings
Direct JWT login
Default: ON
- When enabled, readers are redirected directly to JWT sign-in without being shown a login selection screen. This is appropriate when JWT is the sole authentication method for your knowledge base.
- When disabled, readers are presented with a login selection screen showing all configured sign-in options (JWT, SSO, and the default Document360 login). Disable this setting when multiple authentication methods are active and readers need to choose their sign-in method. A confirmation is required before this change is applied.
- When multiple JWT configurations and SSO are set up, but the project owner wants readers to sign in only through JWT authentication, they can enable Direct JWT login.
Disable default login page
Default: OFF
- When enabled, the standard Document360 email and password login is hidden. Readers can only authenticate through configured JWT or SSO providers. This is typically used in enterprise environments where all reader access must be controlled through a centralized identity system.
Enable this setting only after JWT or SSO authentication has been fully configured and tested. If the external authentication provider is misconfigured, readers will be unable to access the knowledge base.
Click Close to dismiss the modal. Changes are applied immediately.
Step 2: Create a JWT configuration
On the JWT page, click Create JWT in the top-right corner. The Create JWT modal opens.
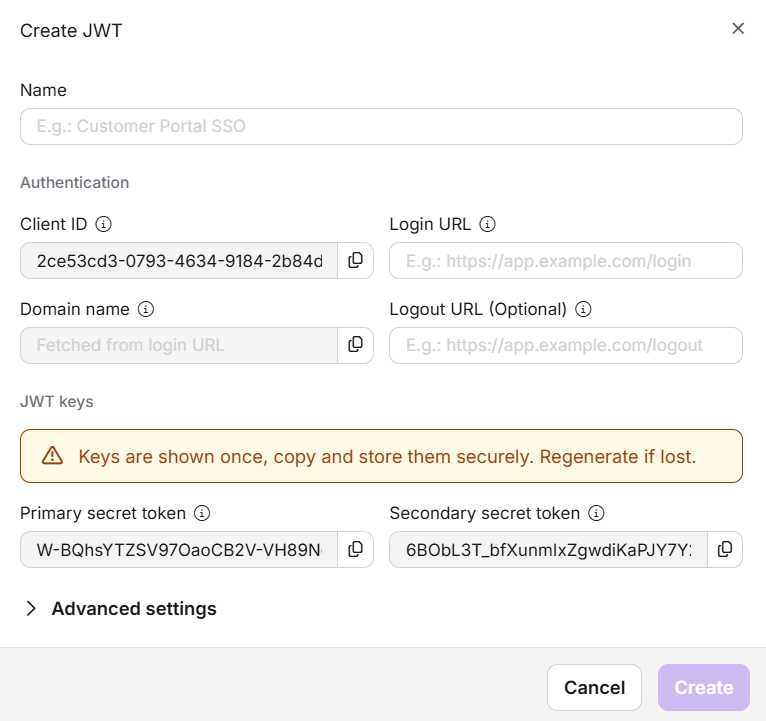
Name
Enter a descriptive name to identify this configuration, for example "Customer Portal SSO". This name appears in the JWT list in the portal. If the login button is enabled, this name is also displayed to readers on the login page, so it should be meaningful to the audience signing in.
Authentication fields
| Field | Required | Description |
|---|---|---|
| Client ID | Yes | Auto-generated by Document360. This is the unique identifier for this JWT configuration. Copy it using the copy icon and add it to your client application. |
| Login URL | Yes | The URL in your application where readers are sent to authenticate (for example, https://app.example.com/login). |
| Domain name | Yes | Automatically derived from the Login URL. This is the domain associated with this JWT configuration. When a reader enters this domain on the login page, they are routed to this configuration's Login URL. The domain must be unique across all JWT configurations in the project. |
| Logout URL | No | The URL to which readers are redirected after signing out (for example, https://app.example.com/logout). If not specified, readers are directed to Document360's default JWT logout page. |
Domain name validation rules:
- Sub-domains are treated as distinct entries.
portal.example.comandexample.comare separate domains and can be assigned to different configurations. - Wildcard domains such as
*.example.comare not supported. Each domain must be an exact value. - A domain already assigned to another JWT configuration in the same project cannot be reused. An inline validation error is shown on save.
JWT keys
Secret tokens are displayed only once at the time of creation. Copy and store them securely before closing the modal. If lost, they must be regenerated, which immediately invalidates the previous tokens.
Document360 automatically generates two secret tokens when the modal opens. These tokens are visible in plain text only during this session. Once the modal is closed, they are masked and cannot be retrieved.
| Token | Purpose |
|---|---|
| Primary secret token | Signs and verifies JWT authentication requests between your application and Document360. This token must be kept confidential. If compromised, regenerate it immediately and update your application to prevent unauthorized access. |
| Secondary secret token | Serves as a backup signing key to support credential rotation without service interruption. During rotation, the secondary token allows authentication to continue while the primary token is being updated. |
Use the Copy icon adjacent to each token to copy its value.
Advanced settings
Expand Advanced settings to configure the following options.
Enable JWT authentication
Default: ON
When enabled, this configuration is active and readers can use it to sign in. Disabling it deactivates the configuration without deleting it, which is useful for temporarily suspending a configuration without losing its settings.
Show login button
Default: OFF
When enabled, a branded login button for this configuration appears on the knowledge base login page. This gives readers a direct sign-in option without needing to enter a domain name.
A maximum of 3 JWT login buttons can be displayed on the login page simultaneously. When this limit is reached, the toggle is automatically disabled for additional configurations. Readers assigned to configurations without a visible button can still authenticate by entering their domain name in the Domain name field on the login page. To control the order in which JWT and SSO buttons appear on the login page, see Managing JWT configurations.
When Show login button is enabled, the following additional fields are available:
- Login button text: the label displayed on the button. This should clearly identify the authentication source for readers.
- Login button logo: an image uploaded to brand the button. Accepted formats: JPG, PNG, SVG. Maximum file size: 512 KB.
Step 3: Set up your application
Copy the following values from the JWT configuration and add them to the corresponding fields in your client application:
- Client ID
- Callback URL
- Code generation URL
- Primary secret token
- Secondary secret token
Click Create. The button remains inactive until all required fields contain valid values. On success, the modal closes and the new configuration appears in the JWT list.
Readers do not require a separate Document360 account. Authentication is handled entirely through your application. An account in your application is sufficient for a reader to access the knowledge base.
Once you have saved the configuration, proceed to Implement JWT in your application to set up the backend redirect logic.
To enable or disable a configuration, regenerate secret tokens, manage domain routing, or review audit logs after going live, see Managing JWT configurations.