Document360 supports SAML SSO with any Identity Provider (IdP) that supports the SAML 2.0 protocol, even if it is not listed explicitly in Document360's IdP options. This article walks you through configuring SSO between Document360 and a custom or unlisted Identity Provider.
Only users with the Owner or Admin project role can configure SSO in Document360.
What you can do with a custom IdP
| Capability | Supported |
|---|---|
| User (portal) authentication | Yes |
| Reader (knowledge base site) authentication | Yes |
| IdP-initiated sign-in | Yes |
| SCIM provisioning | Yes (if supported by your IdP) |
| SSO configuration inheritance (parent-child projects) | Yes |
Before you begin
- You have the necessary credentials and administrative access to both Document360 and your chosen Identity Provider.
- You have Owner or Admin access in your Document360 project.
- Your Identity Provider supports SAML 2.0.
- Open Document360 and your Identity Provider in two separate browser tabs. You will need to switch between them multiple times during setup.
Step 1: Create a SAML application in your Identity Provider
Add a new application in your IdP
- Log in to your Identity Provider's admin console.
- Locate the section where you can create or manage applications (often labelled Applications, Enterprise Applications, or similar).
- Select the option to create a new application.
- Configure the basic settings for the new application:
- Application Name: Enter a name, for example "Document360 SSO".
- Application Type: Select SAML 2.0 as the sign-in method.
- Save your application settings.
Step 2: Configure SAML in your IdP using Document360 parameters
Get the Service Provider parameters from Document360
- Open Document360 in a separate tab.
- Navigate to Settings () > Users & permissions > SSO Configuration.
- Click Create SSO.
.png)
- Select Others as your Identity Provider (IdP) to navigate to the Configure the Service Provider (SP) page automatically.
.png)
- The Configure the Service Provider (SP) page displays the parameters you need to configure SAML in your Identity Provider.
.png)
Enter the Document360 parameters in your IdP
In your Identity Provider's SAML configuration, enter the Document360 parameters using the mapping below.
| Your IdP | Document360 |
|---|---|
| Single Sign-On URL | Callback path |
| Entity ID | Service provider entity ID |
| Audience URI | Service provider entity ID or Single Sign-On URL |
Configure attribute mapping in your IdP
You may need to configure attribute statements in your Identity Provider. Add the following attributes.
| Attribute name | Value |
|---|---|
| NameID | user.email or user ID |
| user.email | |
| name | user.name |
Attribute names are case sensitive.
Complete any additional configuration in your IdP
- Provide any additional configuration details required by your Identity Provider.
- Review your settings and save the SAML configuration.
- Click Next in Document360 to navigate to the Configure the Identity Provider (IdP) page.
Step 3: Complete the SSO configuration in Document360
Configure the Identity Provider in Document360
- Return to the Document360 tab displaying the Configure the Identity Provider (IdP) page.
- The Configure an existing connection field allows you to inherit an SSO configuration that has already been created. By selecting this option, the current SSO configuration will be set as the child and no changes can be made to it.
For more information on inheritance, see Inherit from another application.
- Enter the corresponding values from your Identity Provider using the mapping below.
| Identity Provider | Document360 |
|---|---|
| Single Sign-On URL | Sign-On URL |
| Identity Provider Issuer | Entity ID |
| SAML Certificate (X.509) | SAML Certificate |
- Download the X.509 Certificate from your Identity Provider and upload it to the SAML Certificate field in Document360.
- Toggle the Allow IdP initiated sign in option on or off based on your project requirements.
.png)
- Click Next to proceed to the SCIM provisioning page.
Step 4: Configure SCIM provisioning
SCIM provisioning automates user and reader lifecycle management between your Identity Provider and Document360. This is available if your IdP supports SCIM.
If you do not need SCIM provisioning, skip to Step 5: More settings.
Enable SCIM in Document360
- Turn on the Enable SCIM provisioning toggle.
- A confirmation dialog appears. Review the terms, select the checkbox, and click Agree.
.png)
- A set of parameters will then be displayed — use these to enable SCIM provisioning in your IdP.
.png)
Assign default role and groups in Document360
- Turn on Enable group sync if needed. This automatically assigns users and readers based on your IdP group mappings.
- In the Default role field, the role is set to Contributor by default. You can change this from the dropdown if needed.
- In the User groups and Reader groups fields, select the groups you want to add. Multiple groups can be added, and they will inherit the default role you selected earlier.
- Click Next to navigate to the More settings page.
Step 5: More settings
Configure SSO name and login options
- In the SSO name field, enter a name for the SSO configuration.
- In Customize login button, enter the text for the login button displayed to users.
- Auto assign reader group — this option is only available for existing SSO configurations. For newly created SSO configurations, this toggle will not be displayed as SCIM automatically provisions users and groups. Learn more about Auto assign reader group.
- Enable Sign out idle SSO user if needed, and toggle based on your requirements.
- Choose whether to invite existing user and reader accounts to SSO.
.png)
- Click Create to complete the SSO configuration.
The SSO configuration will now be set up in Document360 using your selected Identity Provider.
When SCIM is enabled, editing a user's name or deleting a user directly in Document360 is disabled, as these actions must be managed through your IdP to keep both platforms in sync. You can only manage content access from Document360. Deleting a profile in your IdP does not remove it from Document360 — the profile will remain with an Inactive status.
Inherit from another application
When creating a new SSO configuration in Document360, you can inherit SCIM settings from an existing SSO connection. This simplifies the setup process, avoids repeating configuration steps, and helps administrators save time while ensuring consistency across integrations.
Child inherited SSO configuration
On the Configure Identity Provider (IdP) page, select the Configure an existing connection field and choose the parent SSO SCIM-enabled application you want to inherit from. Selecting this option designates the current project as the child project, inheriting all relevant properties from the parent.
.png)
Once the SSO configuration is created, the SCIM provisioning settings will be inherited from the parent application and cannot be modified in the child application.
Parent inherited SSO configuration
The parent application will display a list of all projects that have inherited its configuration. Any changes made to the parent application will automatically be reflected in the child application.
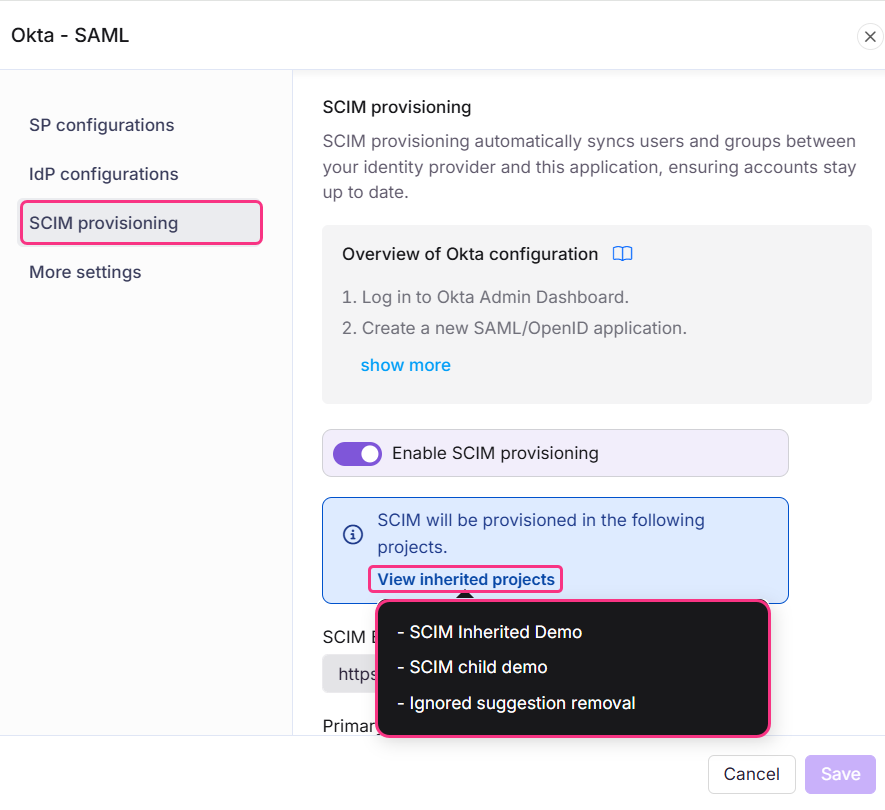
- If SCIM is enabled in the parent project after child projects have already inherited it, the users and groups will be automatically provisioned to all child projects in the background.
- Enabling inheritance makes it easier to manage multiple SSO configurations with SCIM enabled, as all settings are controlled from one parent application. This saves time and reduces the effort required to manage each configuration individually.
Best practices
- Verify SAML 2.0 support before starting. Confirm that your Identity Provider supports the SAML 2.0 protocol. Document360 does not support SAML 1.x or proprietary SSO protocols.
- Check attribute name casing carefully. The attribute names
emailandnameare case sensitive. Ensure they are entered exactly as shown in the attribute mapping table. - Download and store the X.509 certificate before completing setup. You will need to upload this file to Document360. Keep a copy in a secure location in case you need to reconfigure.
- Test with a single user first. Before rolling out SSO to all users, verify the configuration with one test account to confirm that attribute mapping, certificates, and URLs are all functioning correctly.
FAQ
Which Identity Providers can I use with the "Other configurations" option?
You can use any Identity Provider that supports the SAML 2.0 protocol. This includes providers like PingIdentity, Shibboleth, JumpCloud, Centrify, and others not listed explicitly in Document360's IdP selector. If your provider is listed explicitly (Okta, Entra, Google, OneLogin, ADFS), use that dedicated article instead for provider-specific guidance.
What happens to a user's profile in Document360 if I delete them in my IdP?
Deleting a user profile in your IdP does not remove it from Document360. The profile will remain in Document360 with an Inactive status. You can only manage content access directly from Document360.
Can I use SCIM provisioning with any Identity Provider?
SCIM provisioning is available if your Identity Provider natively supports the SCIM 2.0 protocol. If your IdP does not support SCIM natively, you may be able to enable it through a third-party provisioning tool or a custom integration.