Okta is an Identity Provider (IdP) that manages user access across multiple applications from a single platform. With SAML SSO configured between Okta and Document360, your users and readers can sign in to Document360 using their existing Okta credentials, without needing a separate password.
Only users with the Owner or Admin project role can configure SSO in Document360.
What you can do with Okta as your IdP
| Capability | Supported |
|---|---|
| User (portal) authentication | Yes |
| Reader (knowledge base site) authentication | Yes |
| IdP-initiated sign-in | Yes |
| SCIM user provisioning | Yes |
| SCIM reader provisioning | Yes |
| SCIM group sync | Yes |
| SSO configuration inheritance (parent-child projects) | Yes |
Before you begin
- You have an active Okta account with administrator access. If you need to create one, sign up at developer.okta.com/signup.
- You have Owner or Admin access in your Document360 project.
- Open Document360 and Okta in two separate browser tabs. You will need to switch between them multiple times during setup.
Step 1: Create a SAML application in Okta
Create the app integration
- Log in to your Okta account and click Admin in the top right corner to switch to the admin console.
- In the left navigation, expand Applications and click Applications.
- Click Create App Integration.
- In the Create a new app integration dialog, select SAML 2.0 as the sign-in method and click Next.
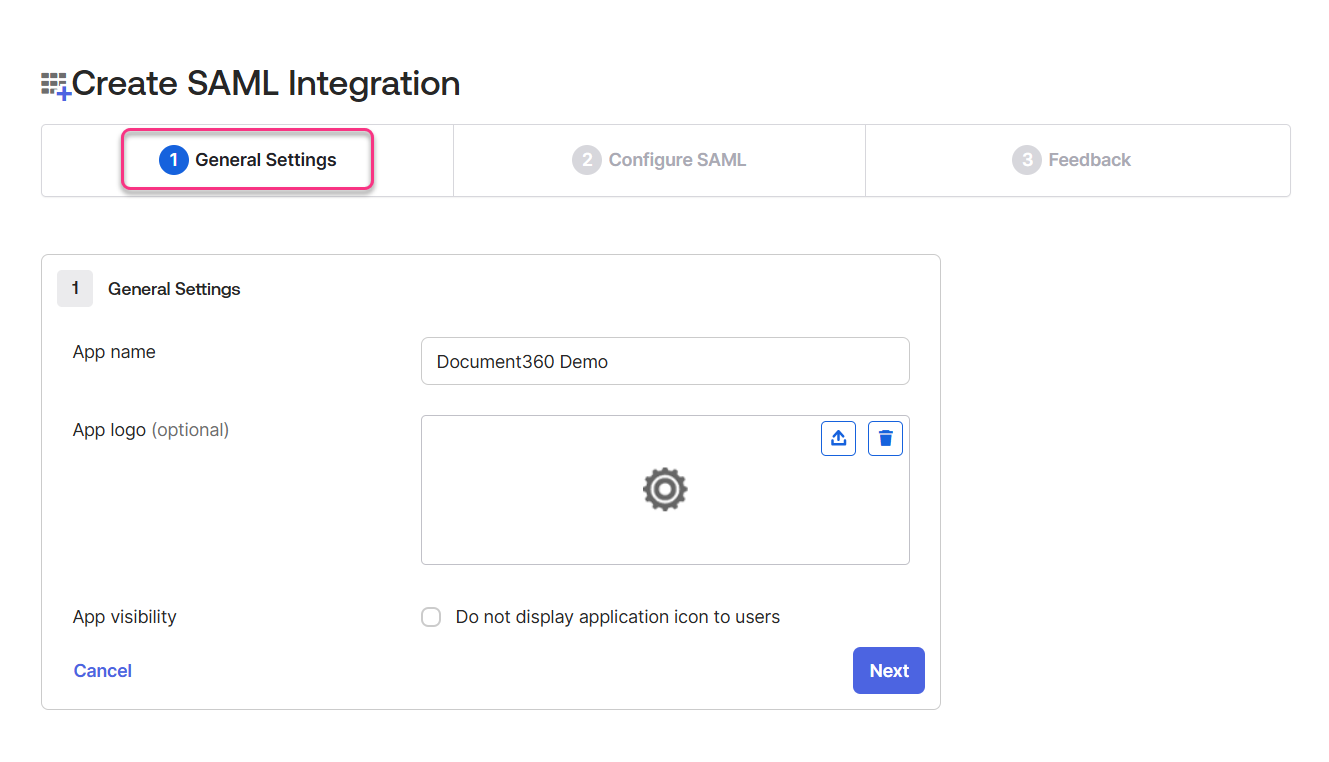
Configure general settings
- On the General Settings tab, enter a name for your application in the App name field (for example, "Document360 SSO").
- Optionally upload a logo and configure app visibility settings.
- Click Next to proceed to the Configure SAML tab.
Configure SAML settings using Document360 parameters
You need the Service Provider (SP) parameters from Document360 to complete this step.
Get the parameters from Document360:
- In Document360, navigate to Settings () > Users & permissions > SSO Configuration.
- Click Create SSO and select Okta as your identity provider.
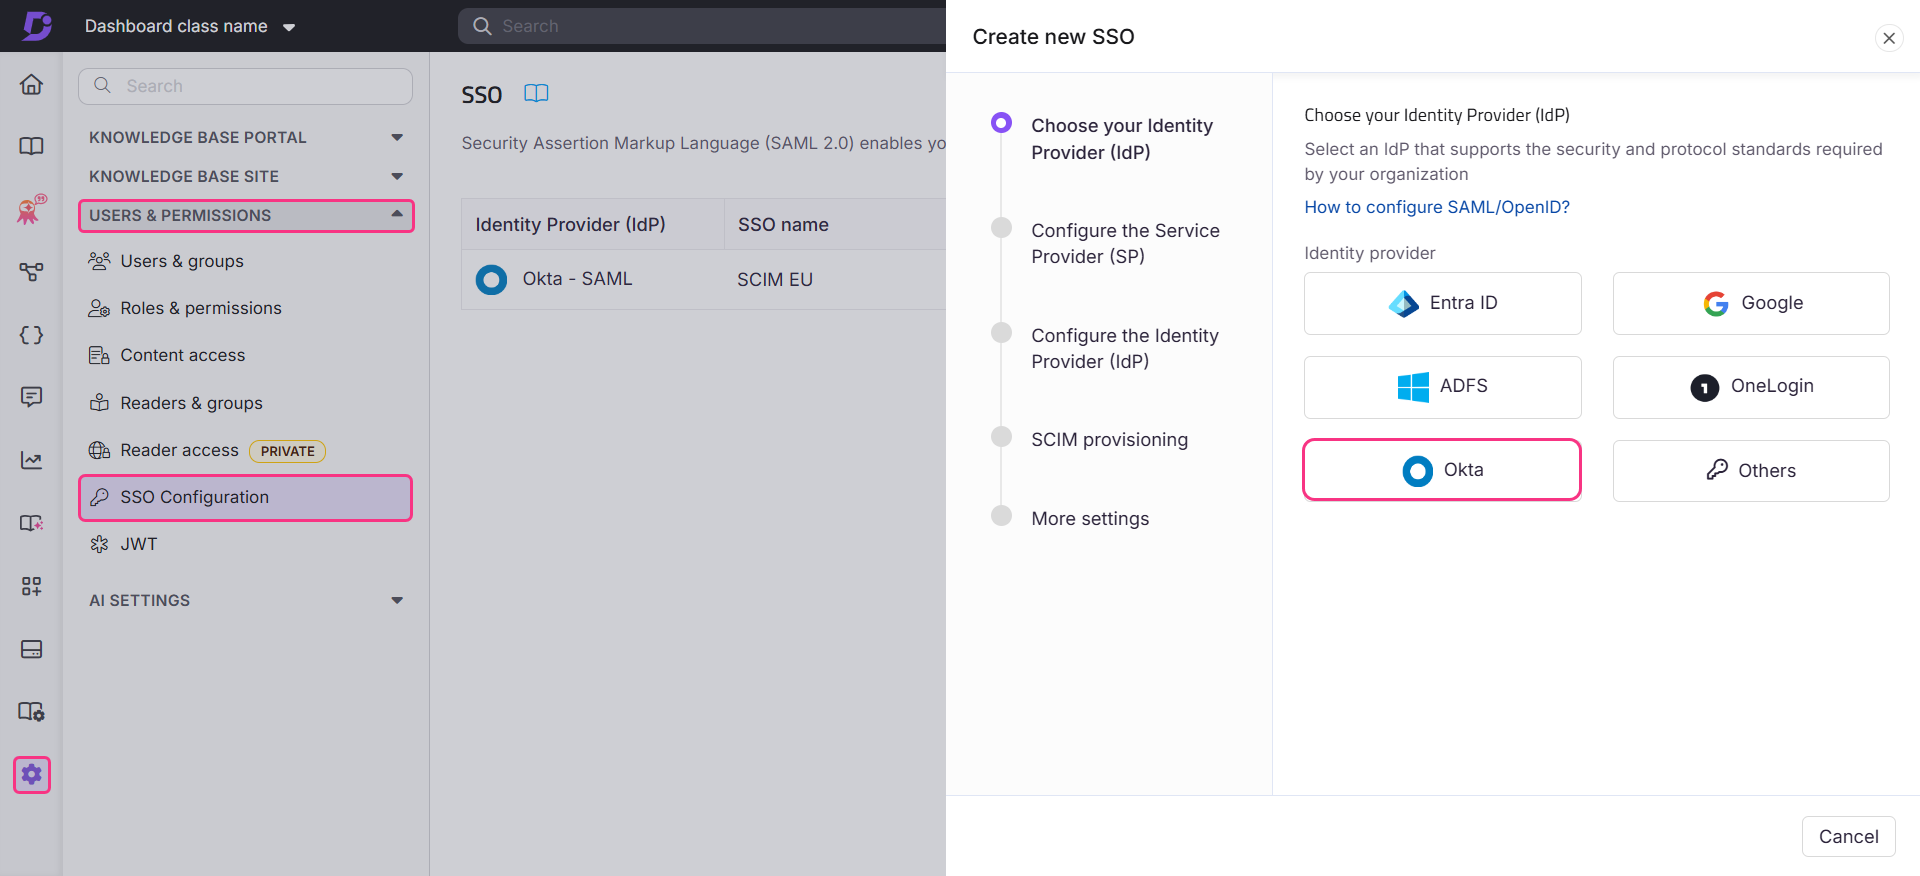
- Document360 displays the Configure the Service Provider (SP) page with the parameters you need.
Enter the parameters in Okta:
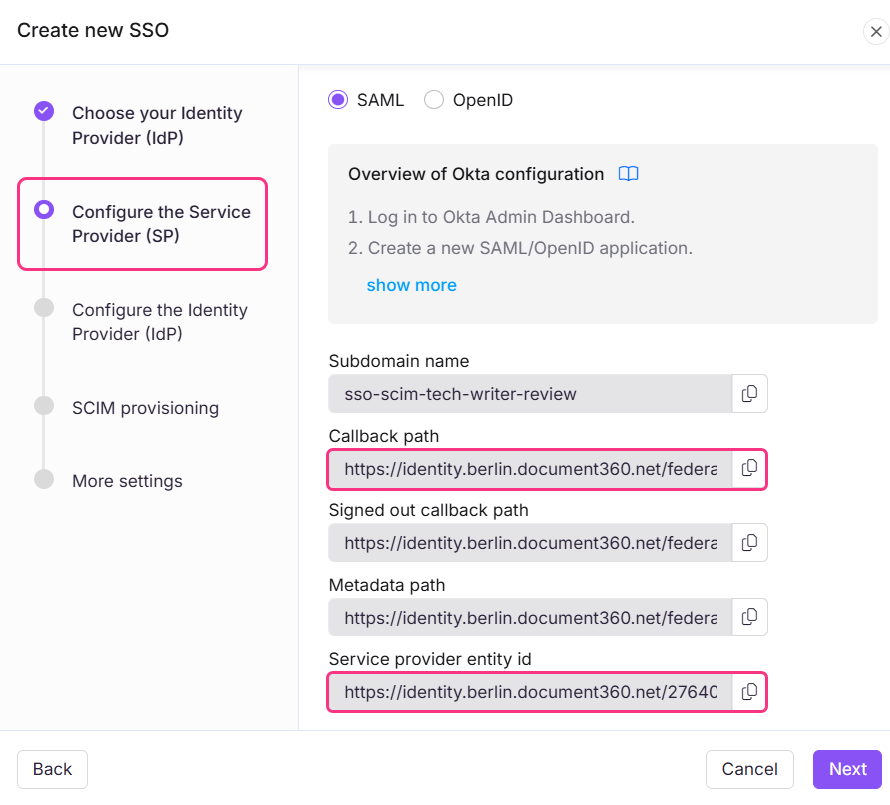
- Switch to the Okta tab. On the Configure SAML tab, enter the Document360 parameters using the mapping below.
| Document360 | Okta |
|---|---|
| Callback path | Single sign-on URL |
| Service provider entity ID | Audience URI (SP Entity ID) |
- Set Name ID format to EmailAddress.
- Set Application username to Email.
Email and name parameters are case sensitive.
.png)
- Click Next to navigate to the Feedback page.
Complete the Feedback page
The Feedback page is for providing information to Okta about how you configure the application.
- Select This is an internal app that we have created.
- Click Finish.
.png)
Your Okta application is now created.
Assign profile attribute statements
- In your Okta application, navigate to the Sign On tab and scroll down to Attribute statements.
- Expand Show legacy configuration and click Edit on Profile attribute statements.
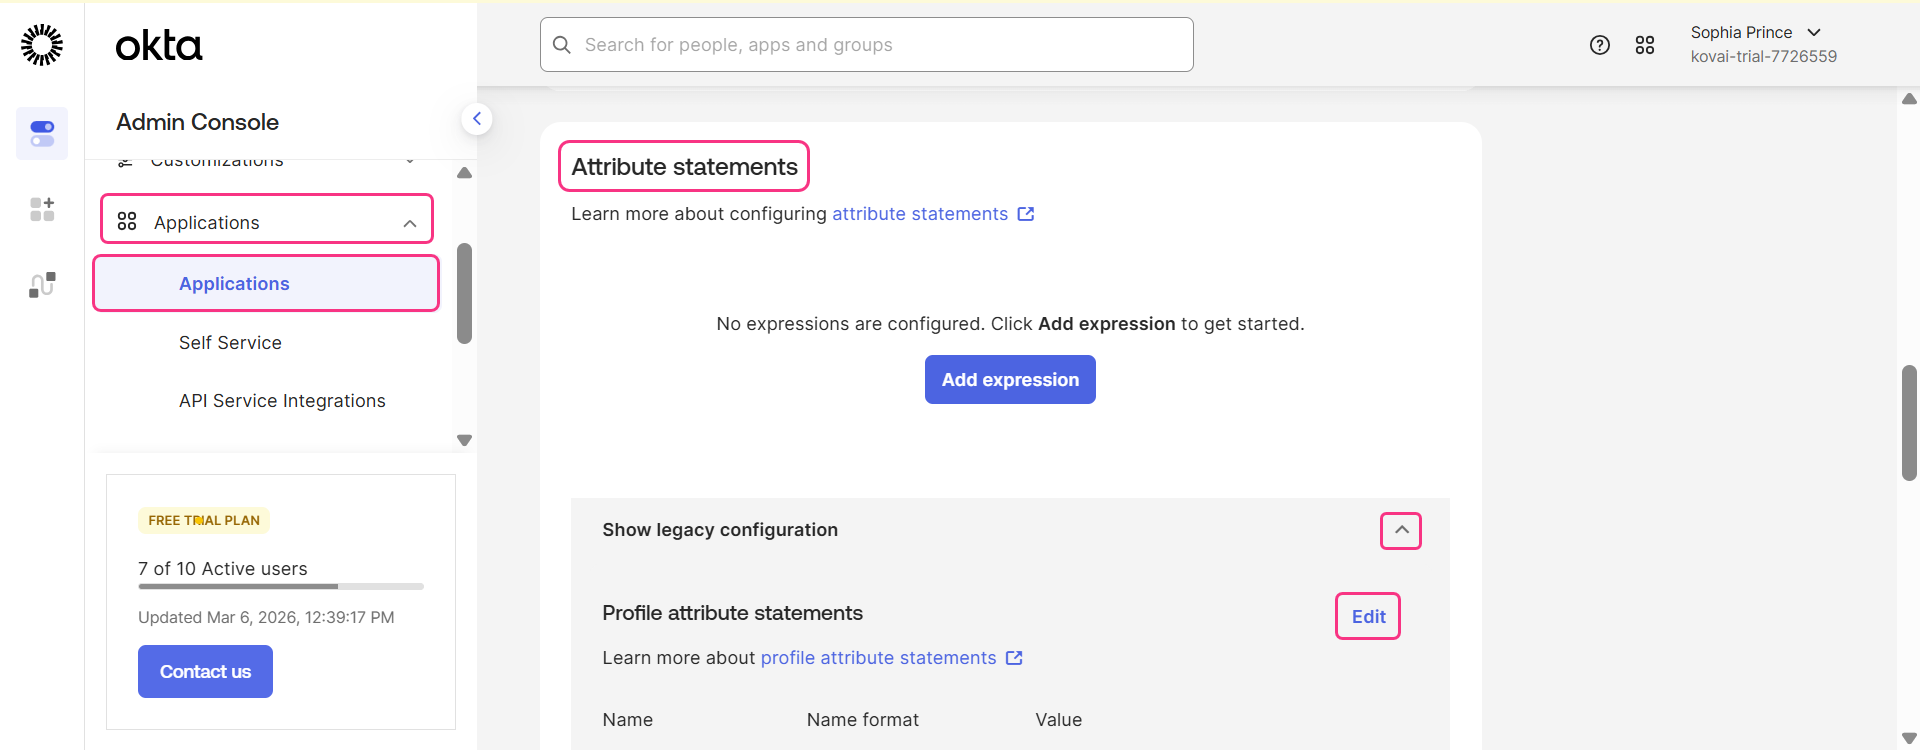
- Add the following attribute statements. You will need to add two additional rows.
| Name | Name format | Value |
|---|---|---|
| urn:oasis:names:tc:SAML:2.0:nameid | URI Reference | user.email |
| name | Unspecified | user.email |
| Unspecified | user.email |
- Click Save.
Step 2: Complete the SSO configuration in Document360
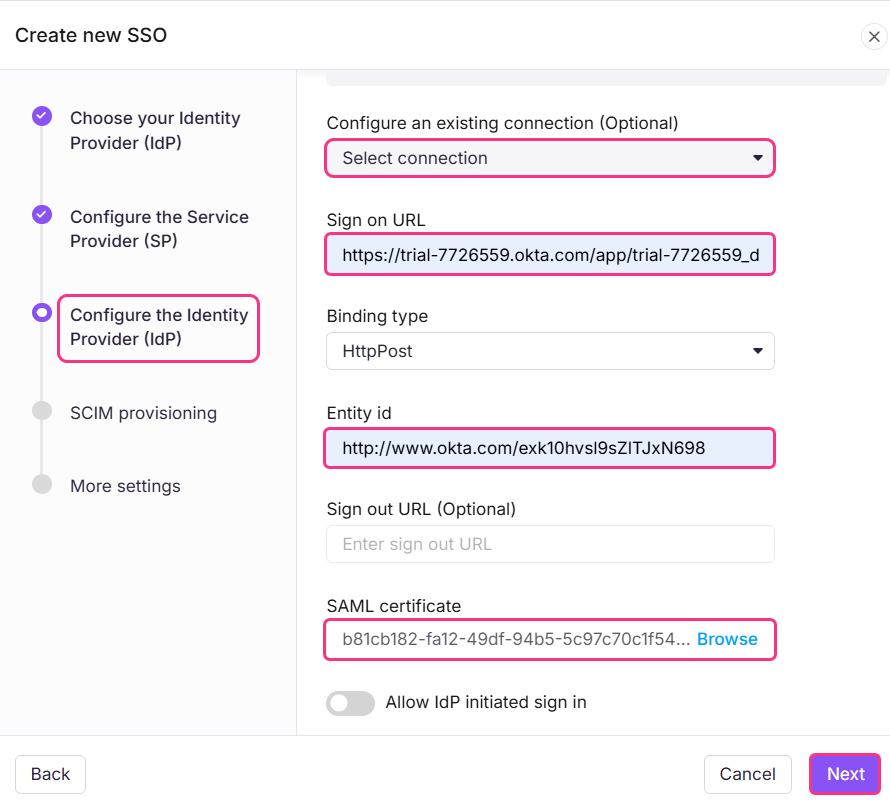
Retrieve SAML setup instructions from Okta
- On the Okta dashboard, click Applications and select Applications.
- Select the active application you want to configure on Document360.
- Click the Sign On tab.
- Click View SAML setup instructions.
The parameters needed to configure Document360 will open in a new webpage.
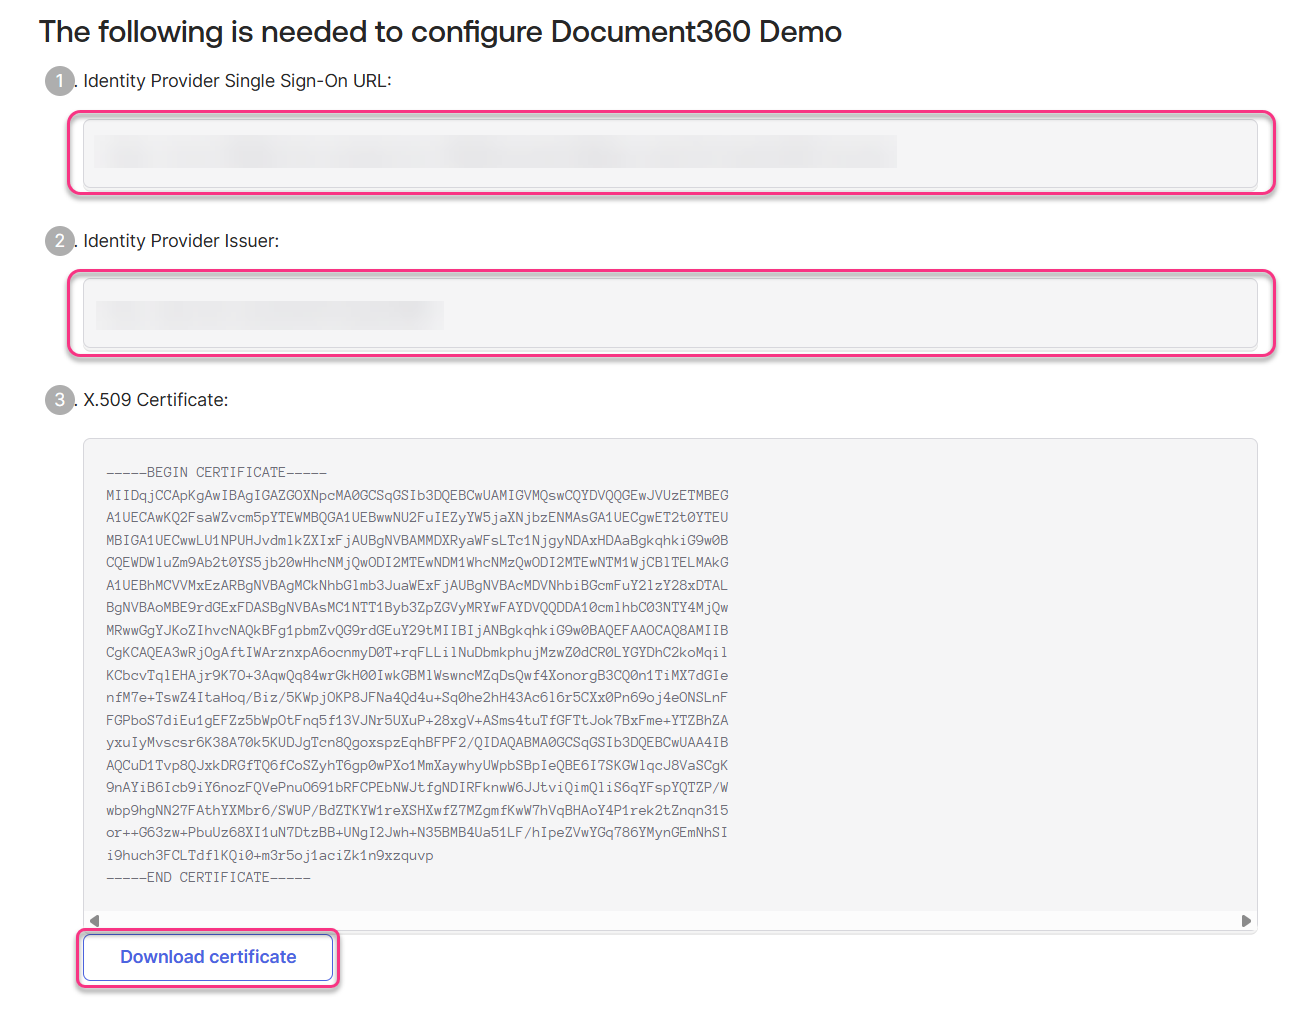
Configure the Identity Provider in Document360
- Switch to the Document360 tab, which should still be showing the Configure the Service Provider (SP) page.
- In the Configure an existing connection field, you can inherit from an already created SSO configuration that has SCIM enabled in the parent project. By selecting and inheriting this connection, the current SSO configuration will be set as the child inherited SSO configuration and will automatically inherit the SCIM configuration from the parent.
For more information on inheritance, see Managing users and readers with SCIM in Okta.
- Complete the fields in the Configure the Identity Provider (IdP) page using the setup instructions from Okta.
- Download the X.509 Certificate from Okta and attach the downloaded file in the SAML certificate field in Document360.
| Document360 | Okta |
|---|---|
| Sign on URL | Identity Provider Single Sign-On URL |
| Entity ID | Identity Provider Issuer |
| SAML certificate | X.509 Certificate |
- Turn the Allow IdP initiated sign in toggle on or off based on your requirements. Learn more about IdP-initiated sign-in.
- Click Next to proceed to the SCIM provisioning page.
Step 3: Configure SCIM provisioning
SCIM provisioning automates user and reader lifecycle management between Okta and Document360. When enabled, users added, updated, or deactivated in Okta are automatically synced to Document360.
If you do not need SCIM provisioning, click Next and follow the instructions from Step 4: More settings.
Enable SCIM in Document360
- On the SCIM provisioning page, turn on the Enable SCIM Provisioning toggle.
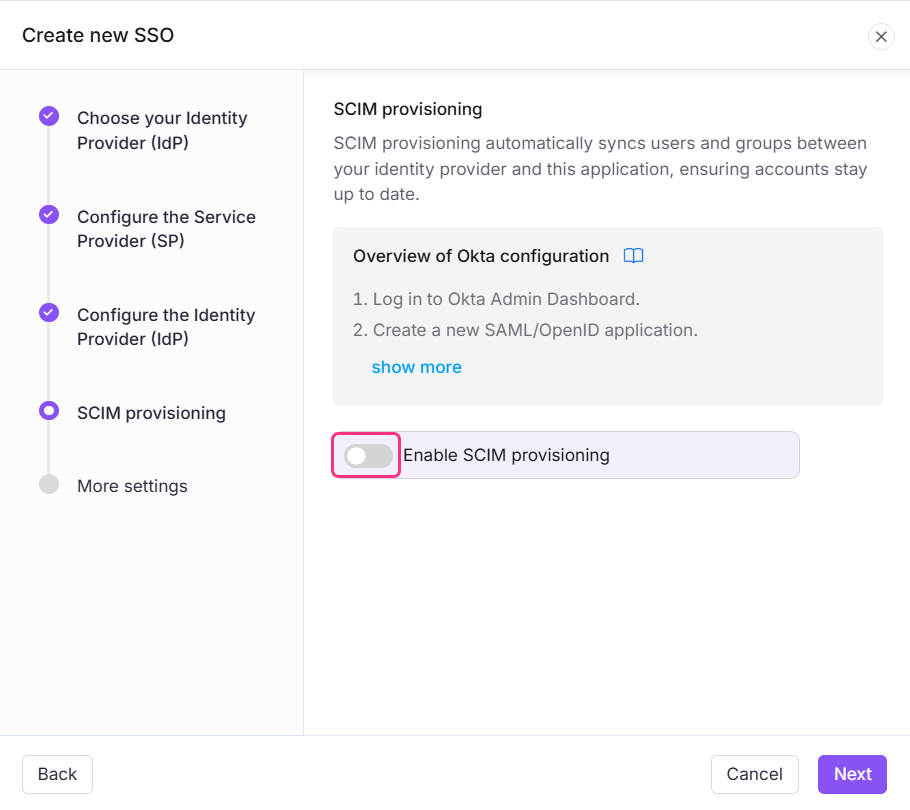
- A confirmation dialog appears. Review the terms, select the checkbox, and click Agree.
- The parameters required to complete the SCIM configuration in Okta will then be displayed.
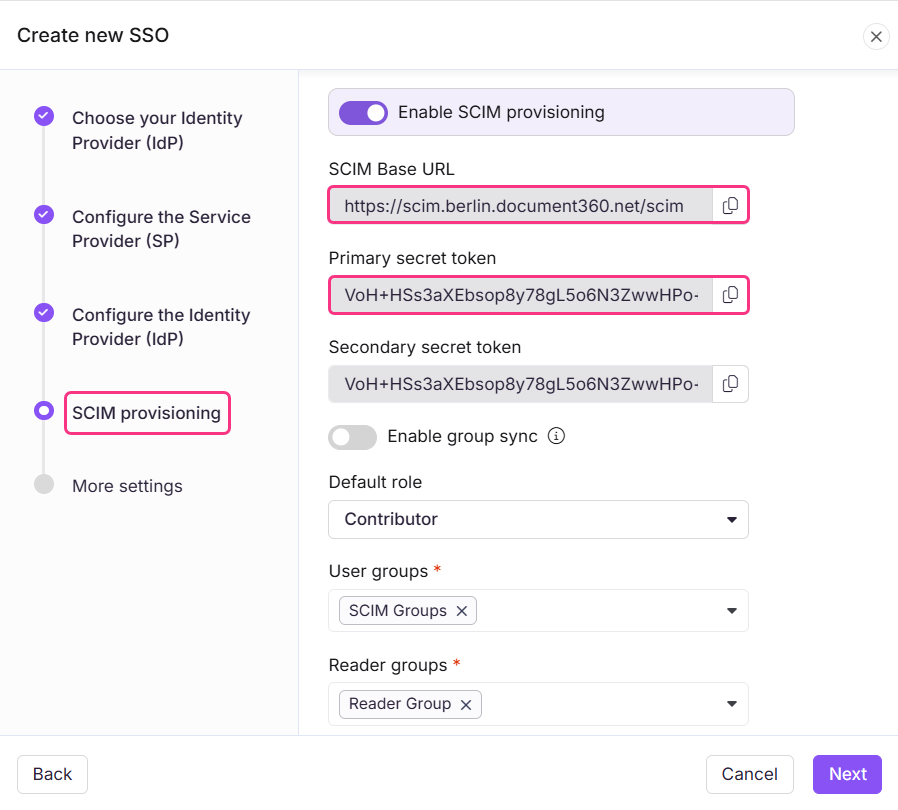
The primary and secondary tokens are generated once and displayed only at the time of creation. Ensure you copy and store them in a secure location before saving the configuration. Once the SSO configuration is saved, the tokens will appear masked and cannot be retrieved. Regenerating a token invalidates the existing one, you will need to update the new token in your Okta configuration to continue syncing without interruption.
Enable SCIM provisioning in Okta
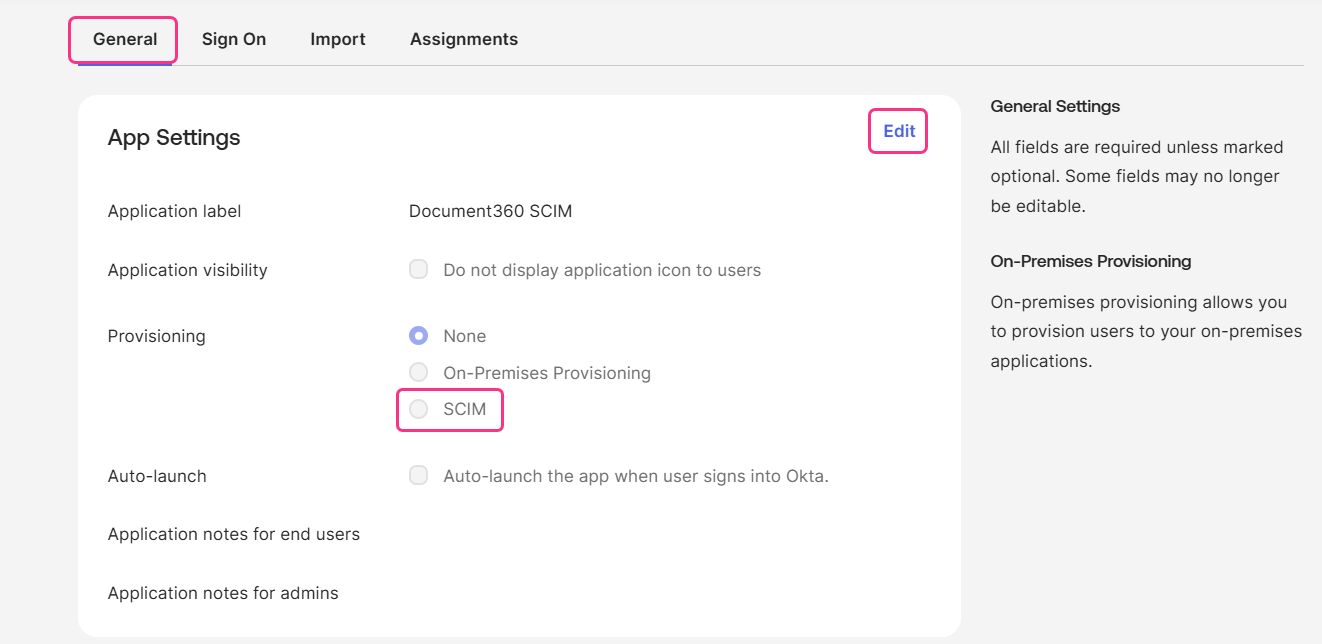
- In the Okta Admin Console, expand Applications and click Applications.
- Select the application where you want to enable SCIM provisioning.
- Navigate to the General tab and click Edit under App Settings.
- Select the SCIM Provisioning radio button and click Save.
Configure the SCIM connection in Okta
- Go to the Provisioning tab and under the SCIM Connection section, click Edit.

- Enter the SCIM Base URL from Document360 into Okta's SCIM connector base URL field using the mapping below.
| Okta | Document360 |
|---|---|
| SCIM connector base URL | SCIM Base URL |
| HTTP Header Authorization | Primary secret token |
- In the Unique identifier field for users, enter userName.
- Under Supported provisioning actions, select only the following:
- Push New Users
- Push Profile Updates
- Push Groups
- From the Authentication mode dropdown, choose HTTP Header.
- In Document360, copy the Primary secret token from the SCIM provisioning page.
- Paste the primary secret token into the HTTP Header Authorization field.
.png)
Do not click Test Connector Configuration yet. At this stage, SCIM provisioning will not work with Document360 as the SSO configuration setup in Document360 is not yet completed.
Set default roles and groups in Document360
- Go to the SCIM provisioning page in Document360 and turn on the Enable group sync toggle if required. This automatically assigns users and readers based on your IdP group mappings.
- In the Default role field, the role is set to Contributor by default. You can change this from the dropdown if needed.
- In the User groups and Reader groups fields, select the groups you want to add. Multiple groups can be added, and they will inherit the default role you selected earlier.

- Click Next to navigate to the More settings page.
For full details on managing users, readers, and groups through SCIM, including attribute mapping, expression builder, provisioning workflows, and deprovisioning, see Managing users and readers with SCIM in Okta.
Step 4: More settings
Configure SSO name and login options
- In the SSO name field, enter a name for your SSO configuration.
- In Customize login button text, enter the text you want displayed on the login button.
- Enable Sign out idle SSO user if needed, and set the duration after which an idle SSO user will be automatically logged out.
- Choose whether to invite all users or selected users using the Convert existing team and reader accounts to SSO radio buttons.
.png)
- Click Create to complete the SSO configuration setup.
Step 5: Complete SCIM setup in Okta
If you enabled SCIM provisioning in 3, complete it now that the Document360 configuration is saved.
Test and save the SCIM connection
After the SSO configuration has been successfully created in Document360, SCIM provisioning can now be completed in Okta.
- Navigate back to the Okta Admin Console and ensure all the necessary details have been filled.
.png)
- Click Test Connector Configuration to verify the connection between Okta and Document360.
- A confirmation dialog will appear, indicating that the test was successful.
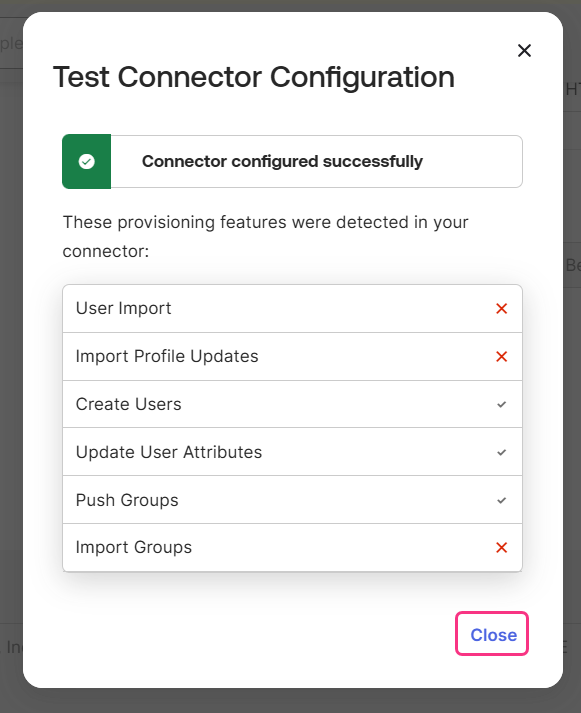
- Click Save to finalise the configuration.
The SSO configuration based on the SAML protocol has been configured using Okta successfully.
For further details on how to add users, readers, and user and reader groups, see Managing users and readers with SCIM in Okta.
Best practices
- Store both secret tokens securely. Treat the primary and secondary SCIM tokens like passwords. Store them in a secrets manager or password vault, not in plain text files or code repositories.
- Use the secondary token for safe rotation. If the primary token is ever exposed, switch Okta to the secondary token first, then regenerate the primary. This avoids any interruption to user sync.
- Test in a non-production environment first. Before rolling out SSO to all users, configure and test the integration with a small group to catch any attribute mapping or access issues.
- Align the idle timeout with your security policy. Enable Sign out idle SSO user and set the duration to match your organisation's session management requirements.
- Do not test the SCIM connector before saving the Document360 configuration. The test will fail at that stage. Always complete and save the Document360 SSO configuration first, then return to Okta to test.
FAQ
What is the purpose of having both a primary and secondary secret token?
Having both a primary and secondary token allows you to rotate tokens safely without disrupting your SCIM integration. If the primary token is accidentally exposed, you do not need to revoke it immediately and risk breaking your user sync. Instead, switch your Okta integration to use the secondary token first, then regenerate the primary token in the background. This ensures that user provisioning continues without interruption while the compromised token is being replaced.
Can I use the same Okta application for both SAML SSO and SCIM provisioning?
Yes. For SAML, SCIM provisioning is enabled within the same Okta application by activating the SCIM Provisioning option under App Settings. This differs from the OpenID Connect setup, where SCIM requires a separate OAuth Bearer Token app in Okta's catalog.
What happens to existing Document360 users when I configure SSO?
Existing users are not automatically converted. During the More settings step, you can choose to invite all existing users or selected users to switch to SSO login. Users who are converted retain all their existing roles and permissions.