Plans supporting this feature: Professional Business Enterprise
NOTE
Starting from 3rd June 2024, the WYSIWYG editor is no longer available for new projects.
Projects created before this date will continue to have access to the WYSIWYG editor. However, no additional improvements or new features will be introduced for this editor going forward.
For best experience and access to ongoing enhancements, we recommend using the Advanced WYSIWYG editor.
The WYSIWYG (What You See Is What You Get) or HTML editor is one of three editor options available in Document360. It enables users to create and preview content exactly as it will appear in published articles or category pages on the Knowledge base site.
NOTE
You cannot switch from the WYSIWYG editor to the Markdown editor. Once articles are converted from Markdown to WYSIWYG, they cannot be reverted. However, switching from Markdown to WYSIWYG is possible.
Editing a WYSIWYG article’s title and URL
To edit the title and URL of a WYSIWYG article, follow these steps:
Navigate to the desired WYSIWYG article in the Knowledge base portal.
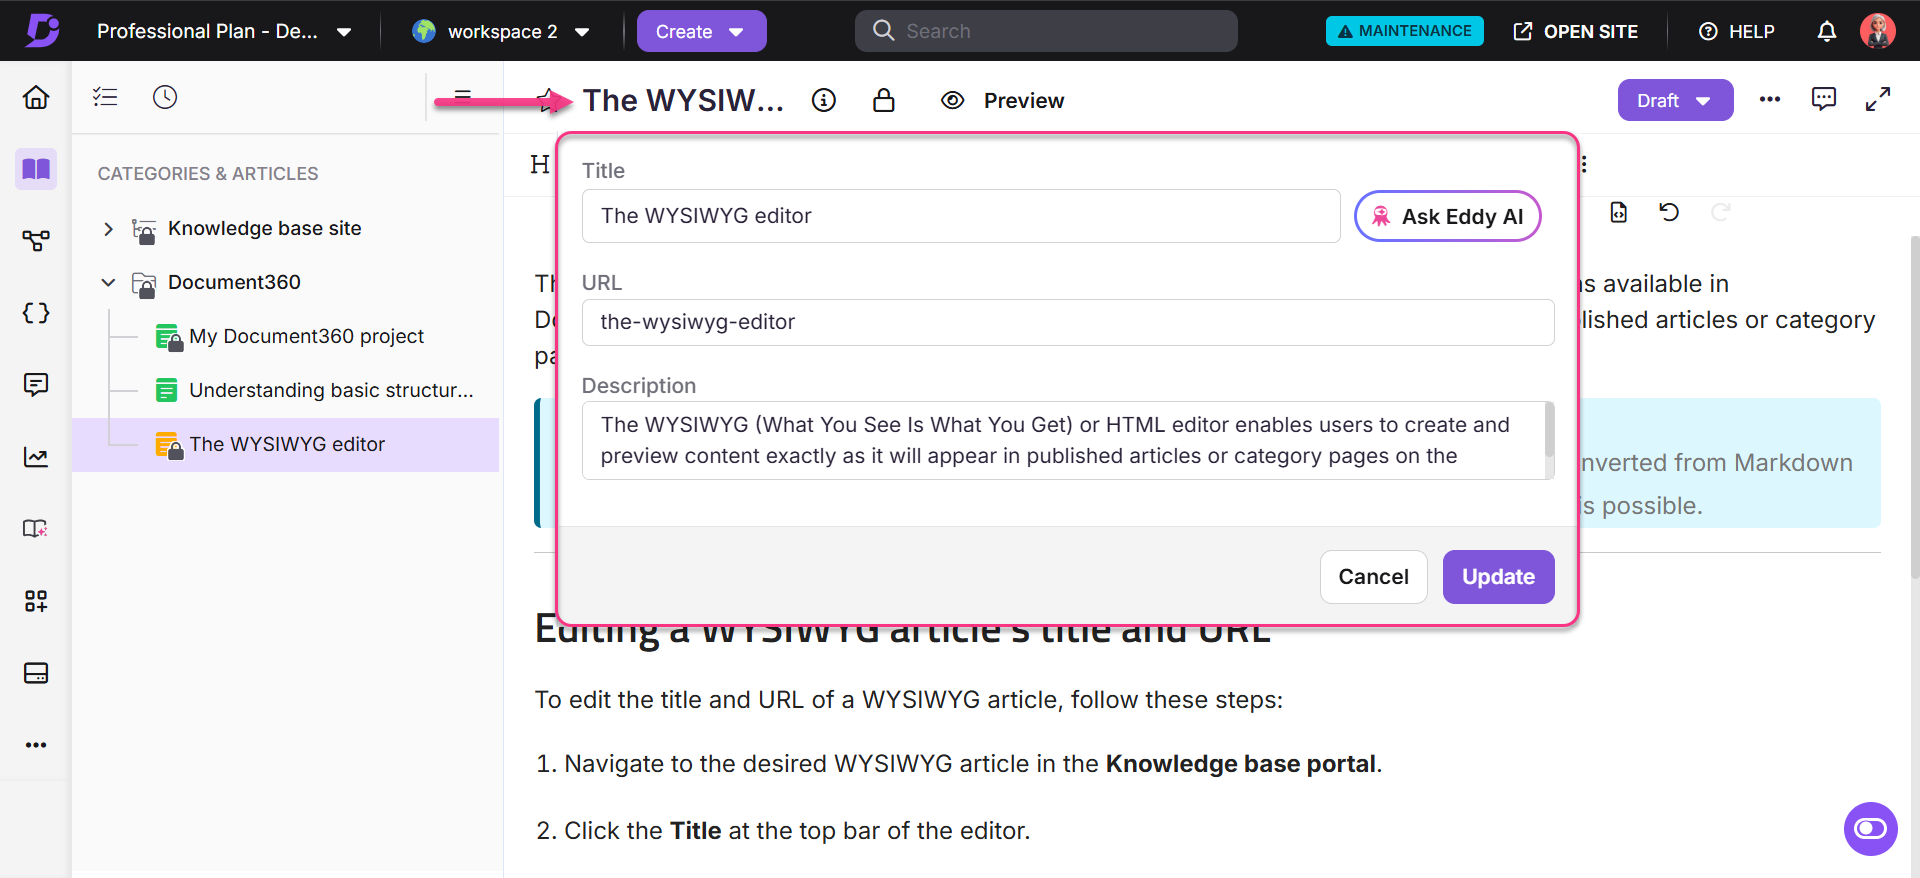
Click the Title at the top bar of the editor.
A panel appears with the following options:
Title: Edit the article’s title.
Ask Eddy AI: Click Ask Eddy AI to generate three title suggestions based on the article content. To use this feature, your article must contain at least 50 characters.
URL: Edit the article’s URL in this field. By default, the slug is generated from the article title.
For example, if the article title is What is Document360?, the URL becomeswhat-is-document360.NOTE
For more information, read the article on Change the URL of an article.
Description: Enter a short description of the article.
WYSIWYG editor toolbar
The WYSIWYG toolbar offers various options to edit and format text, including the option to insert media files. The different toolbar sections and their uses are shown and elaborated below.
Feature | Options | Description |
|---|---|---|
Headings | Normal | Applies the default paragraph style. Use this for regular body content in your article. |
Heading 2 | Used for main section headings. Helps readers quickly identify key topics within an article. | |
Heading 3 | Used for subsections under Heading 2. Organizes content into readable chunks within each section. | |
Heading 4 | Used for smaller divisions within Heading 3 content. Helps structure complex information more granularly. | |
Text formatting | Bold () | Emphasize text using a bold style. |
Italic () | Emphasize text using an italic style. | |
Underline | Add an underline to the selected text. | |
| Cross out text with a strikethrough. | |
More text () | Provides options to update font size, font family, text color, background color, subscript, superscript, and clear formatting. | |
Paragraph formatting | Unordered list () | Make a list with the following symbols: •, ○, ◘. Disc and Default symbols are the same. |
Ordered list () | To make a list denoted with numbers for each item. You can use numbers, alphabets, Roman numerals, and Greek numerals. The default refers to numbers. | |
More paragraphs () | To update alignment, line height of paragraphs, indentations, and quote text. | |
Insert options | Insert link () | Add a hyperlink from a provided URL or Knowledge base article to the selected text. |
Insert codeblock () | Add a code block to your article, such as a JavaScript snippet. | |
Insert image () | Insert an image from the URL, local storage, or Drive. For example, you can add a screenshot of the user interface. You can also use (Ctrl+p) to perform this action. | |
Insert file () | Add a file from the Drive, such as a Word or PDF. | |
Insert callouts () | Add editable info boxes in blue, yellow, and red for additional, important, and essential information, respectively. | |
Private notes | Insert an editable internal comment box visible only to logged-in team members for internal feedback. | |
Insert LaTeX () | Add mathematical expressions and equations using LaTeX syntax.
| |
Find & replace () |
| |
Content reuse () | Reuse content across the project with:
| |
Glossary | Maintain a list of terms and their definitions within the Knowledge base. | |
More rich | Insert video () | Embed videos from platforms like YouTube, Wistia, Streams, or Vimeo. |
Insert table () | Add a table by selecting the desired number of rows and columns. | |
Insert horizontal line (—) | Add a line in the article. | |
Emoticons () | Insert emoticons to enhance the article's engagement. | |
Other options | Code view () | Switch to HTML syntax editor. |
Undo () | Undo the previous action. | |
Redo () | Repeat the previous action. | |
Editor switch | The switch editor toggle comes in use if you want to convert your article to the Advanced WYSIWYG editor. Click the toggle, click Switch to New Editor, and the article will be converted to the Advanced WYSIWYG editor. |
NOTE
For steps and guidance on using the Advanced WYSIWYG editor, read the article on Advanced WYSIWYG editor.
Additional formatting options
Image
Once an image is added to an article, you can access the following options by clicking on the image:
Replace: To replace the image.
Align: Add an image caption to align the image.
Image caption. This will appear at the bottom of the image.
Remove: To remove the image.
Insert link: To add a link to the image. After adding the link, you can open, remove, and edit the link.
Display: To change the image's display. You can use the Inline or Break Text options.
Style: To change the border style of the image. You can use Rounded, Bordered, and Shadow options.
Alternative text: To add alternative text for the image. If the image file cannot be loaded, the alternative text will appear in a blank box where the image will appear.
Change size: Adjust the width and height of the image in pixels. Click update to confirm.
Advanced edit: To edit your image, use advanced tools such as Crop for resizing, Text options to adjust bold, italic, underline, color, and size, and Rotate to adjust orientation. You can also Zoom in or Zoom out for detailed editing, use the Hand tool for navigation, and access History for previous states. Use Undo and Redo to reverse or repeat actions, Reset to return to the original image, Delete to remove specific edits, or Delete all to clear everything. When finished, click Save to apply and store your changes.
Video
Once you embed a video in an article, you can access the following options by clicking on the left or right of the video in the editor pane:
Replace: To replace the video.
Remove: To remove the video.
Display: To change the video display. You can use the Inline or Break Text options.
Align: To align the video.
Change size: To change the size of the video.
Autoplay: To turn the autoplay option on or off.
Once a PDF file is added to an article, you can access the following options by clicking on the left or right side near the PDF file in the editor pane:
Remove: To remove the PDF file.
Change size: To change the size of the PDF file.
Word file
Once a table is added to an article, you can access the following options by clicking on the table:
Table header: Turn the table header on or off. Click on this button, and the top row appears on the table.
Remove table: To remove the table. Click on this button, and the table and the content will be deleted. If you have accidentally clicked on the remove, you can always use the Undo action (Ctrl + Z) to restore the table.
Row: Place the cursor in any cell of the intended row and click 'Insert row above' or 'Insert row below' to add rows to the table. Click on the 'Delete row' to remove the current row.
Column: Place the cursor in any cell of the intended column and click 'Insert column above' or 'Insert column below' to add columns to the table. Click on the 'Delete column' to remove the current column.
Table style: To change the table style. You can use Dashed Borders and Alternate Rows options. The alternate rows option would distinguish the row color.
Cell: Click on this button and select the action to merge or split cells. You can split a cell vertically or horizontally any number of times. The merge option would be enabled only when you select more than one cell horizontally or vertically.
Cell background: To change the cell's background color. You can select from the color palette available or enter the HEX code.
Vertical align: To change the vertical alignment of the content in the cell. You can do this for a single cell or multiple selections of cells. If the cell height is bigger than the content fit, then you can choose to align the content at the top, middle, or bottom of the cell.
Horizontal align: To change the horizontal alignment of the content in the cell. You can do this for a single cell or multiple selections of cells. If the cell width is bigger than the content fit, you can align the content at the left, center, right, or justified style.
Cell style: To change the type of the cell border. You can use the options Highlighted (changes the cell border color) and Thick (increases the cell border thickness) of the selected cell.
When, Where, and Why to Use the WYSIWYG Editor
Who can use the WYSIWYG editor?
Document360 users who are comfortable with HTML editors.
Is the WYSIWYG editor easy to use?
Using the WYSIWYG editor will feel similar to using a word-processing application.
For example, Microsoft Word, Google Docs, etc.
You can copy and paste content directly from a Word document or any other source. No special syntax is required.
Why use the WYSIWYG editor?
Unlike the Markdown editor, the WYSIWYG editor uses a single editing pane since the written content is already in preview mode.
WYSIWYG editor provides a unique feature for pasting large tables from a third-party site or another knowledge base.
FAQ
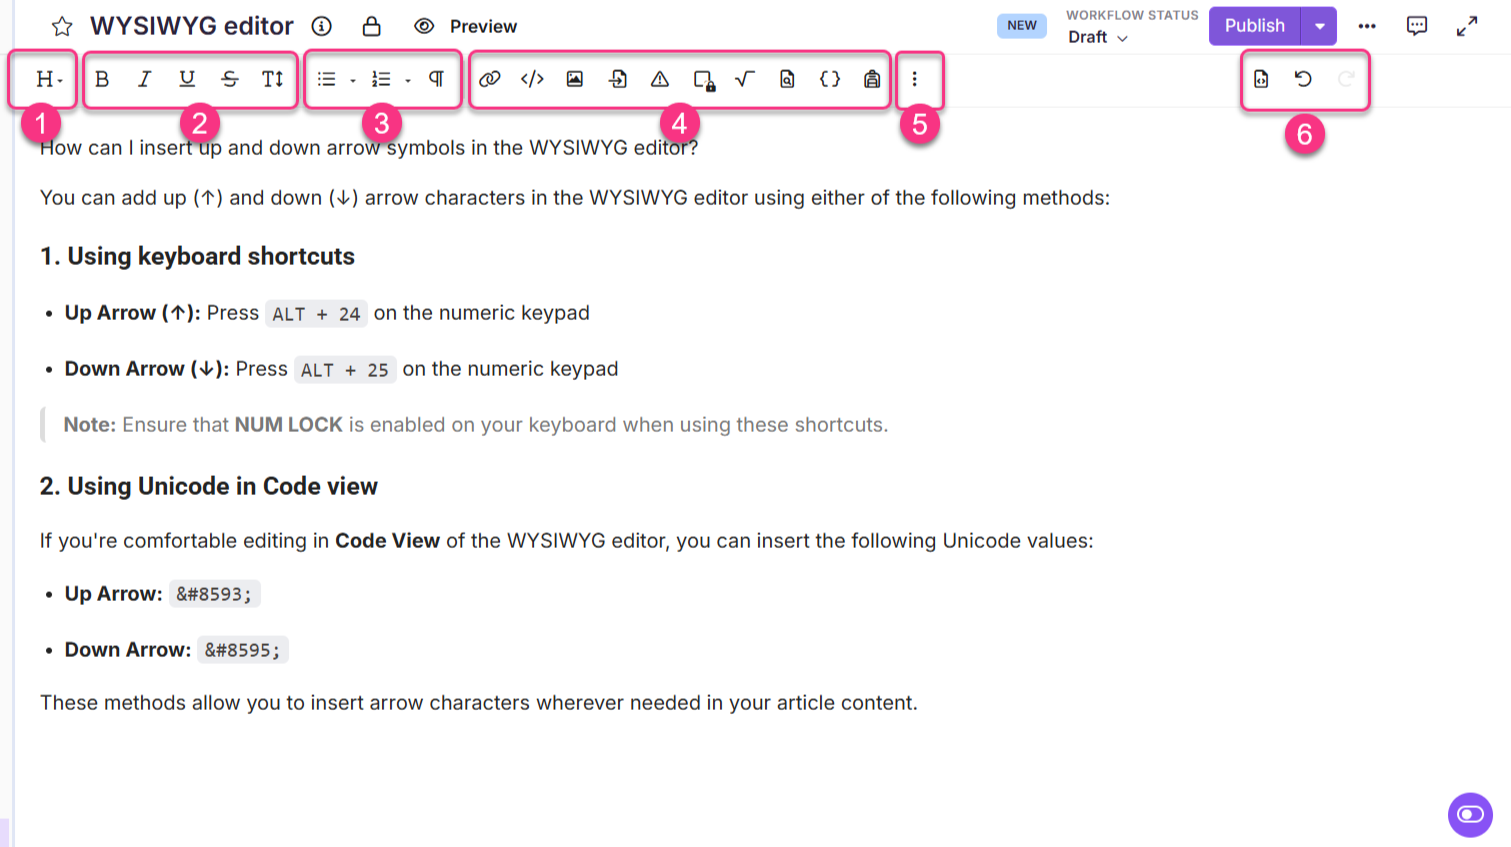
How can I insert up and down arrow symbols in the WYSIWYG editor?
You can add up (↑) and down (↓) arrow characters in the WYSIWYG editor using either of the following methods:
Using keyboard shortcuts
Up arrow (↑): Press
ALT + 24on the numeric keypadDown arrow (↓): Press
ALT + 25on the numeric keypad
Note: Ensure that NUM LOCK is enabled on your keyboard when using these shortcuts.
Using Unicode in code view
If you're comfortable editing in Code View of the WYSIWYG editor, you can insert the following Unicode values:
Up Arrow:
↑Down Arrow:
↓
These methods allow you to insert arrow characters wherever needed in your article content.