Plans supporting this feature: Professional Business Enterprise
Document360 Drive enables you to create and manage folders and subfolders, ensuring that your file structure aligns with your Knowledge base categories for better navigation and accessibility. This article will guide you through the steps to manage system folders, add new folders and subfolders, and organize files, making your document management more organized and intuitive.
System folders
Every Document360 project includes System folders, which are built-in folders that come by default. These folders are essential for the core functionality of your project and cannot be deleted, moved, reordered, or renamed. However, users can perform certain actions within these folders, including adding files or setting a default folder.
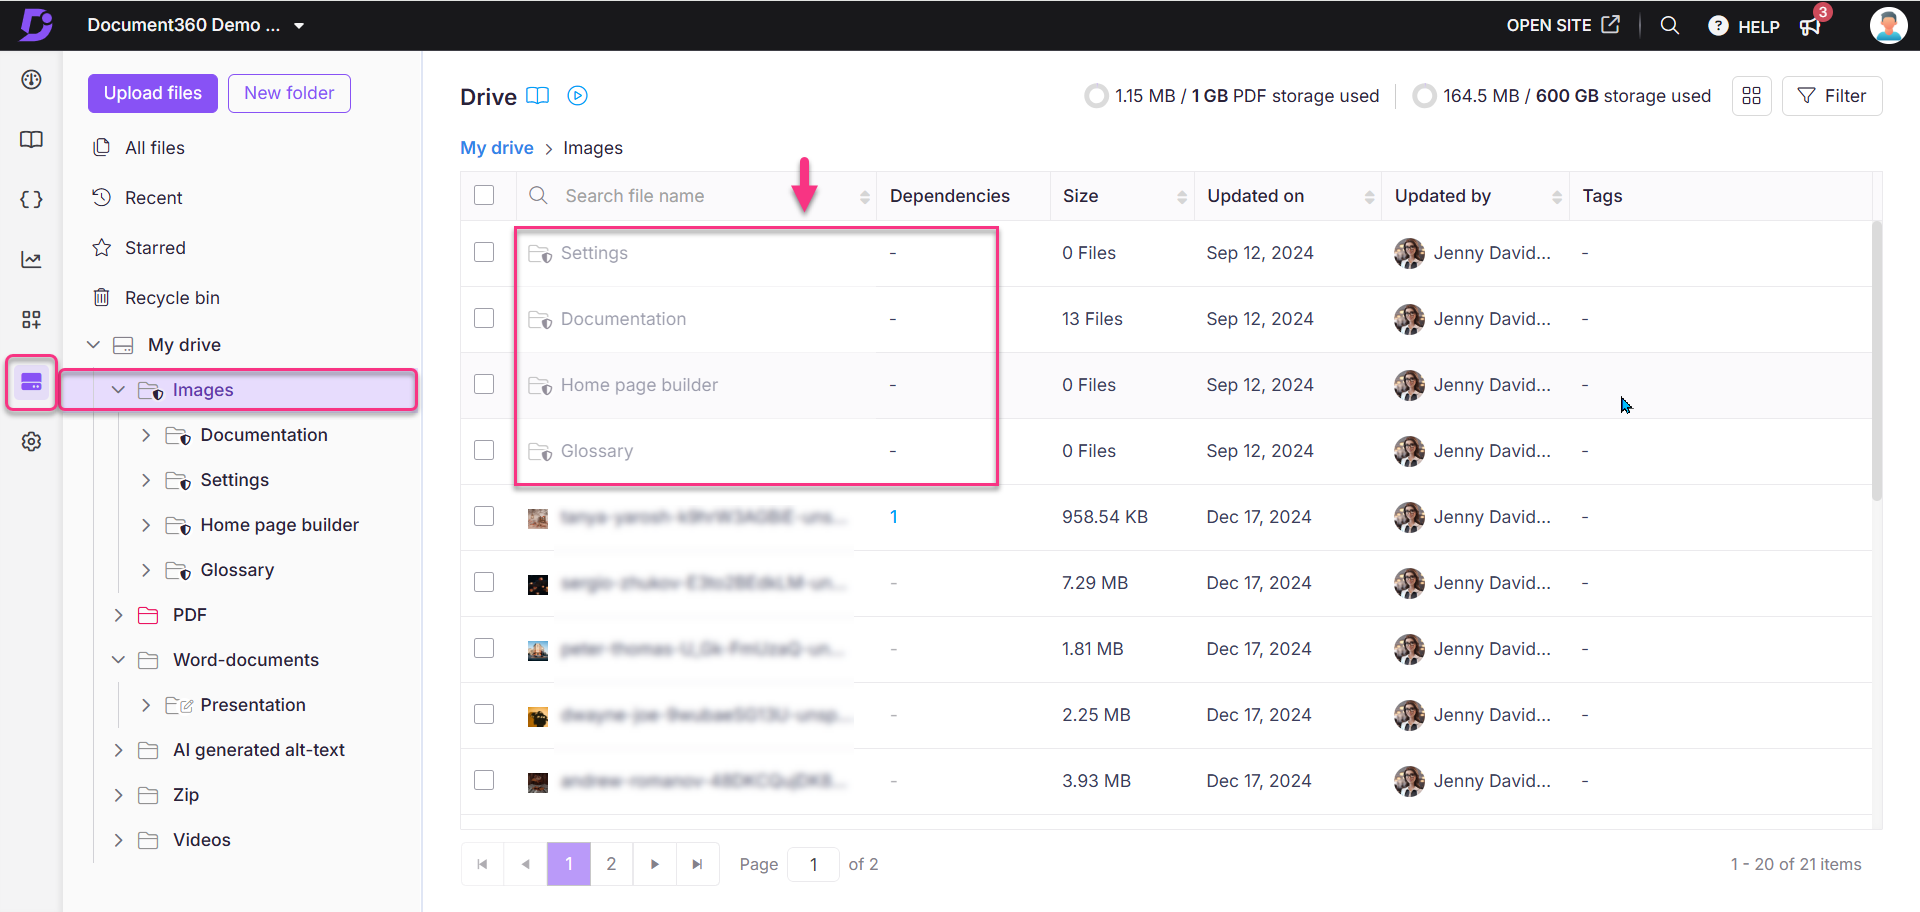
When you navigate to the Drive page, you will see a category tree on the left navigation pane listing all your files and folders. System folders are easily identifiable by the shield icon next to their name.
NOTE
While files within system folders can be deleted (though not recommended), the folders themselves have several restrictions.
For example, Images is a system folder that contains subfolders such as Home page builder, Settings, Documentation, and Glossary.
Folder actions
Restricted actions
Delete: System folders cannot be deleted.
Move/Reorder/Rename: You cannot move, reorder, or rename system folders.
Allowed actions
Add Files/Folder: You can freely add files or create new subfolders within system folders.
Change color: Customize folder colors to help visually organize your Drive.
Set default folder: You can set any system folder as the default for easy access.
Adding a new folder
Here are the methods to create a new folder in your Drive.
Method 1: Using the ‘New folder’ option
Method 2: Using the ‘+’ option
Using the '+' option
Use the Folder Manager navigation pane on the left to add a root-level folder. This process is similar to adding a category using the "Category Manager" in the Documentation section.
Navigate to Drive () in the left navigation bar in the knowledge base portal.
Existing Folders and Subfolders will be displayed in a tree-view style on the left navigation pane.
In the left navigation bar, hover the mouse pointer over the space between the folders until the Flywheel (+) icon appears.
Click the + icon, and a New folder popup will appear.
Enter the desired folder name.
The default location is 'Root level.' You can add a new root-level folder from anywhere in the Drive using the folder location dropdown and clicking on the Reset option.
Click Create.
![]()
Using the 'New folder' option
Navigate to Drive () in the left navigation bar in the knowledge base portal.
Existing Folders and Subfolders will be displayed in a tree-view style on the left navigation pane.
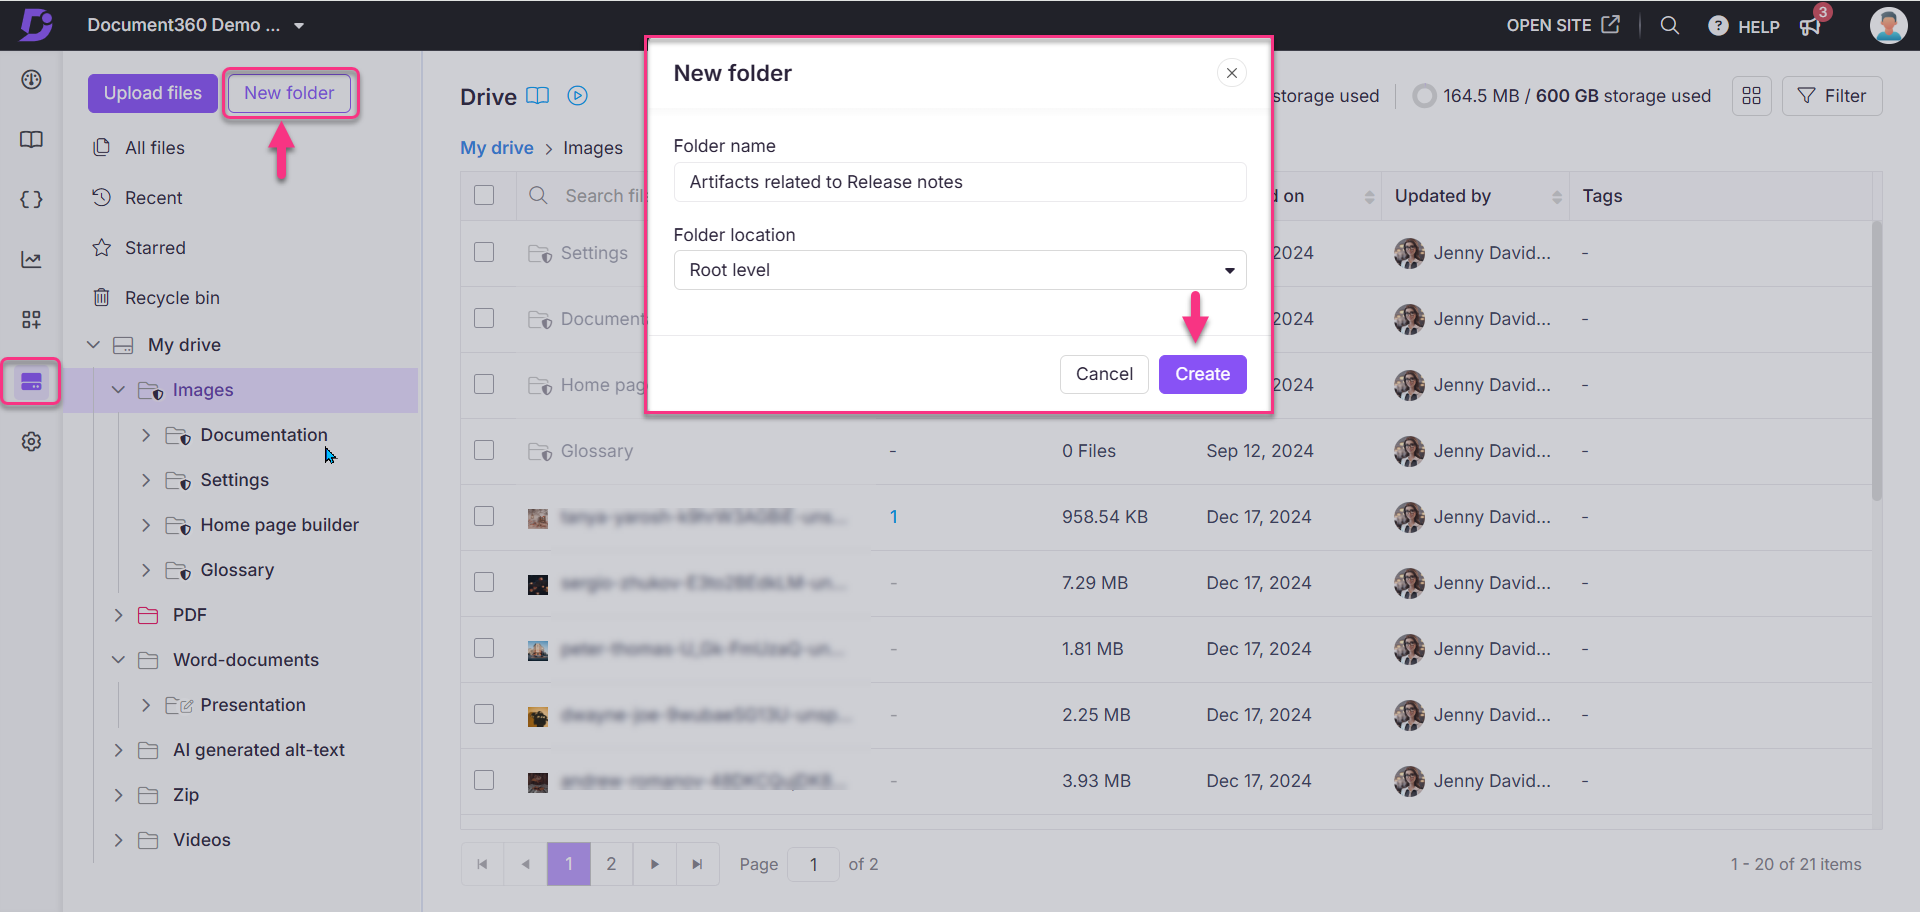
Click the New folder option on the top left.
A New folder dialog will appear.
Enter the Folder name.
The folder location is 'Root level' by default.
Using the Folder location dropdown, you can select the desired folder.
Click Create.
PRO TIP
When you create folders for your knowledge base files, it is easier to navigate and maintain if the folders are in-sync with the Category and Subcategory of your knowledge base.
Adding subfolders
You can add subfolders once you have more than one root-level folder.
Method 1: Using the ‘More’ option
Method 2: Using the ‘+’ option
Using the 'More' option
Navigate to Drive () in the left navigation bar in the knowledge base portal.
Existing Folders and Subfolders will be displayed in a tree-view style on the left navigation pane.
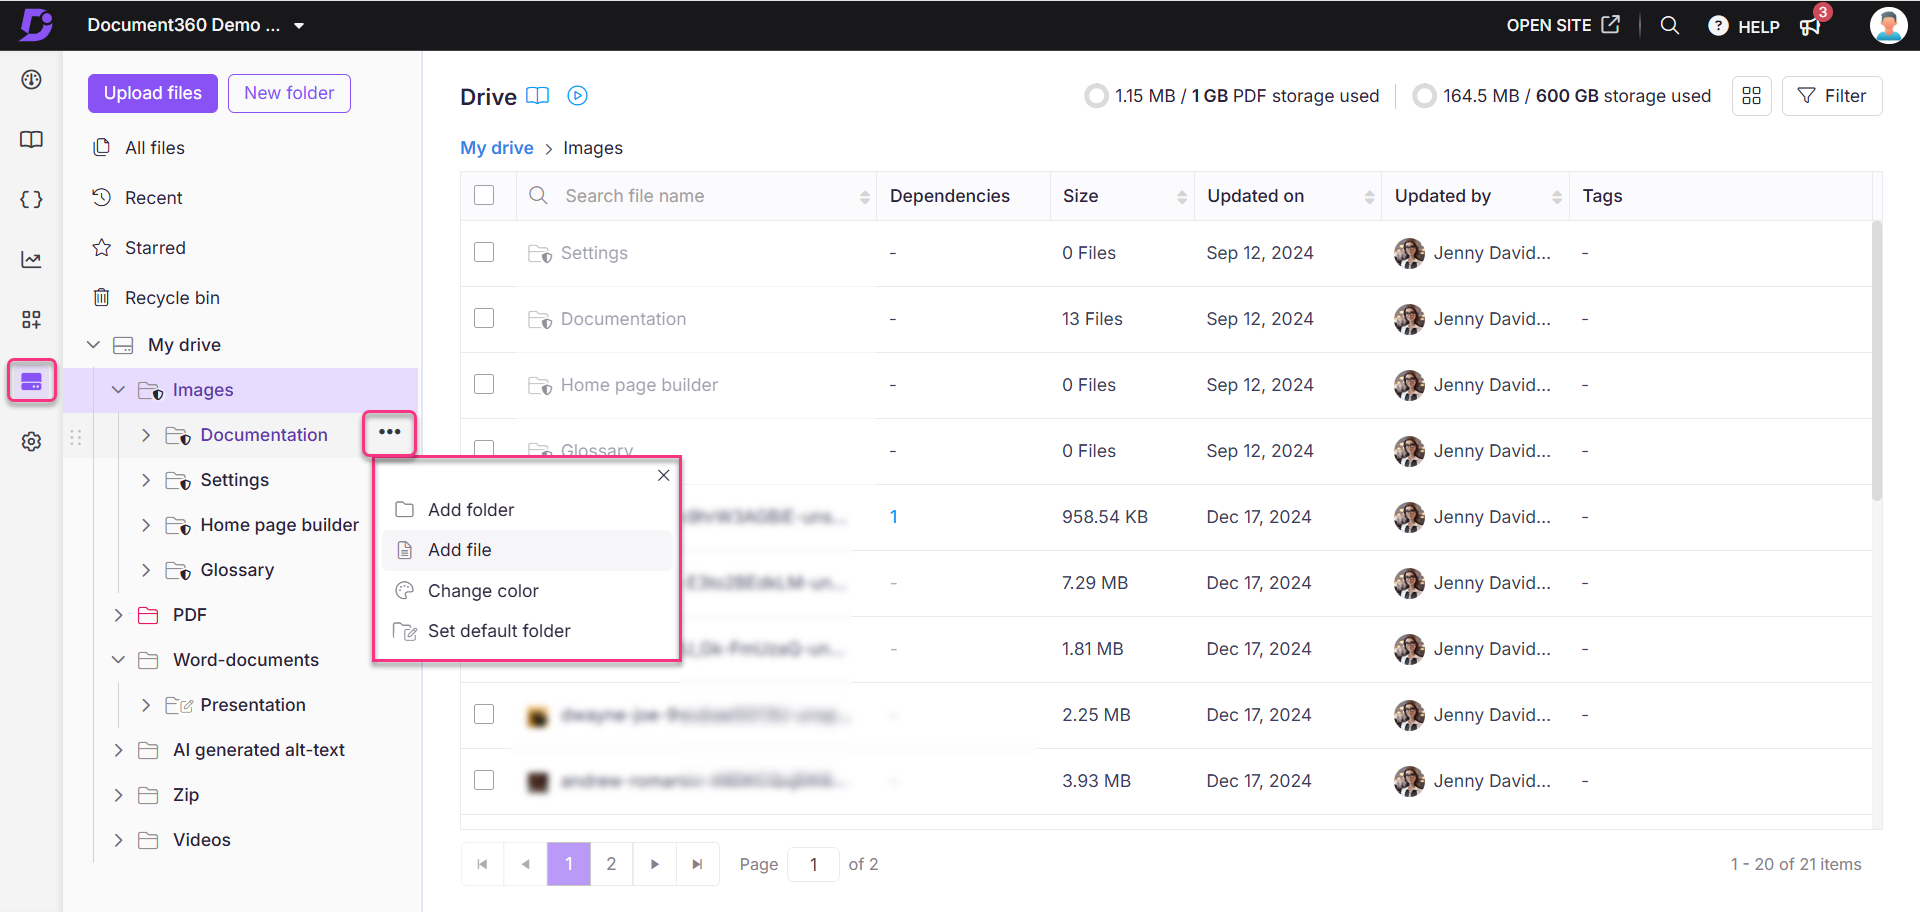
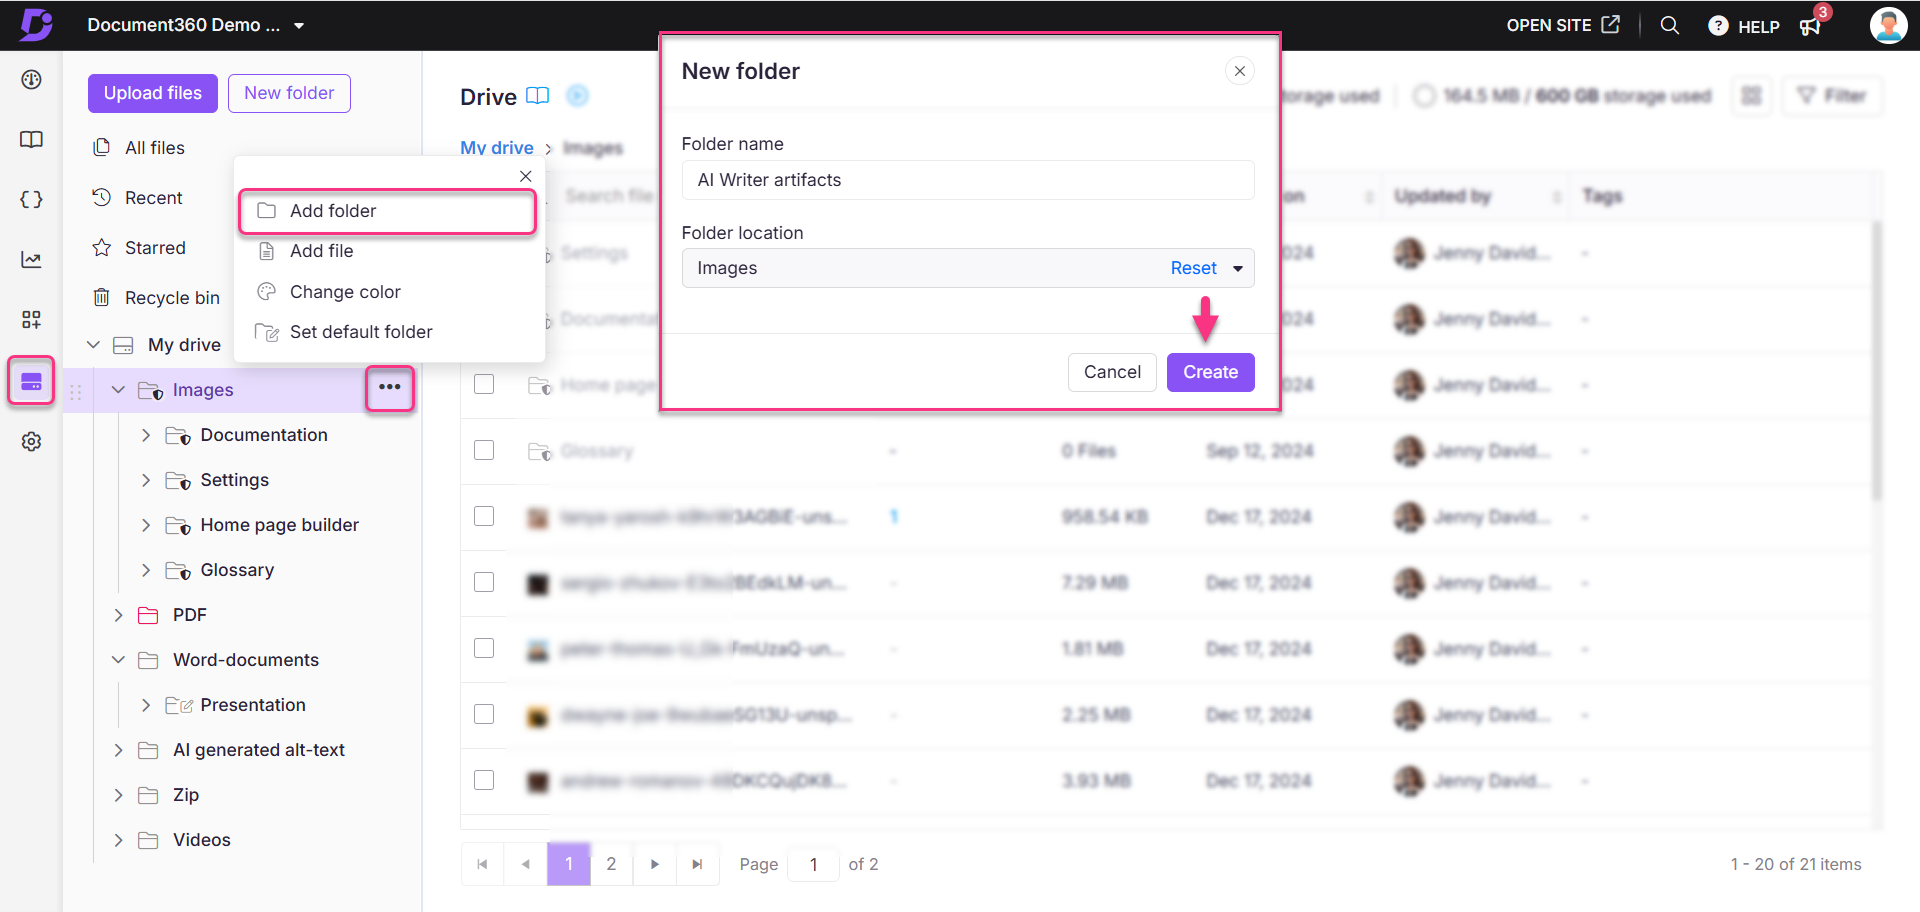
Click the More () icon next to the folder, select Add folder.
The New folder dialog appears.
Enter the Folder name.
The folder location by default is the folder you click on the More () icon.
You can add a subfolder anywhere in the Drive using the location dropdown.
Click Create.
Using the '+' option
Navigate to Drive () in the left navigation bar in the knowledge base portal.
Existing Folders and Subfolders will be displayed in a tree-view style on the left navigation pane.
In the left navigation bar, hover the mouse pointer over the space between the folders until the '+' icon appears.
Click the '+' icon.
A New folder dialog appears.
Enter the desired folder name.
The default location is the folder where you clicked the '+' icon.
Using the location dropdown, you can add a subfolder from anywhere in the Drive.
Click Create.
![]()
NOTE
Ensure the root level folder is expanded (The arrow on the left side of the folder points downwards); if not, a new folder will be created at the same level.
CAUTION
Deleting a root-level folder in the Drive also deletes its subfolders and files. This can cause broken images and file links in articles referencing any deleted file.
Adding files
You can add files to folders in drive using two methods:
Method 1: Using drag and drop in Empty folders
Method 2: Using the 'More' option
Using drag and drop in Empty folders
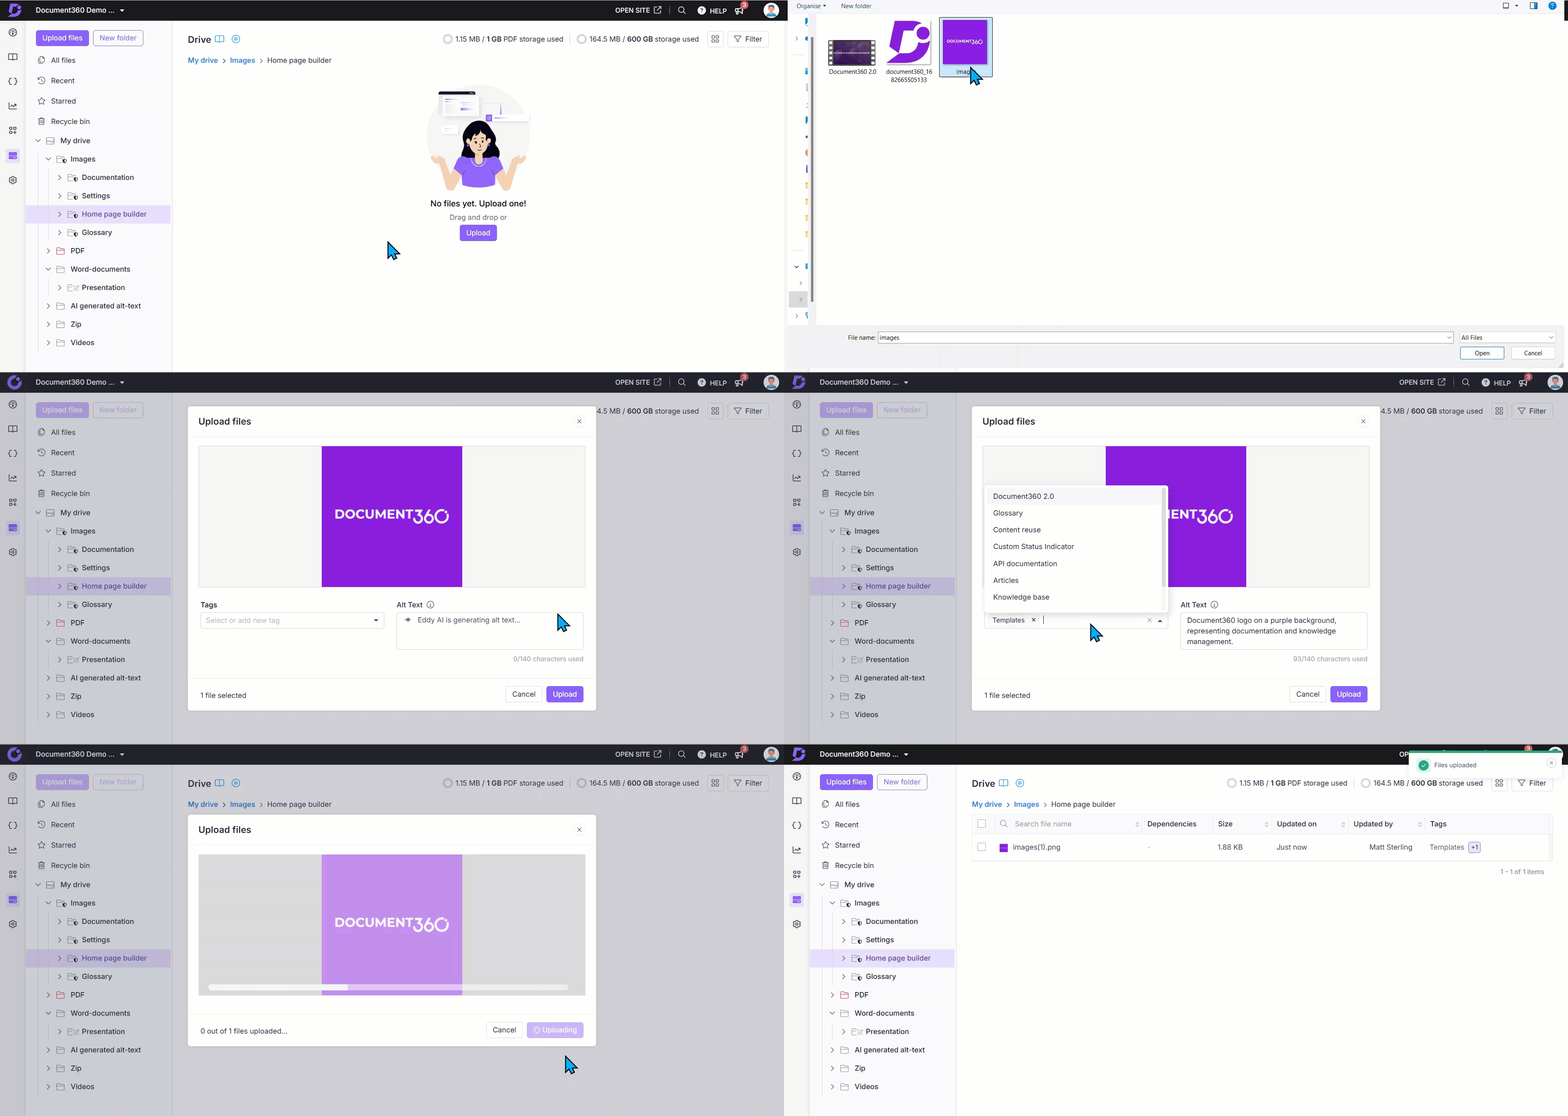
You can add individual or multiple files to folders or subfolders using the drag and drop feature. If your folder is empty, you can use the drag and drop area in the center or click the Upload button.
Drag one or more files from your device's local storage and drop them into the designated area.
Alternatively, click the Upload from my device button and use the file explorer to select your files.
Specify the Folder location where you will store the files.
The folder selected in the Folder manager is set as the default location for file uploads.
After selecting images, you can use the Tags field to either select pre-existing tags or create new ones, which will be added to the available list of tags.
If a single image is being uploaded, define the Alt-text, and if multiple images are being uploaded, define the Common alt-text for the set of images selected for upload.
Click Upload to confirm.
Using the 'More' option
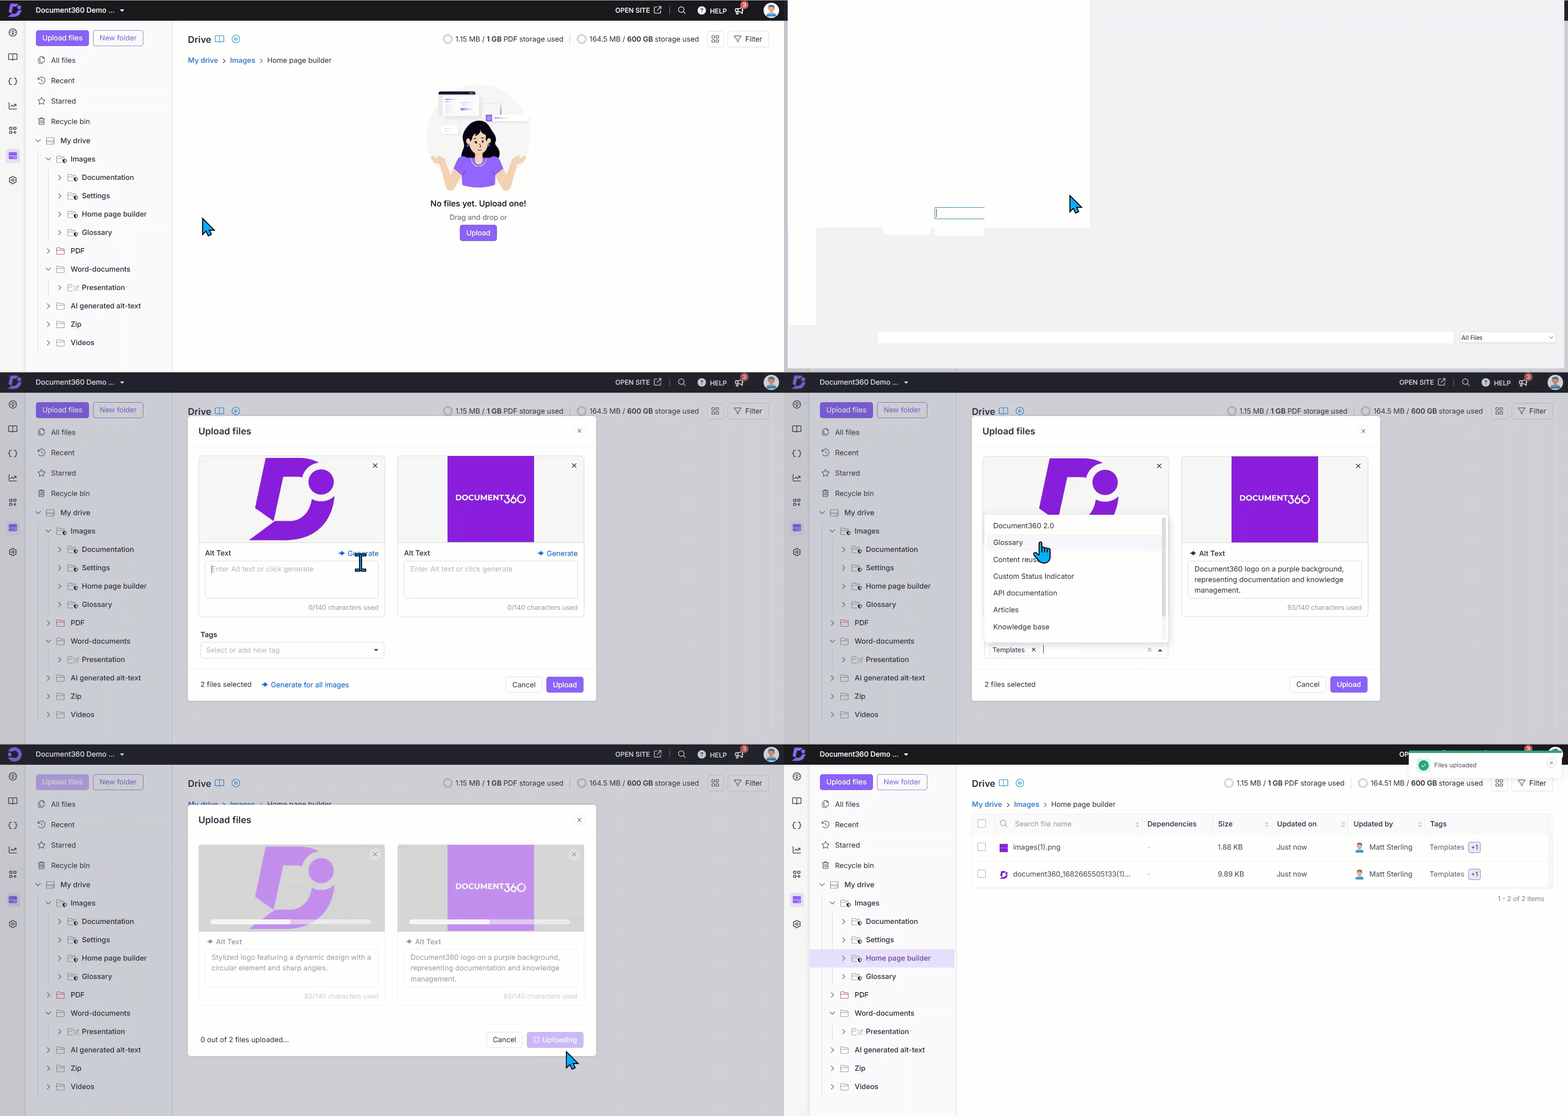
To add files to a subfolder, use the left navigation pane:
Click the More () icon next to the folder.
Select the Add file option.
You can upload your files in two ways:
Click Upload from my device and select your files from local file explorer.
Drag and drop the desired file.
Add Tags and Common alt text if required.
Click Upload.
NOTE
File names should not contain the characters +, %, #, or =.
You can view the list of acceptable file formats in the bottom left. To know more about acceptable formats, read How can I add file type restrictions?
When uploading multiple images, you can add both tags and alt text. However, if you upload a combination of images and other file formats, or if you upload only file formats other than images, you can only add tags. Both Tags and Alt text fields are optional fields.
File limits and file type restrictions
The file limits and file type restrictions are as follows:
Each folder can contain up to 5000 files.
Subfolders are treated as separate folders.
Single file upload: The maximum file size is 150 MB per file (in Decimal units — 1 MB = 1,000,000 bytes).
Multiple files upload: The maximum combined size of all selected files is 160 MB.
NOTE
The 150 MB file size limit is measured using Decimal (SI) units, where 1 MB (Megabyte) = 1,000,000 bytes. In Binary units (1 MiB (Mebibyte) = 1,048,576 bytes = 220 bytes), this corresponds to approximately 143.05 MiB. Some systems display file sizes in binary units, so the displayed size might vary slightly from what Document360 calculates.
Adding file type restrictions
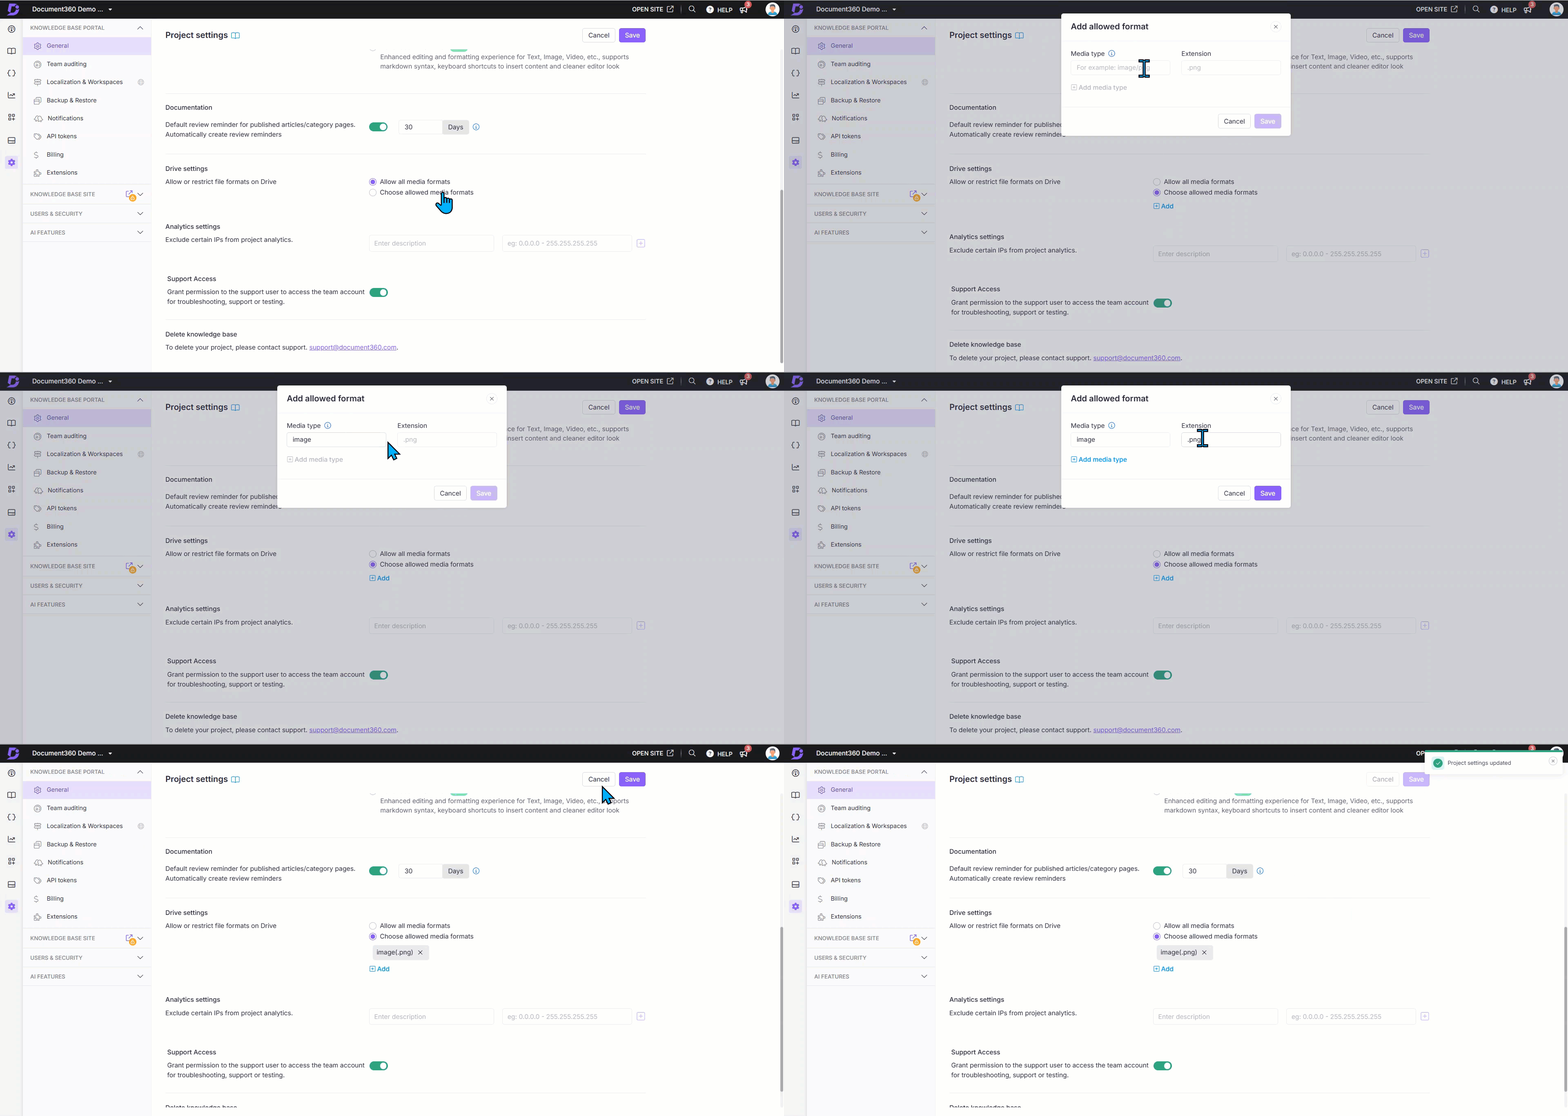
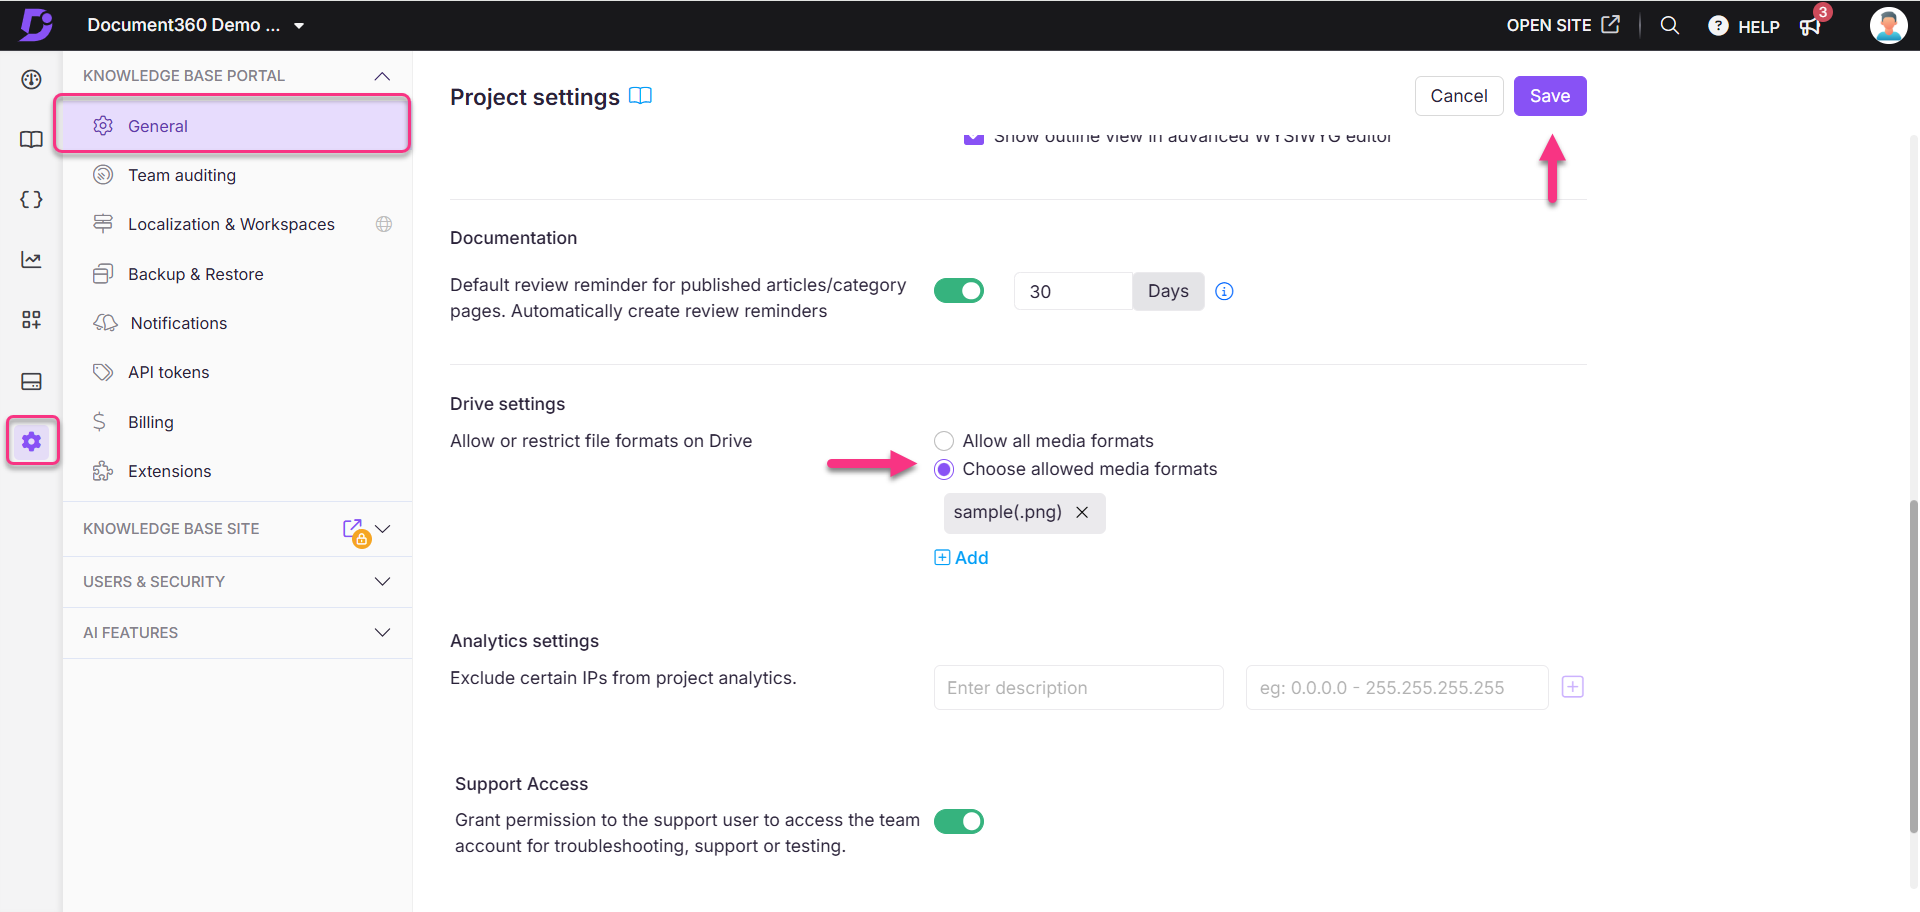
You can restrict the file types you and other team members can upload. For example, if you want to restrict uploads to only .png files, follow these steps:
Navigate to Settings() in the left navigation bar in the Knowledge base portal.
In the left navigation pane, navigate to Knowledge base portal > General > Drive settings.
By default, the Allow all media types option is selected.
Click Choose allowed media formats and click Add.
Enter the Media type and Extension fields.
NOTE
Media type - Type in the media you want to restrict. You must enter the following format:
media type/extension. Refer the basic media format types for better understandingExtension - Type in the extension type. This is a case-sensitive field. Ensure that you enter the lowercase alphabet in this field. (For example, .png, .svg, .jpg)
Click Add media type to add more allowed file formats.
Click Save to confirm.
Troubleshooting
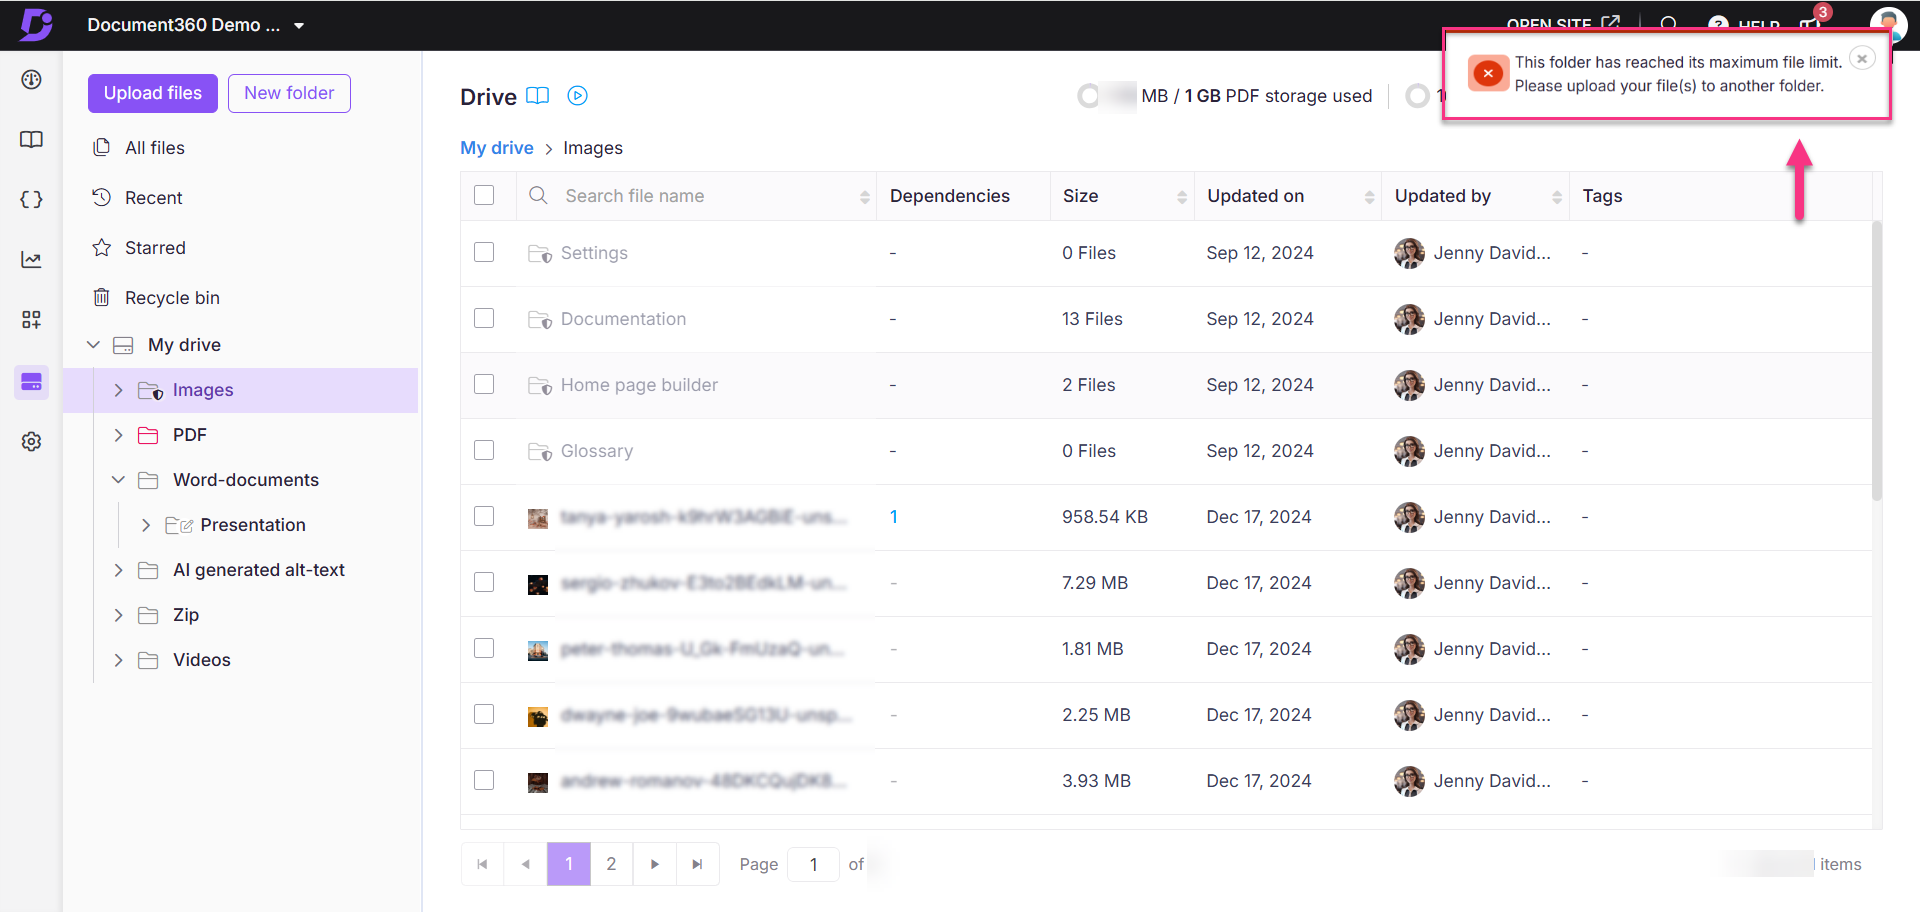
Folder file limit reached
Error: This folder has reached its maximum file limit. Please upload your file(s) to another folder.
This error occurs when a folder exceeds the 5000-file limit in Document360 Drive. This includes:
Files are uploaded directly into a folder.
Images are copied and pasted into the article editor and automatically saved in the default folder by the Set default folder.
Images from imported Docx files are stored in the default folder on the drive.
Steps to resolve:
Upload new files to a different folder or change the default folder on the drive.
Remove unused files from the current folder to free up space.
If the issue persists, clear the browser cache and try again.
Resolving "File type not allowed" or "Invalid file type" errors when uploading files
Error: ‘File type not allowed’ or ‘Invalid file type’
The "File type not allowed" and “Invalid file type” errors occur when uploading a file that is restricted by the system's file type settings. This can happen if specific file formats are blocked or if special characters are present in the file name.
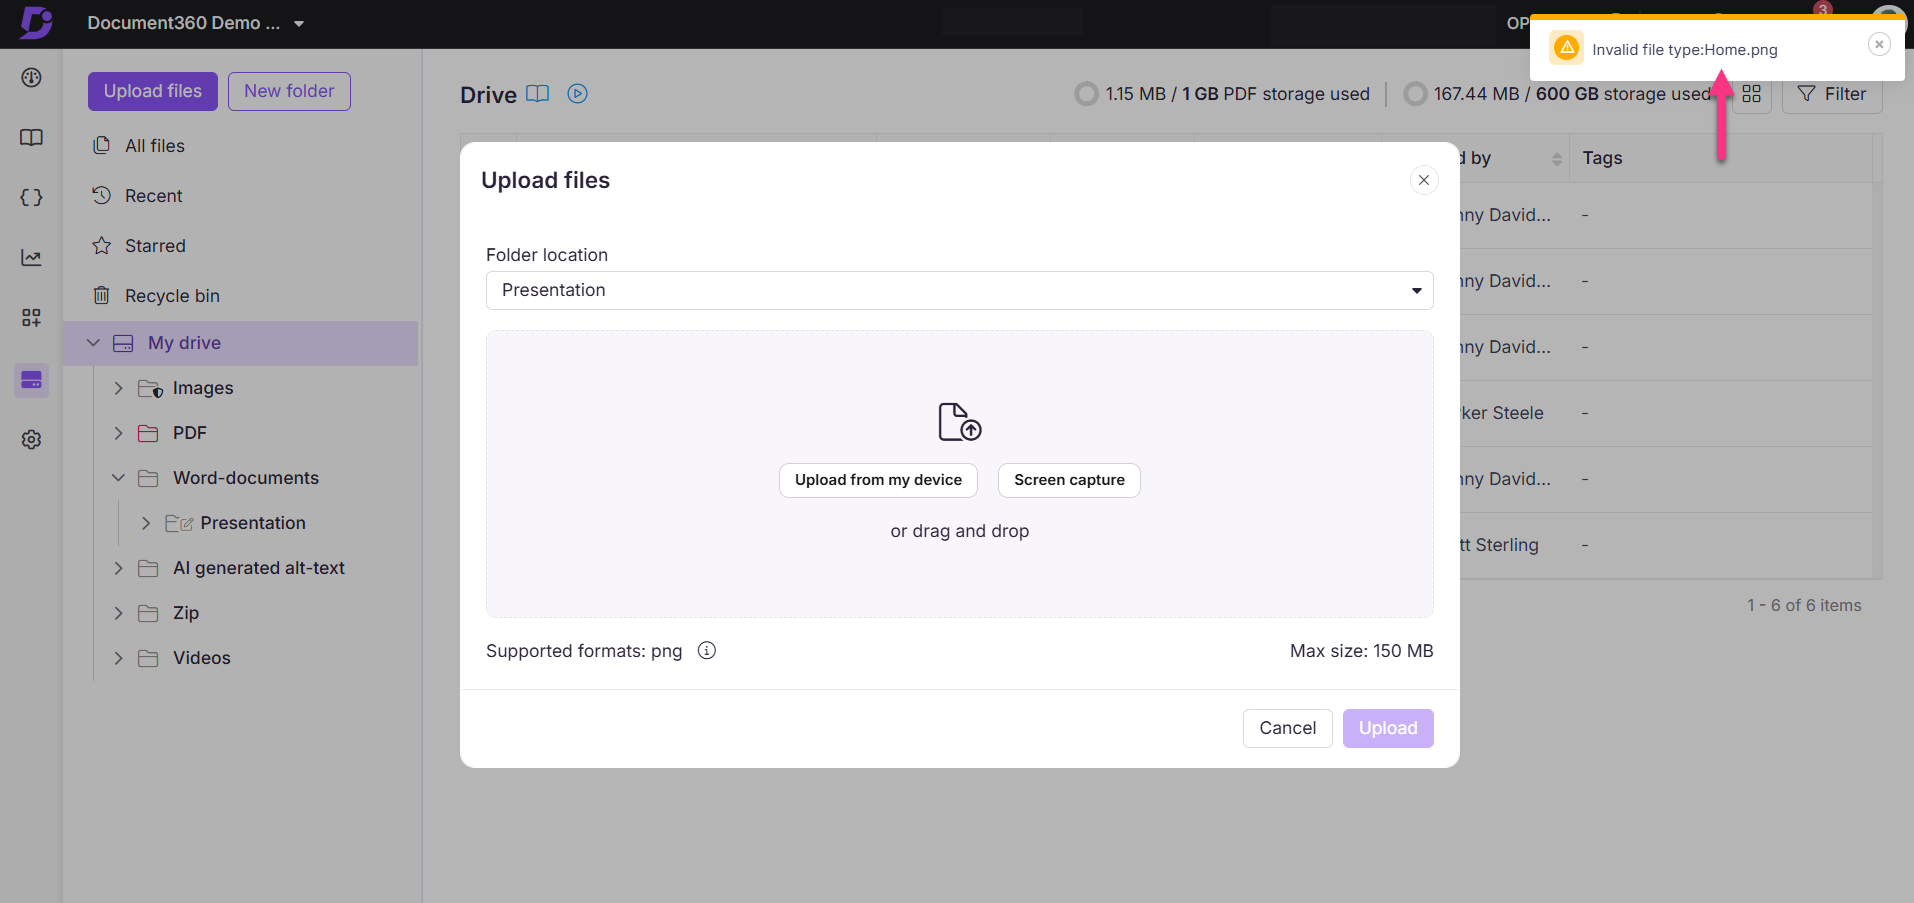
Steps to resolve:
To check and adjust the allowed file formats, follow these steps:
Navigate to Settings() in the left navigation bar in the Knowledge base portal.
In the left navigation pane, navigate to Knowledge base portal > General > Drive settings.
By default, the Allow all media formats is selected.
If this option is enabled, try re-uploading your files or images.
If specific file formats are selected to restrict, you must remove these restrictions to upload your desired files.
Once done, click Save.
NOTE
Ensure that file names in uploaded files do not include the characters +, %, #, or =."
FAQ
What is alt text in Document360 Drive, and how is it used?
Alt text (alternative text) in Document360 Drive is a brief description of an image's content. It is used primarily for accessibility purposes, helping visually impaired users understand the context of images embedded in articles. Alt text should be descriptive yet concise, providing meaningful information about the image.
Specify alt text for each image to ensure accessibility compliance and improve user experience.
Alt text can be set during the upload process or edited later through image properties in Document360 Drive.
Each alt text can be up to 140 characters long.