Plans supporting this feature: Professional Business Enterprise
Organizing content effectively is key to creating a user-friendly and efficient knowledge base. In Document360, categories and subcategories play a pivotal role in structuring your documentation. Whether you’re creating, renaming, deleting, or moving categories, Document360 provides a wide range of options to customize and manage them to meet your specific needs.
Managing categories helps create and customize category icons and perform advanced tasks like cloning, reordering, and starring categories for quick access. With these features, you can ensure your knowledge base remains well-organized and accessible to your team and end users.
Creating a category
In the Knowledge base portal, you can create a category using one of the following methods:
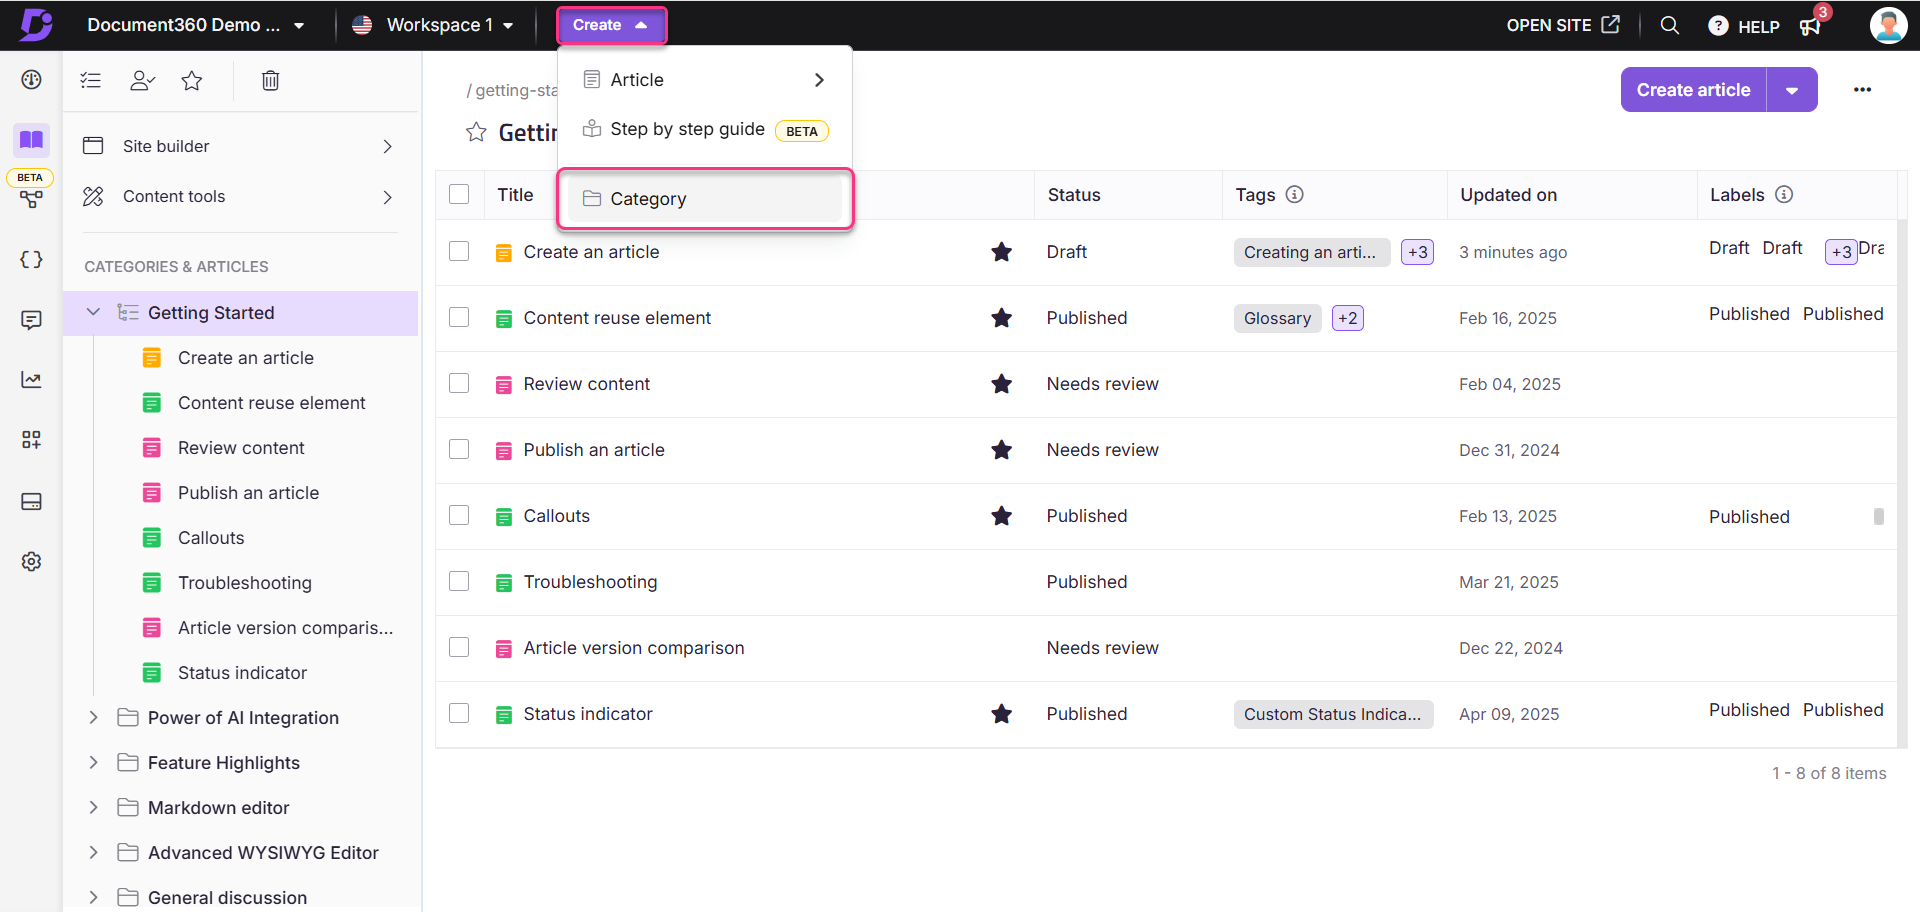
Method 1: Using the Create button on the top navigation bar
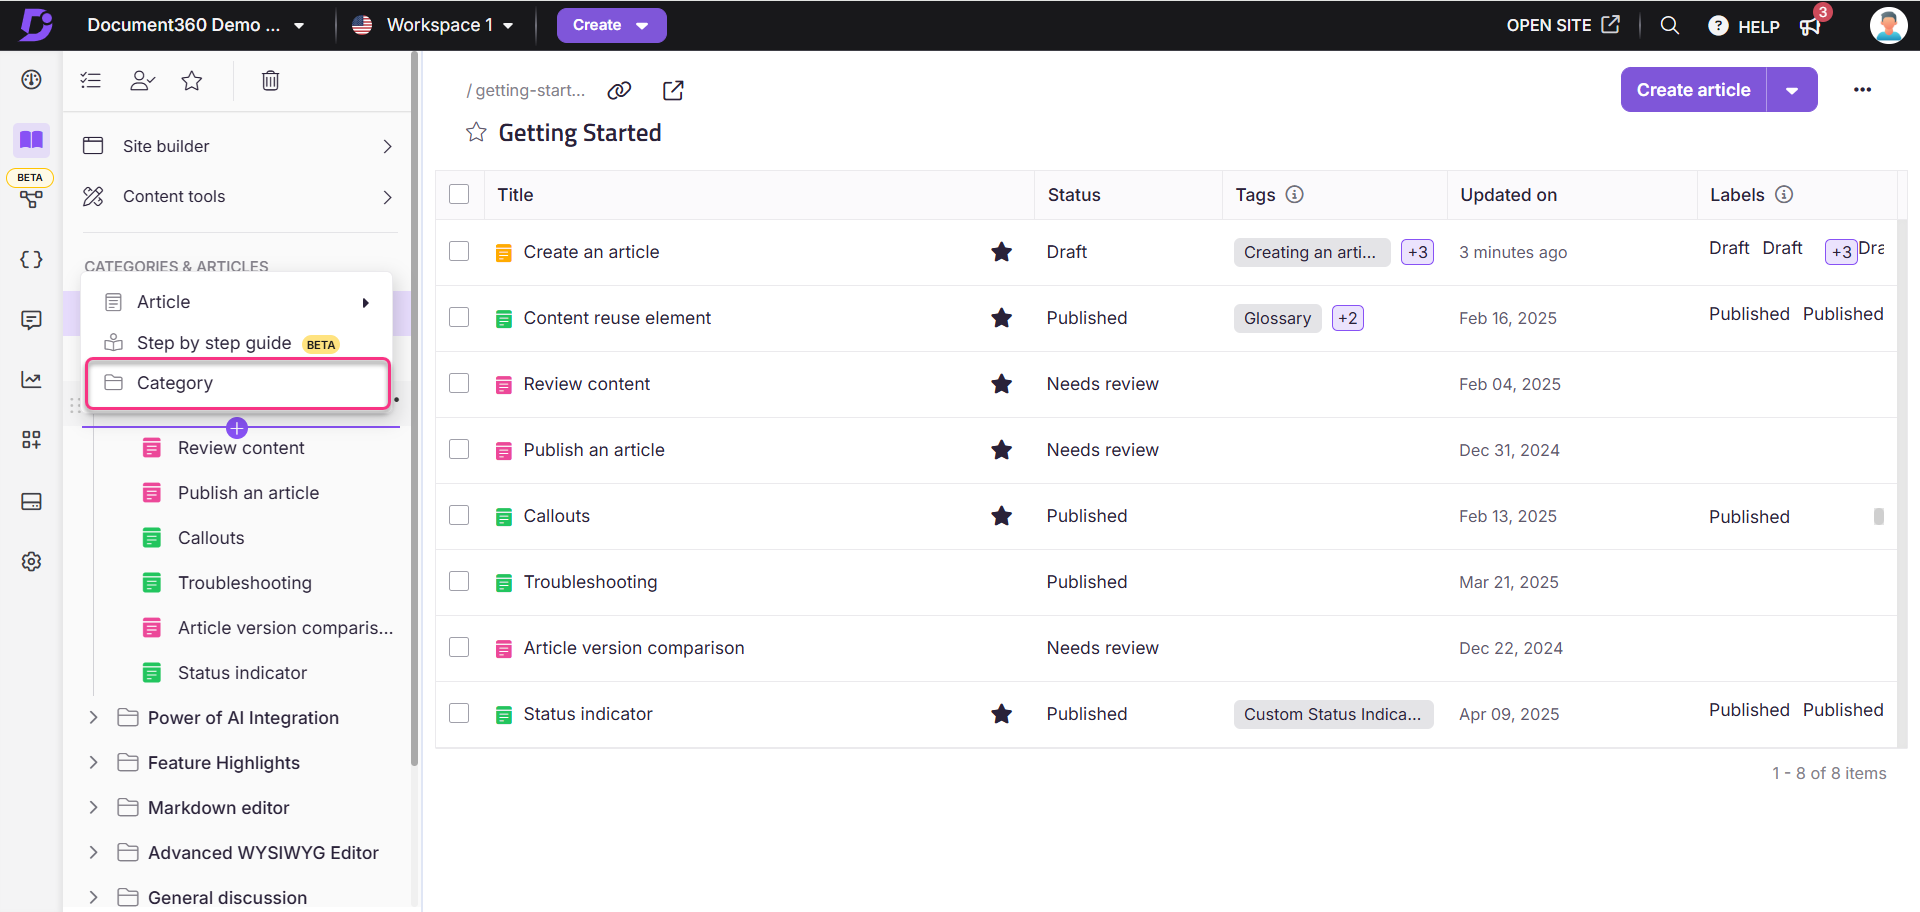
Method 2: Using the Flywheel () icon
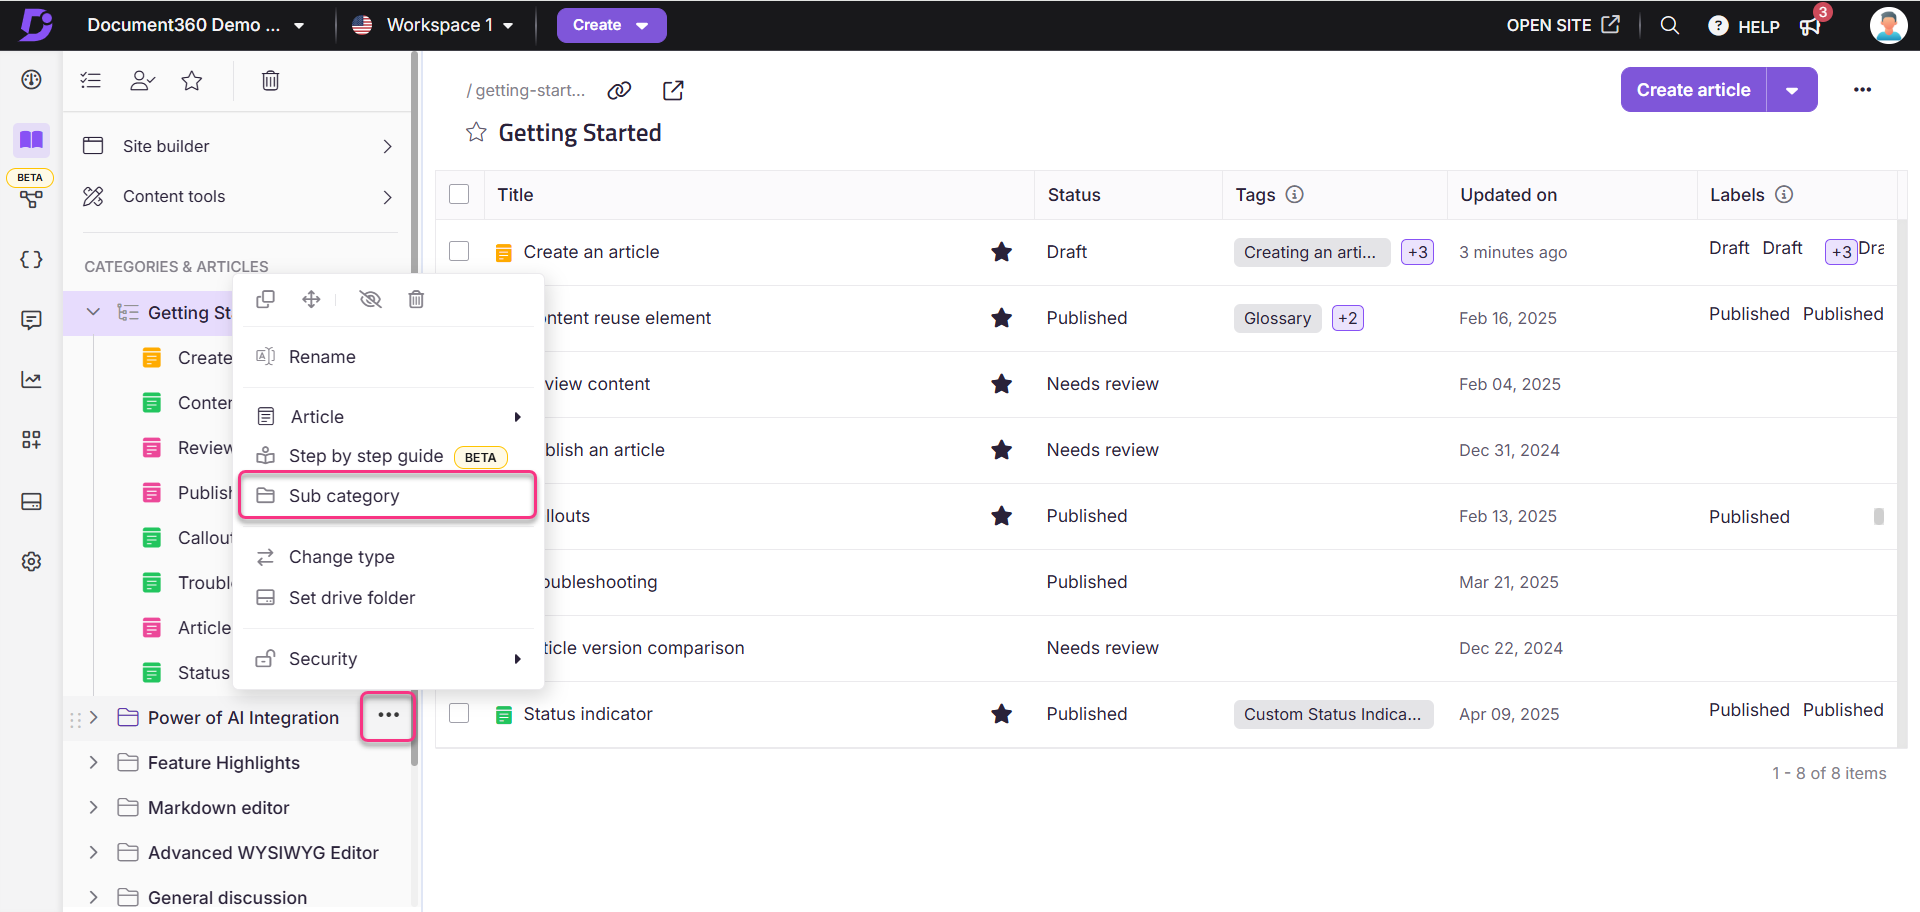
Method 3: Using the More () icon in the Categories & Articles pane
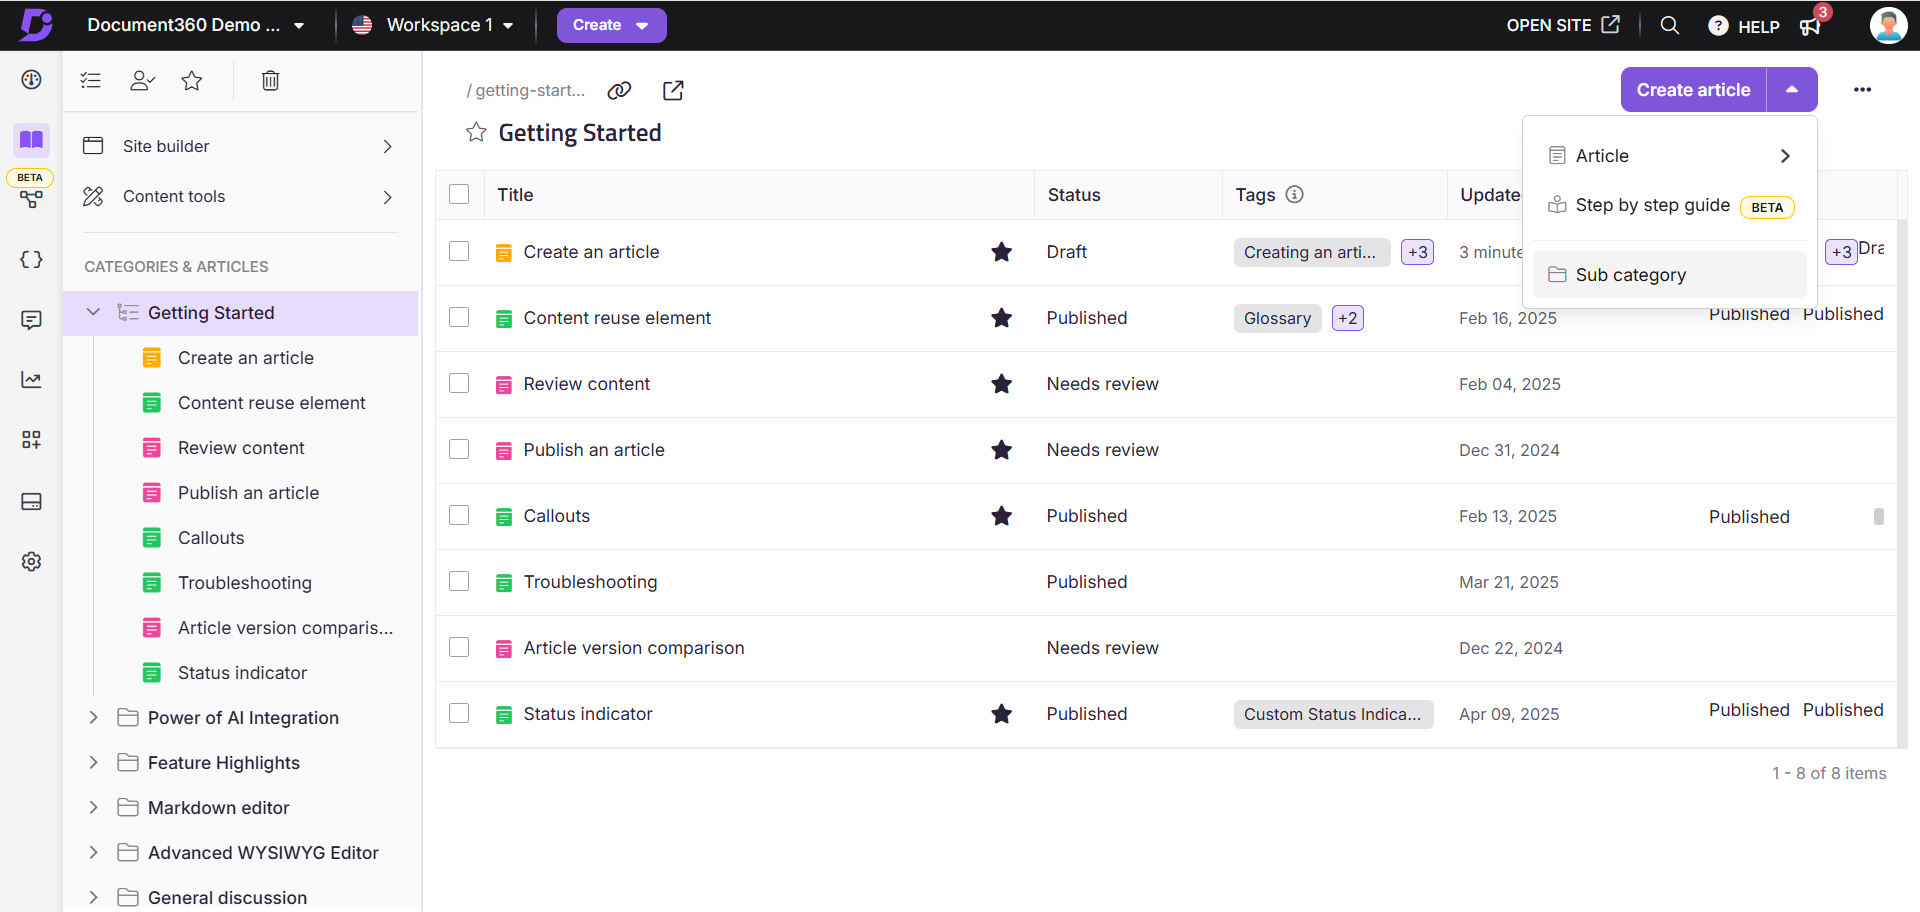
Method 4: Using the Create button in the Folder/Index type category
Method 5: Using the Create category button when creating a new article
To create a category using the Create button on the top bar:
Navigate to Documentation () in the left navigation bar in the Knowledge base portal.
Click the Create dropdown and select Category.
The Create new category panel will appear.
Enter a Name for the new category.
In the Location dropdown, choose the category’s position (root level or inside an existing category).
Click Reset to create the category at the Root level.
Choose the Type of category (Folder, Index, Page, or GitHub).
Click Create.
A new category or subcategory is added.
To create a category using the Flywheel () icon:
Navigate to Documentation () in the left navigation bar in the Knowledge base portal.
In the left navigation pane, hover over just below the desired category, and click the Flywheel () icon.
Click Category.
The Create new category panel will appear.
Enter a Name for the new category.
In the Location dropdown, choose the category’s position (root level or inside an existing category).
Click Reset to create the category at the Root level.
Choose the Type of category (Folder, Index, Page, or GitHub).
Click Create.
A new category or subcategory is added.
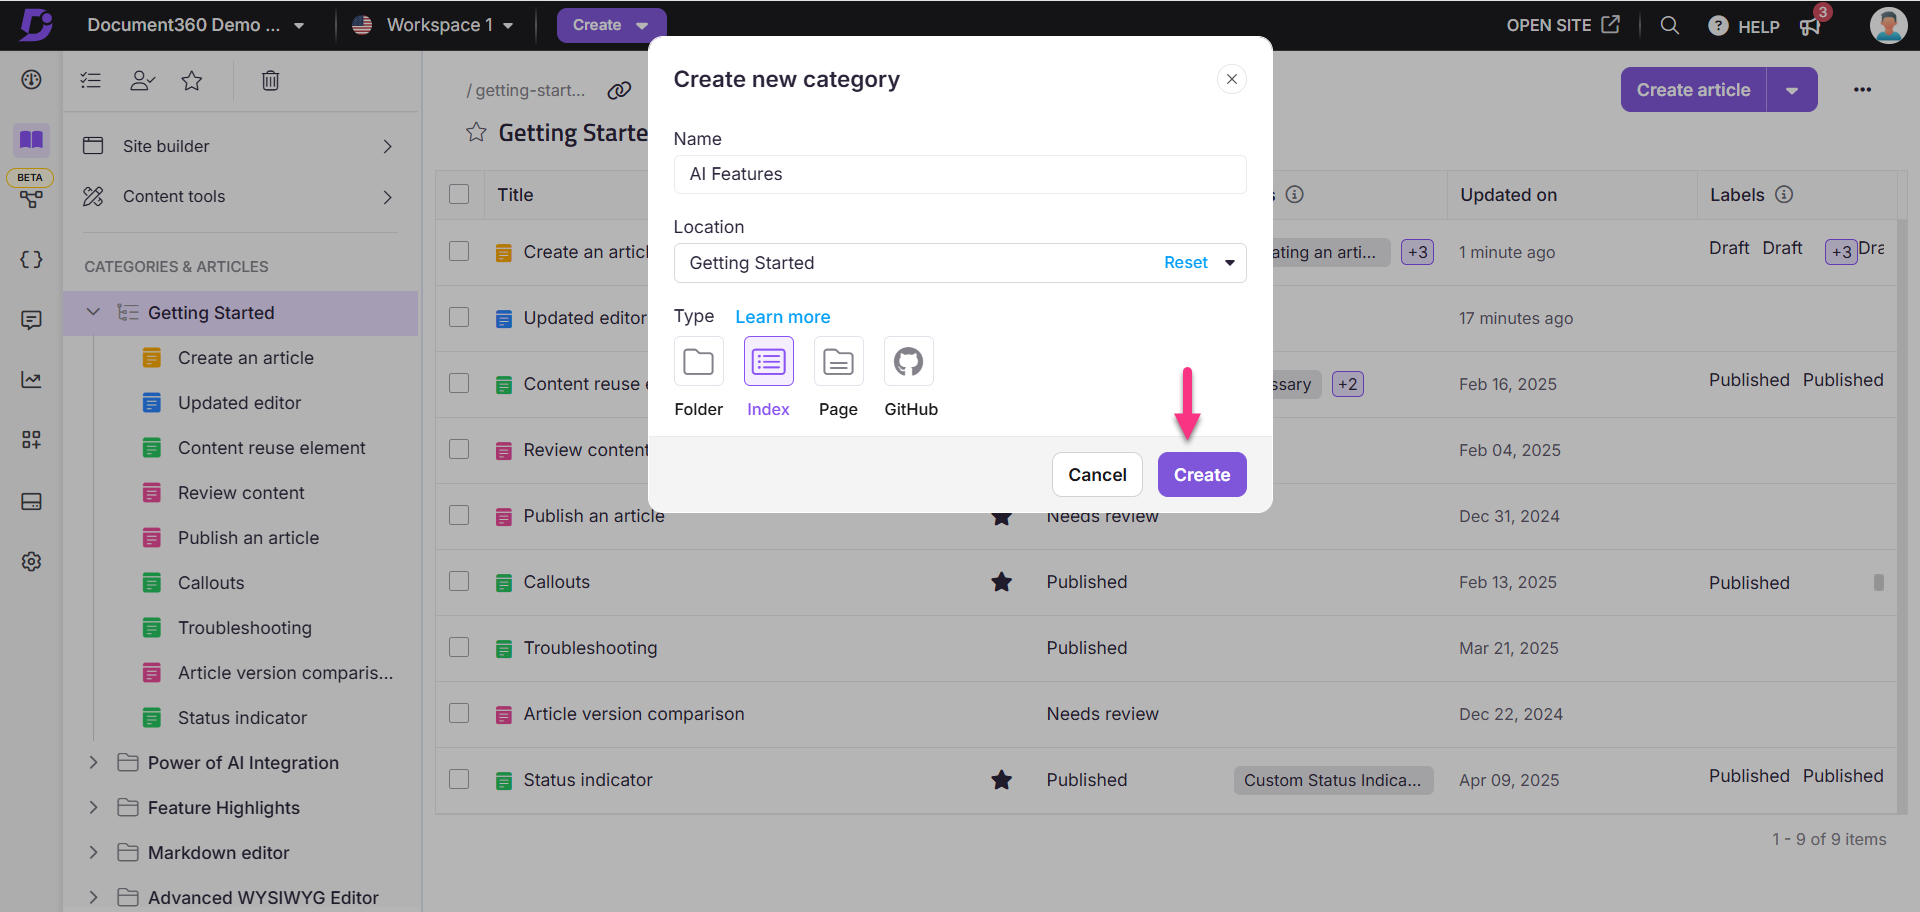
To create a category or sub category using the More () icon in the Categories & Articles section:
Navigate to Documentation () in the left navigation bar in the Knowledge base portal.
In the left navigation pane, hover over the desired category, and click the More () icon.
The Create new category panel will appear.
Enter a Name for the new category.
In the Location dropdown, choose the category’s position (root level or inside an existing category).
Click Reset to create the category at the Root level.
Choose the Type of category (Folder, Index, Page, or GitHub).
Click Create.
A new category or subcategory is added.
To create a category using the Create button in a Folder/Index type category:
Navigate to Documentation () in the left navigation bar in the Knowledge base portal.
Click the desired Folder/Index type category in the Categories & Articles pane.
Click Create dropdown (on the right side of the category page) and select Sub category.
The Create new category panel will appear.
Enter a Name for the new category.
In the Location dropdown, choose the category’s position (root level or inside an existing category).
Click Reset to create the category at the Root level.
Choose the Type of category (Folder, Index, Page, or GitHub).
Click Create.
A new category or subcategory is added.
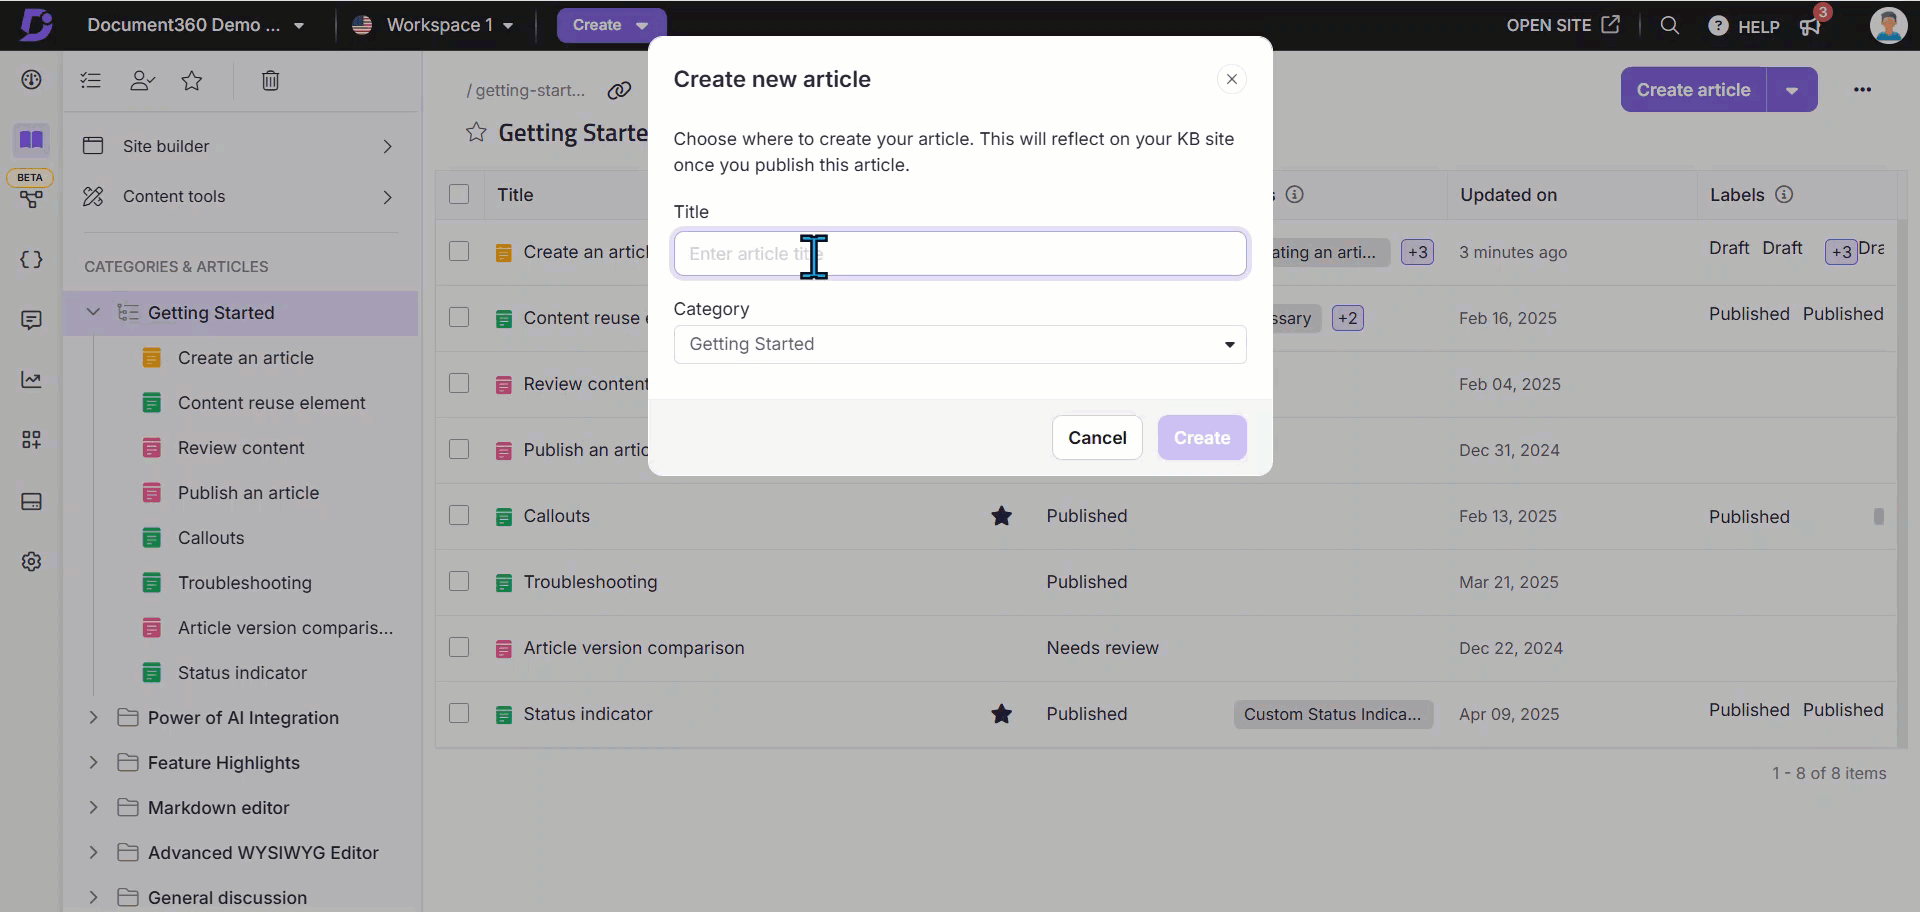
When creating a new article, you can place it in an existing category or create a new category in the same panel.
In the Create new article panel:
Enter the article title in the Title field.
In the Category field, expand the dropdown and click Create category.
The Create new category panel will appear.
Enter a Name for the new category.
In the Location dropdown, choose the category’s position (root level or inside an existing category).
Click Reset to create the category at the Root level.
Choose the Type of category (Folder, Index, Page, or GitHub).
Click Create.
A new category or subcategory is added.
Subcategories level
You can create up to seven levels of categories (1 root category + 6 subcategory levels). The New category option will be inactive for subcategories beyond this limit.
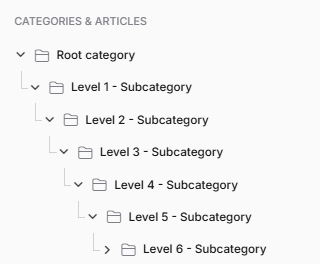
NOTE
When you have more subcategory levels, the user will find it challenging to navigate and discover the desired article without using the Search option.
You can structure the Knowledge base based on your requirement as Document360 facilitates content discoverability using tags, all-in-one search, related articles, internal linking, cloning articles, replicating or sharing one article in multiple categories, and the starred categories/articles feature.
TIP
Use up to three subcategory levels for optimal navigation. Two subcategory levels are ideal.
Changing category icon
When you create a category or subcategory, a default folder icon is assigned. You can change this icon to an emoji to better convey the category’s purpose to your end-users.
Navigate to the Documentation () in the left navigation bar in the Knowledge base portal.
In the left navigation pane, click the folder icon or emoji adjacent to the desired category.
An emoji panel will appear. You can find an emoji by using the search bar, looking through the categories along the top, or using the color-tone icons next to the search bar.
Select your desired emoji to apply it.
NOTE
To revert to the folder icon, click the 🚫 icon in the emoji panel.
Emoji styles may vary depending on the browser.
You cannot update the category icon for Page type categories. Category icon can only be updated for Folder or Index type categories.
![]()
Deleting a category
There are four ways to delete a category in the Knowledge base portal:
Method 1: Using the More() icon in the Categories & Articles pane.
Method 2: Using the More () icon in the Folder/Index category.
Method 3: Deleting multiple articles/categories in the Folder/Index category.
Method 4: Deleting a specific article/sub category in the Folder/Index category.
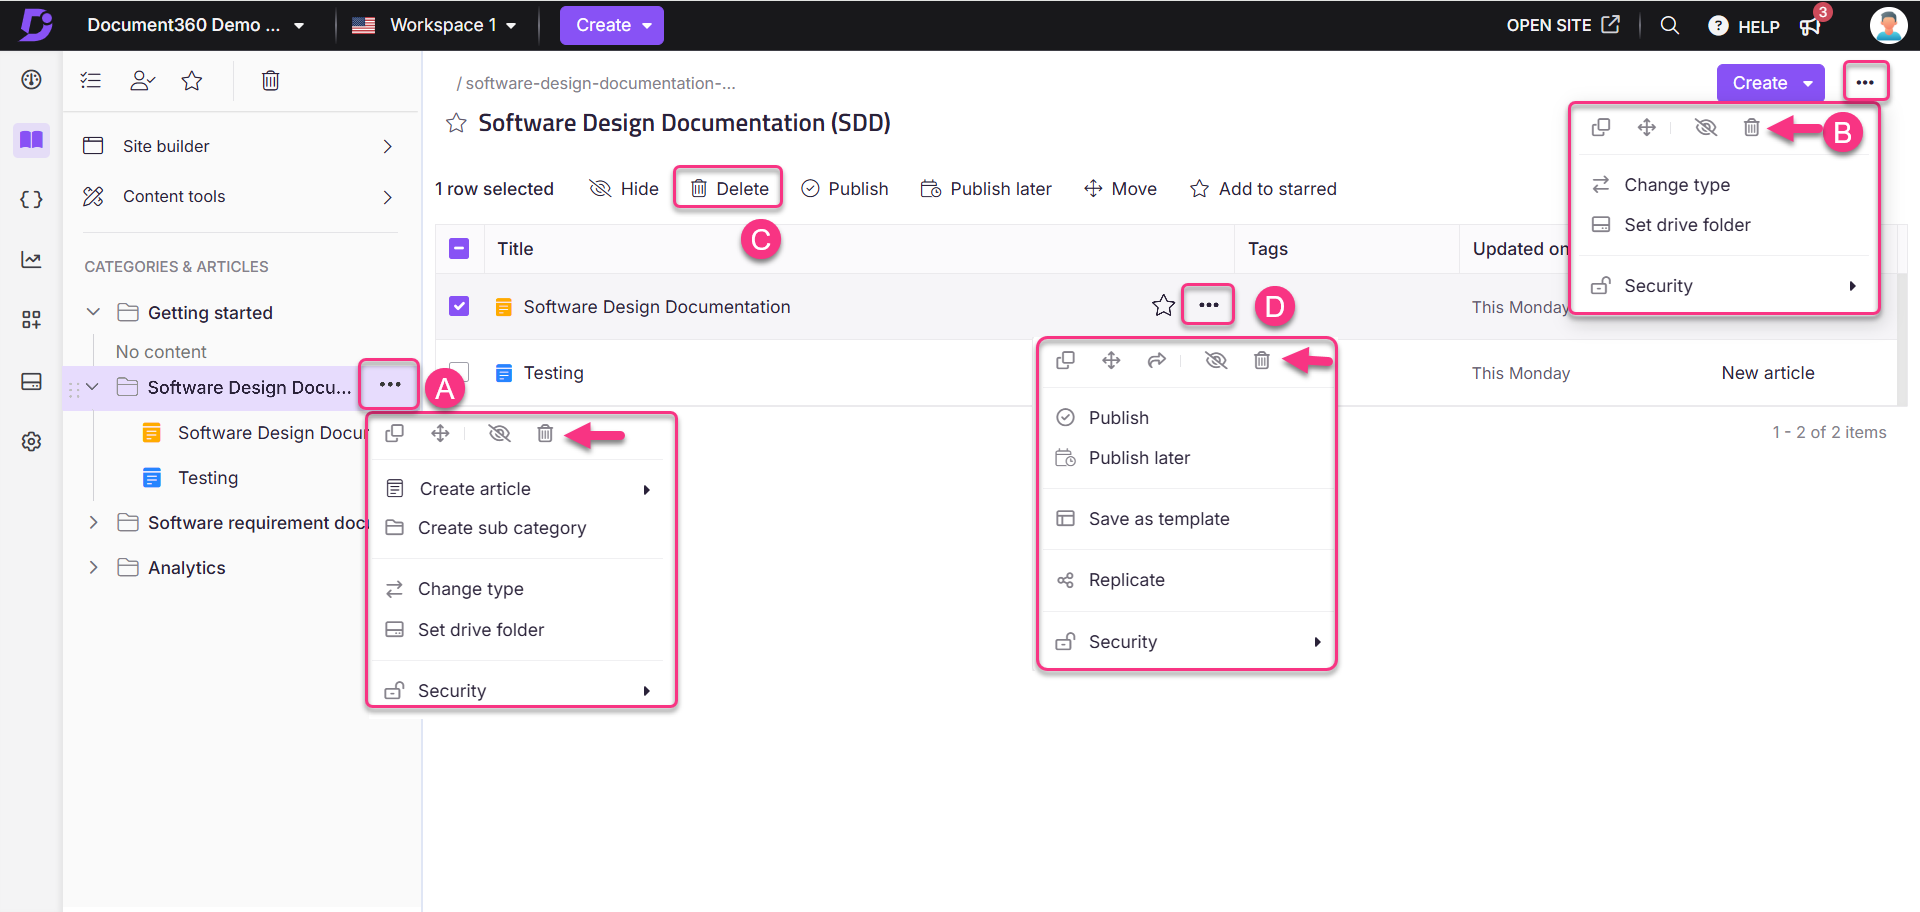
To delete a specific category from the Categories & Articles section:
Navigate to Documentation () in the left navigation bar in the Knowledge base portal.
Hover over the desired category in the Categories & Articles pane.
Click the More () icon and select Delete ().
Click Delete in the confirmation panel.
To delete a specific Folder/Index type category:
Navigate to Documentation () in the left navigation bar in the Knowledge base portal.
Go to the desired Folder/Index category in the left navigation pane.
Click the More () icon and select Delete ().
Click Yes in the Delete confirmation panel.
To delete multiple articles and sub categories within a specific Folder/Index category:
Navigate to Documentation () in the left navigation bar in the Knowledge base portal.
Go to the desired Folder/Index category in the left navigation pane.
Select the checkboxes for the appropriate articles and subcategories.
Click Delete ().
Click Yes in the Delete confirmation panel.
To delete a specific article/sub category within a specific Folder/Index category:
Navigate to Documentation () in the left navigation bar in the Knowledge base portal.
Go to the desired Folder/Index category in the left navigation pane.
Hover over the desired article/sub category.
Click the More () icon and select Delete ().
Click Yes in the Delete confirmation panel.
NOTE
When you delete a root-level category, all the subcategories and articles under that level will also be deleted. Deleted items will be available in the recycle bin for 30 days.
Hiding and unhiding a category
In Document360, you can hide a category or subcategory within the documentation editor to restrict access to users only. Hidden categories are indicated by a strikethrough in the categories list of the Documentation panel.
Suppose your documentation team is drafting a new feature guide that isn't ready for public release. You can temporarily hide the category while it's under review, ensuring that only internal team members can access it. Once finalized, you can unhide the category to make it publicly available.
There are four ways to hide a category in the Knowledge base portal:
Method 1: Using the More () icon in the Categories & Articles pane.
Method 2: Using the More () icon in the Folder/Index category.
Method 3: Hiding/unhiding multiple articles/categories in the Folder/Index category.
Method 4: Hiding/unhiding a specific article/category in the Folder/Index category.
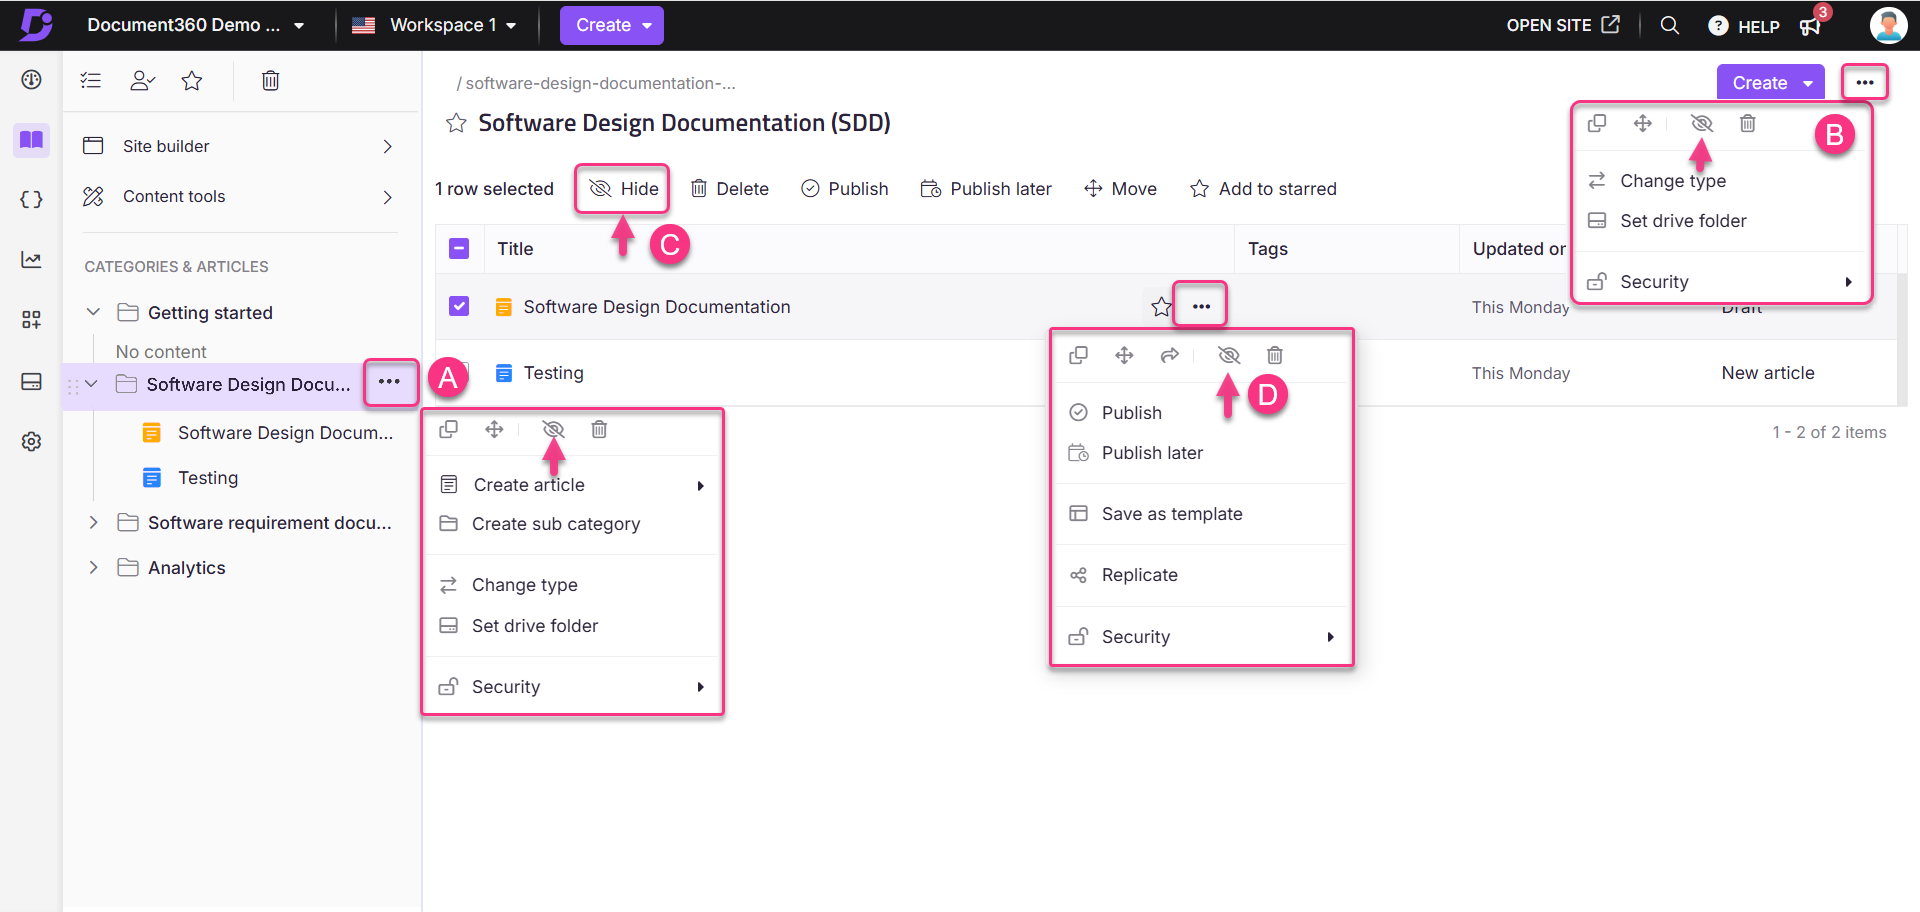
To hide/unhide a specific category from the Categories & Articles section:
Navigate to Documentation () in the left navigation bar in the Knowledge base portal.
Hover over the desired category in the Categories & Articles pane.
Click the More () icon and select Hide ().
To Unhide, click the Unhide () icon.
To hide/unhide a specific Folder/Index type category:
Navigate to Documentation () in the left navigation bar in the Knowledge base portal.
Go to the desired Folder/Index category in the left navigation pane.
Click the More () icon and select Hide ().
To Unhide, click the Unhide () icon.
To hide/unhide multiple articles and sub-categories within a specific Folder/Index category:
Navigate to Documentation () in the left navigation bar in the Knowledge base portal.
Go to the desired Folder/Index category in the left navigation pane.
Select the checkboxes for the appropriate articles and subcategories.
Click Hide ().
To Unhide, click the Unhide () icon.
To hide/unhide a specific article/sub category within a specific Folder/Index category:
Navigate to Documentation () in the left navigation bar in the Knowledge base portal.
Go to the desired Folder/Index category in the left navigation pane.
Hover over the desired article/sub category.
Click the More () icon and select Hide ().
To Unhide, click the Unhide () icon.
NOTE
When you hide a category or subcategory, all its subcategories and articles will also be hidden.
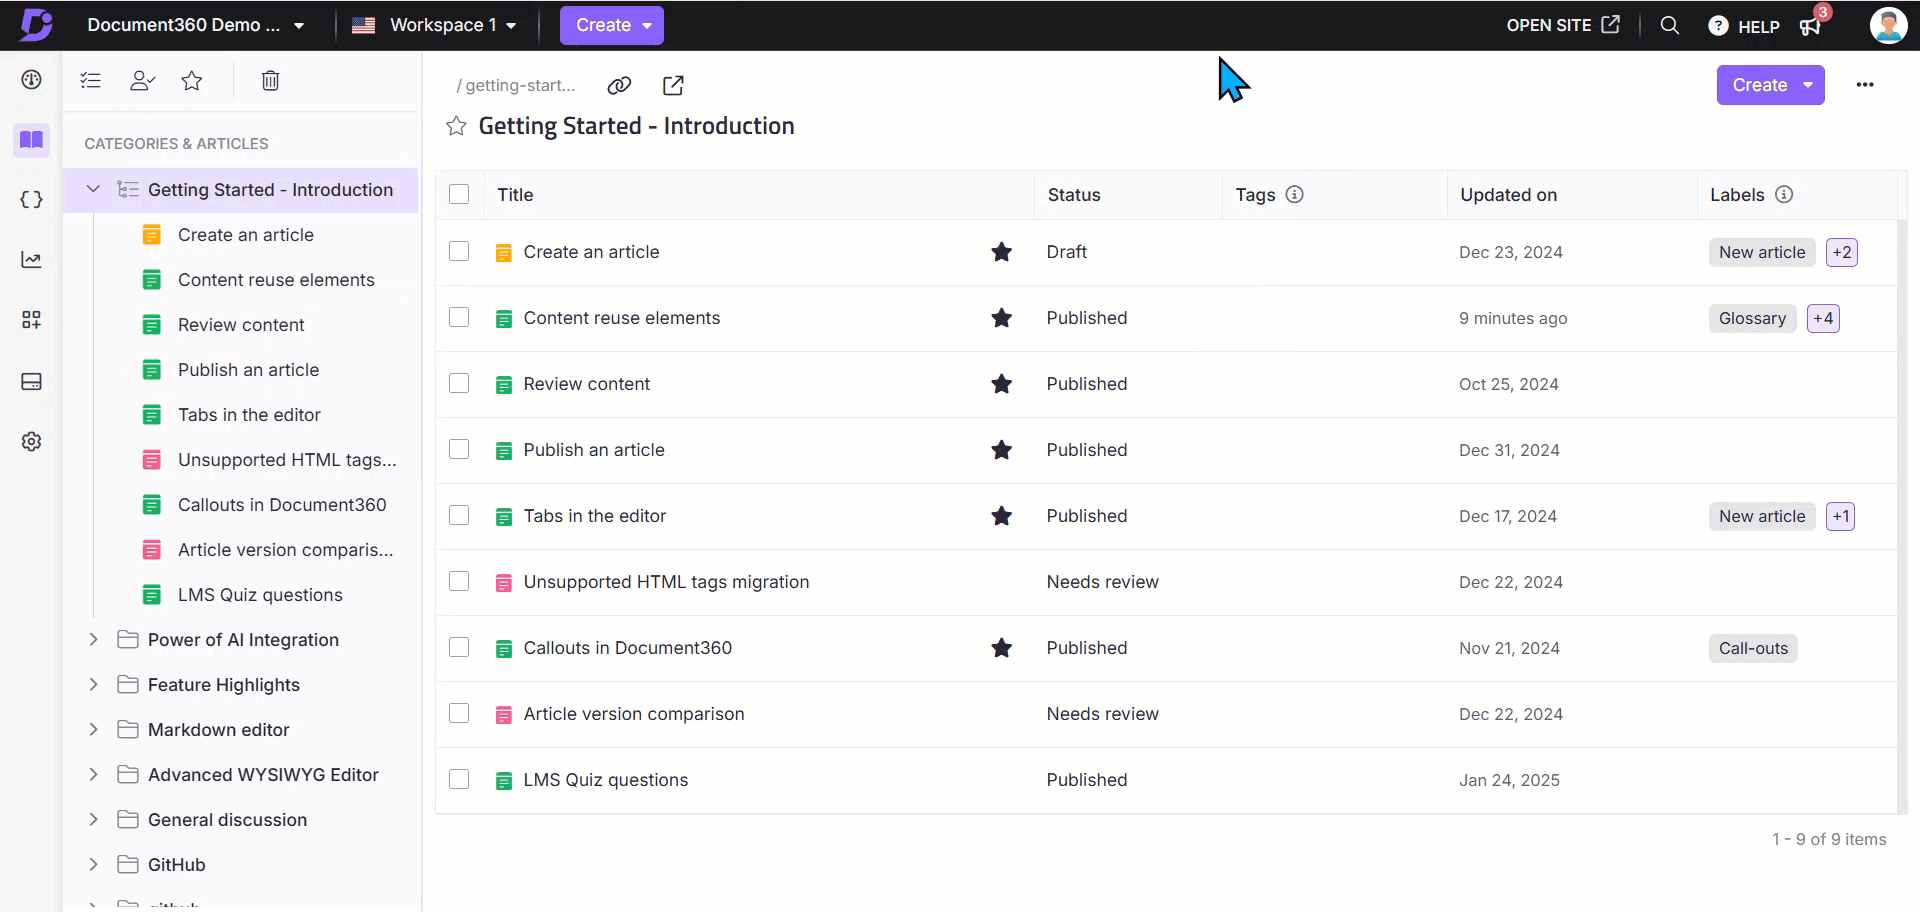
Renaming a category
In Document360, you can rename categories and subcategories as many times as needed.
Navigate to Documentation() in the left navigation bar in the Knowledge base portal.
Go to the desired category or subcategory in the left navigation pane.
On the category page, click the category name to edit.
Alternatively, hover over the desired category in the Categories & Articles pane, click the More () icon, and select Rename to edit the category name.
Enter the new category name and click Update.
NOTE
Renaming the category or subcategory does not impact the category slug.
Moving a category
You can move a category or subcategory across workspaces. All subcategories and articles within the category will also be moved when you perform the Move operation.
There are five ways to move a category in the Knowledge base portal:
Method 1: Using the drag and drop () icon in the Categories & Articles pane.
Method 2: Using the More () icon in the Categories & Articles pane.
Method 3: Using the More () icon in the Folder/Index category.
Method 4: Moving multiple articles/categories in the Folder/Index category.
Method 5: Moving a specific article/category in the Folder/Index category.

To move a category using the drag and drop () icon in the Categories & Articles pane:
Navigate to Documentation () in the left navigation bar in the Knowledge base portal.
Hover over the desired category.
The drag and drop () icon will appear.
Hold and drag the category to the appropriate location.
NOTE
You cannot move a root-level category into its subcategory.
Drag and drop () icon allows moving categories only within the same workspace.
From the Categories & Articles pane, you can move a category within or across workspaces:
Navigate to Documentation () in the left navigation bar in the Knowledge base portal.
Hover over the desired category or subcategory in the left navigation pane.
The More () icon will appear.
Click the More () icon and select the Move () icon.
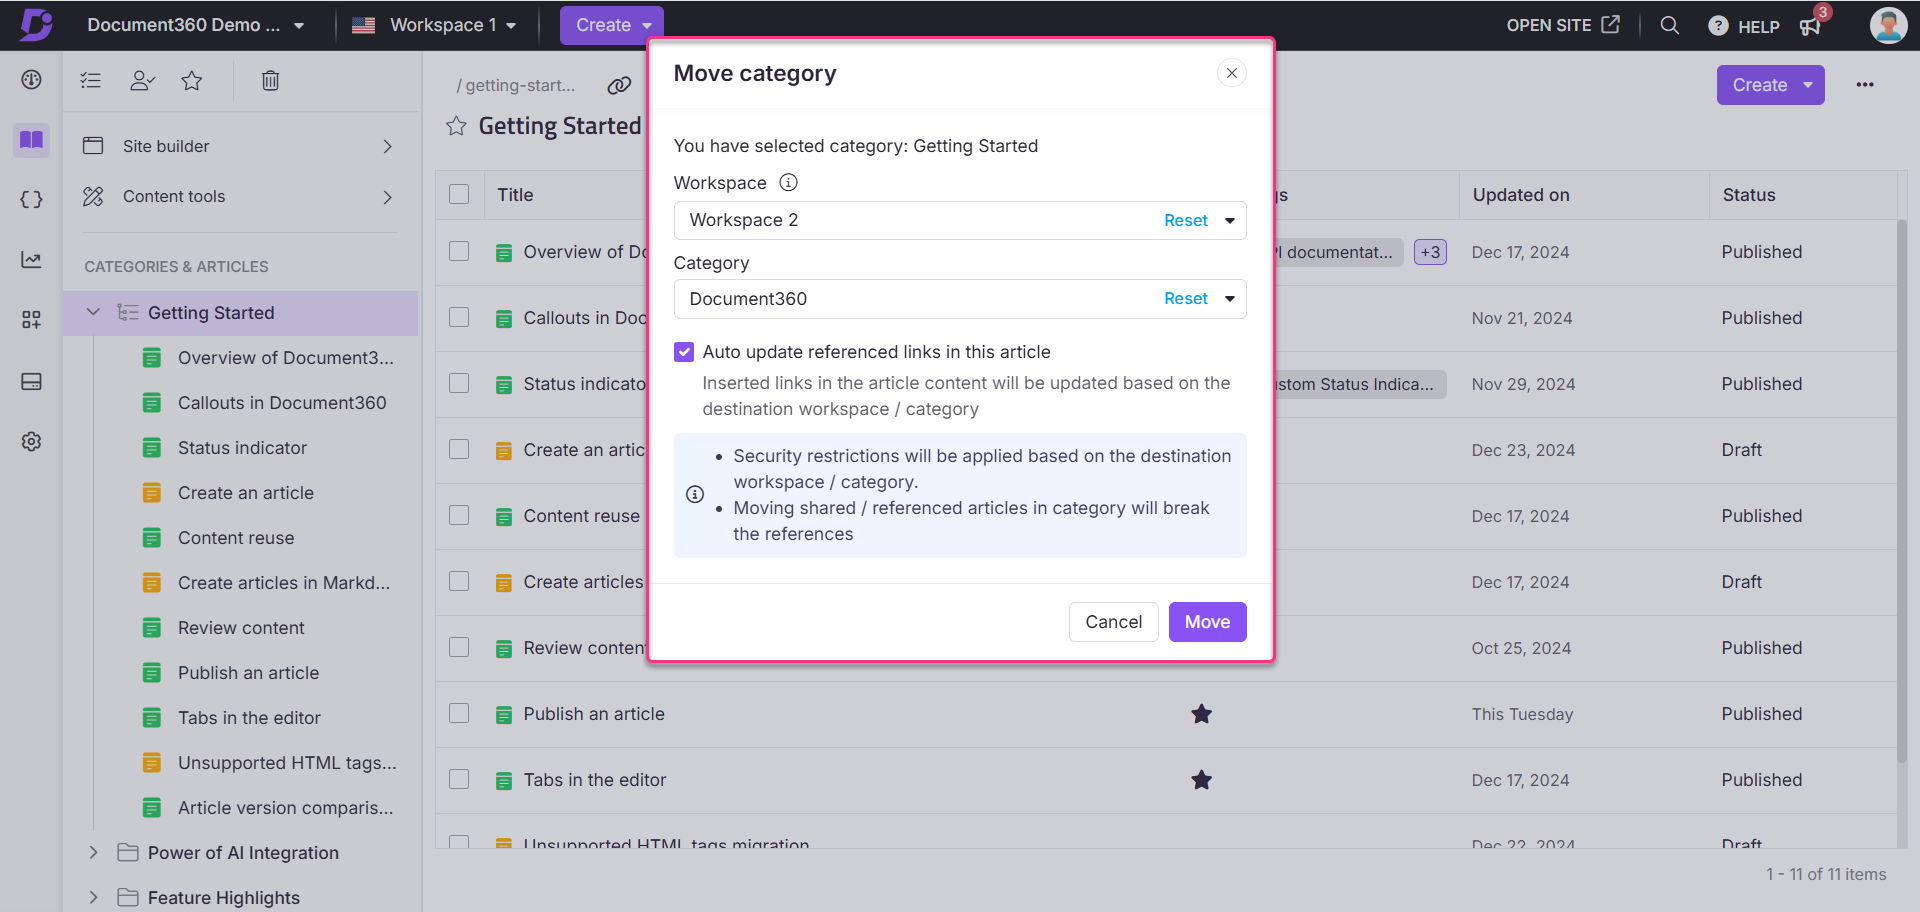
In the Move category panel, perform the following:
Workspace: Select the desired workspace from the dropdown. Click Reset to assign it under the main workspace.
Category: Select an existing category from the selected workspace. Click Reset to assign it under the root category.
Auto update referenced links: Select this checkbox to ensure links in the article content are updated based on the destination workspace/category.
Click Move.
You can move a Folder/Index category using the More () option in it:
Navigate to Documentation () in the left navigation bar in the Knowledge base portal.
Go to the desired Folder/Index category in the left navigation pane.
Click the More () icon and select the Move () icon.
In the Move category panel, perform the following:
Workspace: Select the desired workspace from the dropdown. Click Reset to assign it under the main workspace.
Category: Select an existing category from the selected workspace. Click Reset to assign it under the root category.
Auto update referenced links: Select this checkbox to ensure links in the article content are updated based on the destination workspace/category.
Click Move.
To move multiple articles/sub categories within a specific Folder/Index category:
Navigate to Documentation () in the left navigation bar in the Knowledge base portal.
Go to the desired Folder/Index category in the left navigation pane.
Select the checkboxes for the appropriate articles and subcategories.
Click the Move () icon.
In the Move category panel, perform the following:
Workspace: Select the desired workspace from the dropdown. Click Reset to assign it under the main workspace.
Category: Select an existing category from the selected workspace. Click Reset to assign it under the root category.
Auto update referenced links: Select this checkbox to ensure links in the article content are updated based on the destination workspace/category.
Click Move.
To move a specific article/sub category within a specific Folder/Index category:
Navigate to Documentation () in the left navigation bar in the Knowledge base portal.
Go to the desired Folder/Index category in the left navigation pane.
Hover over the desired article/sub category.
The More () icon will appear.
Click the More () icon and click the Move () icon.
In the Move category panel, perform the following:
Workspace: Select the desired workspace from the dropdown. Click Reset to assign it under the main workspace.
Category: Select an existing category from the selected workspace. Click Reset to assign it under the root category.
Auto update referenced links: Select this checkbox to ensure links in the article content are updated based on the destination workspace/category.
Click Move.
Cloning a category
Clone categories are exact copies of the content created as new articles. You can clone the categories within or across workspaces.
There are three ways to clone a category in the Knowledge base portal:
Method 1: Using the More () icon in the Categories & Articles pane.
Method 2: Using the More () icon in the Folder/Index category.
Method 3: Cloning a specific article/sub category within a Folder/Index category.
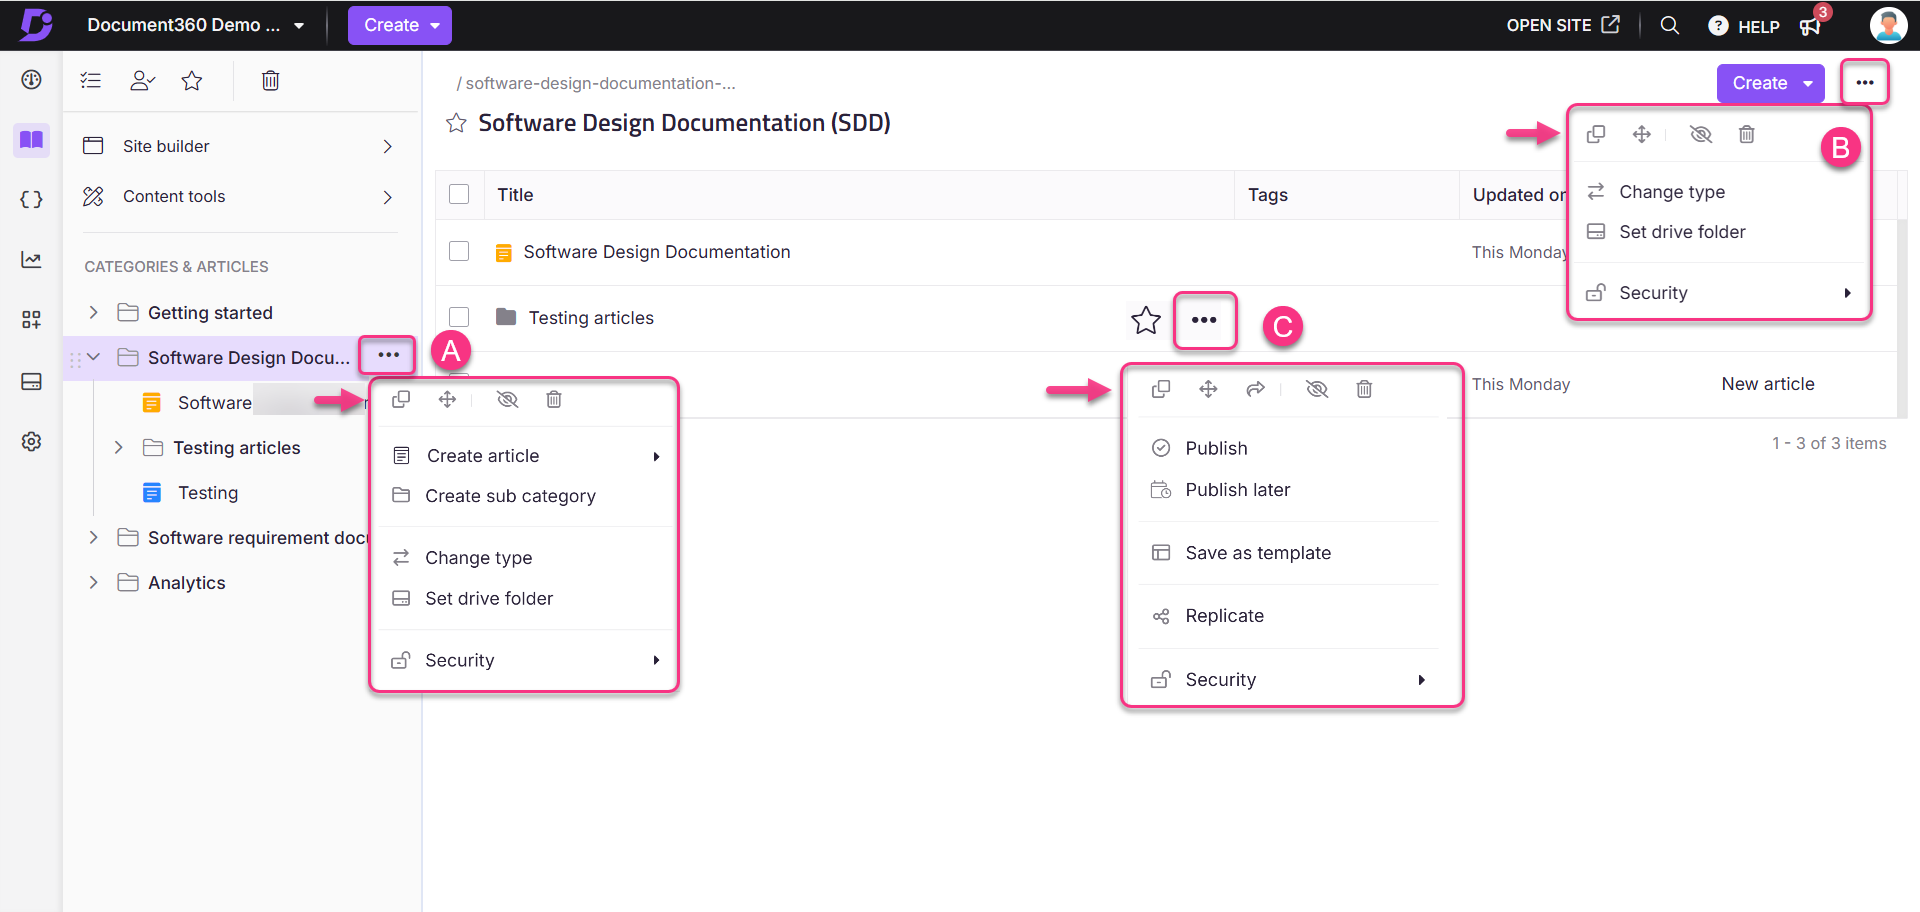
From the Categories & Articles section, you can clone a category within or across workspaces:
Navigate to Documentation () in the left navigation bar in the Knowledge base portal.
Hover over the desired category or subcategory in the left navigation pane.
The More () icon will appear.
Click the More () icon and select the Clone () icon.
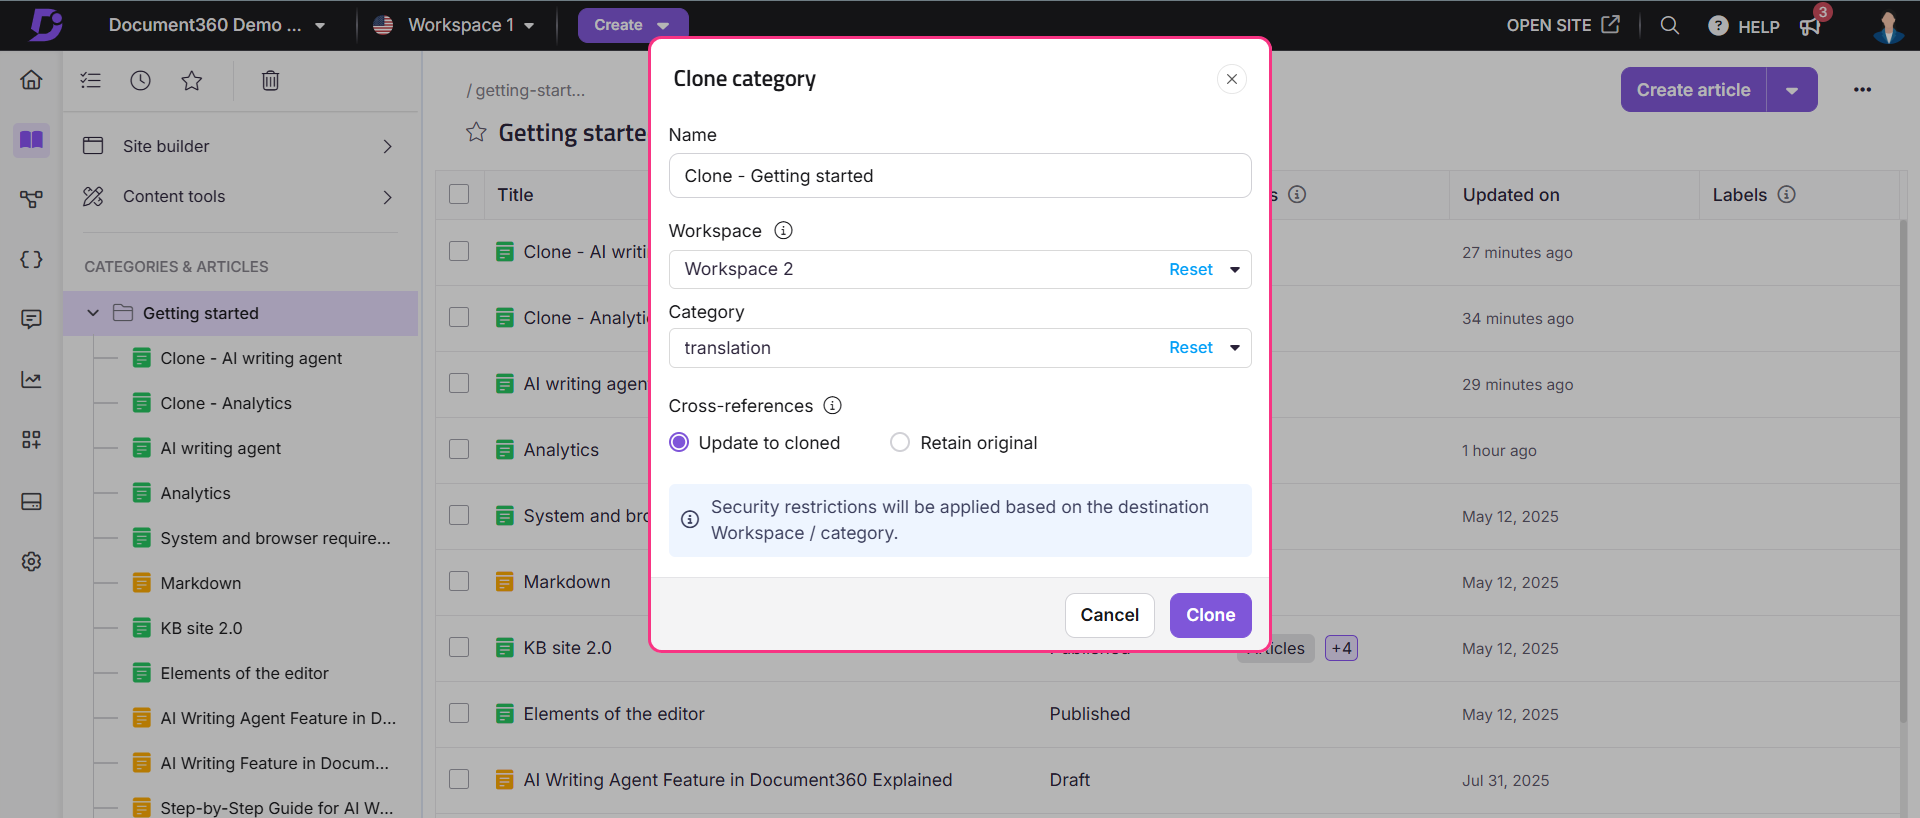
In the Clone category panel, perform the following:
Name: Enter the name for the cloning category.
Workspace: Select the desired workspace from the dropdown. Click Reset to assign it under the main workspace.
Category: Select an existing category from the selected workspace. Click Reset to assign it under the root category.
Cross-references: Select Update to cloned if you want hyperlinks to automatically navigate to the cloned category whether it is within the same workspace or across workspaces. Select Retain original if you prefer the hyperlinks to navigate to the original category. If the hyperlinked article is not cloned and you choose Update to cloned which is the default selection, the hyperlink will still point to the original version of the article.
Click Clone.
You can clone a Folder/Index category using the More () option in it:
Navigate to Documentation () in the left navigation bar in the Knowledge base portal.
Go to the desired Folder/Index category in the left navigation pane.
Click the More () icon and select the Clone () icon.
In the Clone category panel, perform the following:
Name: Enter the name for the cloning category.
Workspace: Select the desired workspace from the dropdown. Click Reset to assign it under the main workspace.
Category: Select an existing category from the selected workspace. Click Reset to assign it under the root category.
Cross-references: Select Update to cloned if you want hyperlinks to automatically navigate to the cloned category whether it is within the same workspace or across workspaces. Select Retain original if you prefer the hyperlinks to navigate to the original category. If the hyperlinked article is not cloned and you choose Update to cloned which is the default selection, the hyperlink will still point to the original version of the article.
Click Move.
To move a specific article/sub category within a specific Folder/Index category:
Navigate to Documentation () in the left navigation bar in the Knowledge base portal.
Go to the desired Folder/Index category in the left navigation pane.
Hover over the desired article/subcategory.
The More () icon will appear.
Click the More () icon and select the Clone () icon.
In the Clone category panel, perform the following:
Name: Enter the name for the cloning category.
Workspace: Select the desired workspace from the dropdown. Click Reset to assign it under the main workspace.
Category: Select an existing category from the selected workspace. Click Reset to assign it under the root category.
Cross-references: Select Update to cloned if you want hyperlinks to automatically navigate to the cloned category whether it is within the same workspace or across workspaces. Select Retain original if you prefer the hyperlinks to navigate to the original category. If the hyperlinked article is not cloned and you choose Update to cloned which is the default selection, the hyperlink will still point to the original version of the article.
Click Clone.
NOTE
Security restrictions will be applied based on the destination workspaces/categories.
Starring a category
If you frequently use certain categories in your documentation, you can move them to Starred for quick and easy access. This feature functions like a favorites section and is available only in the Knowledge base portal.
NOTE
You can star categories, subcategories, and articles.
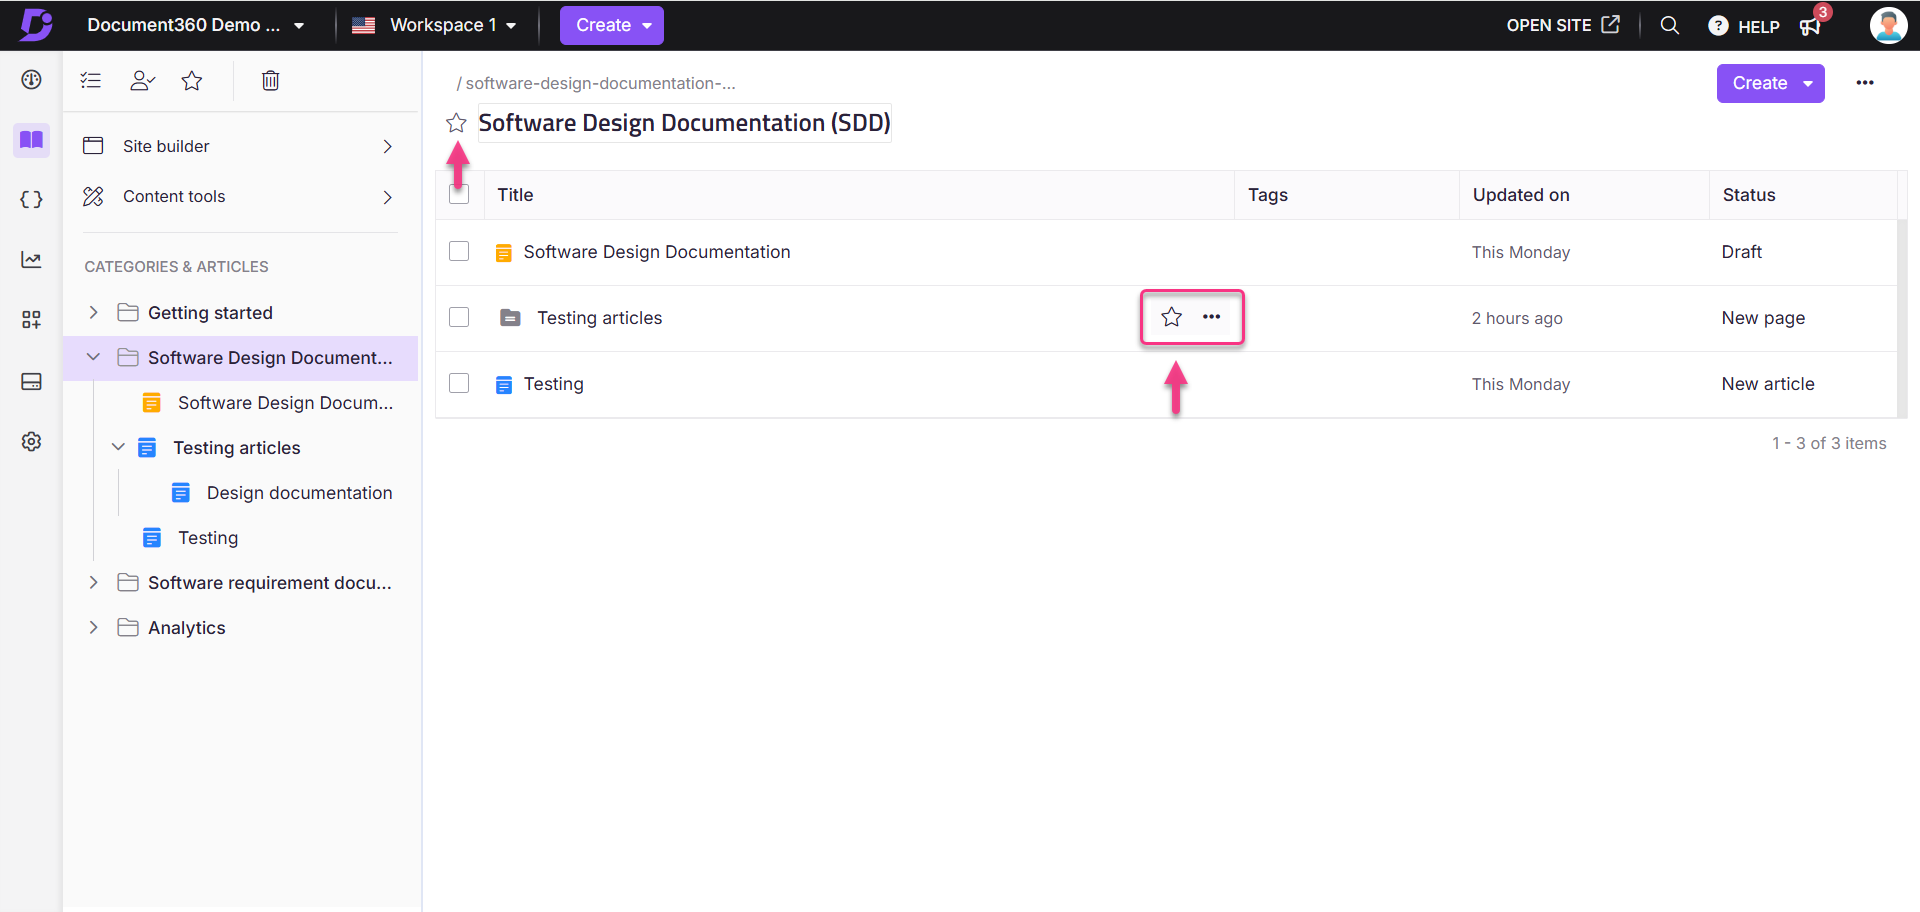
To add a category to Starred, follow these steps:
Navigate to Documentation () in the left navigation bar in the Knowledge base portal.
Select the desired category from the left navigation pane.
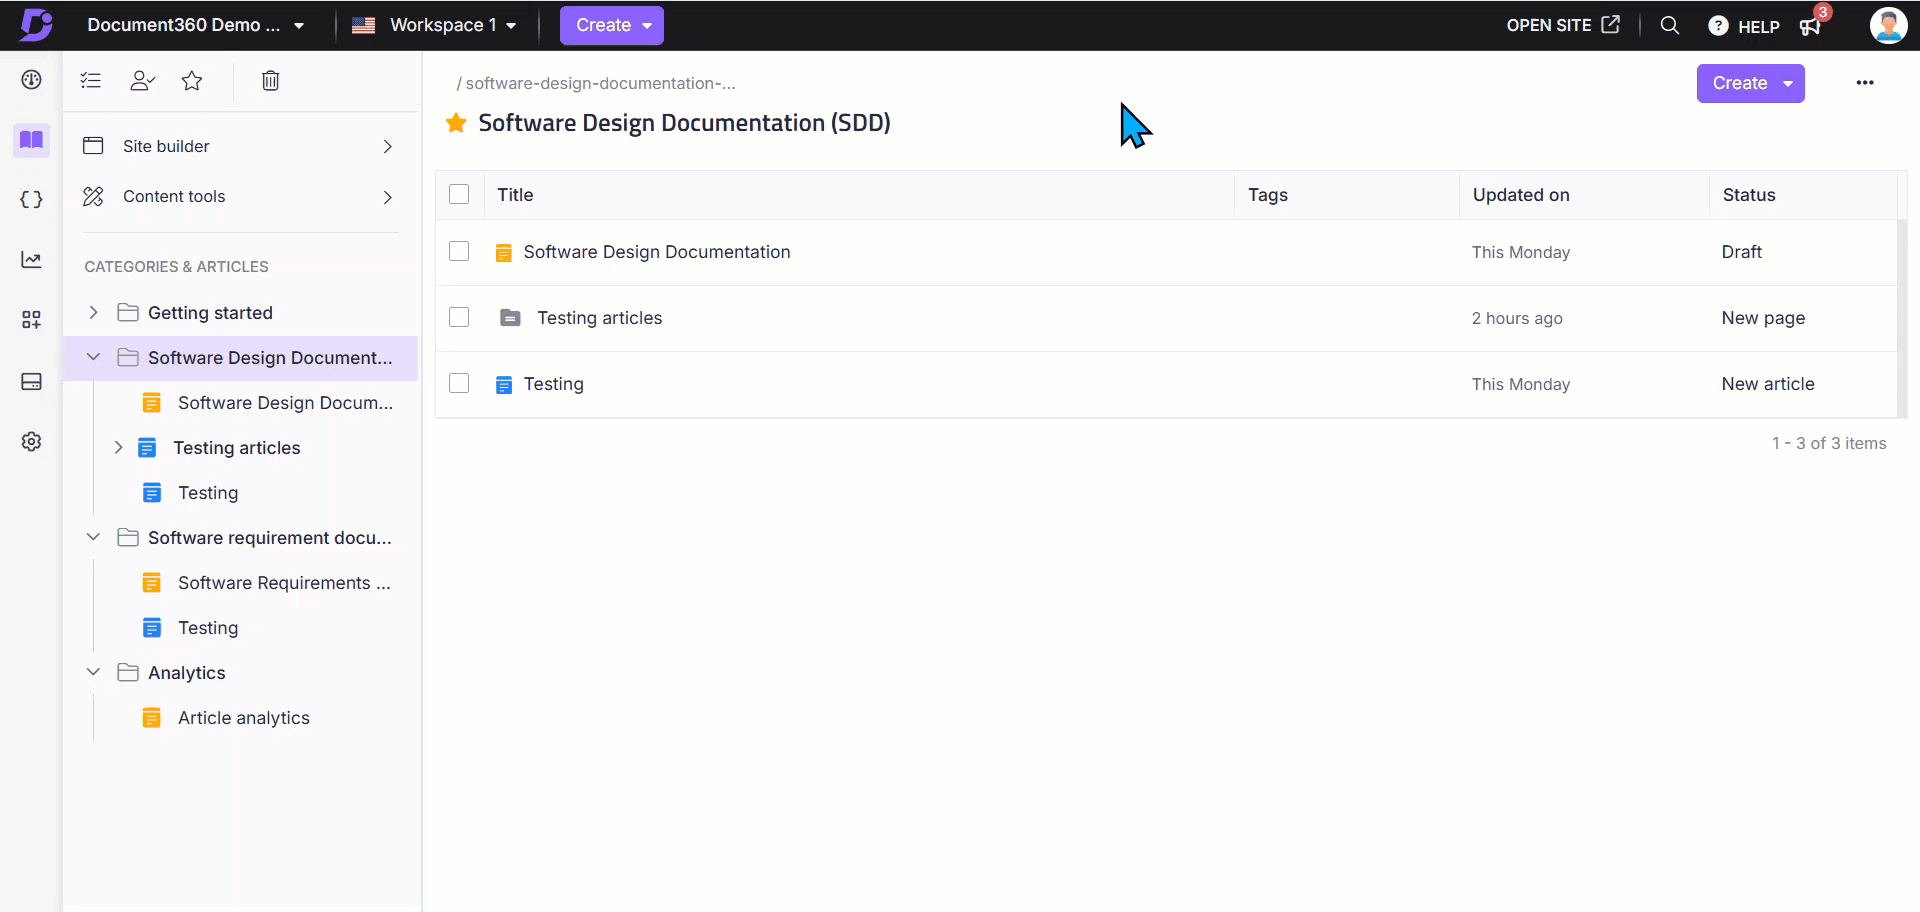
Click the Starred () icon next to the category title.
Alternatively, hover over a subcategory in the Folder/Index overview and click the Starred () icon.
For a page category type, click the Starred () icon near the category title.
You can remove a Starred category in two ways:
Method 1: Direct removal
Method 2: Removing from the Starred () section
To remove a starred category directly from the categories, follow the steps below:
Navigate to the desired category or subcategory in the Folder/Index overview page.
Click the Starred () icon in the left navigation pane next to the category or subcategory title to unstar it.
To remove a Starred category in the Starred () section:
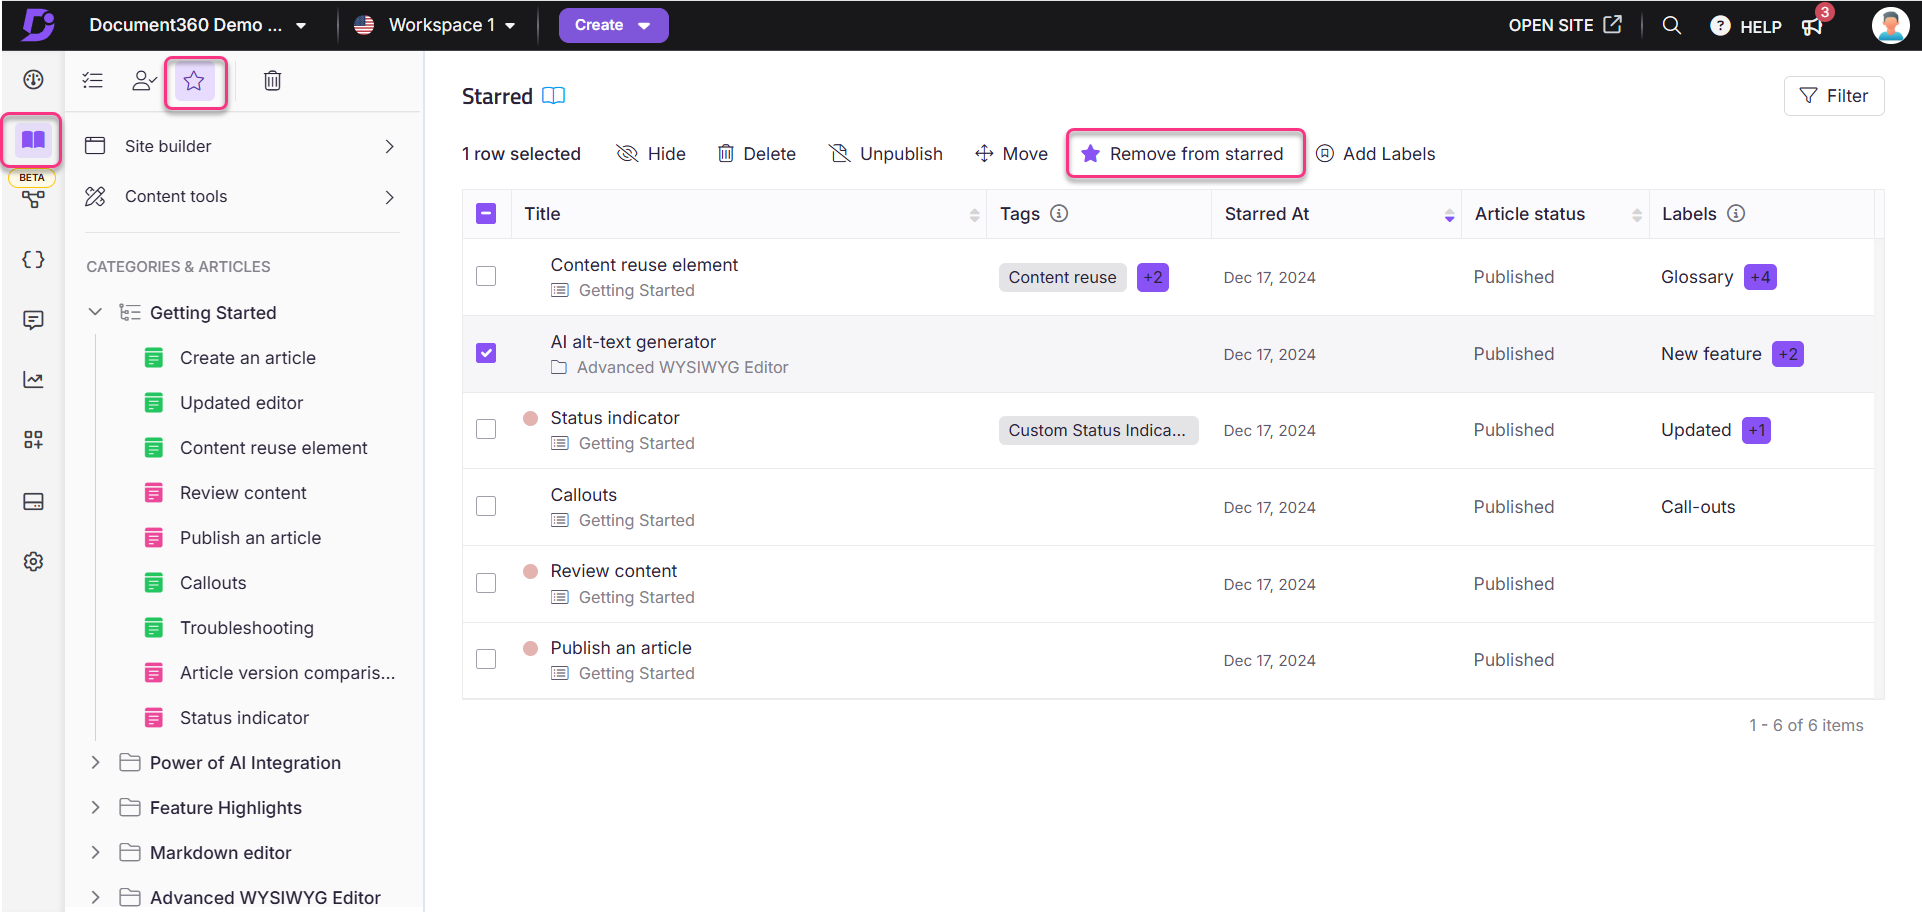
Navigate to Documentation () in the left navigation bar in the Knowledge base portal.
Click Starred () in the left navigation pane. The Starred () page will appear, displaying a list of starred categories.
Select the checkboxes next to the categories you want to remove.
Click the Remove from starred option.
NOTE
When the category filter is applied to the starred items, you cannot view the article status for starred folders or index categories. This is because the starred articles are treated as independent items and are not associated with the category filter. However, only page categories will display the article status.
Accessing Starred categories
To view your Starred categories:
Navigate to Documentation () in the left navigation bar in the Knowledge base portal.
Click the Starred () icon section in the left secondary navigation panel.
To remove a category from this list, select it and click Remove from starred at the top.
To remove an article from this list, select it and click Remove from starred at the top. You can also view your starred categories in the Overview page for quick access.
NOTE
Only the categories and articles you star will appear on your Starred page, while those starred before September 2025 remain visible to all team members.
For more information, read the article on Starred page.
Troubleshooting
This section provides a solution to an issue you may encounter when managing categories in Document360.
Index-type subcategory not visible in the category tree
Error: When identifying an article’s location, the index-type subcategory may not be visible. This issue occurs when an index-type category is created under a folder category, preventing the subcategories from appearing in the user site category tree.
Steps to resolve:
To make the index-type subcategory visible, follow these steps:
In the Category menu, change the type from Index Category to Folder Type.
After changing the category type, refresh the page to ensure the subcategories appear in the category tree.
If the issue persists, contact support@document360.com with the following details:
A detailed screen recording of the issue.
A HAR file captured when the issue occurs.
FAQ
What types of categories can I create?
You can create categories of type Folder, Index, Page, or GitHub.
Is there a limit to the number of categories I can create?
Yes, you can create up to 1,000 categories per workspace.
Can I create subcategories under a main category?
Yes, you can create up to seven levels of categories, including one root category and six subcategory levels.
What is the character limit for the article or category title?
The character limit for article or category titles is 300, including spaces.
Can I change the category icon to an emoji?
Yes, you can change the icon for Folder or Index type categories or subcategories to an emoji.
Is there a way to remove the emoji and revert to the folder icon?
Yes, you can click the 🚫 icon in the emoji dropdown to remove the emoji and revert to the folder icon.
Do emoji styles vary by browser?
Yes, some emoji styles may vary by browser.
What is the purpose of hiding a category in Document360?
Hiding a category restricts access to certain information, making it visible only to users while keeping it hidden from the Knowledge base site.
How can I identify hidden categories in Document360?
Hidden categories are indicated by a strikethrough in the categories list in the Documentation () section.
Can I hide multiple subcategories at once?
Yes, in Folder/Index type categories, you can hide multiple subcategories under the same parent category simultaneously by selecting the desired subcategories and clicking Hide ().
Is it possible to hide a category after it has been published?
Yes, you can hide a category even after it has been published by navigating to the Categories & Articles pane and selecting the Hide () option.
NOTE
When you hide a category or subcategory, all its subcategories and articles will also be hidden.
Can I move a category across workspaces?
Yes, you can move a category between workspaces.
Does moving a category also move its subcategories and articles?
Yes, moving a category will also move its subcategories and articles to the desired location.
Can I move a root-level category into its subcategory?
No, you cannot move the root-level category into its subcategory.
Are there any security restrictions when moving categories?
Yes, security restrictions will be applied based on the destination workspaces/categories.
What are cloned categories?
Cloned categories are exact copies of the content created as new articles.
Can I clone categories across different workspaces?
Yes, you can clone categories within or across workspaces.
Is it possible to create new categories or articles within a cloned category?
Yes, you can create new categories or articles within a cloned category.
Can I change the type of a cloned category after it has been created?
Yes, you can change the type of the cloned category after it has been created.
What is the purpose of starring categories in the Knowledge base portal?
Starring categories allow you to easily access frequently used categories, similar to a favorites section.
Is it possible to remove multiple categories from 'Starred' at once?
Yes, you can remove multiple categories from 'Starred' at once from the Starred () page.
How long are deleted categories available in the recycle bin?
Deleted categories will be available in the recycle bin for 30 days.
Does renaming a category update its slug?
No, renaming a category or article does not automatically update its slug. You must manually update the slug if required.
What are some best practices for naming categories?
Best practices include clarity and simplicity, consistent formatting, reader-centric language, avoiding repetition, logical hierarchy, keyword optimization, avoiding abbreviations, considering scalability, and ensuring contextual relevance.