A slug is the part of an article's URL that identifies the page. By default, Document360 generates a slug from the article title when the article is created. For example, an article titled "Getting started with Document360" gets the slug /getting-started-with-document360.
You can change the slug at any time. When you do, any existing links pointing to the old URL break unless you set up a redirect rule. A redirect rule automatically sends readers from the old URL to the new one, preventing broken links and preserving SEO value.
Changing an article title does not automatically update the slug. The two are independent once the article is created.
When to use redirect rules
- You renamed an article or restructured your knowledge base and need to update slugs without breaking existing links.
- You are migrating content from another platform to Document360 and existing URLs need to be remapped.
- You are redirecting removed or hidden workspaces or language paths to active ones.
- You need to update URL patterns in bulk across multiple articles at once.
Change the slug of an article
- Open the article in the knowledge base portal.
- Click the Article information () icon in the article header.
- Click the Edit () icon next to the URL slug field.
- Update the URL field and click Update.
Document360 prompts you to set a redirect rule for the old slug when you update it. Select the Set a redirect rule for the updated slug checkbox and click Update URL to apply it automatically.
You can also change the slug from the following locations:
- From Article settings: Click the More () icon in the article header and select SEO. In the GEO/SEO tab, update the Slug field and click Save.
- From the editor title: In the Advanced WYSIWYG editor, click the article title at the top of the content area, select URL and Description, update the URL field, and click Update.
Add a redirect rule
Redirect rules are managed from Settings () > Knowledge base site > Article redirect rules.
There are two redirect types:
| Type | Use when |
|---|---|
| Ends with | You want to redirect a specific article slug at the end of a URL. |
| Replace with | You want to redirect a path segment between the domain and the slug. Useful for workspace or language migrations. |
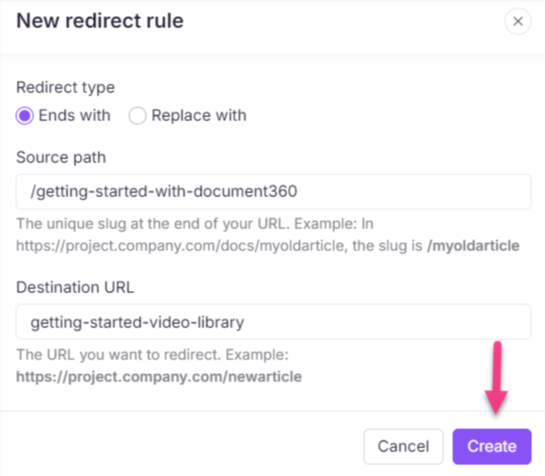
Ends with
- Go to Settings () > Knowledge base site > Article redirect rules.
- Click New redirect.
- Select Ends with as the redirect type.
- In Source path, enter the old slug. The slug must start with a forward slash (
/). - In Destination URL, enter the new slug or full destination URL.
- Click Create.
Example:
- Source path:
/getting-started-with-document360 - Destination URL:
getting-started-video-library
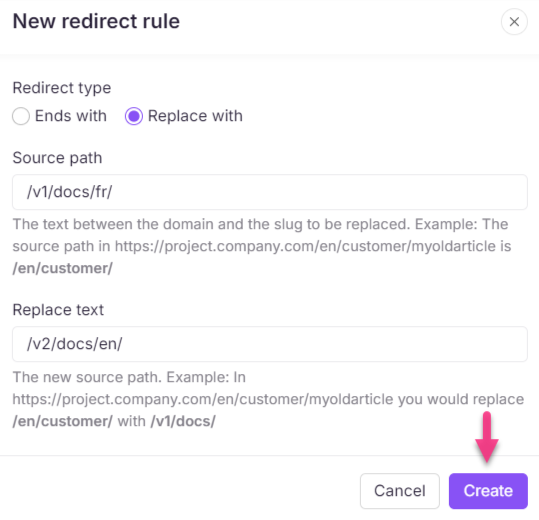
Replace with
- Go to Settings () > Knowledge base site > Article redirect rules.
- Click New redirect.
- Select Replace with as the redirect type.
- In Source path, enter the path segment to replace. Must start and end with a forward slash (
/). - In Replace text, enter the new path segment. Must start and end with a forward slash (
/). - Click Create.
Example:
- Source path:
/v1/docs/fr/ - Replace text:
/v2/docs/en/
Manage redirect rules
Edit a redirect rule
- Go to Settings () > Knowledge base site > Article redirect rules.
- Use the Filter to find the rule.
- Hover over the rule and click the Edit () icon.
- Update the fields and click Update.
Delete a redirect rule
- Go to Settings () > Knowledge base site > Article redirect rules.
- Hover over the rule and click the Delete () icon.
- To delete multiple rules, select the checkboxes next to each rule and click Delete.
- Click Yes to confirm.
Deleted redirect rules cannot be recovered.
Filter redirect rules
Use the Filter options on the Article redirect rules page to find specific rules:
- Search: Enter a keyword from the source path or destination URL.
- Type: Filter by Ends with, Replace with, or Both.
- Modified date: Filter by last modified date. Choose from preset ranges or set a custom date range.
Import redirect rules in bulk
To set up multiple redirect rules at once, upload a CSV file matching the following format:
| Source | Destination | RedirectionType |
|---|---|---|
/myoldarticle |
newarticle |
endswith |
/en/customers/ |
/v1/docs/ |
replacewith |
The CSV file size must be 1 MB or less. Download the import template: import-redirect-rule.csv →
- Go to Settings () > Knowledge base site > Article redirect rules.
- Click Import redirect rule.
- Drag and drop the CSV file or click Click to Upload.
- Review the list of valid and invalid rules. Download the invalid rules list if needed.
- Click Import to apply the valid rules.
Export redirect rules
- Go to Settings () > Knowledge base site > Article redirect rules.
- Click Export to download all rules as a CSV file.
Best practices
- Always set a redirect rule when changing the slug of a published article. Broken links damage both reader experience and SEO.
- For multilingual knowledge bases, create separate redirect rules for each language path. A rule set for the default language does not automatically apply to other language paths.
- Use Replace with for bulk workspace or language migrations rather than creating individual rules for each article.
- Audit your redirect rules periodically to remove outdated or duplicate rules that may cause redirect chains.
- Keep slugs short, lowercase, and descriptive. Avoid special characters other than hyphens.
FAQ
Does changing an article title automatically update the slug?
No. The slug and article title are independent once the article is created. Renaming an article does not change its slug. Update the slug manually from the GEO/SEO tab or Article information panel.
Is it mandatory to set a redirect rule when changing a slug?
It is optional but strongly recommended for published articles. Without a redirect rule, any existing links to the old URL will break and return a 404 error to readers.
Do redirect rules apply across all languages in a multilingual knowledge base?
No. A redirect rule set for the default language path applies only to that language. Create separate rules for each language path. For example, to redirect the same article in German, create a new rule with the German language prefix included in the source path.
Can I use special characters in the source path?
Yes. The following special characters are supported in the source path: # % ^ & _ - + = | . ? /
Can I change an article slug to use numbers instead of the title?
Yes. Open the Article information () panel, click the Edit () icon next to the URL slug field, enter the new slug, and click Update. Set a redirect rule for the old slug to avoid broken links.