Categories are the primary way to organize content in your knowledge base. Before you start adding articles, setting up a clear category structure helps readers navigate your documentation and helps your team manage content at scale.
When do you need a new category?
Create a new category when you need to:
- Group related articles under a common topic, for example a "Getting Started" category for onboarding content.
- Separate content by audience: Create distinct categories for end users, administrators, and developers.
- Reflect your product structure: Align categories with product areas, features, or modules so readers find content where they expect it.
- Add a subcategory to an existing category when a topic grows large enough to need further division.
You can create up to 1,000 categories per workspace. Category names have a maximum of 300 characters including spaces.
Create a category
The most common way to create a category is using the Create button on the top navigation bar.
- Navigate to Documentation () in the left navigation bar.
- Click the Create dropdown and select Category.
.png)
- In the Create new category panel, fill in the following:
| Field | What to do |
|---|---|
| Name | Enter a name for the category (max 300 characters) |
| Location | Choose where the category sits, at root level or inside an existing category. Click Reset to place it at the root level |
| Type | Select a category type: Folder, Index, Page, or GitHub |
- Click Create. The new category is added immediately.
To know more about category types, read Category types.

You can also create a category using the Flywheel icon by hovering just below any category in the Categories & Articles pane, from the More () icon next to an existing category, from the Create dropdown inside a Folder or Index type category, or directly from the Create new article panel by clicking Create category in the Category dropdown.
All entry points open the same Create new category panel with the same Name, Location, and Type fields.
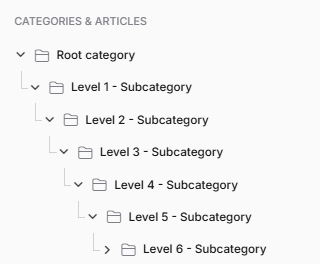
Subcategory levels
You can nest categories up to seven levels deep, one root category plus six subcategory levels.
The New category option becomes inactive once you reach the seventh level.
Use up to three subcategory levels for optimal navigation. Two levels is ideal for most knowledge bases. Deeper hierarchies make it harder for readers to find content without using search.
Change the category icon
When you create a category, a default folder icon is assigned. You can change it to an emoji to make the category easier to identify at a glance.
- Navigate to Documentation () in the left navigation bar.
- In the Categories & Articles pane, click the folder icon or existing emoji next to the desired category.
- An emoji panel appears. Search for an emoji using the search bar, browse by category, or filter by color tone.
- Select your desired emoji to apply it.
.png)
- To revert to the default folder icon, click the 🚫 icon in the emoji panel.
- Emoji styles may vary depending on the browser.
- Category icons can only be changed for Folder and Index type categories. Page type categories do not support custom icons.
Best practices
- Name categories from the reader's perspective: Use language your readers would use when looking for content, not internal team terminology.
- Be consistent with formatting: Decide on title case or sentence case and apply it uniformly across all categories.
- Start broad, then narrow: Root categories should cover broad topics; subcategories should divide them into specific, focused areas.
- Avoid single-article categories: If a category only contains one article, consider whether it belongs in a broader category instead.
- Use emoji icons intentionally: Emojis help readers quickly identify categories at a glance. Choose ones that clearly represent the topic.
FAQ
What types of categories can I create?
You can create four types: Folder, Index, Page, and GitHub. Each type has different behavior and use cases. See Category types for details.
Can I change the category type after creating it?
Yes. You can change the type of a category at any time after it has been created. See Types of categories for details.
Can I create subcategories under a main category?
Yes. You can create up to seven levels of categories, one root category and six subcategory levels. The New category option becomes inactive beyond the seventh level.
Can I change the category icon to an emoji?
Yes, but only for Folder and Index type categories. Page type categories do not support custom icons. To revert to the default folder icon, click the 🚫 icon in the emoji panel.
Why is my new category not visible on the Knowledge base site?
A category won't appear on the Knowledge base site if it has no published articles, if it is hidden, or if all articles inside it are hidden or unpublished. Publish at least one article inside the category to make it visible.