Plans supporting this feature: Business Enterprise
Mixpanel is an event-centric analytics tool that tracks user events rather than automatically capturing data. Integrating Mixpanel with your knowledge base enables you to analyze how readers interact with your content, which articles drive engagement, where they drop off, and measure the effectiveness of your site.
Document360 supports Mixpanel as one of its many third-party integrations.
Prerequisites before integrating Mixpanel with Document360
A Mixpanel account
Your Mixpanel Project token (available in Mixpanel under Settings > Project settings > Project token).
Configuration options
When integrating Mixpanel with Document360, you can choose from two configuration options:
Basic configuration: Standard setup that automatically tracks page views after you enter your Mixpanel Project token.
Custom configuration: Advanced setup that requires loading and initializing the Mixpanel library manually. You can then add custom tracking code for specific events.
Basic configuration
Use the Basic configuration if you want a quick setup that automatically tracks page views with minimal effort.
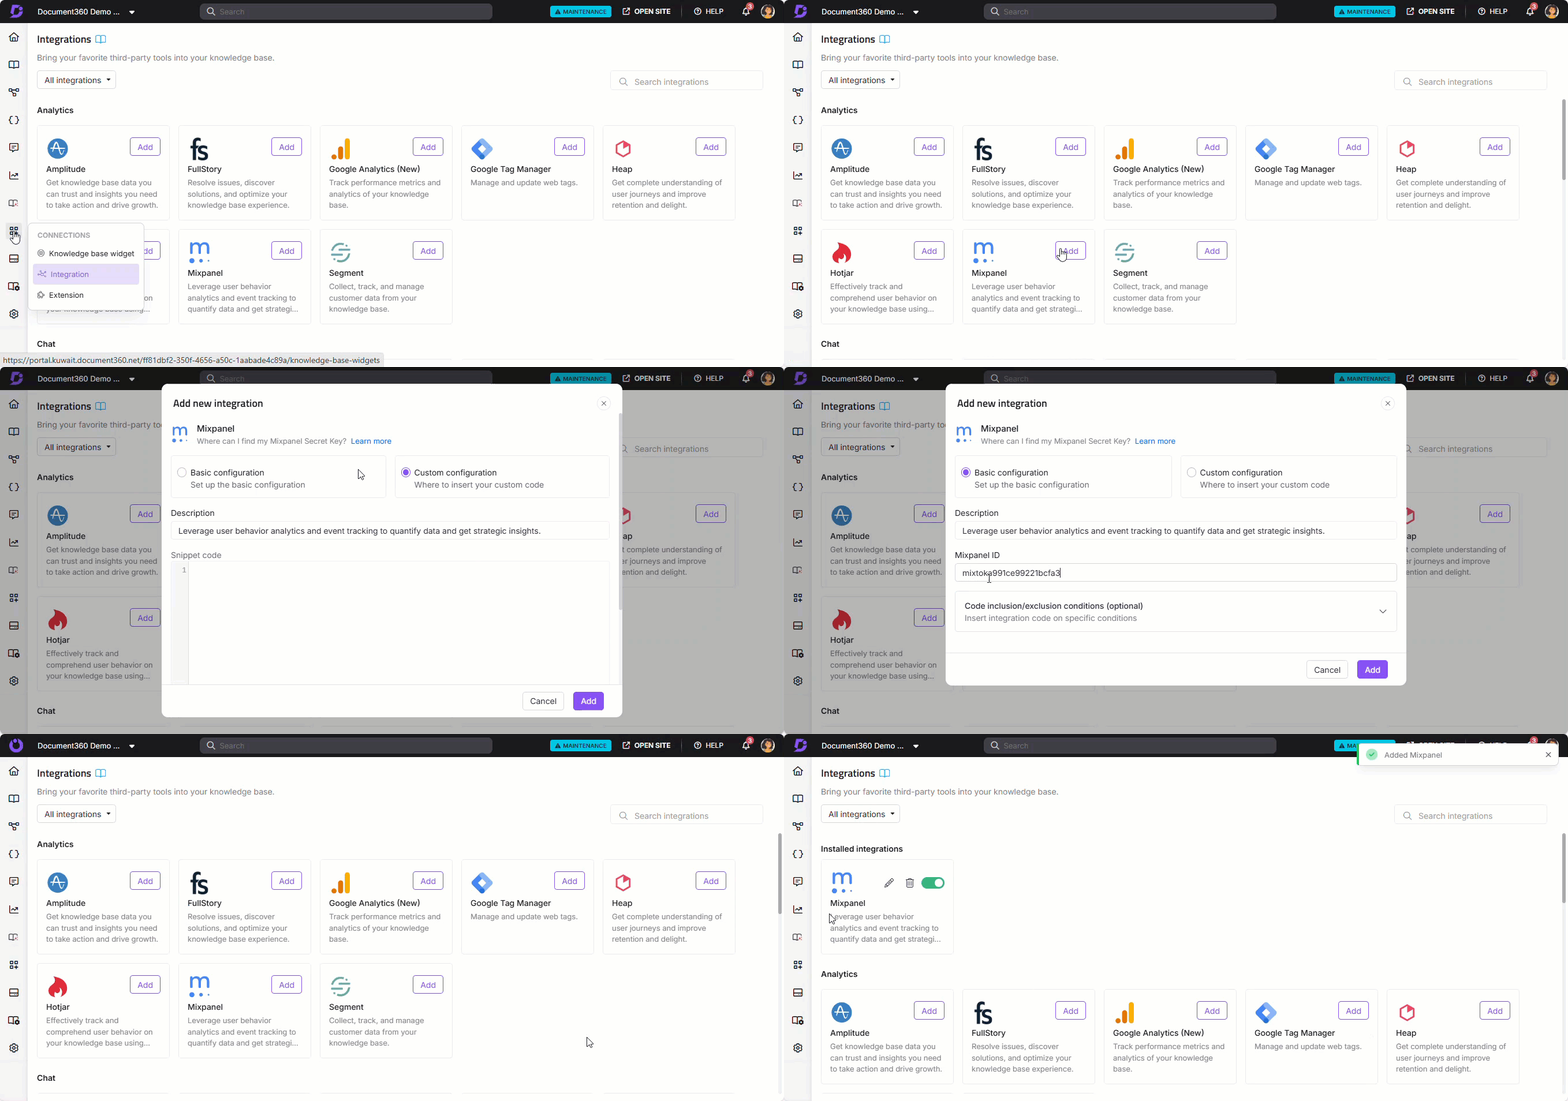
Navigate to Connections () > Integrations in the left navigation bar in the Knowledge base portal.
Select Mixpanel from the list of integrations and click Add.
The Add new integration dialog will appear.
Select the Basic configuration option.
Enter the Description.
Enter your Mixpanel Project token in the Mixpanel ID field. For details on where to find your Mixpanel Project token, see the Mixpanel installation guide.
Optionally, use the Code inclusion/exclusion conditions feature to apply the code based on IP address, Workspace, or Language.
Click Add to save your integration.
Your knowledge base will now send page view data to Mixpanel.
NOTE
If you want to track additional events (such as button clicks or form submissions), you can use the Custom configuration option.

Custom configuration
Use Custom configuration to set up advanced Mixpanel integration. This option allows you to add JavaScript code directly in the configuration panel and further customize the integration based on your needs.
Navigate to Connections () > Integrations in the left navigation bar in the Knowledge base portal.
Select Mixpanel from the list of integrations and click Add. The Add new integration panel will appear.
Select the Custom configuration option.
Enter the description in the Add new integration panel.
Paste your JavaScript snippet (see examples below).
Optionally, use the Code inclusion/exclusion conditions feature to apply the code based on IP address, Workspace, or Language.
Click Add to save your integration.
CAUTION
The Custom configuration does not load Mixpanel automatically. You must first include the Mixpanel library and initialize it with your Mixpanel Project token.
Example: Load and initialize Mixpanel
Replace YOUR_PROJECT_TOKEN with your actual Mixpanel Project token from Mixpanel’s Project settings.
<script>
(function(f,b){
  if(!b.__SV){
    var e,g,i,h;window.mixpanel=b;b._i=[];
    b.init=function(e,f,c){function g(a,d){var b=d.split(".");
      2==b.length&&(a=a[b[0]],d=b[1]);
      a[d]=function(){a.push([d].concat(Array.prototype.slice.call(arguments,0)))}}
      var a=b;"undefined"!==typeof c?a=b[c]=[]:c="mixpanel";
      a.people=a.people||[];a.toString=function(a){var d="mixpanel";
      "mixpanel"!==c&&(d+="."+c);a||(d+=" (stub)");return d};
      a.people.toString=function(){return a.toString(1)+".people (stub)"};
      i="disable time_event track track_pageview track_links track_forms track_with_groups add_group set_group remove_group register register_once alias unregister identify name_tag set set_once union unset toString reset opt_in_tracking opt_out_tracking has_opted_in_tracking has_opted_out_tracking clear_opt_in_out_tracking get_group".split(" ");
      for(h=0;h<i.length;h++)g(a,i[h]);
      b._i.push([e,f,c])
    };
    b.__SV=1.2;
    e=f.createElement("script");
    e.type="text/javascript";e.async=!0;
    e.src="https://cdn.mxpnl.com/libs/mixpanel-2-latest.min.js";
    g=f.getElementsByTagName("script")[0];
    g.parentNode.insertBefore(e,g)
  }
})(document, window.mixpanel || []);
mixpanel.init("YOUR_PROJECT_TOKEN");
</script>
Example: Page view tracking
<script>
mixpanel.track("Page View", {
  "Page URL": window.location.href,
  "Page Title": document.title,
  "Referrer": document.referrer || ""
});
</script>
NOTE
You can rename
"Page View"to another event name such as"Article Viewed"or"Category Opened", depending on what you want to track.
Example: Button click tracking
Replace yourButtonId with the actual ID of the button you want to track, and update "Button Name" with a meaningful label.
<script>
document.getElementById("yourButtonId")
  .addEventListener("click", function() {
    mixpanel.track("Button Click", {
      "Button Name": "Your Button Label",
      "Page URL": window.location.href
    });
  });
</script>
NOTE
For example, if you’re tracking a button labelled “Subscribe”, replace
yourButtonIdwith"subscribeButton"and"Your Button Label"with"Subscribe".
PRO TIP
The code samples above show only the most common use cases (page views and button clicks). If you want to track other types of custom events, such as form submissions, video plays, or scroll depth, refer to the Mixpanel JavaScript SDK documentation. It includes a complete list of methods, properties, and advanced event-tracking patterns.
Verify the configuration
If no data appears in Mixpanel:
Confirm your token
Make sure you entered the Mixpanel Project token (not Project ID or API secret).Check the page source
Open your knowledge base site in a browser.
Right-click anywhere on the page and select View page source.
Shortcut: Ctrl+U (Windows/Linux) or ⌘+Option+U (Mac).
Press Ctrl+F / ⌘+F and search for
mixpanel.If you do not find it, the Mixpanel integration script has not been injected.
Check the Network tab
Open your knowledge base site in a browser.
Press F12 (Windows/Linux) or ⌘+Option+I (Mac) to open Developer Tools.
Go to the Network tab.
In the filter box, type
api.mixpanel.com.Reload the page or perform an action such as viewing an article.
If you see requests to
api.mixpanel.com, events are being sent.If no requests appear, the Mixpanel library is not loading, or the events are blocked.
Rule out blockers
Check for ad blockers, cookie consent banners, or restrictive Content Security Policies (CSP). These may prevent Mixpanel from loading or sending data.
PRO TIP
Always test in an incognito/private window. This ensures you are loading the latest published scripts and avoids issues caused by browser caching.
Workaround using Custom HTML
If the integration script does not load correctly, you can add a Custom HTML integration as a workaround.
Navigate to Connections () > Integrations in the left navigation bar in the Knowledge base portal.
Select Custom HTML from the list of integrations and click Add. The Add new integration panel will appear.
Paste the Mixpanel library snippet (see “Load and initialize Mixpanel” above).
Add your custom event tracking code.
Save your integration and test again in Mixpanel.