Unlike the Markdown editor, the Advanced WYSIWYG editor offers different image formatting options. You can access the image formatting options when you click an image you wish to edit.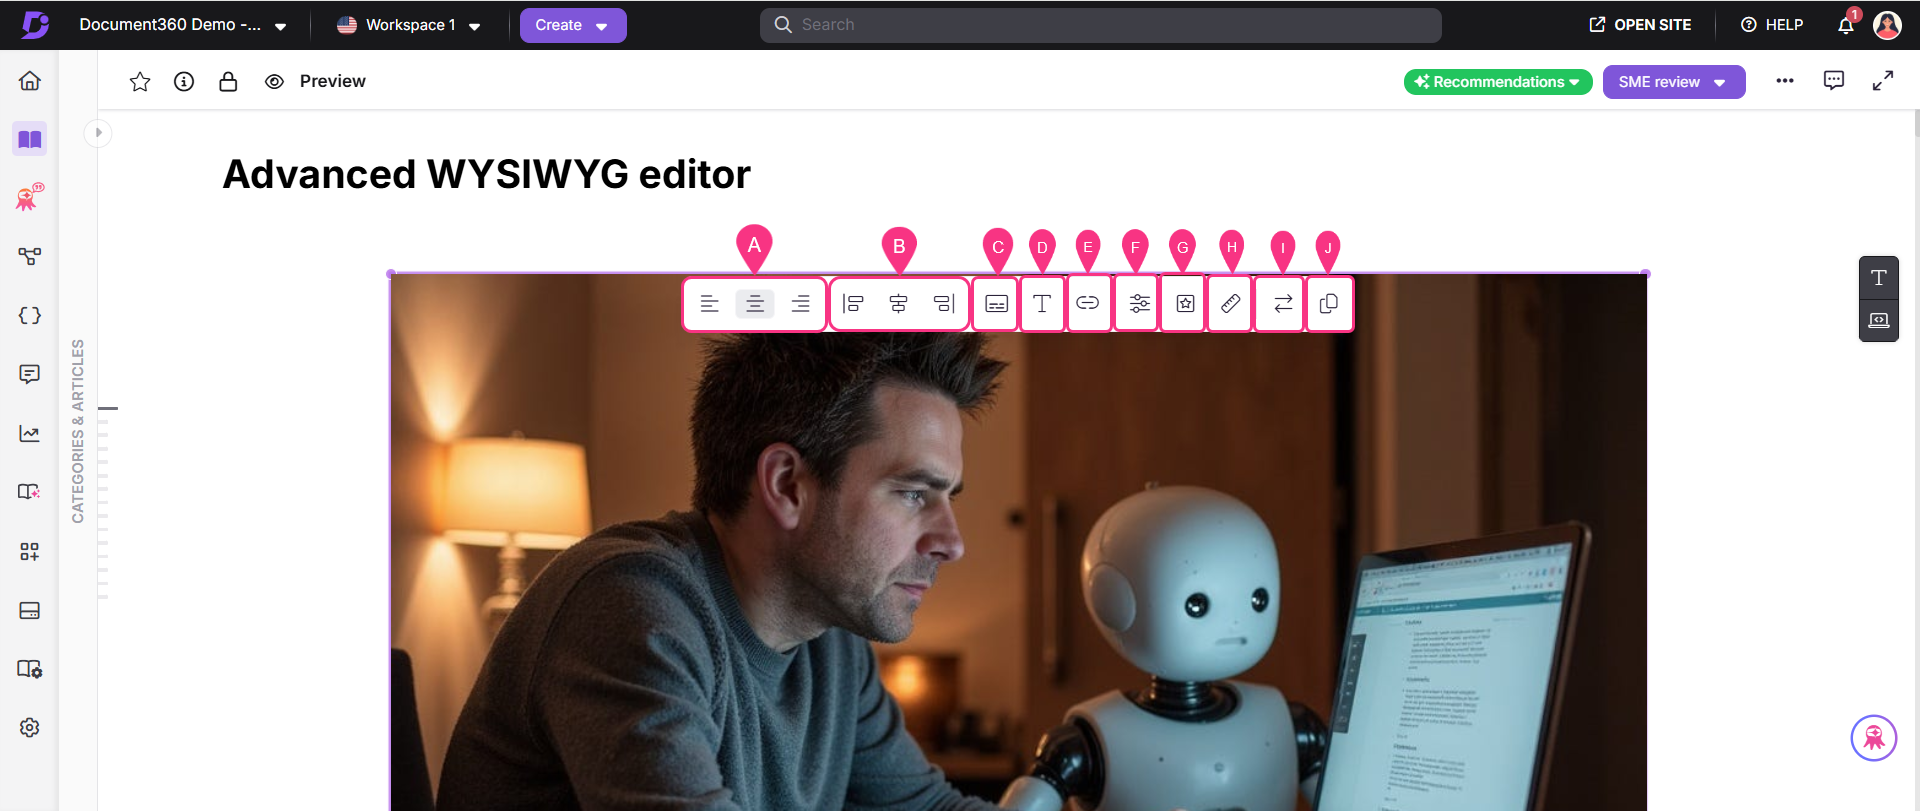
Click on the image, and you’ll have a floating menu with the following features to edit the selected image:
Align
There are three common alignment options available for images:
Align Left (): Aligns the image to the left side of the content.
Center (): Centers the image within the content.
Align Right (): Aligns the image to the right side of the content.
Inline left (), Inline block (), and Inline right ():
When you select an inline display option, the image aligns side by side with the text. The alignment (left or right) places the image on the corresponding side of the text, while the inline block option keeps the image within the text flow without disrupting the layout.
Image caption ():
You can add a caption to your image, which will appear at the bottom of the image. This is useful for providing additional context or descriptions.
Alt text ():
Also known as alt tags or alt descriptions, alt text is the written copy that appears in place of an image if it fails to load on a user's screen.
Enter the alternative text for the image and click the () icon to save it.
Hyperlinking images ():
Click on the link icon to add hyperlinks to your images. Paste the URL and select the Open in a new tab box below if you want the link to be opened in a new tab and click Insert. After linking your image, three new options will appear in the formatting tray:
Open Link: Opens the link in a new tab.
Edit Link: Edits the attached link.
Unlink: Removes the link from the image.
Click on the Advanced edit () icon to edit your image such as resize, crop, etc.,
Style ():
There are three styling options available for images:
Rounded: The image appears as a rounded rectangle with blunt corners.
Bordered: A light gray border is added to the image.
Shadow: The image casts a visible drop shadow effect.
Resize (): You can customize the width and height of the image.
Replace (): Click the Replace icon to switch the current image with another using any of the three insert image methods.
Copy (): Click the Copy icon to copy the selected image for use elsewhere in the article.
Advanced editing options for images
To access advanced editing options for the image,
Select the image and click the Edit icon.
The advanced editing options will then appear.
.png)
1. Top menu options

Zoom In/Zoom Out: Click Zoom In or Zoom Out to adjust the image size.
Hand: Click the Hand icon to move the image while editing.
History: Click History to view the edit history of the image.
Undo: Click Undo to revert the most recent action.
Redo: Click Redo to reapply the previously undone action.
Reset: Click Reset to return the image to its original state, removing all edits.
Delete: Select any edited element (e.g., circle, shape) and click Delete to remove that particular element.
Delete All: Click Delete All to remove all the edited elements from the image.
2. Bottom menu options

Resize: Click Resize to adjust the width and height of the image, and lock aspect ratio. Once done, click Apply.
Crop: Click Crop to choose a cropping option such as Custom, Square, etc. Once done, click Apply.
Flip: Click Flip to select either horizontal or vertical flip. Use Reset to revert to the original image.
Rotate: Click Rotate to rotate the image between 0° to 360° (custom range available).
Draw: Click Draw to add lines or shapes. Options include:
Free Draw: Allows custom drawing.
Straight: Draw straight lines.
Color: Select the desired color for the drawing.
Range Slider: Adjusts the thickness of the drawing line.
Shape: Click Shapes to insert shapes like rectangles, circles, or triangles. Options include:
Fill Color: Choose a color to fill the shape.
Stroke: Select the outline color for the shape. You can also adjust the thickness using custom Stroke range slider.
Icon: Click Icons to add icons such as arrows, location markers, polygons, etc. You can also upload a custom icon from local storage. Adjust the icon color as needed.
Text: Click Add text to the image with formatting options (bold, italic, underline, alignment, color, text size).
Filter: Click Filter adjust image parameters such as grayscale, blur, brightness, sepia, contrast, etc., Once done, click Save.
FAQs
What image formatting options are available in the Advanced WYSIWYG editor?
The Advanced WYSIWYG editor offers options such as alignment, inline display, image captions, alt text, hyperlinking, advanced edit options, styling, resizing, replacing, copying, and deleting images.
How can I align an image in the Advanced WYSIWYG editor?
You can align an image to the left, center, or right by selecting the corresponding alignment option from the floating menu after clicking on the image.
Can I add a caption to my image?
Yes, in the advanced WYSIWYG editor, you can add a caption to your image, which will appear at the bottom of the image for additional context or descriptions.
Is it possible to hyperlink an image?
Yes, you can hyperlink an image by clicking the link () icon, pasting the URL, and choosing to open the link in a new tab if desired.