


Plans supporting this feature: Professional Business Enterprise
6268A project in Document360 serves as a comprehensive container for all your documentation needs. It encapsulates your articles, categories, subcategories, home page, team accounts, readers, and groups (for private and mixed projects), and custom configurations or settings. This centralized approach ensures that your knowledge base is organized, easily accessible, and scalable.
How do you create a knowledge base project in Document360?
Document360 projects are designed to streamline your documentation process, offering a structured and efficient way to manage your information. Whether you're creating user manuals, internal process documents, or documentation, a Document360 project provides the framework to store, manage, and distribute content effectively. Follow these steps to create your knowledge base project.
Accessing the dashboard
Log in to the Document360 portal with your account to access the Dashboard.
If you are logged in and are in a different project's Knowledge base portal, click the Document360 icon in the top navigation bar to be redirected to the Dashboard.Click the +Project button on the top right to create a new project.

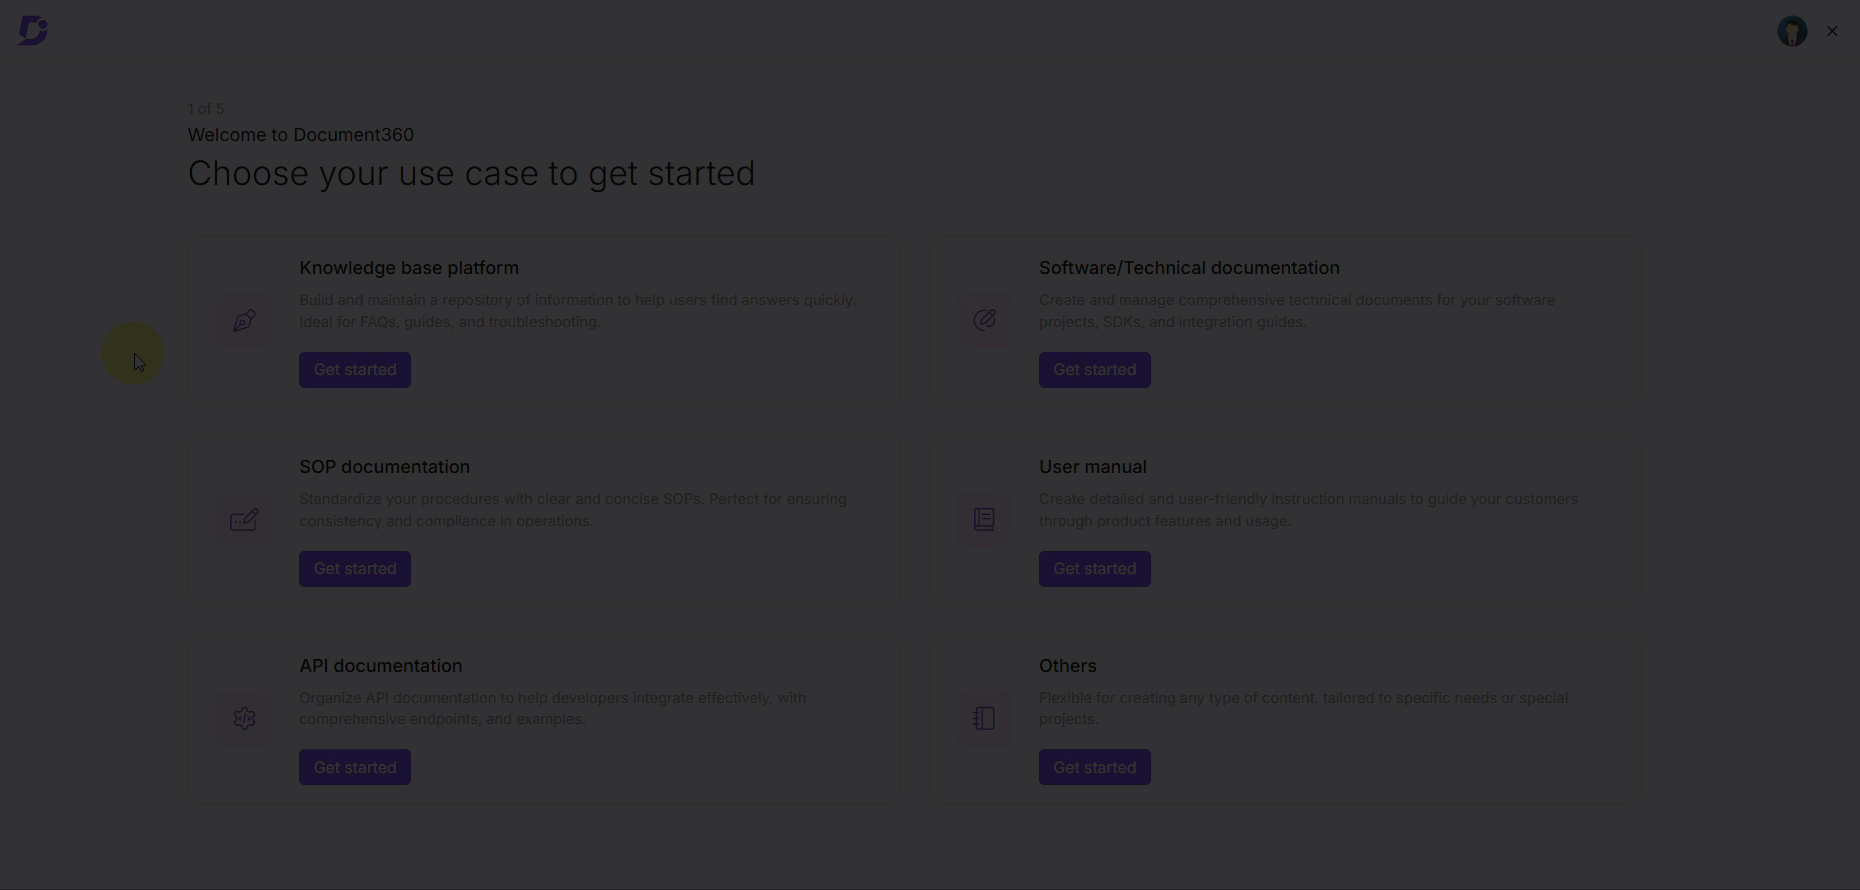
Choose your use case
Select your primary use case for Document360 by clicking Get started.
Use case | Description |
|---|---|
Knowledge base platform | You can create a centralized hub where all your team's knowledge and resources are stored. It helps your team quickly find answers and enhances customer self-service by providing them with easy access to the information they need. |
Software documentation/Technical documentation | You can efficiently organize and maintain all your software or technical documentation. It helps your team document product features, APIs, release notes, and more, making sure that developers and users have clear and up-to-date information. |
SOP documentation | You can create detailed SOPs that your team can follow consistently. It ensures that everyone adheres to the same processes, reduces errors, and helps in onboarding new employees by providing them with clear procedural guidelines. |
User manual | You can develop comprehensive user manuals that guide your customers or team members through your product's features and usage. It helps in reducing support queries by offering step-by-step instructions and troubleshooting tips. |
API Documentation | Document detailed information about API endpoints, request and response formats, authentication methods, and examples. This ensures developers have a clear understanding of how to integrate with your APIs. Selecting this option will redirect you to the API setup flow. |
Others | Choose this option if your use case does not fall into the predefined categories. You can customize your knowledge base based on specific organizational or project needs. |
Select a Template
Select the type of content you'll create in your Document360 project. You can pick up to two templates that suit your needs.
NOTE
Based on your selection, these templates will be embedded within your project during creation. However, your selection does not limit you from using other features or creating different types of content.
If you selected API Documentation as your use case, you will skip this step and be redirected to API setup instead.
Knowledge base platform templates
If you have selected the Knowledge base platform in step 3, you can choose any two templates from the list below.
Template | Purpose |
|---|---|
Getting started guides | Help new users quickly understand and begin using your product with clear, step-by-step instructions. This ensures a smooth onboarding experience. |
How-to guides | Provide detailed instructions for specific tasks, enabling users to fully utilize and explore your product’s features efficiently. |
FAQs | Address common questions at any stage of the user journey, helping users find quick answers and reducing support queries. |
Policy & procedures | Outline essential organizational protocols, helping users understand and adhere to company guidelines effectively. |
Software/Technical documentation templates
If you have selected Software/Technical documentation in step 3, you can choose any two templates from the list below.
Template | Purpose |
|---|---|
Release notes | Keep users informed about updates, new features, bug fixes, and improvements with each software release. |
Software Design Documentation (SDD) | Outline software architecture and design, including diagrams and specifications for development guidance. |
Software Requirement Documentation | Describe the software's purpose, functionalities, and environment to ensure development aligns with project goals. |
Product Requirement Documentation (PRD) | Define the product’s purpose, value, and functionalities to meet user needs and business objectives. |
Process documentation | Detailed steps and procedures involved in software development to standardize workflows and enhance efficiency. |
User guide | Give comprehensive instructions on using your product, covering all features and functionalities. |
SOP documentation templates
If you have selected SOP documentation in step 3, you can choose templates from the list below.
Template | Purpose |
|---|---|
Compliance policies and procedures | Ensure your organization meets regulatory requirements by documenting policies that enforce compliance. |
Operation SOP | Enhance efficiency and productivity by standardizing operational procedures across your organization. |
User manual templates
If you have selected the User manual in step 3, you can choose any two templates from the list below.
Template | Purpose |
|---|---|
Installation manual | Provides all necessary setup information, including product overview, specifications, and assembly instructions, ensuring a smooth start with the Knowledge base platform. |
Instruction manual | Offers step-by-step assembly and usage instructions with diagrams and safety warnings, ideal for precise setup and safety warnings for proper usage. |
Maintenance manual | Provide detailed instructions for regular upkeep, troubleshooting, and repair procedures to ensure optimal performance. |
Training manual | Provides comprehensive guidance on installation, operation, and troubleshooting, and support for user training and effective platform usage. |
Operations manual | Provide detailed instructions for daily maintenance and troubleshooting, ensuring ongoing effective management of the Knowledge Base platform. |
Personalize your knowledge base
Enter your company’s URL. Document360 will analyze your site and use AI to generate relevant content, branding elements, and structured documentation.
If you want to skip this step, the domain will default to the one linked to your registration email.
Brand guidelines
Your project name, default language, branding logo, and brand colors will be automatically set based on the URL you provided. However, you can edit the fields if needed.
Your browser’s language settings determine the default language. English will be selected by default if other languages don’t support your browser’s language.
NOTE
If you choose Spanish or Brazilian Portuguese as your default language; the portal language will be set to Spanish or Brazilian Portuguese. Otherwise, English will be the default language.
The branding logo and primary/secondary colors are extracted from your website. If you choose to Skip this step, the project name will be derived from your registration email, and Document360’s default logo and colors will be applied.
You can preview your Knowledge base site on the right side of the screen.
Set documentation privacy
Choose the desired privacy settings for your site:
Private: Restrict access to the Knowledge base so that only team accounts can view and interact with the content, keeping it secure and internal.
Public: Make the Knowledge base accessible to everyone, including external users, allowing open access to all content.
Mixed: Combine private and public access by allowing some sections of the Knowledge base to be visible to the public while keeping other sections restricted to team accounts only.
Click Next to proceed.
Access the Document360 Knowledge base portal
Once you complete the setup, enter the Document360 Knowledge base portal.
For users who selected Knowledge base platform, Software documentation/Technical documentation, SOP documentation, or User manual as their use case: Document360 will automatically generate relevant articles and categories based on the selected use cases and your website’s content. Each category will have at least 2-3 AI-generated articles, and subcategories will be created if necessary. If your selected language is supported by Eddy AI, your documentation will be generated in that language. If not, it will default to English. If no relevant content is found in the provided URL, you will see pre-loaded articles based on your selected use case and templates, giving you a head start on creating your content.
NOTE
Articles generated by Eddy AI will be published and then set to draft mode. You can update the articles as needed.
For users who selected the API documentation use case: You will be redirected to the API documentation workspace, where:
You will see the API reference of the API specification you provided during onboarding.
If you did not provide an API specification, a sample API reference (Pet store API) will be available.
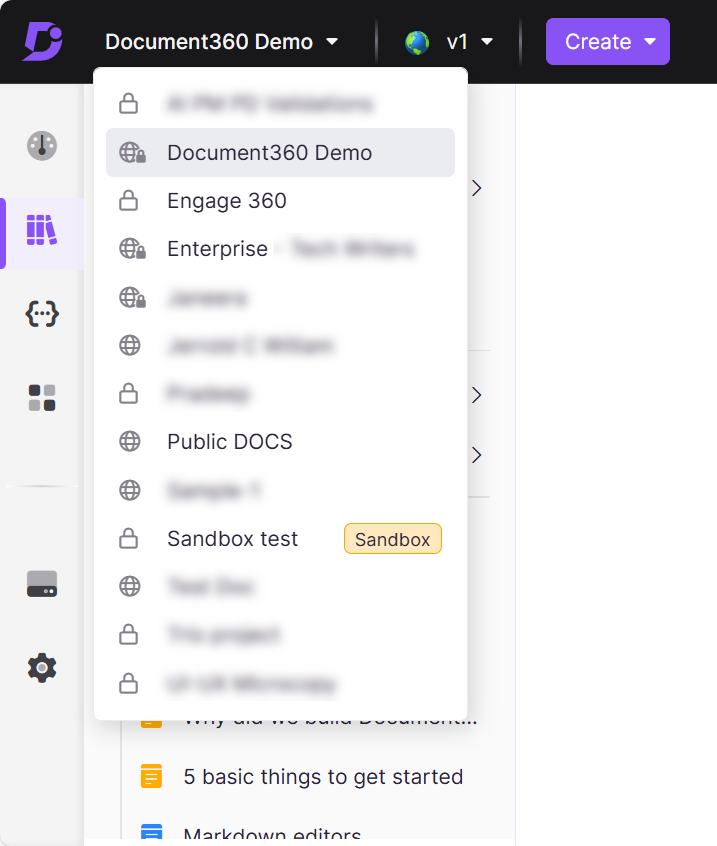
Switching between Document360 projects
Once you’ve created your projects in Document360, you may need to work on multiple projects or switch between them for various tasks. Document360 provides an intuitive project switcher to help you manage this seamlessly.
There are two ways to switch projects from the Knowledge base portal:
Using the Projects dropdown
From the Projects dashboard
Switching projects using the Projects dropdown
From any module in the Knowledge Base portal, click on the project dropdown in the top navigation bar.
You can view the "Project Name," "Site Access" (Public - , Private - , or Mixed ), and a "Sandbox" label if it is a Sandbox project.
Click on the project you want to view from the list.
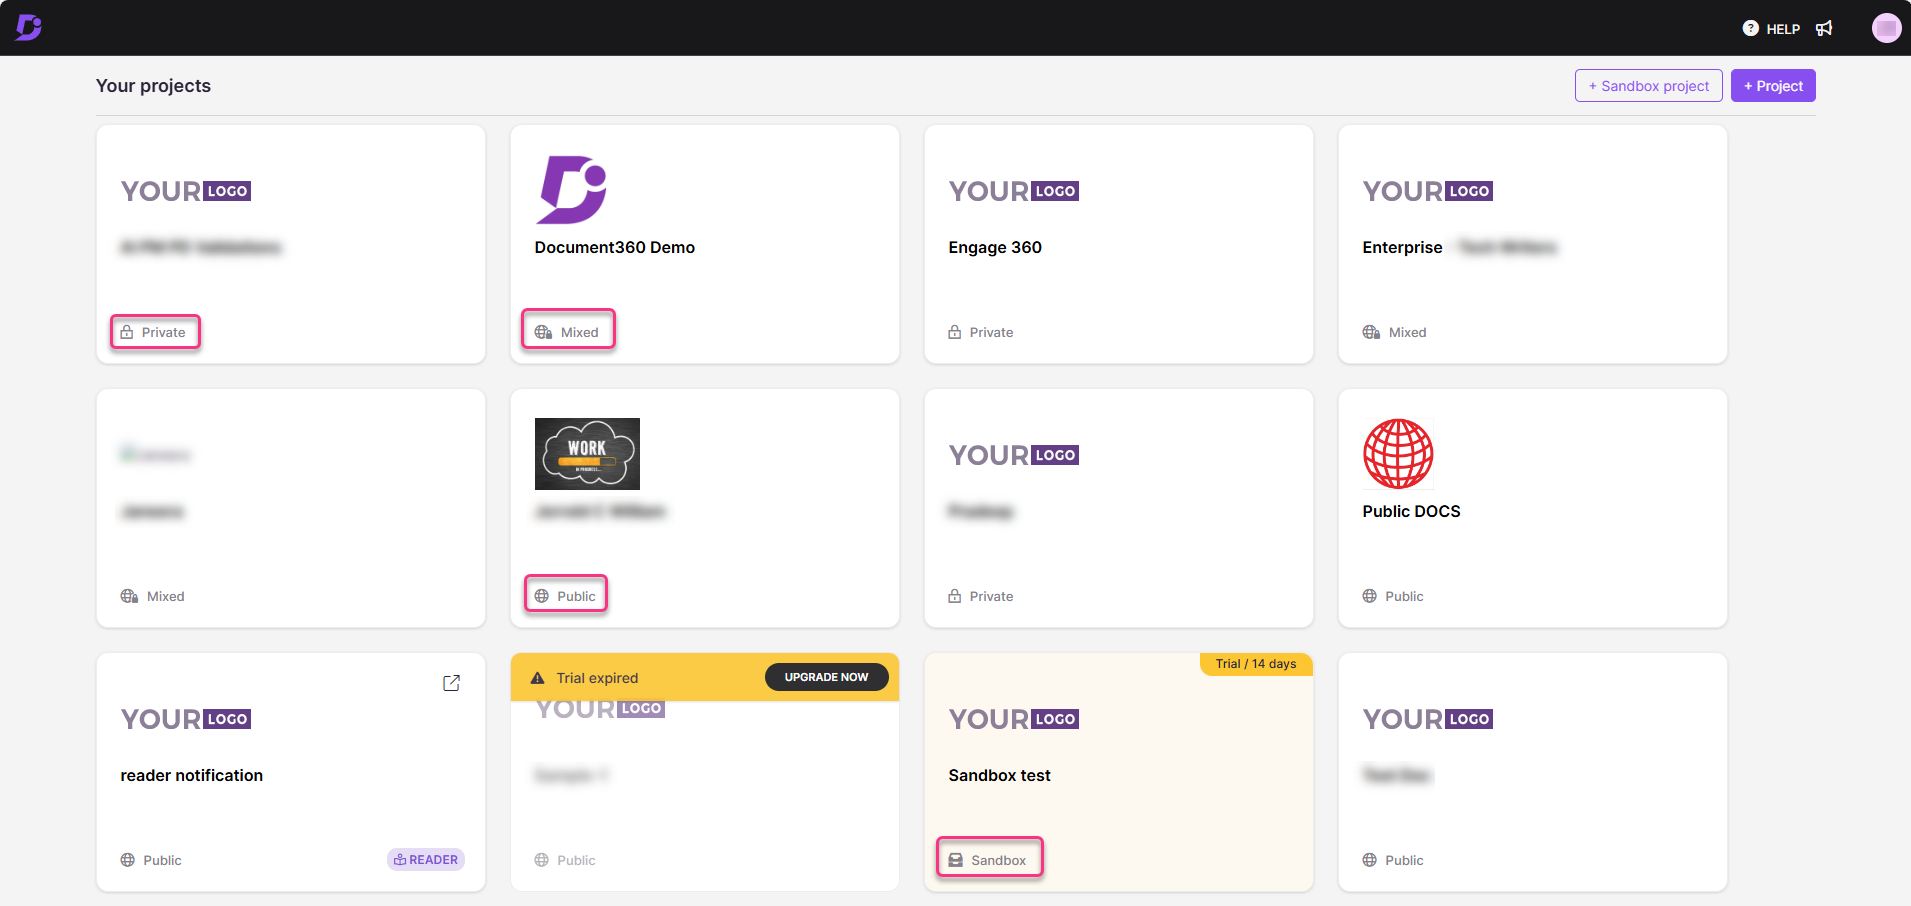
Switching projects from the Projects dashboard
Click the Document360 logo in the top navigation bar.

You will be redirected to the "My Projects" page.
The list of all projects owned or associated with your account will be displayed.
Click on the project you want to navigate to.
FAQs
Does Document360 support different languages in the onboarding flow?
Yes, Document360 offers multi-lingual support in the onboarding flow, including languages such as English, Spanish, Brazilian Portuguese, German, and Swedish. However, within the Document360 portal, language support is currently limited to English, Spanish, and Brazilian Portuguese.
Can I customize the appearance and structure of my Document360 project?
Yes, Document360 projects offer extensive customization options. You can customize the look and feel of your knowledge base by designing your home page, themes, adding your organization's branding, editor oriented, and organizing articles in a hierarchical structure (categories) that suits your documentation needs.
Is it possible to control access and permissions within Document360 projects?
Absolutely. Document360 offers robust access control and permission settings. You can assign roles and permissions to team accounts, restricting or granting access to specific features and content based on their responsibilities and requirements.
How does Document360 help with version control and documentation history?
Document360 projects maintain a comprehensive article version control system referred to as "Article revisions." It automatically saves and tracks changes made to articles, allowing you to revert to previous versions if needed. This ensures the integrity of your documentation and simplifies collaboration on content updates.
How do I know which project I am currently working on?
You can check the project name displayed in the top navigation bar in the Knowledge Base portal.
What happens if I don't see the project I want to switch to?
Ensure you have the necessary access permissions for that project. If the project still doesn't appear, contact your Document360 administrator for assistance.
What is a "Sandbox" project, and how is it different from other projects?
A Sandbox project is a test environment where you can experiment without affecting your live projects. It will have a "Sandbox" label in the project dropdown.
What does "Site Access" mean in the project dropdown?
"Site Access" indicates whether the project is Public, Private, or Mixed. This defines the accessibility level of the project's content.
How can I request access to a project I am not currently associated with?
Contact your team administrator or project owner to request access to the desired project.
What happens if Eddy AI cannot generate content from my website for the default articles?
If Eddy AI is unable to extract sufficient content from your website, the system will use default templates based on your selected use case.
How many projects can I create in Document360?
You can create as many projects as you like in Document360. Each new project comes with a 14-day free trial, after which you’ll need to purchase a separate subscription plan for that project.
Why can't I change the site visibility for my trial project?
By default, all trial projects in Document360 are set to Private to protect your content during evaluation and prevent unintentional exposure. You’ll notice that the Mixed and Public visibility options are disabled (greyed out) in both the onboarding screen and the Site access settings page.
If you want to change the visibility of your trial project:
Click the Contact Sales link shown in the info banner.
This will trigger an automated email request to our sales team with your project details.
Once your request is validated, the sales team will send a confirmation email.
You can then switch your project’s visibility to Mixed or Public from the Site access settings page.
NOTE
This restriction ensures your project stays secure until you're ready to make it publicly accessible.