Document360 workspaces allow you to create and manage multiple distinct knowledge bases within a single project. This flexibility is especially valuable for organizations with diverse audiences or documentation needs, enabling you to organize content that’s tailored to specific users or product areas. Workspaces keep your documentation organized, accessible, and relevant, no matter the complexity of your knowledge base.
Defining workspaces and their role
When you purchase a Document360 plan, you’re provided with a single project that serves as your knowledge base repository. A project can contain all of your documentation, making it easy to manage and maintain content in one place. Think of it as the central hub for your knowledge base content, whether you have a single product or multiple offerings.
Within your Document360 project, you can create one or more workspaces to better organize your documentation based on audience, product lines, or other criteria.
A workspace is essentially a specialized area within your project that can house content for a particular group or use case. For example:
If you’re managing documentation for a single SaaS product, one workspace may suffice.
If you have multiple products or need separate documentation sets for external customers, internal users, and support teams, multiple workspaces can be more efficient.
The number of workspaces you can create depends on your Document360 plan.
Getting started with Workspaces
When you create a new project in Document360, a default workspace titled v1 is automatically created. You can start building your knowledge base in this workspace immediately or create additional workspaces as your documentation needs evolve.
Using multiple workspaces allows you to keep your documentation streamlined, targeted, and well-organized. This way, every user—from internal teams to end customers—can access relevant information quickly and efficiently.
Adding a new workspace
To add a new workspace,
Navigate to Settings () > Knowledge base portal in the left navigation bar in the Knowledge base portal.
In the left navigation pane, navigate to Workspace & localization.
Under the Workspace & Localization tab click the Add workspace button.
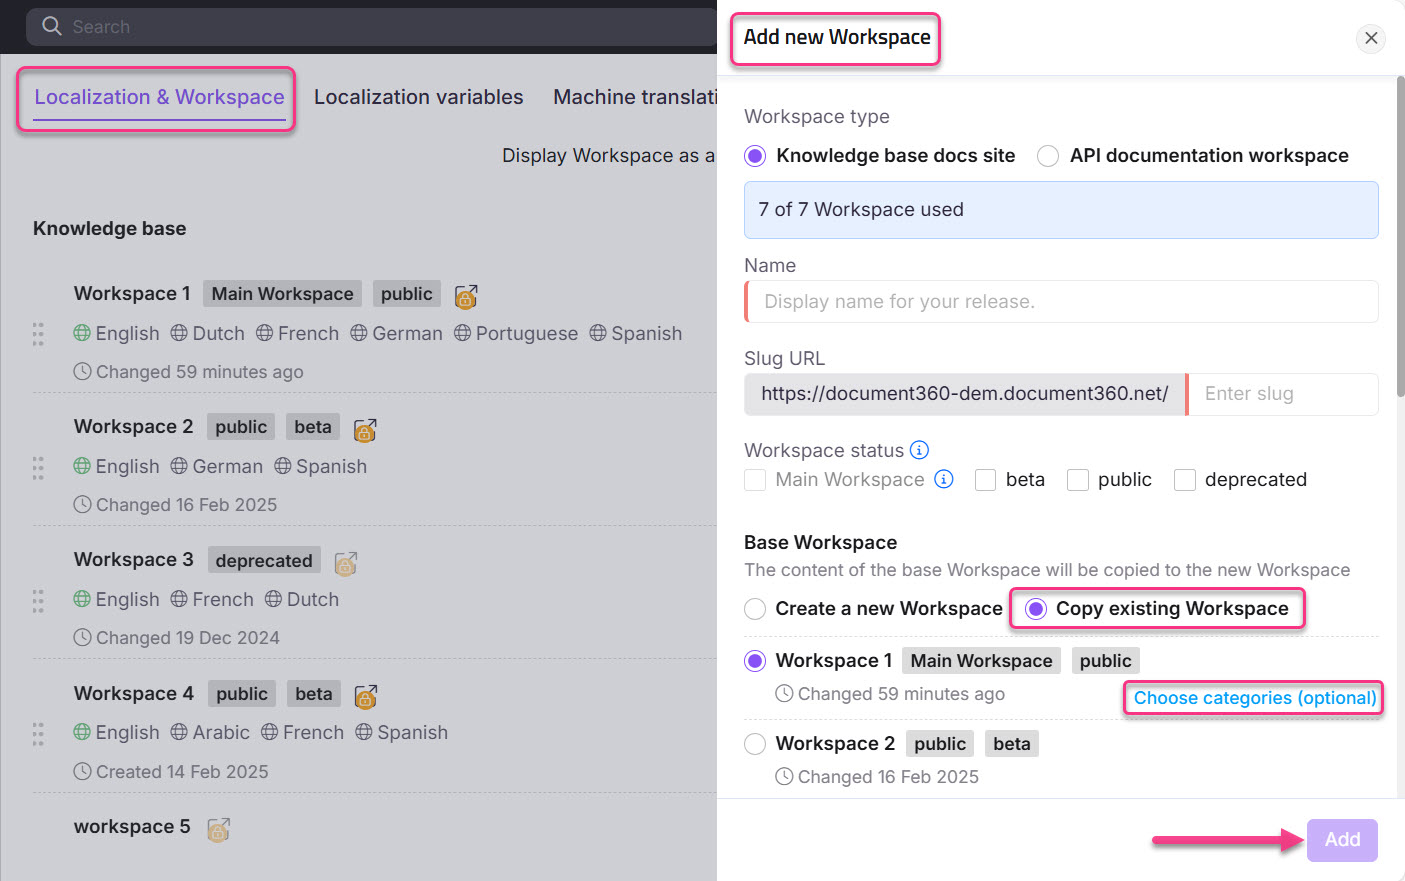
In the Add new workspace dialog, enter the required details.
Select the Workspace type - Knowledge base docs site or API documentation workspace.
In the Name field, enter your desired name for your new workspace in your preferred language.
NOTE
The Name field has a character limit of 30 characters. You can only use alphanumeric characters and hyphens.
The Slug URL field will be auto-populated based on the workspace name you provided in the Name field. You can further customize the URL of your workspace based on your requirements.
Next, select the Workspace status for your new workspace.
Main workspace: The Main workspace is the default workspace users will see when they visit your knowledge base site.
NOTE
The Main workspace should be public and cannot be deprecated.
beta: Select beta to indicate that the workspace is in a creation/testing phase and not yet ready to go live.
public: Select public for workspaces that should be visible to users.
deprecated: Select deprecated to indicate the workspace is old and contains out-of-date information.

Base workspace
While creating a new workspace, you can choose to either create a new workspace or copy an existing workspace from the same project.
Create a new workspace
If you select Create a new workspace, you will create an empty workspace with no content.
Copy existing workspace
If you select Copy existing workspace, you can copy the contents of an existing workspace to your new workspace.
Select the workspace you wish to copy from the list of existing workspaces.
Click Choose categories (optional) to select specific categories from the existing categories. Only the contents of the selected categories will be copied to the new workspace.
Select either New or Existing for Internal links.
If you select New, the article’s link will point to the article version created in the new workspace.
If you select Existing, the article’s link will point to the original article in the existing workspace.
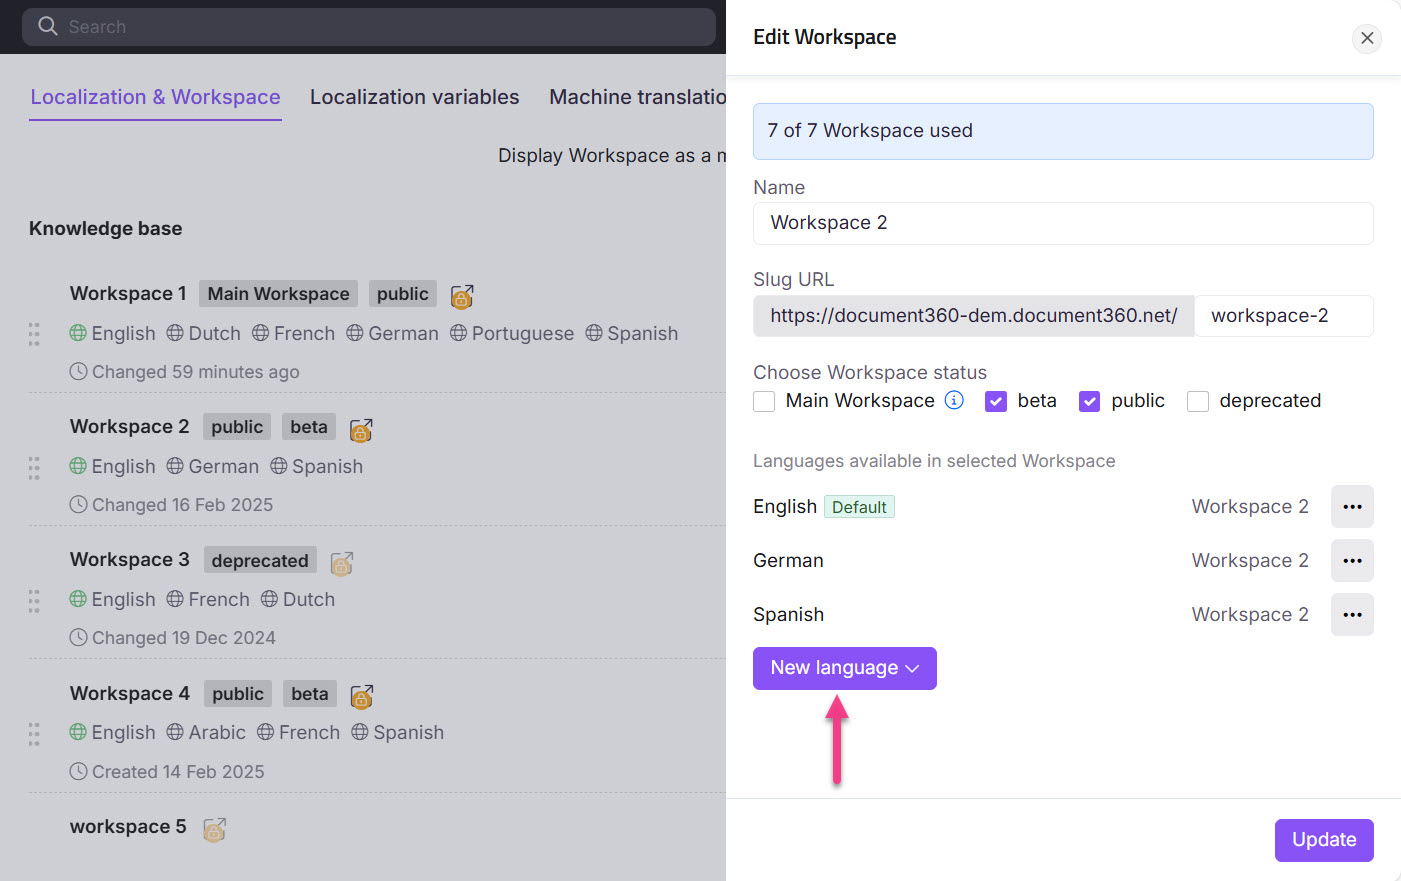
Languages
The default language of your project will be assigned as the default language of your new workspace as well. To add more languages, click the New language dropdown. From the dropdown, search for the desired languages and select the checkbox next to the language name.
For more settings related to a language, click the More options () icon next to the language name.
Set as default: Select this option to set the corresponding language as the default language for your knowledge base site.
Edit display name: Use this option to update the display name for your workspace. The updated name will be shown on the knowledge base site when the corresponding language is selected. You can set a custom display name for your workspace in each of the available languages.
Right to left: Enable this toggle for languages that follow a right-to-left script (Arabic, Hebrew). By enabling this toggle, the article’s content will start from the right and continue to the left in the knowledge base portal as well as the knowledge base site.
Hide: Select this option to hide the language from the knowledge base. Hidden languages are indicated by strikethrough in the Knowledge base portal for reference.
Remove: Select this option to remove the language from your knowledge base.
Once you complete customizing the details of your new workspace, click the Add button at the bottom right to finish creating the new workspace.
Purchasing workspaces from Workspaces & localization
Navigate to Settings () > Knowledge base portal in the left navigation bar in the Knowledge base portal.
In the left navigation pane, navigate to Workspace & localization.
Under the Workspace & Localization tab click buy more on the right side of the screen.
NOTE
The buy more link is available only for users assigned the Owner role in projects.
Add or remove workspaces in the Purchase add-on panel. The corresponding cost will be displayed as Amount due.
Click Confirm Payment to proceed with the payment. Once the payment is processed, a payment success message will display, and the additional workspaces will be added to your project successfully.
Click Download invoice to download the invoice for the payment made.
NOTE
You can also purchase workspaces from the Billing section in Document360 settings. To learn more, read the article on Purchasing add-ons.
Managing workspace label and switching behavior in the Knowledge base site
Document360 allows you to customize the term Workspace across the Knowledge base portal and control switching behavior when switching between workspaces (versions) on the Knowledge base site.
NOTE
This feature is available only for new projects created after 31st August 2024. Users who upgraded from the Legacy plan to the new pricing plan after this date can also access this feature.
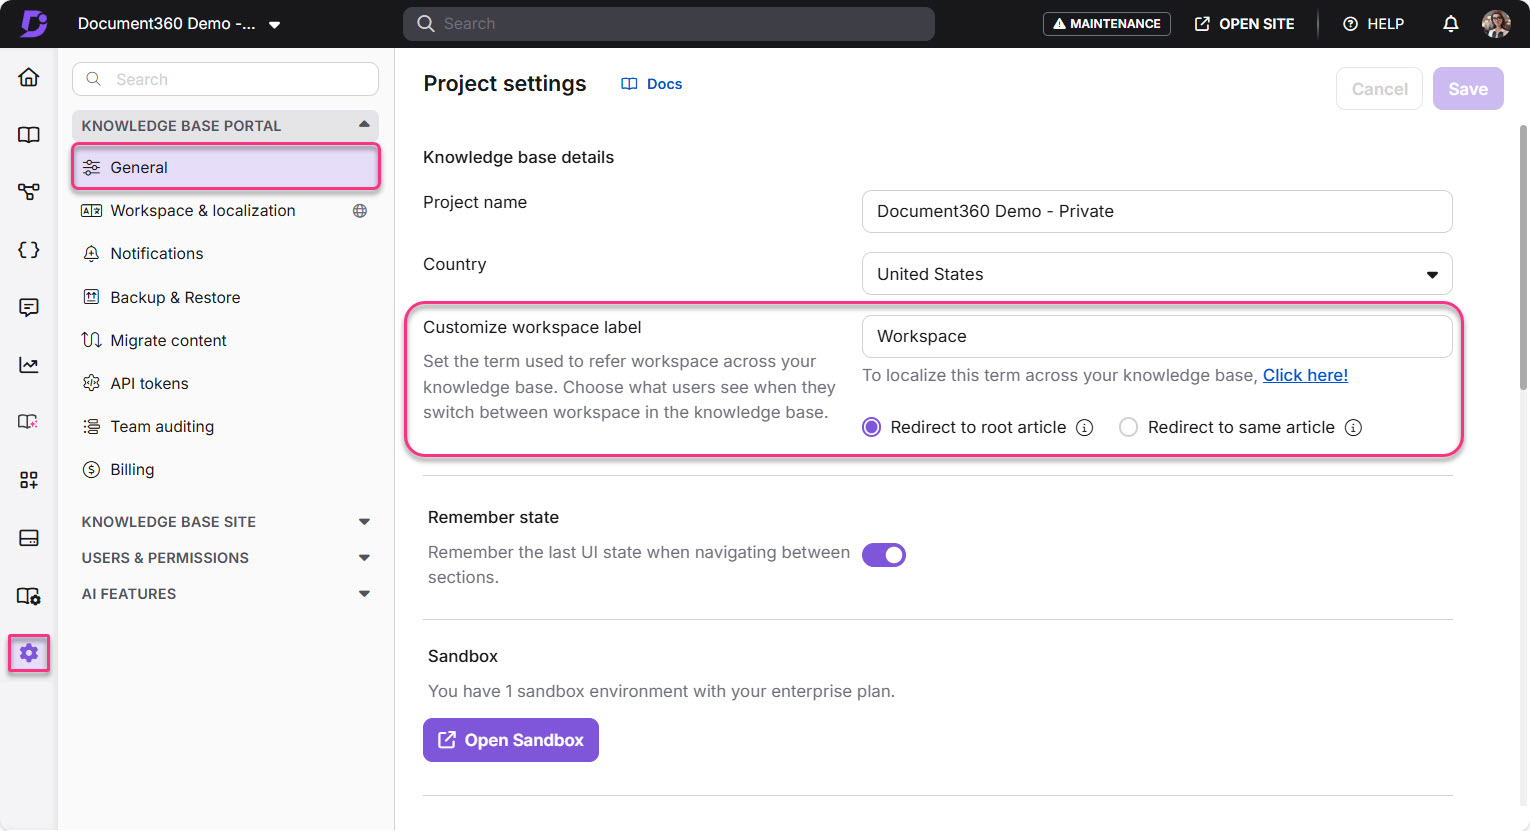
Customizing the Workspace label
You can rename Workspace to align with your internal terminology, such as "Version", "Edition", or "Release".
To update the workspace label:
Navigate to Settings () > Knowledge base portal > General in the Knowledge base portal.
In the Project settings page, locate the Customize workspace label field.
Enter your desired term (for example, “Version”) with a maximum of 30 characters and no special characters.
NOTE
This change updates all instances of the term Workspace across the portal UI.
The default label is Workspace.
You can customize the Workspace label for Knowledge base site from Localization variables page.
Configuring workspace switching behavior
When a user switches between workspaces in the Knowledge base site, you can control how the redirection works:
Below the Customize workspace label field, you can select any one of the following options:
Redirect to root article (default)
Users are redirected to the root article of the selected workspace.Redirect to same article
If the same article exists in the target workspace, users are redirected to it.
If not, they’ll be redirected to the root article instead.
This setting is particularly useful when you maintain different versions, localized content, or audience-specific documentation, and want readers to switch between workspaces without losing context.
Example scenario:
You have two workspaces: Workspace A and Workspace B
Workspace A contains articles: A1, A2, A3
Workspace B contains articles: A1, A2, A4
Assume Workspace B is your main workspace:
Scenario
Configuration
Outcome
You switch workspaces
Redirect to root article
Always redirects to the root article of the selected workspace
You are on article A2 in Workspace B and switch to Workspace A
Redirect to same article
Redirects to article A2 in Workspace A
You are on article A4 in Workspace B and switch to Workspace A
Redirect to same article
Redirects to the root article of Workspace A (A4 doesn't exist there)
Click Save to apply your selected behavior.
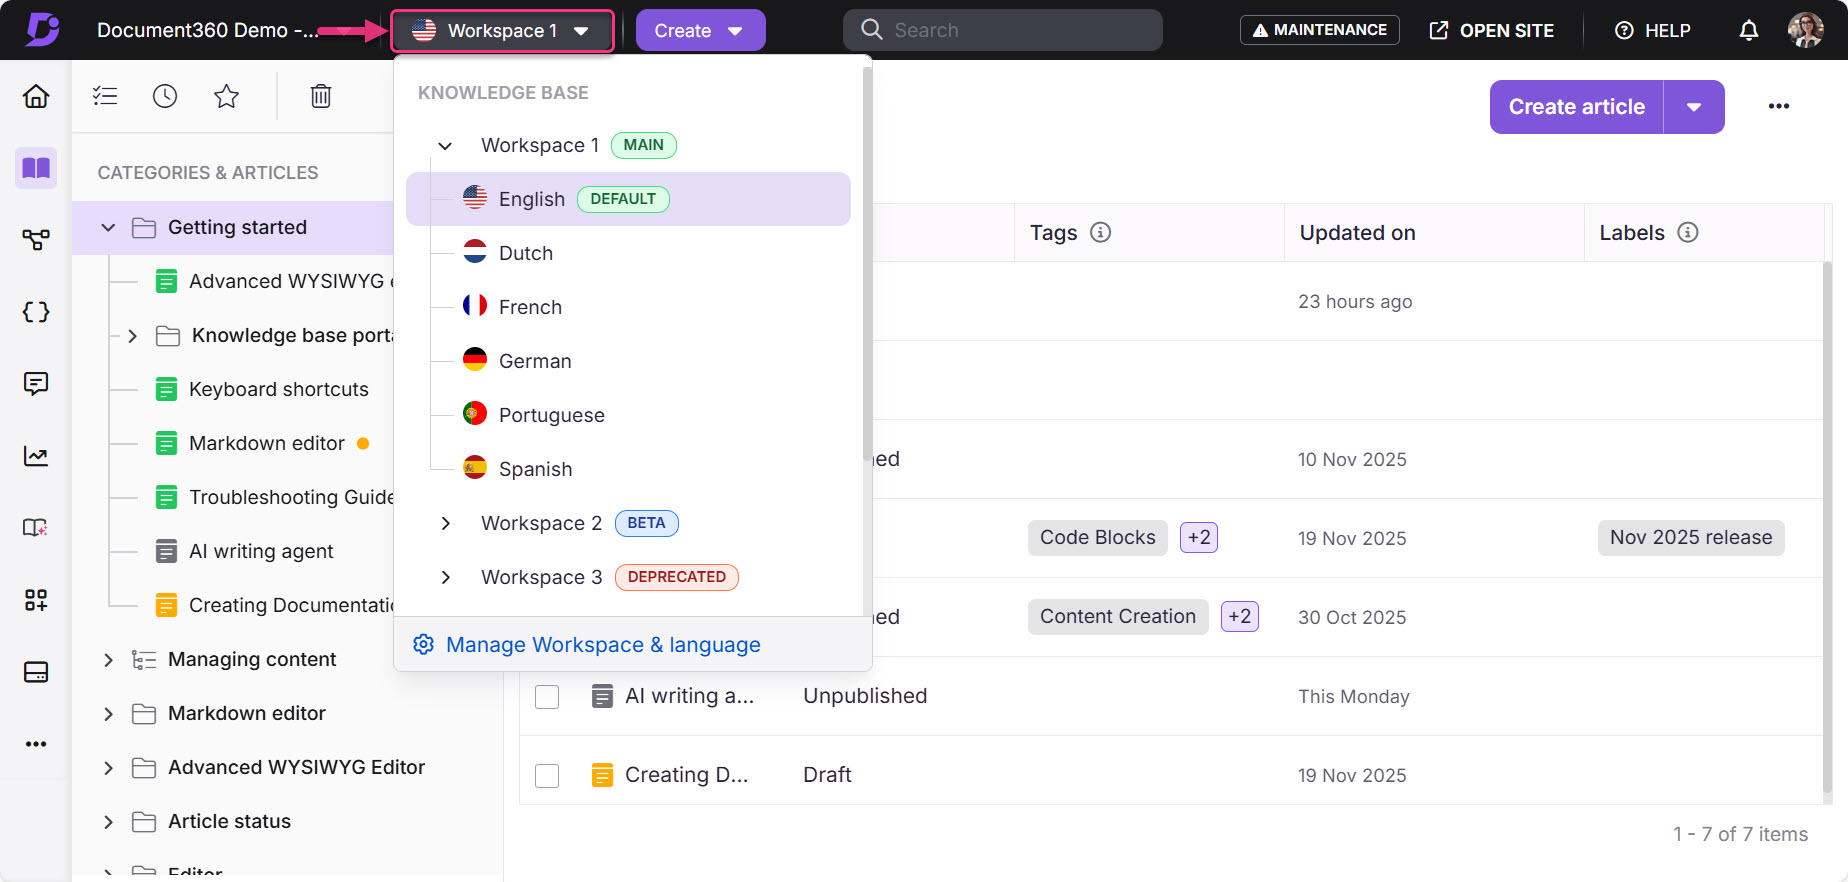
Switching workspaces in the documentation
To switch workspaces:
In the Documentation () section of the Knowledge base portal, click the Workspace dropdown in the top navigation bar.
The dropdown displays all available workspaces along with their associated languages.
Expand the desired workspace and select the preferred language.
NOTE
A Main badge next to a workspace indicates that it is the primary default workspace displayed on the Knowledge base site.
You can view the Beta and Deprecated tags next to the respective workspaces.
A Default badge next to a language indicates that it is the default language for that workspace.
Troubleshooting
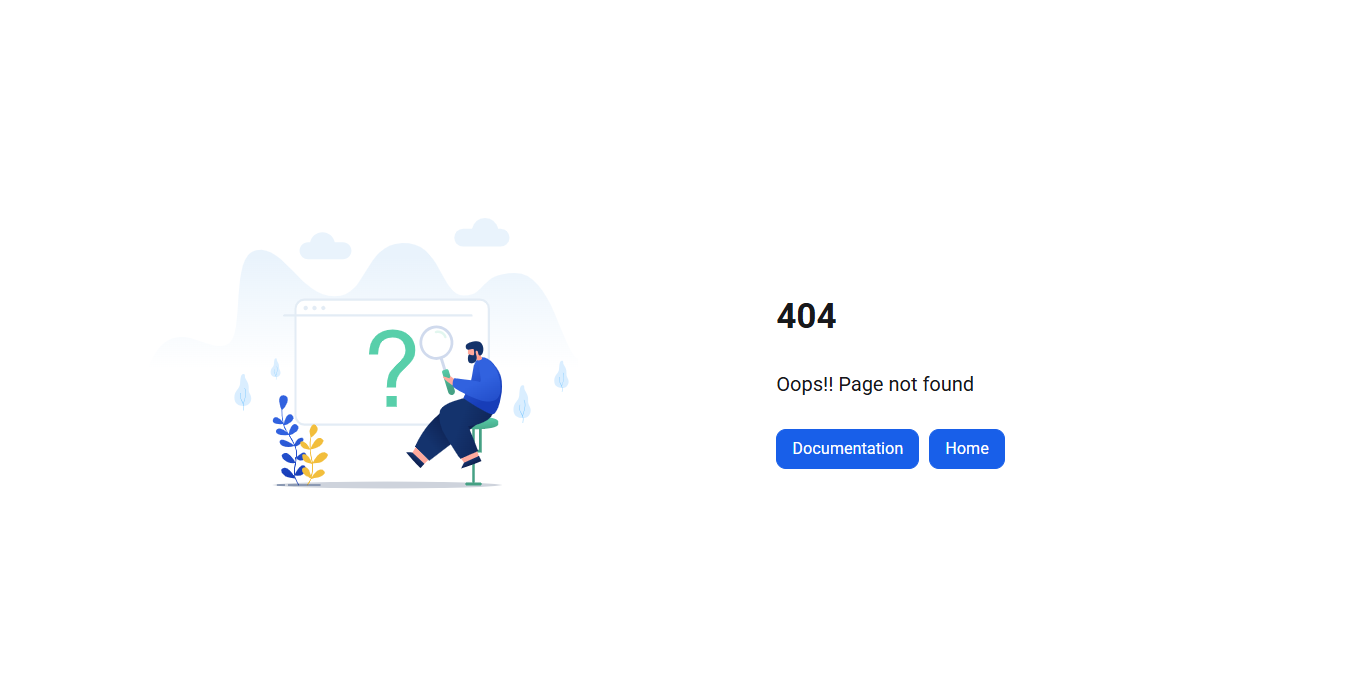
Encountering 404 Page not found error when navigating to a secondary workspace
Error: 404 Page not found error
A 404 error can occur for various reasons, including missing or restricted content. If you're experiencing this issue while navigating to a workspace or an article, it may be due to workspace visibility settings or the absence of published articles.
NOTE
For other potential causes of 404 errors, refer to the 404 Page article.
Steps to resolve:
This error may occur due to one of the following reasons:
Check if the workspace is set to Public:
Navigate to Settings () > Knowledge base portal in the left navigation bar in the Knowledge base portal.
In the left navigation pane, navigate to Workspace & localization.
Under the Workspace & Localization tab locate the respective workspace and click the Edit () icon.
In the Choose workspace status section, select the Public checkbox.
Click Update.

No articles are published in the workspace.
All articles in the workspace are hidden.
Ensure at least one article is published and visible on the Knowledge base site.
FAQ
I am trying to set a workspace as the main workspace, but the Main workspace checkbox is inactive. What do I do?
To set a workspace as the main workspace, it must also be set to public. To enable the Main workspace checkbox, first select the public checkbox. Once you select the public checkbox, the Main workspace checkbox will automatically be enabled.
How do I enable notifications for workspace label updates?
Navigate to Settings > Knowledge base portal > Notifications in the Knowledge base portal.
Go to the Notification mapping tab and expand the Knowledge base portal settings section.
Turn on the Workspace label updated toggle to receive notifications when a workspace label is changed.
Turn on the Workspace redirection setting updated toggle to get notifications when redirection settings are modified for users switching between workspaces on the Knowledge base site.
How do I track who changed the workspace label?
Navigate to Settings () > Knowledge base portal > Team auditing in the Knowledge base portal.
Use the Event filter and select Workspace label updated and Workspace redirection setting updated options to view changes related to the workspace label or redirection settings.
How do I reorder my workspaces?
To reorder your workspaces, hold and drag the drag handle next to the workspace name. Using the drag handle, move the workspace to the desired location.
How do I edit a workspace?
Once you navigate to the Workspace & localization page in Settings ()> Knowledge base portal, hover over the workspace you wish to edit. Click the Edit () icon that appears at the right side of your screen to edit the workspace. You can edit the following properties of a workspace:
Workspace name
Workspace URL
Workspace status
You can also add or delete workspace languages while editing a workspace.
How do I delete a workspace?
Similar to editing a workspace, navigate to the Workspace & localization page in Settings ()> Knowledge base portal and hover over the workspace you wish to delete. Click the Delete () icon that appears at the right side of your screen to delete the workspace. Note that the delete option will be inactive for the Main workspace.
NOTE
Articles from a deleted workspace will appear as broken links.
How do I recover a deleted workspace?
You can recover a deleted workspace by following these steps:
Navigate to Settings () > Knowledge base portal in the left navigation bar in the Knowledge base portal.
In the left navigation pane, navigate to Backup & Restore.
Find the desired backup, click the Restore options dropdown, and select Documentation.
In the Restore documentation panel, choose the workspace you want to restore.
Click Restore.
NOTE
Backup and Restore features are available only on Business and Enterprise plans.
I have multiple workspaces added to my knowledge base site. How do I display them as a dropdown menu?
In the Localization and workspaces page, locate the toggle named Display workspaces as a menu (only public workspaces). To display your workspaces as a dropdown menu, set the toggle to OFF.
What are the benefits of using workspaces?
Workspaces offer several advantages that enhance both content organization and the overall user experience:
Relevant information: By dividing documentation into specific workspaces, you ensure that each audience only accesses content relevant to them, making it easier for users to find the information they need.
Better organization: Workspaces help you structure your knowledge base into clearly defined sections, simplifying content management and updates for your team.
Team collaboration: Workspaces support effective teamwork by enabling peer reviews, tracking updates, and gathering feedback within focused areas of content.
What are some common use cases for workspaces?
Workspaces can be used in a variety of scenarios to better organize and manage documentation within a single project. Here are a few common use cases:
Product-specific documentation: If you’re managing documentation for multiple products, such as a CRM, project management tool, and analytics platform, you can create a separate workspace for each product within a single project. This keeps everything centralized while maintaining clear boundaries between each product’s knowledge base.
Audience-specific documentation: For products with different types of users (e.g., developers, end-users, and administrators), separate workspaces help tailor content to each audience. This ensures users only access information relevant to their roles, reducing confusion and complexity.
Internal and external knowledge bases: When you need to manage both internal documentation (e.g., for support or development teams) and external documentation (e.g., for customers), workspaces allow you to separate the content cleanly. You can also control access permissions, keeping internal content restricted while making public-facing documentation available to all.