Plans supporting this feature: Professional Business Enterprise
Feedback manager is a tool in Document360 designed to help you track, evaluate, and respond to feedback from readers on your knowledge base. It plays a crucial role in addressing user concerns and identifying areas for content improvement.
The Article feedback manager has two tabs:
Feedback: Collects feedback specific to articles or categories in your knowledge base.
Unanswered queries: Captures feedback when readers find no results for their search queries.
Both tabs share similar features, such as filtering, assigning feedback, setting feedback status, and exporting feedback data for further analysis.
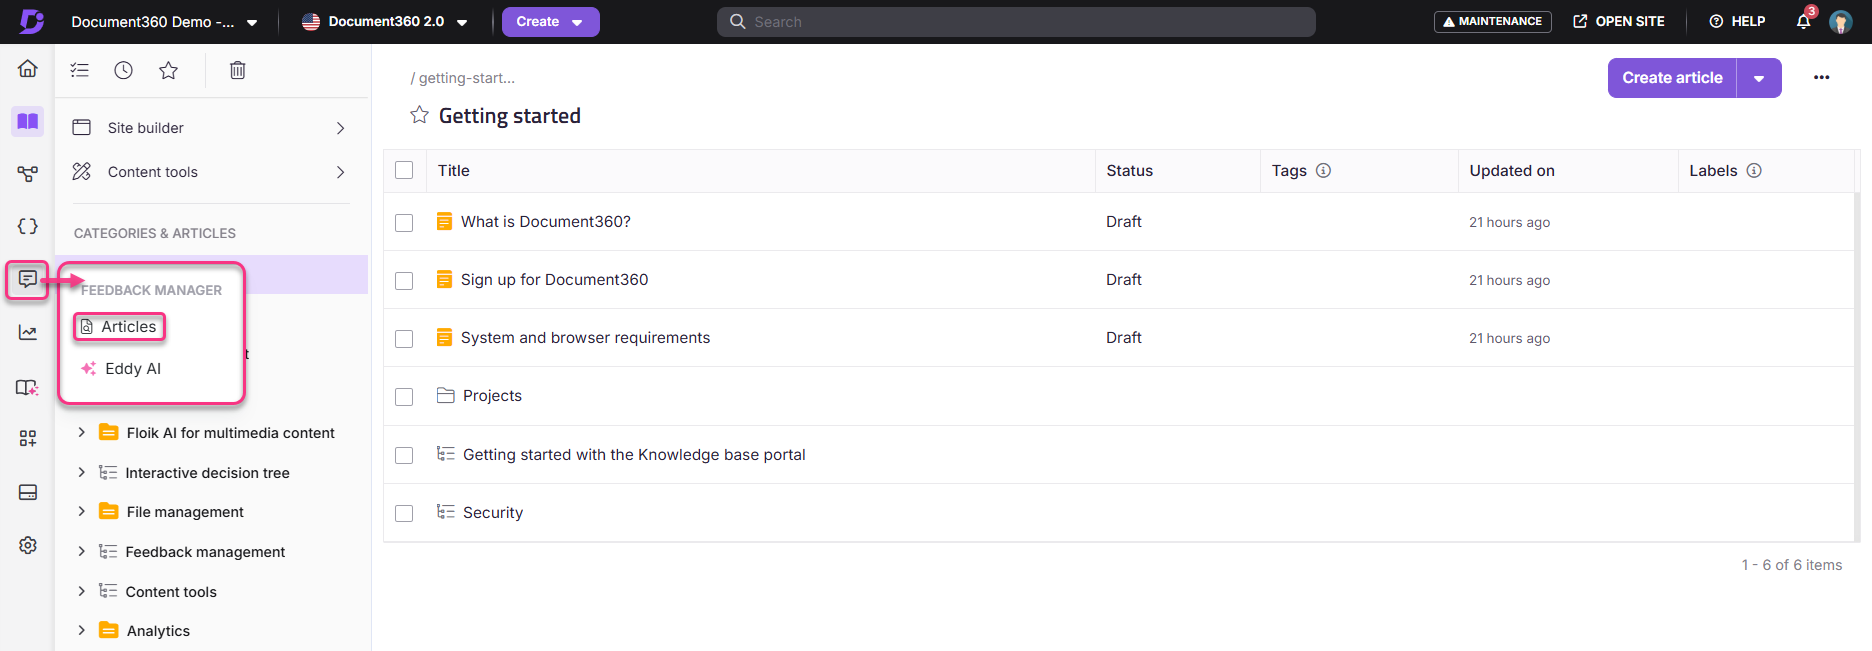
Accessing the Article feedback manager
To access the Article feedback manager in Document360,
Navigate to Feedback manager () in the left navigation bar on the Knowledge base portal.
Click Articles.
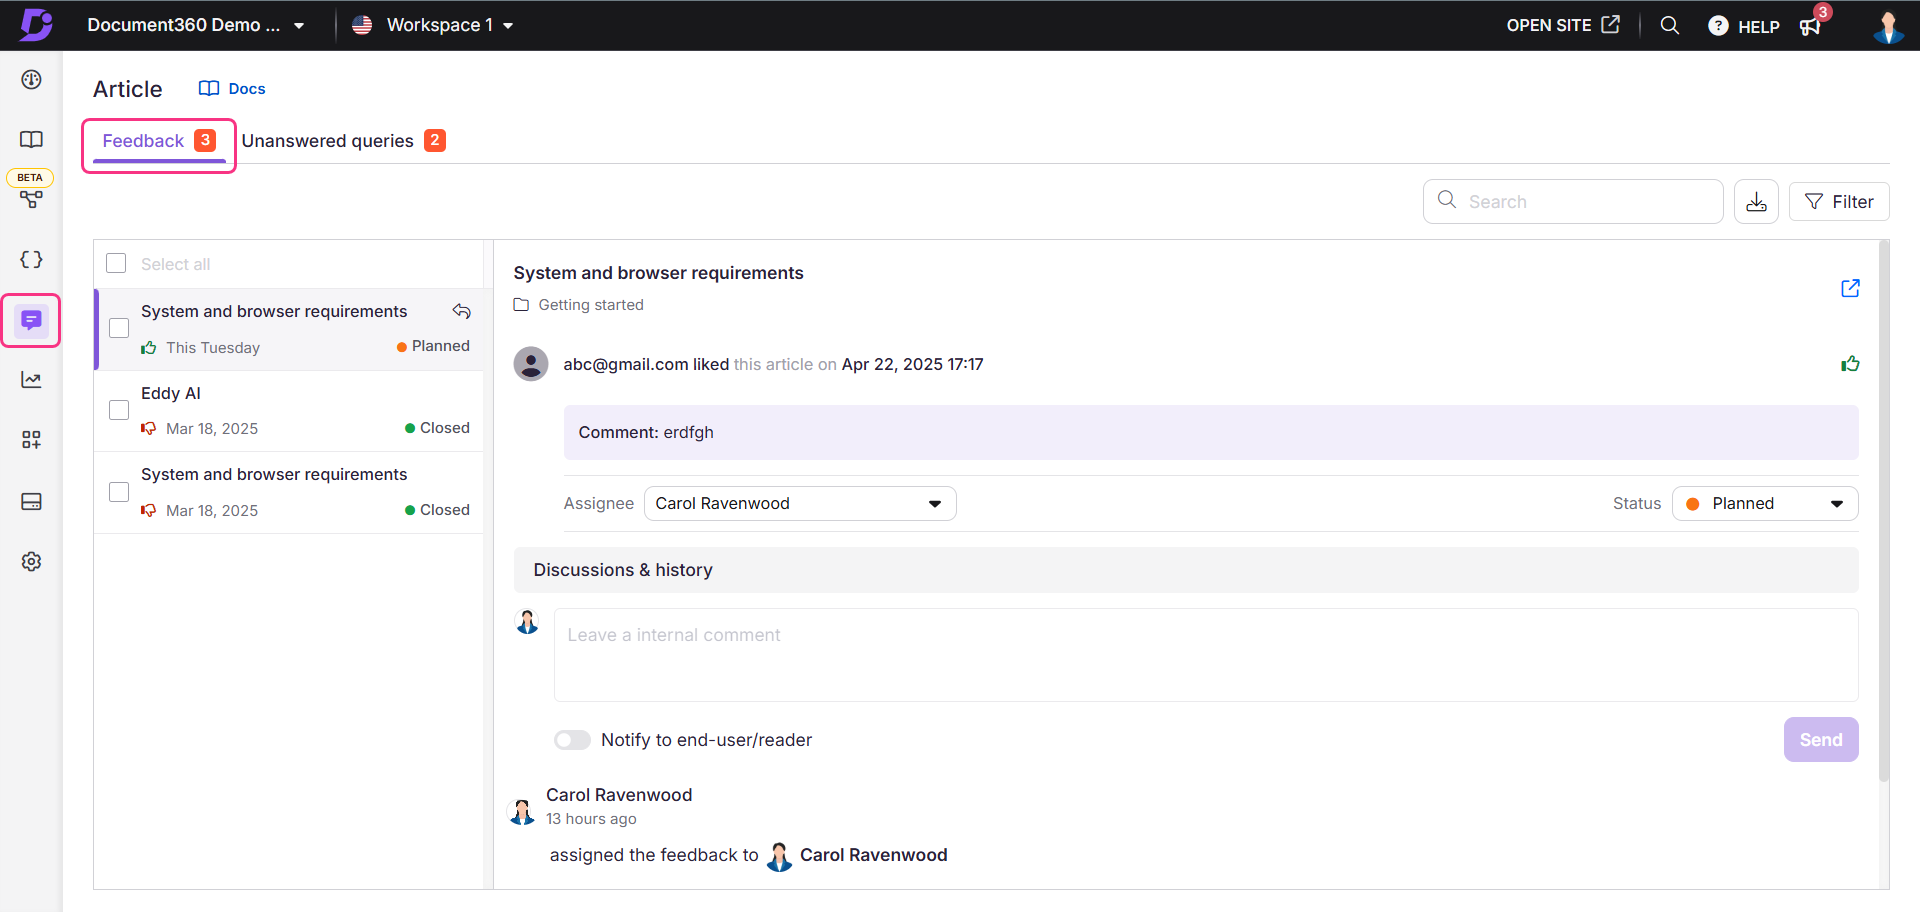
Feedback tab
The Feedback tab compiles feedback directly related to individual articles or categories within your knowledge base. This includes reader comments, likes and dislikes, and any specific concerns raised about the content.
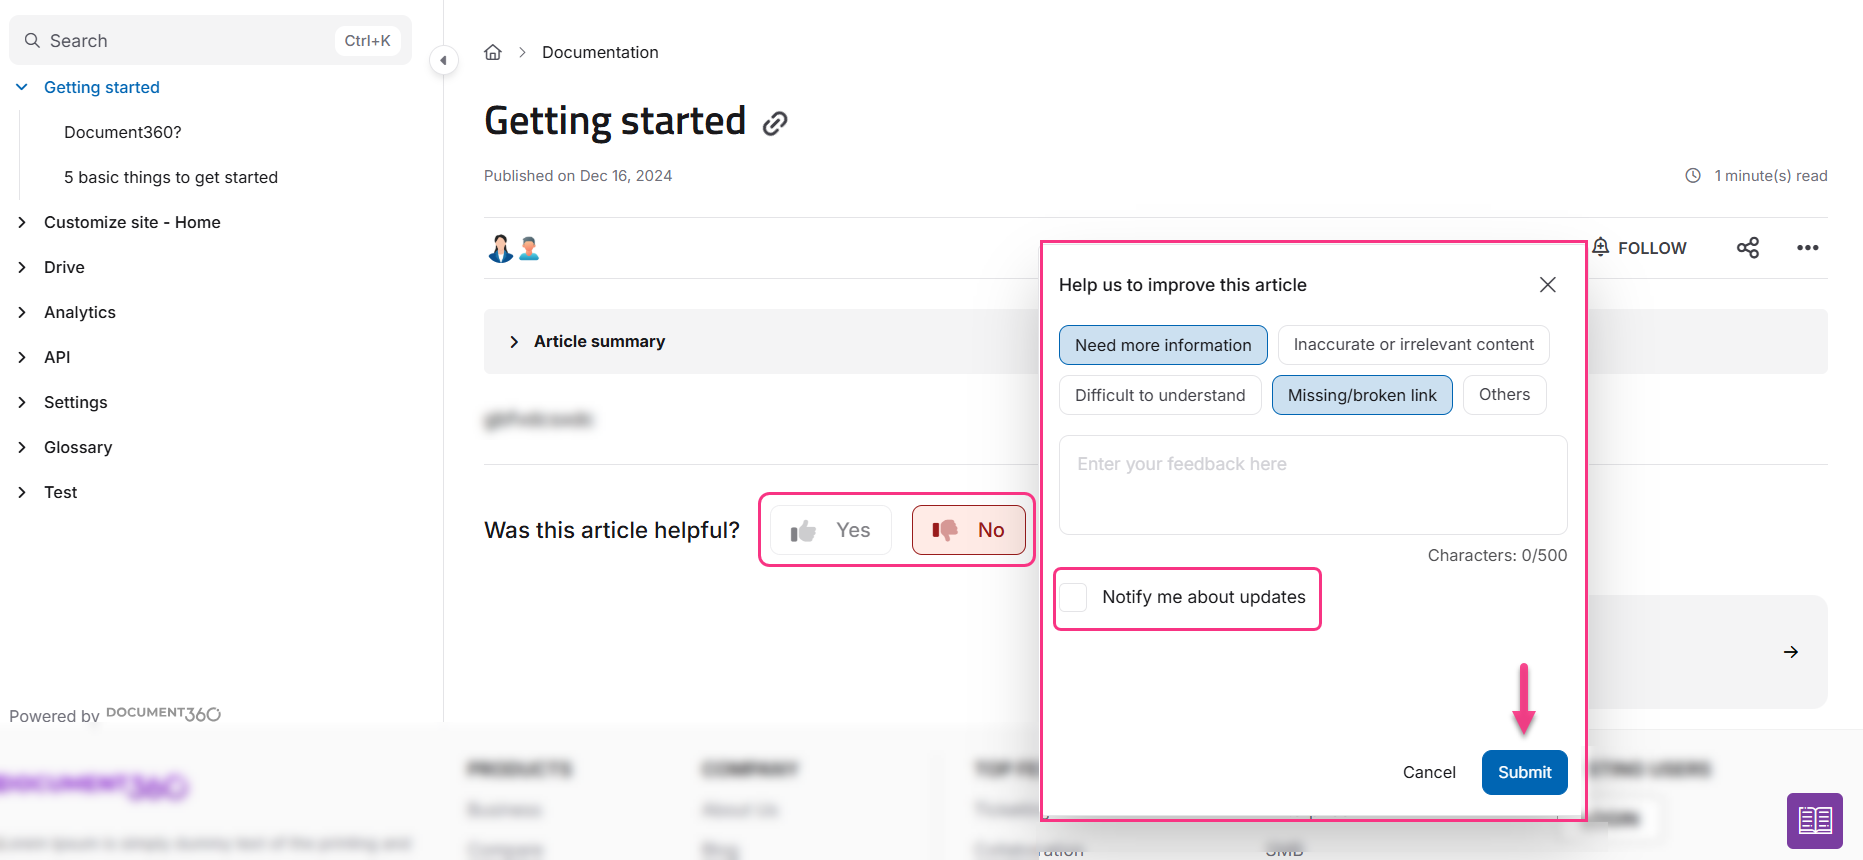
Submitting feedback in the Knowledge base site
At the end of each article, readers can provide feedback on the article:
Yes: Selecting Yes counts as a Like for the article. They can optionally add a comment.
No: Selecting No counts as a Dislike for the article. They can choose a reason (like Need more information, Inaccurate or irrelevant content, Difficult to understand, Missing/broken link, or Others) and provide additional comments.
The input box for the comment displays up to five lines of text without scrolling. Readers can add a comment of up to 1000 characters. A character counter is displayed below the input box to show the remaining characters.
They can also opt in for updates by selecting the Notify me about updates checkbox. Once done, click Submit.
For public projects, readers must manually enter their email addresses, while for private and mixed projects, the Email field is automatically prefilled for logged in users with their email addresses.
NOTE
The latest recorded response, whether Yes or No, will be captured in the Feedback tab. For instance, if a reader first selects Yes and later changes their response to No, only the No response will be recorded in the Feedback manager.
Accessing feedback in the Knowledge base portal

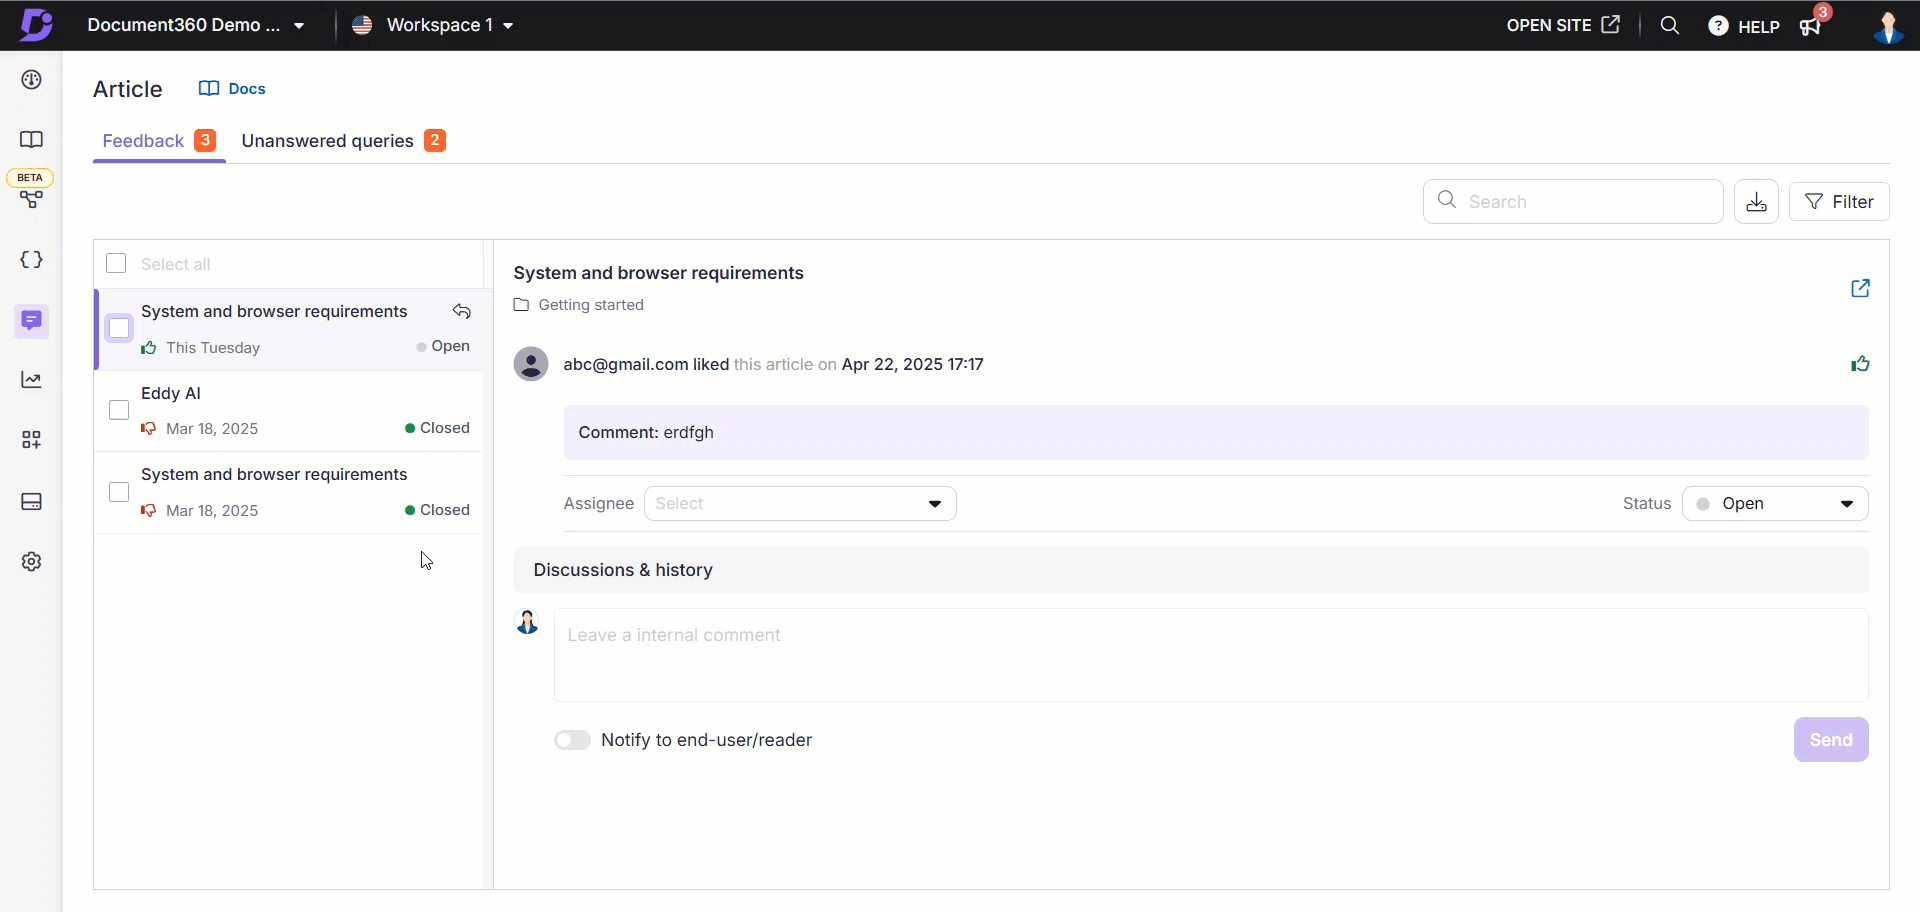
The Feedback tab shows:
Select feedback: Click the checkbox of a feedback to access bulk action options. Use the Select all checkbox to select the entire list of feedback.
() Assign to: Click to set an assignee and the status of the feedback.
() Change status: Click to change the status of the feedback.
Search feedback: Use the search field to search for feedback.
Export CSV (): Click to export and download the feedback data for external analysis and purposes from the last 90 days.
Filter: Click to filter feedback by:
Application (Both, Knowledge base, Knowledgebase assistant)
Assigned to - filter by a contributor name
Feedback type (Select all, Dislike, Like)
Status (Select all, Open, Planned, In Progress, Complete, Closed)
Date range (All, 7 days, 30 days, 3 months, 1 year, Custom date)
Article name & category: Displays the article name that received the feedback and the respective category.
Feedback details: Displays the reader’s email ID, feedback type, and the date & time of the feedback.
Feedback icon: Displays the type of feedback, Like or Dislike .
Feedback comment: Displays the comment added along with feedback.
Assignee: Select the assignee from the dropdown to assign the feedback to.
Status: Click to set the status of the individual feedback.
Discussion & history: This section displays the internal discussions and history log of the feedback.
Add comments and replies in the text field that can be viewed by the internal team accounts.
Turn on the Notify to end-user/reader toggle if you wish to notify the reader or if they have requested a response for their feedback.
Once done, click Send.
NOTE
If the reader has requested a response for their feedback, enable the Notify to end user/reader toggle after adding your response in the Discussions & history section to notify the end user the status and the response of the feedback. When you post a response with this toggle turned on, the feedback status will automatically change to Closed, and you will no longer be able to perform any further actions on the feedback. The response will be sent via email from the account of the user who addressed the feedback. The end-user or reader may reply to this email, and you can continue the conversation through email if necessary.
Addressing article feedback
To respond to feedback in the Feedback tab, follow these steps:
Choose the feedback to be addressed from the list in the Feedback tab.
Read through the reader’s comments to understand their input and review the feedback.
The article that received the feedback is displayed at the top for reference.
If necessary, assign the feedback to a team member by selecting their name from the Assignee dropdown.
Update the feedback with any comments/responses related to the feedback in the Discussions & history field.
Select a status from the Status dropdown to indicate the feedback’s progress. The available statuses are:
Open: Feedback is assigned the Open status by default, indicating it is yet to be addressed.
Planned: The Planned status shows that the feedback has been reviewed and scheduled for future action.
In progress: Set to In progress when a team member actively works on the feedback.
Complete: When the feedback has been addressed, assign it the Complete status. You can still add comments to feedback marked as Complete if needed.
Closed: The Closed status indicates that the feedback is no longer active, and no further actions can be performed.
By addressing feedback in this tab, you can enhance the quality and relevance of your articles, ensuring a better experience for your readers.
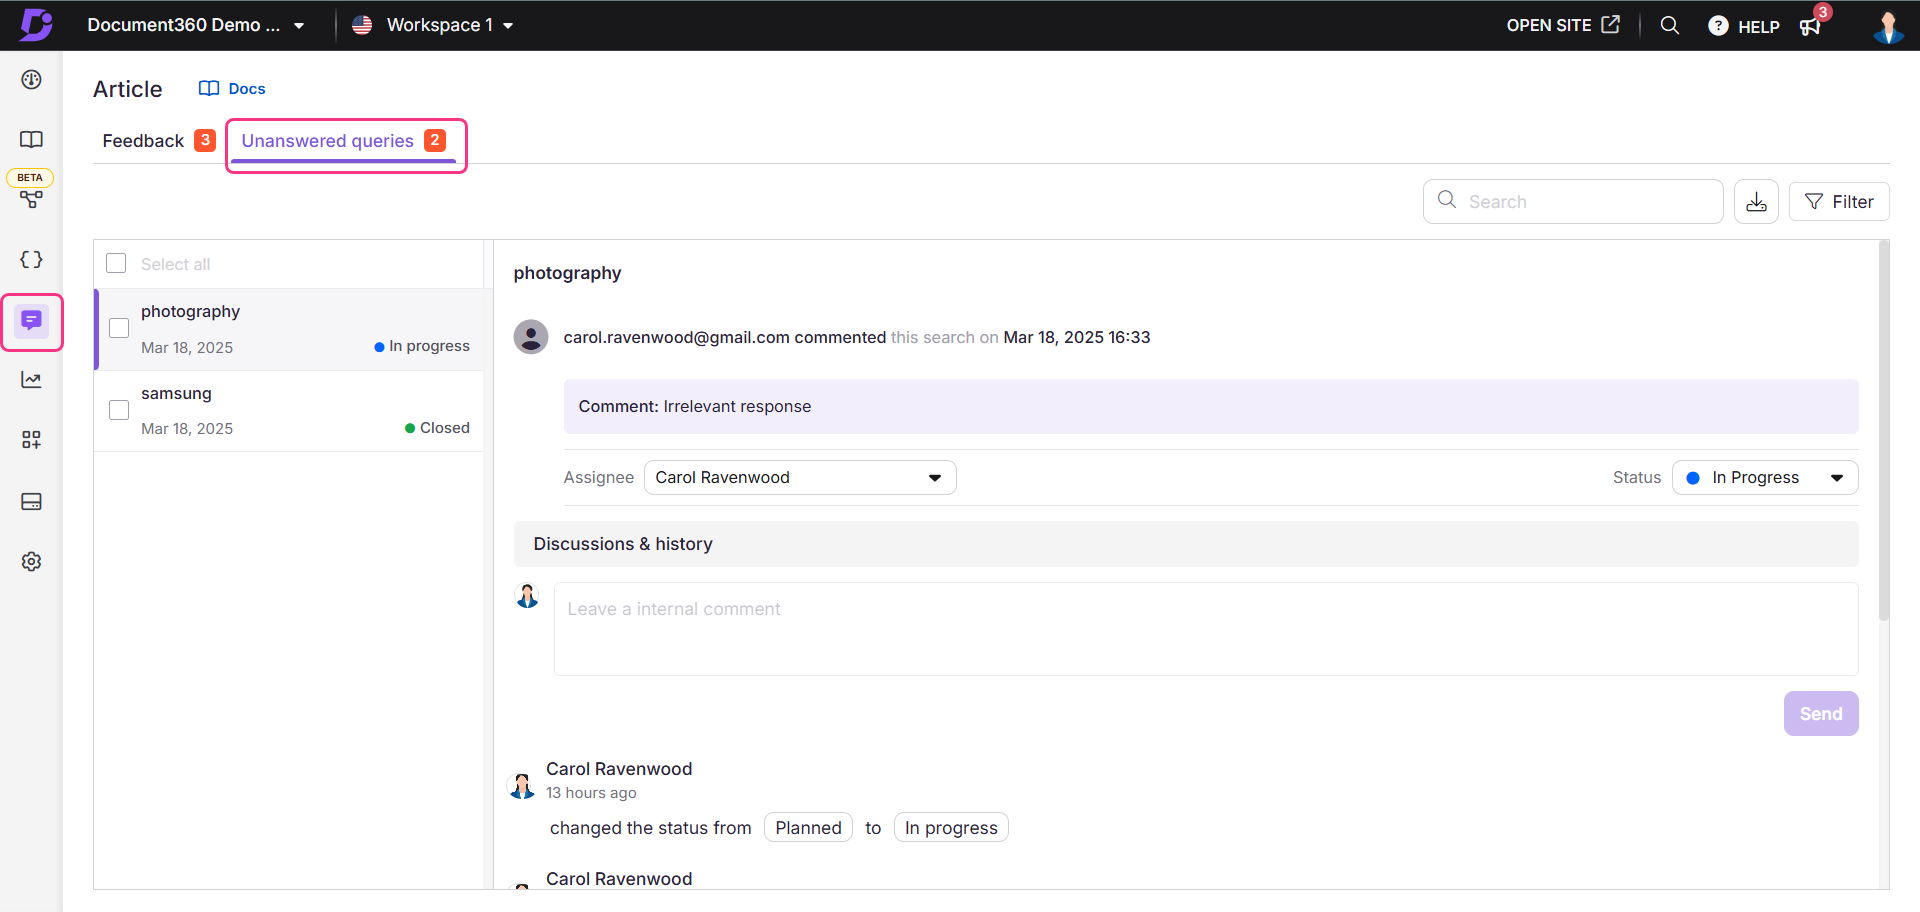
Unanswered queries tab
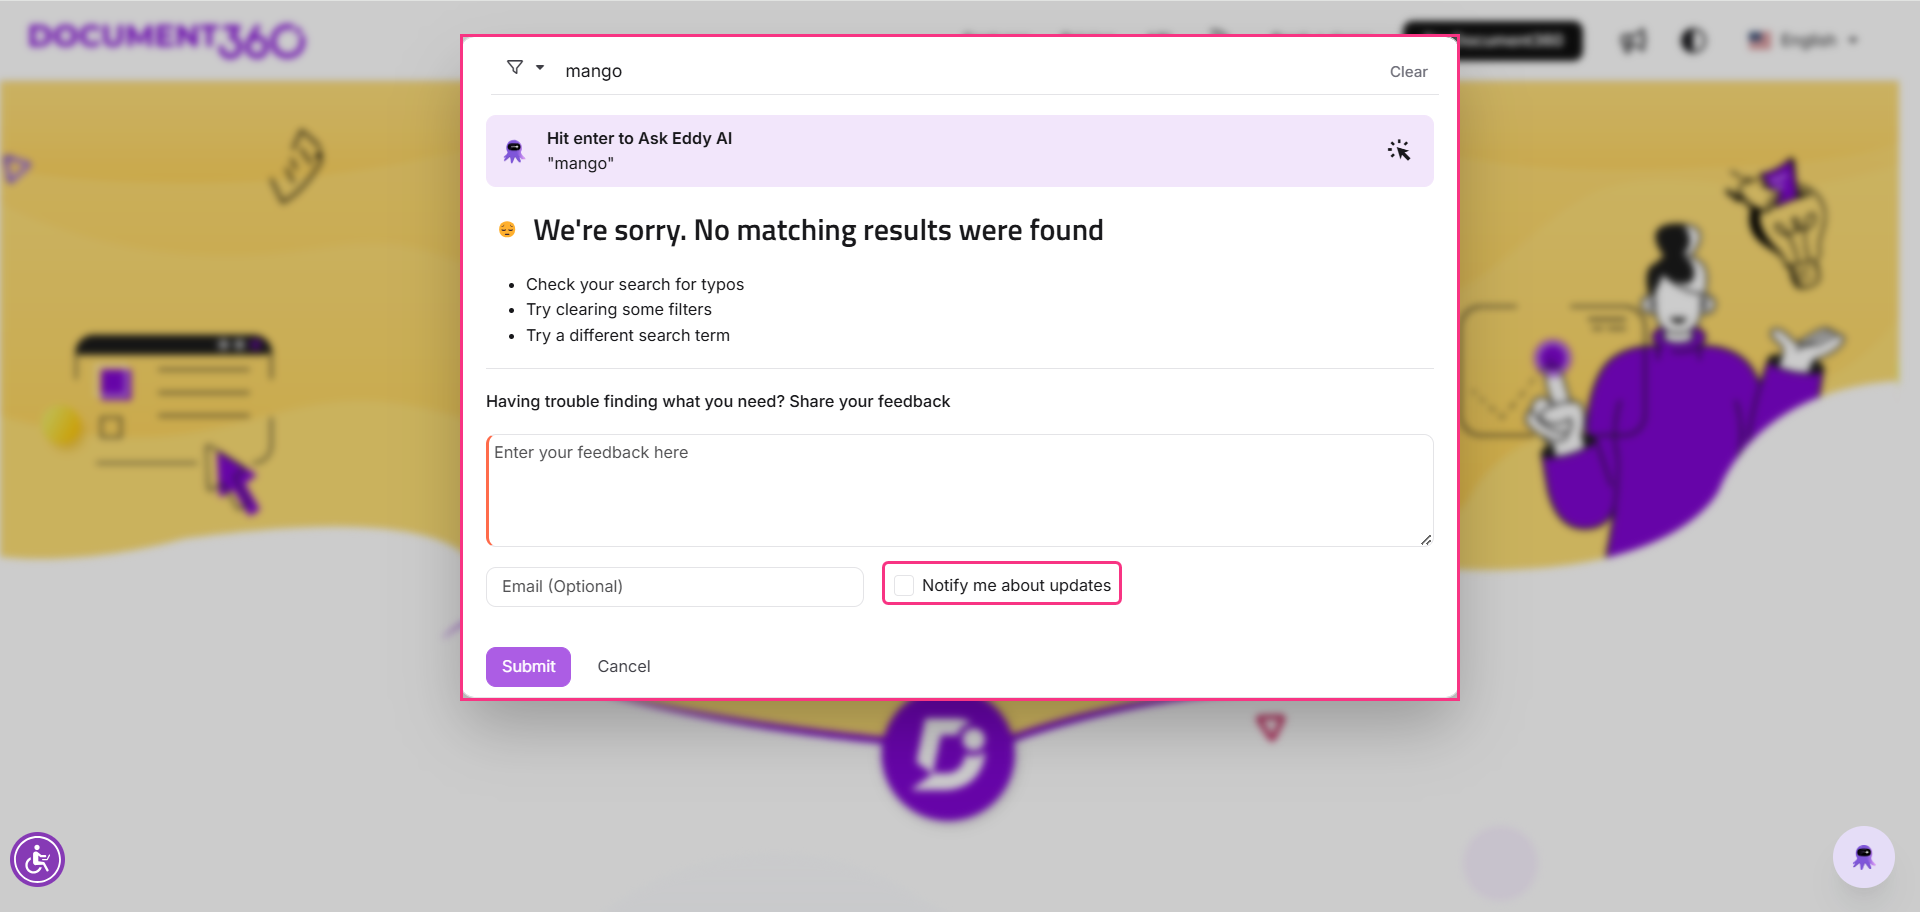
The Unanswered queries tab captures feedback from readers who did not find results for their search queries. This feedback is useful for uncovering gaps in content or identifying keywords to improve search relevance.
When a reader does not find any results for a particular search query or keyword, they can share their feedback. The system compiles all feedback under the Unanswered queries tab.
TIP
Regularly review feedback from the Unanswered queries tab to uncover missing keywords or topics.
Submitting feedback in the knowledge base site
When a reader performs a search that yields no results, they can submit feedback about their query:
Readers can explain what they are looking for.
They can also opt in for updates by selecting the Notify me about updates checkbox and clicking Submit.
For public projects, readers must manually enter their email addresses, while for private and mixed projects, the Email field is automatically prefilled for logged in users with their email addresses.
Accessing feedback in the Knowledge base portal
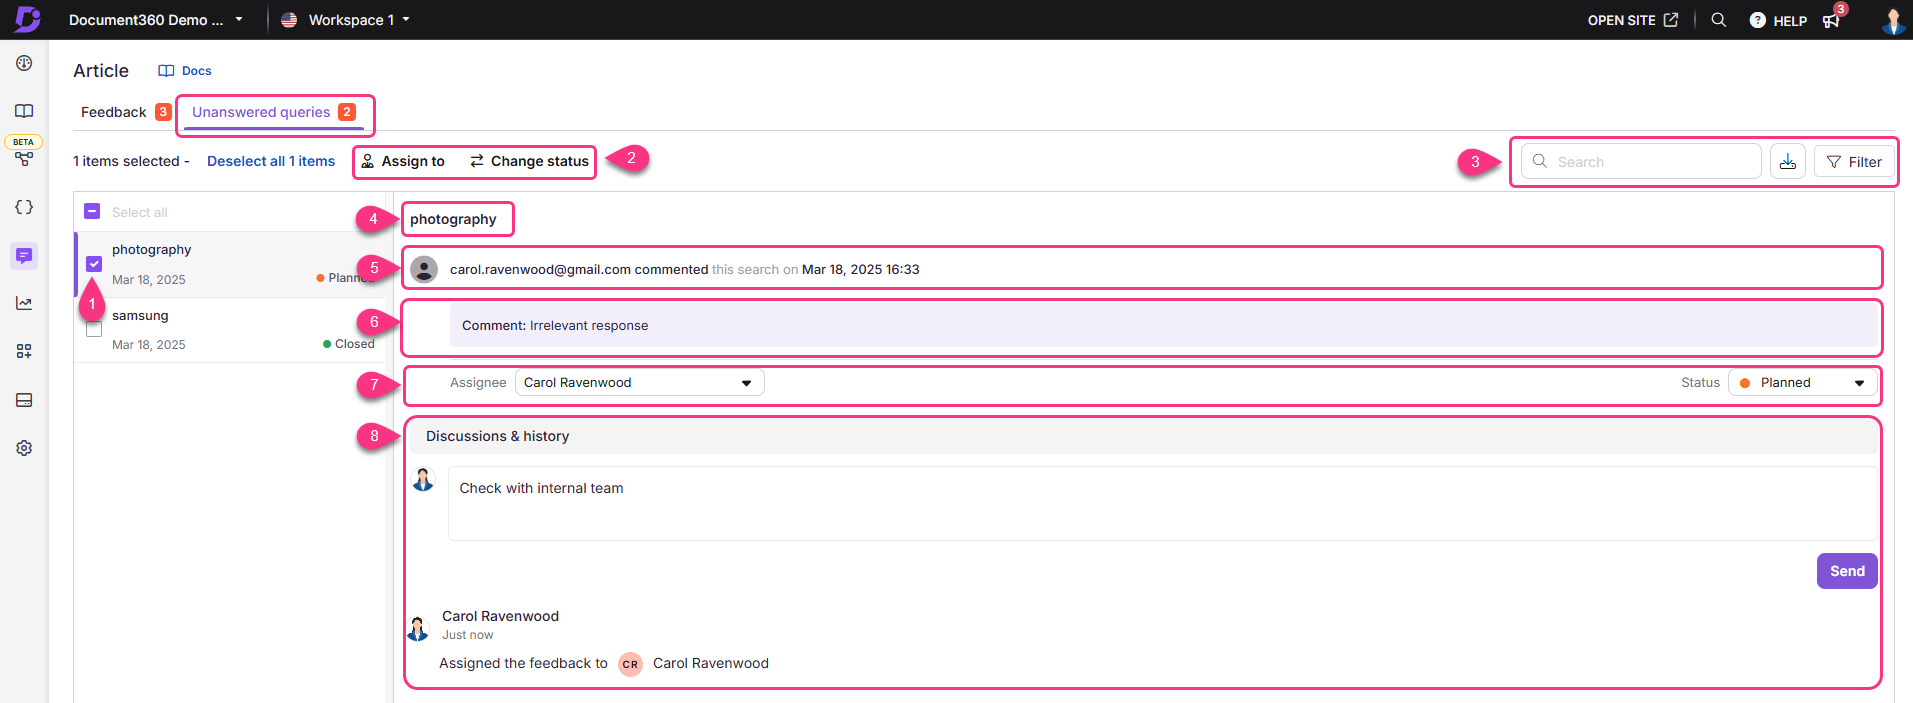
The Unanswered queries tab shows:
Select feedback: Click the checkbox of a feedback to access bulk action options. Use the Select all checkbox to select all feedback.
() Assign to: Click to set an assignee and the status of the feedback.
() Change status: Click to change the status of the feedback.
Search feedback: Use the search field to search for feedback.
Export CSV (): Click to export and download the feedback data for external analysis and purposes from the last 90 days.
Filter: Click to filter feedback by:
Application (Both, Knowledge base, Knowledgebase assistant)
Assigned to - filter by a contributor name
Feedback type (Select all, Dislike, Like)
Status (Select all, Open, Planned, In Progress, Complete, Closed)
Date range (All, 7 days, 30 days, 3 months, 1 year, Custom date)
Search query: Displays the search query that received the feedback.
Feedback details: Displays the reader’s email ID, feedback type, and the date & time of the feedback.
Feedback comment: Displays the comment added along with feedback.
Assignee: Select the assignee from the dropdown to assign the feedback to.
Status: Click to set the status of the individual feedback.
Discussion & history: This section displays the internal discussions and history log of the feedback.
Add comments and replies in the text field that can be viewed by the internal team accounts.
Once done, click Send.
Addressing unanswered queries feedback
To respond to feedback in the Unanswered queries tab, follow the steps below:
Check and review the search query provided by the user. This information helps you understand what the reader was looking for but couldn’t find.
Read any additional comments from the user to gain more context about their needs.
Use the Assignee dropdown to assign the feedback to a relevant team member.
Take the necessary steps to address the feedback, such as creating new content, updating existing articles, or adding relevant keywords to improve search results.
Update the feedback with any comments/responses related to the feedback in the Discussions & history field.
Use the status options (Open, Planned, In Progress, Complete, and Closed) to track the feedback’s progress.
By addressing feedback in this tab, you can close content gaps and improve the search experience for your readers.
Managing feedback in the Feedback manager
To assign the feedback to any user or to set the status of a feedback received in the Feedback tab or in the Unanswered queries tab,
Select the checkbox next to the feedback you wish to update the assignee and status for. Only feedback with an Open status can be selected for these actions.
Click () Assign feedback or () Change status available above the list of feedback.
A Manage feedback pop-up will appear.
To assign the feedback to a user, click the Assign dropdown and click the desired user. Use the search field to search for the user.
To set the status of the feedback, click the Select status dropdown and click the desired status (Open, Planned, In progress, Complete, Closed).
Once done, click Save.
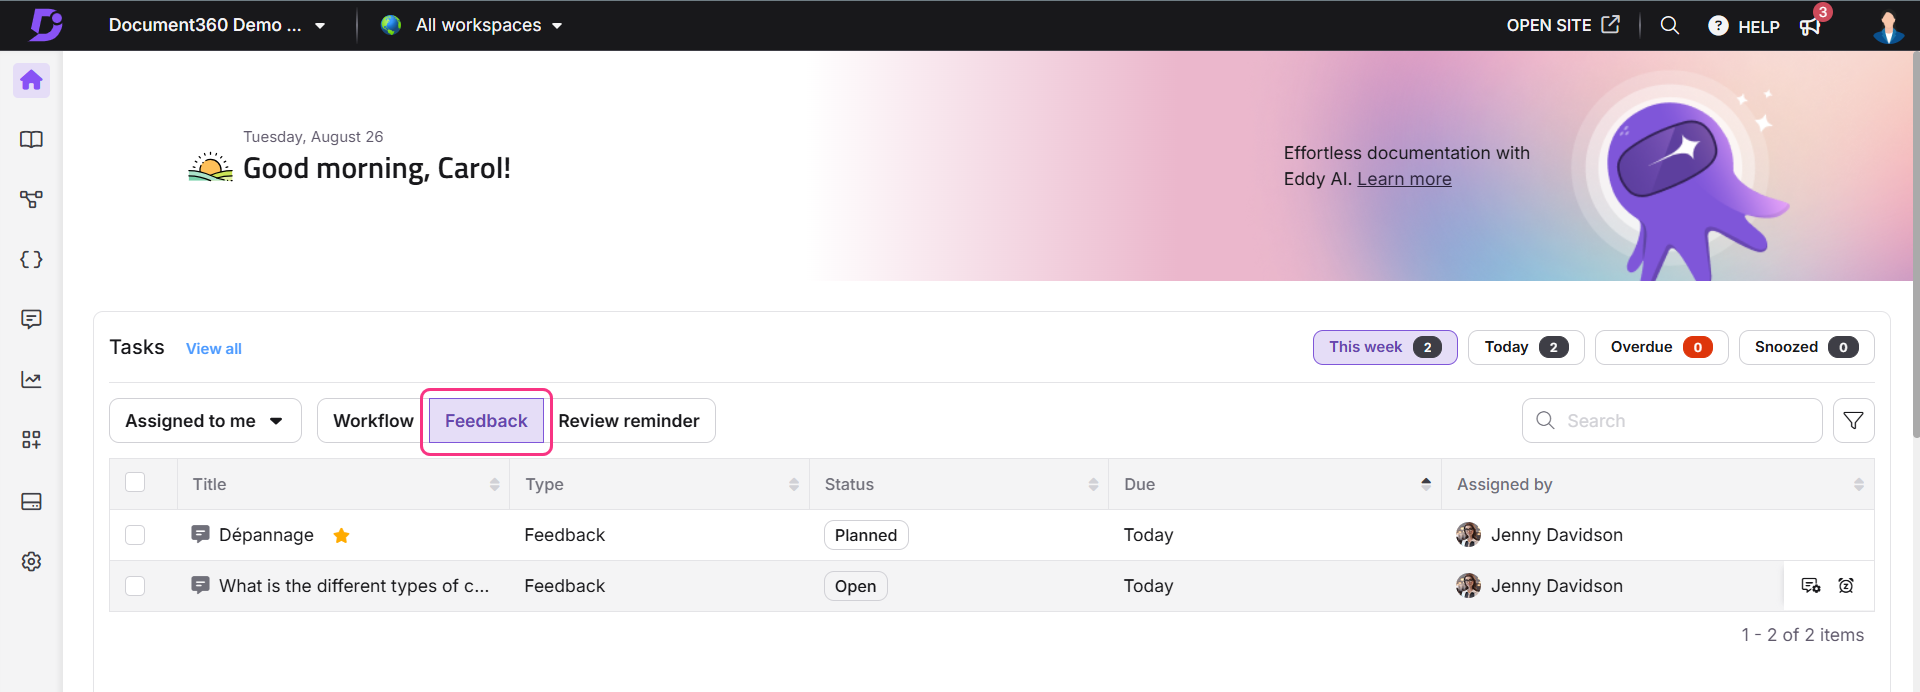
Managing article feedback in the Overview page
The Tasks card on the Overview page displays article feedback assigned to you from the Feedback manager.
Each feedback task displays the article title, task type, status, due date, and assignee.
To perform quick actions on the feedback, hover over the task or select the checkbox next to the article name. You can perform the following actions:
Snooze - Click the Snooze () icon to temporarily postpone a task by choosing one of the following options: Tomorrow (9 AM), Next week (Monday, 9 AM), or a custom date and time.
Manage feedback - Click the Manage feedback () icon to assign the feedback to any user or to set the status of the feedback as Open, Planned, In progress, Complete, or Closed.
Hover over a feedback and click the information () icon to view details such as contributors, article status, URL, description and more.
Clicking the feedback will take you to the Feedback tab in the Feedback manager.
FAQ
What is the difference between "Complete" and "Closed" in the Feedback Manager?
In the Feedback manager, the status Complete indicates that the feedback has been fully addressed, while Closed signifies that all actions related to the feedback are resolved. Once the feedback is closed, it cannot be reopened, whereas feedback in Complete status can be set to Open if needed.
For example:
Let's say a user submits feedback about an issue with a feature. Once the team reviews and addresses the feedback, they mark it as Complete to indicate that the work is complete. However, if the user later reports that the issue isn't fully resolved, the team can change the status from Complete back to Open to continue working on it.
On the other hand, if the feedback is not in scope or the team finishes all related actions, such as updating the documentation and informing the user, they mark the feedback as Closed. Once feedback is Closed, it cannot be reopened for further changes.
Is there a character limit for feedback provided by readers?
Yes, readers can provide up to 1000 characters of feedback, regardless of whether it is positive or negative. The limit includes spaces, and formatting options like bold, italics, or bullet points are not supported. A character counter is displayed below the input box to show the remaining characters.
Can I export the data from the Feedback manager?
Yes, you can export data from the feedback from the Feedback manager for a maximum of up to 90 days.
Why did I receive an email notification, but can’t find the feedback in Feedback Manager?
If a reader withdraws their feedback (for example, by undoing a Like or Dislike) before you take any action on it, the feedback is automatically removed from the Feedback Manager. Email notifications are sent when feedback is first submitted, but the feedback may not remain available if it is later withdrawn by the reader.
Can I customize the feedback reasons available when selecting a dislike for an article?
The feedback reasons (such as Need more information, Inaccurate or irrelevant content, Difficult to understand, Missing/broken link, or Others) are currently not customizable. However, if you would like to request a customization, please reach out to our support team.
How should I effectively manage and respond to article feedback?
Start by prioritizing feedback on high-traffic or recently updated articles—especially those marked as "Dislike." Address critical issues first, such as inaccurate information or unclear instructions. Once updates are made, always verify that the concern is resolved before marking the feedback as complete. For feedback that includes a response request, reply politely through the feedback tool, summarize the action taken, and thank the reader for their input.
What’s the best way to handle unclear or unanswered feedback and ensure nothing gets missed?
Review article feedback regularly—ideally weekly—to stay on top of actionable items. For feedback that’s vague or unclear, use context to interpret intent or leave a follow-up comment if your tool allows. Avoid auto-resolving such items. Track unresolved feedback for future follow-up. For new articles or recent updates, monitor feedback more closely in the first few days to catch any immediate concerns.
Is it possible to localize or customize the text in the feedback form for articles in the knowledge base site?
Yes. You can localize or customize the text displayed in the feedback form using the Localization variables feature. This allows you to translate the default text into other languages. To update this text,
Navigate to Settings () in the left navigation bar in the Knowledge base portal.
In the left navigation pane, navigate to Knowledge base portal > Workspace & localization.
In the Localization variables tab, expand the Feedback accordion.
You can update elements such as Please enter a valid email, Notify me about updates, and Submit.NOTE
By default, the system localizes variables to the respective language.
Click Save.