Categories are the backbone of your knowledge base. They give your documentation structure, help readers navigate to the right content, and make it easier for your team to organize and maintain articles over time.
In Document360, a category works like a folder that groups related articles under a common topic. You can nest categories up to seven levels deep, change their type, move them across workspaces, and control their visibility, all from the Knowledge base portal.
Why categories matter
Without a clear category structure, even the best-written articles become hard to find. Well-organized categories:
- Improve navigation: Readers can browse through a logical hierarchy instead of relying entirely on search.
- Reduce duplication: Grouping related articles in one place prevents the same information from being scattered across the knowledge base.
- Support team workflows: Categories make it easier to assign ownership, track content status, and manage reviews across large documentation sets.
- Improve discoverability: A well-named category hierarchy helps both readers and search engines understand the structure of your content.
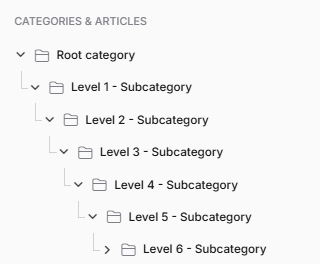
Category hierarchy
Every category in Document360 sits within a hierarchy. At the top is the root category, and below it you can create up to six subcategory levels, giving you a maximum depth of seven levels.
Use up to three subcategory levels for optimal navigation. Two levels is ideal for most knowledge bases. Deeper hierarchies can make it harder for readers to find content without using search.
Get started
| Article | What it covers |
|---|---|
| Create category Learn more → |
Add a new category or subcategory to your knowledge base. Covers all five creation methods and category icon customization. |
| Category types Learn more → |
Understand the four category types: Folder, Index, Page, and GitHub, and when to use each one. |
| Mapping a category with a folder in Drive Learn more → |
Map a Drive folder to a category so uploaded images automatically save to the right location. |
| Move category Learn more → |
Move a category and all its content within or across workspaces. |
| Clone category Learn more → |
Create an exact copy of a category and its articles within or across workspaces. |
| Delete category Learn more → |
Permanently remove a category and its contents. Deleted items go to the recycle bin for 30 days. |
| Hide & Unhide category Learn more → |
Temporarily hide a category from the Knowledge base site without deleting it. |
| Rename category Learn more → |
Update a category's display name. Renaming does not change the category slug or article URLs. |
| Star category Learn more → |
Add frequently used categories to your Starred list for quick access in the portal. |
Best practices
- Keep names clear and reader-centric: Category names should describe what readers will find inside, not how your team internally classifies content. Avoid abbreviations, jargon, and overly technical terms.
- Use consistent formatting: Decide on title case or sentence case and stick to it across all categories.
- Limit hierarchy depth: Aim for two to three subcategory levels. Deeper structures increase cognitive load and reduce discoverability.
- Avoid empty categories: Categories with no published articles do not appear on the Knowledge base site and can confuse your team during content planning.
- Plan before you build: Sketch out your category structure before creating articles. Restructuring later is possible but time-consuming.
- Use keywords in category names: Category names appear in page titles and navigation. Choosing descriptive, keyword-aware names improves SEO.
FAQ
Is there a limit to the number of categories I can create?
Yes, you can create up to 1,000 categories per workspace.
How many subcategory levels can I create?
You can create up to seven levels: one root category and six subcategory levels. The New category option becomes inactive once you reach the seventh level.
What is the character limit for a category name?
Category names have a limit of 300 characters, including spaces.
Why is a category not visible on the Knowledge base site?
A category may not appear on the Knowledge base site if:
- All articles within it are hidden or not published.
- The category is empty (no articles have been added).
- The category itself is hidden.
Ensure at least one article in the category is published and visible.
Can an article belong to multiple categories?
Yes. You can display an article in multiple categories using the Replicate () option. Replicated articles share the same content. Updating the source article automatically updates all replicated versions.
Can I reorder categories after they are created?
Yes. Use the drag and drop () handle next to a category name in the Categories & Articles pane to reorder it.