Op de pagina Alle artikelen kun je je volledige artikelenlijst filteren op status, bijdrager, categorie, datum, tags en meer. Filters helpen je snel specifieke artikelen te vinden zonder door de volledige lijst te hoeven scrollen, en je kunt veelgebruikte filtercombinaties opslaan als aangepaste filters voor hergebruik.
Wanneer artikelen filteren
Filter op status om alle concept-, niet-gepubliceerde of verouderde artikelen in je werkruimte te vinden tijdens een inhoudsaudit.
Filter op recensieherinnering om verouderde artikelen te vinden die aandacht nodig hebben.
Filter op Bijdrager om alle artikelen te zien die aan een specifiek teamlid horen.
Pas filters toe om de lijst te verkleinen voordat je bulkacties uitvoert zoals Publiceren, Verbergen of Verwijderen.
Pas een filter toe
Navigeer naar Documentatie () in de linker navigatiebalk.
Klik op Alle artikelen () in het linker navigatiepaneel.
Gebruik het keuzemenu Alle artikelen bovenaan om op status te filteren, of klik op de knop Filter () om toegang te krijgen tot alle filteropties.
Selecteer de filters die je wilt toepassen en klik op Toepassen.
Toegepaste filters verschijnen als tags bovenaan de artikellijst, zodat je in één oogopslag kunt zien wat er actief is.

Beschikbare filters
Status
Filtert artikelen op hun huidige redactionele status.
Optie | Wat het laat zien |
|---|---|
Allemaal | Alle artikelen, ongeacht status. |
Gepubliceerd | Artikelen met Gepubliceerde status. |
Ongepubliceerd | Artikelen met ongepubliceerde status. |
Gepland | Artikelen staan gepland voor publicatie. |
Draft | Artikelen met Draft-status. |
Gebroken links | Artikelen die links hebben gebroken op basis van de meest recente linkvalidatie. |
Verouderd | Artikelen die als Vervallen zijn gemarkeerd op de kennisbanksite. |
OPMERKING
Om gepubliceerde artikelen binnen een specifieke tijdsperiode te vinden, past u de filters Gepubliceerde Status en Datum toe. De resultaten zullen echter zowel recent gepubliceerde als bijgewerkte en hergepubliceerde artikelen bevatten. Om het verschil te maken tussen nieuw gepubliceerd en heruitgegeven, beweeg je muis over een artikel en klik je op het info-icoon om de Aangemaakt op-datum en Status (publicatiedatum) te bekijken.
Workflowstatus
Filtert artikelen op hun huidige workflowfase. De beschikbare opties weerspiegelen de workflow-statussen die in de Workflow Designer van uw project zijn geconfigureerd. Selecteer Alles om artikelen te tonen, ongeacht de workflowstatus.
Workflow toegewezen aan
Filtert artikelen op de gebruiker of gebruikersgroep waaraan ze momenteel in de workflow zijn toegewezen.
Optie | Wat het laat zien |
|---|---|
Allemaal | Alle artikelen, ongeacht de opdracht. |
Niet toegewezen | Artikelen zonder toegewezen gebruikers of gebruikersgroepen. |
Alle gebruikers | Artikelen toegewezen aan elke gebruiker in het project. |
Specifieke gebruikers | Artikelen toegewezen aan één of meer geselecteerde gebruikers. |
Recensieherinnering
Filtert artikelen op hun beoordelingsherinneringsstatus.
Optie | Wat het laat zien |
|---|---|
Allemaal | Alle artikelen, ongeacht de beoordelingsstatus. |
Fresh | Artikelen die hun beoordelingsdatum nog niet hebben bereikt. |
Oud | Artikelen die hun beoordelingsdatum hebben bereikt en een beoordeling vereisen. |
OPMERKING
De Review-herinneringsfilter is alleen beschikbaar bij particuliere projecten.
In de hoofdrol
Filtert artikelen op of ze met een ster zijn gemarkeerd.
Optie | Wat het laat zien |
|---|---|
Allemaal | Alle artikelen, ongeacht de sterstatus. |
In de hoofdrol | Artikelen die gestern zijn. |
Niet gespeeld | Artikelen die niet zijn gemarkeerd. |
Voorwaardelijke inhoud
Filtert artikelen op het type conditionele inhoudsparameters dat erin wordt gebruikt. Selecteer één of meer regeltypen om de lijst te verkleinen tot artikelen die ten minste één overeenkomend blok met conditionele inhoud bevatten.
Optie | Wat het laat zien |
|---|---|
Land | Artikelen die een voorwaardelijk inhoudsblok met een Country-parameter bevatten. |
Datum | Artikelen die een voorwaardelijk inhoudsblok bevatten met een Datum-parameter. |
Apparaattype | Artikelen die een voorwaardelijk inhoudsblok bevatten met een apparaattypeparameter. |
Werkruimte | Artikelen die een voorwaardelijk inhoudsblok bevatten met een Workspace-parameter. |
Lezersgroepen | Artikelen die een voorwaardelijk inhoudsblok bevatten met een parameter voor Lezergroepen. |
IP-adres | Artikelen die een voorwaardelijk inhoudsblok bevatten met een IP-adresparameter. |
Zichtbaarheid
Filtert artikelen op hun zichtbaarheid op de kennisbanksite.
Optie | Wat het laat zien |
|---|---|
Allemaal | Alle artikelen, ongeacht zichtbaarheid. |
Zichtbaar | Alle artikelen behalve verborgen. |
Verborgen | Artikelen gemarkeerd als verborgen, weergegeven met een doorstreep in het portaal. |
Leesbewijs
Filtert artikelen op of leesontvangst is ingeschakeld.
Optie | Wat het laat zien |
|---|---|
Allemaal | Alle artikelen, ongeacht de status van de leesontvangst. |
Ingeschakeld | Artikelen met een leesbewijs ingeschakeld. |
Gehandicapt | Artikelen met een ontvangstbewijs voor gelezen gelezen uitgeschakeld. |
OPMERKING
De Read receipt-functie is alleen beschikbaar voor Private en Mixed projecten in KB site 2.0. Lees meer →
Bijdrager
Zoek naar en selecteer één of meer bijdragers om artikelen die aan hen gekoppeld zijn te filteren. De standaardselectie toont artikelen voor alle bijdragers.
Categorie
Filter artikelen op categorie of subcategorie. Selecteer één of meer categorieën uit de lijst. Breid een wortelcategorie uit om toegang te krijgen tot subcategorieën.
OPMERKING
Het selecteren van een categorie toont alleen artikelen direct onder die categorie. Om artikelen uit een subcategorie op te nemen, selecteer je de subcategorie handmatig.
Datum
Filter artikelen op hun laatst bijgewerkte datum. Van toepassing op artikelen in de status Gepubliceerd, Nieuw, Concept en Verouderd.
Optie | Verspreiding |
|---|---|
Allemaal | Geen datumbeperking. |
7 dagen | Laatste 7 dagen. |
30 dagen | Laatste 30 dagen. |
3 maanden | De afgelopen 3 maanden. |
1 jaar | Het afgelopen jaar. |
Aangepaste datum | Geef een aangepaste datumperiode op. |
Tags
Zoek naar en selecteer één of meer tags om artikelen die eraan gekoppeld zijn te filteren. De standaardselectie bevat Alle tags en Geen (artikelen zonder tags).
Labels
Zoek naar en selecteer één of meer labels om artikelen te filteren op interne label. De standaardselectie bevat Alle labels en Geen (artikelen zonder labels).
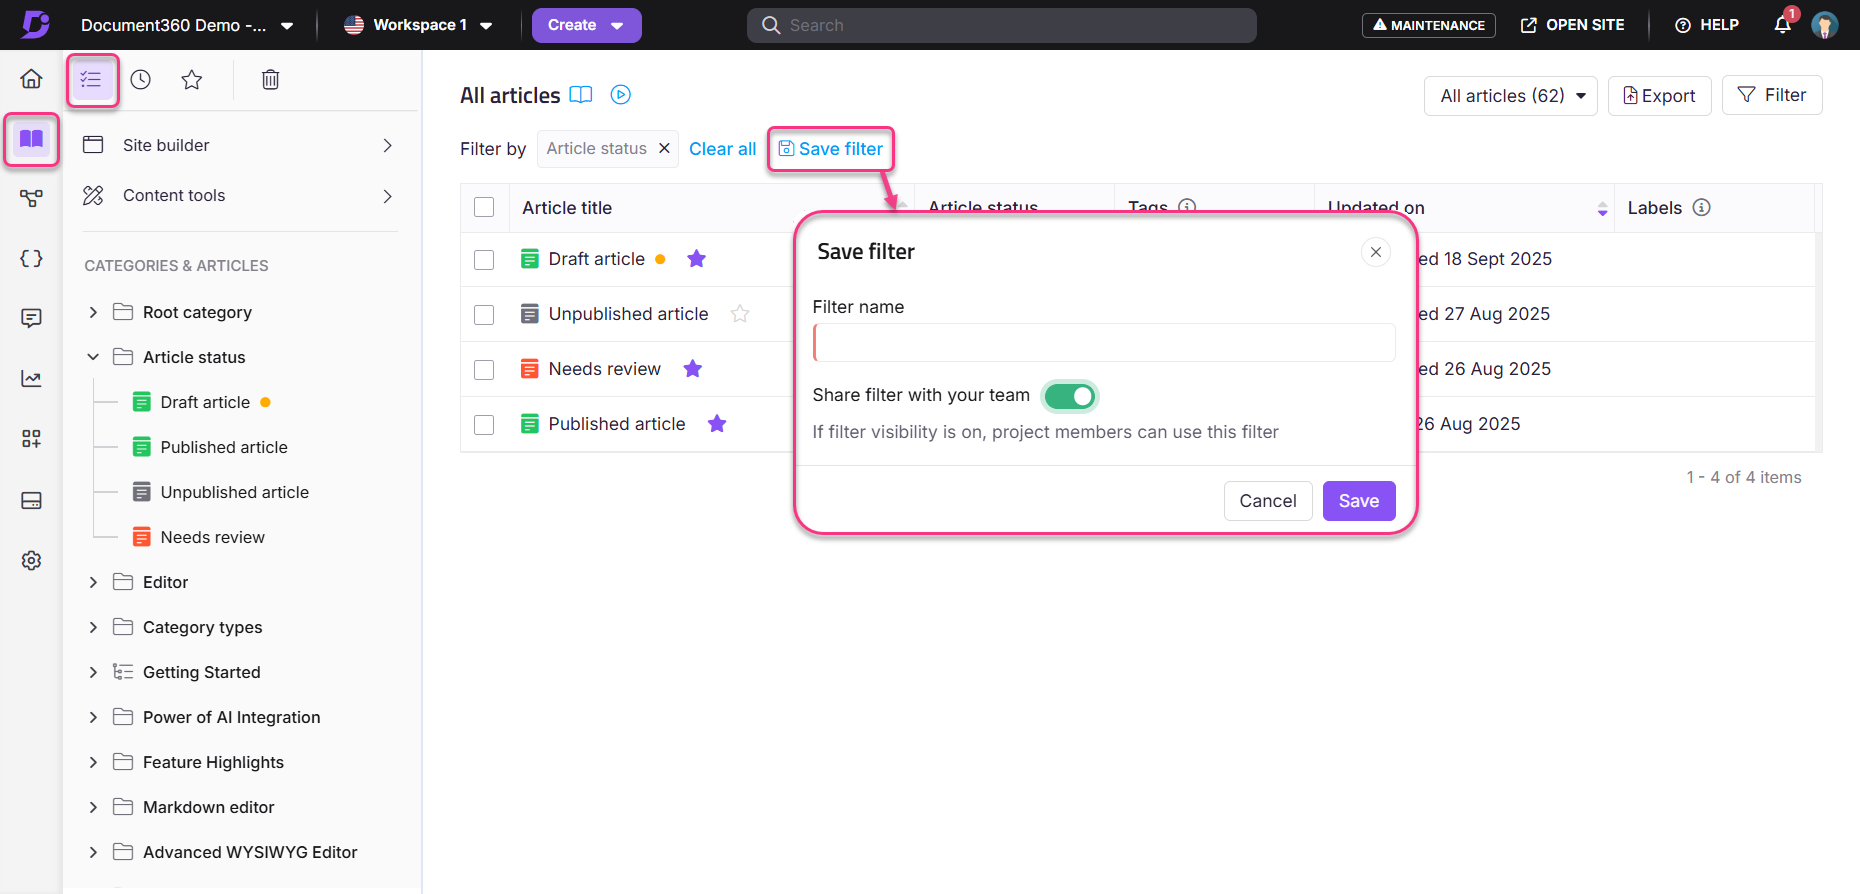
Sla een aangepast filter op
Je kunt een combinatie van filters opslaan als een aangepast filter om later opnieuw te gebruiken. Opgeslagen aangepaste filters zijn toegankelijk via de uitvouwpijl rechts van de Filterknop .
Navigeer naar Documentatie () > Alle artikelen ().
Pas de filters toe die je wilt opslaan en klik op Toepassen.
Klik op Sla opslaan-filter.
Voer in het Save-filterpaneel een Filternaam in van maximaal 30 tekens.
Schakel het deelfilter met teamleden in als je wilt dat het filter beschikbaar is voor andere gebruikers. Als het wordt weggelaten, is het filter alleen voor jou zichtbaar.
Klik op Opslaan.
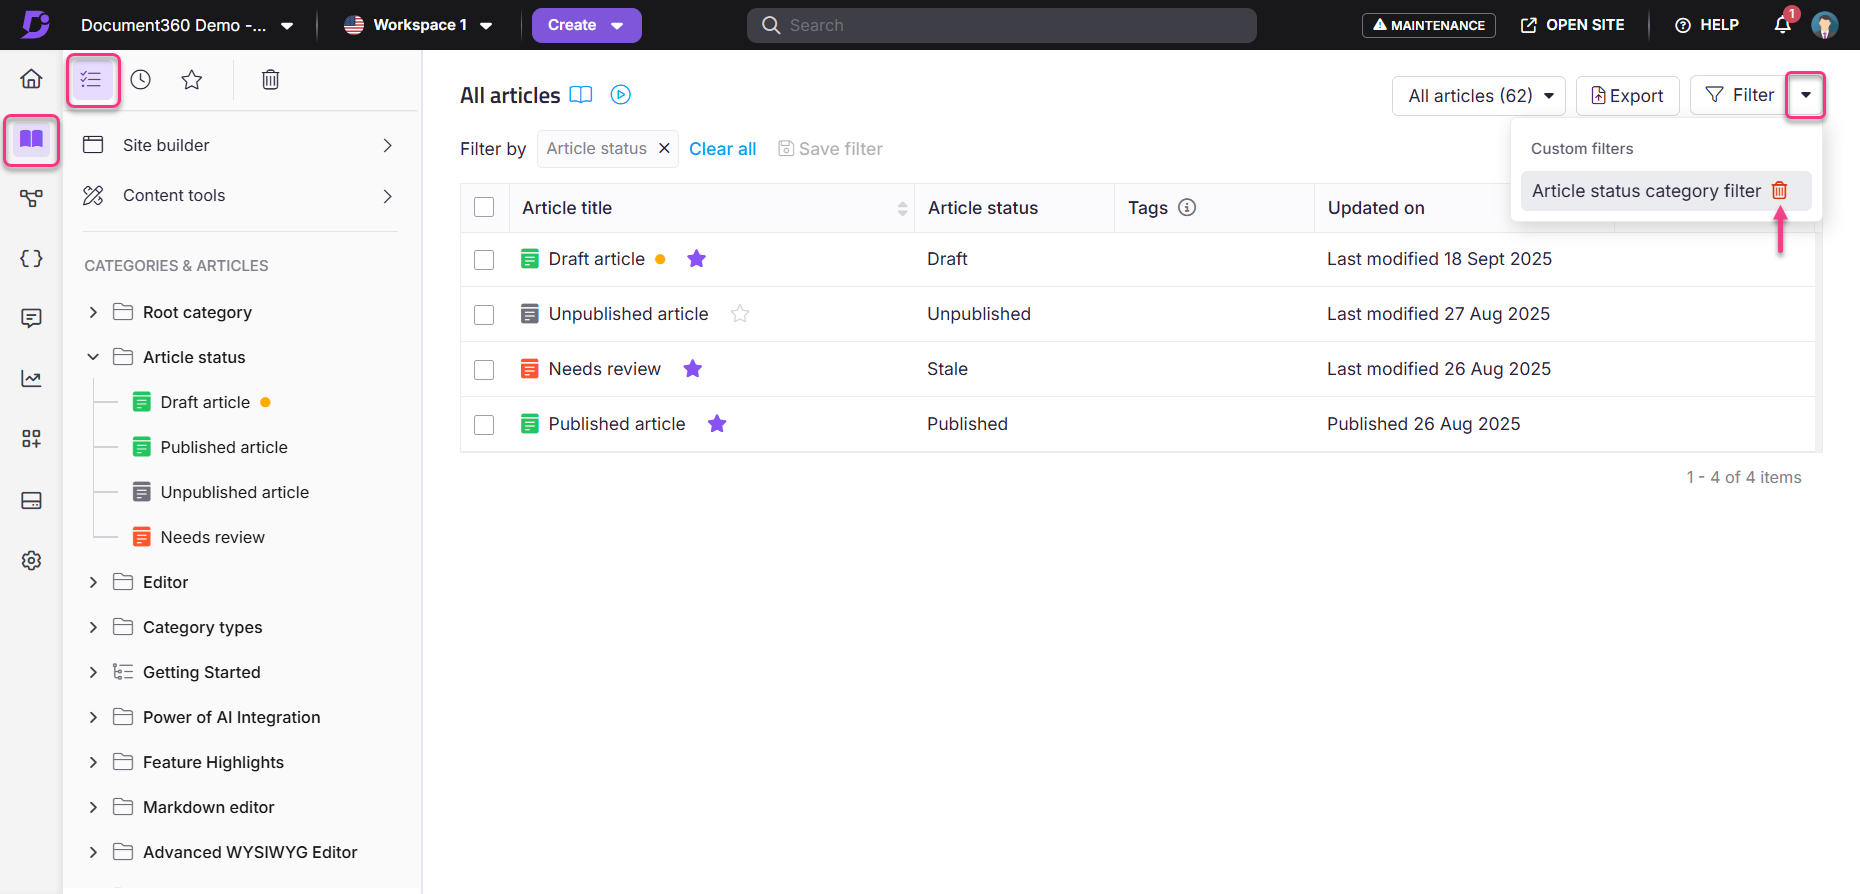
Verwijder een aangepast filter
Klik op de uitvouwpijl () naast de Filterknop .
Beweeg je muis over het aangepaste filter en klik op het Verwijderen () icoon.
Klik op Ja in de bevestigingsprompt.
OPMERKING
Aangepaste filters kunnen niet worden bewerkt na het opslaan. Verwijder en maak het filter opnieuw aan als er wijzigingen nodig zijn. Alleen de gebruiker die een aangepaste filter heeft aangemaakt kan deze verwijderen, zelfs als deze met het team is gedeeld.
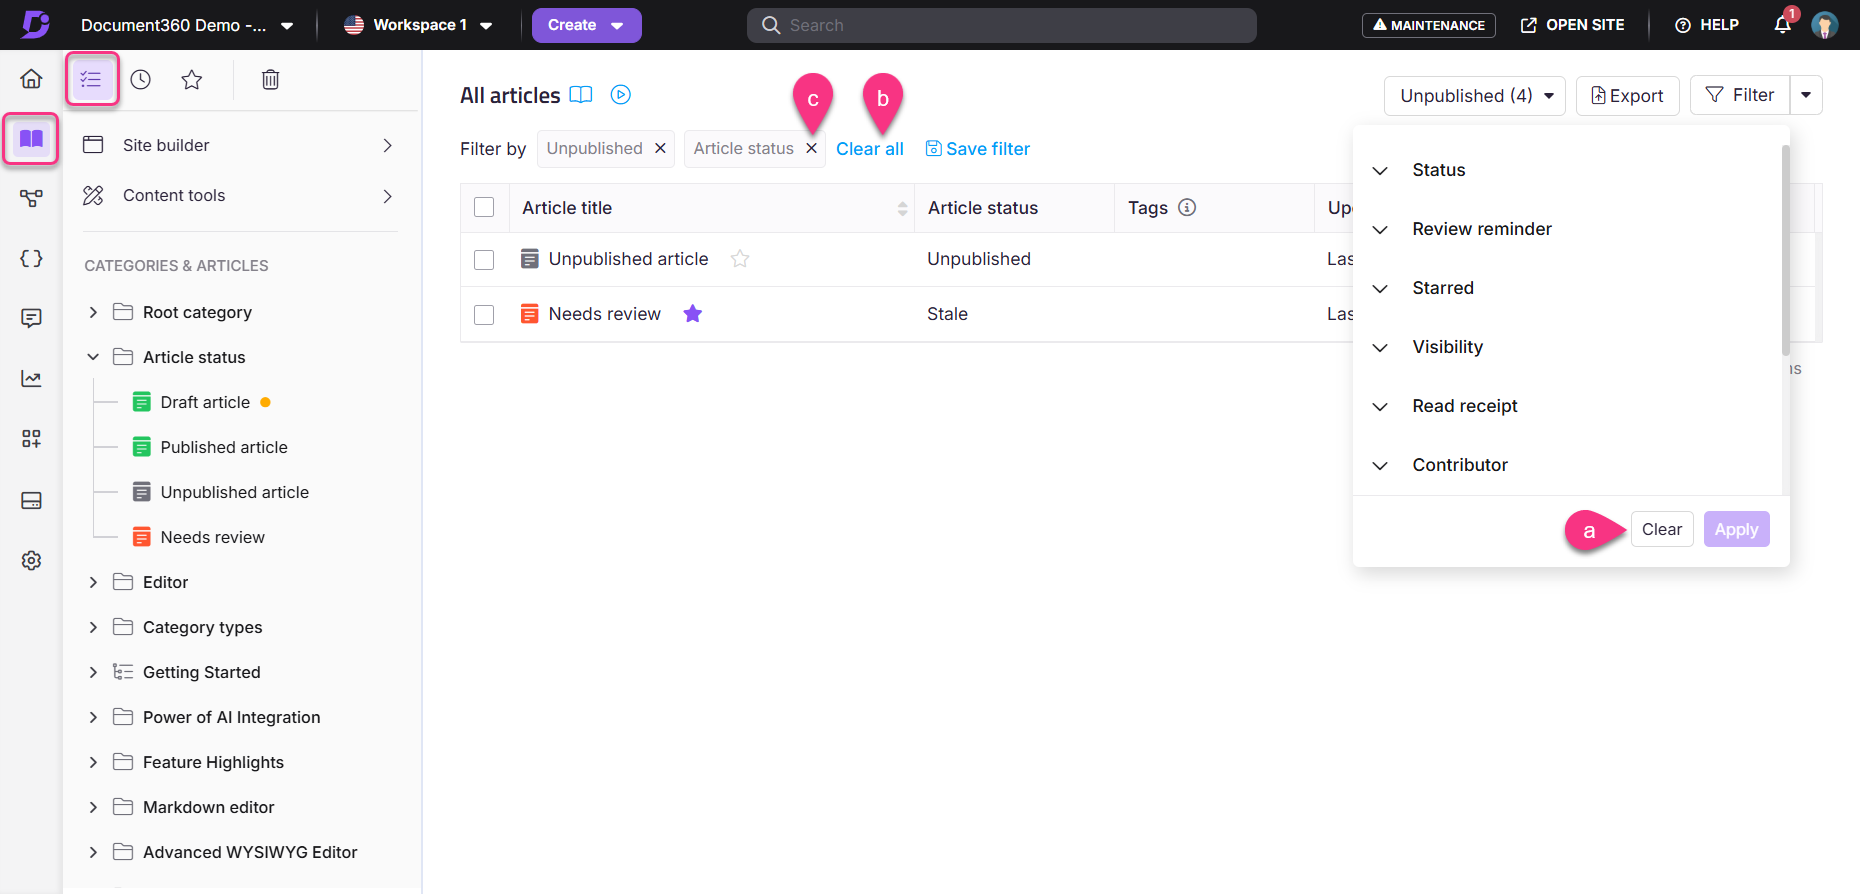
Doorzichtige filters
Om toegepaste filters te verwijderen:
Klik bovenaan het paneel op 'Alles verwijderen ' om alle actieve filters tegelijk te verwijderen.
Klik op Clear in het filtermenu om de filterselecties te resetten.
Klik op de X naast een individuele filtertag boven de artikellijst om alleen dat filter te verwijderen.
Best practices
Filter voordat je bulkacties hebt. Pas altijd de relevante filters toe voordat je artikelen selecteert voor bulk publiceren, verbergen, verwijderen of verplaatsen om te voorkomen dat je op de verkeerde set artikelen reageert.
Bewaar filters voor terugkerende taken. Als je regelmatig artikelen controleert op een specifieke bijdrager, status of datum, sla die combinaties dan op als aangepaste filters zodat je ze niet elke keer opnieuw hoeft te maken.
Filter delen met je team. Gebruik de Delen-filterschakelaar bij het opslaan van filters die je hele team zal gebruiken, bijvoorbeeld een filter voor alle Verouderde artikelen die aan een specifieke workflowfase zijn toegewezen.
Combineer Datum- en Statusfilters. Het gebruik van de Datumfilter samen met Concept- of Nieuwe status is een snelle manier om artikelen te vinden die recent zijn aangemaakt maar nog niet gepubliceerd.
Gebruik het filter voor voorwaardelijke inhoud om artikelen te auditen met specifieke regeltypes. Als je de regels voor voorwaardelijke inhoud in je kennisbank beoordeelt of bijwerkt, helpt deze filter je snel te identificeren welke artikelen worden getroffen.
FAQ
Kan ik een aangepast filter bewaren voor toekomstig gebruik?
Ja. Na het toepassen van je filters klik je op 'Sla filter', geef je het een naam en deel je het optioneel met je team. Opgeslagen filters zijn toegankelijk via de uitvouwpijl naast de Filterknop.
Kan ik een opgeslagen aangepast filter bewerken?
Nee. Aangepaste filters kunnen niet worden bewerkt na het opslaan. Om een aangepast filter bij te werken, verwijder je het en maak je een nieuw filter aan met de bijgewerkte instellingen.
Kunnen andere gebruikers een gedeeld aangepast filter verwijderen?
Nee. Alleen de gebruiker die het aangepaste filter heeft aangemaakt, kan het verwijderen, zelfs als het met het team gedeeld is.
Waarom is de filter voor leesbevestigingen niet beschikbaar in mijn project?
De leesontvangstfunctie en het bijbehorende filter zijn alleen beschikbaar voor Private en Mixed projecten in KB site 2.0.