Revision history in Document360 lets you track, compare, and manage every version of an article from a single panel. When a published article is edited, a new unpublished version is created automatically. The previous version is added to the revision history but remains live on the knowledge base site until the new version is published.
This allows admins, reviewers, and contributors to compare differences between versions and revert to a previous version at any time.
Creating a new article version does not delete existing content. Only a user can manually delete older article versions.
When to use revision history
- Track what changed between two versions of an article before republishing.
- Fork an older version to restore content from a previous state without losing the current version.
- Use version comparison to review content changes during the review and approval process.
- Use workflow history to see which workflow stages an article version has passed through and who was assigned at each stage.
Create an article version
There are two ways to create a new article version: forking an older revision, or editing directly from the editor.
Fork an older revision
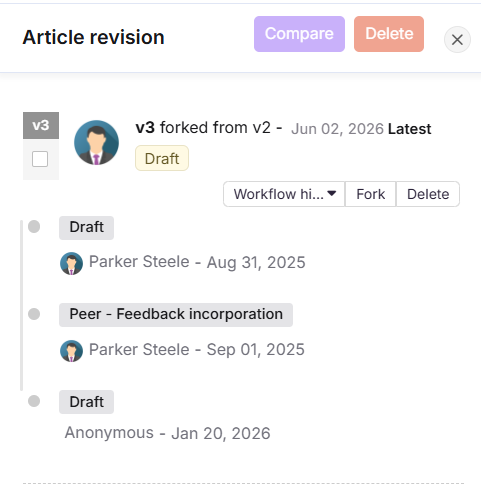
Forking is the recommended approach when you want to branch off from or restore a specific previous version. When you fork a version, Document360 creates a new draft with the exact content of that version, without affecting the currently published article.
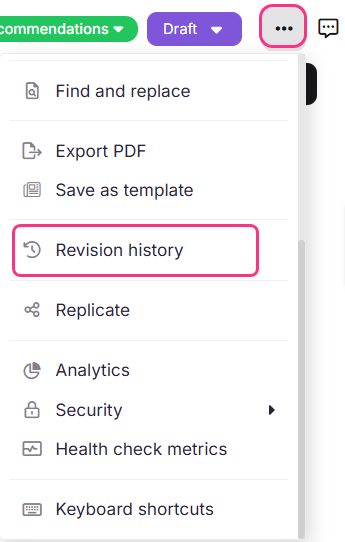
- Navigate to the article in the knowledge base portal.
- Click the More () icon in the article header and select Revision history ().
- Click Fork on the version you want to fork.
- Click Yes in the confirmation prompt. A new draft version is created with the content of the selected version. The currently published article remains live and unchanged.
- Click Open on the latest version in the history to open it in the editor.
- Make any necessary updates and publish when ready.
Forking before making changes preserves the original version so you can always restore it.
From the editor
You can also create a new version by clicking Edit on a published article. A new draft is created and opened in the editor. Make your changes and publish when ready.
Article revision actions
Each version listed in the revision history supports the following actions:
| Action | What it does |
|---|---|
| Fork | Creates a new article version from the selected version, opened in the editor for editing. |
| Delete | Permanently deletes the article version. This action cannot be reversed. |
| Open | Opens the article version in the editor. Use this to restore a previous version to its published state. |
| Workflow history | Displays all workflow stages, assignees, comments, and dates for that version. |
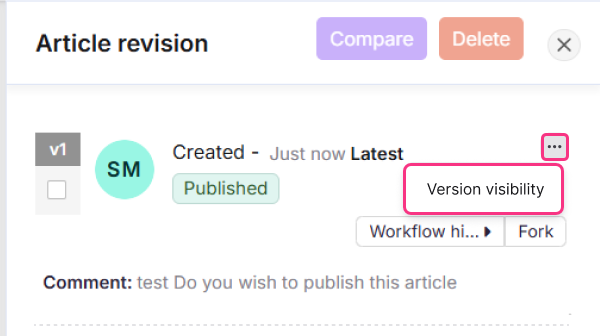
| Version visibility | Opens the Version Visibility modal, where you can control whether this version appears in the published version log on the knowledge base site and set a custom version number. |
You cannot delete a published article version. Only unpublished versions can be deleted.
Each version also displays the version number, contributor name, creation date, and visibility status.
Manage version visibility
The version visibility setting controls whether a published version appears in the version history on the knowledge base site. You can also assign a custom version number to each published version for clearer identification.
To manage version visibility for a published version:
- Navigate to the article in the knowledge base portal.
- Click the More () icon in the article header and select Revision history ().
- Locate the version you want to configure and click Version visibility.
- In the Version Visibility modal, toggle Display this version info on knowledge base site on or off.
- If the toggle is on, edit the Customize version number field to set a version label for this entry. The field is pre-filled with a system-generated value (for example, V10).
- Click Save.
The knowledge base site displays the latest 10 published versions for which visibility is enabled, along with the version number, publication date, publisher, and comments. When a new version is made visible and the limit of 10 is reached, the oldest visible version is removed automatically.
Version number validation rules:
| Rule | Detail |
|---|---|
| Maximum length | 20 characters |
| Allowed characters | Letters, numbers, hyphens (-), and underscores (_) |
| Must be unique | Duplicate version numbers are not allowed per article |
Compare article versions
You can select any two versions in the revision history and compare them side by side.
- Navigate to the article in the knowledge base portal.
- Click the More () icon in the article header and select Revision history ().
- Select the checkboxes for the two versions you want to compare.
- Click Compare.

Content highlighting criteria
The comparison view highlights changes between the two versions using colour coding.
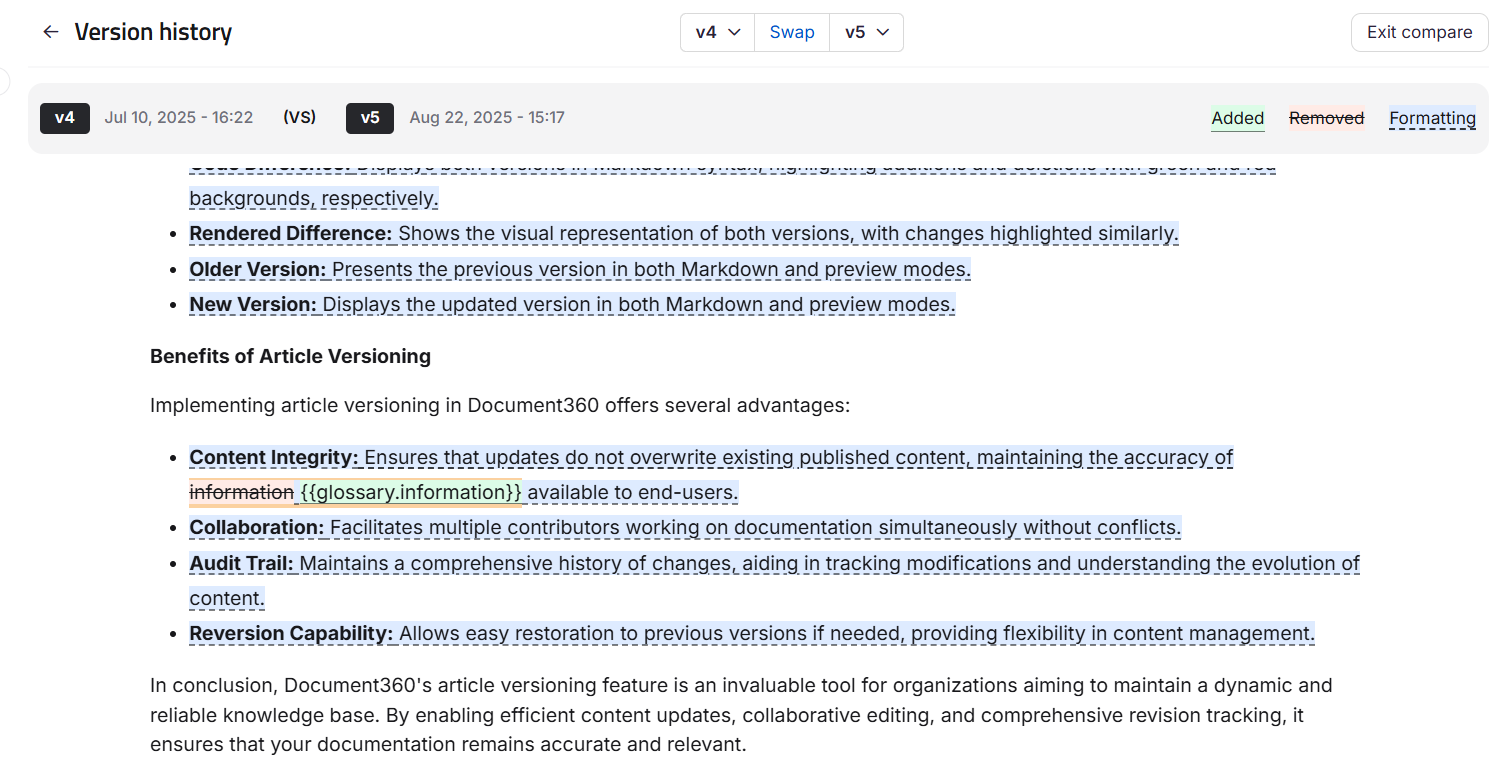
Added content:
- New text is highlighted in green.
- For images, videos, code blocks, PDFs, and self-closing tags (
<br>,<hr>), added content shows a green Added badge. - Table additions are highlighted in green.
Removed content:
- Deleted text is highlighted in red with a strikethrough.
- For images, videos, code blocks, PDFs, and self-closing tags, removed content shows a red Removed badge.
- Table removals are highlighted in red.
Formatting changes:
- Changes to bold, italic, underline, font size, or lists are highlighted in blue.
- Non-text formatting changes such as table styles or image resizing show a blue Modified badge.
Content block movements and multi-formatting changes (applying italic, bold, and underline to the same content block simultaneously) are not highlighted in the comparison view.
Swap versions: The Swap button at the top of the comparison view reverses the comparison order of the two selected versions. All highlights update in real time. Content previously marked as Added will appear as Removed after the swap.
Exit compare: Click Exit compare at the top right to return to the main article view. You are taken back to the exact location you were viewing before entering comparison mode.
Best practices
- Fork before making significant changes to an article so you always have a clean restore point.
- Use the comparison view before republishing a major update to verify that only the intended changes are included.
- Delete redundant draft versions regularly to keep the revision history clean and easier to navigate.
- Check the workflow history on a version when reviewing articles in a multi-stage approval process to confirm who has reviewed it and when.
FAQ
Can I restore a previous revision of an article?
Yes. For published articles, delete the forked version containing recent edits to restore the last published version. For draft or new articles, fork an earlier revision to create a new version from that point, or delete the forked version with recent edits. Forking before making changes always preserves the original version so you can restore it at any time.
How do I discard current changes and revert to the previous version?
If the changes have not been published, open the Revision history, find the previous version, and click Open to view and restore it. This works if the article has been published at least once. If the article was never published, use the Backup and Restore option in Settings to restore the article's content.
Why does the revision history show a team member's name with a recent timestamp even though they have not made recent changes?
This can happen in two situations. First, when one user forks an article version and a different user publishes it later — the revision history shows the name of the user who forked the version, along with the timestamp of when it was published. Second, when a save action is triggered on a version, the timestamp updates to reflect the latest save, even if no meaningful content changes were made. Both are expected behaviors. To see who performed each action and when, click Workflow history on that version in the revision history panel, or check the Team auditing log.
Why are the timestamps of forked versions not in chronological order?
If older versions are opened and updated after forking, the revision history reflects the most recent modification timestamp for each version. This means a version that was originally older may appear with a more recent timestamp if it was edited after forking.
Can I change the published or last updated date of an article to a past date?
No. The published date and last updated date cannot be modified. The last updated date always reflects the most recent modification, regardless of which version was published.