Article revision
Versioning in a knowledge base ensures accurate, up-to-date content by tracking changes, supporting different product versions, and maintaining a history of edits. It helps teams collaborate, revert to previous versions if needed, and comply with audit requirements. Users can access the right information for their needs while minimizing errors and improving transparency.
In Document360, when a user clicks the Edit button on a published article, a new unpublished version of that article is created. The old version is added to the article’s version history but remains available on the Knowledge base site until the new version is published.
This article versioning option allows project admins, reviewers, and contributors to compare differences between versions and revert to a previous version at any time.
NOTE
Creating a new article version does not delete existing content. Only a user can manually delete older article versions.
Creating an article version
There are two ways to create a new version of an article:
Method 1: From the Editor
To create a new article revision, follow the steps below:
Open a published article in the Knowledge base portal.
Click Edit in the article header.
A new version of the article is created and opened as a draft in the text editor.
Update the article content.
Click Publish in the Workflow dropdown and click Yes in the confirmation prompt.
Method 2: Fork an older revision to create a new article version
To restore an old version of the article:
Navigate to the desired article in the Knowledge base portal.
Click the More () icon in the article header and select the Revision history ().
Click Fork on the desired version listed in the history.
Click Yes in the pop-up.
This action will create a new version of the article with the content of the selected article version.
To edit the new version, click Open on the latest version listed in the history.
If required, update the article content.
Click Publish and click Yes in the confirmation prompt.
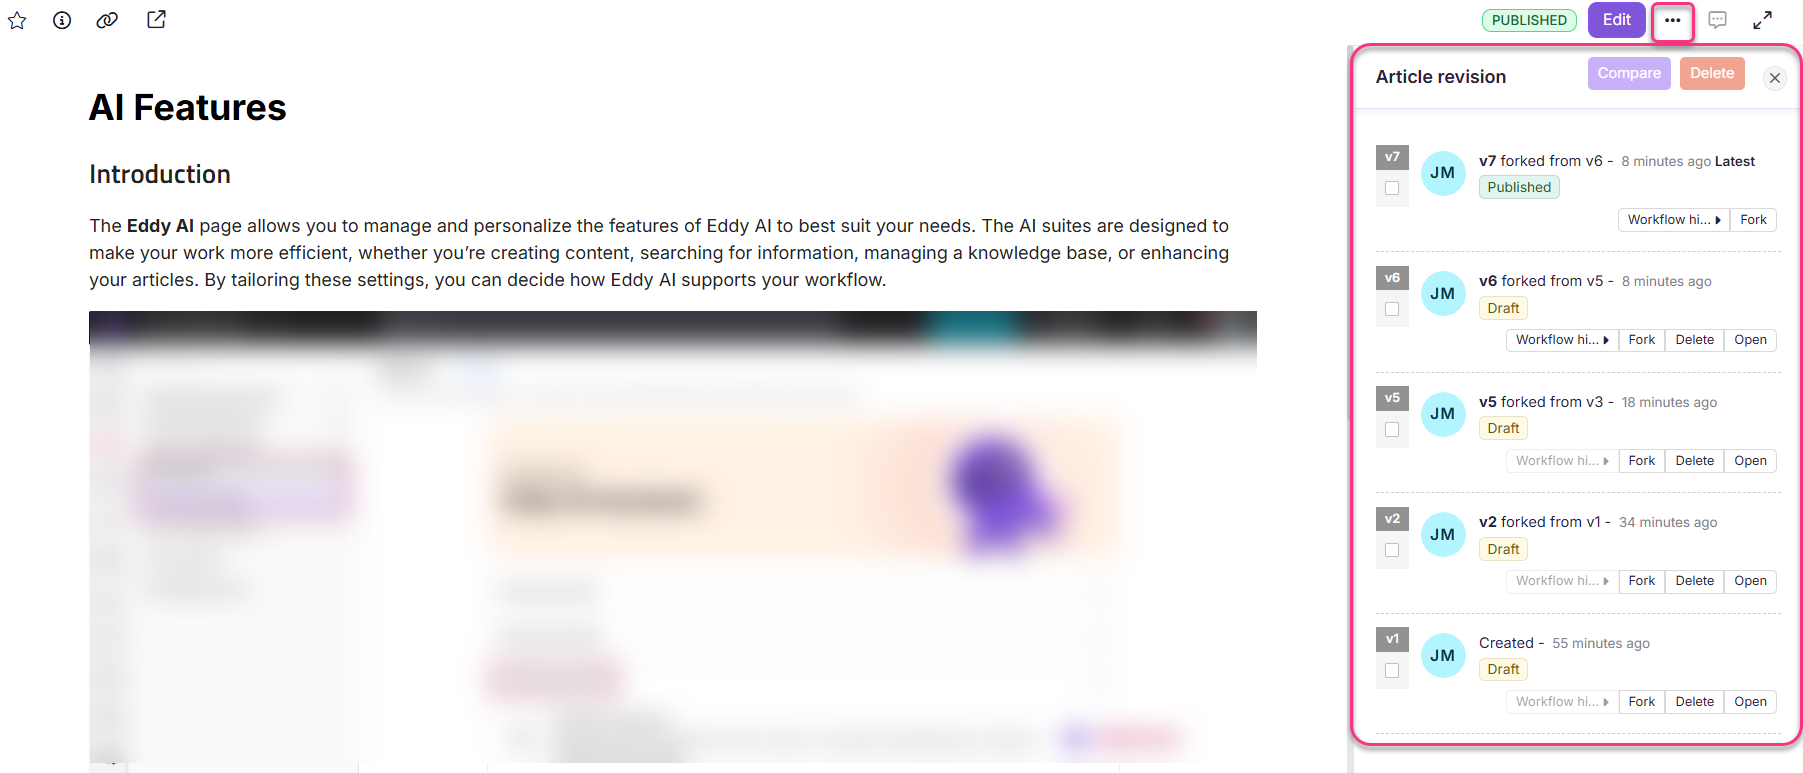
Article revision actions
The following options are available in Article revision:
Fork: To create a new article version from an existing article version. Here, the article is opened in the Editor mode, where you can make changes to the article content.
Delete: To delete the article version. This action cannot be reversed.
NOTE
You cannot delete a published article version. Only unpublished versions can be deleted.
Open: To open the article version in the Editor. This helps you restore any of the previous versions to their published state.
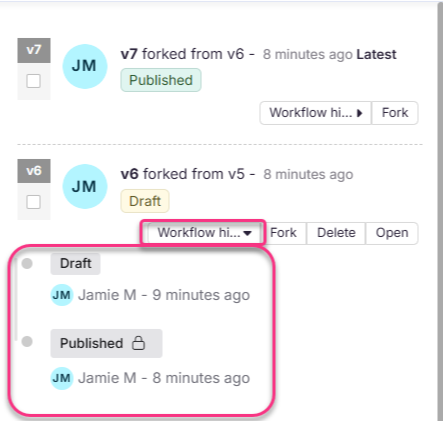
Workflow history: View the article version's workflow history. This includes all the Workflow stages, Workflow assignees, comments, and dates.
To make any previous version of an article public, open that version in the editor and click Publish.
You can also see detailed information for each version, including the version number, contributor, creation date, and visibility.
Comparing article versions
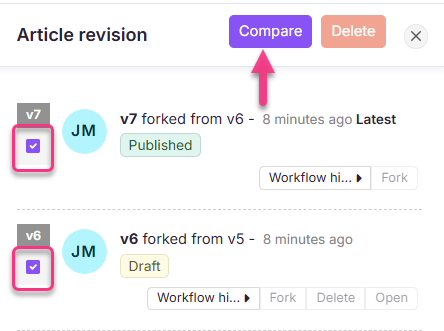
You can open two versions of an article at any point in Article revision and compare them.
To compare two versions of an article:
Go to the desired article in the Documentation editor.
Click the More () icon in the article header and select the Revision history ().
Select the checkbox for the desired versions you want to compare.
Click the Compare button.
Content highlighting criteria
The compared view of the two versions shows the following details:
Added content:
New content in the compared versions is highlighted in green for easy identification.
For images, videos, code blocks, PDFs, and self-closing tags (<br>, <hr>), added content is highlighted with a green badge labeled 'Added.'
For changes made to tables, the content is highlighted in green.
Highlights remain visible while scrolling, ensuring added content is easy to spot throughout the article.
Removed content:
Deleted content is highlighted in red with a strikethrough.
For images, videos, code blocks, PDFs, and self-closing tags (<br>, <hr>), removed content is highlighted with a red badge labeled 'Removed.'
For changes made to tables, the removed content is highlighted in red.
Removed content remains visible in the comparison view for clarity and to ensure removed content is easy to spot across the entire article.
Formatting changes:
Changes in formatting (e.g., bold, italic, underline, font size, lists) are highlighted in blue.
Non-text formatting changes, like table styles or image resizing, are also highlighted in blue with a blue badge labeled ‘Modified.’
NOTE
Content block movements and multiple formatting changes will not be highlighted when comparing article versions. Multi-formatting changes refer to applying italic, bold, and underline formatting to the same content block.
Swap versions:
The Swap button is placed near the version dropdowns at the top for easy access.
This allows you to reverse the comparison order of two versions, instantly switching the comparisons of the old and new versions.
This helps you understand changes from both perspectives, such as seeing what was previously added and removed or vice versa.
The comparison view updates in real time without requiring a page reload, ensuring a seamless experience.
All existing highlights, filters, and settings are preserved when switching.
After swapping, the version labels will update to reflect the new order, ensuring clarity on which version is being compared as the new and old.
NOTE
All highlights for additions, removals, and formatting changes will be retained after the swap. The system will update the highlights to reflect the new comparison.
For example, content previously marked as "added" will appear as "removed" after the swap.
Exit version compare:
The Exit compare button is located at the top right, which you can use to exit from the comparison panel.
Clicking the button will take you back to the main document view without reloading the page.
You will return to the exact location of the article you were viewing before comparison mode to ensure workflow continuity.
FAQ
Why are the updated timeframes of the forked article not in order?
If the older versions are opened and updated, the recently modified version will be shown with the updated timeframe accordingly.
Why does the revision history show a team member's name with a recent timestamp, even though they haven't made any changes recently?
This can happen when one user forks an article version and another user publishes it later.
In Document360, the revision history shows the name of the user who forked the article version, along with the timestamp of when that version was published, even if the publish action was performed later by a different user.
For example, if User A forks an article in May 2024 and User B publishes that forked version in January 2026, the revision history will display User A’s name with a January 2026 timestamp. This does not mean User A made changes in 2026, it only means the version originally forked by User A was published at that time.
To see who performed each action separately (fork, publish, or edit), check the Team auditing log.
Can I restore a previous revision of the article?
If you need to revert an article to a previous state before your recent edits, follow these steps:
For published articles: Delete the forked version that contains your recent edits. This restores the last published version of the article.
For draft or new articles: Create a new version by forking an earlier revision or delete the forked version that includes recent edits.
Forking before making changes preserves the original version, so you can restore it anytime.
How do I discard the current changes and revert to the previous version of the article?
Method 1:
If the changes have not been published, follow these steps to revert to the previous version:
Click on the Revision history of the article.
Open the previous version to view and restore the old content.
Note: This option works if the article has been published at least once.
Method 2:
If the article was never published, try the Backup & Restore option in the Settings page. This allows you to restore the content of a specific article.
Can I change or modify the article's published or last updated date to a past date?
No, the article's published date or last updated date cannot be changed. The last updated date will always reflect the most recent modification date, even if the article version is old.