Plans supporting this feature: Business Enterprise
Ticket deflectors streamline query resolution by helping users find answers independently before reaching out for support. This guide walks you through creating a ticket deflector, from setting up its components to customizing its functionality for user needs.
Imagine you run a SaaS platform with extensive documentation. A user encounters an issue with billing. Instead of submitting a support ticket immediately, the ticket deflector helps the user locate a relevant FAQ or guide on resolving billing issues. If the provided resources don’t solve their problem, they are directed to a tailored contact form to raise a ticket.
NOTE
In business and enterprise plans, you can have multiple ticket deflectors of up to 10.
Creating a new Ticket deflector
To create a ticket deflector, follow these steps:
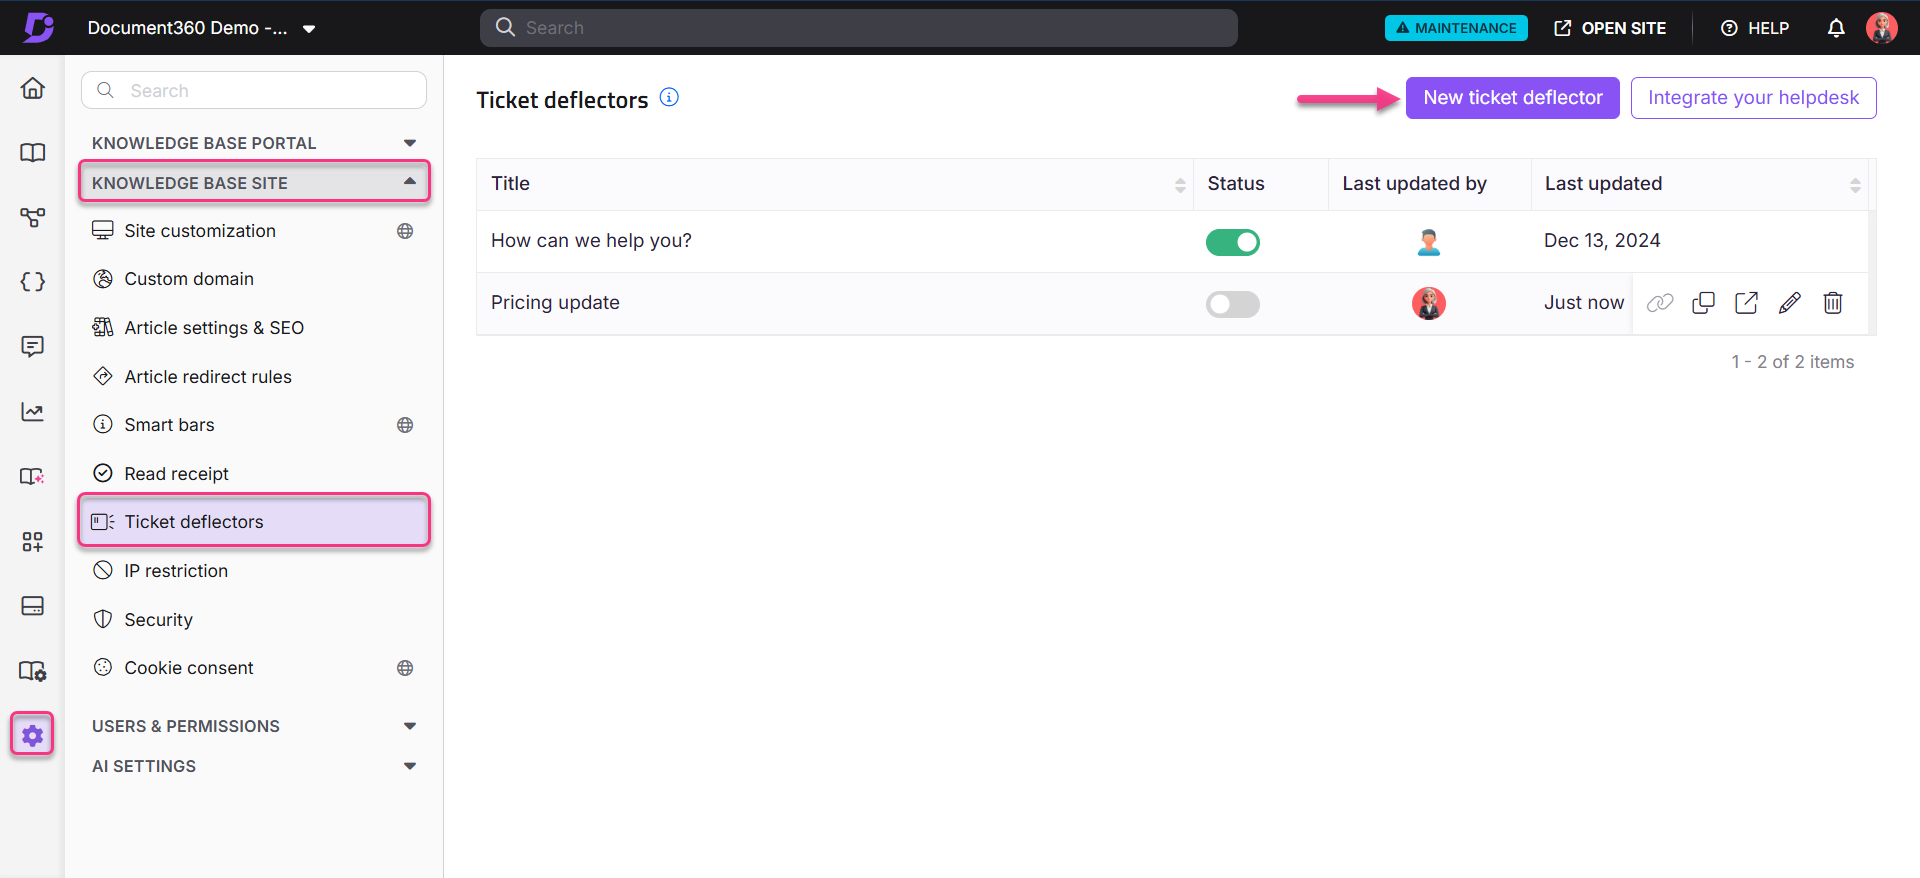
Navigate to Settings () > Knowledge base site in the left navigation bar in the Knowledge base portal.
In the left navigation pane, navigate to Ticket deflectors.
Click New ticket deflector.
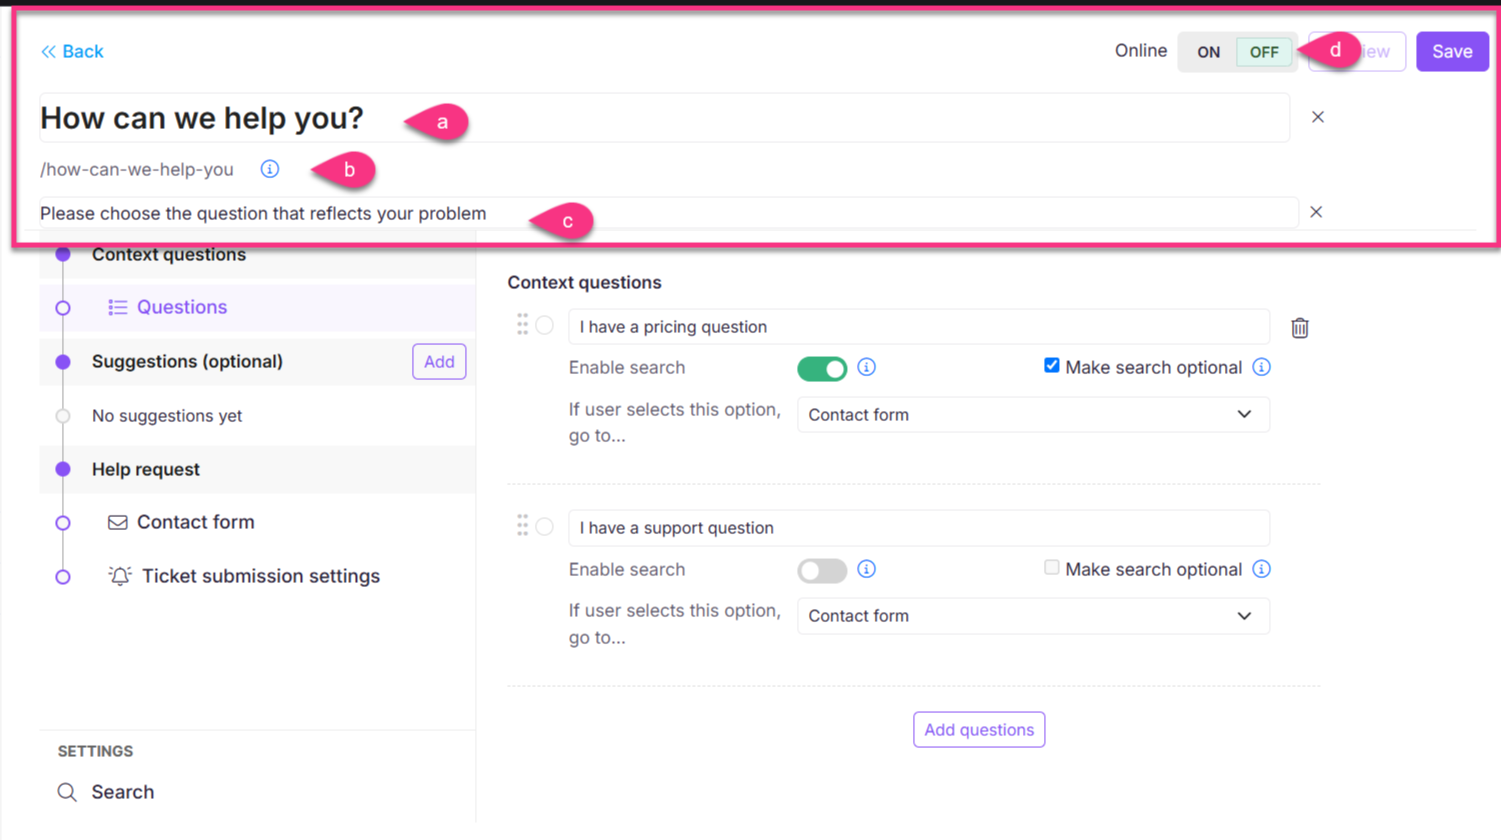
Step 1: Ticket deflector Form Title, Slug, and Description
The ticket deflector form will appear with the default title “How can we help you?”
Click the Ticket deflector title and edit the desired title. Titles cannot exceed 150 characters (including spaces).
The Ticket deflector slug is autogenerated but can be edited. Slugs cannot exceed 150 characters.
NOTE
Changing the Ticket deflector’s URL will break any existing references to it.
Add a concise description to inform users about the purpose of the ticket deflector.
Ensure the Online setting is toggled on for the deflector to appear on the Knowledge base site.
Step 2: Context questions
Why are Context questions important?
Context questions help understand user issues, guide them effectively, and determine the next step in resolution. While called "questions," they can be phrased as statements or prompts based on your audience's needs.
NOTE
There is no character limit for Context questions.
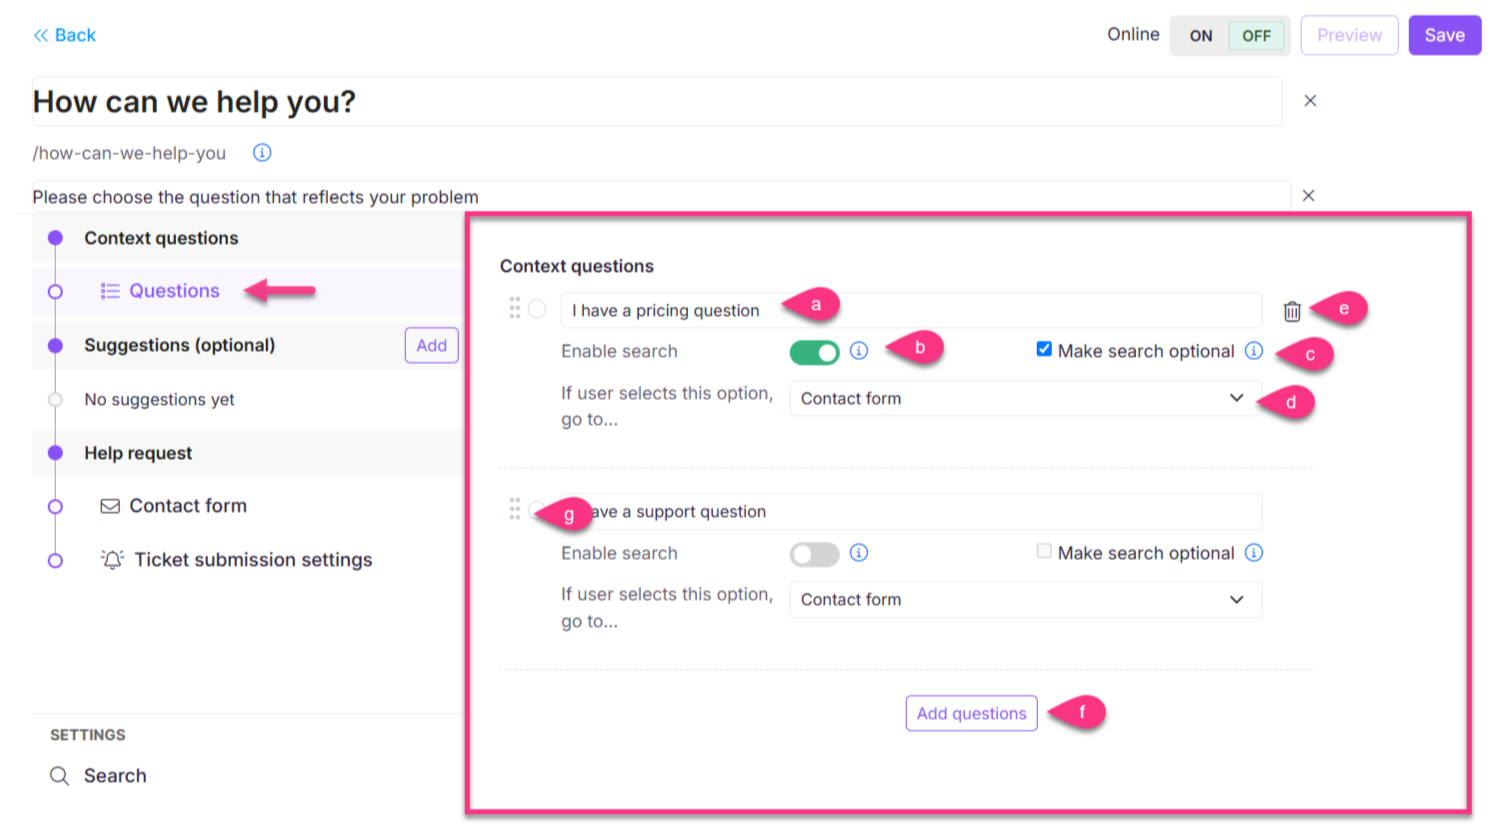
Click Questions to begin. By default, two questions are provided.
For each question:
a. Enter the desired text (e.g., I have a pricing question).
b. Turn on the Enable search toggle to require users to search the knowledge base before proceeding.
c. Select the Make search optional checkbox to allow skipping the search step.
d. Choose the next action from the If user selects this option, go to... dropdown (e.g., contact form).
e. Hover over any question and click the Delete () icon to remove unwanted questions.
f. Click Add questions to include more questions.
g. Use the Reorder () icon to rearrange the question order.
NOTE
At least one qualifying question is mandatory.
There are no limits to the number of questions per form.
Step 3: Suggestions
In Suggestions, adding steps to the Document360 ticket deflector provides simple checkpoint navigation based on user responses. You can guide users directly to the contact form or include additional steps and questions to help them self-serve using the knowledge base.
NOTE
Suggestions are optional for the ticket deflector form. You can create a form with a simple Q&A style or direct users to the contact form or helpdesk ticket based on their responses to the qualifying questions.
Creating block steps
In the Suggestions section, click Add to create a block step.
Choose one of the following suggestion types:
Additional question
Answer
Answer from your knowledge base
a. Additional question
This section is similar to Context questions and you can narrow queries further.
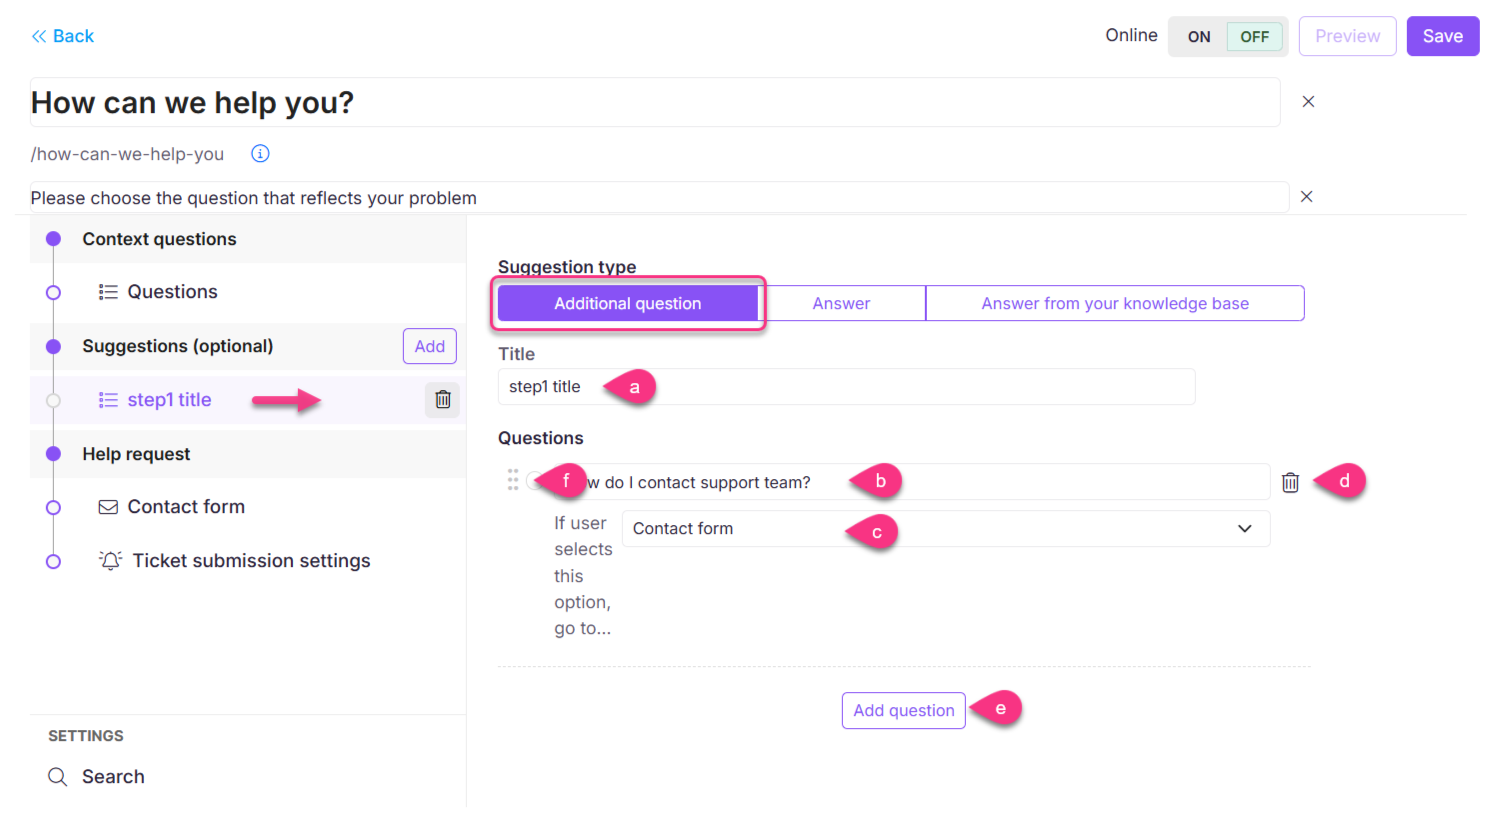
Enter a title for the block step.
Enter the desired question for the block step.
Choose the next action from the If user selects this option, go to... dropdown (e.g., contact form).
Hover over any question and click the Delete () icon to remove unwanted questions.
Click Add questions to include more questions.
Use the Reorder () icon to rearrange the question order.
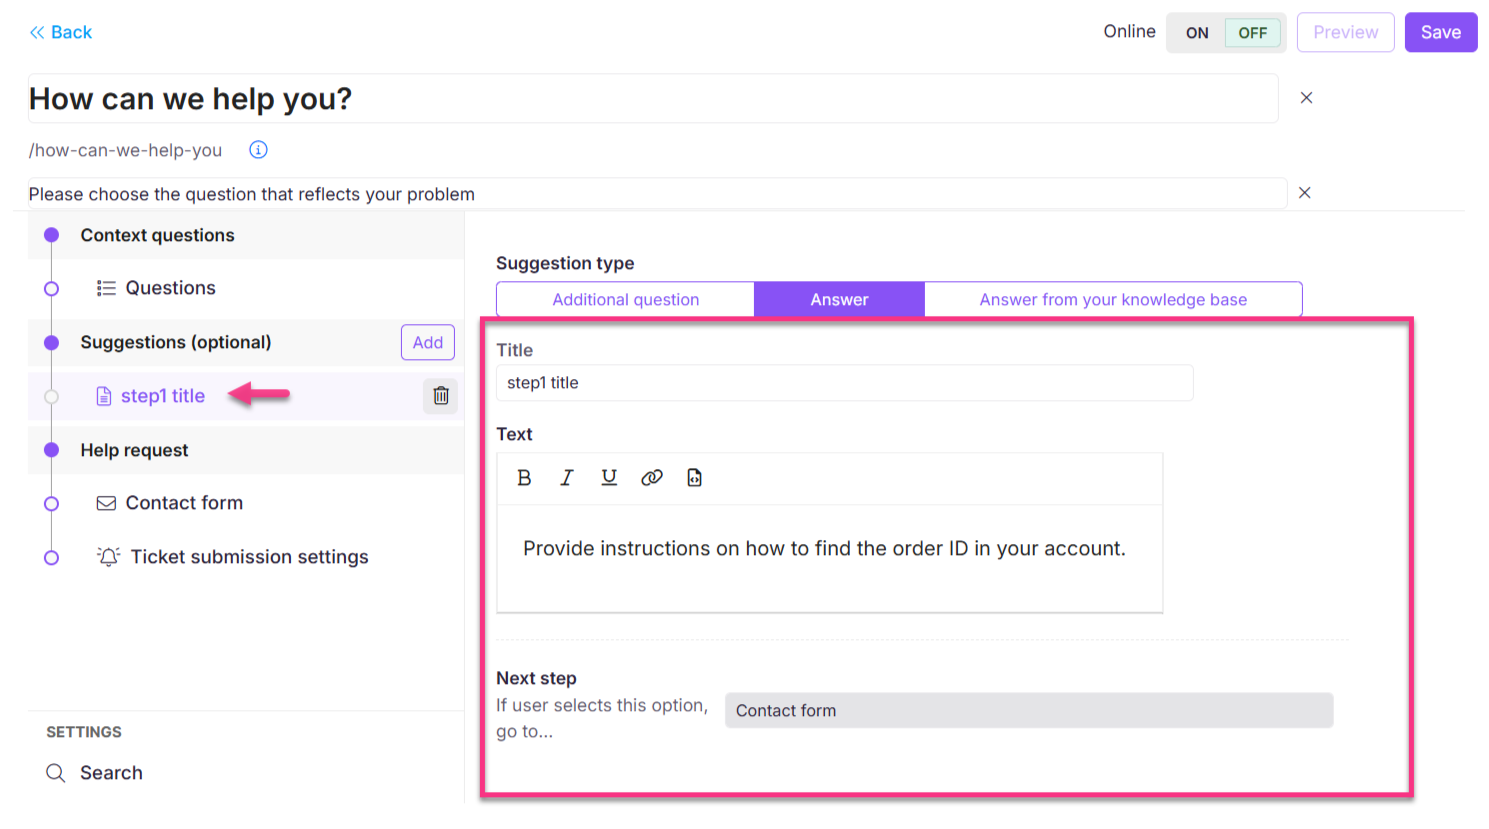
b. Answer
Enter the desired title and provide a straightforward text answer with basic formatting options (bold, italics, underline, hyperlinks, and code view).
c. Answer from your knowledge base
In this section, you can direct users to a relevant article.
Enter the title for the step block.
Select the desired workspace in the Workspace dropdown.
Search and add the article in the Article field.
By default, the next step will be the Contact form.
NOTE
Multiple articles cannot be linked.
Step 4: Help request
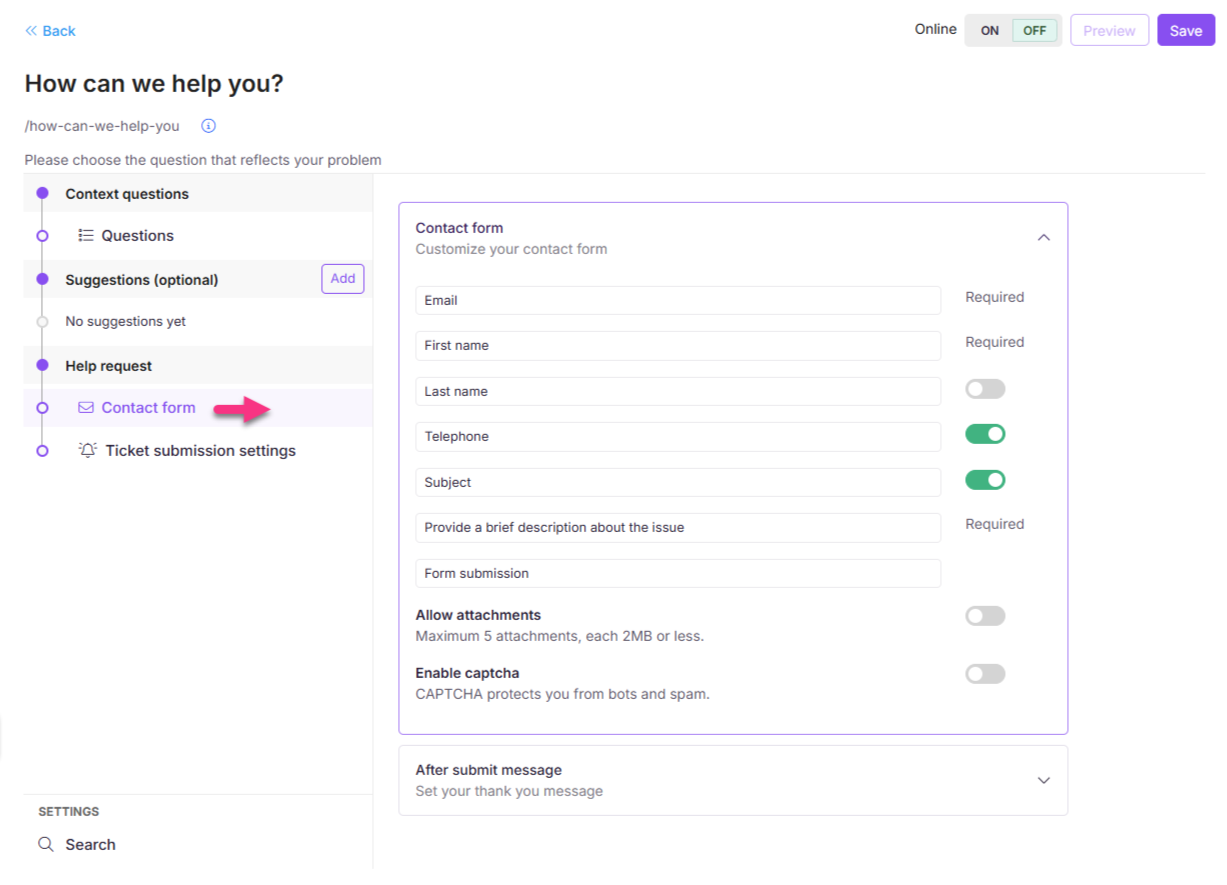
Contact form
The next step in a ticket deflector is the contact form. These form fields can be configured or customized to suit the ticket deflector's requirements. You can customize the following field names:
Field | Description | Mandatory |
|---|---|---|
Users must provide their email address for further communication. | Yes | |
First name | Users must enter their first name. | Yes |
Last name | Users can enter their last name. Use toggle to make it mandatory if needed. | Optional by default |
Telephone | Users can enter their telephone number. Use a toggle to make it mandatory if required. | Optional by default |
Description | Users must describe their issue. Character limit is 5000. | Yes |
Subject line | Users can enter a subject. Turn on the toggle to make this field mandatory if needed. The maximum character limit is 100. If no subject is entered, a default subject will be used. | Optional by default |
Form submission | Users can customize the text displayed on the form submission button as needed. | Yes (button needed) |
Allow attachments | Users can turn on this toggle to allow users to upload attachments. A maximum of five files is allowed, with each file size up to 2 MB. | Optional |
Enable CAPTCHA | Users can turn on this option to add a CAPTCHA field to the form. This helps prevent spam and automated submissions. | Optional |
After submission message | Users can enter a custom message to display after the form is submitted. Must not exceed 250 characters (including spaces). | Yes |
Step 5: Ticket submission settings
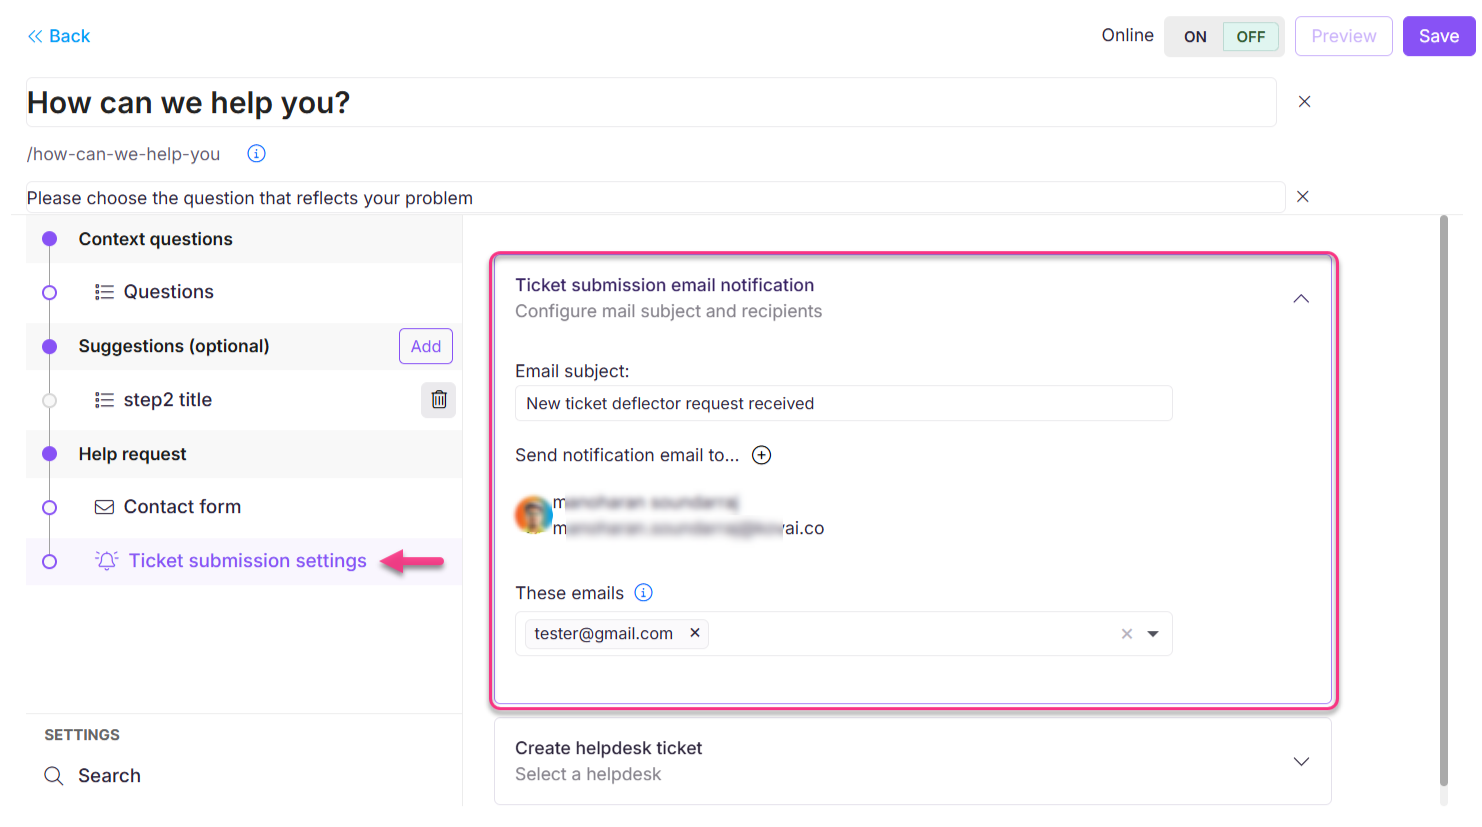
Ticket submission email notification
In the Ticket submission email notification section, you can configure the email subject and the recipients of the notification emails.
Email subject
Enter the desired subject for the email.
The email subject cannot exceed 100 characters.
Send notification email to
Add one or more users associated with the project as recipients of the notification email.
Click the button to search and select from the list of users.
These emails (adding additional recipients)
Add individual or group email IDs as additional recipients. This is an optional field.
There is no limitation on the number of recipients.
Enter a valid email ID and press Enter on your keyboard.
NOTE
Mapping Ticket deflector forms to specific emails
Each ticket deflector form can be mapped to different email addresses within your company.
For example:
A sales ticket deflector form can send notifications to sales@yourcompany.com.
An operations ticket deflector form can send notifications to tech@yourcompany.com.
This feature ensures that relevant departments are notified about submissions or tickets specific to their forms.
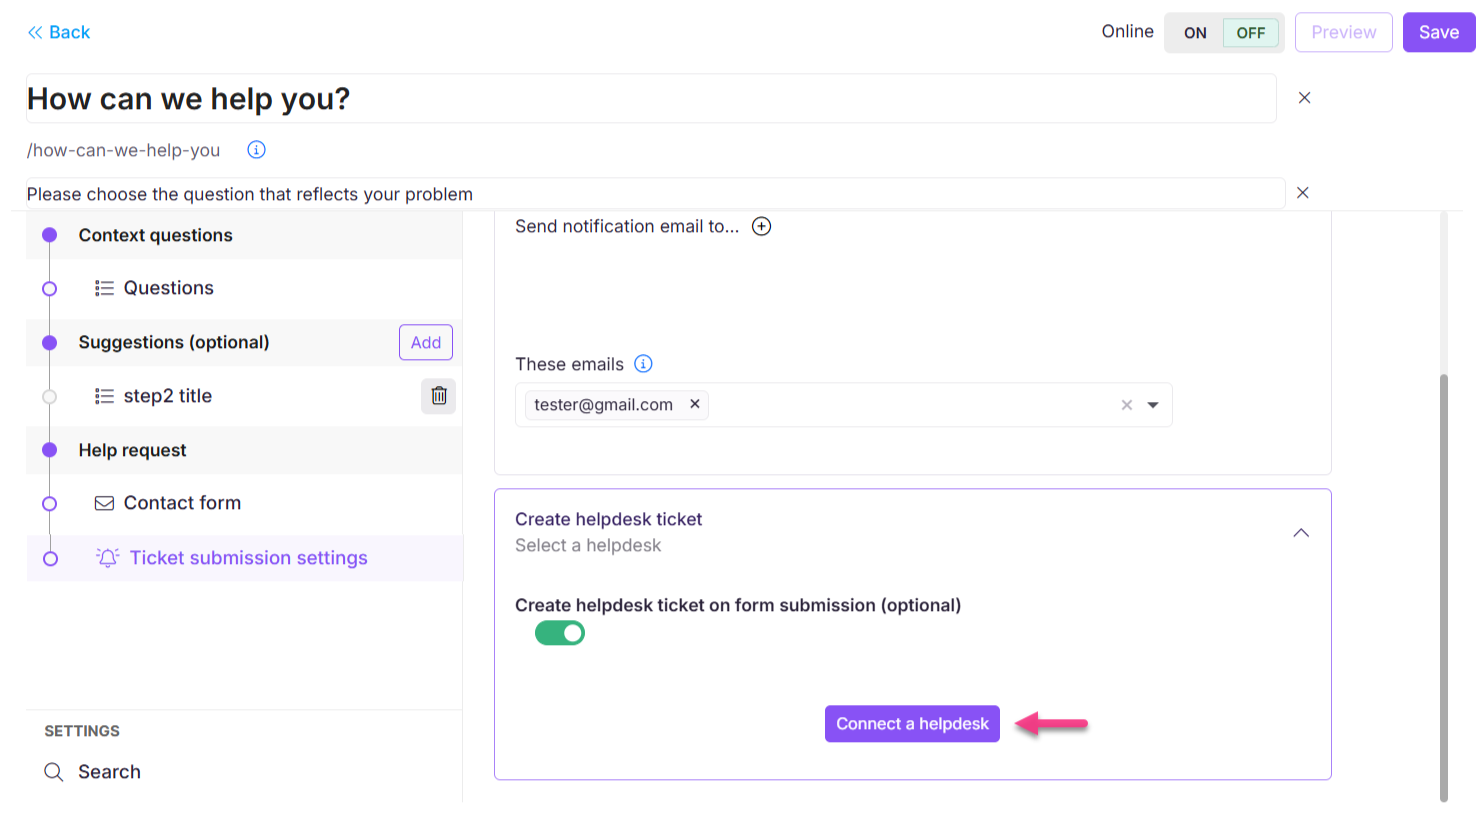
Connect a helpdesk
From the received ticket deflector, you can create a helpdesk ticket:
Expand the Create helpdesk ticket accordion and turn on the Create helpdesk ticket on form submission toggle.
Click Connect a helpdesk.
The helpdesk configuration panel will appear.
Select the desired helpdesk application, such as Freshdesk or Zendesk.
Enter the appropriate credentials and click Validate & save.
NOTE
For more information, read the article on Accessing the Ticket deflectors in portal.
Acknowledgment email for submitted forms
When an end user submits a form through the Ticket deflector, Document360 automatically sends an acknowledgment email to the email address provided in the form. This helps users know their request has been received and is being looked into.
If your project is integrated with a ticketing system (such as Freshdesk, Zendesk, etc.), the acknowledgment email is sent from the configured helpdesk email address.
If there is no ticketing system integration, the email is still sent using the mapped support email address configured in your project (not the default
support@document360.com).The acknowledgment email includes the user’s name and email to personalize the communication.
If domain mapping is enabled, the email will be sent using your custom domain for a consistent brand experience.
Localize or customize text in the ticket deflector
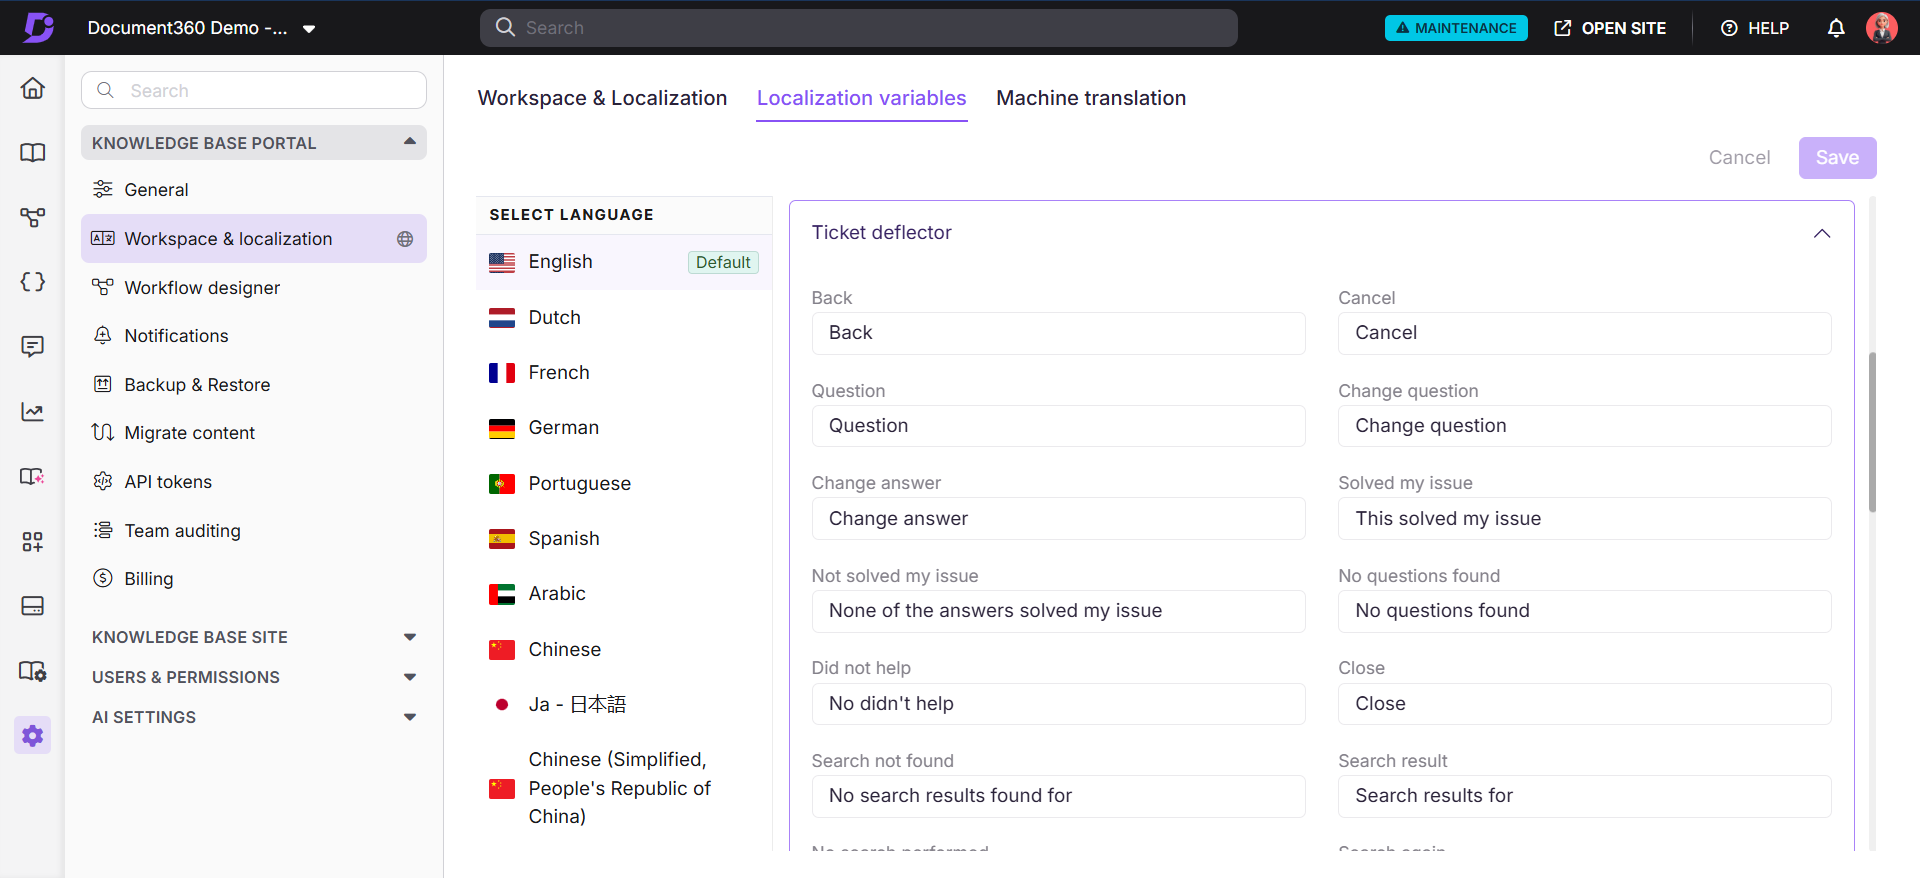
You can localize or customize the text displayed in the ticket deflector in your Knowledge base site. This allows you to translate the default text into other languages. To update this text,
Navigate to Settings () > Knowledge base portal in the left navigation bar in the Knowledge base portal.
In the left navigation pane, navigate to Workspace & localization.
In the Localization variables tab, expand the Ticket deflector accordion.
You can update elements such as Question, Solved my issue, and Change answer.By default, the variable texts are localized to the respective language.
Click Save.
