The Ticket deflectors overview page is where you manage all your existing ticket deflectors, monitor their status, edit their content, connect your helpdesk, and embed deflector links across your knowledge base site.
Accessing the overview page
- Navigate to Settings () in the left navigation bar of the Knowledge base portal.
- In the left navigation pane, go to Knowledge base site > Ticket deflectors.
The overview page lists all configured ticket deflectors with the following information:
| Column | Description |
|---|---|
| Title | The name of the ticket deflector. |
| Status | Toggle to set the deflector online or offline. Offline deflectors are not visible to readers and cannot be copied. |
| Last updated by | The team member who last modified the deflector. |
| Last updated | The date the deflector was last changed. |
Hover over any deflector row to access the following actions:
| Action | Description |
|---|---|
| Copy | Copies the direct form link. Only available when the deflector is online. |
| Clone | Duplicates the deflector including its settings, questions, and content. |
| Preview in knowledge base | Shows how the form will appear on the knowledge base site before it goes live. |
| Edit | Opens the deflector for editing. |
| Delete | Permanently removes the deflector. The deflector must be offline before deletion. |
Set the deflector to offline before deleting it. Deletion is permanent and cannot be undone.
How to edit and save a ticket deflector
- Navigate to Settings () > Knowledge base site > Ticket deflector.
- Hover over the deflector and click Edit (). The deflector opens in the editor.
- Make your changes in the Context questions, Suggestions (optional), and Help request steps.
- Click Preview to check your changes.
- Click Save. The Save button stays disabled until you make a change.
- To make the deflector live, turn the Online toggle ON.
The editor has no Publish button. The Online toggle controls whether the deflector is live on the knowledge base site.
How to connect a helpdesk
Ticket deflectors support direct integration with Freshdesk and Zendesk. When connected, submitted forms that are not answered from the knowledge base automatically create tickets in your helpdesk.
- On the Ticket deflectors overview page, click Integrate your helpdesk.
- Select either Freshdesk – Create ticket or Zendesk – Create ticket.
- Configure the selected platform:
Freshdesk:
- Enter the API key and domain URL from your Freshdesk account.
- Click Validate & save.
Zendesk:
- In the Zendesk subdomain field, enter your Zendesk subdomain. For example, for
acme.zendesk.com, enteracme. - Click Connect. A Zendesk window opens.
- Sign in to Zendesk as an admin and approve access. The panel shows the connected account and Connection successful.
- Click Validate & save.
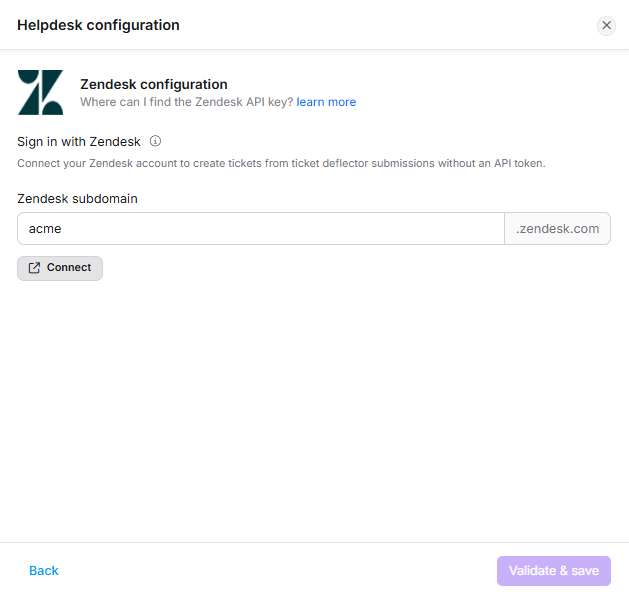
Once saved, Zendesk – Create ticket shows Configured. To change the connected account later, click Edit () next to it. To remove Zendesk, open it and click Remove helpdesk.
- Zendesk no longer allows new API tokens to be created, and existing tokens stop working after April 30, 2027. Document360 connects to Zendesk with your Zendesk account instead.
- Only a Zendesk admin can approve the connection.
- If you leave without clicking Validate & save, the connection is removed.
- If the connection stops working, for example because access was revoked in Zendesk, Zendesk – Create ticket shows Not connected instead of Configured. Open it and connect again.
- If your browser blocks the Zendesk window, Document360 shows a link to open Zendesk instead. Approve access there, then return to Document360.
How to embed a ticket deflector
Once a deflector is online, copy its form link and add it anywhere readers are likely to need support.
- Hover over the deflector and click Copy (). The link is copied to your clipboard.
- Paste the link into any of the following locations:
- Inside articles or category pages
- Smart bars
- Cookie consent notifications
- Snippets and variables
- Knowledge base home page
- Knowledge base assistant
Adding to header navigation
You can also add a ticket deflector directly to your site's primary or secondary navigation:
- Navigate to Settings () > Knowledge base site > Site customization.
- Click Customize site.
- From the left dropdown, select Site header & footer.
- Expand Header and select Primary navigation or Secondary navigation.
- Click Add new item.
- In the Select type dropdown, select Ticket deflector.
- Enter a title and select the deflector from the dropdown. Only online deflectors are listed.
- Select Open link in new tab if needed, then click Add.
Adding to footer navigation
- Navigate to Settings () > Knowledge base site > Site customization > Customize site.
- Select Site header & footer from the dropdown, then click Footer.
- For a Basic footer: click Add new link, enter a title, paste the ticket deflector link, and click Add.
- For a Custom footer: paste the deflector link into the relevant location in your footer HTML code.
- Click Preview to review your changes, click Save, then click Publish to make them live.
Best practices
- Preview every deflector using Preview in knowledge base before setting it online, especially after editing questions or changing the form flow.
- Use Clone to create variations of a working deflector for different products or topics rather than building each one from scratch.
- Keep deflectors online only when they're actively in use. Set unused deflectors to offline to keep the overview page clean and prevent stale links from circulating.
- Place the deflector link in your site's primary or secondary navigation so readers can access it from any page, not just the home page or specific articles.
- Monitor the Ticket deflector analytics page regularly to track search success rate and identify topics where your knowledge base isn't resolving queries. Those gaps are candidates for new articles.
FAQ
Can I preview the deflector before making it live?
Yes. Hover over the deflector and click Preview in knowledge base () to see exactly how the form will appear to readers. You can preview in either online or offline status.
What does Clone do?
Clone duplicates an existing ticket deflector including its title, questions, suggestion steps, contact form settings, and notification configuration. The clone is created as a separate deflector in offline status so you can customize it without affecting the original.
Why is the Copy icon greyed out?
The form link copy icon is only available when the deflector's status is online. Set the deflector to online first to generate and copy the link.
How do I delete a ticket deflector?
Set the deflector's status to offline, then hover over it and click Delete (). Confirm in the prompt. Deletion is permanent, clone the deflector first if you might need it again later.