NOTE
Floik AI features are available across all Document360 plans as an add-on. To purchase or learn more, please contact our support team.
Document360 offers built-in screen recording and formatting options, allowing you to capture your screen and enhance the video directly within your articles without needing external tools.
For instance, technical writers often need to add visuals to their articles. Switching between different tools to record and insert videos takes time. Instead of using multiple screenshots, they can use Document360’s built-in screen recording to create video demos. This helps readers understand better. Writers can edit videos with tools like blur, spotlight, crop, and trim before publishing.
Accessing the Screen recorder
To access the screen recorder:
Navigate to the desired article in the Advanced WYSIWYG editor.
Type the Slash command
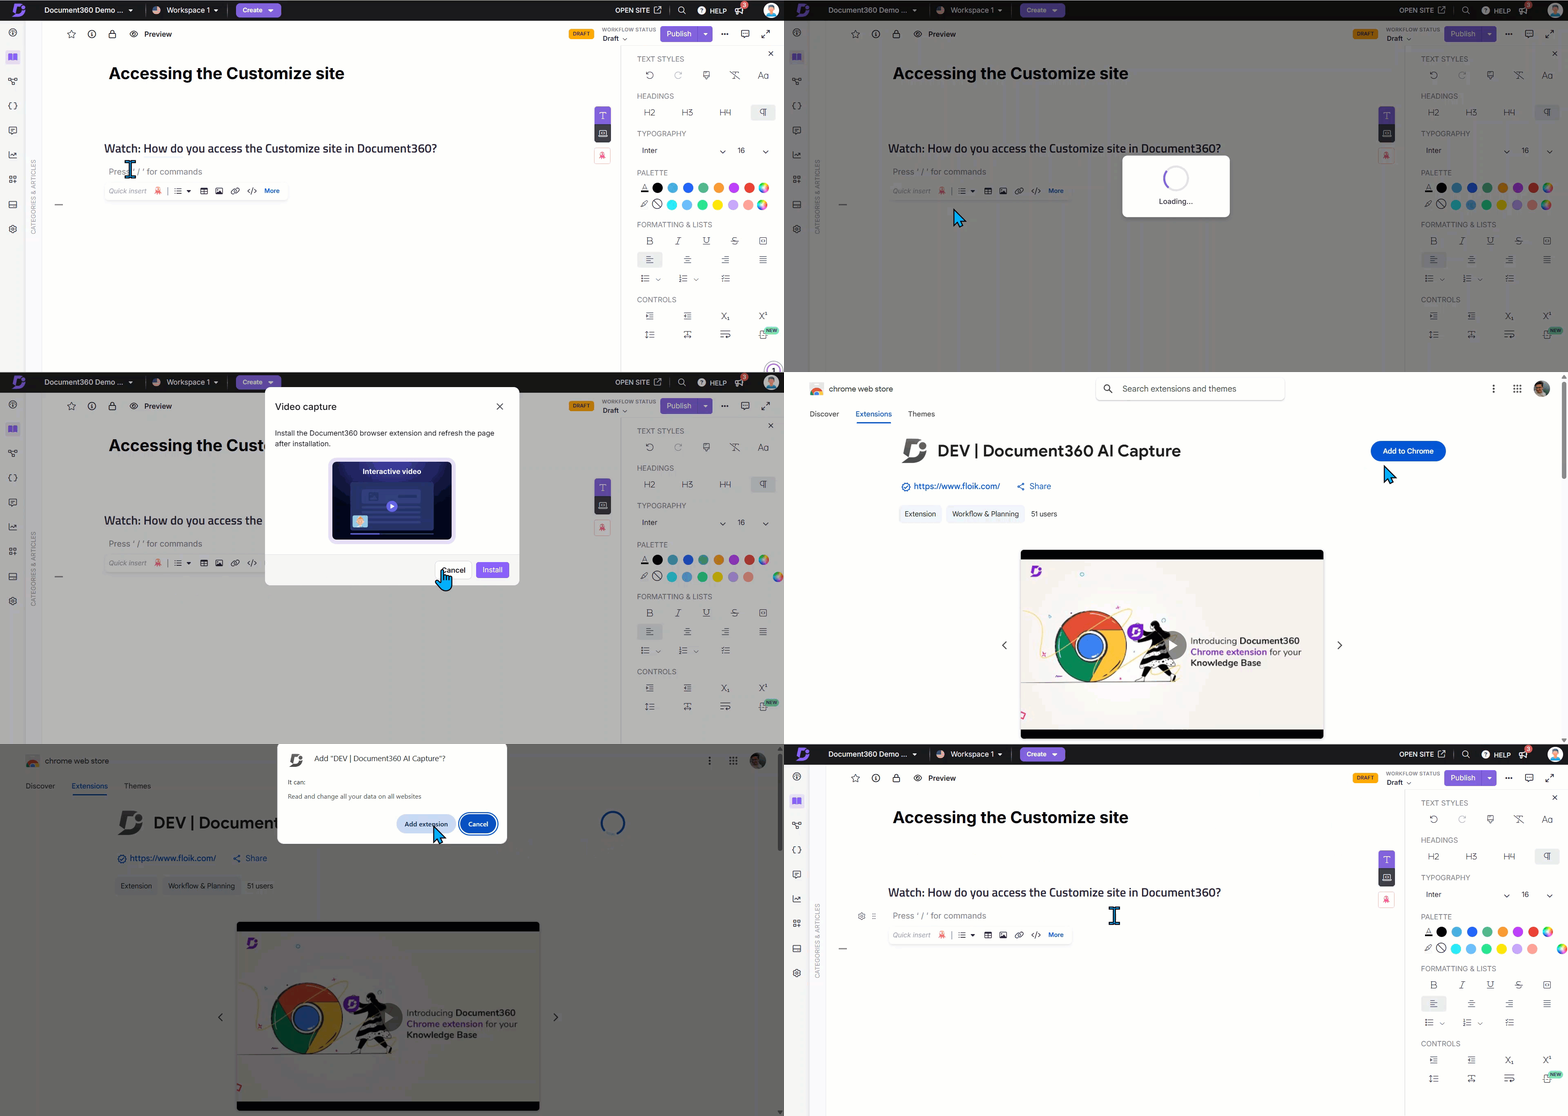
/Record videoand press Enter.If you haven't installed the Document360 Screen Recorder extension, Click Install.
NOTE
This extension is currently supported only in the Chrome browser.
Click Add to Chrome in the Chrome web store page.
Once installed, return to the Knowledge base portal.
Recording the screen
The Video capture panel will appear with two options:
Screen only video: Captures only the screen.
If you select Screen only video, the Screen only video panel will appear.
Select the desired audio from the dropdown, if required. If no audio is needed, select No audio.
Click Next.
Screen + Camera video: Captures both the screen and the presenter via the camera.
If you select Screen + Camera video, the Screen + Camera video panel will appear.
Select the desired camera and audio options from the dropdown menus.
Click Next.
Select the screen to capture:
Chrome tab: Records only the selected Chrome tab.
Window: Records only the selected window.
Click Share.
The selected screen will appear along with the Screen recording panel.
Choose the recommended resolution (16:9 or 4:3).
Click Start capturing to begin recording.
Click Discard to cancel and return to the previous screen.
In the Blur selected section, click Add to hide specific areas of the screen when recording sensitive information.
If needed, enable the Show recording controls on screen toggle. A Document360 logo will appear in the bottom left corner of the recording screen. Clicking the logo will pause the recording. This logo will also be visible in the recorded video.
During recording, mouse clicks and interactions will be captured, with click indicators displayed for easier guide editing.
Click Pause to pause the recording and Record to resume.
To stop recording, click Stop sharing in the floating panel or Stop recording in the Screen recording panel.
After recording, the system will take some time to import the video into the article.
Adding interactive elements
Once processed, the recorded video will appear in the Video editor panel.
Click the Play () icon to preview the recorded video.
The Video editor provides formatting tools, including:
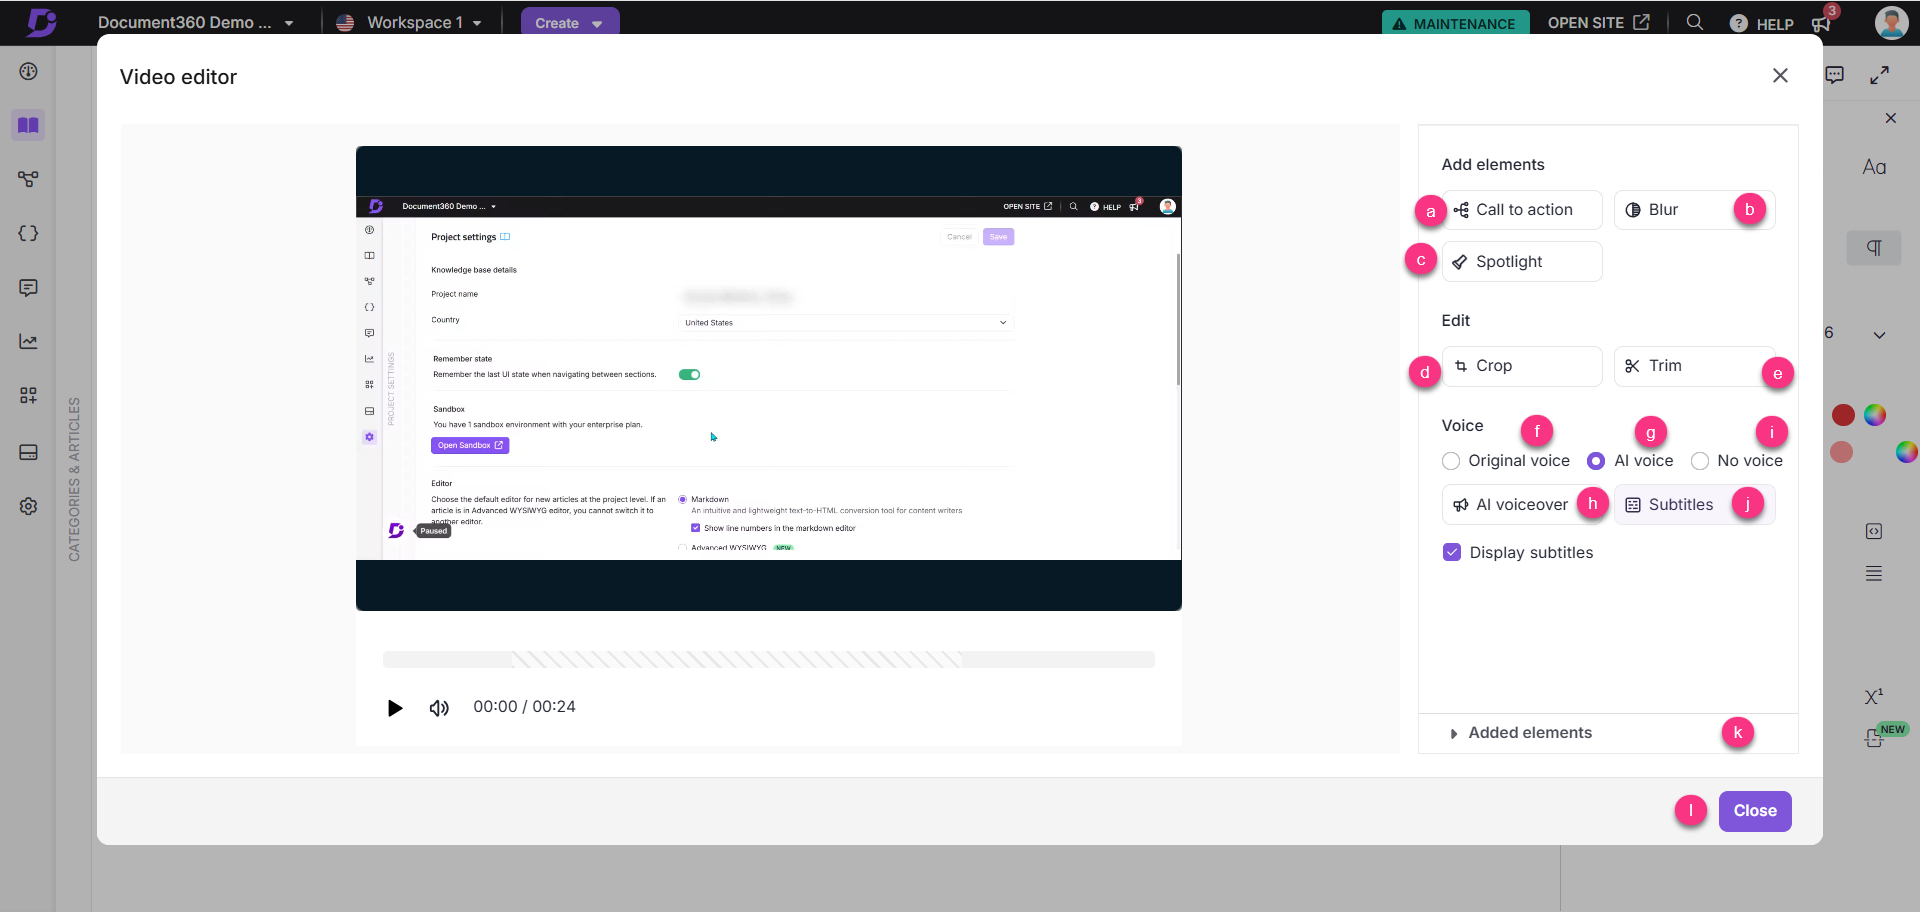
Add elements:
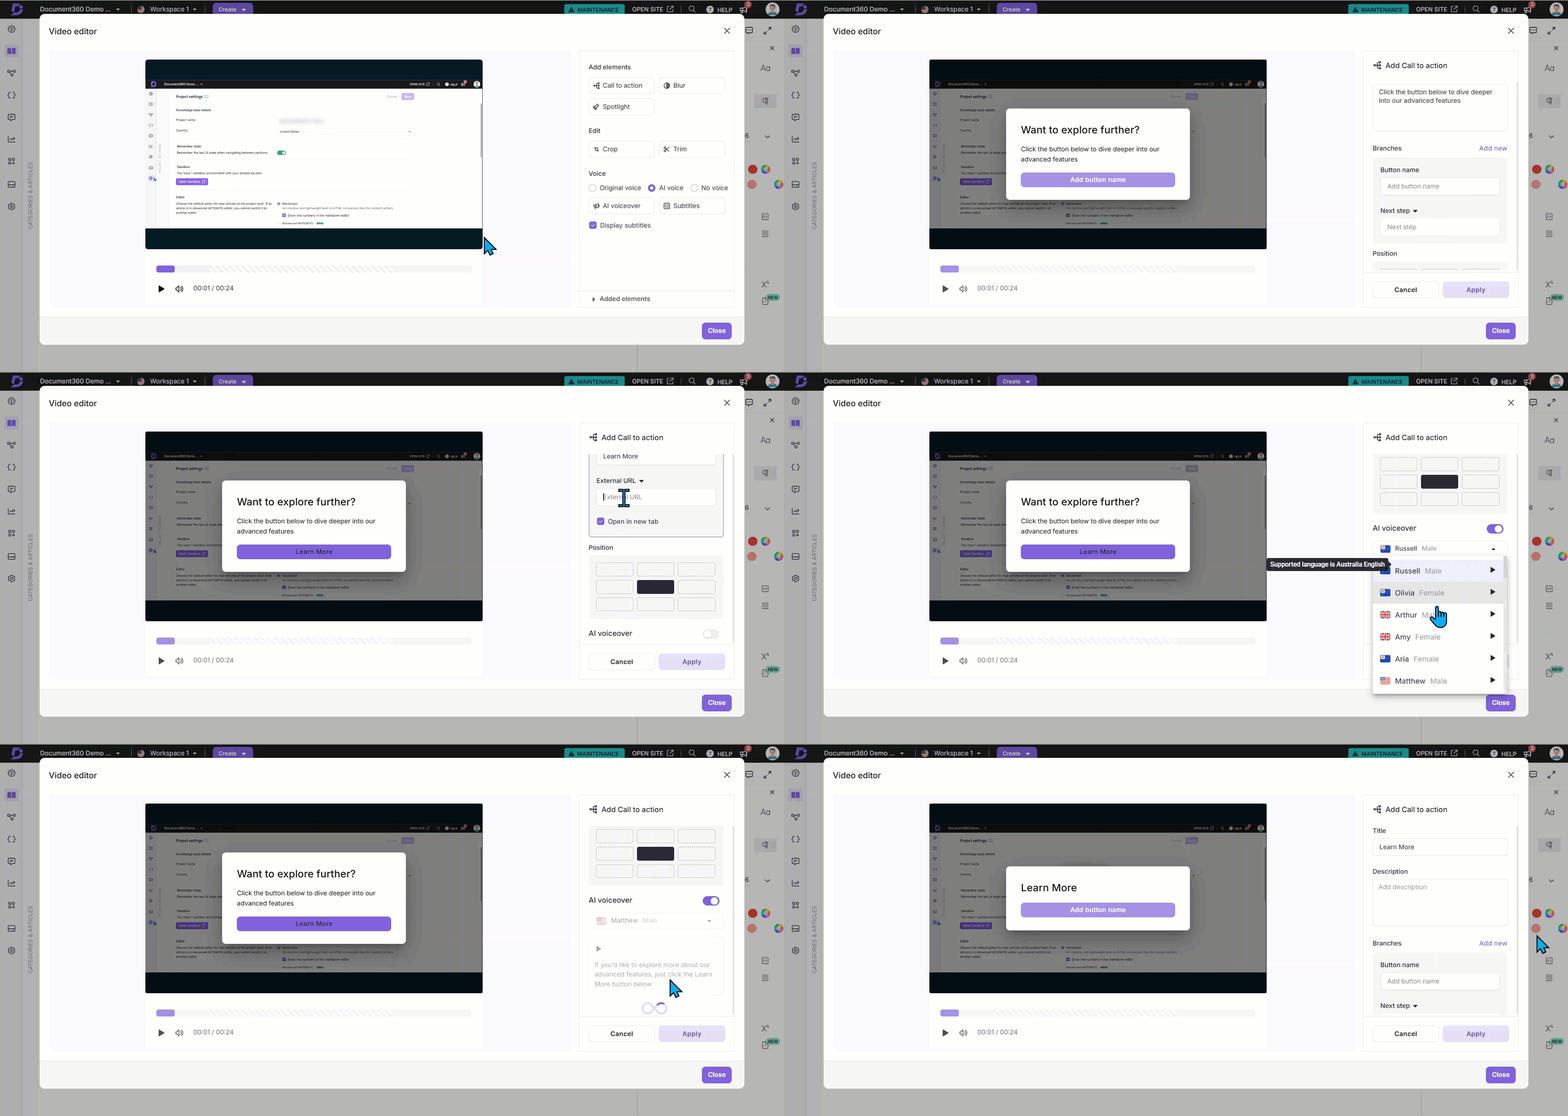
a. Call to action: To add an interactive button in the video
Enter the title and description.
In the Branches section, enter the button name and select the desired action:
External URL: Enter the destination link.
Next step: Displays a message or information for the user.
Click Add new to include another button.
Choose the desired button position under the Position section.
Enable the AI voiceover toggle to add narration:
Select a voice.
Enter the narration script.
Click the Play icon to preview.
Click Apply.
b. Blur: Hide sensitive information in screen recordings
Click Add new to blur areas in the video.
Enter a name for the blur.
Select the Start time and End time for the blur. Use the Fine-tune milliseconds () option for precise adjustments.
Choose a shape: Circle or Rectangle.
Adjust the Intensity slider to modify opacity.
Click Apply to save changes.
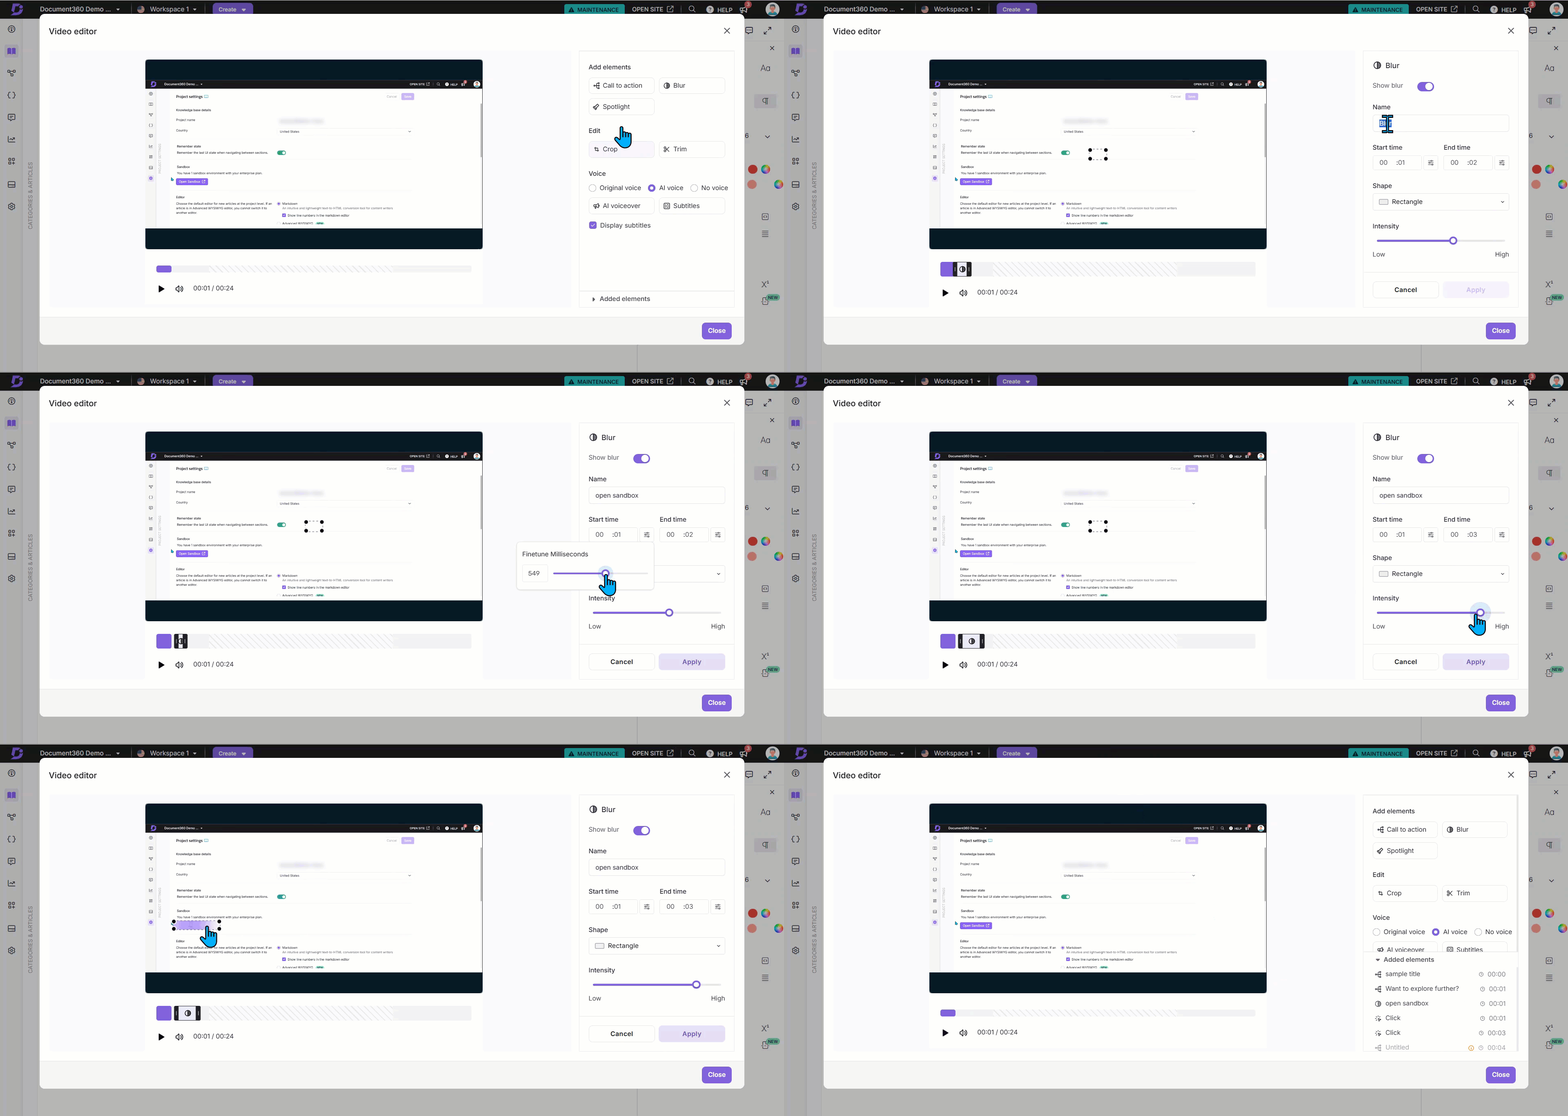
c. Spotlight: Highlight important areas in the video
Click Add to create a spotlight.
Enter a name for the spotlight.
Select the Start time and End time. Use the Fine-tune milliseconds () option for precise adjustments.
Choose a shape: Circle or Rectangle.
Click Apply to save changes.
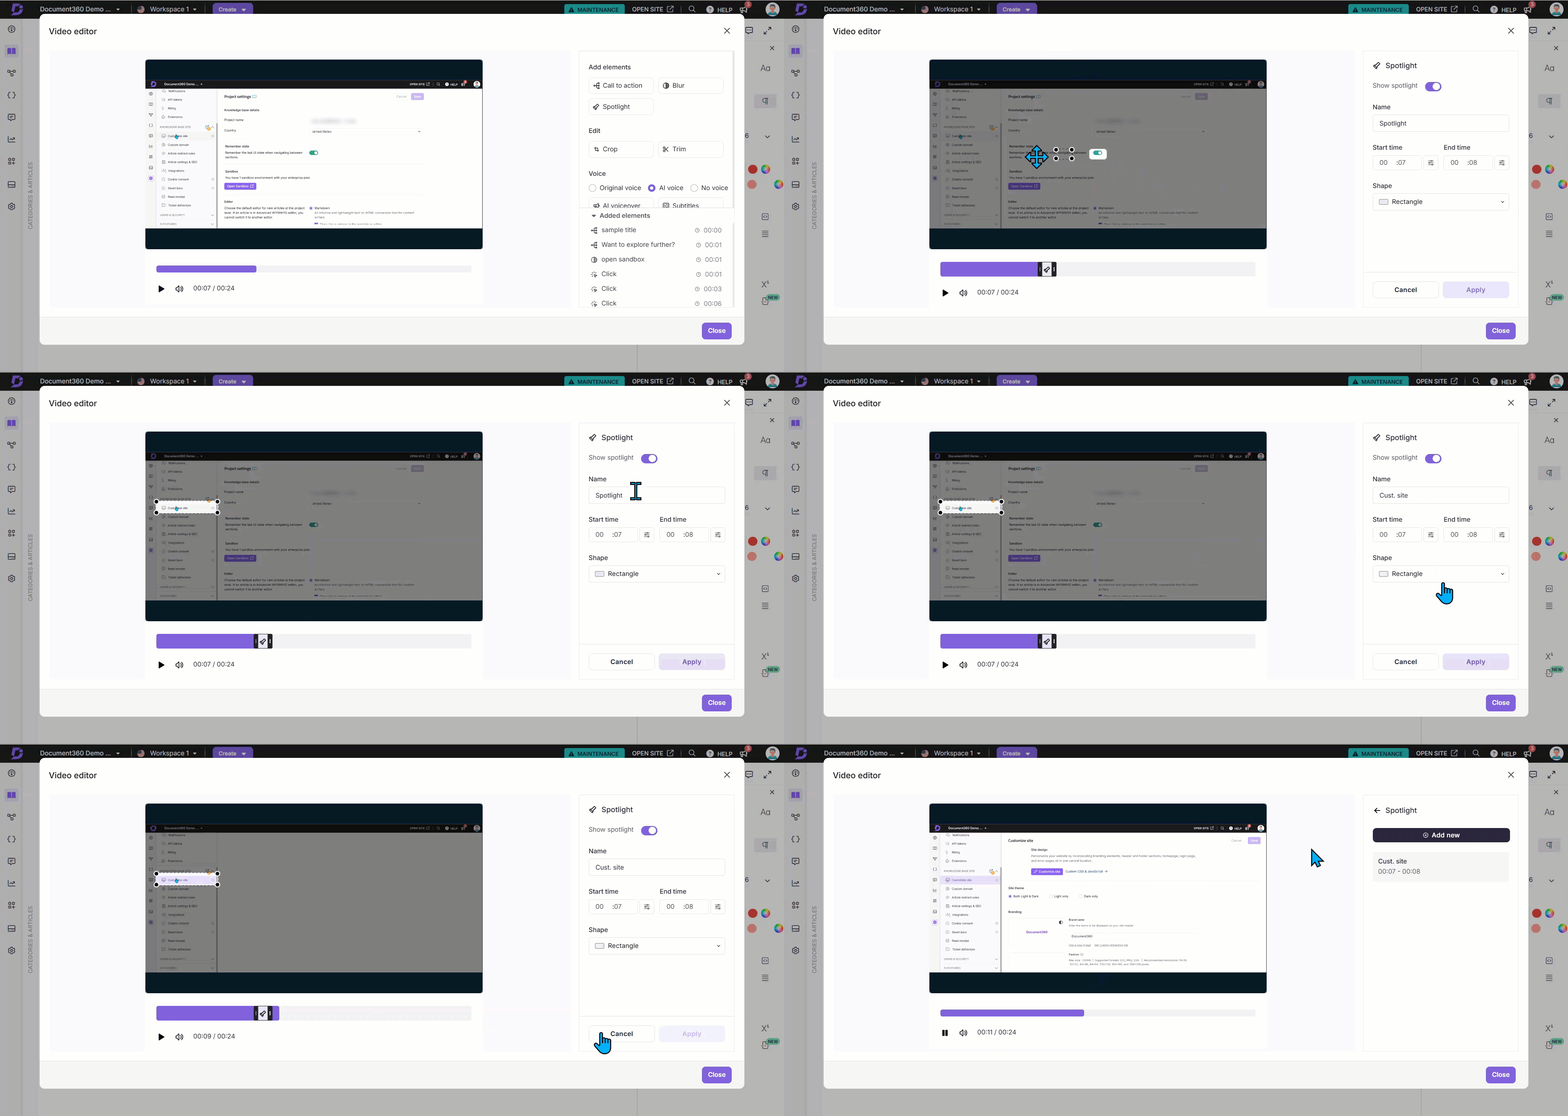
Edit
d. Crop
Select an Aspect ratio: Original, Custom, Square, Landscape, or Portrait.
Adjust the Crop output (width and height) based on the selected ratio.
Click Apply to save changes.
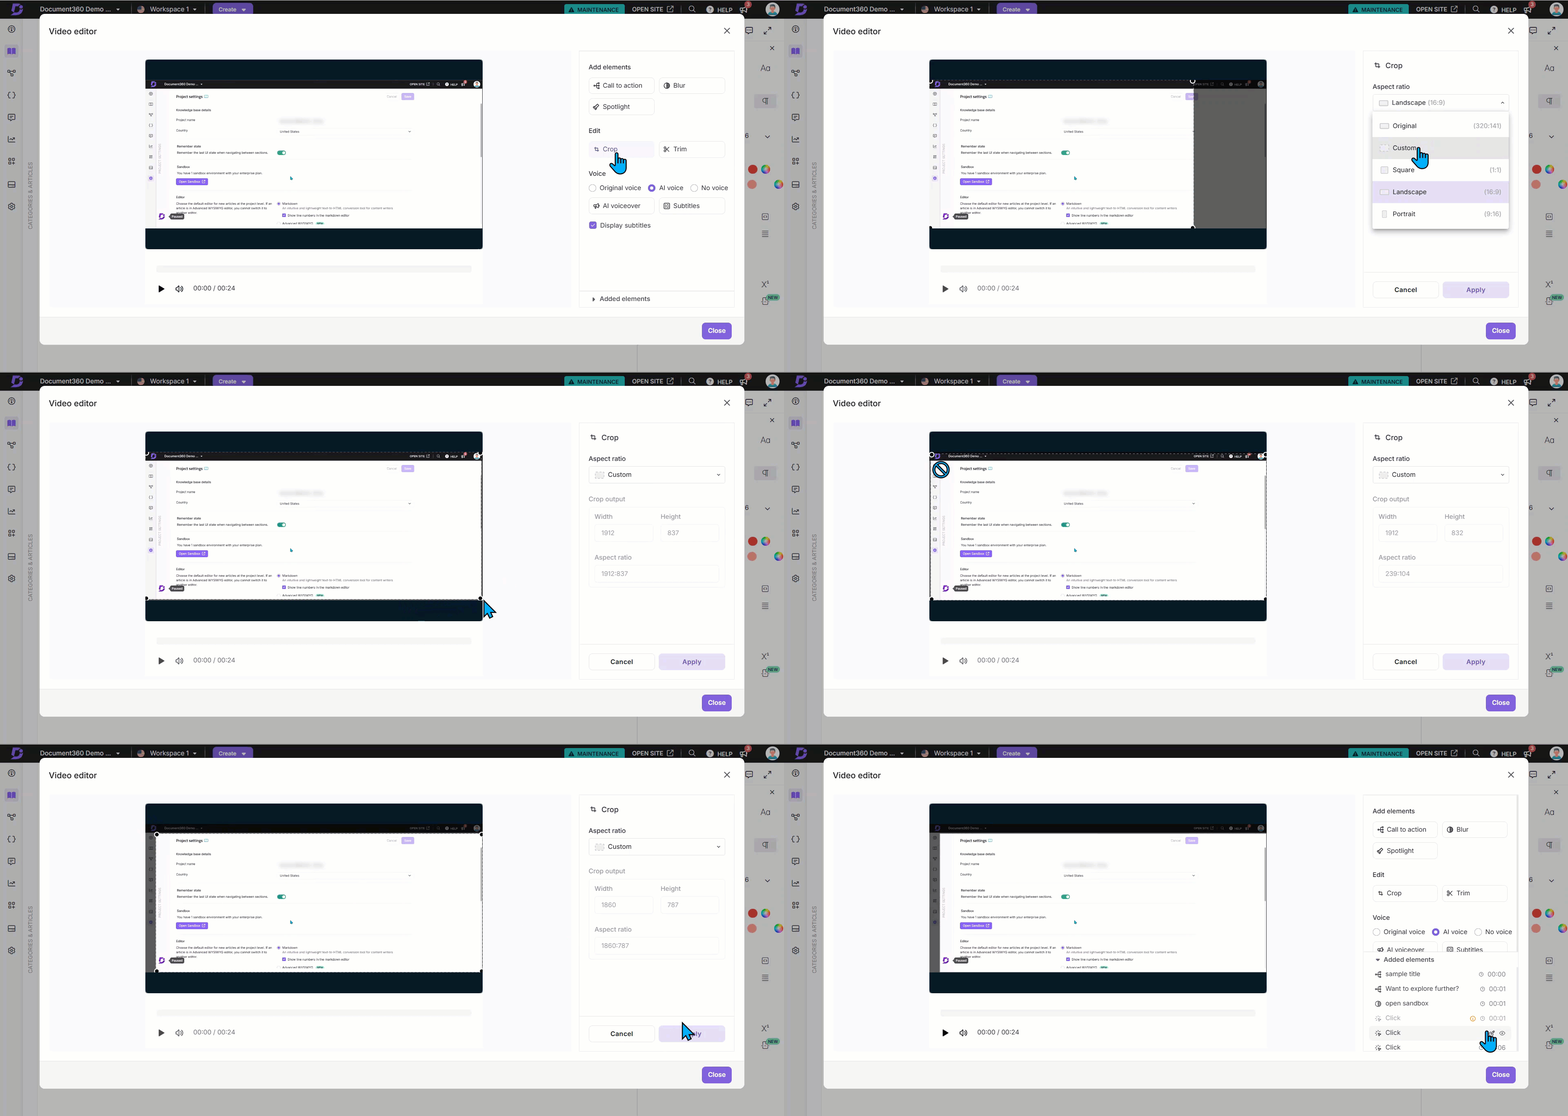
e. Trim
To trim any part of the recorded video:
Click Add now to add a new trim to the video.
Set the From and To timings.
Click Apply and click Done.
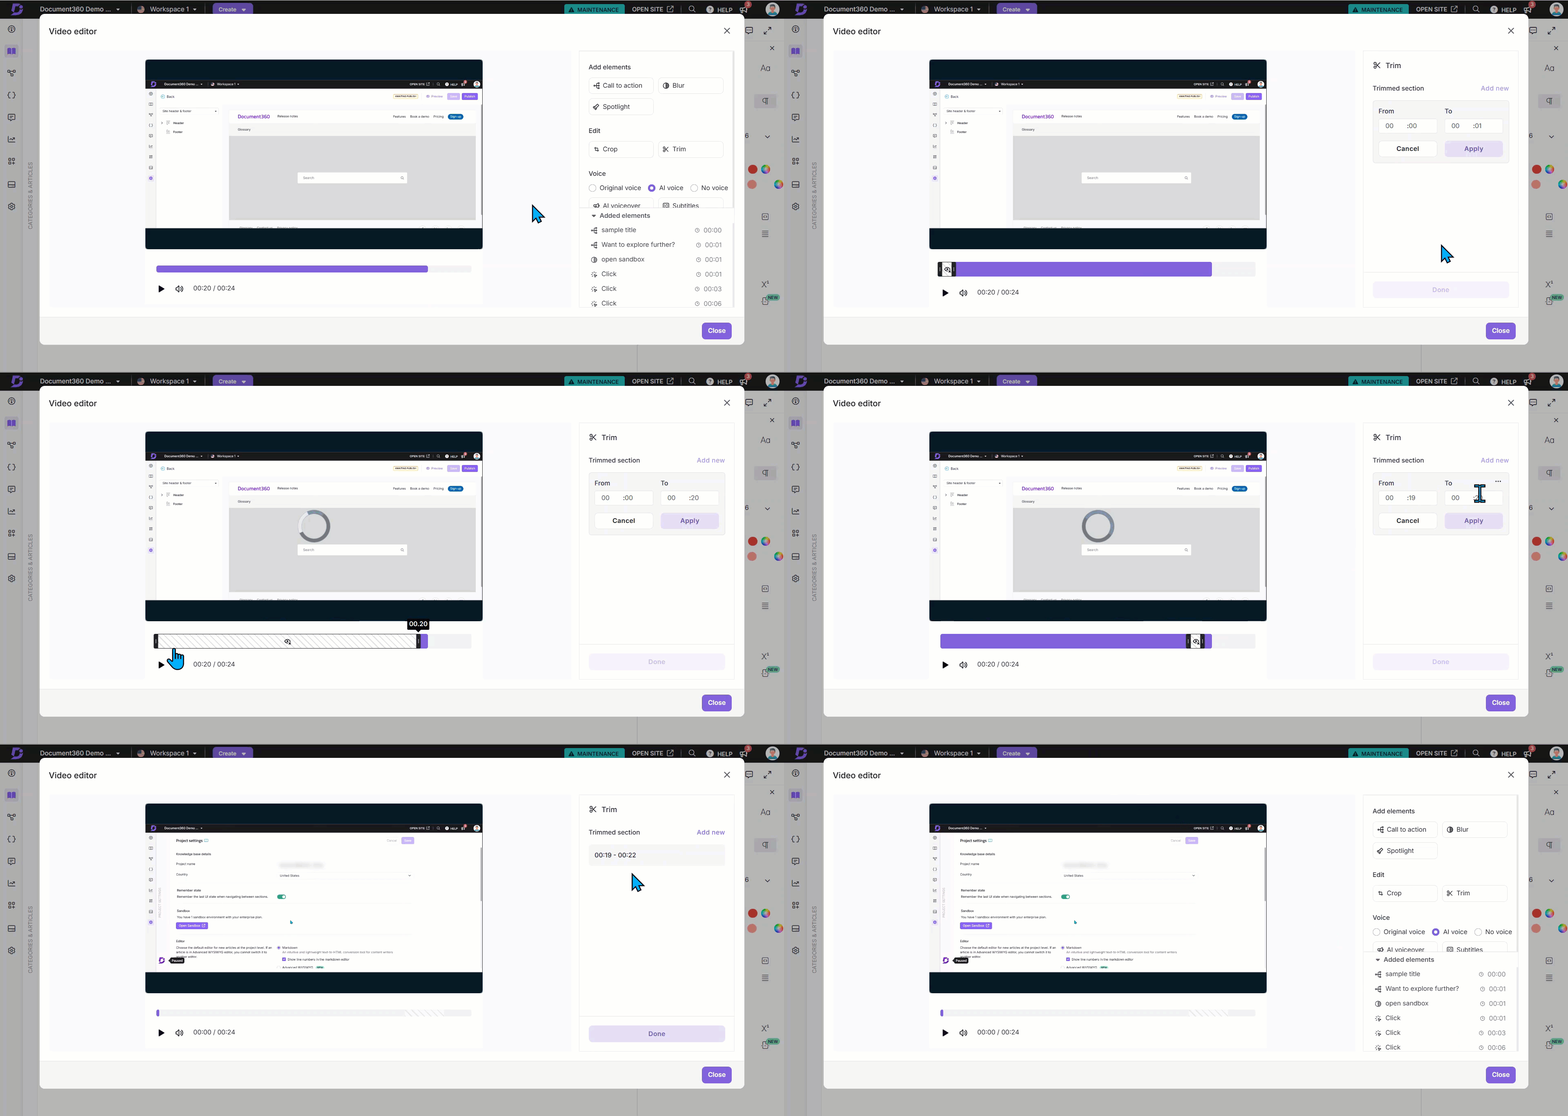
Voice
You can choose how the video is narrated:
Original voice: Uses the original background voice.
AI voice: Allows AI-generated voiceovers in multiple languages.
Click AI voiceover to select the desired AI voiceover from multiple languages. The video script will be rendered in the Script section.
No voice: No voiceover will be applied.
Subtitles: Click Subtitles to add subtitles to the videos. If the video has a voiceover, the auto-generated subtitles will appear here, and you can edit them as needed.
Alternatively, you can manually enter your own voiceover script. Enable the Display subtitles checkbox to show subtitles in the video.
In the Added elements dropdown, you can view the elements that are added in the video. From here, click the Edit () icon to edit the desired element. Click the Delete () icon next to the elements to delete, and click the Eye () icon to hide the mouse clicks across the video.
Click Close to save changes.
NOTE
The maximum video size for recording video is 150 MB.
Editing the recorded video
Once the video is added to an article, you can apply the following formatting options:
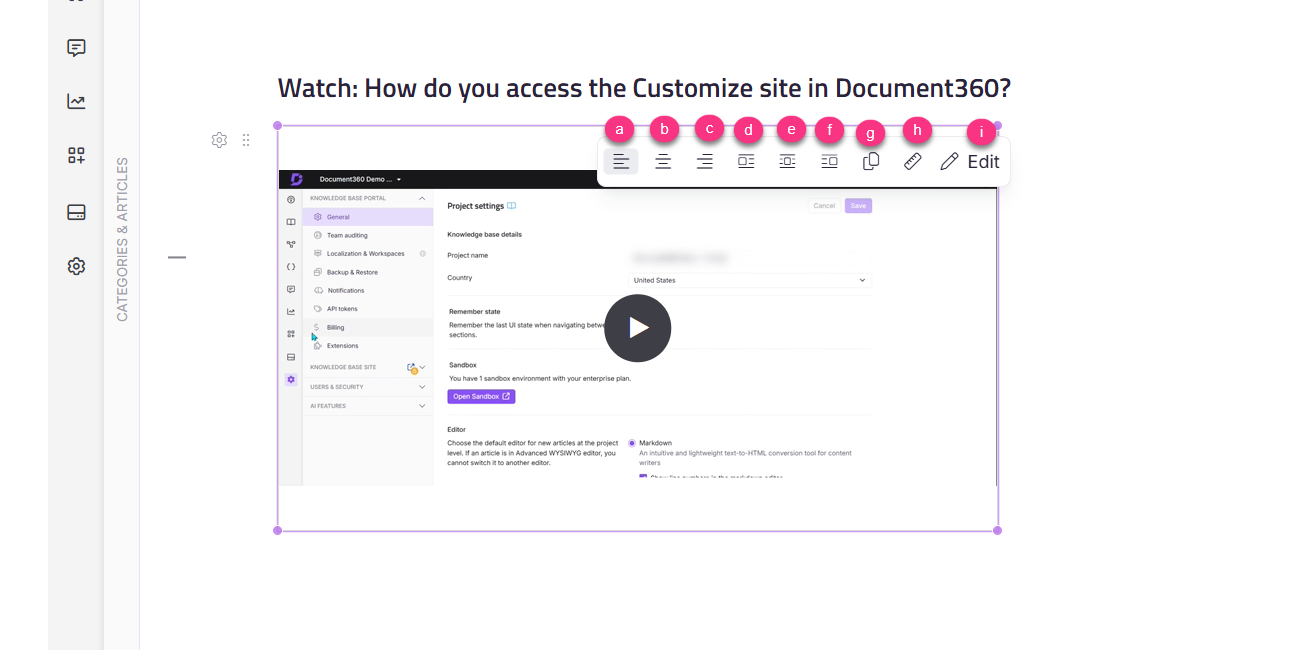
Align left: Aligns the video to the left.
Center: Aligns the video to the center.
Align right: Aligns the video to the right.
Inline left: Places the video inline on the left.
Inline block: Displays the video as an inline block element.
Inline right: Places the video inline on the right.
Resize: Adjusts the video dimensions.
Copy: Copies the video to the clipboard for reuse in another article or category within the same project.
Edit: Allows further modifications, including:
Add elements: Blur and Spotlight
Edit: Crop, Trim, and Music
Voice: Original voice, AI voice, and No voice