NOTE
Floik AI features are available across all Document360 plans as an add-on. To purchase or learn more, please contact our support team.
The interactive demo feature allows users to engage with a product simulation or walkthrough instead of watching a static video or reading text instructions. It provides a hands-on experience where users can click, type, hover, and explore the interface in a guided environment.
Document360 offers built-in interactive demos and formatting options. You can capture your screen, mouse clicks, and enhance the interactive demo directly within your articles without any external tools.
For example, if you're writing a how-to article on configuring user roles, you can record an interactive demo that shows each step in action. This helps readers follow along visually and understand the process without needing to guess or rely only on text instructions.
NOTE
The Interactive demo feature available only for KB Site 2.0.
Accessing the Interactive demo
To access the Interactive demo,
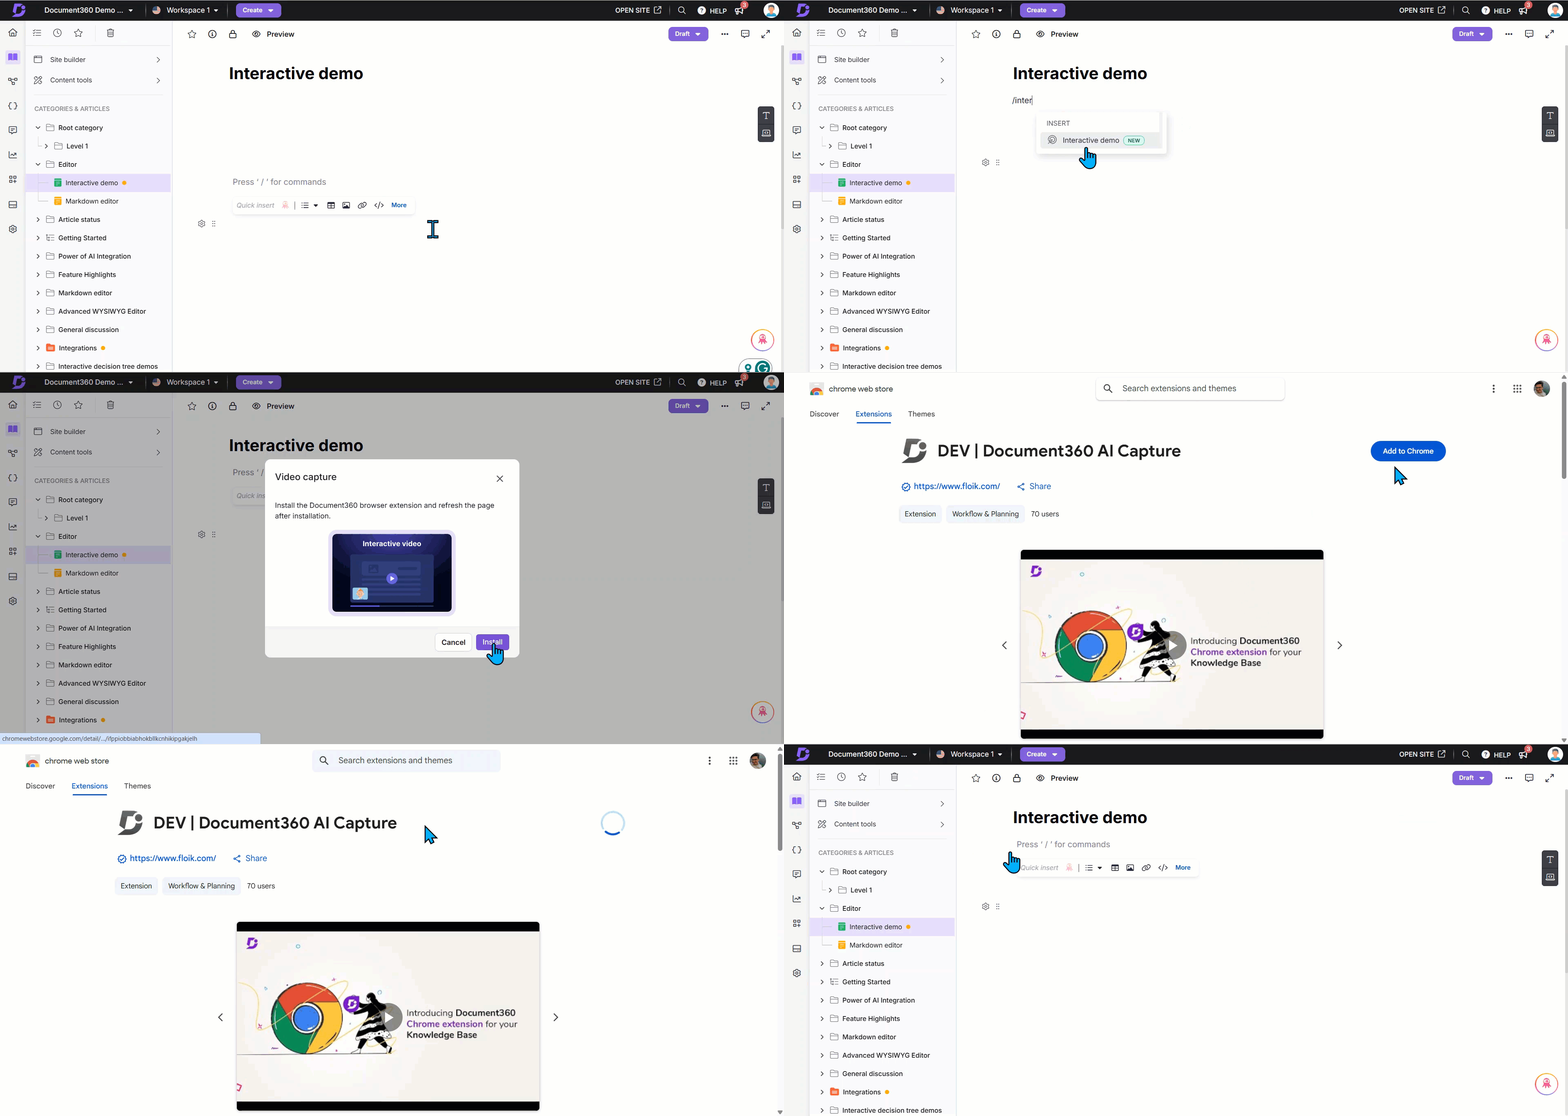
Navigate to the desired article in the Advanced WYSIWYG editor.
Type the Slash command
/Interactive demoand press Enter.If the Document360 Interactive demo extension is not installed, click Install.
NOTE
This extension is currently supported only in the Chrome browser.
In the Chrome web store, click Add to Chrome.
Once installed, return to the Knowledge base portal.
Recording the screen
The Interactive demo dialog will appear.
From the audio dropdown, select the desired option or select No audio to record without sound.
Click Next.
Select the screen to capture:
Chrome tab: Records only the selected Chrome tab.
Window: Records only the selected application window.
Click Share.
The selected screen will appear along with the Screen recording panel.
Choose the recommended resolution (16:9 or 4:3).
Click Start capturing to begin recording.
Click Discard to cancel and return to the previous screen.
In the Blur selected section, click Add to hide specific areas of the screen when recording sensitive information.
If needed, enable the Show recording controls on screen toggle.
A Document360 logo will appear in the bottom left corner of the recording screen. Clicking the logo will pause the recording. This logo will also be visible in the recorded interactive demo.
Mouse clicks and interactions will be captured, and click indicators will be displayed for easier guide editing.
Click Pause to pause the recording and Record to resume.
To stop recording, click Stop sharing in the floating panel or Stop recording in the Screen recording panel.
After recording, the system will import the interactive demo into the article. This may take a few moments.
.gif)
Adding interactive elements
Once processed, the recorded interactive demo appears in the interactive demo editor panel.
Click the Play () icon to preview the recorded interactive demo.
The Interactive demo editor provides formatting tools, including:
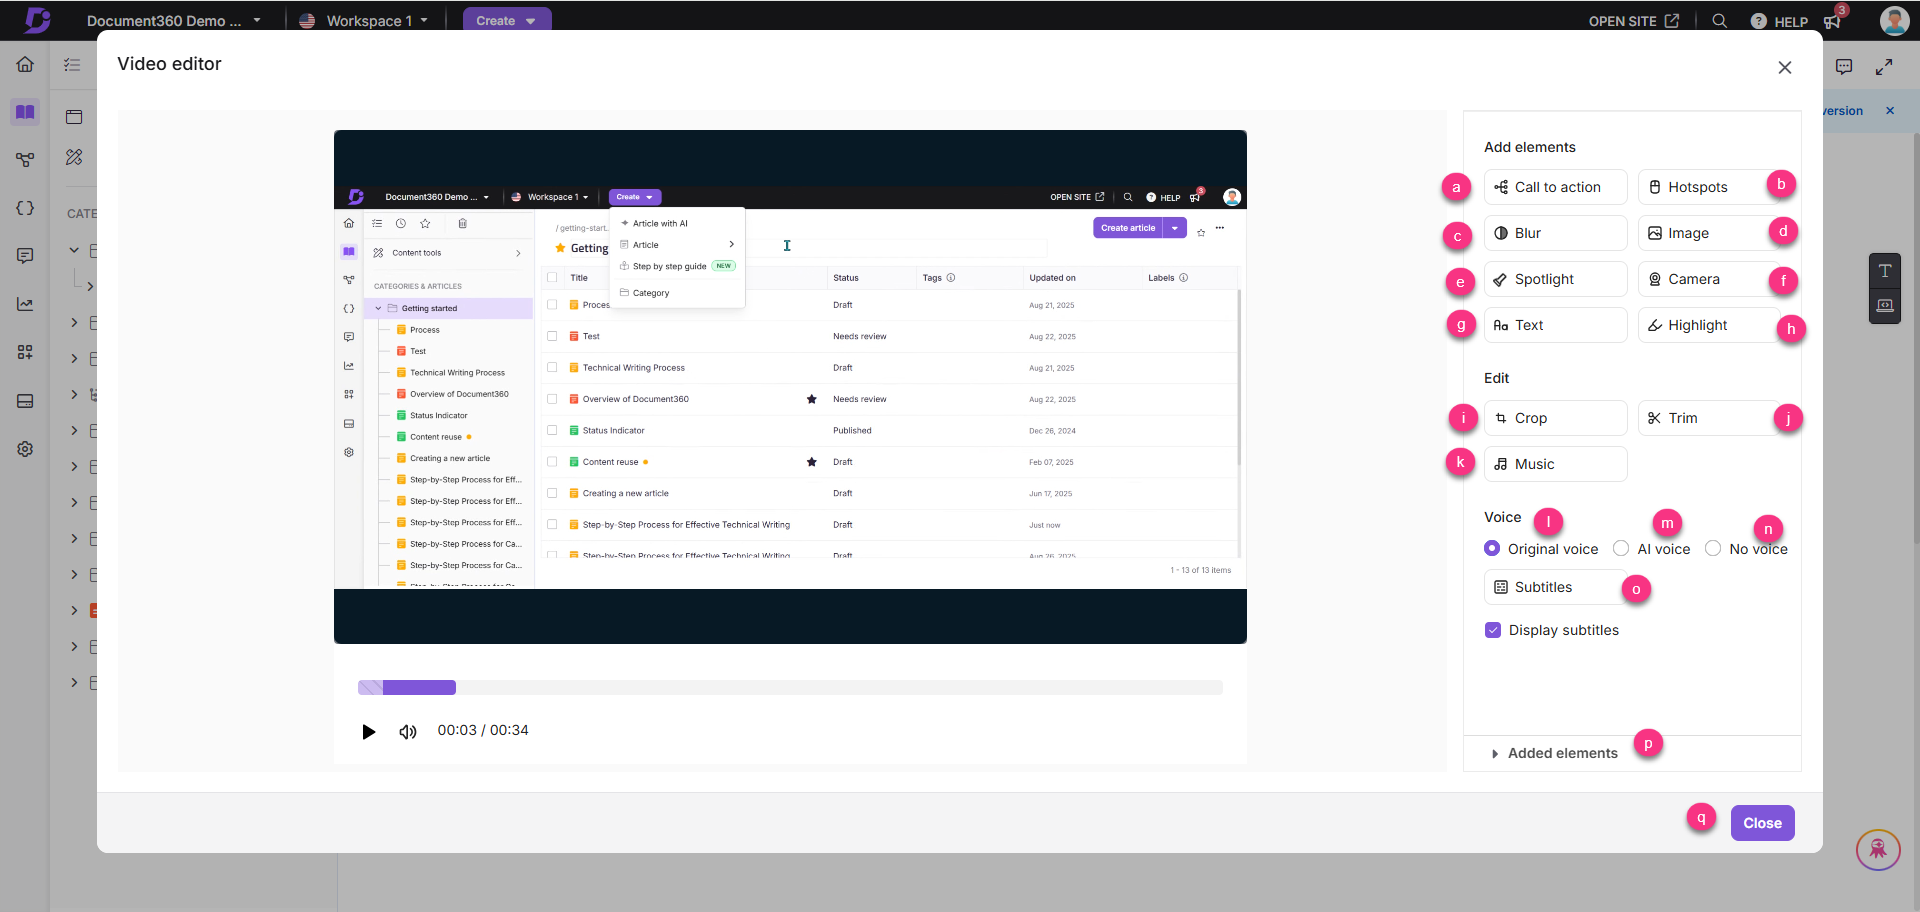
Add elements
a. Call to action: To add an interactive button in the demo
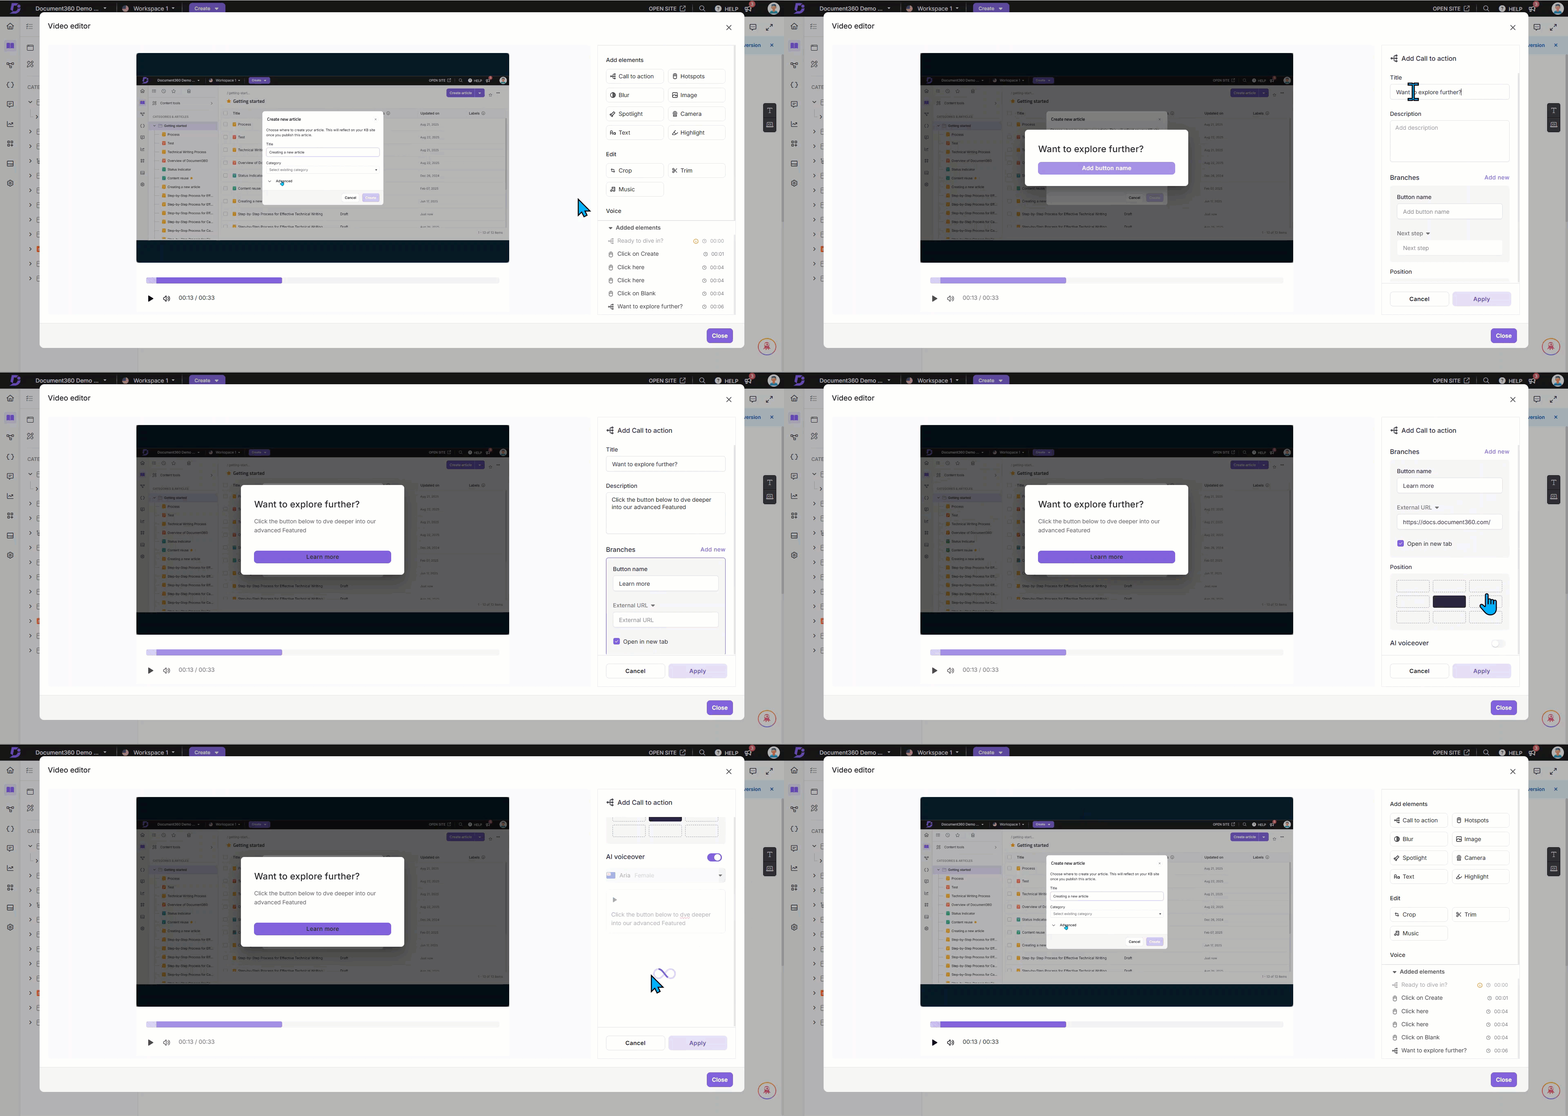
In the right pane, click Call to action.
Enter the Title and Description.
NOTE
In the Description field, select the content and you can use the basic formatting tools such as Bold (), Italics (), Underline (), Ordered list (), Unordered list (), and Hyperlink ().
In the Branches section, enter the button name and select the desired action:
External URL: Enter the destination link.
Next step: Displays a message or information for the user.
Click Add new to include another button.
Choose the desired button position under the Position section.
Enable the AI voiceover toggle to add narration:
Select a voice from the dropdown.
Enter the narration script.
Click the Play () icon to preview.
Click Apply.
b. Hotspots
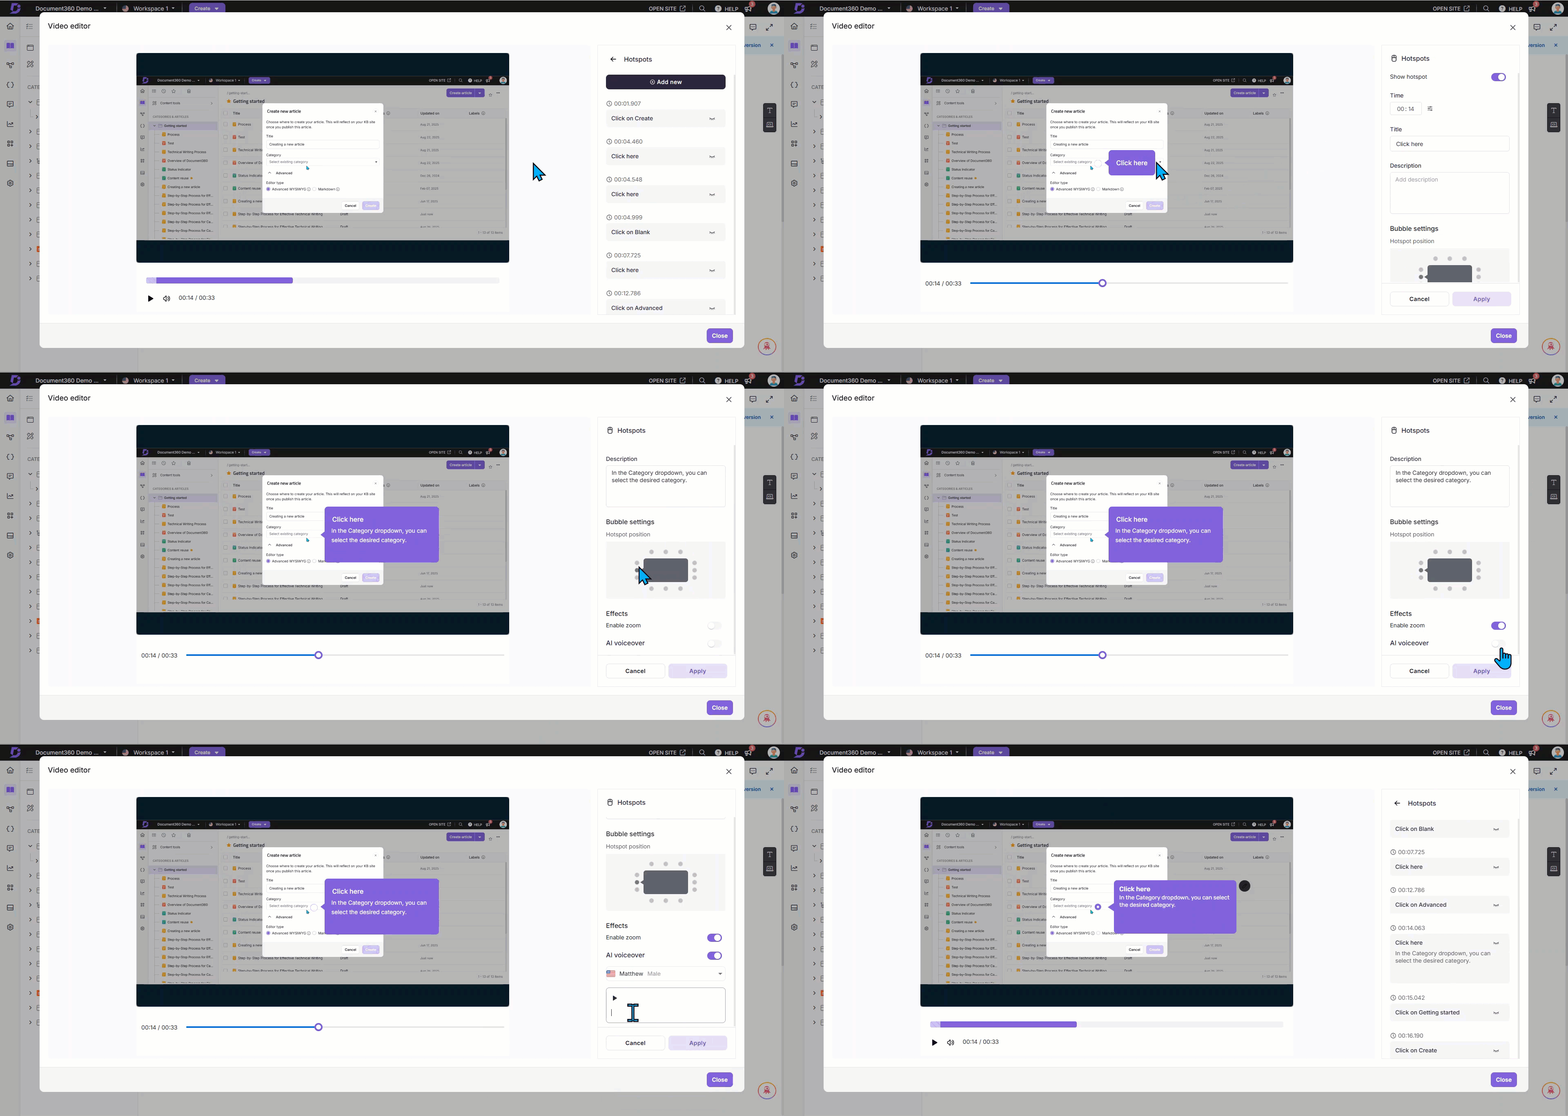
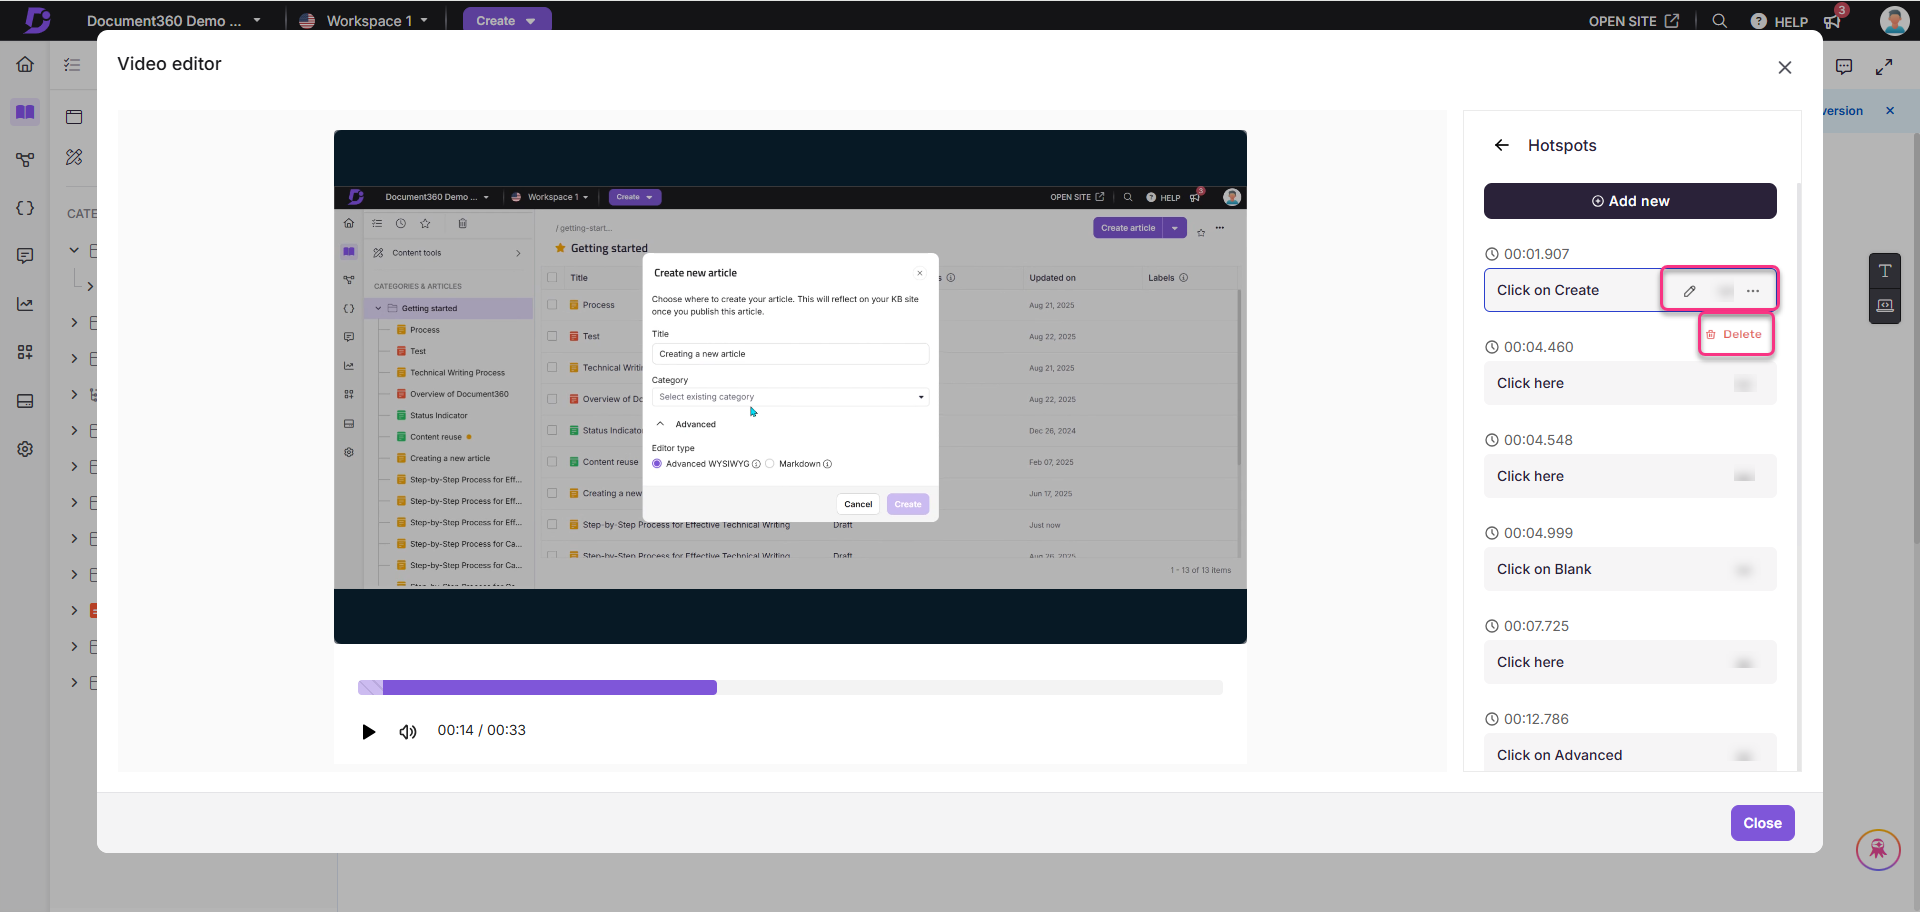
Hotspots can be used to showcase the mouse click effect in the Interactive demo.
Go to the exact duration in the video and click Hotspot to add.
In the Hotspots dialog, review the list of existing hotspots (if any).
Navigate to the desired location in the video and click Add new to add a hotspot to the timeline.
You can drag the hotspot to the desired position.
Turn on the Show hotspot toggle to display the hotspot.
In the Time field, enter the desired time. Use the Fine-tune milliseconds () option for precise adjustments.
Enter a title in the Title field.
Enter the description in the Description field.
NOTE
In the Description field, select the content and you can use the basic formatting tools such as Bold (), Italics (), Underline (), Ordered list (), Unordered list (), and Hyperlink ().
Under Bubble settings, adjust the hotspot position by choosing the exact grid point from the given options.
In the Effect section, turn on the Enable zoom toggle if required.
To add voice narration, turn on the AI voice over toggle.
Select the desired voice and enter the content in the text field.
Click the Play () button next to the content to preview it in the selected voice.
Click Apply to save the changes.
The text will be added to the list. Hover over any text to:
Click the Edit () icon to modify.
Click the More () icon and select Delete to remove.
c. Blur:
To hide sensitive information in the interactive demo:
In the right pane, click Blur.
If no blurs were added before, click Add to add a new blur.
If there are already many blurs, click Add new to add new blurs.
Click Add new to add a blur area.
Ensure the Show blur toggle is turned on.
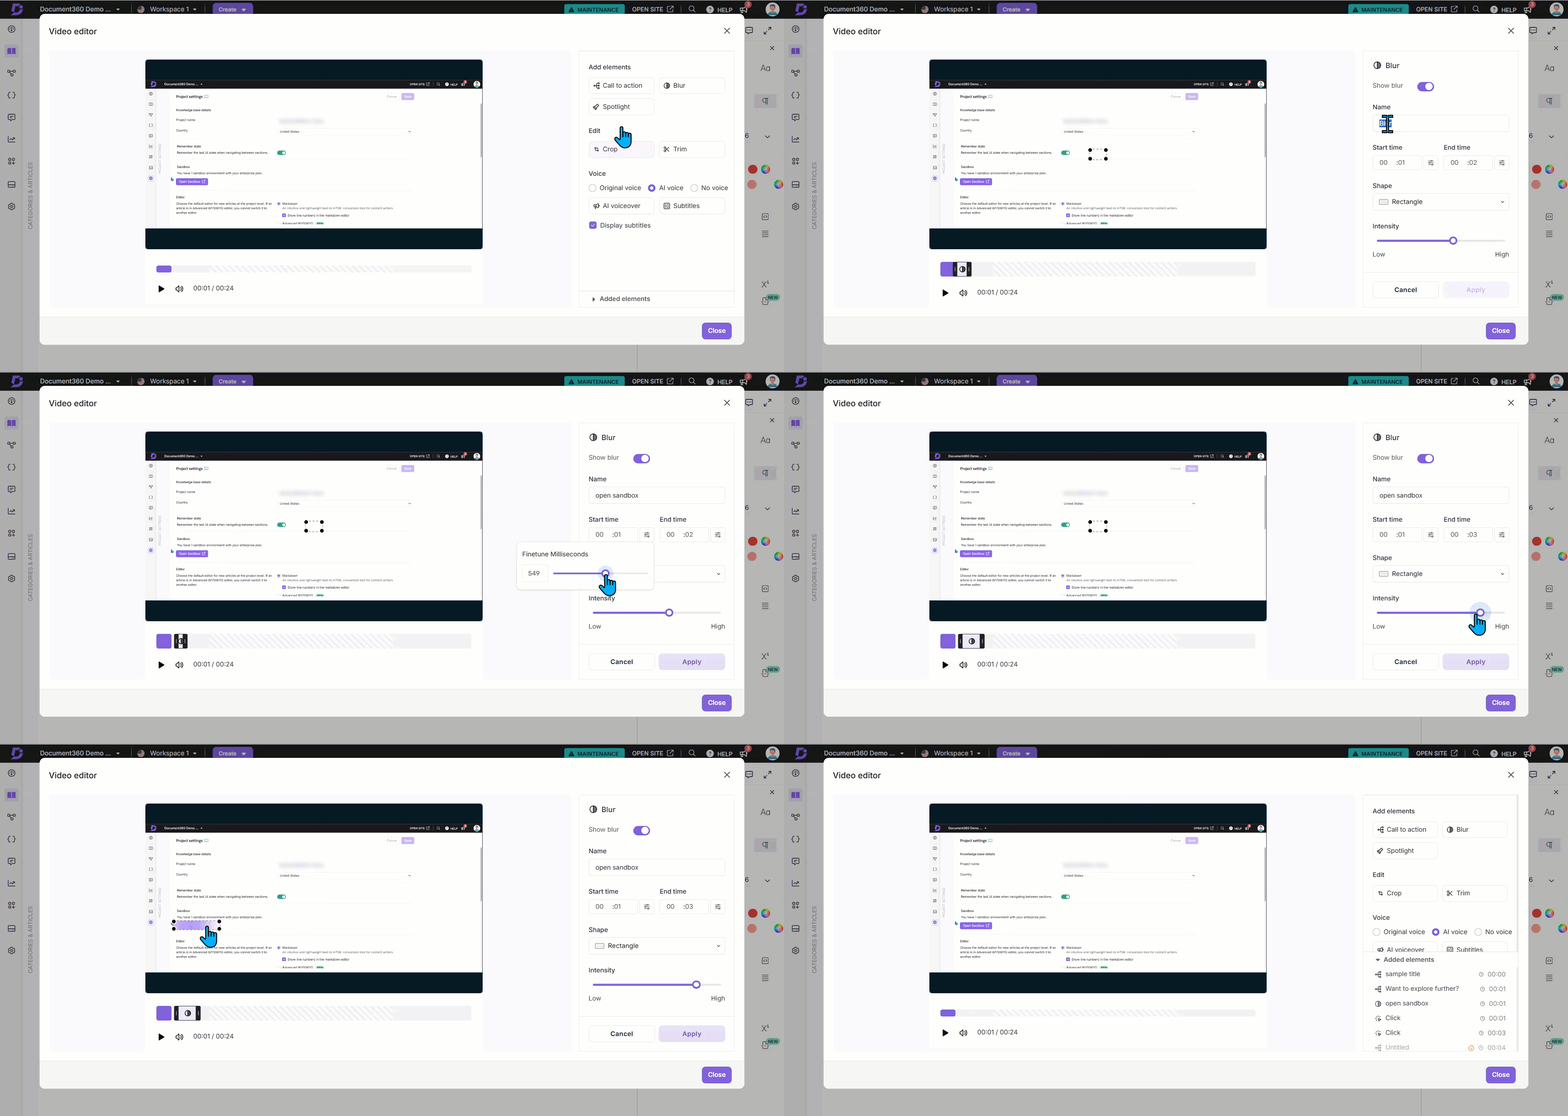
Enter a Name for the blur.
Select the Start time and End time for the blur. Use the Fine-tune milliseconds () option for precise adjustments.
NOTE
You can use the slider of the video to adjust the start and end time of the video. and you can resize the blur dimension by dragging the edges in the interactive video.
Choose a shape: Circle or Rectangle.
Adjust the Intensity slider to modify opacity.
Click Apply to save changes.
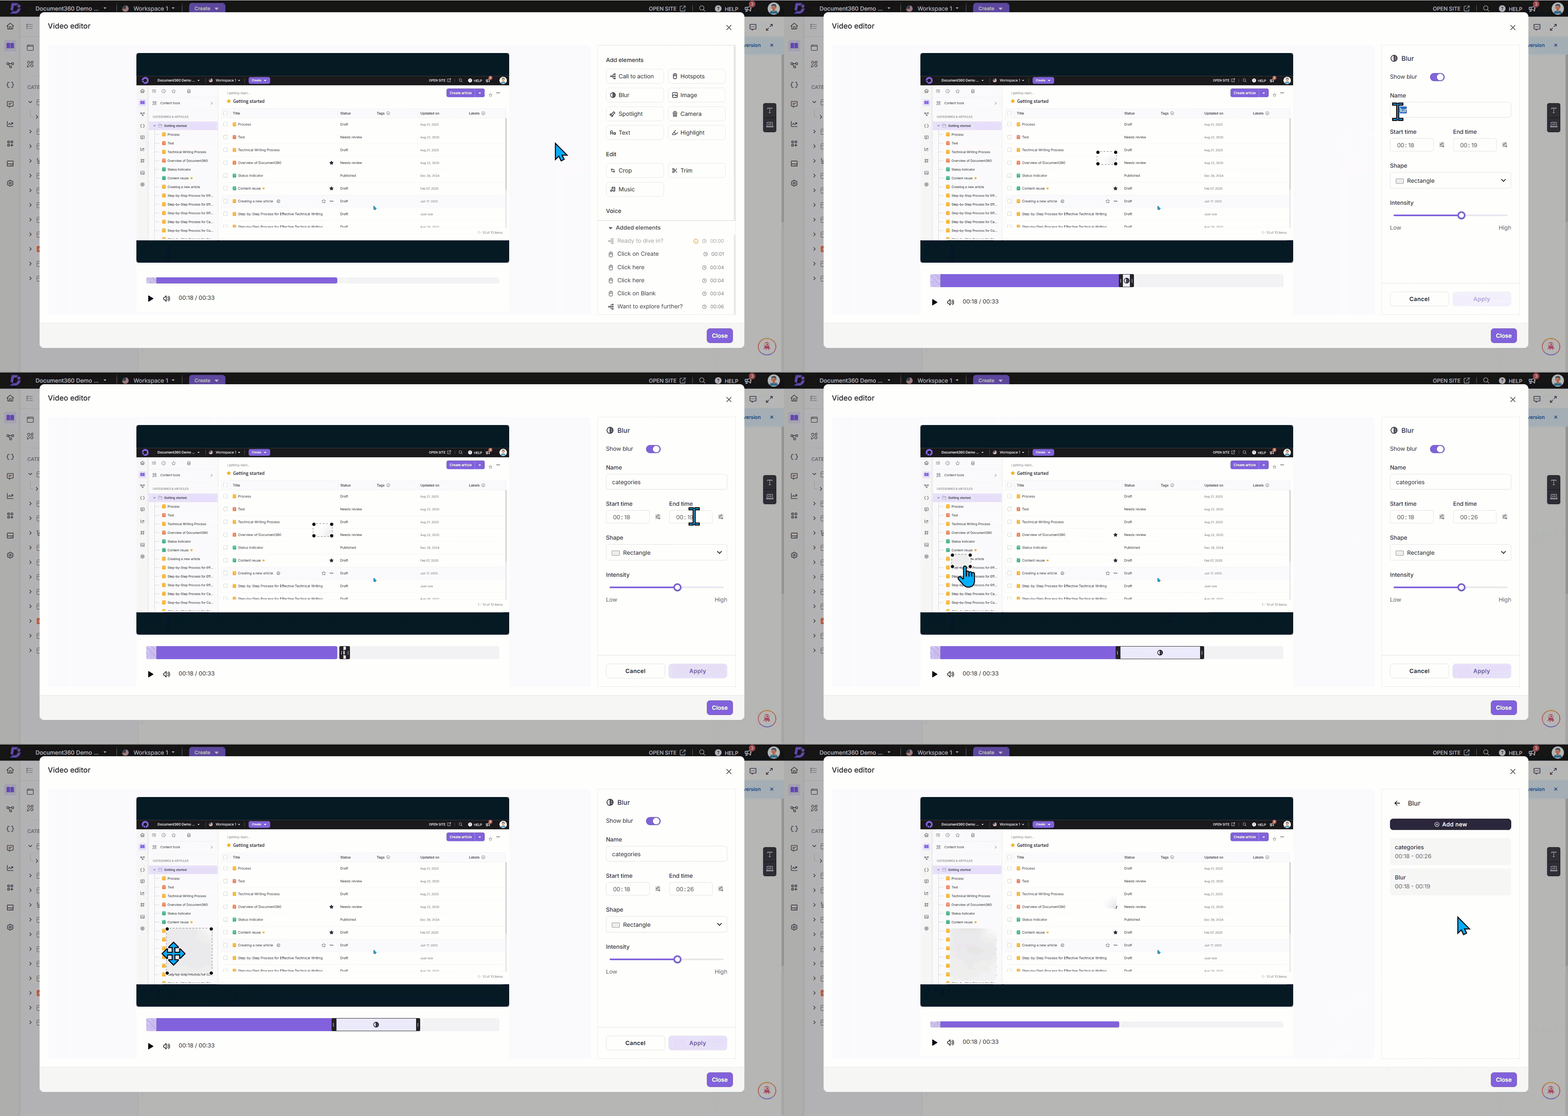
The blur will be added to the list.
Hover over any blur item, click the More () icon, and select Delete to remove.
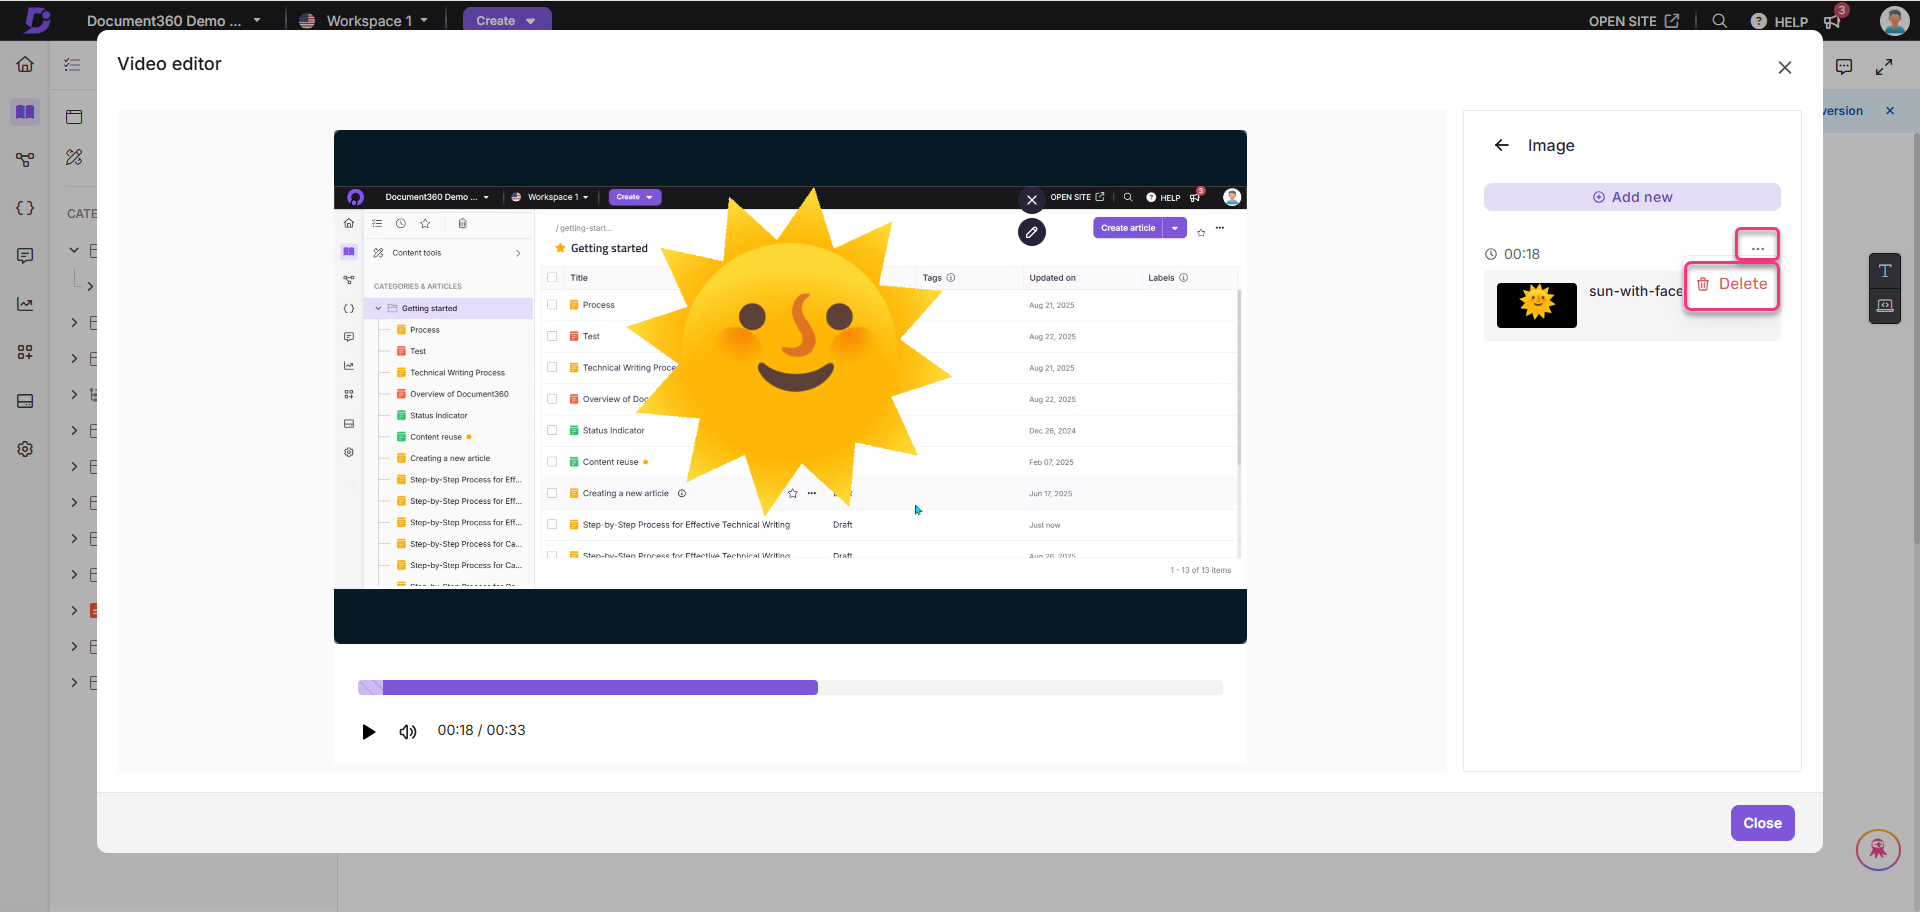
d. Image
The list of existing images appears.
If no images were added before, click Add to add a new image.
If there are already many images, click Add new to add new images.
In the Time field, enter the desired time. Use the Fine-tune milliseconds () option for precise adjustments.
Click Image to import predefined images and emojis categorized by name.
To apply your own image, click the icon, and import the desired image from your local file explorer.
Once uploaded, this image will be placed above the recorded video.
You can perform the following actions on the uploaded image:
Time: In the Time field, update the desired time. Use the Fine-tune milliseconds () icon for precise adjustments.
Replace image: Click Replace image to replace the uploaded image. Supported formats are JPG or PNG.
Size and position: Select Freeform to adjust the image position using mouse drag.
In the Degree field, enter the desired value to rotate the image.
Use the Rotate left or Rotate right icons.
Or, select Fit to screen to adjust the image to the screen size.
In the Behaviour section, you can select:
Stay for: Keep the image for a specific duration. Enter the number of seconds in the Sec field.
Next button: Keep the image visible until the Next button is clicked.
CTA: Link a Call to Action.
In the Voiceover section:
Turn on the Voiceover toggle.
Select the desired voice in the dropdown (based on your preferred accent).
In the Content field, enter the desired voiceover text.
Click the Play () icon to preview the content with the selected voice.
Click Apply to save the changes.
The image will be added to the list.
Hover over any image item, click the More () icon, and select Delete to remove.
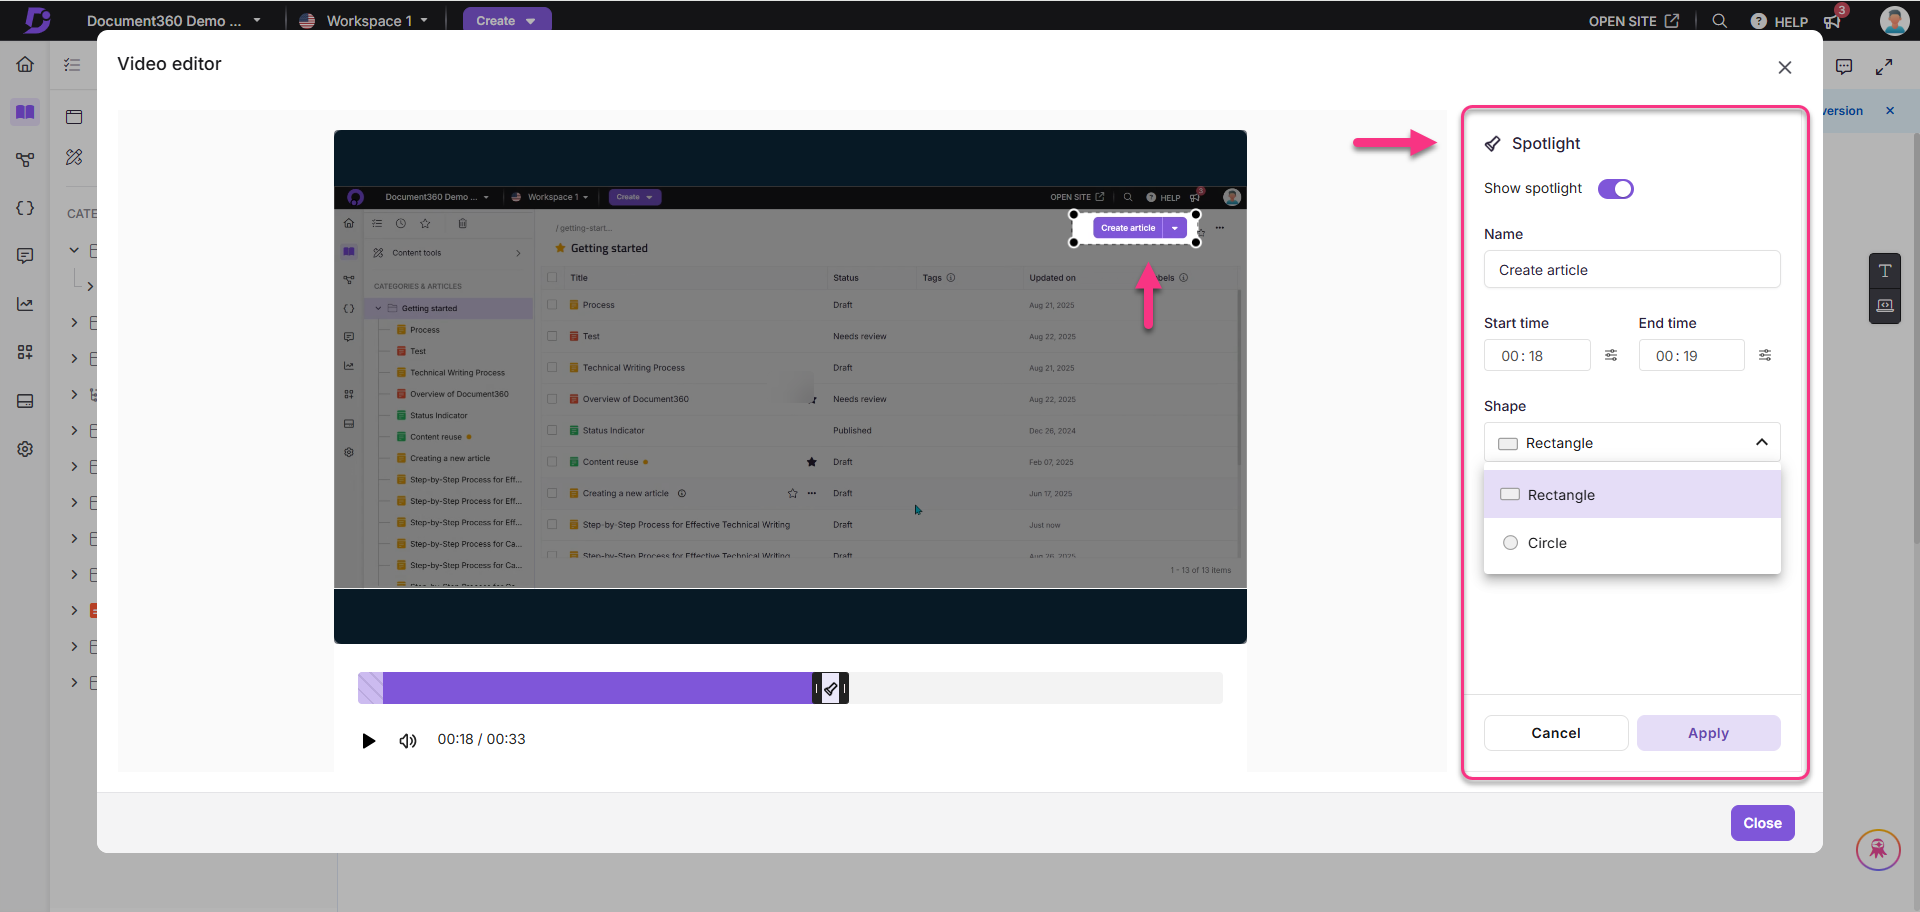
e. Spotlight: Highlight important areas in the interactive demo
In the right pane, click Spotlight.
Click Add to create a spotlight.
Enter a Name for the spotlight.
Select the Start time and End time. Use the Fine-tune milliseconds () option for precise adjustments.
Choose a Shape: Circle or Rectangle.
Click Apply to save changes.
f. Camera
While editing, you can record a video from your camera and add it to your Interactive demo.
Click Camera.
The Recording pane appears with a list of prerecorded videos (if any).
Click Create.
If no videos were added before, click Create.
If there are already many videos, click Add new to add another.
In the Add new recording pane, choose one of the following:
Record new: Record a video directly using your camera.
Select video: Upload an already recorded video.
In the Time field, enter the desired time. Use the Fine-tune milliseconds () option for precise adjustments.
Select the desired camera and microphone, then click Start recording.
After the 3-second countdown, the recording begins.
Use Pause and Resume as needed.
Click the Retake icon to start over.
Click Discard to delete the current recording.
Click Stop to end recording.
After stopping, click Save and continue. The system will process and add the video to the demo.
If required, click Record again to create a new recording.
The recorded video will overlay above the Interactive demo. From the right panel, you can:
Click Replace video to swap the original.
Click the Play () icon to preview.
Click Record new to capture a fresh video.
In the Shape section, choose a display shape: Circle, Square, Wide, or Portrait.
In the Position section, select where the video should appear in the demo.
Turn on the Subtitles toggle to auto-generate subtitles if speech is detected.
Click Apply to save changes.
All recorded videos are listed in the pane. To delete one, hover over it, click the More () icon, and select Delete.
NOTE
You cannot create two recorded videos at the same timestamp.
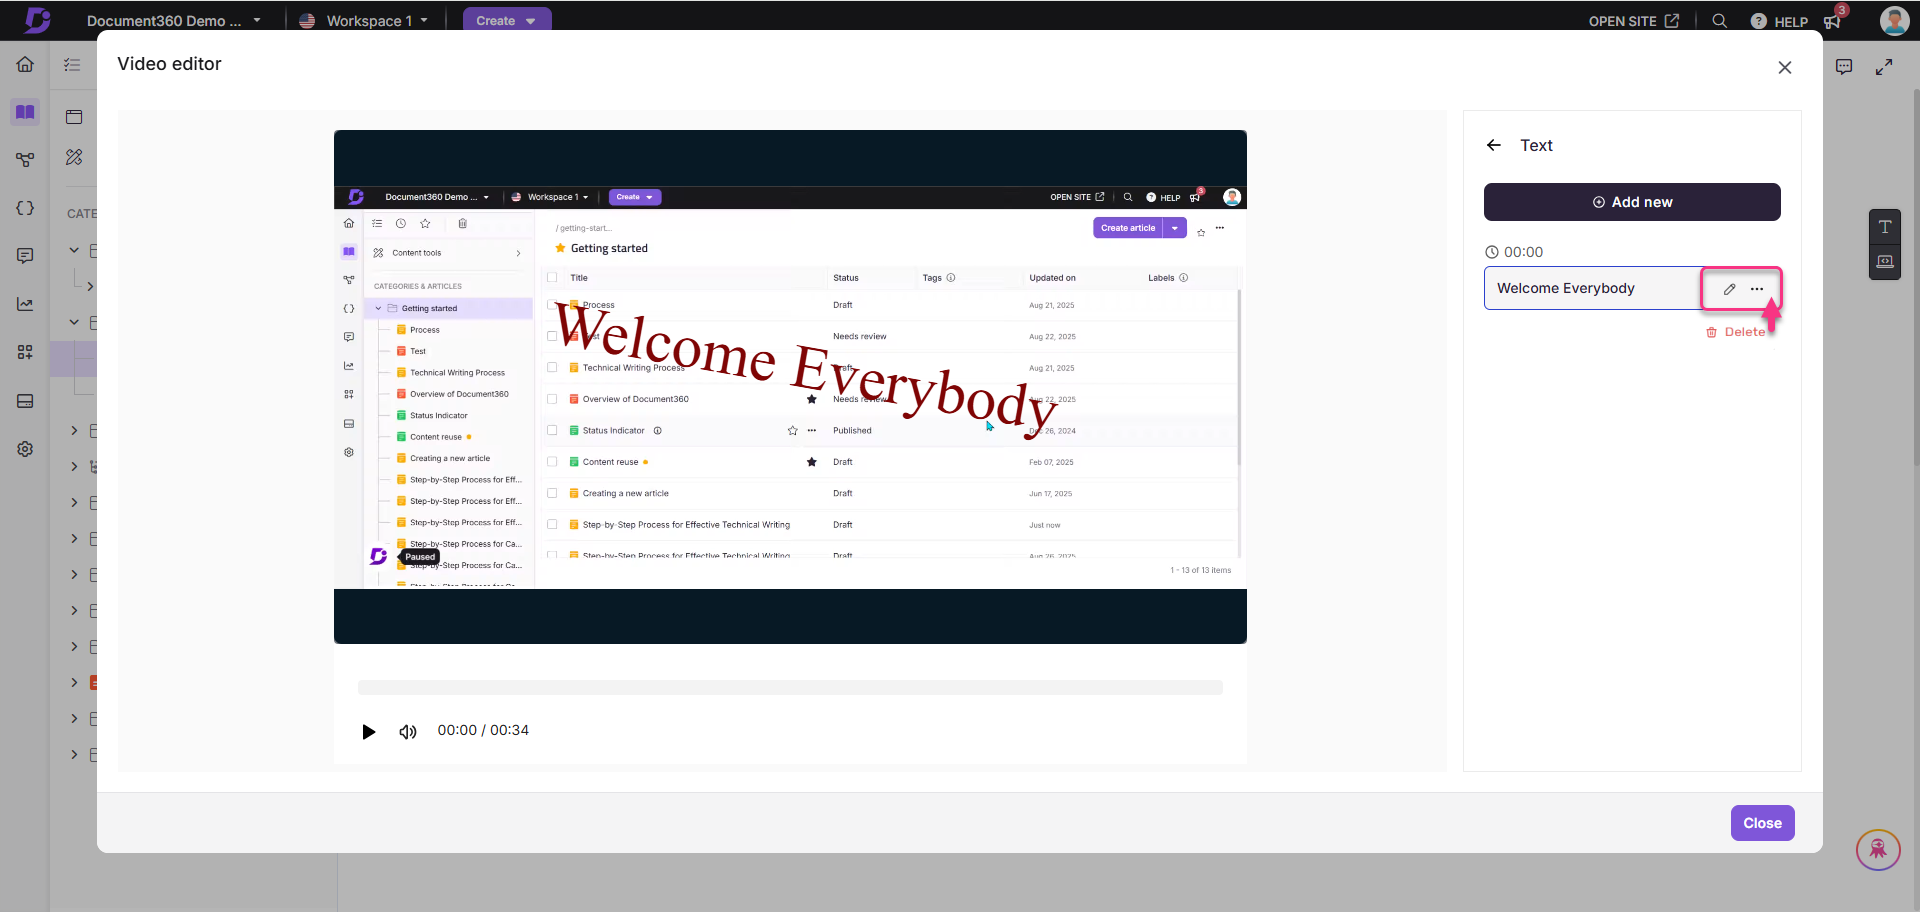
g. Text
You can add text overlays to your Interactive demo.
Click Text.
If no texts were added before, click Add.
If texts already exist, click Add new.
In the Time field, set when the text should appear. Use the Fine-tune milliseconds () option for precise adjustments.
Enter the desired text in the Text field.
Choose the font and font size.
Select a text color from the palette or enter a hex code.
In the Degree field, enter a value to rotate the text position.
In the Behaviour section, choose one:
Stay for: Enter the number of seconds the text remains visible.
Show until: Enter the time until which the text remains visible.
If you selected Stay for, you can enable AI voiceover:
Turn on the AI voiceover toggle.
Select a voice from the dropdown.
Enter the voiceover content.
Click Play to preview.
Click Apply to save.
The text will be added to the list. Hover over any text to:
Click the Edit () icon to modify.
Click the More () icon, and select Delete to remove.
h. Highlight
You can use highlights to draw attention to specific elements in the demo.
Click Highlight.
If no highlights exist, click Add.
If highlights already exist, click Add new.
In the Name field, enter a name. This will not appear in the demo.
Select the Start time and End time for the highlight. Use the Fine-tune milliseconds () option for precise adjustments.
In the Shape dropdown, choose Rectangle or Circle.
In the Color section, select a highlight color.
Click Apply to save.
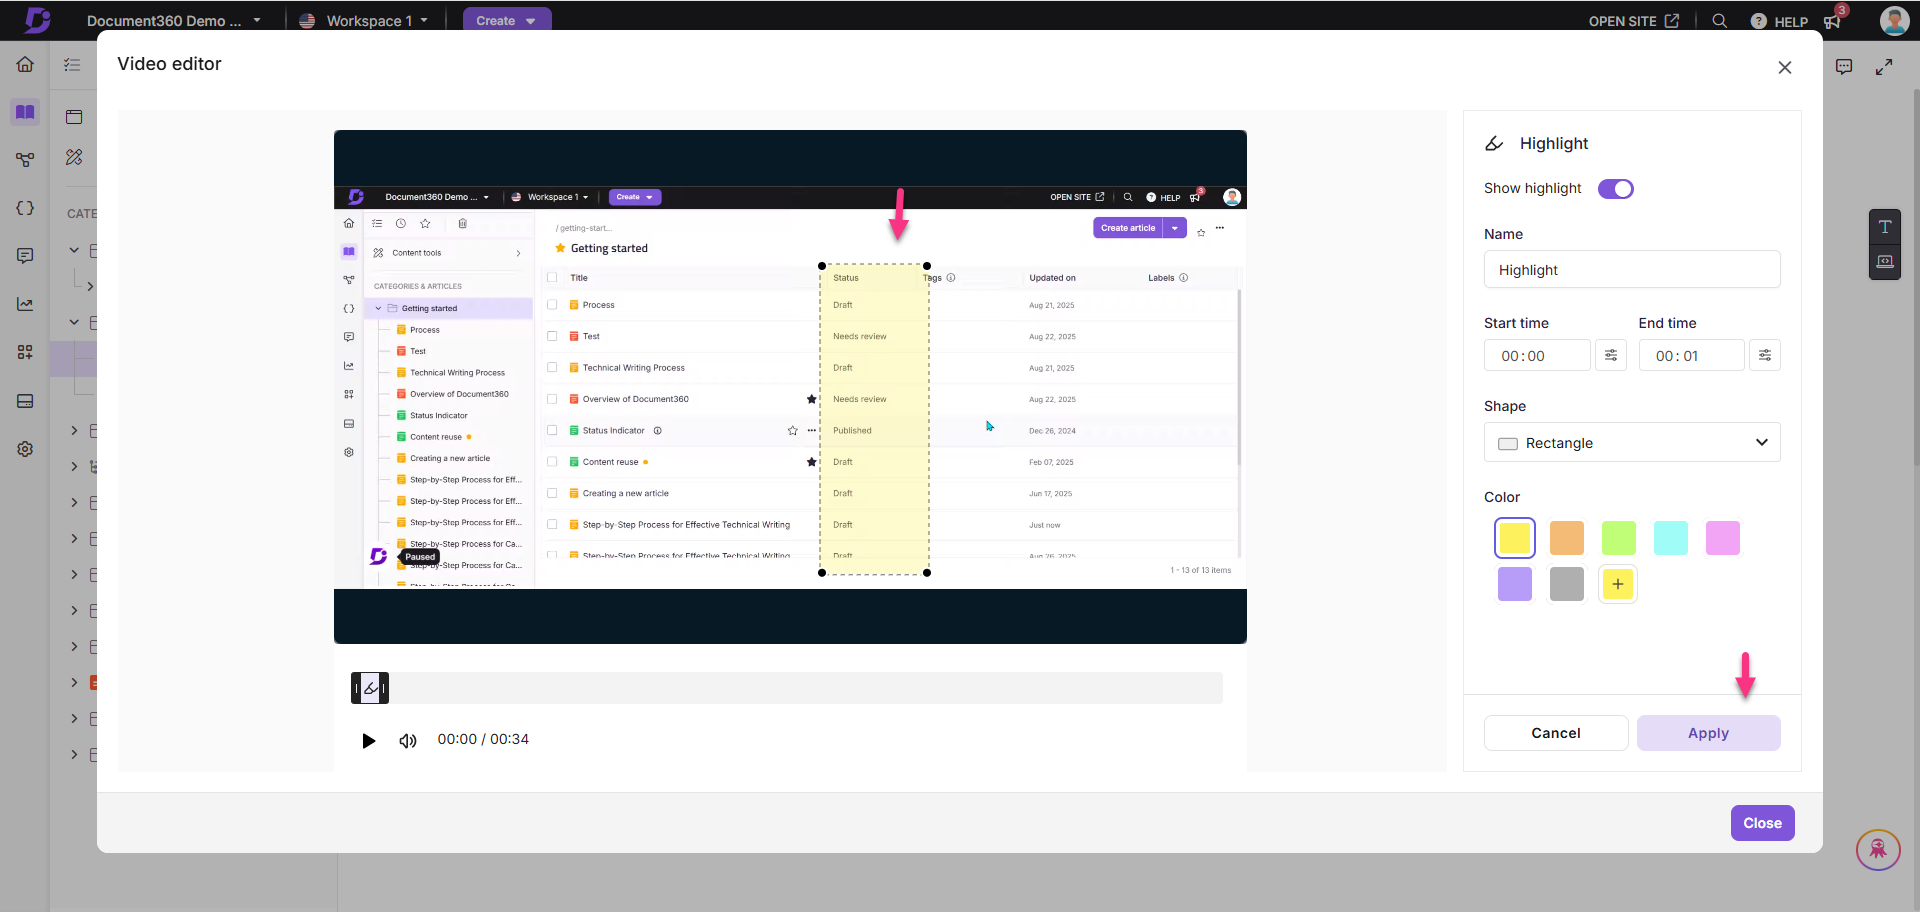
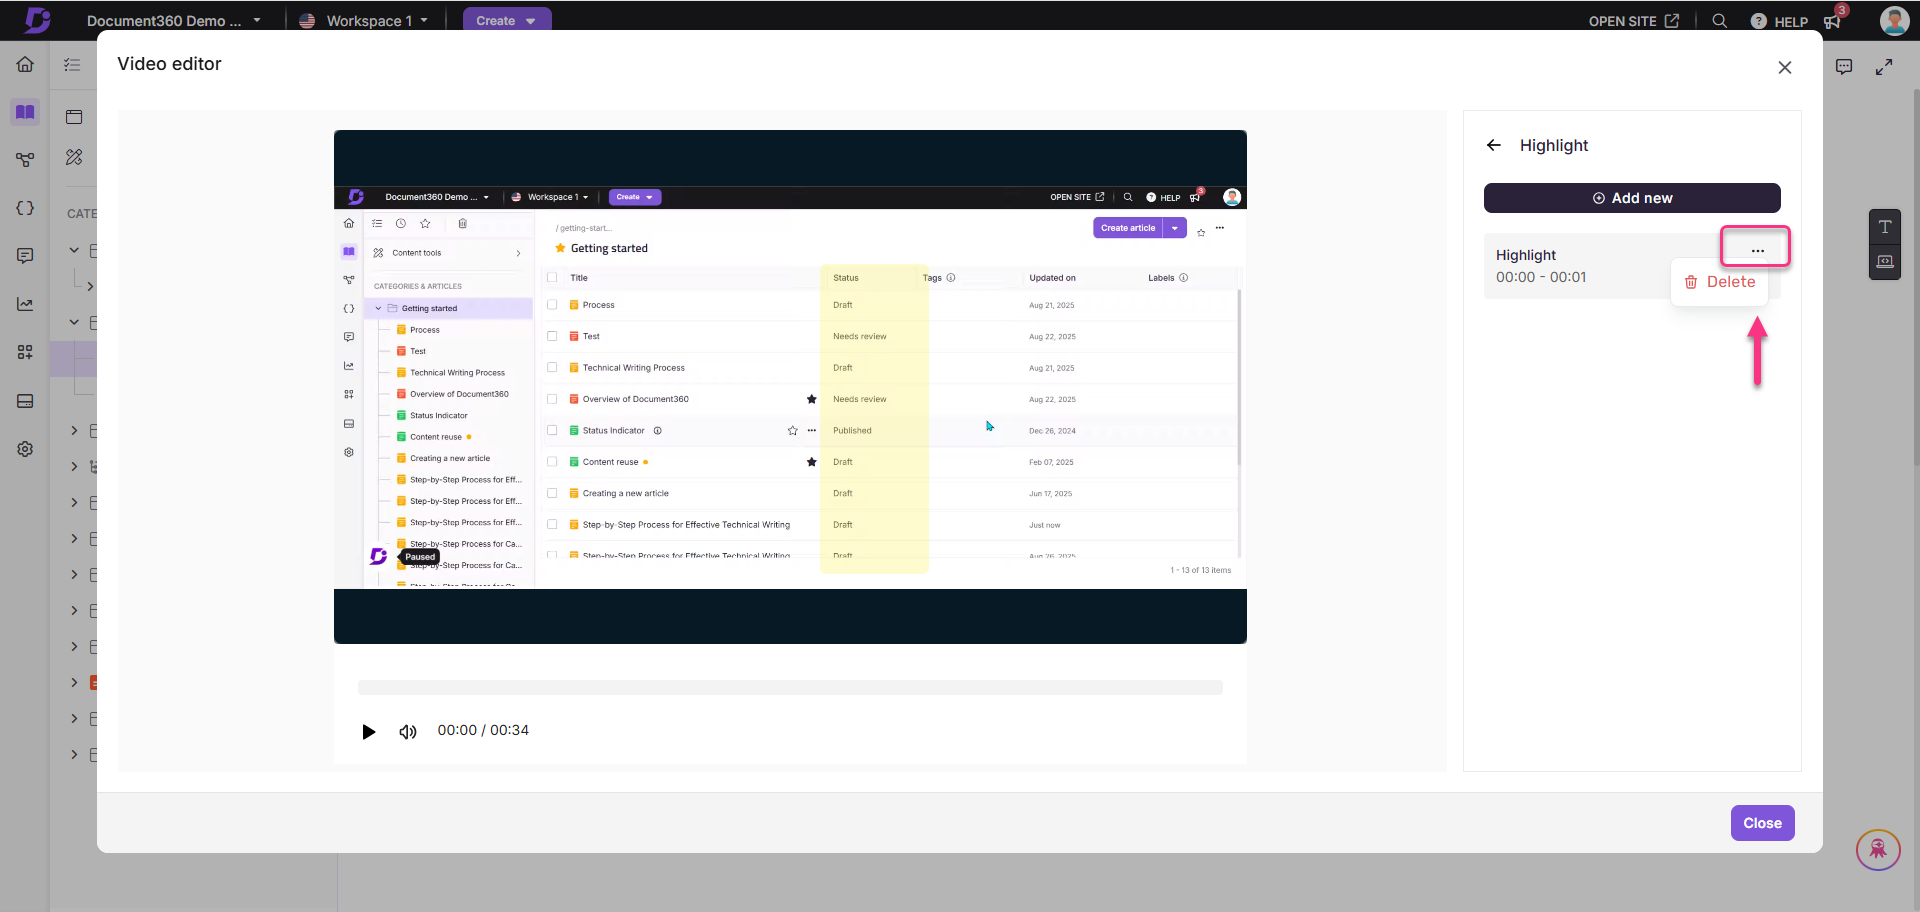
The highlight will be added to the list. To delete a highlight, hover over it, click the More icon, and select Delete.
Edit
i. Crop
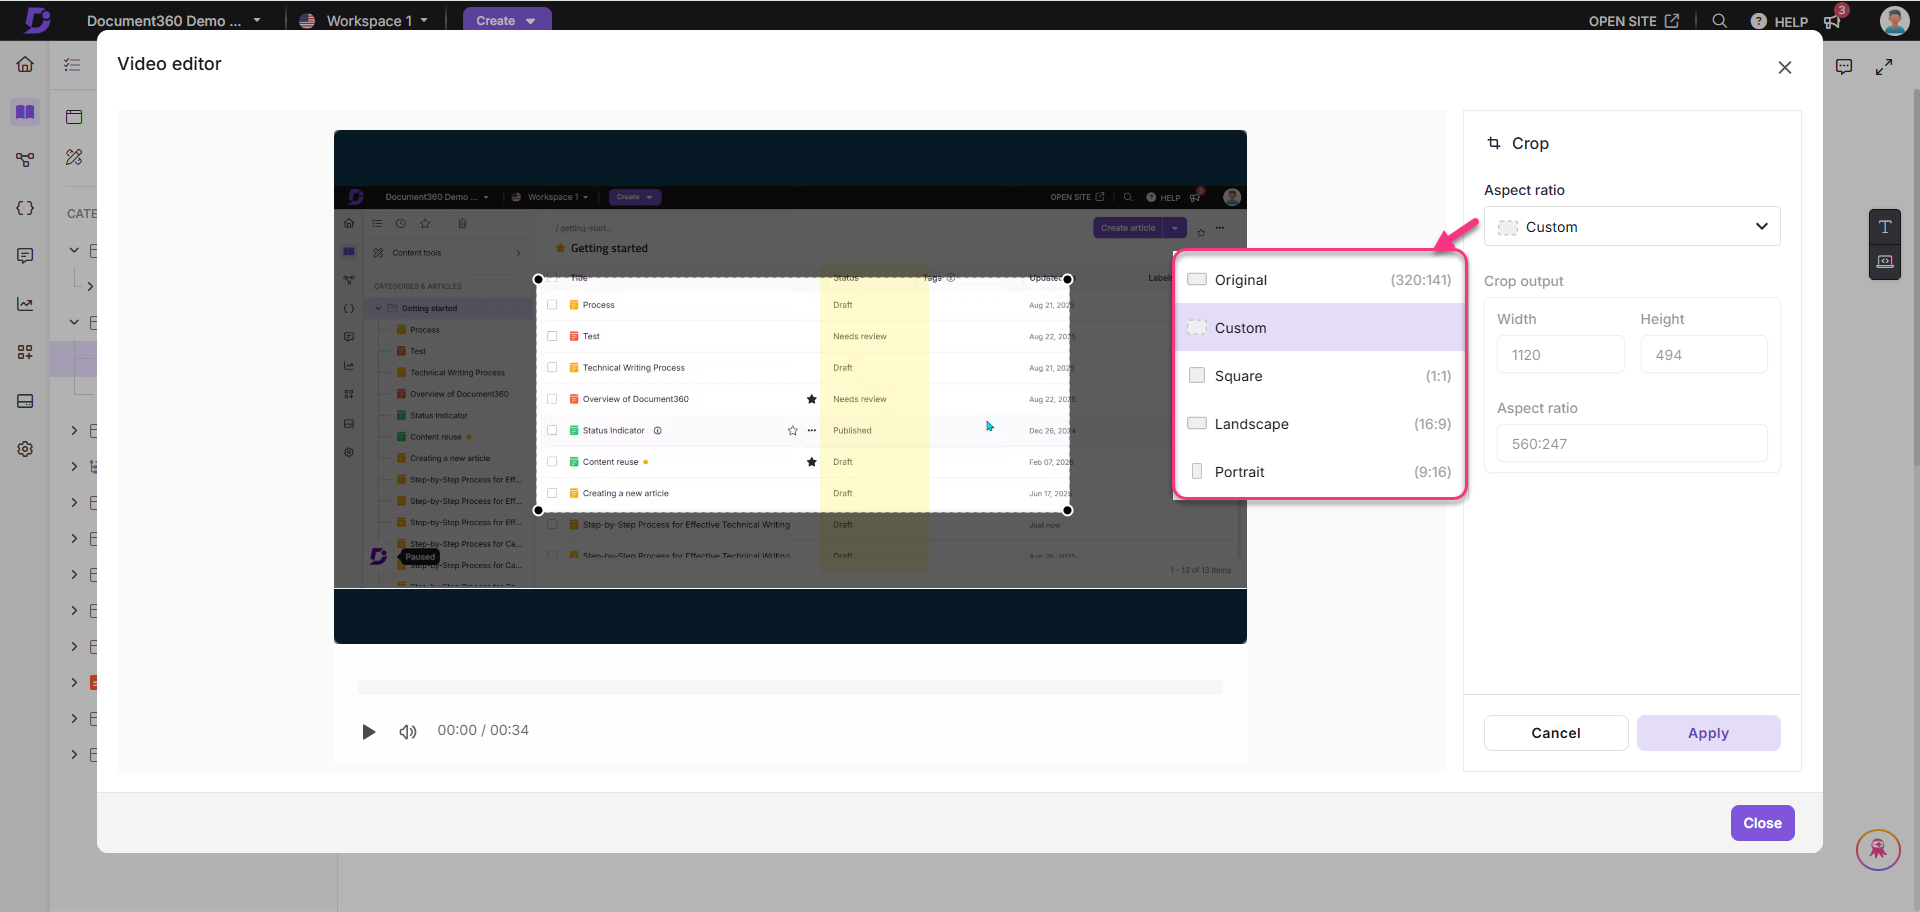
To crop any part of the video:
In the right pane, click Crop.
Select an Aspect ratio: Original, Custom, Square, Landscape, or Portrait.
You can view the Crop output (width and height) based on the selected ratio.
Click the Delete () icon to delete the applied crop.
Click Apply to save changes.
Once cropped, only the cropped part will be visible when the video is saved.
j. Trim:
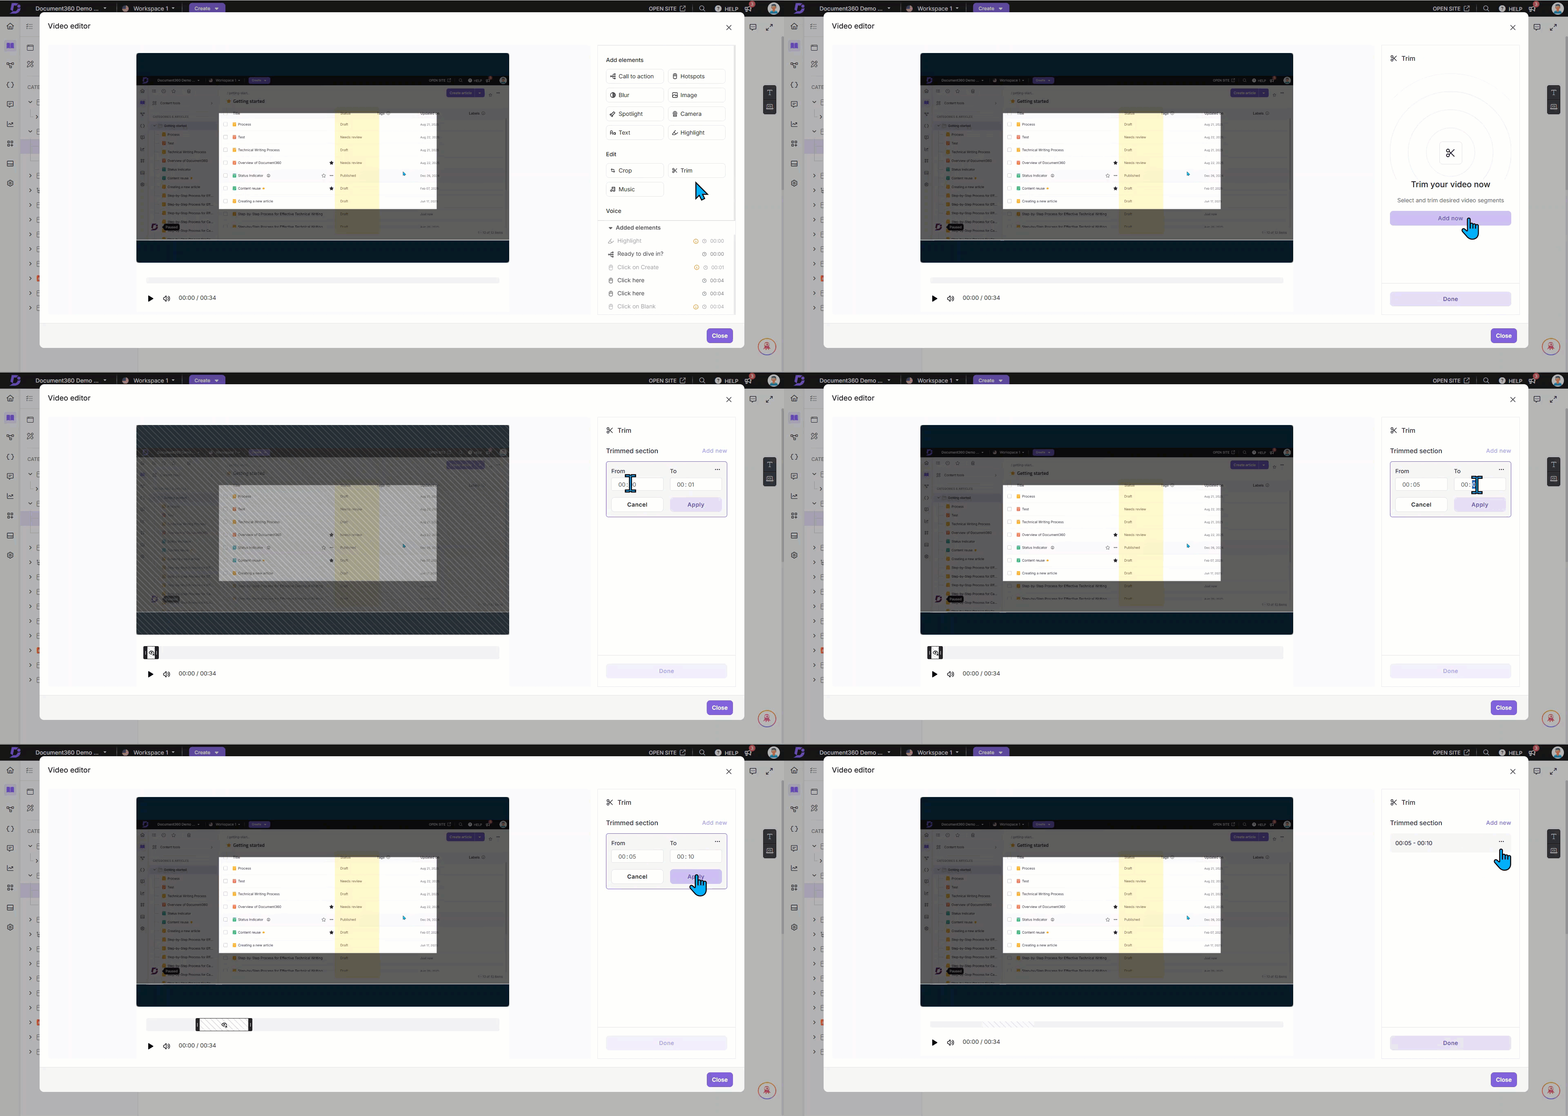
To trim any part of the video:
In the right pane, click Trim.
Click Add now to add a new trim to the interactive demo.
If trims already exist, click Add new to add another trim.
Set the From and To timings.
Click Apply and click Done.
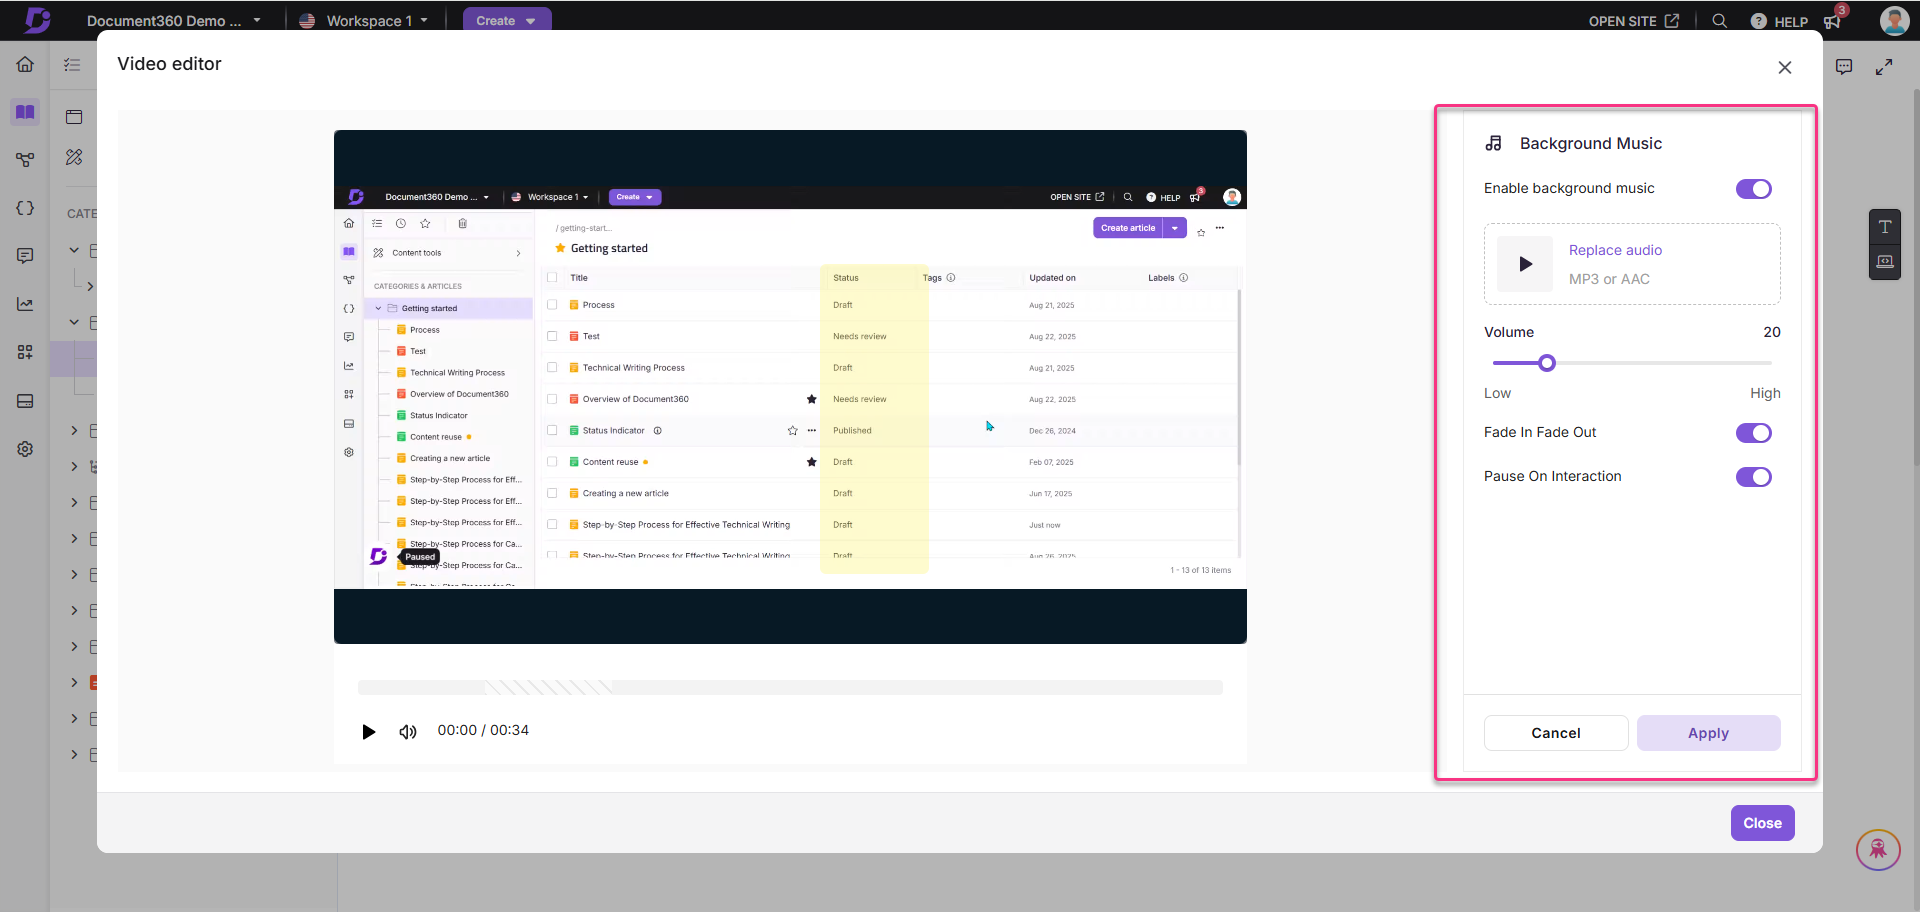
k. Music:
To add music to the Interactive demo
Turn on the Enable background music toggle to add background music to the interactive demo.
Click Choose from Galary to upload a file.
NOTE
Supported audio formats: .mp3, .aac (maximum file size: 5 MB).
In the Presets tab, you can use preloaded music options.
Select any music and click Insert.
Once uploaded, click Replace audio to change the selected track.
Adjust the Volume slider to control the volume.
The Fade In/Fade Out option makes the music start and end smoothly during these interactions.
Turn on the Pause on Interaction if required. When the user adds background music, the Pause on Interaction option will temporarily pause the added music whenever the user clicks on hotspots or interacts with the video.
Once done, click Apply.
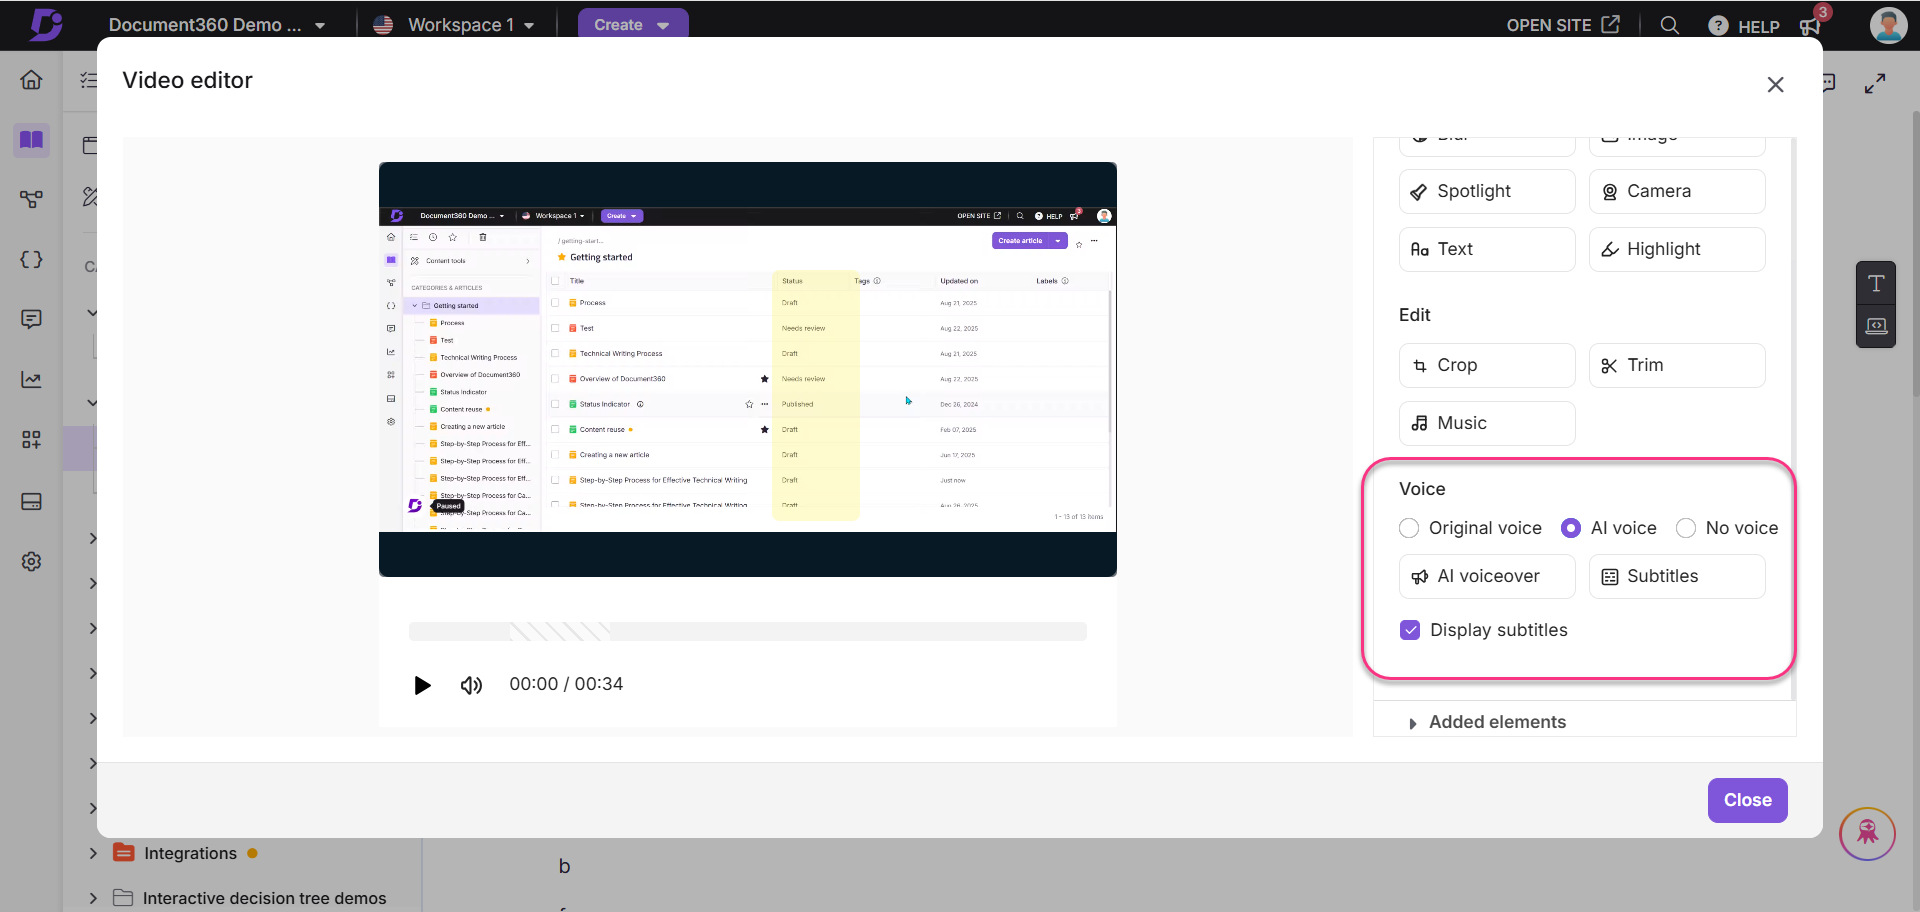
Voice
You can choose how the interactive demo is narrated:
Original voice: Uses the original background voice.
AI voice: Allows AI-generated voiceovers in multiple languages.
AI voiceover: To select the desired AI voiceover from multiple languages. The video script will be rendered in the Script section.
No voice: No voiceover will be applied.
Subtitles: Click Subtitles to add subtitles to the interactive demo. If the video has a voiceover, the auto-generated subtitles will appear here, and you can edit them as needed.
Alternatively, you can manually enter your voiceover script. Enable the Display subtitles checkbox to show subtitles in the interactive demo.
Added elements: You can view the elements added in the interactide demo. From here, click the Edit () icon to edit the desired element. Click the Delete () icon next to the elements to delete.
Click Close to save changes.
Editing the recorded interactive demo
Once the interactive demo is added to an article, you can apply the following formatting options:
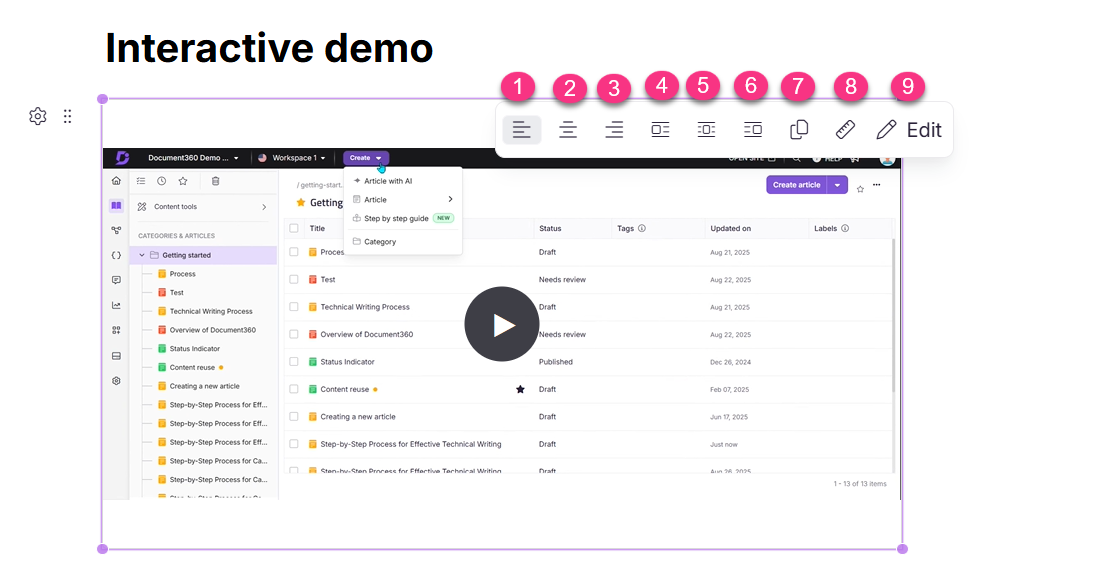
Align left: Aligns the interactive demo to the left.
Center: Aligns the interactive demo to the center.
Align right: Aligns the interactive demo to the right.
Inline left: Places the interactive demo inline on the left.
Inline block: Displays the interactive demo as an inline block element.
Inline right: Places the interactive demo inline on the right.
Resize: Adjusts the interactive demo dimensions.
Copy: Copies the interactive demo to the clipboard for reuse in another article or category within the same project.
Edit: Allows further modifications, including:
Add elements: Blur and Spotlight
Edit: Crop, Trim, and Music
Voice: Original voice, AI voice, and No voice
FAQ
Will articles with an interactive demo appear in portal search results?
Yes. Articles that contain an interactive demo will still appear in the portal search results if there is a match in the article title or content.