Creating interactive decision trees in Document360 helps you map out clear, sequential steps to simplify tasks for users. This guide shows you how to create interactive decision trees in Document360 using blank canvases or templates. Learn to add steps, media, and actions for an engaging user experience.
Create a new Interactive decision tree
- Log-in to the Knowledge base portal and select your project.
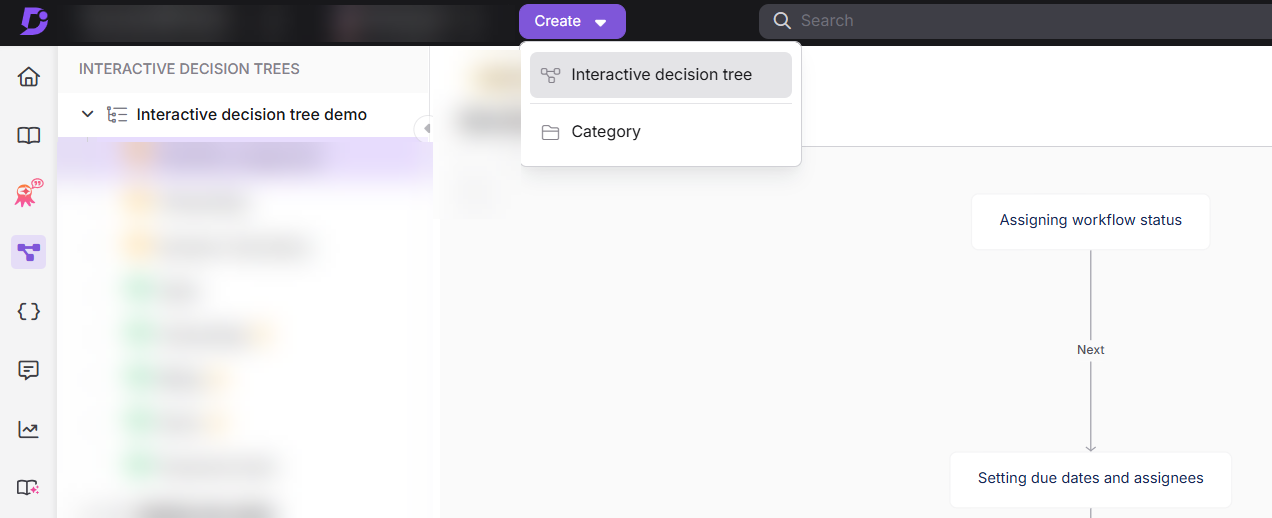
- Select Interactive decision tree from the left navigation bar.
- Click the Create button from the header menu and select Interactive decision tree. This will open the Create a new interactive decision tree panel.
- In the Create a new interactive decision tree panel, enter a name in the Title field and select a category from the Category dropdown menu.
- Click Create.
The system automatically creates a default category titled "Interactive Decision Trees" before you create your first decision tree, unless you create one yourself.
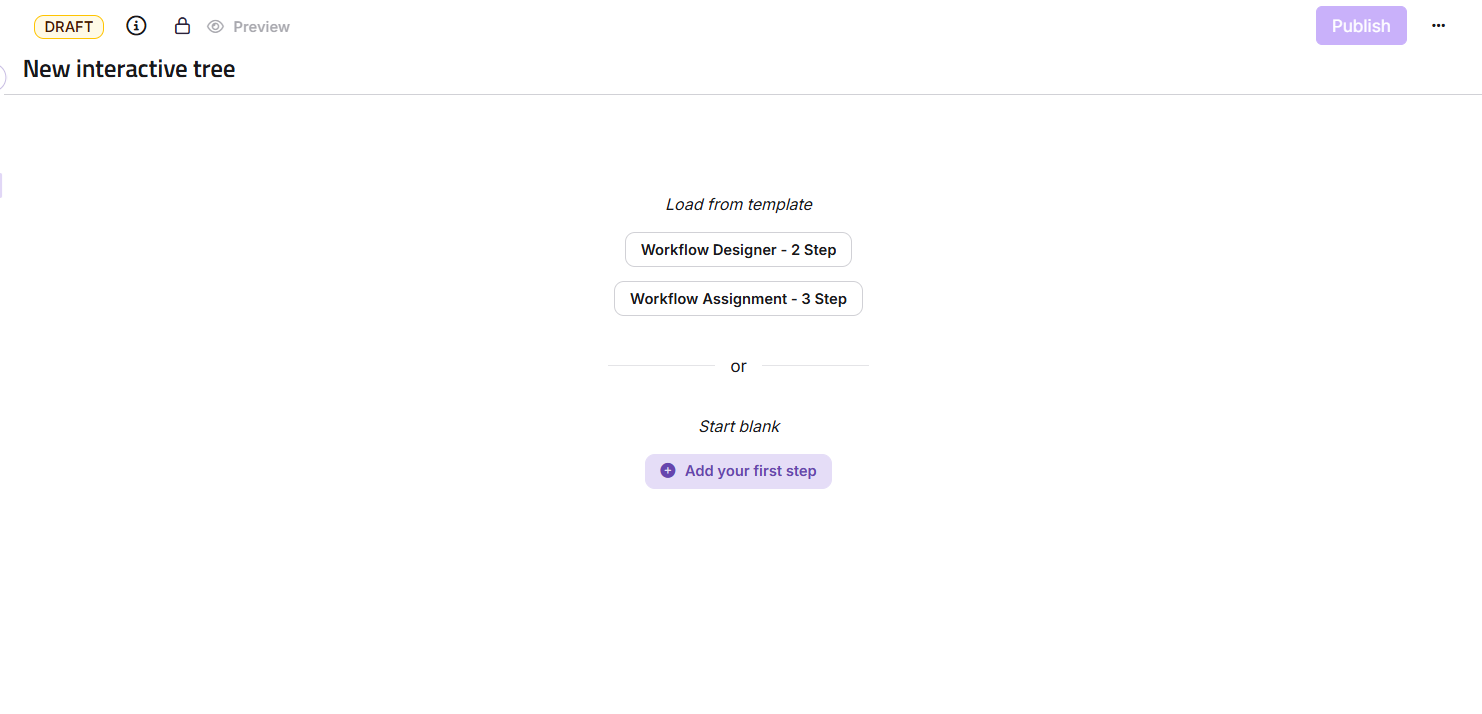
Once you have created your interactive decision tree, you can start adding steps. You can either select a pre-built template or start from a blank canvas.
Creating an interactive decision tree from a blank canvas
To add steps to your decision tree from a blank canvas,
- Click +Add your first step. This will open a panel where you can select your content layout and add your step details.
- Click the Layout dropdown in the top-left corner of the panel to display the available layouts and alignment options. The available layouts include:
- Content-only layouts: Ideal for text-focused steps.
- Mixed layouts: Combine text and visuals side-by-side.
- Visual-first layouts: Highlight images or media with supporting text.
- Use the Alignment options (left, center, or right) to position your content within the selected layout.
-
Enter a title for your step. This will be visible in the visual editor in the knowledge base portal.
-
Next, enter a description for your step. You can add any relevant information here. You can access formatting and insert options using the
/command.NOTEYou can access all key editor functions using the slash command, with the exception of Page break, File, Private note, and Content reuse elements (Glossary, Snippets, Variables), which aren't supported at this time.
Adding Media
To add media to your step,
- Click Add image or video in the media section of the layout.
- Upload an image or video from your local drive or select from your previously uploaded media from Drive.
- Adjust the placement of the media within the layout to ensure it complements the text content.
Adding Actions
To include actions in your step,
- Click + Action to open the action type dropdown.
- Select an action type from the available options:
- Buttons: Add navigation buttons for the next or previous step in the decision tree.
- Radio Choices: Present multiple-choice options for users to select one.
- Dropdown Choices: Provide a dropdown menu for users to pick from predefined options.
- Configure the action's behavior, such as linking to a new or existing step, external URL, or an existing Interactive decision tree.
- Save the action to include it in the step.
- If you have multiple steps added to your decision tree, you can quickly switch to a different step and make any edits using the Jump to option.
- Click Done to add the step to your decision tree. Repeat these steps to continue building your interactive decision tree with additional steps.
- Once you are done creating all the required steps, click Publish to make the Interactive decision tree live.
You can use the drag-and-drop functionality in the visual editor to link one step to another. This allows you to create a logical flow between steps, enhancing the decision tree's usability and navigation.
Creating an interactive decision tree from a template
To create an interactive decision tree using a pre-built template,
-
Select a template from the list of templates displayed on the screen. Templates include options like a 3-step onboarding Interactive decision tree or a 2-step Interactive decision tree without media.
-
Review the template structure. Templates come with pre-defined steps and layouts to help you get started quickly.
-
Click on a step to edit its title, content, or media. Use the following features as needed:
-
Adding media: Click Add image or video, upload media, and adjust placement to align with the step content.
-
Adding actions: Click + Action to include buttons, dropdowns, or other interactive elements. Configure the behavior for each action.
NOTEClick Preview before finalizing the step to view it in the knowledge base site.
-
-
Click Preview in the article header to view the entire decision tree in the knowledge base site from a reader's perspective.
-
When satisfied, click Publish to make the Interactive decision tree live.
You can use the drag-and-drop functionality in the visual editor to link one step to another. This allows you to create a logical flow between steps, enhancing the decision tree's usability and navigation.
FAQ
What are the supported file types when adding media to Interactive decision trees?
When adding media files to Interactive decision trees, the supported file types include JPG, PNG, GIF, and MP4.
Are there any restrictions for images and videos uploaded to Interactive decision trees?
Images added to decision trees should be under 5MB, and videos should not exceed 20MB for optimal performance. The recommended resolution for videos is 1920x1080, and the recommended resolution for images is 1080x720.
Can I add actions directly from the visual editor?
Yes, you can add actions directly from the visual editor by clicking the + Action button below a step. Choose an action type from the dropdown options, such as buttons, radio choices, checkbox choices, or dropdown choices. Once selected, configure the behavior of the action and save it within the step.
Why do I see a warning about unconnected actions when publishing an Interactive decision tree?
If you see a warning stating, "You've got unconnected actions," it means some steps contain actions (e.g., buttons or dropdowns) that are not linked to other steps or destinations. While this warning does not prevent you from publishing the decision tree, it serves as a reminder to review and confirm that all actions are appropriately connected. Unconnected actions may disrupt the flow and impact the usability of the decision tree.
Are Interactive decision trees mobile-friendly?
Yes, decision trees are fully responsive and optimized for viewing on mobile devices, though layout choices may affect how content is displayed.