Plans supporting this feature: Enterprise
Okta is an Identity Provider (IdP) that simplifies user access management by allowing users to sign in to multiple applications with a single set of credentials. This article demonstrates how to configure SSO between Okta and Document360, enabling your users to access Document360 using their Okta credentials. Please note that only users with Owner or Admin as the Project role can configure SSO in Document360.
PRO TIP
It is recommended to open Document360 and Okta in two separate tabs/browser windows, since configuring SSO in Document360 will require you to switch between Okta and Document360 multiple times.
Sign up for Okta
Access to an Okta account is a prerequisite for configuring single sign-on in Document360 with Okta. To sign up for Okta,
Navigate to https://developer.okta.com/signup/ and complete the signup process.
After signing up, you will receive an email with your login credentials and an account activation link at your registered email.
Once you click on the activation link, you will be redirected to the Okta Domain login page.
Log in with your credentials.
Once you log in, you will be redirected to the Okta developer console.
Adding an application
To create a Document360 SSO configuration using Okta, you must create a new application on Okta. To create a new application on Okta,
Log in to Okta using the credentials used while creating an Okta account.
Switch to the admin user role by clicking on Admin at the top right next to your profile name.
From the left navigation list page, expand the Applications dropdown, and click Applications.
In the Applications page, click the Create App Integration button.
In the Create a new app integration dialog, select SAML 2.0 as the Sign-in method and click Next.
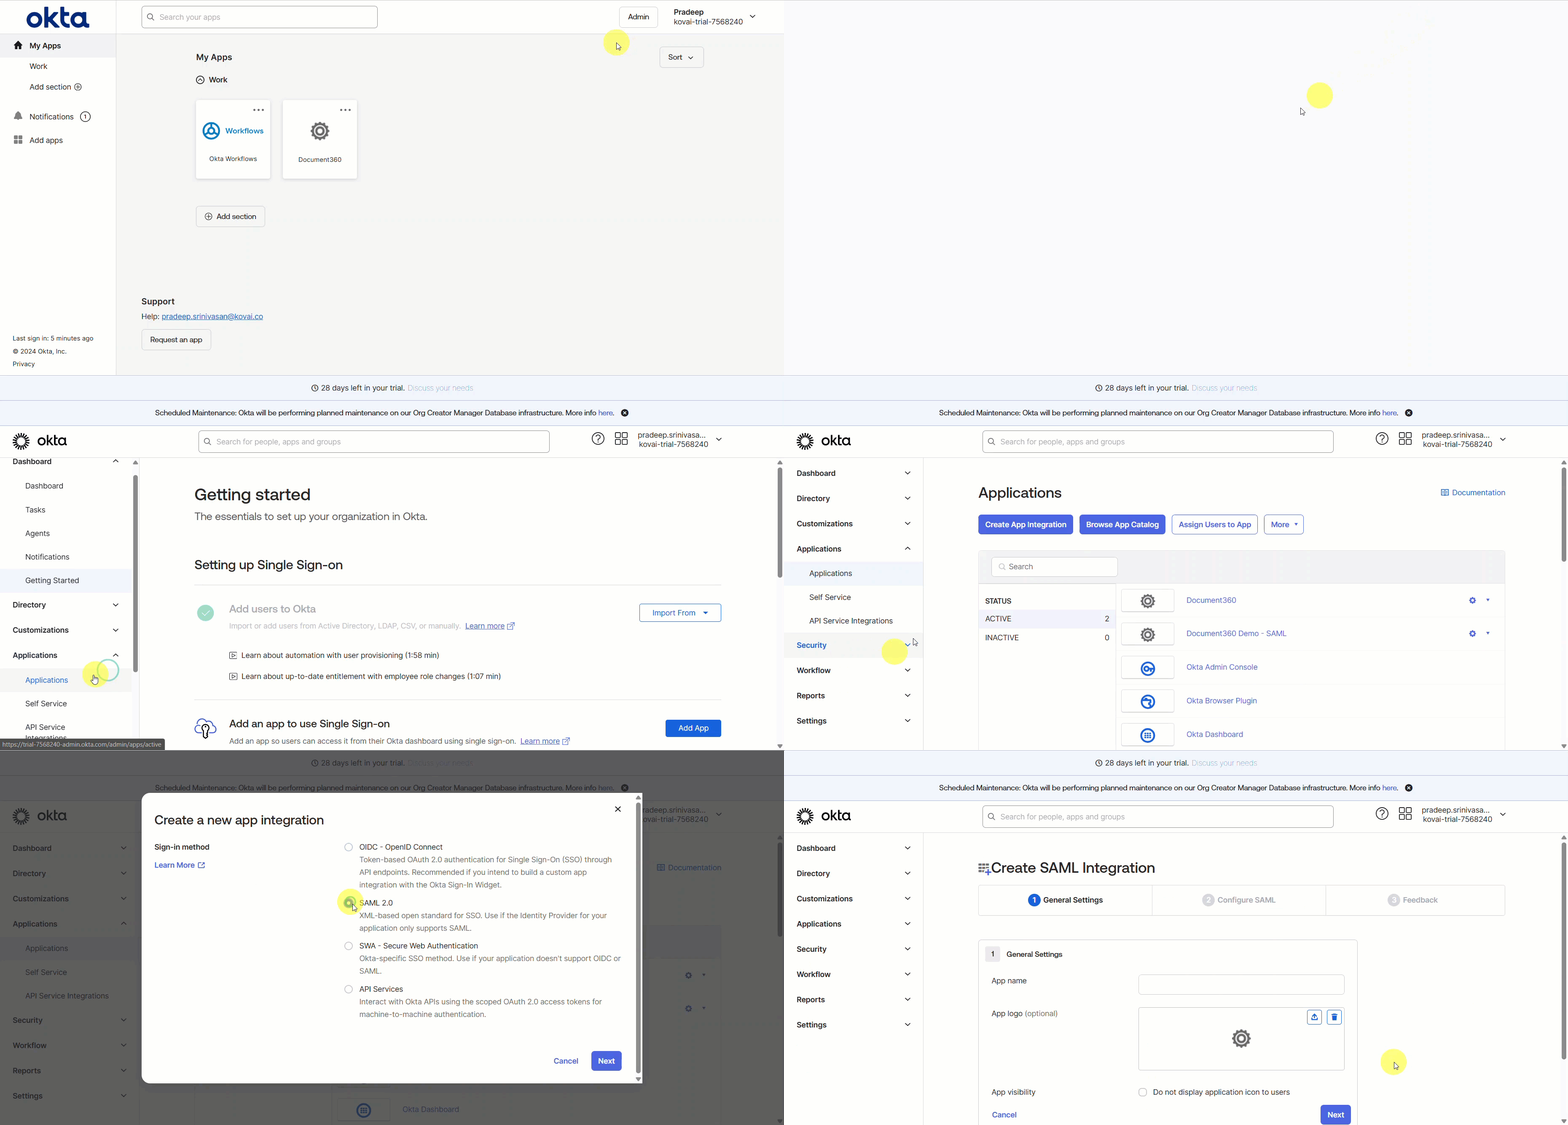
Creating a SAML integration
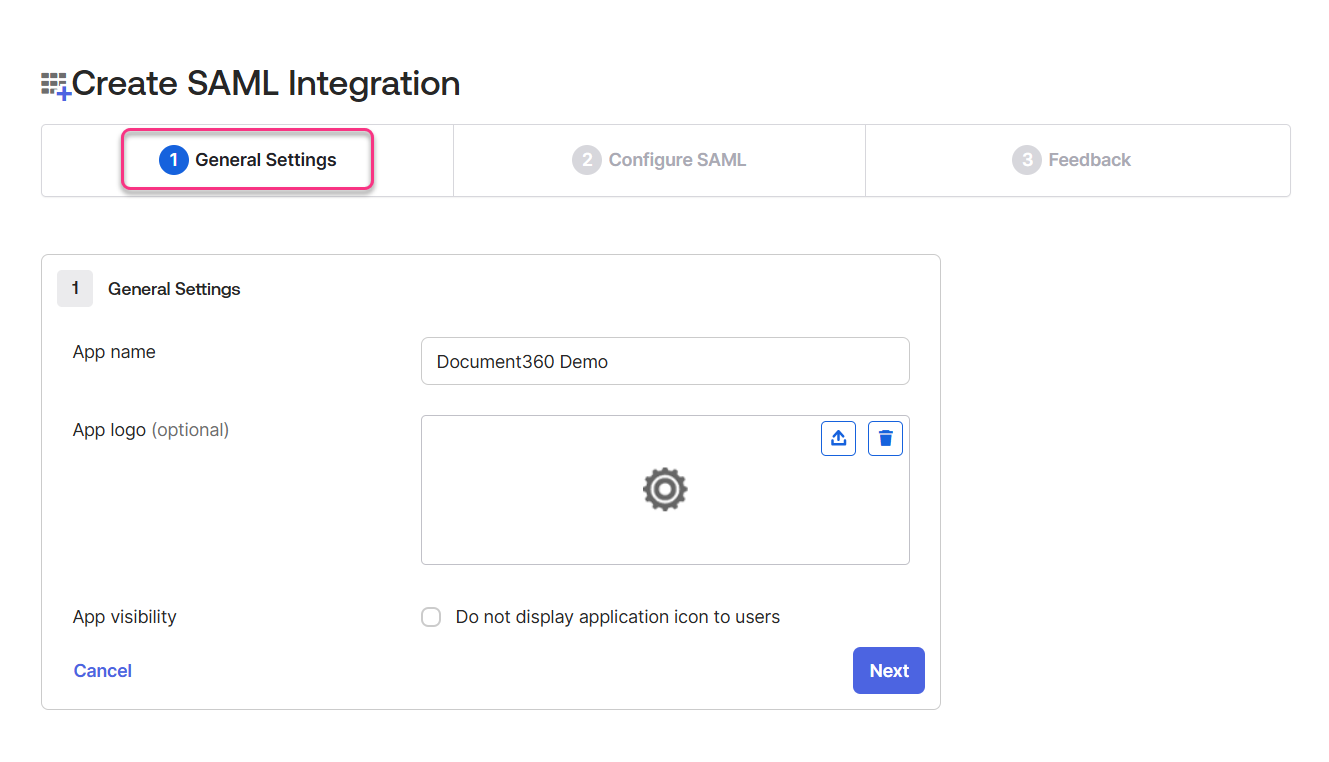
Next, you will be redirected to the Create SAML Integration page.
General Settings
In the General Settings tab, enter the name of your new application in the App name field.
Browse and upload a logo for your application in the Add logo field if required.
Next, you can check the App visibility checkbox if required.
Click on the Next button to navigate to the Configure SAML tab.
Configure SAML
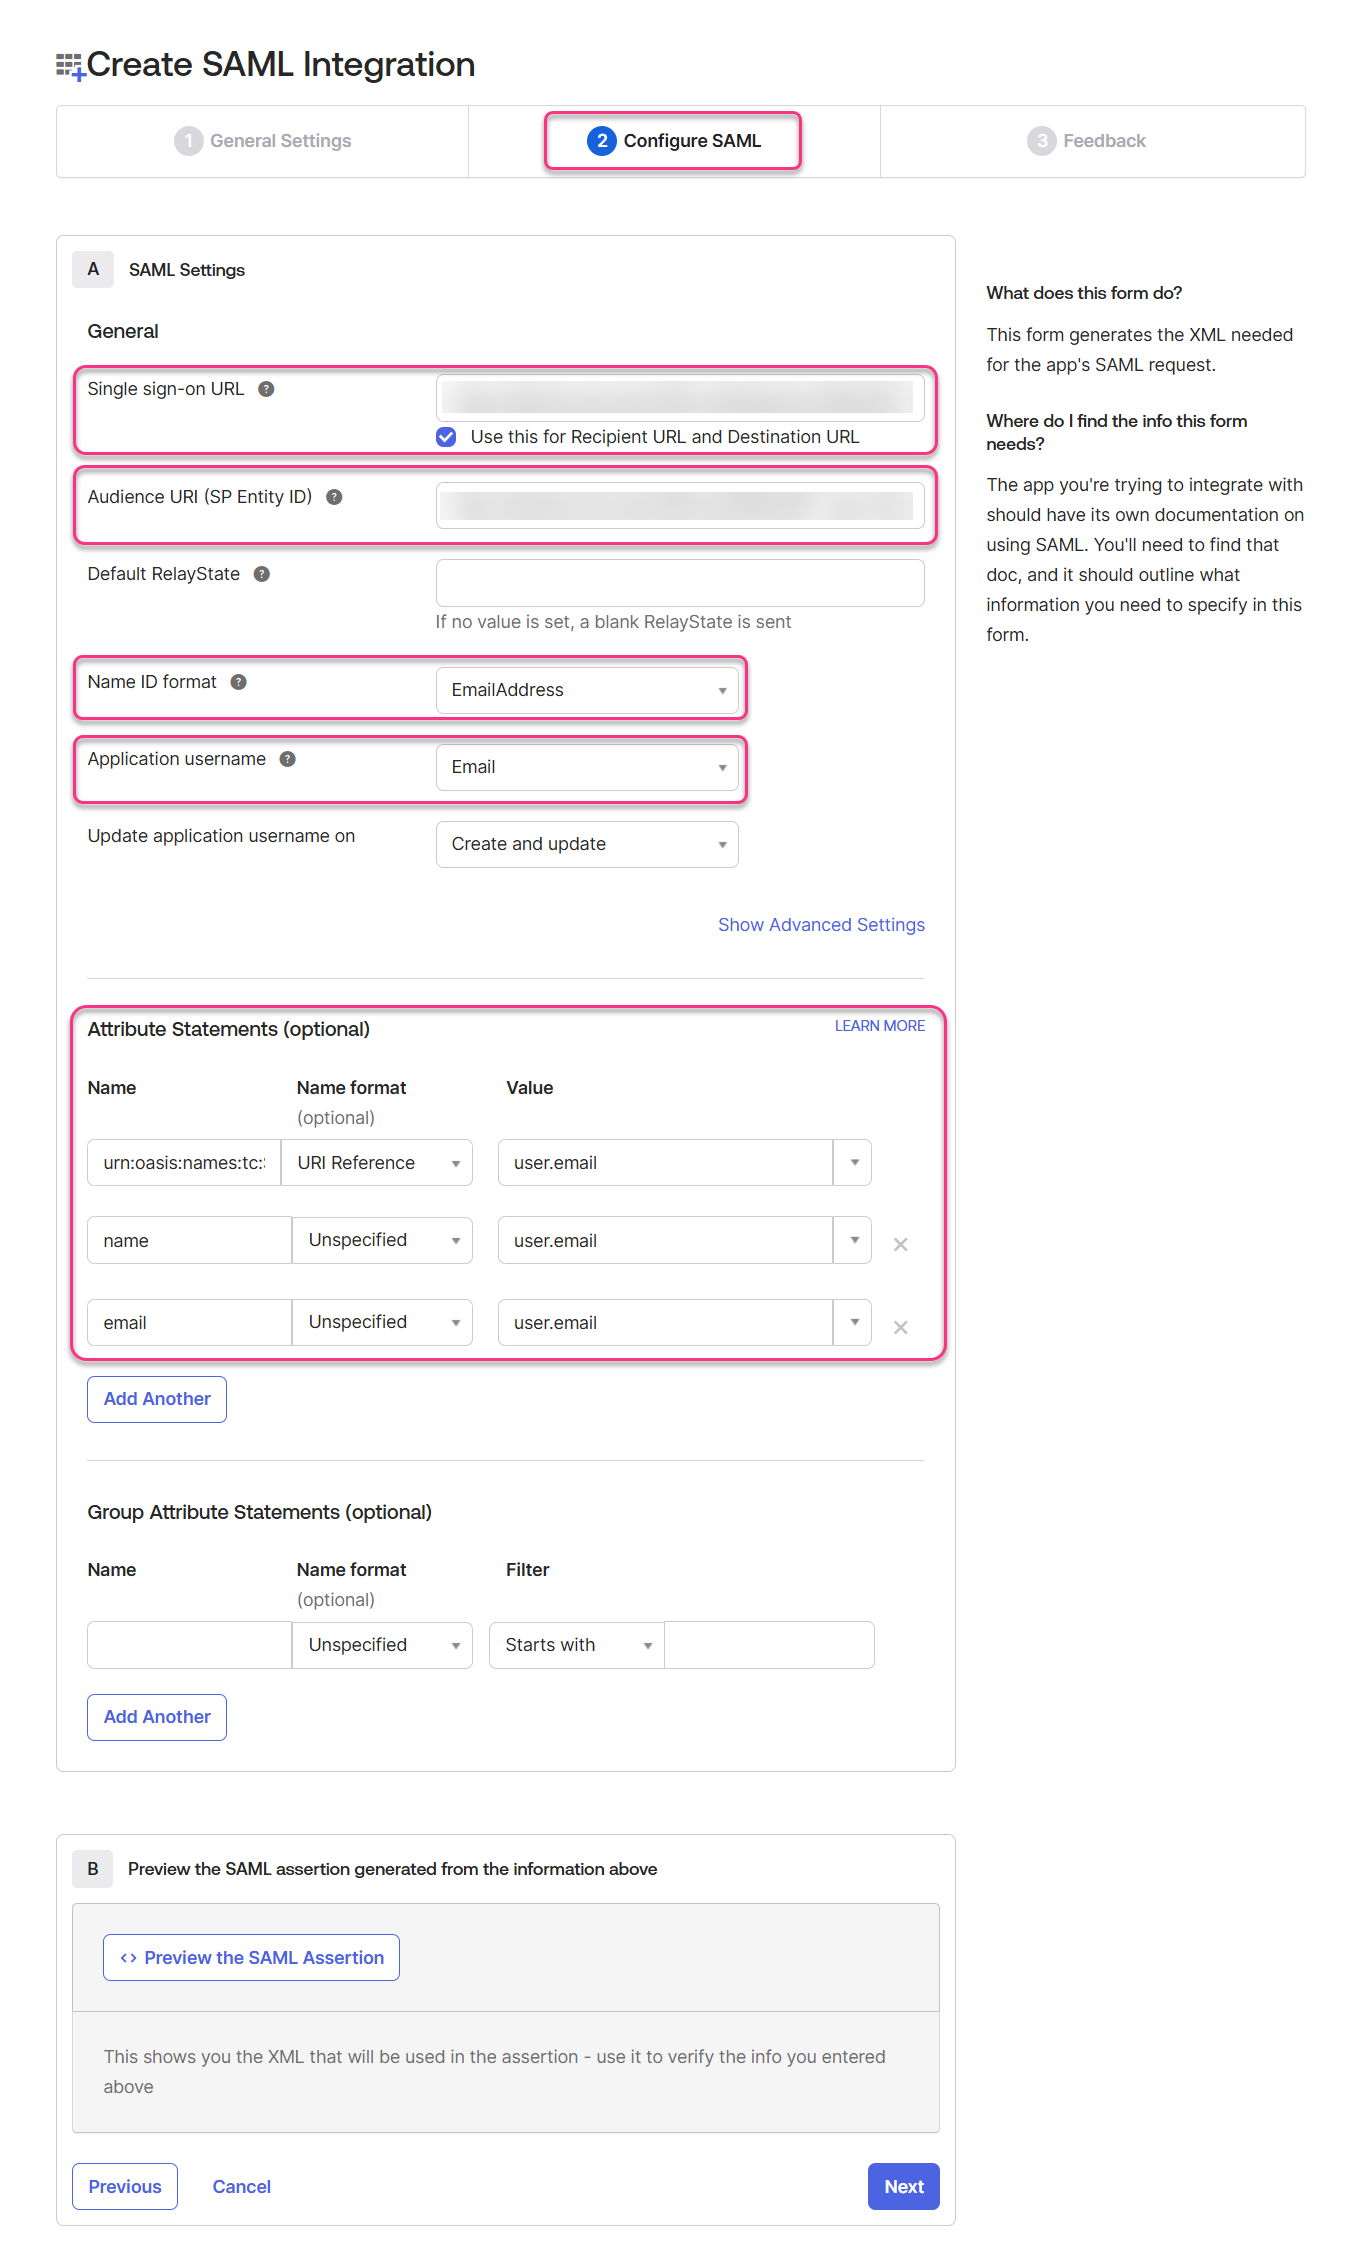
In the Configure SAML tab, you will require the parameters provided on the Configure the Service Provider (SP) page in Document360.
To access the Configure the Service Provider (SP) page, navigate to Settings > Users & permissions > SSO Configuration in Document360.
Click the Create SSO button, select Okta in the Choose your Identity Provider (IdP) page.
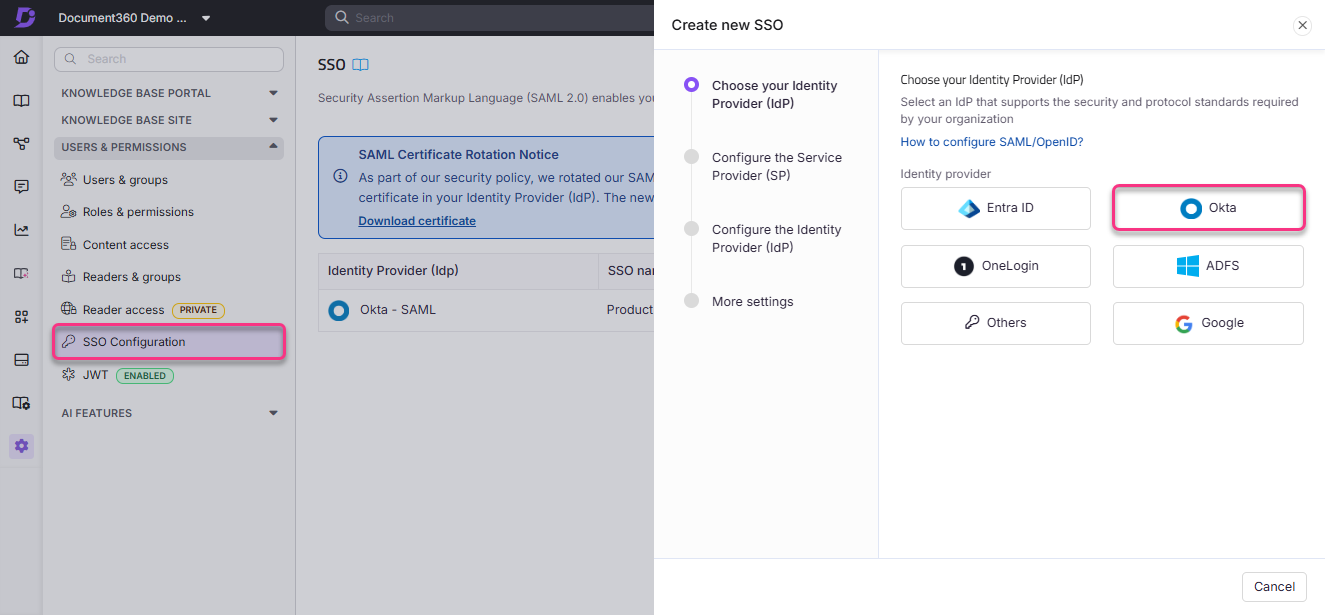
This will redirect you to the Configure the Service Provider (SP) page, which will display the parameters required to complete the SAML configuration on Okta.
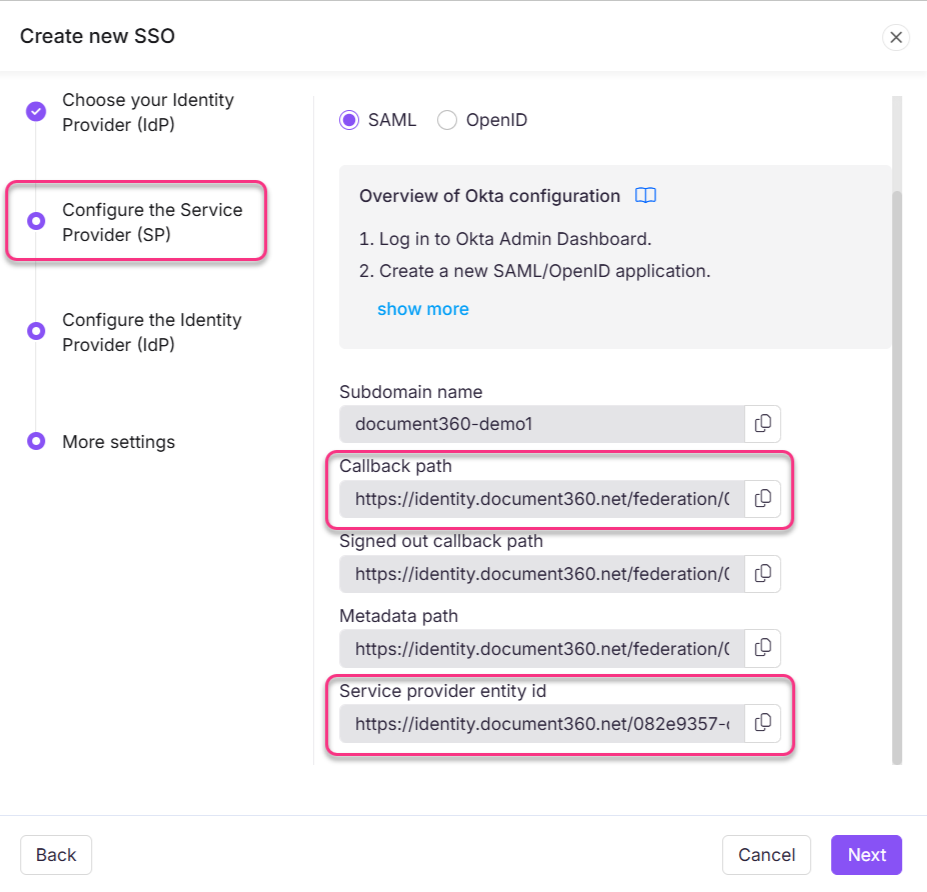
Document360 | Okta |
|---|---|
Callback path | Single sign-on URL |
Service provider entity id | Audience URI (SP Entity ID) |
Enter the parameters from Document360 to Okta based on the above table.
Select EmailAddress from the Name ID format dropdown menu.
Select Email from the Application username dropdown menu.
Update the Attribute Statements field based on the table below. You will have to add two additional rows to enter all the details from the table below.
Name
Name format
Value
urn:oasis:names:tc:SAML:2.0:nameid
URI Reference
user.email
name
Unspecified
user.email
email
Unspecified
user.email
NOTE
Email and name parameters are case sensitive.
Click Next to navigate to the Feedback page.
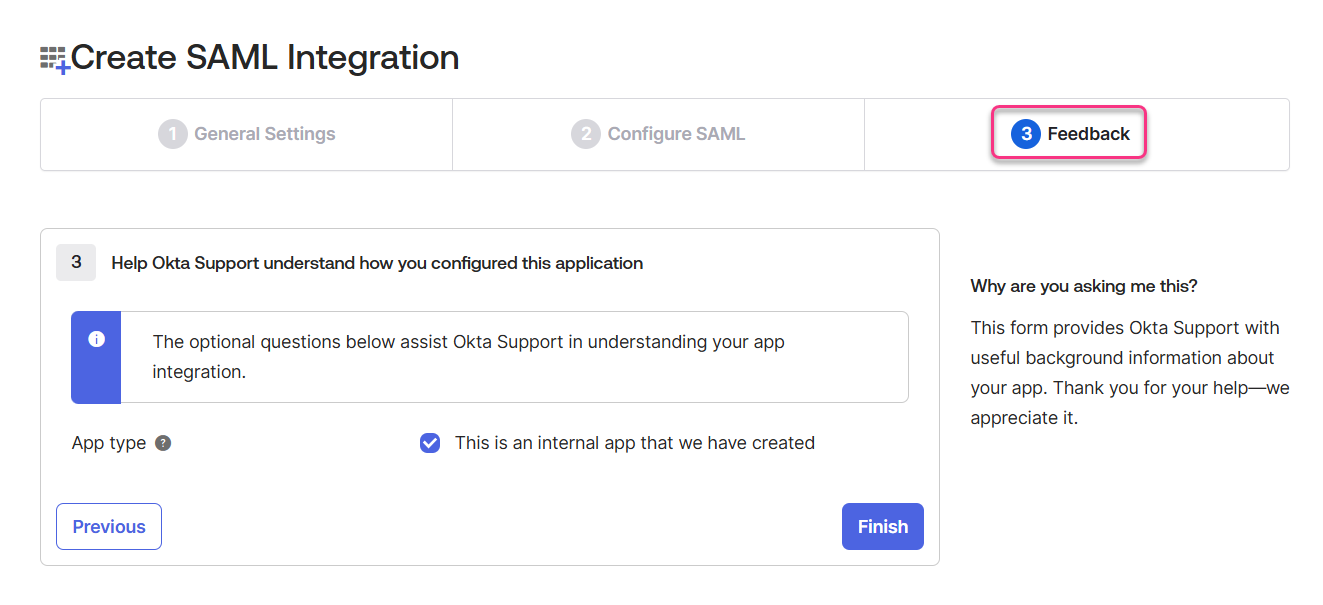
Feedback
The feedback page is for providing information to Okta about how you configure the application. Select the This is an internal app that we have created checkbox and click Finish.
You have now successfully configured your application on Okta. Next, you will complete the configuration on Document360 using the information from the application on Okta.
Okta to Document360 SAML SSO configuration
SAML setup instructions on Okta
On the Okta dashboard, click on the Applications dropdown and select Applications.
On the Applications page, select the active application you want to configure on Document360.
Click the Sign On tab.
Click the View SAML setup instructions button
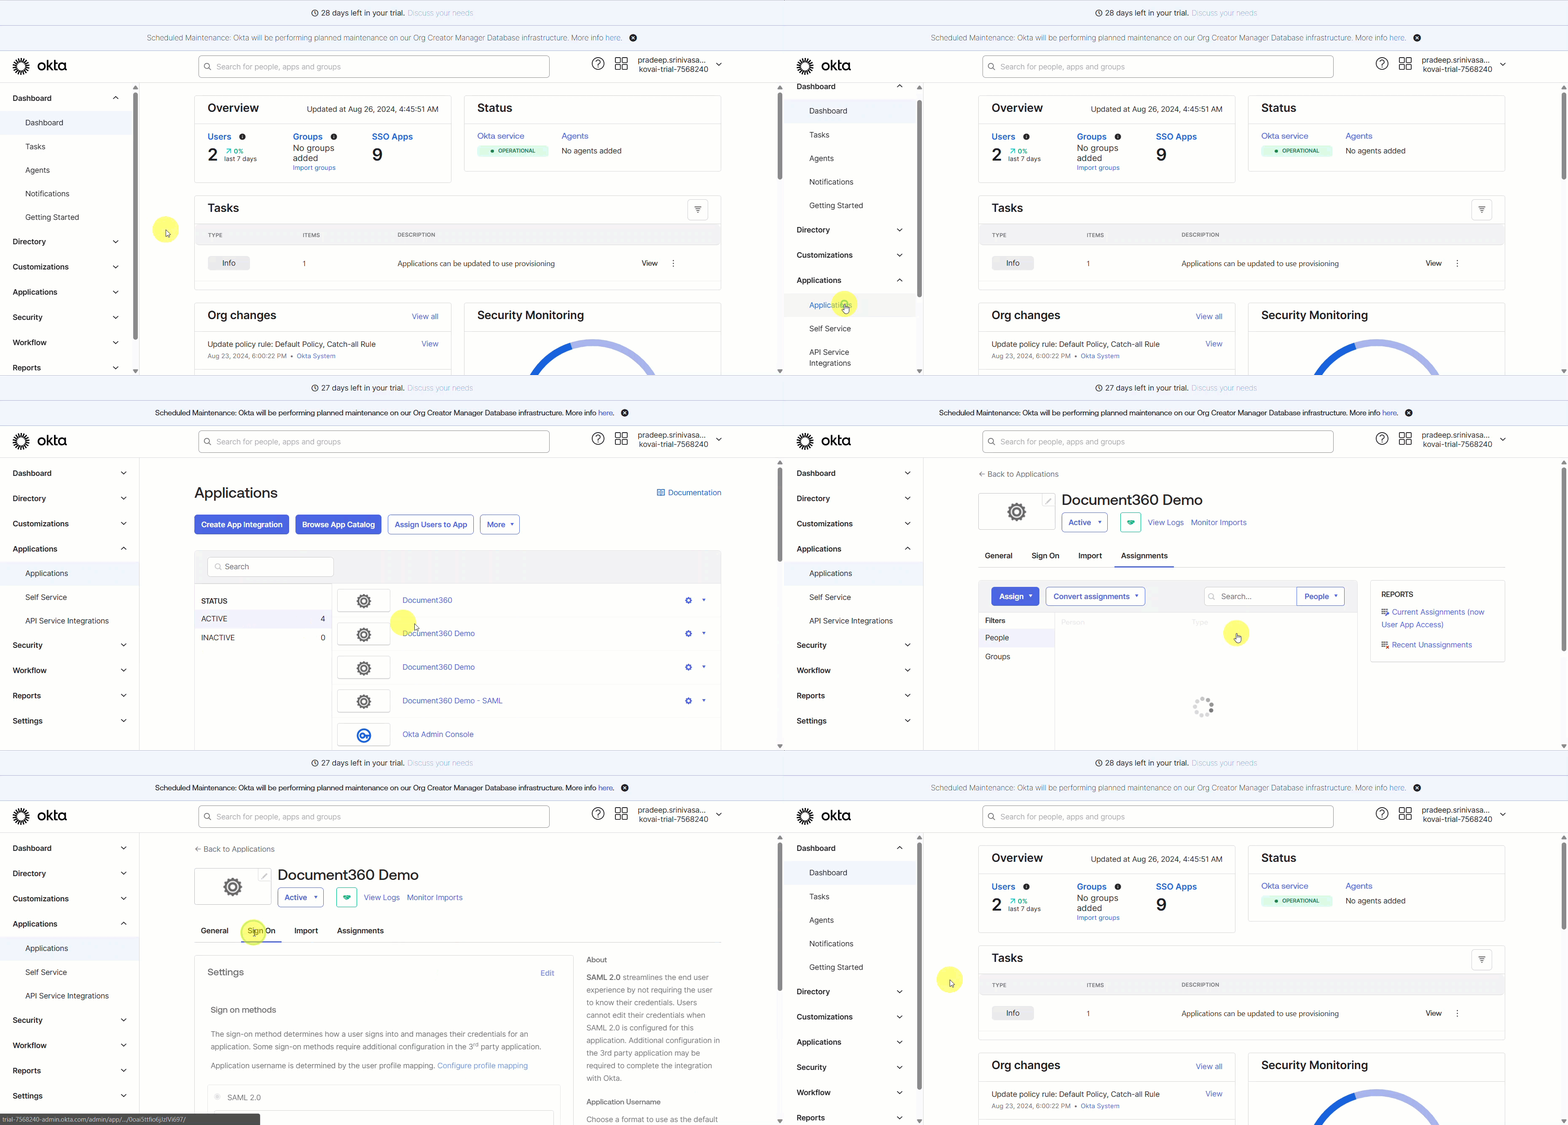
The parameters needed to be configured will open in a new webpage.
SSO configuration on Document360
Switch to the Document360 page you had opened, displaying the Configure the Service Provider (SP) page.
Click Next to navigate to the Configure the Identity Provider (IdP) page.
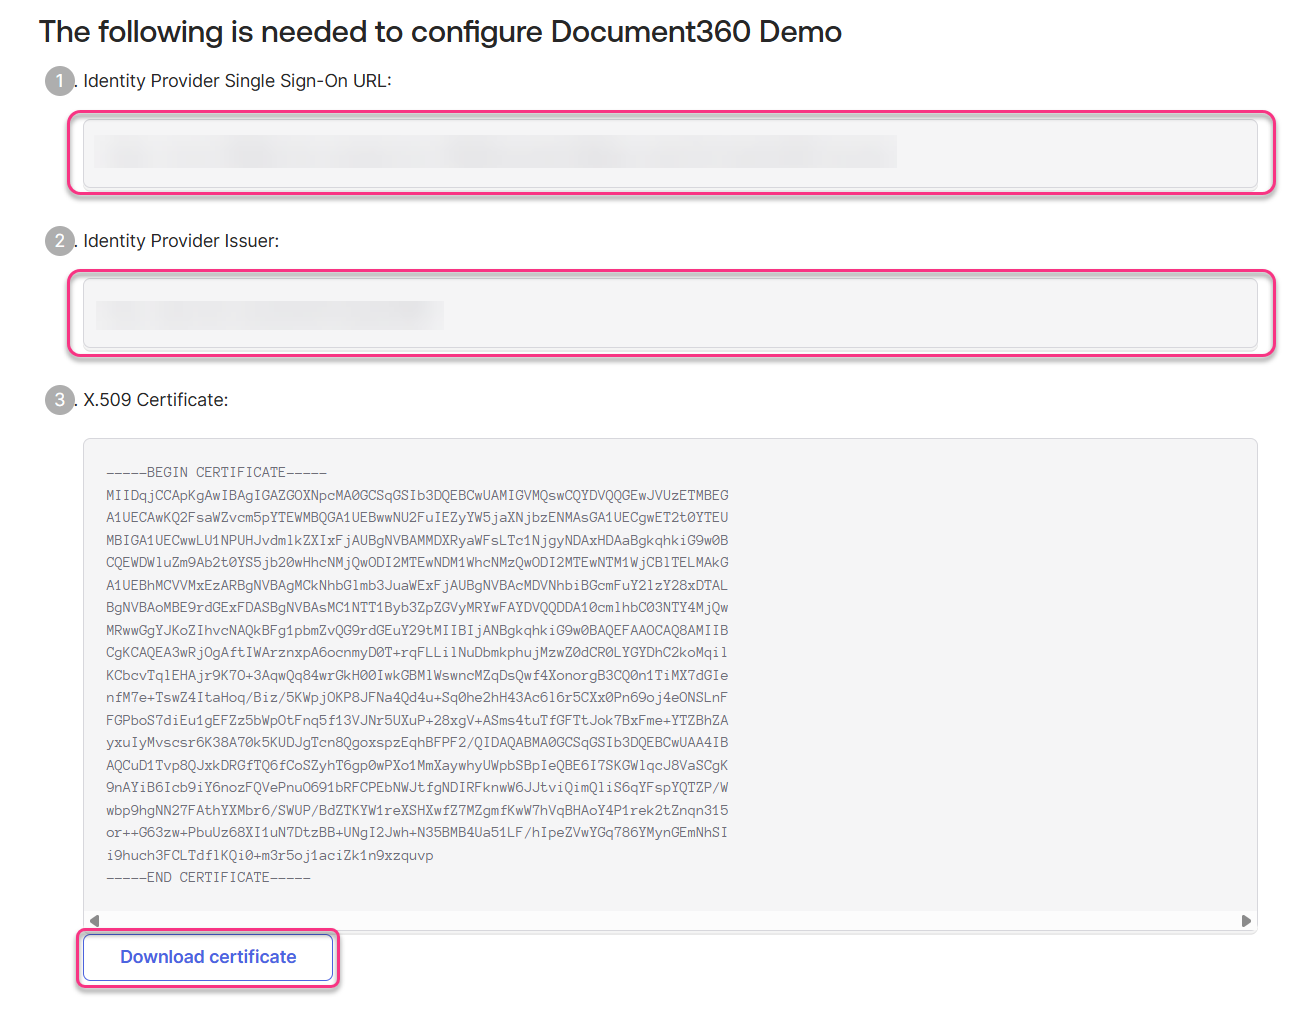
Complete the fields in the Configure the Identity Provider (IdP) page using the setup instructions from Okta.
Document360 | Okta |
|---|---|
Sign on URL | Identity Provider Single Sign-On URL |
Entity ID | Identity Provider Issuer |
SAML certificate | X.509 Certificate |
Download the X.509 Certificate from Okta and attach the downloaded okta.cert file in the SAML certificate field on Document360.
Next, turn on/off the Allow IdP initiated sign in toggle as per your project requirements.
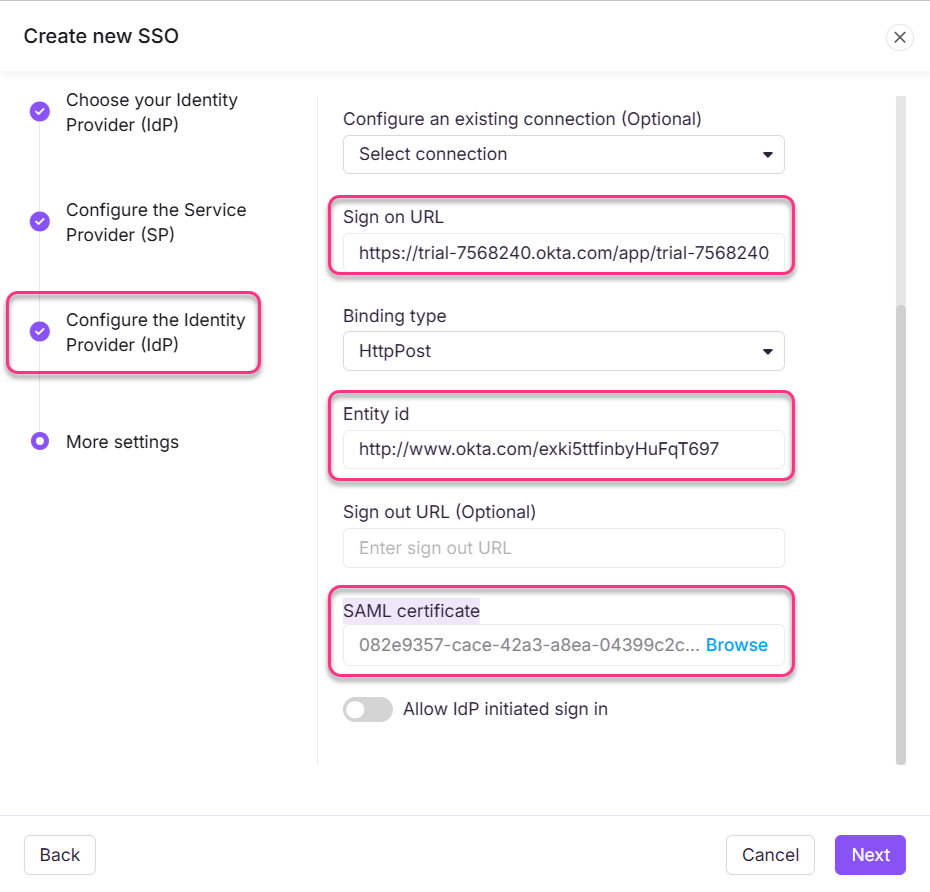
Once done, click the Next button to navigate to the More settings page.
In the More settings page, enter the desired name for the SSO configuration in the SSO name field.
Enter the text you would like to show users for the login button in the Customize login button text.
Toggle on/off the Auto assign reader group and Sign out idle SSO user toggles based on your requirements.
Invite all your users or selected users using the Convert existing team and reader accounts to SSO radio buttons.
Click Create to complete the SSO configuration setup.
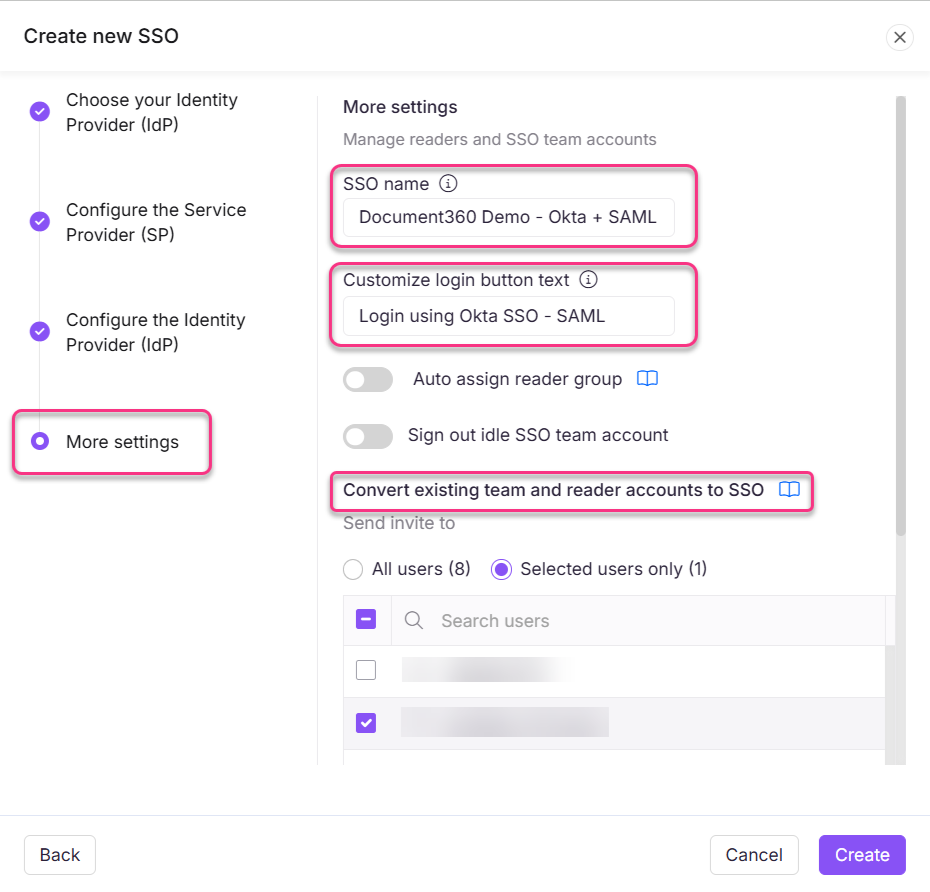
The SSO configuration based on the SAML protocol will be configured using Okta successfully.