NOTE
Floik AI features are available across all Document360 plans as an add-on. To purchase or learn more, please contact our support team.
Document360 introduces the Step by step guide feature to help you create interactive, visually engaging content. In general, the Step by step guide is a structured set of instructions designed to lead users through a specific process or task in a sequential manner, breaking it down into easy-to-follow steps.
This new feature allows users to add tooltips, screen recordings, and clickable hotspots, making complex tasks easier to follow. By using the Step by step guide, content creators can simplify tutorials, improve customer onboarding, and enhance overall user comprehension. It provides users with clear, interactive instructions, helping them follow processes easily and reducing the need for extensive support.
NOTE
Step by step guides can currently be created only in English (default). Other languages and English variants, such as English (UK), English (US), and English (Australia), are not supported yet.
Creating a Step by step guide
The Step by step guide feature in Document360 offers multiple ways to create interactive, instructional guides. To create:
Method 1: From the Create button
Method 2: From the Categories & Articles pane
Method 3: Between two articles or categories
Method 4: From the Page category editor
Method 5: From an Empty index category
You can create a step by step guide using the Create dropdown on the top bar:
Navigate to Documentation () in the Knowledge base portal.
Click Create dropdown on the top bar and select Step by step guide.
You can create a step by step guide directly from the Categories & Articles pane in the left navigation bar:
Navigate to Documentation () in the Knowledge base portal.
Go to the desired category in Categories & Articles pane
Click the More () icon and select Create step by step guide.
You can insert a step by step guide seamlessly between existing articles or categories in the Categories & Articles pane:
Navigate to Documentation () in the Knowledge base portal.
In the Categories & Articles pane, position the cursor between two articles or categories.
A Flywheel () icon will appear.
Click on it and select Step by step guide.
You can add a step by step guide under a page category:
Navigate to Documentation () in the Knowledge base portal.
In the page category editor, click the More () icon next to the Publish button.
Select Create step by step guide.
You can create a step by step guide within an Empty index category:
Navigate to Documentation () in the Knowledge base portal.
Go to the desired index type category, click the More () icon, and select Create step by step guide.
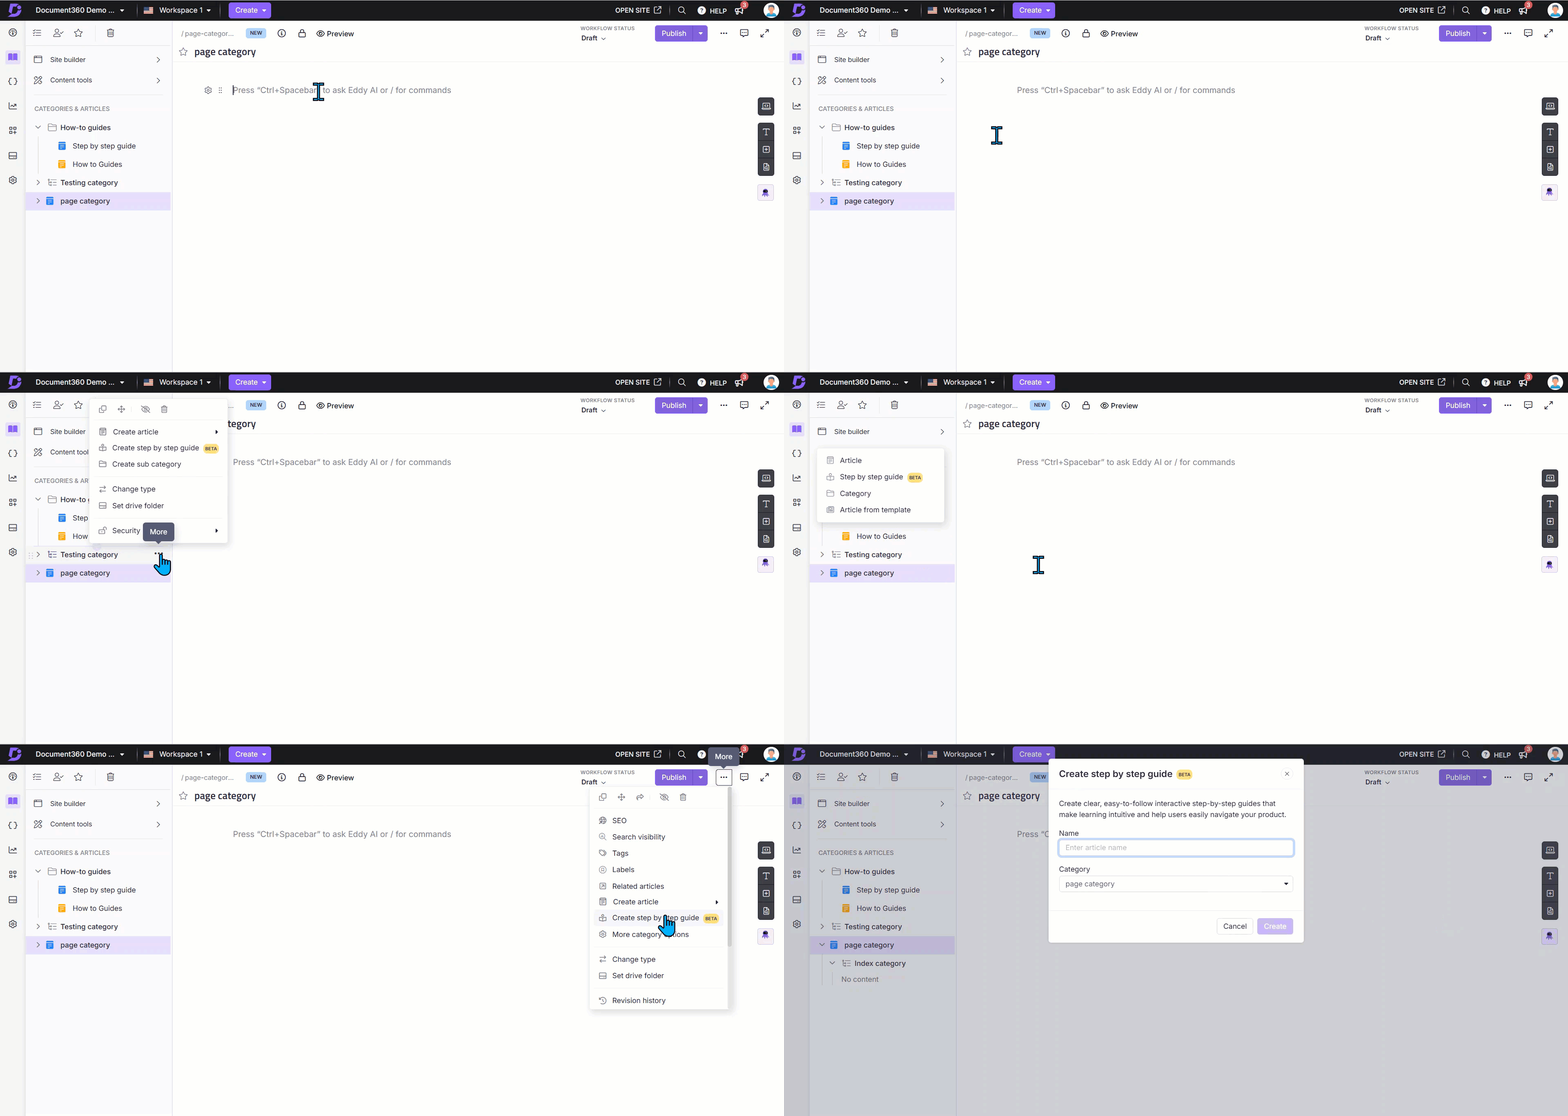
Accessing the Step by step guide
After selecting Step by step guide through any of the above methods, the Create step by step guide dialogue will appear.
In the Title field, enter your desired guide name with a maximum of 150 characters. Special characters and reserved words are not allowed.
Choose a desired category in the Category dropdown.
Click Create.
Click Install when prompted to install the Document360 Step by step guide extension.
NOTE
This extension is exclusively supported in the Chrome browser.
This will redirect you to the Chrome web store or the appropriate browser store page.
Click Add extension in the Chrome web store page.
Once installed, return to the Knowledge base portal and click Start capturing.
Select the desired screen to record:
Chrome tab: Records only the selected Chrome tab.
Window: Records only the selected window.
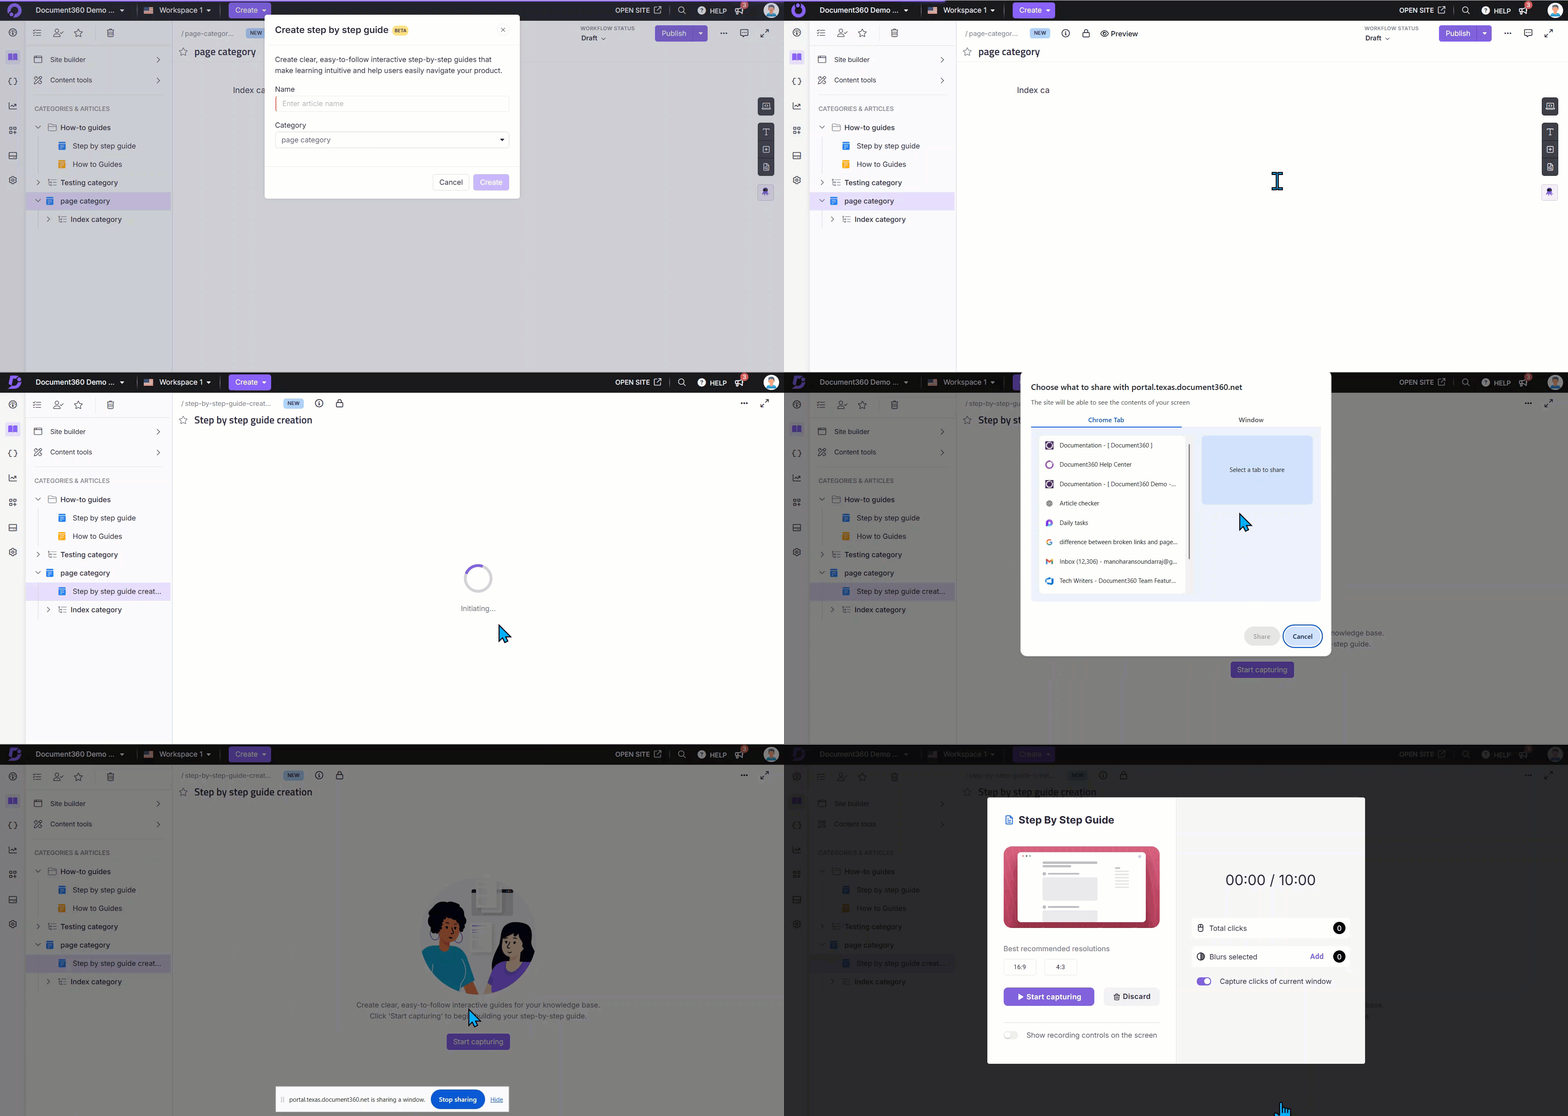
Recording steps
Once selected, click Share.
The Step by step guide recording panel will appear.
Choose the best recommended resolution [Options include 16:9 and 4:3].
Click Start capturing to begin recording.
Click Discard to cancel and return to the previous screen.
In the Blur selected section, click Add to hide specific areas of the screen when recording sensitive information.
Turn on the Show recording controls on the screen toggle if needed.
NOTE
If the Show recording controls on the screen toggle is turned on, a Document360 logo will appear in the bottom left corner of the recording screen. Clicking the logo will pause the recording. This logo will also be visible in screenshots.
Mouse clicks and interactions will be recorded, with click indicators displayed for easier guide editing.
Once recording begins, navigate through the screens and perform the necessary actions. All on-screen interactions, including mouse clicks and typing, will be recorded. A recording status icon will appear to show that the recording is active.
Click Pause and Record to pause or resume the recording.
To stop recording, click Stop sharing in the floating panel or click Stop recording in the Step by step guide dialogue.
After recording, the steps are automatically uploaded to the guide editor in the Knowledge base portal. Each step will display the recorded screens with content.
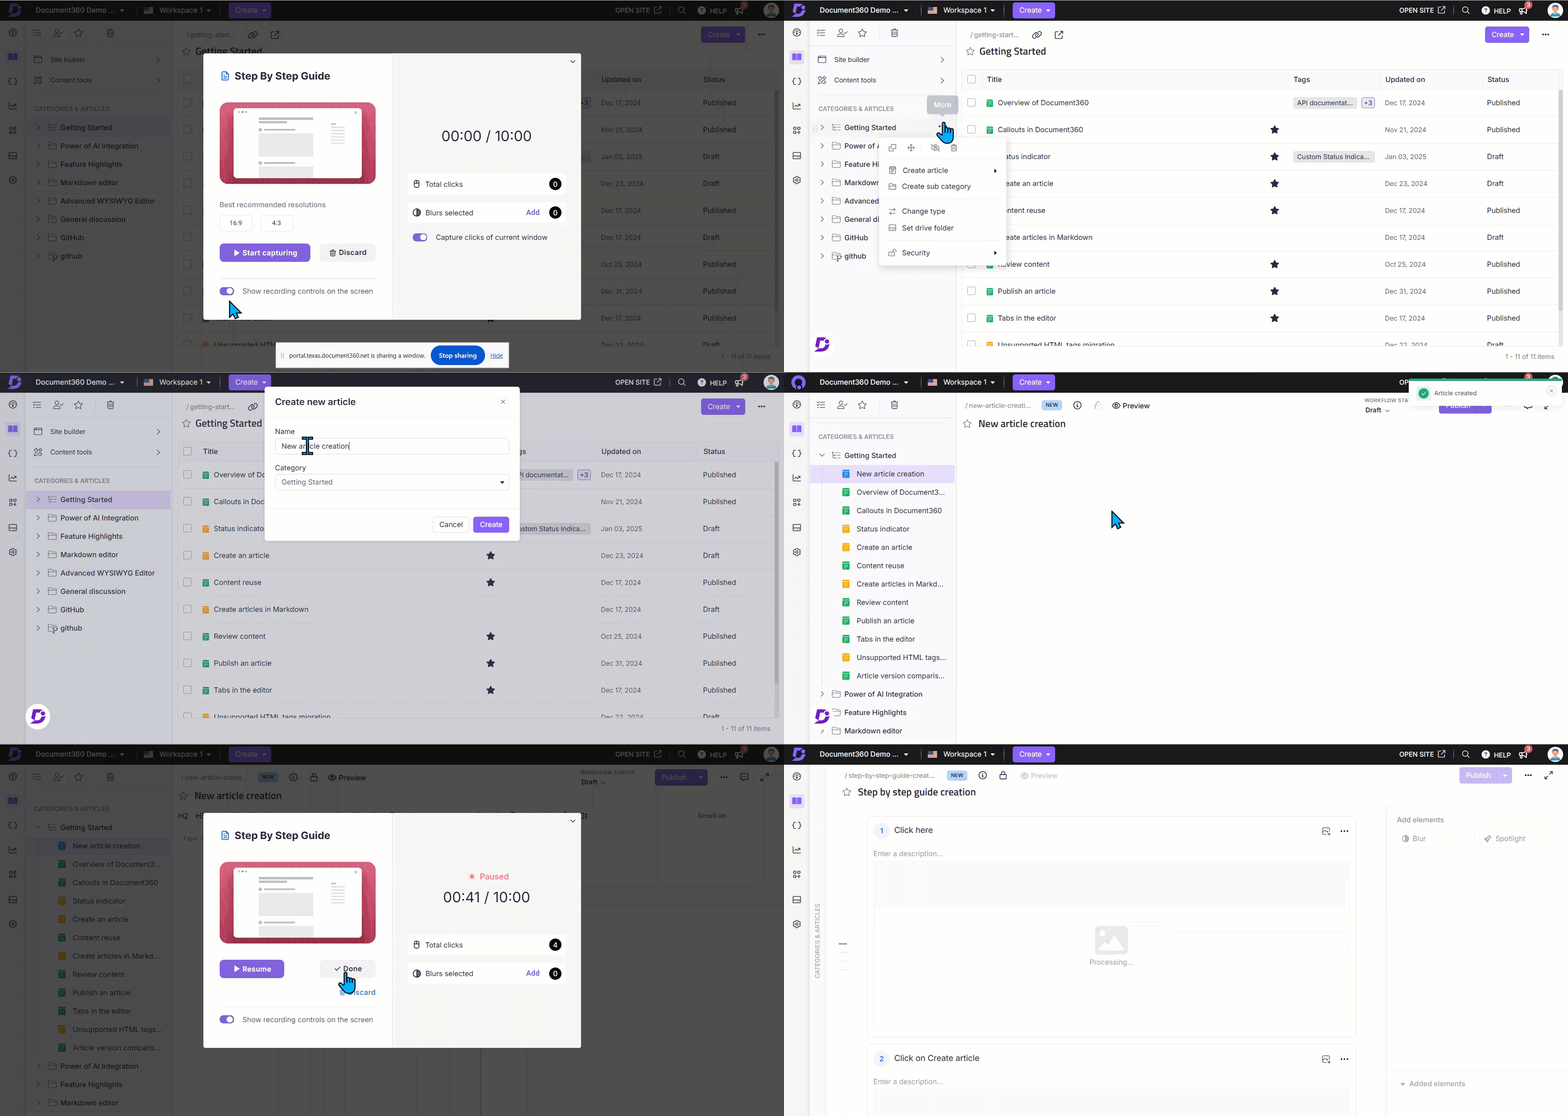
Editing and enhancing the content
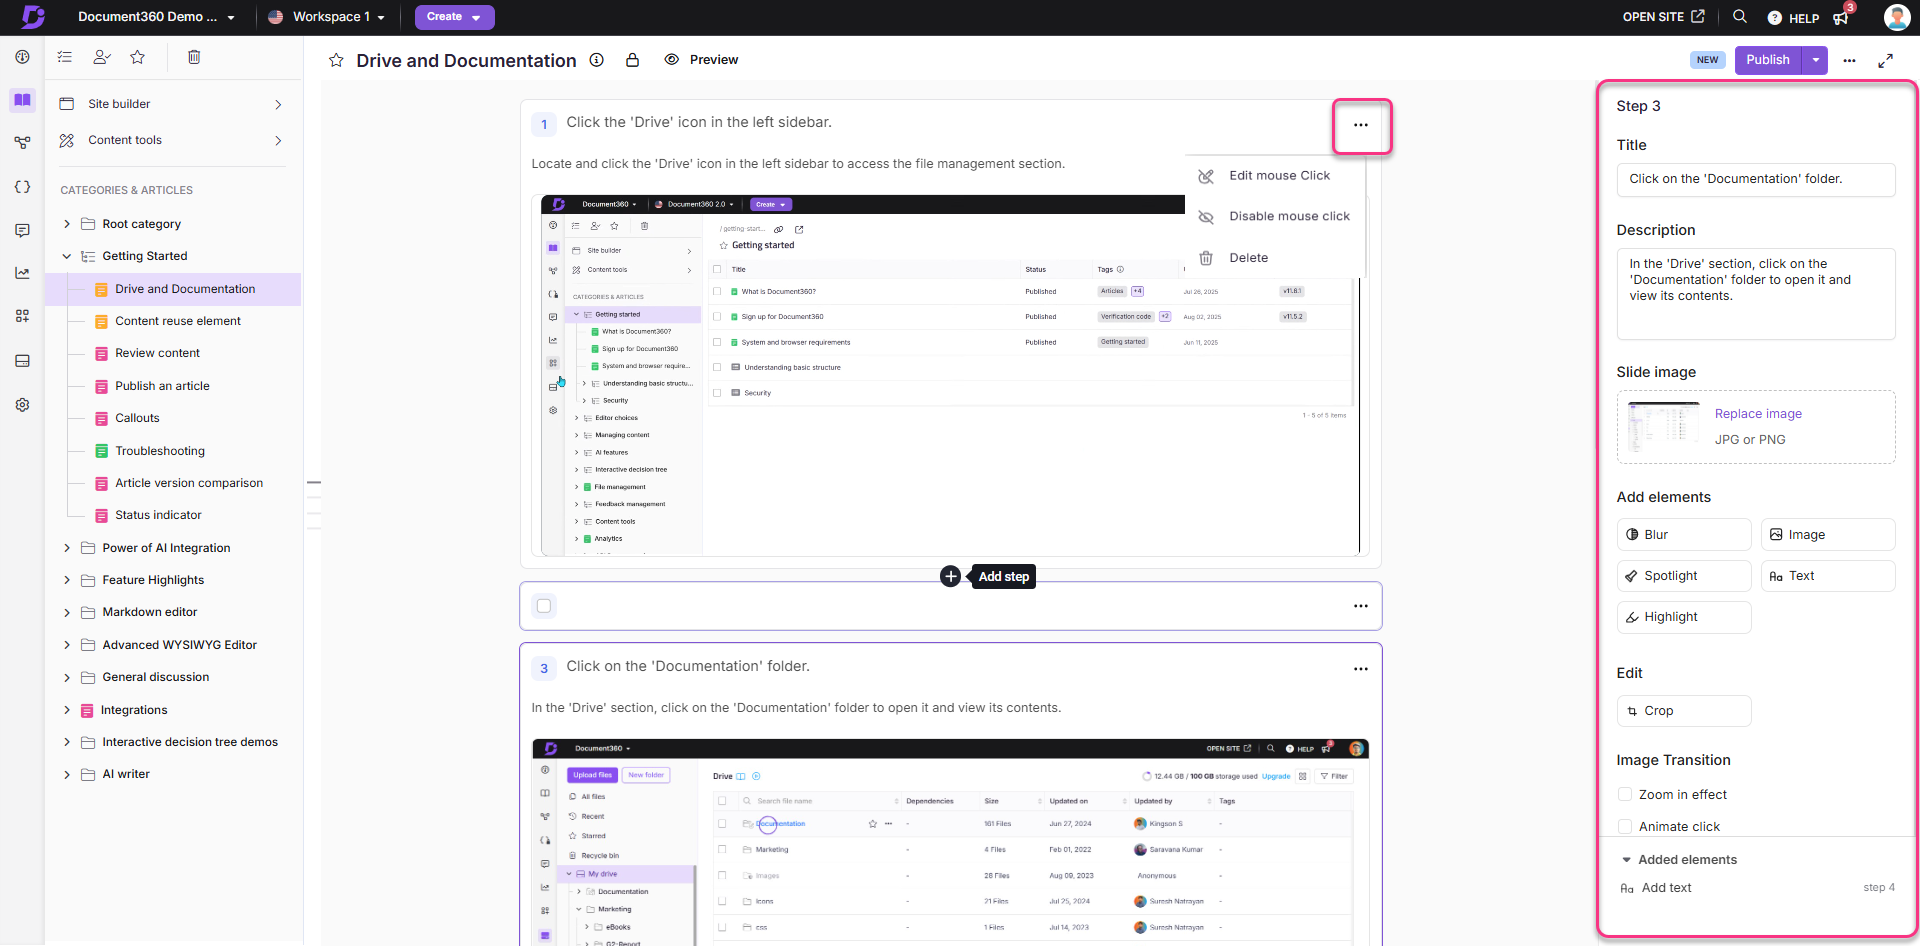
You can edit and enhance each step in your step by step guides directly from the right-side pane.
Hover between any two steps and click the + icon to insert a new step.
Editing step content
Use the right pane to modify the following elements of a step:
Title: Enter the title of the step. To add a hyperlink, select the text and click the Hyperlink () icon.
Description: Add a detailed explanation or instruction. After adding the content, you can format it using basic options such as Bold (), Italics (), Underline (), Orderlist (), unordered list (), and Hyperlink ().
Slide Image:
Click Replace image to change the captured image with a maximum file size of 10 MB.
NOTE
Supported formats are JPG or PNG.
Recommended resolution for uploading images: 1920x892, with a minimum of 100x100.
The Select slide image panel will appear with two tabs:
Select from original: Choose an image from the recorded video. Use the Fine-tune milliseconds () option for precision.
My uploads: Click Upload to select an image from your local file explorer.
Click Insert to apply the selected image.
Add elements
Blur: Use blur to hide sensitive or private information in a screenshot.
Click Blur.
Click Add.
Ensure the Show blur toggle is turned on to display the blur effect on the image.
Enter a name for the blur.
Select the step to apply the blur.
Choose a shape: Circle or Rectangle.
Adjust Intensity (opacity) using the slider.
Click Apply.
Once added, all blur elements will be listed. Hover over any blur element, click the More () icon, and select Delete to remove it.
Click Add new at the top to add additional blur elements to the step by step guide.
NOTE
You can add multiple blur effects to a single image.
Image: To add an image to a step:
Click Image.
Click Add.
In the My uploads dialog:
Select from previously uploaded images.
Or click the Upload () icon to browse from your local file explorer.
Optionally, use predefined image assets.
Once the image is selected, in the Size and position section, you can choose one of the following options:
Freeform: Allows you to adjust the image size and position using the mouse cursor.
In the Angle field, you can enter a specific rotation value.
Use the Rotate left () or Rotate right () buttons to adjust the image angle manually.
Fit to screen: By default, the image will be set to fit the step's image area.
Click Apply.
Spotlight: Use spotlight to emphasize a specific area.
Click Spotlight.
Click Add.
Enter a name for the spotlight.
Select the desired step.
Choose a shape: Circle or Rectangle.
Click Apply.
Once added, all spotlight elements will be listed. Hover over any spotlight element, click the More () icon, and select Delete to remove it.
Click Add new at the top to add additional spotlight elements to the step by step guide.
NOTE
All areas outside the spotlight will be dimmed. Currently, you cannot adjust the brightness of the dimmed area.
Text: Add custom text annotations.
Click Text.
Click Add.
Enter your text in the Text field. After adding the content, you can format it using basic options such as Bold (), Italics (), Underline (), Orderlist (), unordered list (), and Hyperlink ().
Choose a font and font size.
Pick a color from the palette.
Rotate the text using the degree control.
Click Apply.
Once added, all text elements will be listed. Hover over any text element,
Click the Edit () icon to edit the content.
Click the More () icon, and select Delete to remove it.
Click Add new at the top to add additional text elements to the step by step guide.
Highlight: Highlight important areas on the screen.
Click Highlight.
Click Add.
A rectangle will appear on the image.
Ensure the Show highlight toggle is turned on to display the highlight effect on the image.
Enter a Name for the highlight.
Choose a shape: Circle or Rectangle.
Select a color:
Choose from the list or
Click + to pick a custom color from the palette.
Click Apply.
Once added, all highlight elements will be listed. Hover over any highlight element, click the More () icon, and select Delete to remove it.
Click Add new at the top to add additional highlight elements to the step by step guide.
Edit image
Crop: Crop any part of the image:
Click Crop.
Choose an aspect ratio: Original (320:141), Custom, Square (1:1), Landscape (16:9), Portrait (9:16)
For Custom, manually adjust the crop area on the image.
In the Crop output section, the width, height, and aspect ratio values are displayed.
Click Apply to save.
NOTE
Once cropped, only the selected area will be highlighted and visible in the Knowledge base site.
Image transitions
Zoom in effect: You can apply a zoom-in effect to hotspots or specific areas to draw attention and highlight key details
Click the + or - buttons on the top-right to zoom in or out of the image.
Use this to focus on hotspots or areas of importance.
Animate click
You can animate a step by playing a short video frame instead of a static image.
Select the desired slide in the step by step guide.
In the right pane, go to Image transition.
Choose Animate click.
Select the duration: 3, 5, or 10 seconds.
Your step will now play as a mini video for the chosen duration, showing exactly how the click was performed.
NOTE
This feature works only for slide images taken from the original recording (not custom uploads).
The video plays around the click point, which is treated as the center of the animation.
For example:
A 3-second animation will show 1.5 seconds before and after the click.
A 10-second animation will try to show 5 seconds on either side, but it adjusts based on available video footage.
Manage added elements
Expand the Added elements section to view all enhancements made so far.
Hover over any item:
Click the Edit () icon to update it.
Click the Delete () icon to remove it.
Cloning step by step guides
Cloning, a step by step guide creates an exact copy of the original content as a new guide. You can clone step by step guides within the same workspace or across different workspaces.
There are two methods to clone a step by step guide in the Knowledge base portal:
Method 1: From the Categories & Articles pane.
Method 2: From within a specific Folder or Index category.
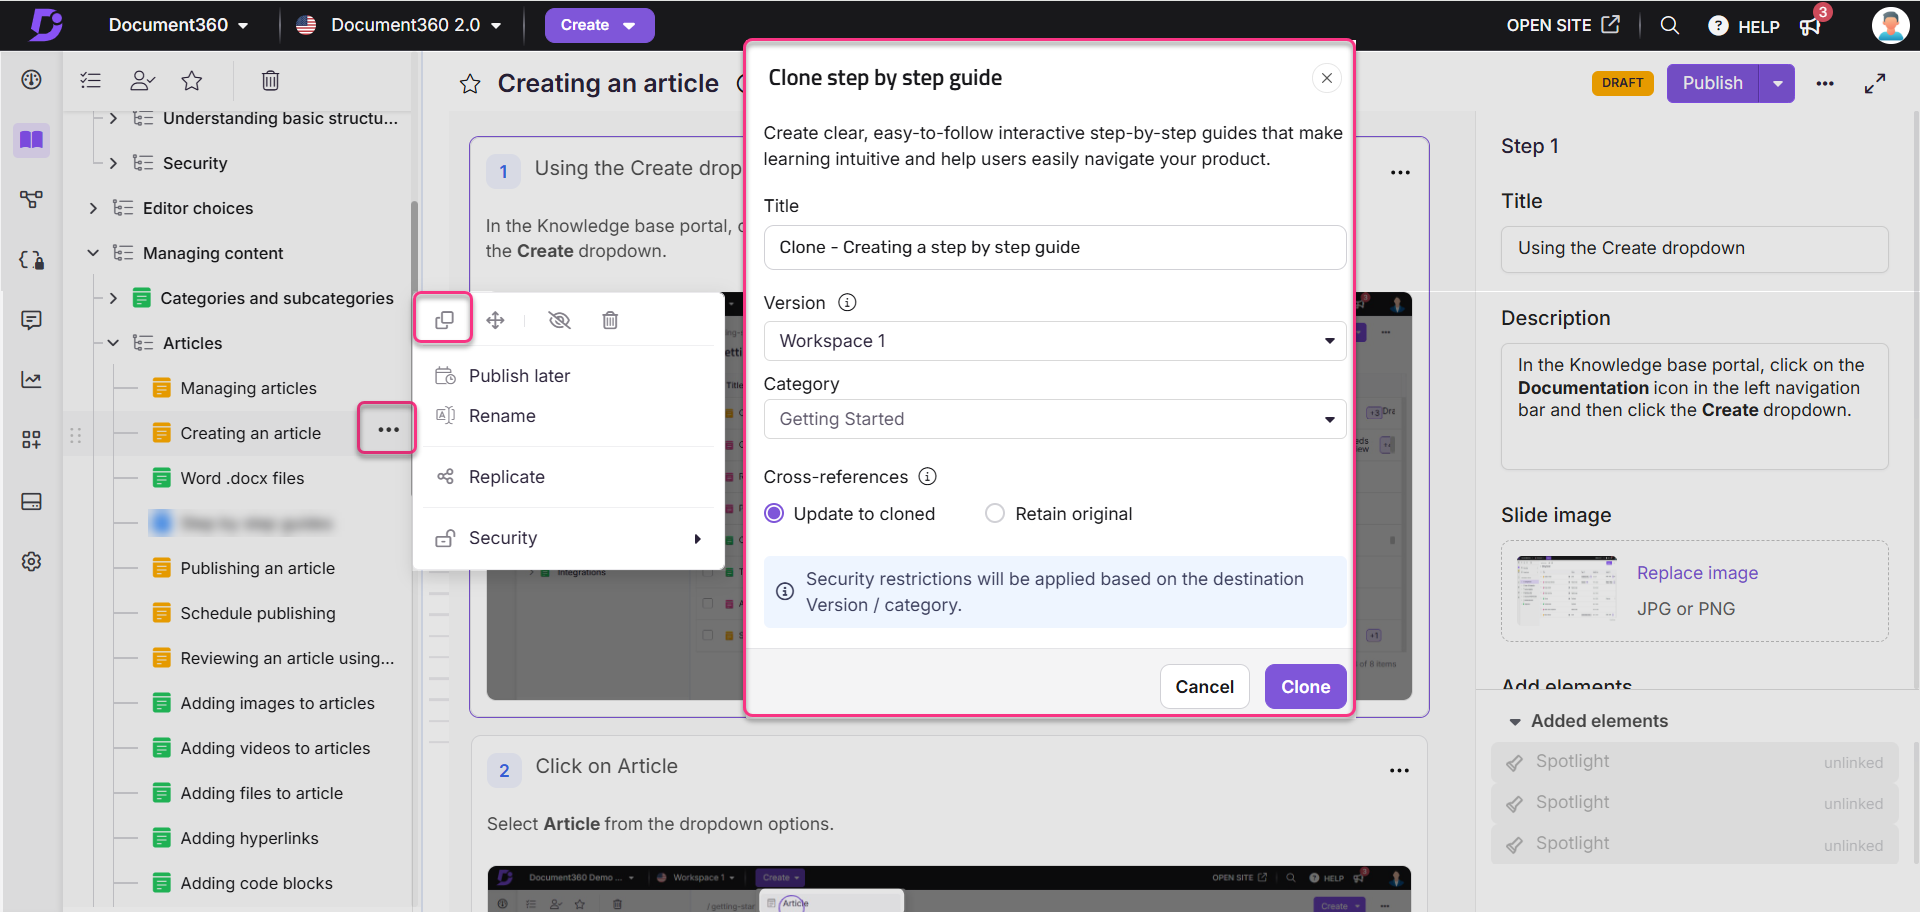
From the Categories & Articles pane, you can clone a step by step guide within or across workspaces:
Navigate to Documentation () in the left navigation bar in the Knowledge base portal.
Hover over the desired step by step guide in the left navigation pane.
The More () icon will appear.
Click the More () icon and select the Clone () icon.
In the Clone step by step guide dialog, perform the following:
Title: Enter the name for the cloning step by step guide.
Workspace: Select the desired workspace from the dropdown. Click Reset to assign it under the main workspace.
Category: Select an existing category from the selected workspace.
Auto update referenced links: Select this checkbox to ensure links in the step by step guide content are updated based on the destination workspace/category.
Cross-references: Select Update to cloned to automatically update cross-reference links to match the new workspace or category, or select Retain original to keep the links pointing to the original article.
Click Clone.
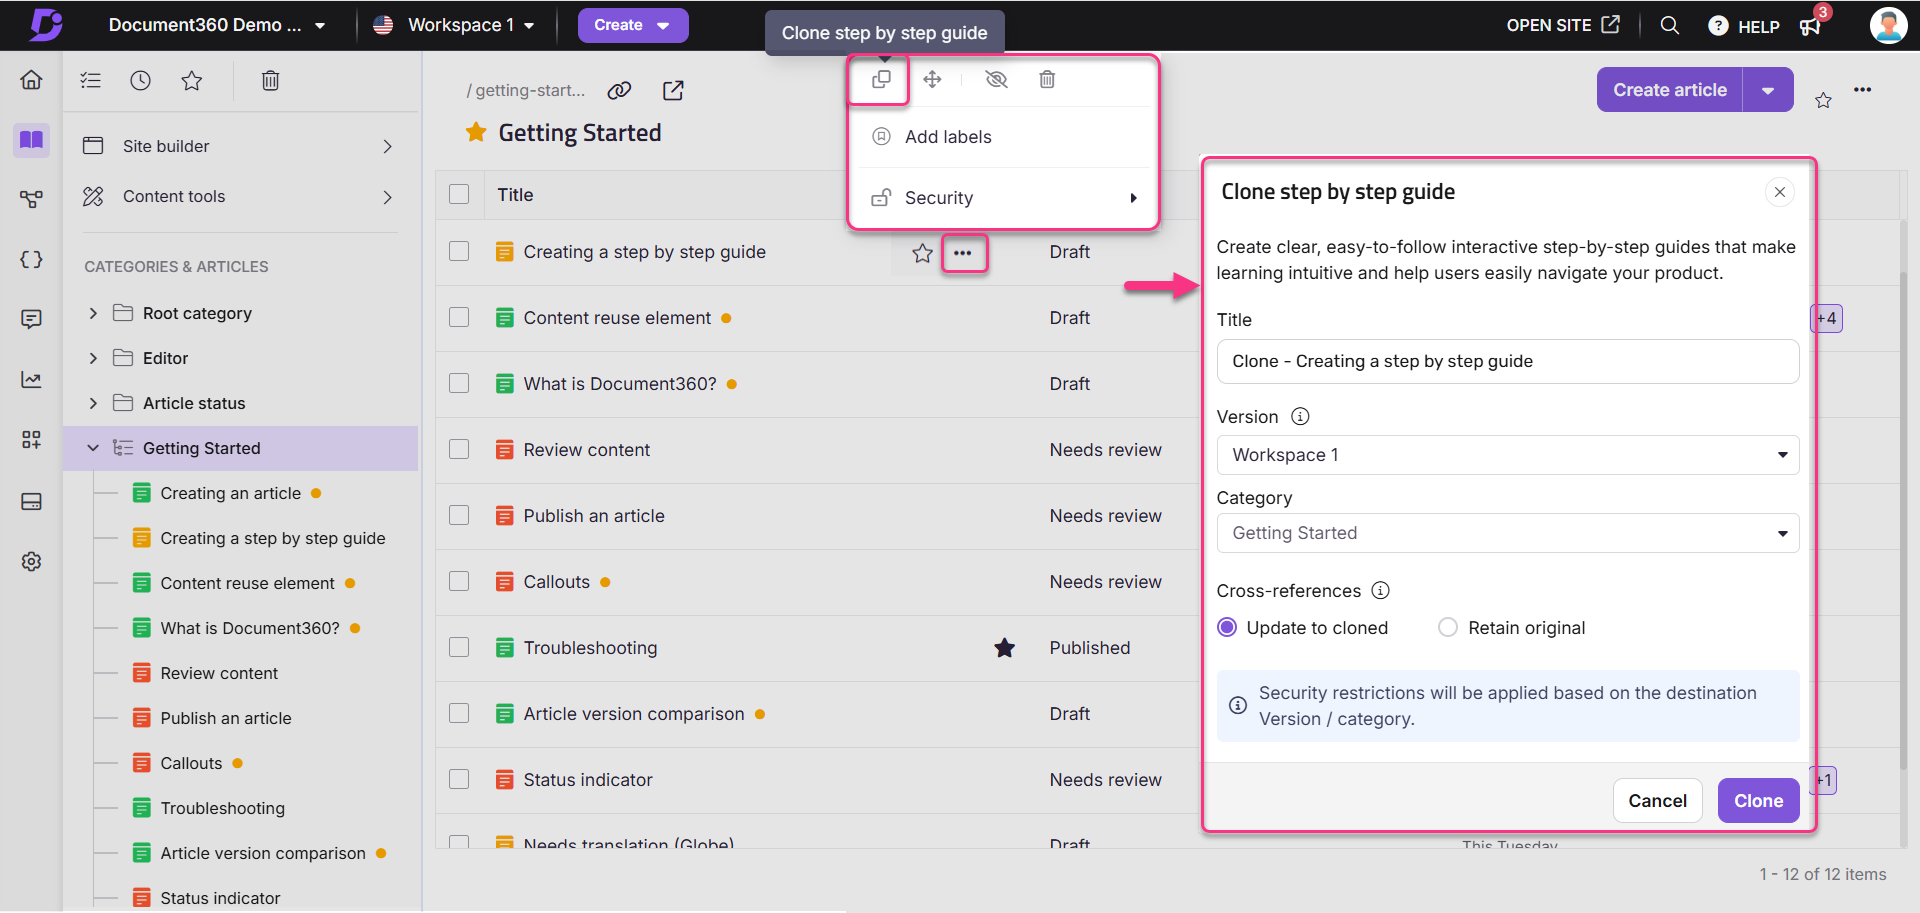
To move a specific step by step guide within a specific Folder/Index category:
Navigate to Documentation () in the left navigation bar in the Knowledge base portal.
Go to the desired Folder/Index category.
Hover over the desired step by step guide.
Click the More () icon and select the Clone () icon.
In the Clone step by step guide dialog, perform the following:
Name: Enter the name for the cloning step by step guide.
Workspace: Select the desired workspace from the dropdown. Click Reset to assign it under the main workspace.
Category: Select an existing category from the selected workspace.
Auto update referenced links: Select this checkbox to ensure links in the step by step guide content are updated based on the destination workspace/category.
Click Clone.
Unpublishing step by step guide
Similar to unpublishing a regular article, you can also unpublish a step by step guide if it is no longer needed or requires updates.
For example, if a guide was created for a feature that is still in development but was mistakenly published, you can unpublish it until the feature is ready. This ensures only accurate and finalized information appears in your knowledge base.
NOTE
Only team accounts with Publish permissions can unpublish articles.
You can unpublish a step by step guide using any of the following methods:
Method 1: From the Categories & Articles section
Method 2: From the Folder/Index category
Method 3: From the All articles () section
Method 4: From the Article editor
Method 1
To unpublish a step by step guide from the Categories & Articles section:
Navigate to Documentation () in the left navigation bar in the Knowledge base portal.
In the Categories & Articles pane, hover over the published step by step guide.
Click the More () icon and select Unpublish ().
The Confirm unpublishing panel will appear.
Enter the Reason for unpublishing. This is an optional field.
Click Unpublish.
To edit or republish:
Click Edit to make changes.
Click Publish to republish without editing.
Method 2:
To unpublish a step by step guide from the Folder/Index category:
Navigate to the desired category in the Documentation () section.
Hover over the published step by step guide in the left navigation pane and click the More () icon.
Select Unpublish ().
Alternatively, to unpublish multiple guides, select the desired published guides and click Unpublish () at the top.
The Confirm unpublishing panel will appear.
Enter the Reason for unpublishing. This is an optional field.
Click Unpublish.
To edit or republish:
Click Edit to make changes.
Click Publish to republish without editing.
Method 3:
To unpublish multiple step by step guides from the All articles section:
Navigate to Documentation () in the left navigation bar in the Knowledge base portal.
In the left navigation pane, navigate to All articles ().
Select one or more published guides.
Click Unpublish () at the top.
The Confirm unpublishing panel will appear.
Enter the Reason for unpublishing. This is an optional field.
Click Unpublish.
To republish or edit:
Click Edit to make changes.
Click Publish to republish without editing.
Method 4:
To unpublish a step by step guide from the Article editor:
Navigate to Documentation () in the left navigation bar in the Knowledge base portal.
Open the desired published step by step guide and click the More () icon at the top right.
Select Unpublish ().
The Confirm unpublishing panel will appear.
Enter the Reason for unpublishing. This is an optional field.
Click Unpublish.
To republish or edit:
Click Edit to make changes.
Click Publish to republish without editing.
NOTE
Once a step by step guide is unpublished:
Unpublishing a step by step guide changes its status from Published to Draft.
All associated links will break.
The guide will be hidden from the Knowledge base site.
In the Knowledge base portal, the status will show as Unpublished and step by step guide’s status icon will appear in gray ().
FAQ
How do I edit a published Step by step guide?
To make changes to a published Step by step guide:
Navigate to the desired guide in the Knowledge base portal.
Click Edit at the top right near the More () icon.
Modify the guide by adding new steps, replacing images, or updating any content as needed.
Once done, click Publish to save and publish the updated guide.
How do I perform bulk operations for Step by step guides?
Step by step guides function similarly to articles and are displayed in the All Articles section. Here, you can manage, search, and organize them alongside other articles in your project. In the All Articles section, you can use filters to sort guides by status (e.g., Draft, Published, New), category, tags, or date modified.
Can I find Step by step guides using the search bar in Document360?
Yes, step by step guides are accessible through the Document360 search bar in the Knowledge base portal. If published, they are also searchable on the Knowledge base site.
What are the actions I can perform with Step by step guides?
You can perform several actions on Step by step guides, including starring, tagging, cloning, moving, deleting, and hiding. For example:
Move: Move the guide to different categories or across workspaces.
Hide: Make the guide invisible on the Knowledge base site.
Delete: Send the guide to the recycle bin, where it will stay for 30 days before permanent deletion.
Additional actions, like starring and tagging, allow organizing and managing guides.
How do I update the title and slug of a Step by step guide?
To update the title, URL slug, and description of a Step by step guide:
Click on the guide's title and update the desired title, URL slug, and Description.
Once updated, click Update to save the changes.
How can I view the contributors for a Step by step guide?
To see the contributors for a guide:
Click the Information icon at the top near the status badge.
A panel will display a list of contributors, the number of steps, last updated date, and creation details.
Why is a step by step guide locked, and how can I unlock it?
When a user is editing a step by step guide, it is locked to prevent changes from others. A Step by step guide is unlocked when:
There is no activity for 15 minutes.
You click the Lock () icon and select Unlock.
You navigate to another article or page within the Knowledge base portal.
How can I schedule publish a Step by step guide?
To set a publish date for later:
Click the dropdown icon next to Publish and select Publish later.
In the Publish later panel, select the desired date, time, and time zone.
Optionally, add a comment.
Click Schedule to finalize the scheduled publication.
For more information, read the article on Schedule publish.
How do I configure the SEO title and description for a Step by step guide?
To set up SEO for a Step by step guide:
Navigate to the desired guide in the Knowledge base portal.
Click the More () icon and select SEO.
In the Article settings dialog, update the meta title, slug, and description.
Click Save to apply the changes.
For more information, read the article on Article SEO.
How can I exclude a Step by step guide from appearing on the external search engine results?
To exclude a guide from external search engine results:
Navigate to the desired guide in the Knowledge base portal.
Click the More () icon and select SEO.
In the Article settings dialog, select the Exclude from external search engine results checkbox.
Click Save to confirm.
What are the Article settings I can apply to a Step by step guide?
You can configure various article settings for a Step by step guide:
SEO: Update the SEO meta title, slug, and description.
Search visibility: Manage the guides from appearing on the Knowledge base site.
Tags: Add tags for better organization.
Related articles: Manually add the related articles.
Featured image: Upload a featured image for the guide.
Attachments: Attach files or images to enhance the guide.
Status indicator: Set status labels like New, Updated, or Custom for the step by step guides in the Knowledge base site.
How can I enable the Table of Contents for my Step by step guide?
Each step in a guide can appear as part of a Table of Contents on the Knowledge base site. To enable the Table of Contents:
Navigate to Settings () > Knowledge base portal > Article settings & SEO in the Knowledge base portal.
In the Article settings tab, expand the Article right accordion.
Turn on the Show table of contents toggle.
Is it possible to switch the editor for a Step by step guide?
In Document360, the Step by step guide feature can be used only in the Advanced WYSIWYG editor.
How can I track the analytics of my Step by step guides?
In Document360, navigate to Analytics () > Article analytics tab to track the views, reads, likes, and dislikes of Step by step guides. In Document360 Analytics (), guides data metrics are also included like article views, search results, user activity, feedback, link status, and Page not found metrics.
How do I validate links in a Step by step guide?
To validate links:
Navigate to Analytics () > Link status in the Knowledge base portal.
Click Validate links to review and confirm all links are functioning.
How can I control access to individual Step by step guides?
Using Document360’s article-level access control, you can grant or deny access to specific Step by step guides independently of category-level settings. For more information, read the article on Security - Article Access Control.
Are Step by step guides accessible through the Knowledge base widget?
Yes, Step by step guides are searchable and readable in the Knowledge base widget.
How do I track activity events for Step by step guides?
To monitor activity events in the Step by step guide:
Navigate to Settings () > Knowledge base portal > Team auditing in the Knowledge base portal.
In the Team auditing tab, you’ll find updates on visibility changes, title updates, and contributor modifications for each guide.
For more information, read the article on Team auditing.
How many steps can I create in a step by step guide?
You can create up to 200 steps in a step by step guide.
How do I export a step-by-step guide in the Knowledge base site?
In the Knowledge base site, you can export a step-by-step guide as a PDF:
Navigate to the desired step-by-step guide.
In the article header, click the More () icon and select Export to PDF.
The PDF download begins automatically. Choose the desired location in your local file explorer and click Save.
How do I export a step by step guide in the Knowledge base portal?
In the Knowledge base portal, you can export a step-by-step guide as a PDF:
Navigate to the draft or published step-by-step guide in the Knowledge base portal.
Click the More () icon near the Share option.
Select Export to PDF to download a well-formatted PDF version of the article to your computer.
Does the content included in step by step guides get fetched by Eddy while generating responses?
Yes, the textual content from step by step guides, including the title, description, and body content is fetched by Eddy AI when a search is performed on the Knowledge base site. Each Eddy AI generated response will also include a citation that links users directly to the relevant step by step guide article, ensuring transparency and easy access to the source content.