Plans supporting this feature: Business Enterprise
Zendesk is a customer support platform that helps teams manage questions, complaints, and other service requests.
Integrating the Document360 knowledge base with Zendesk allows support agents to:
Search and share articles directly in Zendesk without switching tabs.
Create new knowledge base articles without leaving the Zendesk interface.
Use AI-powered responses and article suggestions with Eddy AI.
Prerequisites
To integrate Document360 and Zendesk, you will need
A Zendesk Enterprise or Enterprise Plus account for federated search.
A Document360 project with admin access.
API token access in both platforms.
Install the Document360 app on Zendesk
Install the Document360 app in your Zendesk Support console so you can connect your knowledge base and access articles directly within Zendesk.
Log in to your Zendesk Support console.
Go to the Zendesk Marketplace and click Apps.
In the newly opened Marketplace tab, enter Document360 in the Filter apps field.
Click Document360.
Click the How to install tab to view the instructions and complete any pre-installation tasks.
Click Install at the top right.
If you have multiple accounts, select the intended account and click Install.
To complete the installation, you will have to enter the Title, Token, and restriction details in the respective fields.
Once done, click Install.
Configuring Document360 with Zendesk
To obtain an API token from Document360, follow the steps below.
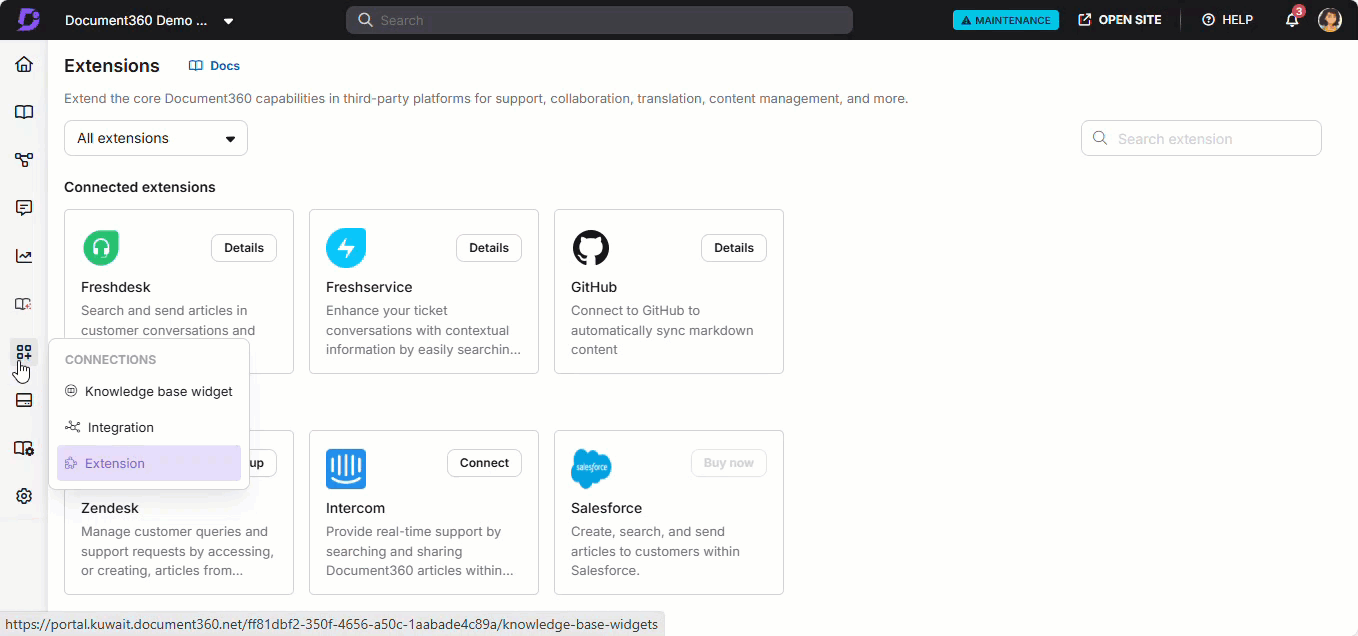
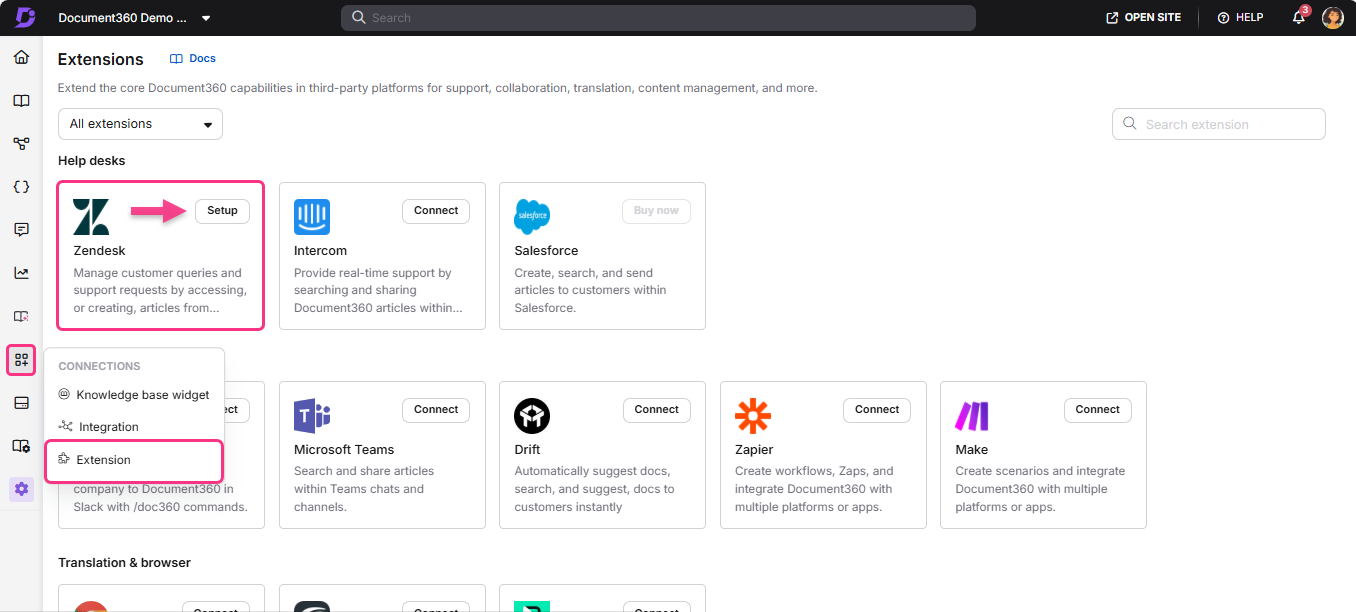
Navigate to Connections () > Extensions in the left navigation bar in the Knowledge base portal.
In the Help desks section, click Zendesk.
Click Setup.
In the Generate API token option, click Generate. Click Refresh token to regenerate the token.
The Generate extension token dialog will appear.
Click Yes.
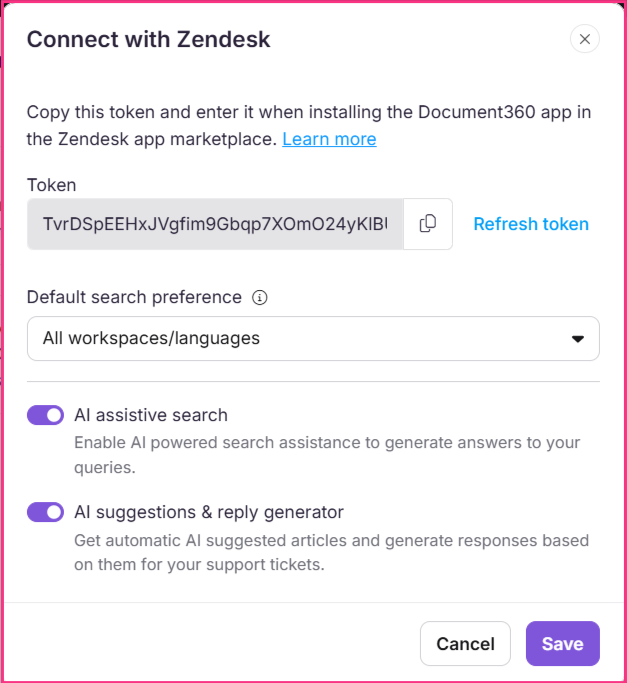
The Connect with Zendesk dialog will appear, where you will have your token displayed.
Click the Copy () icon to copy the token.
Click Close.
Go to the Zendesk platform and fill in the Title field.
In the Token field, paste the copied API token from Document360.
Add your preferred restriction settings. By default, this option is turned off.
Click Install.
Configuring Zendesk federated search in Document360
Follow these steps to configure Zendesk federated search in Document360:
Accessing Zendesk setup in Document360
To set up Zendesk from the Knowledge base portal, follow the steps below:
Navigate to Connections () > Extensions in the left navigation bar in the Knowledge base portal.
In the Helpdesk section, click Zendesk.
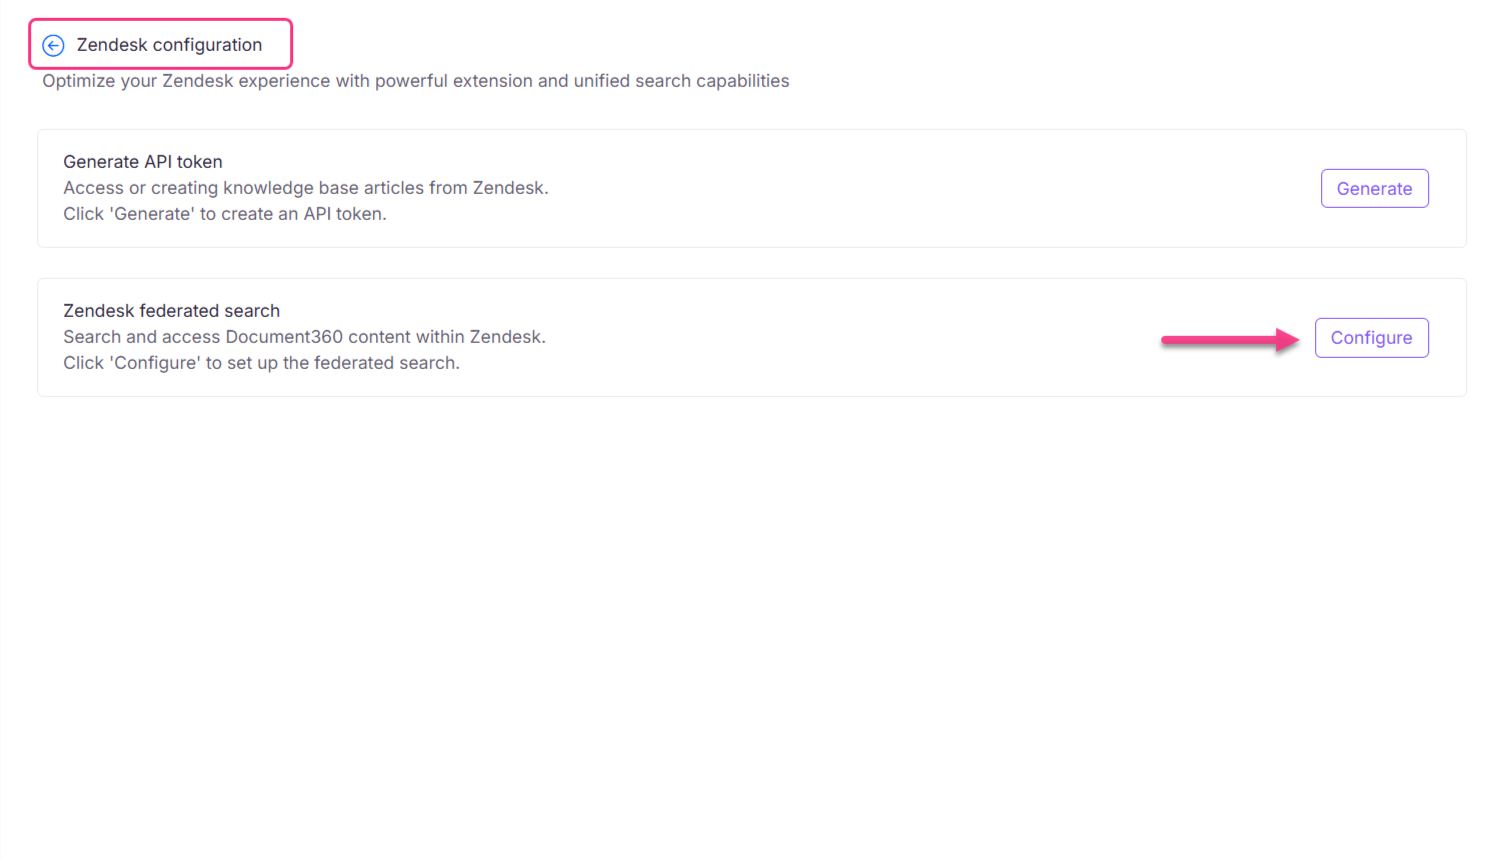
Click Setup to open the Zendesk configuration page.
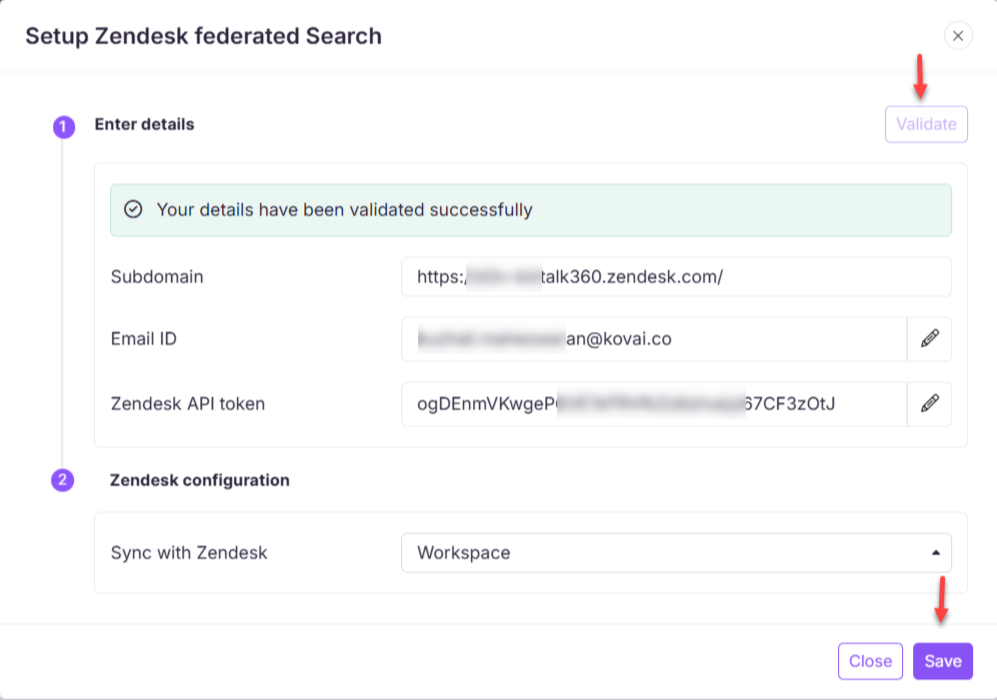
In the Zendesk configuration page, click Configure in the Zendesk federated search setting.
The Setup Zendesk federated search dialog will appear.
Provide the following details in the Zendesk platform:
Subdomain:
Copy the subdomain from your Zendesk URL.
Example: For the URLhttps://kovaico3776.zendesk.com/admin/apps-integrations/apis/zendesk-api/settings/tokens/, the subdomain ishttps://kovaico3776.zendesk.com.Email ID:
Go to the Zendesk overview page, click Settings (), and select Go to Admin center.
In the left navigation bar, go to Channels and click Email to view email configurations.
In the Support addresses section, locate your Zendesk account’s admin email address.
Zendesk API Token:
From the Zendesk overview page, click Settings (), and select Go to Admin center.
In the left navigation bar, go to Apps and integrations > Zendesk API.
Click Add API token and copy the generated token.
Click Validate to confirm the details you entered.
In the Sync with Zendesk dropdown, select the desired workspace and language in your Document360 project.
Once the configuration is complete, click Save.
You can now search and access your Document360 articles as an external source within the Zendesk platform.
NOTE
To ensure seamless synchronization, the language codes must match between the Zendesk ticketing platform and Document360.
Enabling AI functionalities for Zendesk extension from the Knowledge base portal
Enabling AI assistive search for the Zendesk extension allows agents to seamlessly fetch AI-powered responses from your knowledge base without leaving the Zendesk interface, improving efficiency and response accuracy. To set up AI assistive search,
Navigate to Connections () > Extensions in the left navigation bar in the Knowledge base portal.
In the Helpdesk section, click Zendesk.
Click Setup to open the Zendesk configuration page.
Click Modify in the Generate API token setting. The Connect with Zendesk dialog will appear.
Enter the token generated in the Zendesk token field.
From the Default search preference field select the option to fetch search results in Zendesk’s Document360 app. The options are:
Default workspace/language - allow Eddy AI to fetch results from the default workspace or language.
All workspaces/languages - allow Eddy AI to fetch results from all the workspaces and languages in the knowledge base.
Enable the AI assistive search toggle to allow access to AI search in the Zendesk extension.
NOTE
To enable the AI assistive search for Zendesk extension you must enable the assistive search for KB widget and extensions in the Knowledge base settings. If you have not enabled the settings, the AI assistive search toggle will remain turned off.
Enable the AI suggestions & reply generator toggle to get automatic AI-suggested articles and generate responses based on them for your support tickets.
This makes it easy and convenient to handle support tickets on the Zendesk platform.
Once done, click Save.
Enhancing Zendesk support: Find suggested articles and draft replies with Eddy AI
Once you ensure AI search is enabled for the Zendesk extension,
Click the pinned Document360 icon in the Zendesk sidebar or open it from the sidebar.
The Eddy AI recommended articles will load in the Document360 panel.
In the Document360 panel, when you start typing in the search bar, it will prompt you to search the knowledge base using Eddy AI.
NOTE
Eddy AI assistive search analytics will be captured for this extension. You can filter the analytics by selecting the Zendesk extension as the source.
The workspace and language filters will appear based on the content access configuration set in the extension.
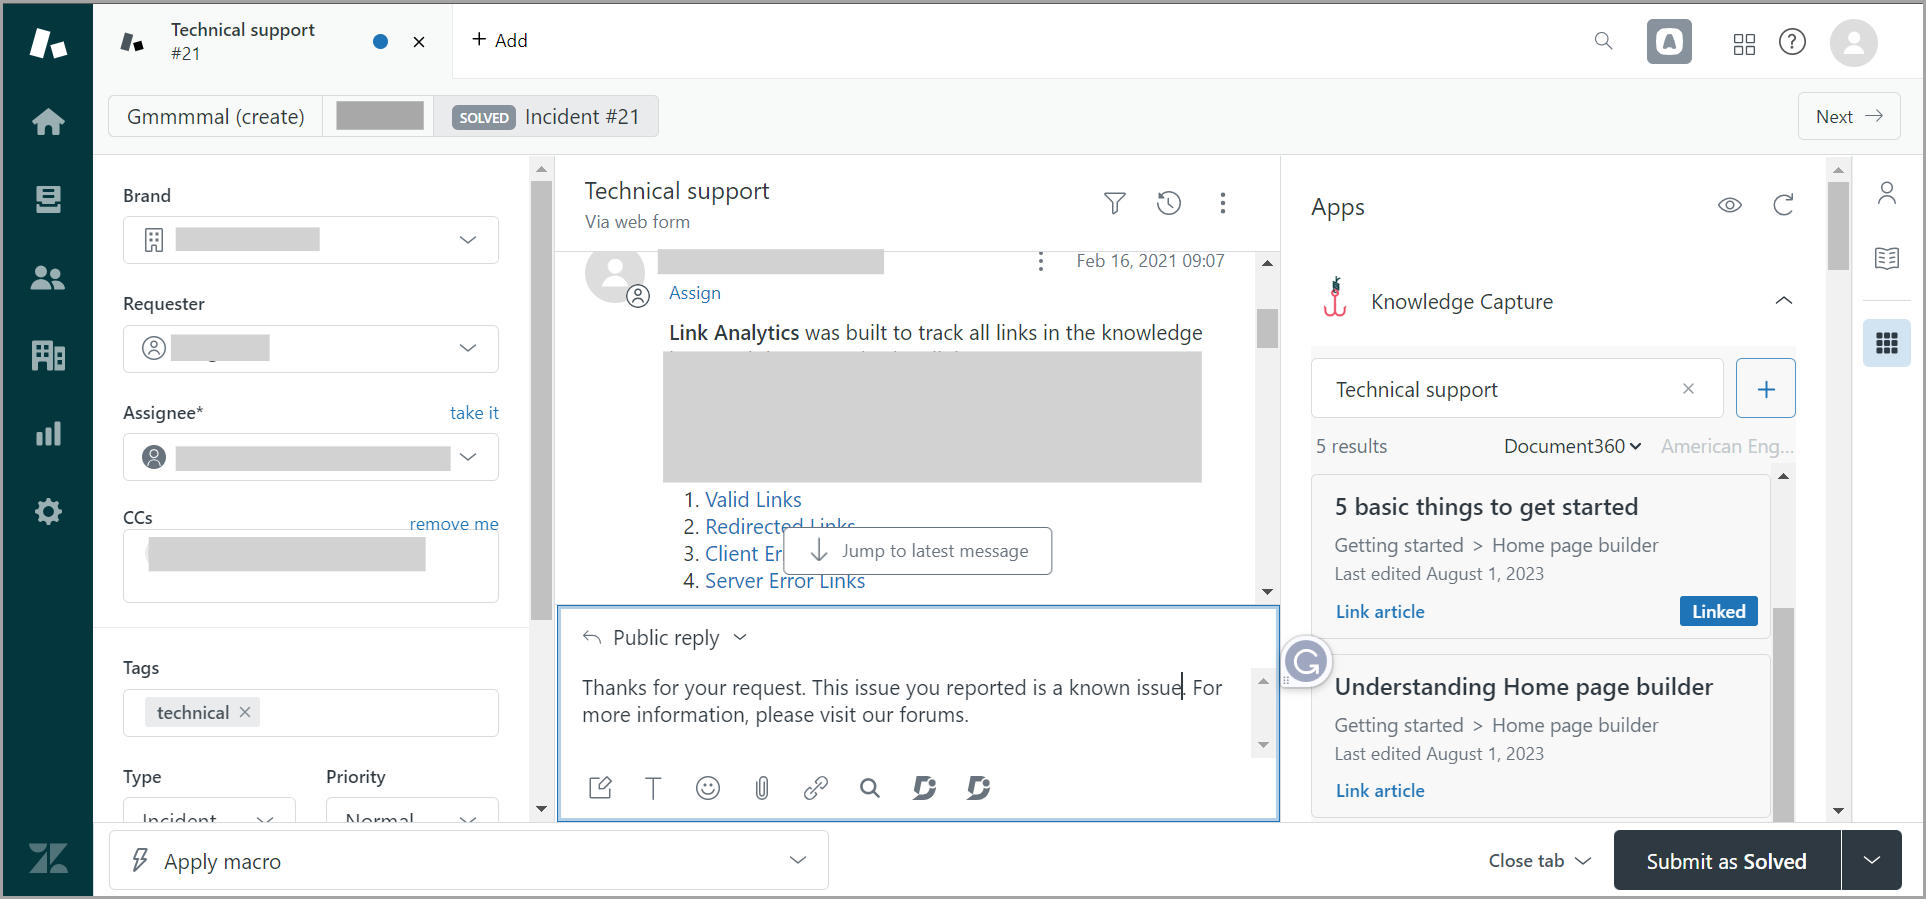
Click the Document360 icon in the reply pane to find the two options below:
Drafting a reply using Eddy AI
On clicking this option, a suggested response is generated based on the context of the support ticket.
If Eddy AI is unsure about the reply, it will provide a fallback response.
The drafted reply will be generated in the same language as the conversation.
NOTE
If AI credit usage alerts are enabled in the notification mapping settings, you will receive email notifications when credit consumption reaches 80%, 90%, and 100%.
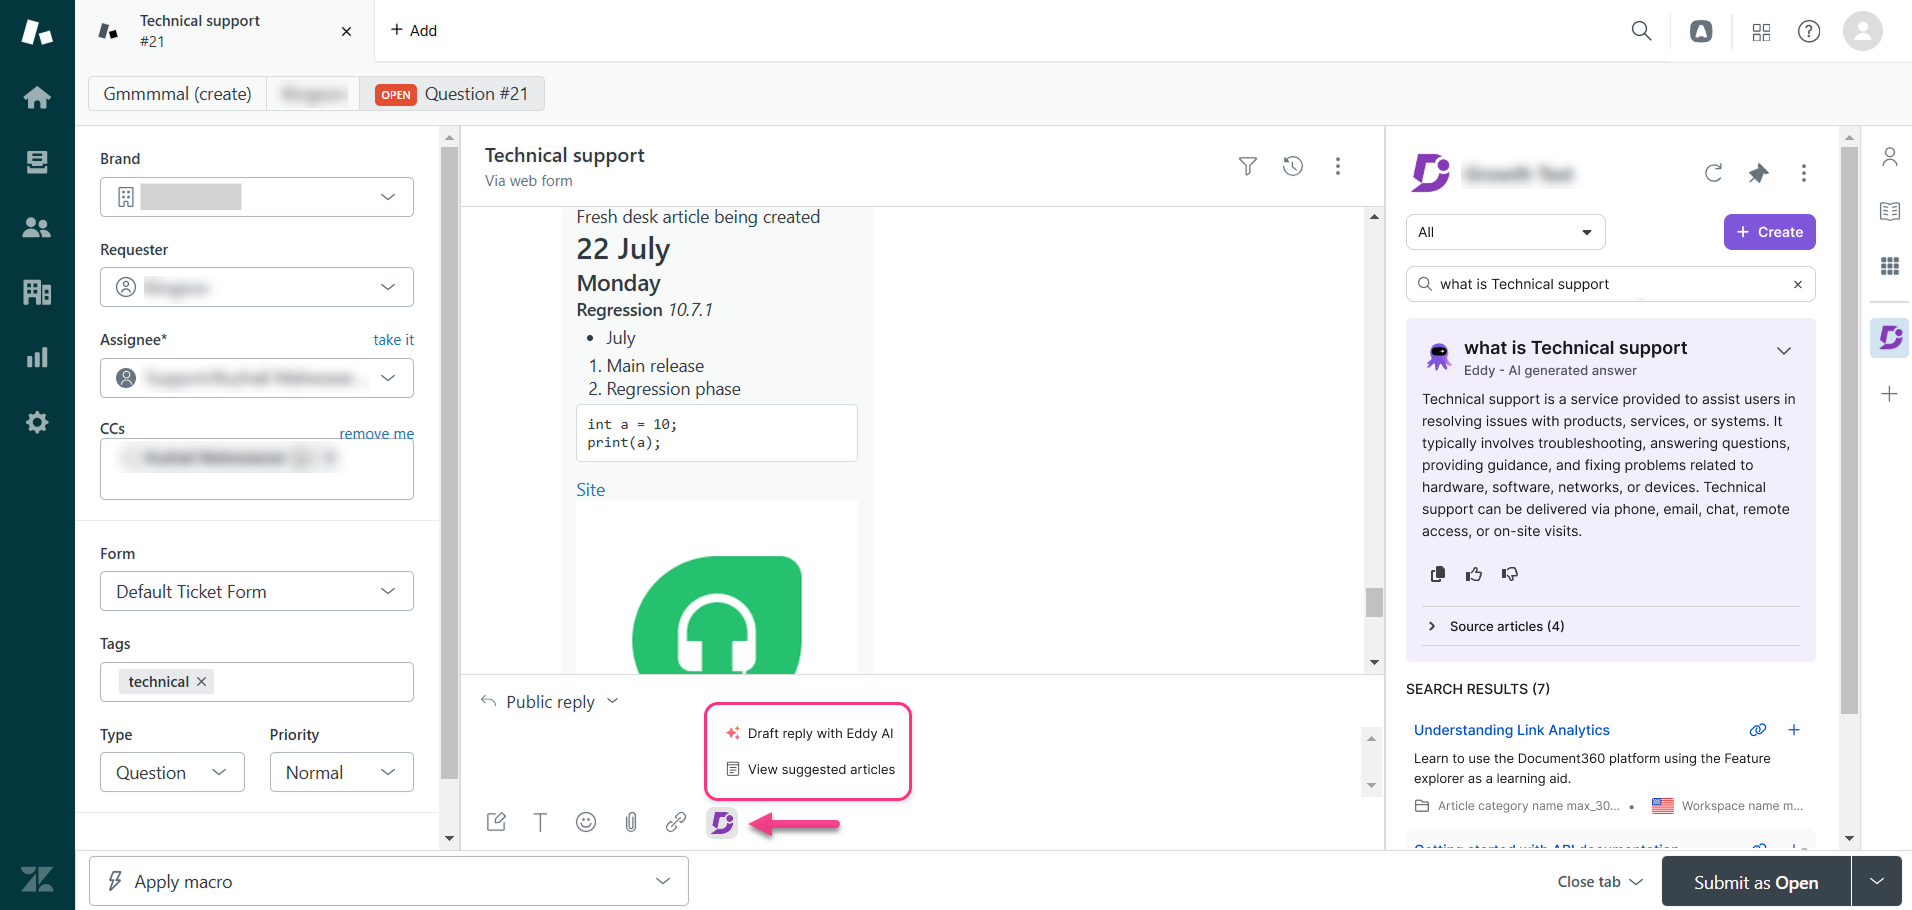
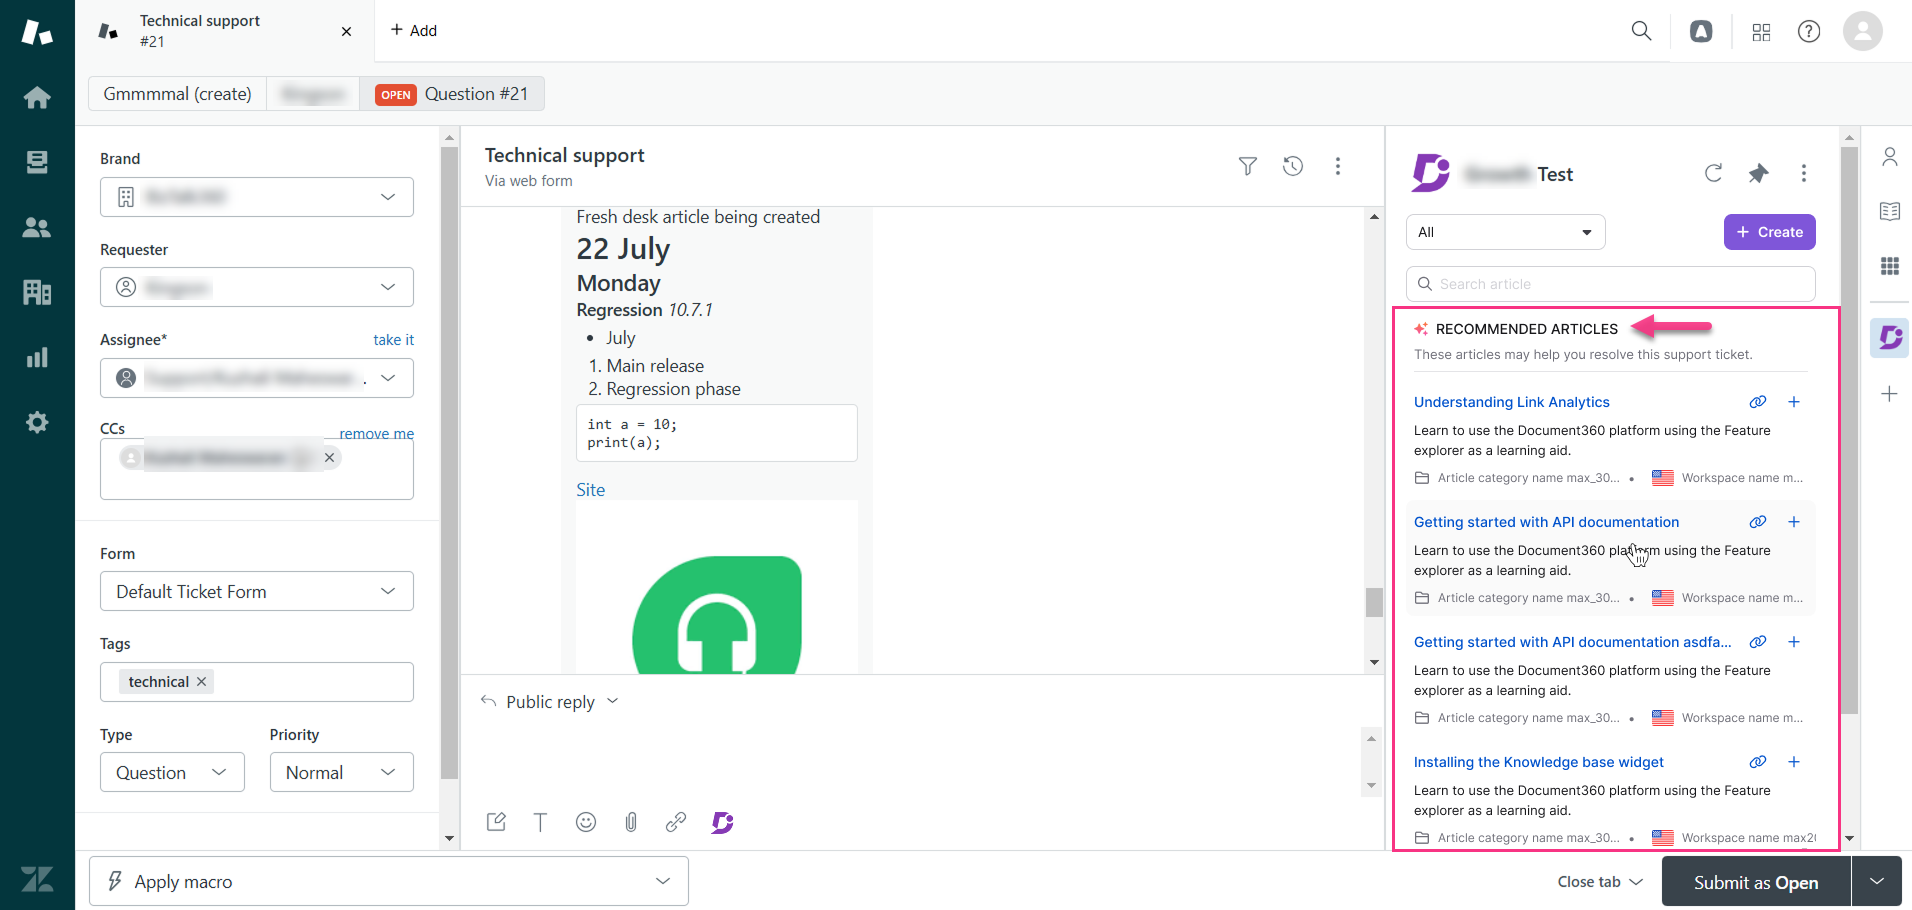
Viewing suggested articles
On clicking this option, the Knowledge base dialog opens with Eddy AI-recommended articles.
A maximum of 5 articles will be displayed.
While fetching articles, Eddy AI will consider the workspace filter applied.
For Your Information
When using Zendesk’s Messaging API, new messages might not appear instantly. To keep things running smoothly, Zendesk sometimes processes messages in batches, especially when there’s a lot of activity. This delay only affects the Messaging API. Tickets from forms, live chat, or other methods are not delayed. Because of this, features like Draft reply and View suggested articles might take a little longer to update with the latest data.
Searching and sharing articles on ticket responses
While responding to support tickets, you can use the installed Document360 app to respond to customers. You can directly access the Knowledge base in the Zendesk environment.
The installed app is available on the right side of the open ticket response panel.
Click the Document360 app.
As the Document360 frame loads, Zendesk will automatically search for articles based on the title of the support ticket.
You can always type in the search term in the field, and the relevant articles will be listed below.
Click Link article of the article you wish to attach.
You can also preview the article by clicking on Preview.
In the preview mode, there will be three options,
Open Document360 - The article opens in a new tab.
Link article - Insert the article link in your response message.
Insert content - Add the entire article's content to your response message.
This makes it easier and more instantaneous for agents to respond to customers as they don't have to navigate between the Document360 and Zendesk tabs.
Once you link an article to a response, the Linked label isn't in the article list. This helps you identify the article that is already linked to the conversation.
Creating an article on the Knowledge base from Zendesk
On the Zendesk platform, you can create articles in your Knowledge base without the need for additional team accounts.
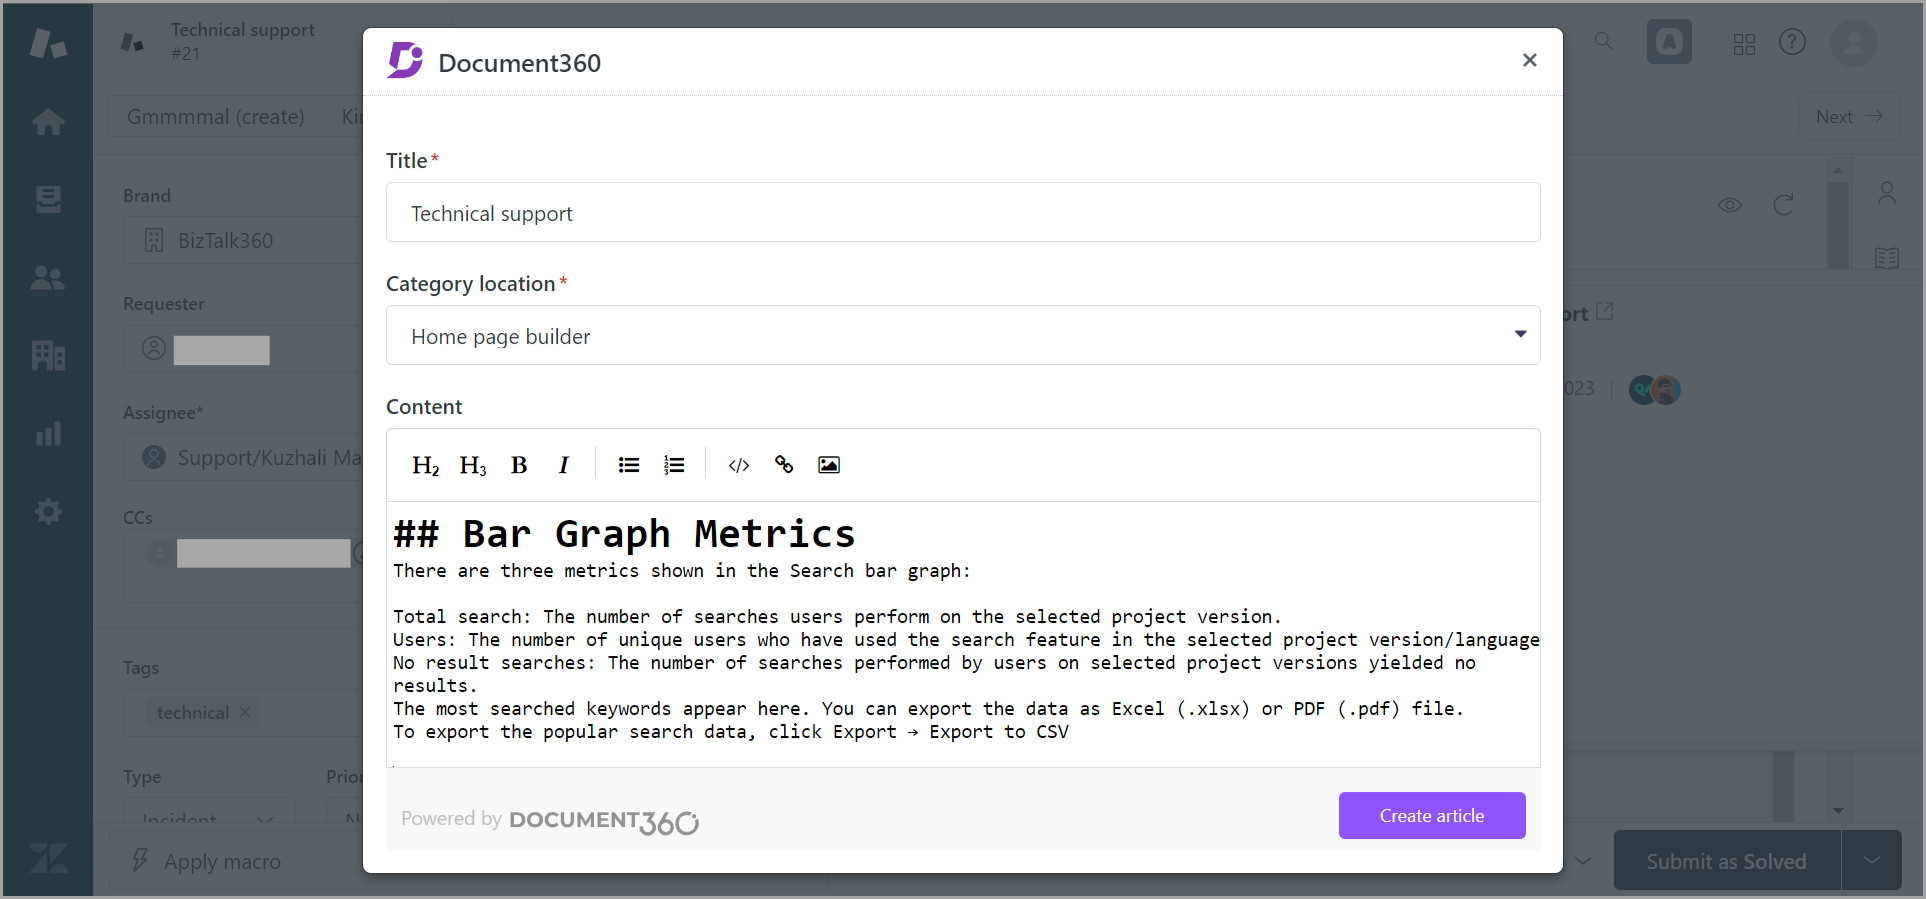
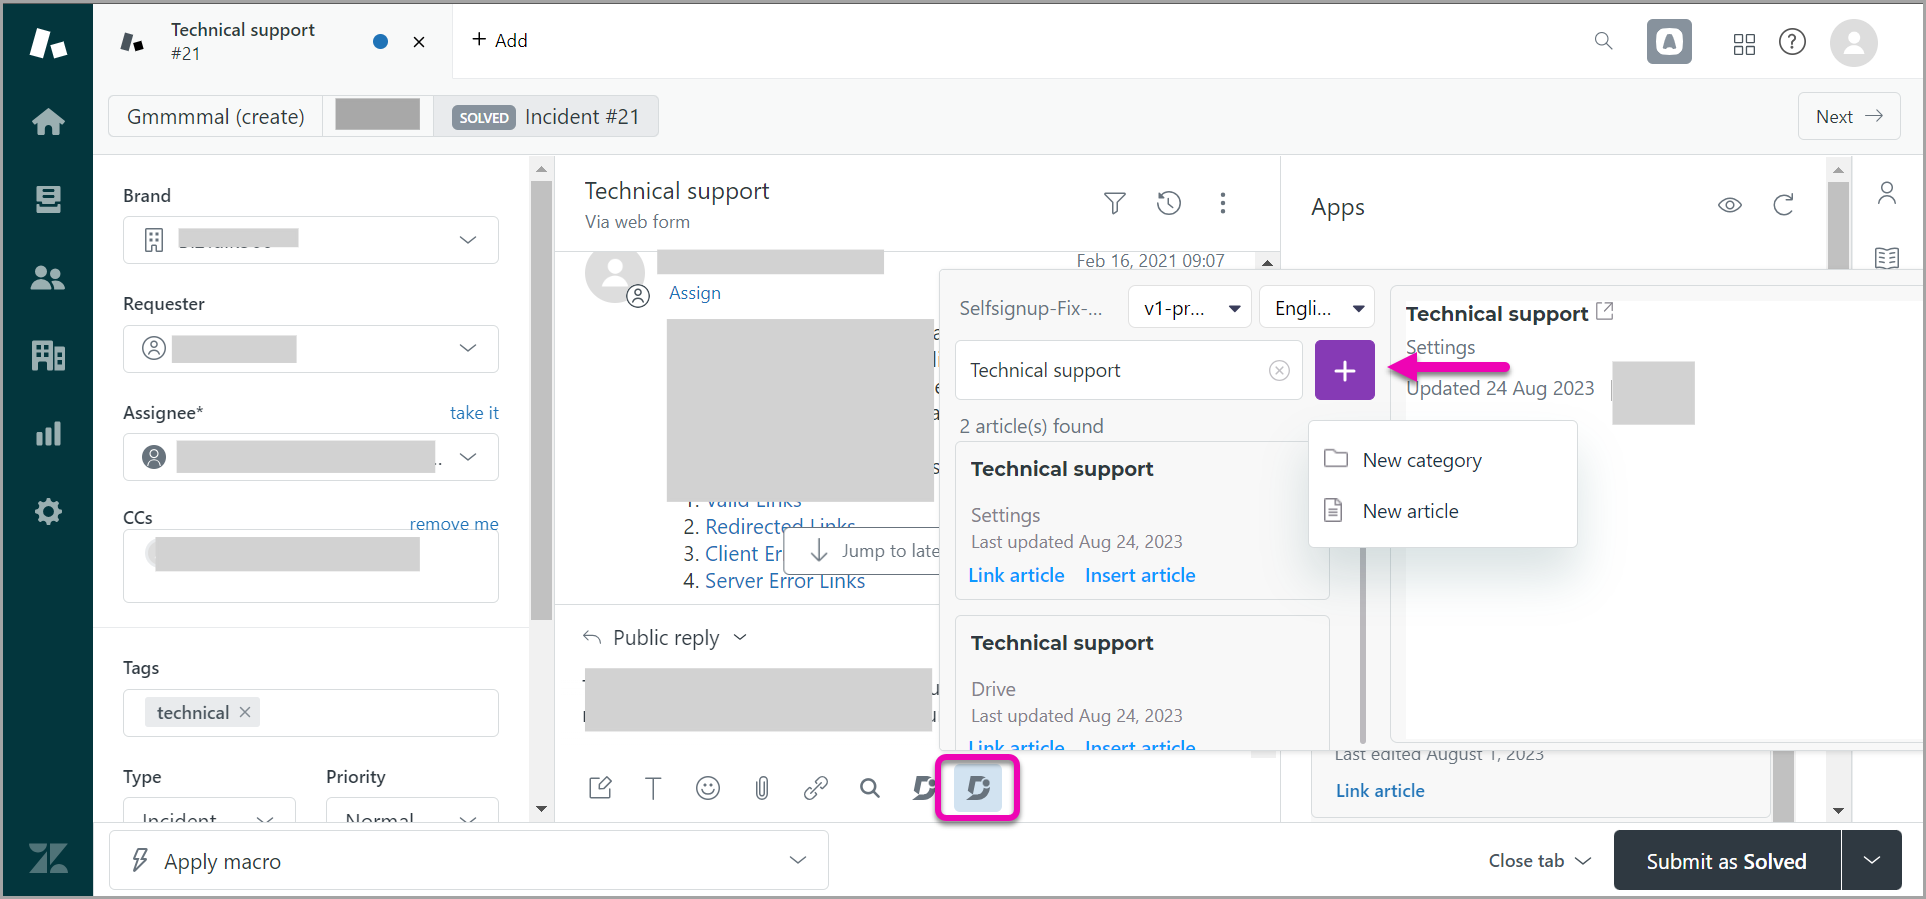
Click Create an article in the Document360 app frame or click the plus (+) icon.
Add the Title of the article and select the category or subcategory in which you want to place the new article.
NOTE
You can create root-level categories and subcategories on your knowledge base from Zendesk.
You can author the content of your article in the Markdown editor.
In the Article body editor, basic text formatting such as headings (H2 and H3), Bold, Italic, Ordered list, and Unordered list, and Insert options such as code block, Hyperlink, and Image are available.
Once done, click Create.
The article is created in a draft state, allowing your editors to review and enhance it before publishing it on the Knowledge base.
Document360 quick launch in the reply panel
In the chat controls at the bottom, click the Document360 logo represented by the D icon to open the module.
Select the Document360 workspace and language you want to refer to.
The relevant articles appear when you use the search.
From this panel, you can either:
Link article - to share the article's Document360 URL
(or)
Insert article - to insert the article's content in the responseClick the plus (+) icon to create articles for your Document360 Knowledge base from Zendesk.
Removing Document360 from Zendesk
To uninstall a configured Document360 application from Zendesk, follow the steps below:
On the Zendesk platform, from the left navigation pane, navigate to Apps and integrations > Apps > Zendesk Support apps.
The My Apps page will appear.
You can find the list of apps currently installed.
Hover over the Document360 app.
Click the settings () icon and then click Uninstall.
In the Uninstall App prompt panel, click Uninstall App.
Troubleshooting
Zendesk federated search configuration error
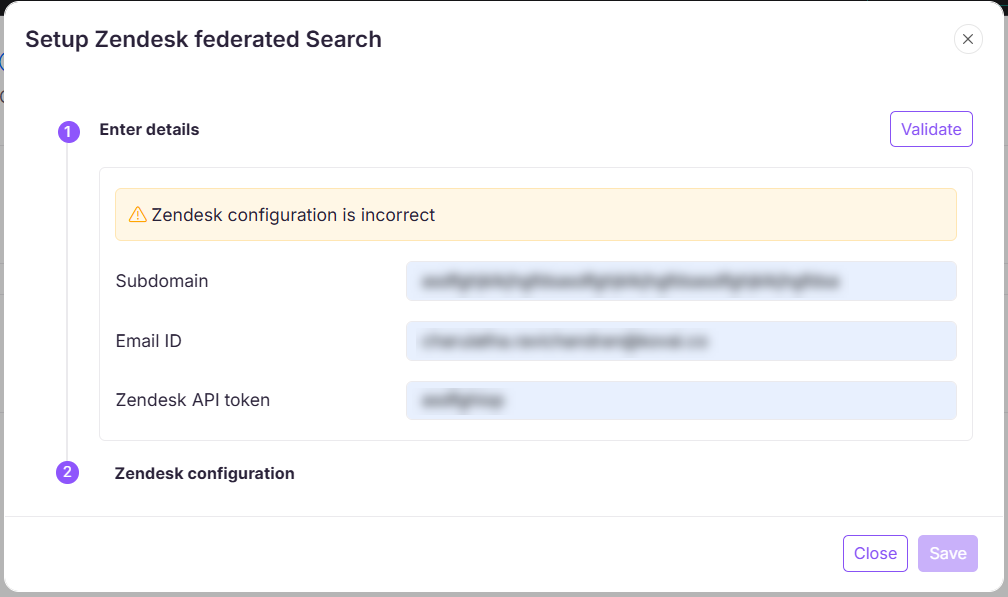
Error: Zendesk configuration is incorrect
This error might occur if your Zendesk plan does not support federated search or if the API token, email ID, or subdomain is incorrectly configured. Zendesk federated search is available only for Zendesk Enterprise and Enterprise Plus account-holding users. Ensure that your plan supports this feature by verifying your subscription with Zendesk.
Steps to resolve:
Verify your Zendesk plan: If you are not an Enterprise user, upgrade your Zendesk account to access federated search.
Check configuration details: Ensure that the API token, email ID, and subdomain are correctly entered as per the Zendesk documentation.
If you are an Enterprise plan user and still experiencing issues, reach out to Document360 support with the following details:
A screenshot of the subdomain added in both Document360 and Zendesk.
The HAR file logs to capture request details. Read the article on Generating a HAR file for more information.
FAQ
Can I push multiple articles from Zendesk to Document360 simultaneously?
You can transfer articles from Document360, but the process involves pushing articles one at a time, individually.