The Intercom helpdesk extension connects your Document360 knowledge base to Intercom, so your support agents can search, preview, and share knowledge base articles directly within the Intercom Inbox - without leaving an active conversation. When a customer reaches out through Intercom, agents no longer need to open a separate browser tab, search the knowledge base manually, and copy a link back into the chat. The Document360 app is embedded directly in the Intercom interface, putting your entire knowledge base one click away during any live conversation.
Agents can also create new knowledge base articles directly from Intercom - turning recurring support queries into documented answers without leaving the helpdesk.
This article covers the agent-side helpdesk extension for Intercom Inbox. If you want to embed your knowledge base in the Intercom Messenger for end-user self-service, refer to the Intercom chat integration article.
When to use the Intercom helpdesk extension
- Your support team uses Intercom Inbox to handle customer conversations and needs fast access to knowledge base articles while responding — without context switching.
- You want agents to share relevant articles as part of their responses rather than writing the same answers repeatedly for common questions.
- You want agents to contribute to the knowledge base directly from Intercom when they handle a query that isn't yet documented, so the answer is available for future conversations.
- You manage a multilingual knowledge base and need agents to access content in a specific workspace and language depending on the customer they're supporting.
Before you begin
- You must have an active Intercom account.
- Only an Admin or Owner in Document360 can set up the extension.
How to connect Intercom to Document360
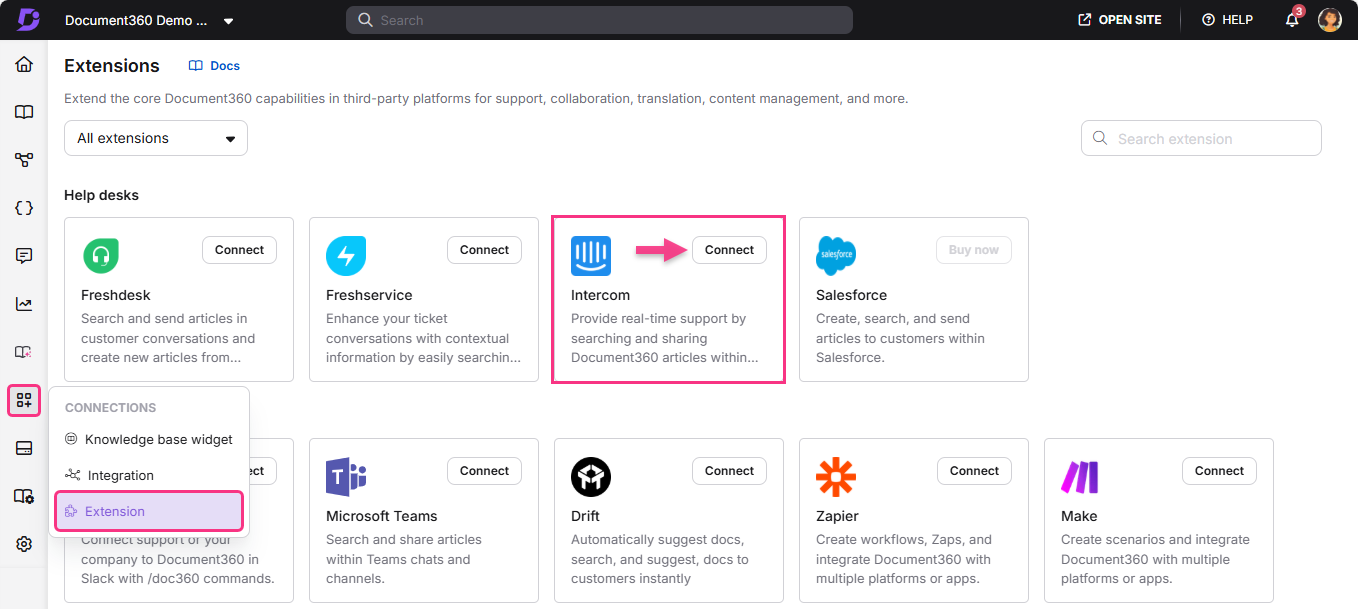
- Navigate to Connections > Extensions in the left navigation bar of the Knowledge base portal.
- Under the Help desks section, locate Intercom and click Connect.
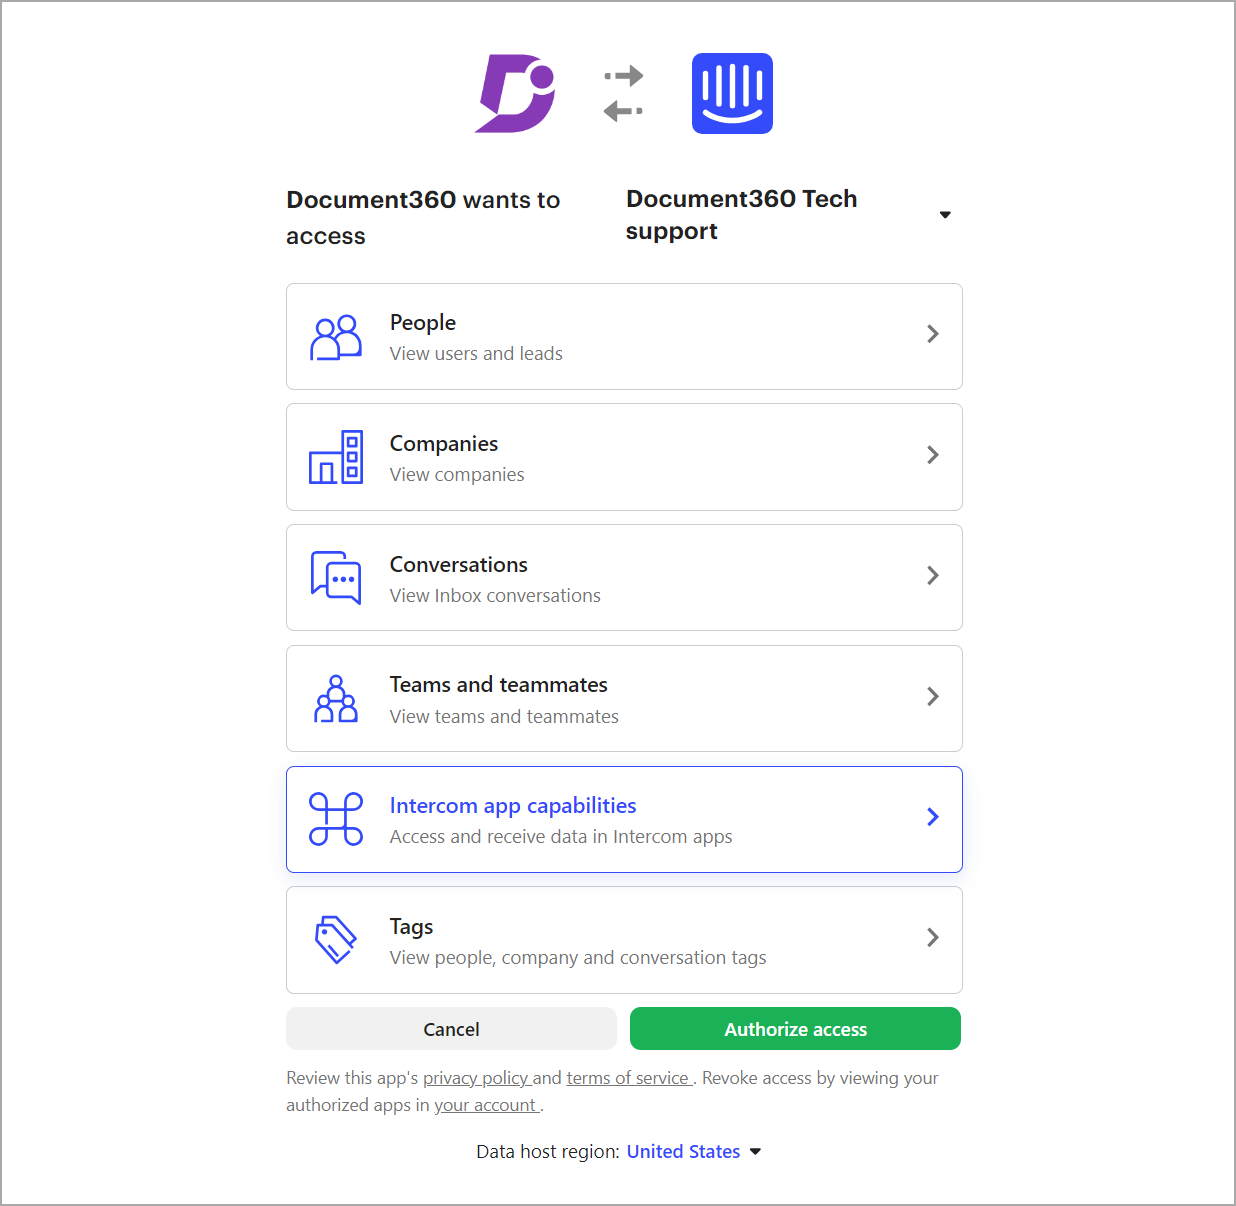
- You are redirected to Intercom. If you are not logged in, the Intercom sign-in page appears.
- On the authorization page, click Authorize access.
- You are redirected back to the Extensions page in Document360.
- Click the Edit icon on the Intercom tile.
- Choose the workspace and language from the dropdowns. The selected workspace and language are added to the Document360 app in Intercom.
How to search and share articles in Intercom
When a reader initiates a chat conversation in Intercom, you receive a notification in your Intercom workspace. From within the conversation, agents can search and share knowledge base articles without switching tabs:
- In the ticket response area, click the Document360 icon. A search panel appears.
- Type a keyword or question in the search bar and press Enter.
- The top three relevant articles from your knowledge base are listed.

- If there are more matching articles, click See more.
- Click the intended article — it is inserted into the chat as an article assistant.
- Click Send or Send and Close. The reader receives the article in the chat and can open it in a separate tab.
When an article link is shared through the Intercom chat assistant, it opens within the Intercom chat box rather than in a new browser tab.
How to create an article from Intercom
When agents handle a support query that isn't covered in the knowledge base, they can create a new article directly from the conversation — without opening the Document360 portal. The article is saved to the knowledge base immediately, making it available for future conversations.
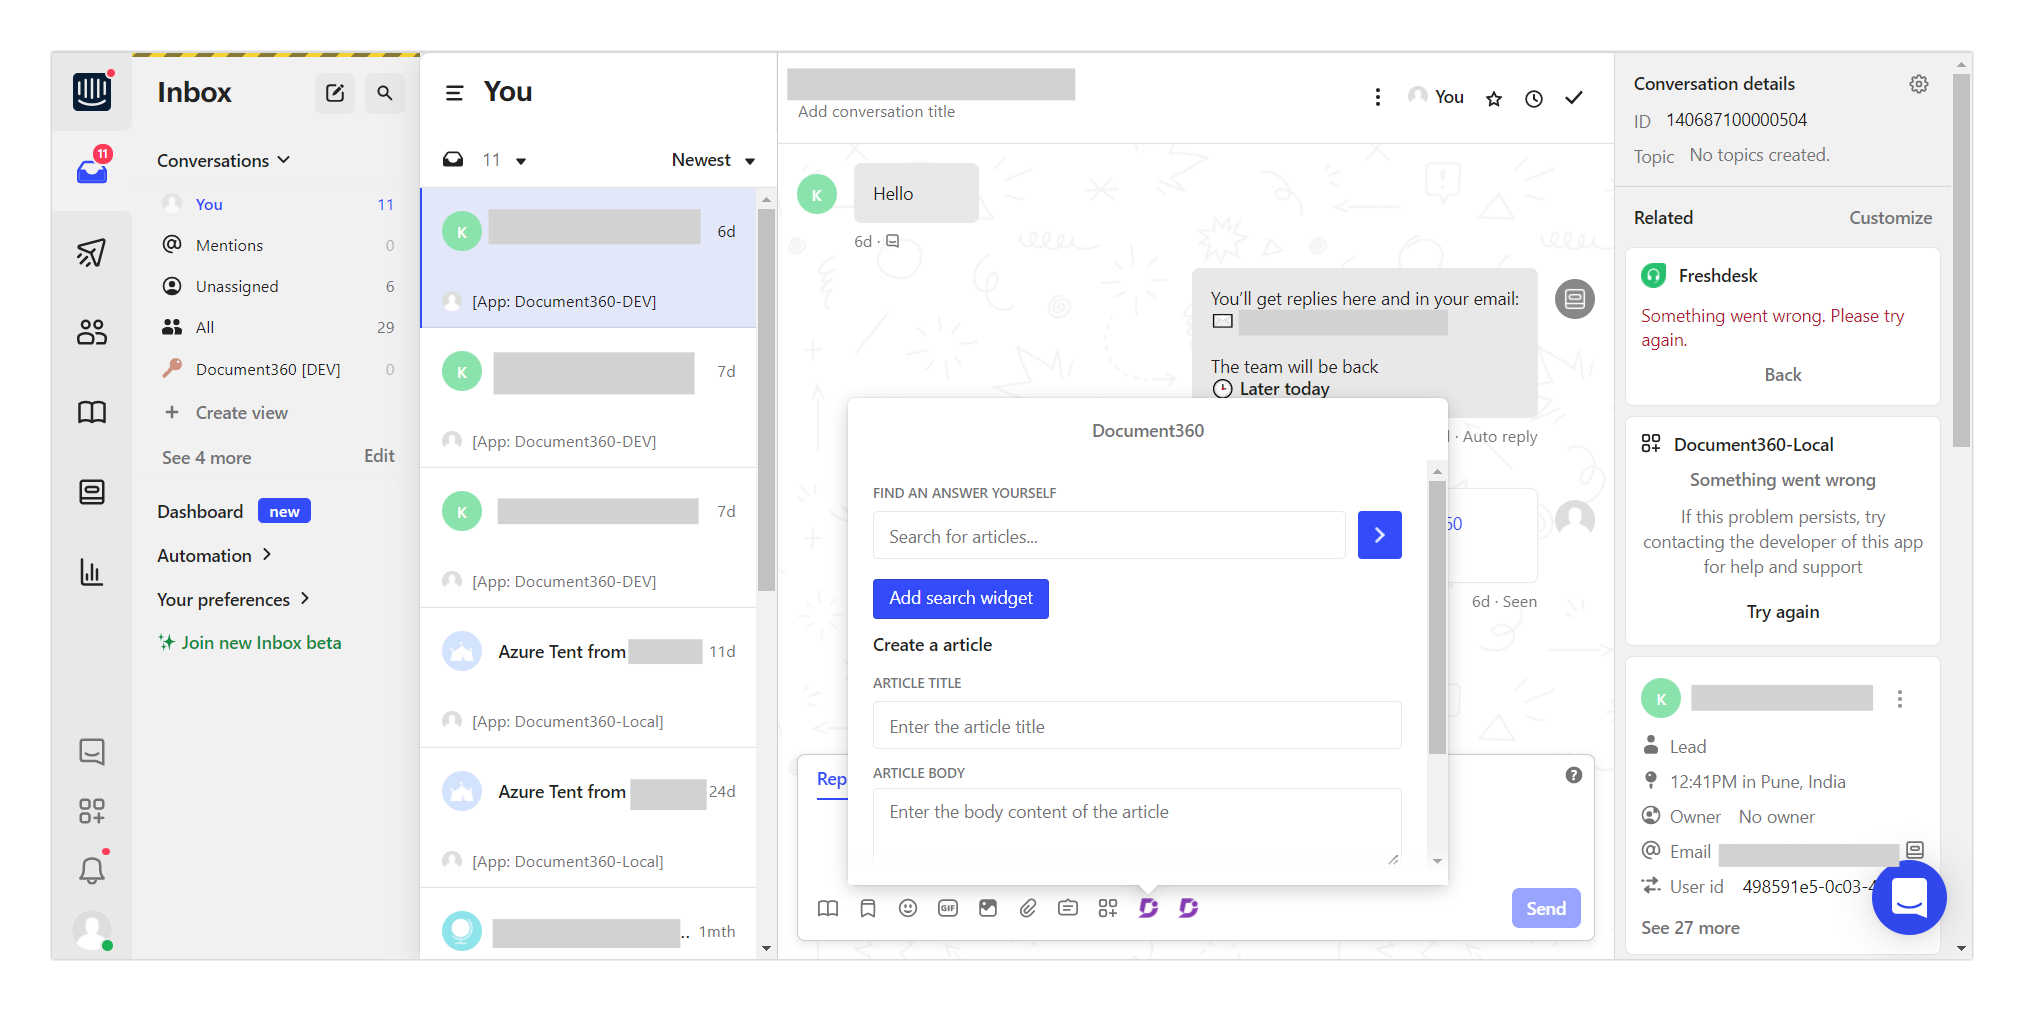
- In the chat response area, click the Document360 icon next to the Send button.
- In the app assistant panel, click Create an article.
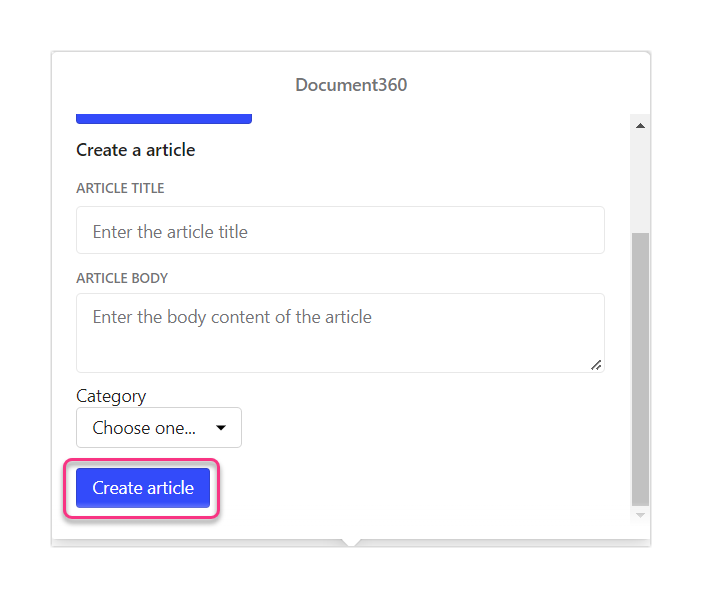
- Fill in the following fields:
- Article title — enter a title for the article.
- Article body — enter the article content.
- Category — select an existing category from the dropdown.
- Click Create article.
The article is created in your Document360 knowledge base and is available for future use.
How to disconnect Intercom
To remove the Document360 integration from Intercom:
- In Intercom, click Settings in the left navigation sidebar.
- Open the Integrations dropdown and select App Store.
- Under Manage, click Your installed apps. Locate the Document360 app.
- Click the Document360 app tile and scroll down to Uninstall.
- Click Uninstall. The integration is removed from your Document360 portal.
Best practices
- Search for articles before creating a new one. Agents often reach for Create article when a relevant article already exists — a quick search first prevents duplicate content in your knowledge base.
- Keep article titles descriptive when creating from Intercom. The title you enter becomes the article's permanent title in Document360, so "Password reset not working" is more useful than "New article".
- Assign new articles to the most specific relevant category. Broadly categorized articles are harder for other agents and readers to find later.
- Use Send and Close when sharing an article that fully resolves the conversation — it keeps your inbox clean and signals to teammates that the query is handled.
- Set the correct workspace and language in the extension settings for your team. If your agents support multiple languages, ensure they select the right workspace before searching so results match the reader's language.
- Encourage agents to share article links over copying and pasting article content into the chat. Shared links always reflect the latest version of the article, while pasted content can become outdated if the article is updated later.
FAQ
What is the difference between the Intercom helpdesk extension and the Intercom chat integration?
The helpdesk extension is for agents — it lets support staff search and share knowledge base articles inside Intercom Inbox while responding to conversations. The chat integration is for end users — it embeds your knowledge base in the Intercom Messenger so readers can search for articles themselves before contacting support. Both can be enabled independently.
Can I choose which workspace and language agents can access in Intercom?
Yes. After connecting, click the Edit icon on the Intercom tile and select the workspace and language from the dropdowns. Only content from the selected workspace and language will appear in the Intercom sidebar.
Why does a shared article open inside the Intercom chat box instead of a new tab?
This is expected behavior for articles shared via the Intercom chat assistant. When an article link is sent through the assistant, Intercom opens it within the chat box rather than in a new browser tab. This is a behavior controlled by Intercom, not Document360.
Can new categories be created from Intercom when creating an article?
No. Only existing categories are available when creating an article from Intercom. To create a new category, do so in the Document360 portal first, then return to Intercom to add the article under that category.