Plans supporting this feature: Professional Business Enterprise
You can efficiently manage users to ensure seamless collaboration. You can create new users, edit existing ones to update roles or permissions, and delete accounts that are no longer needed. Additionally, you can convert users to SSO or readers, allowing flexibility in adapting to your team’s evolving needs. Users were previously referred to as users in Document360.
NOTE
Any existing users with the relevant permissions can add or manage users and assign content or portal access.
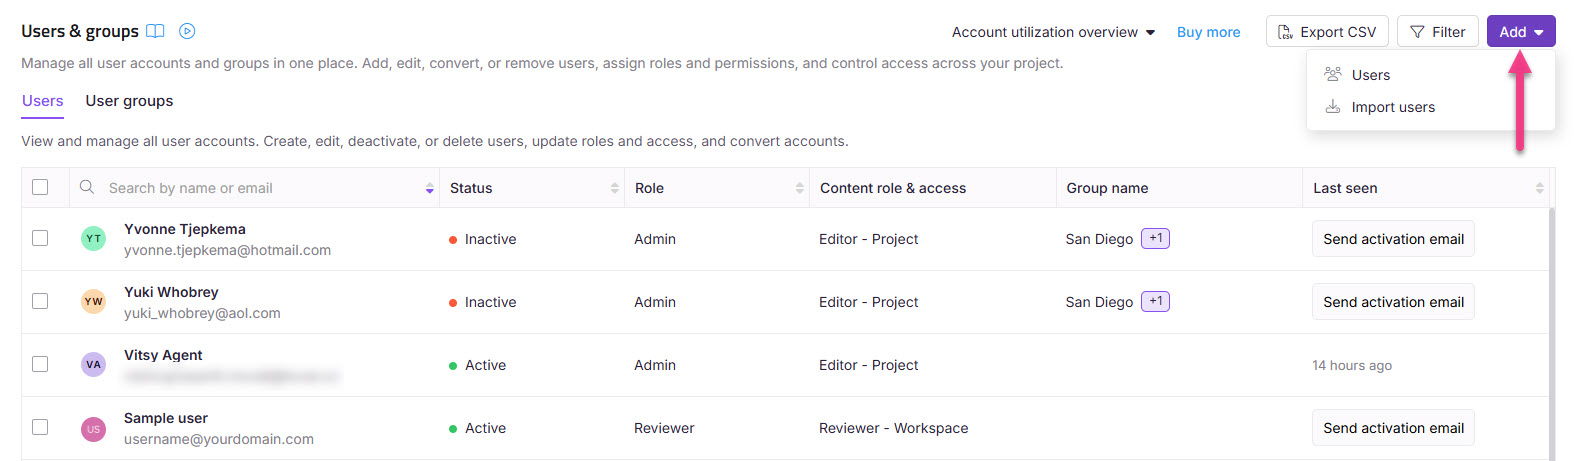
Overview of Users & groups page
To access the Users & groups page:
Navigate to Settings () Users & permissions in the left navigation bar in the Knowledge base portal.
In the left navigation pane, navigate to Users & groups > Users.
.png)
Key elements of the Users tab:
Search by name or email: Search for a user by name or email.
User list: Displays the name and email ID of all users in the project.
Status: Shows whether the account is active or inactive. An inactive status indicates the account has been deactivated.
Role: Displays the portal role, such as Owner, Admin, Contributor, or a custom role.
Content role & access: Shows the content role and content access assigned to the account.
Group name: If the account belongs to a group, the group name will be displayed.
Last seen: Displays when the user was last active. For inactive users, an option to send an activation email will be displayed.
Select the desired user, and the following options will appear:
Convert to SSO account: Convert the User to an SSO account.
Convert to reader account: Convert the User to a reader account.
Deactivate/Activate: Deactivate/activate the user. Furthermore, you can also choose to convert the user to reader or delete the user.
Hover over a User to access:
Email notifications (): View the email activity history for the past 30 days.
Edit (): Edit the configuration of the user.
Other elements:
Account utilization overview: Shows how many users are allowed under your plan and how many have been created.
Export CSV: Export the list of Users as a CSV file.
Filter: Use filters to narrow results by portal type, account types, or status.
Add: Add a new User.
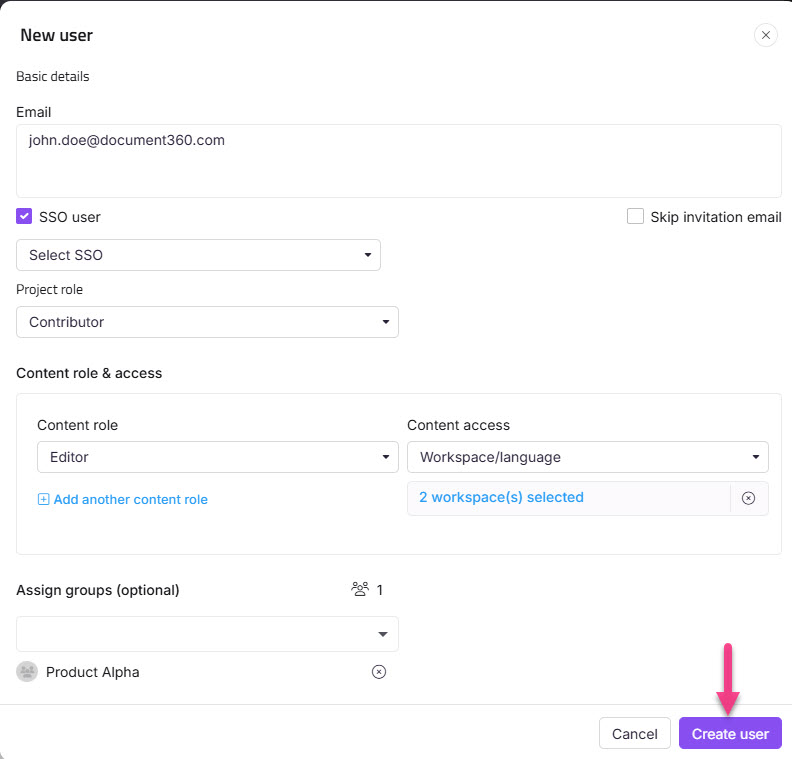
Adding a new User
To add one or more users to your project,
Navigate to Settings () > Users & permissions in the left navigation bar in the Knowledge base portal.
In the left navigation pane, navigate to Users & groups > Users.
Click Add > User to open the New user dialog.
In the Email field, enter the email addresses of the accounts you wish to add.
NOTE
You can add up to five email addresses separated by commas.
Select the SSO user checkbox to add the user as an SSO user.
If you selected the SSO user checkbox, select an SSO configuration from the Select SSO dropdown menu.
Select the Skip invitation mail checkbox, if you don't want your new users to receive an invitation email.
Choose the desired Project role for the new accounts.
Admin: Have access to all features except billing. They can manage users, projects, and configurations.
Contributor: Create, edit, and publish draft articles and category pages.
Reviewer: Can log in to the knowledge base portal to access any articles assigned to them for review.
Custom role: Create roles with specific permissions based on your needs.
NOTE
You cannot choose individual portal roles for each email you enter in the Email field.
Select the desired Content role for the new users.
Draft Writer: Can create and edit articles and category pages, but cannot publish them.
Editor: Manage articles, categories, drives, workflows, and content reuse.
Reviewer: Can add comments to articles, update the workflow status, and set due dates for workflow statuses.
None: No specific content role assigned initially. This can be changed later as needed.
NOTE
You can assign multiple content roles to control access by selecting Add another content role. If no content role is selected, the user is assigned None by default.
Choose the level of content access you want for the Content role.
None: Select this option if the user should not have access to any knowledge base content.
All: Choose this option to grant access to all knowledge base content across all workspaces and languages.
Workspace/Language: Restrict access to content within specific workspaces and languages. Users will only be able to view content designated for these selections.
Category: Limit access to certain categories within specified workspaces and languages. Users will have access only to content categorized under selected categories.
Finally, assign groups for the new users from the Assign groups dropdown. This field is optional. You can also add users without associating them with any group.
Once done, click New user.
Importing Users
You can use the Import users feature to add more than five accounts at once. To add new users to your project:
Navigate to Settings () > Users & permissions in the left navigation bar in the Knowledge base portal.
In the left navigation pane, navigate to Users & groups > Users.
Click Add > Import users to open the Import users panel.
Select the SSO user checkbox to add the user as an SSO user.
If you selected the SSO user checkbox, select an SSO configuration from the Select SSO dropdown menu.
Download the CSV file template by clicking the Download template option.
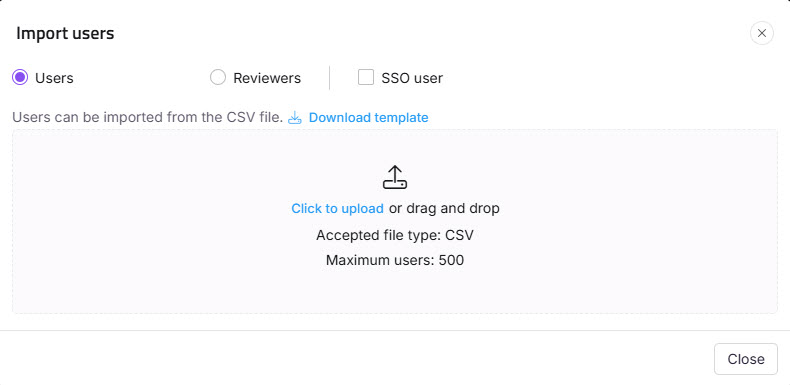
Open the downloaded CSV file in a local application such as MS Excel.
Enter the new account emails and first and last names.
Save the CSV file, then click Click to upload in the dialog. You can also drag and drop the file into the designated drop frame.
The data will be validated, and the Valid emails and Invalid emails will be listed in the Validation summary table.
Click the Skip invitation mail checkbox if you don't want your new users to receive an invitation mail.
Assign the Portal role, Content role, Content access, and Group for the imported Users using the respective dropdown.
Click the Import button.
Managing Users
Editing a user
To edit the configuration of a user, follow the steps below:
Navigate to Settings () > Users & permissions in the left navigation bar in the Knowledge base portal.
In the left navigation pane, navigate to Users & groups > Users.
Hover over the desired user and click the Edit () icon.
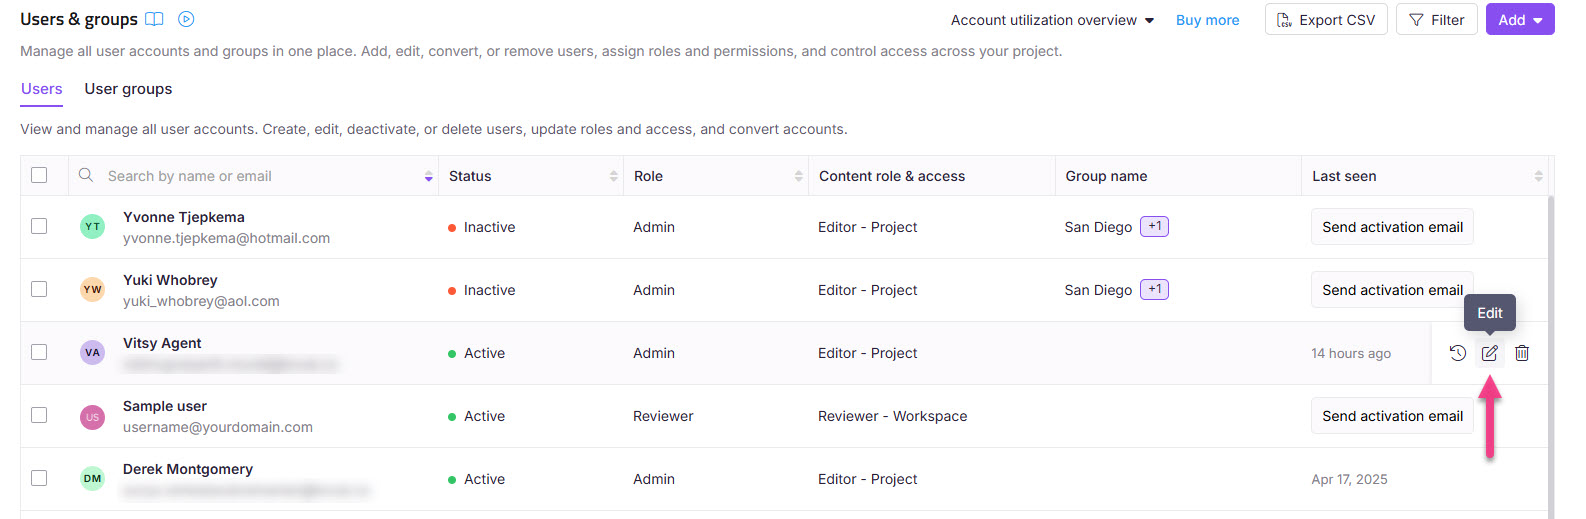
To update the portal role:
Click Manage project role.
Select the desired portal role in the Edit user panel.
Click Update.
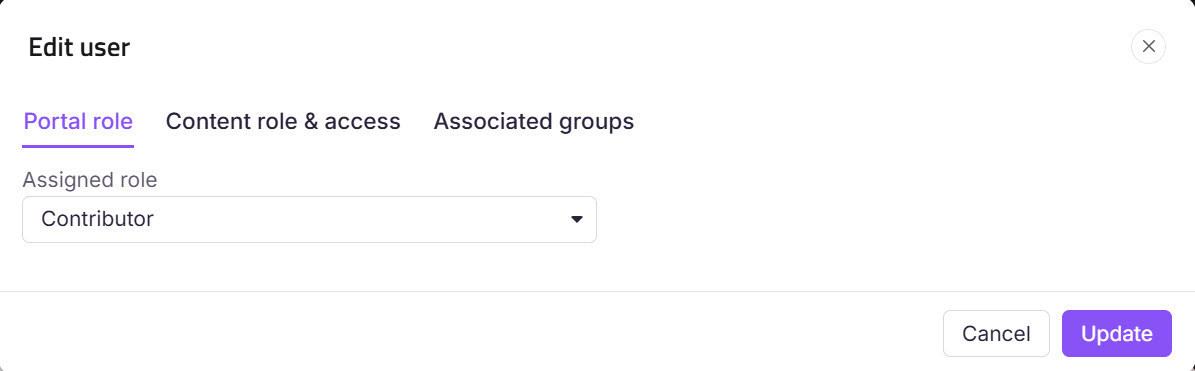
To update content access permission:
Click Manage content roles & permissions.
Select the desired Content role and Content access in the Edit user panel.
Click Update.
NOTE
For users, access is inherited, allowing them to view both categories and subcategories unless access is explicitly restricted.
Deleting a user
Delete a user using one of two methods:
Navigate to Settings () > Users & permissions in the left navigation bar in the Knowledge base portal.
In the left navigation pane, navigate to Users & groups > Users and select the desired user.
In the user profile details page, click the Delete icon and select Yes in the confirmation dialog.
.png)
Or, alternatively select the checkbox of the user, and click Deactivate and a dialog box will appear.
Select the Delete user radio button and click Delete to delete the user.
.png)
NOTE
Bulk selection of both Active and Inactive users will not display the Deactivate button.
Bulk selection of only Inactive users will display only the Activate and Delete button.
NOTE
Role-based Restrictions
Admins cannot delete nor edit Owners, but can delete other roles.
Owners can delete Admins, Contributors, and Readers.
Owner cannot be deleted if it is the last remaining one.
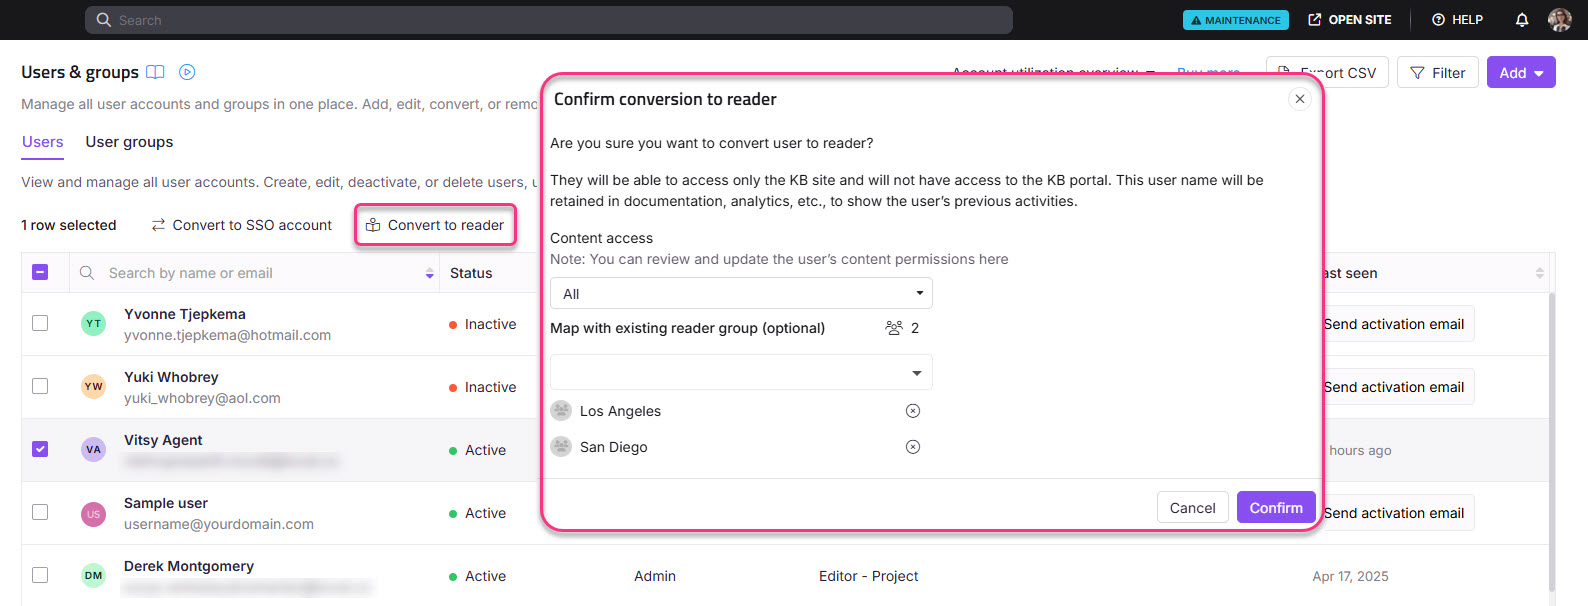
Converting Users to readers
To convert a user to a reader:
Navigate to Settings () > Users & permissions in the left navigation bar in the Knowledge base portal.
In the left navigation pane, navigate to Users & groups.
Select one or more Document360 users (non-SSO) and click Convert to reader.
Or, alternatively, you can select the desired user, click Deactivate and select Convert to reader in the dialog box.
NOTE
If you select an SSO user when converting users to readers, the user will be converted to an SSO Reader.
Assign the desired content access permissions from the Content access dropdown.
As an optional step, map the user to any existing reader groups from the Map with existing reader group dropdown.
Click Confirm to convert the User to a Reader.
NOTE
When a user is converted to a reader, all contributions made while they were in the user role will be retained.
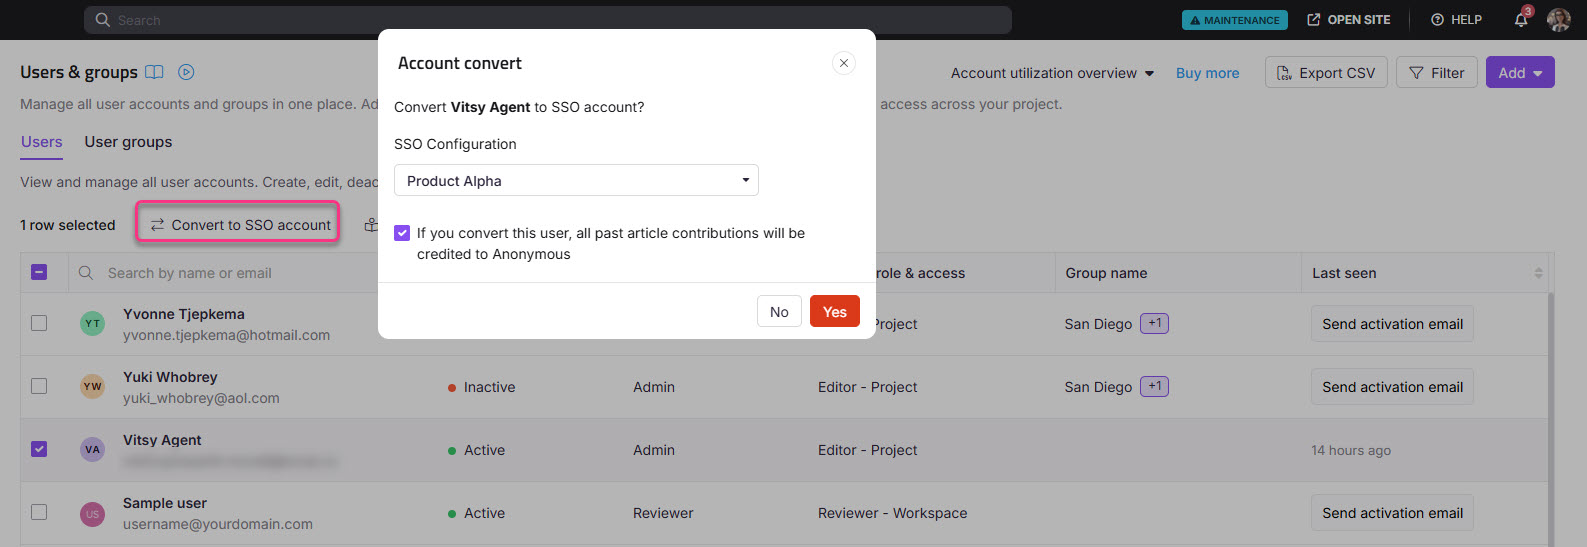
Converting users to SSO
To convert a user to an SSO account:
Navigate to Settings () > Users & permissions in the left navigation bar in the Knowledge base portal.
In the left navigation pane, navigate to Users & groups > Users.
Select one or more Document360 users (non-SSO) and click Convert to SSO account.
From the Select SSO dropdown, choose an SSO configuration.
Click Proceed.
The SSO accounts are identified by an SSO badge displayed next to their name.
NOTE
If you convert a user to SSO account, all the past article contributions will be credited to Anonymous.
Deactivating and reactivating a user
To deactivate a user, follow the steps below:
Navigate to Settings () > Users & permissions in the left navigation bar in the Knowledge base portal.
In the left navigation pane, navigate to Users & groups > Users.
Select the desired user and click Deactivate at the top. The Confirm user deactivation panel will appear.
Click Deactivate user to deactivate the user.
NOTE
You can deactivate any standard, SSO user or reader accounts.
Deactivated accounts lose access to the portal but retain their data in documentation, analytics, etc.
Deactivation will take effect only after the current SSO session ends. The SSO user will remain signed in until the session resets.
.png)
To reactivate a deactivated user, follow the steps below:
Select one or more deactivated users.
Click Activate.
Click Confirm in the Confirm user activation panel.
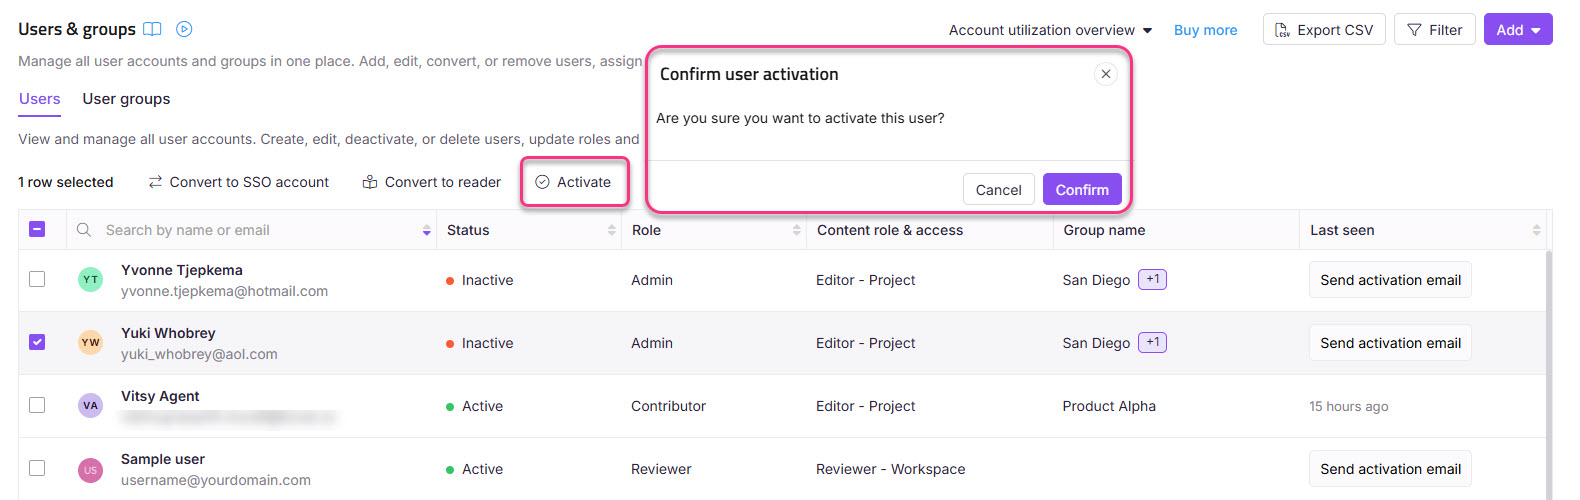
NOTE
If reactivating a deactivated user exceeds your user limit, the Exceeding user limit panel will appear. You can either remove existing active users or purchase additional users as add-ons.
Filter and export user information
There are three buttons found at the top of the list: Filter, Export, and Create.
Filtering Users
To narrow down the list of users:
Click the Filter icon.
Use the following parameters to refine your search, then click Apply:
Portal role: Select all, Admin, Contributor, Owner, Reviewer, Custom role.
Status: All, Active, Inactive.
Account types: Select All, Document360 User, SSO User.
.png)
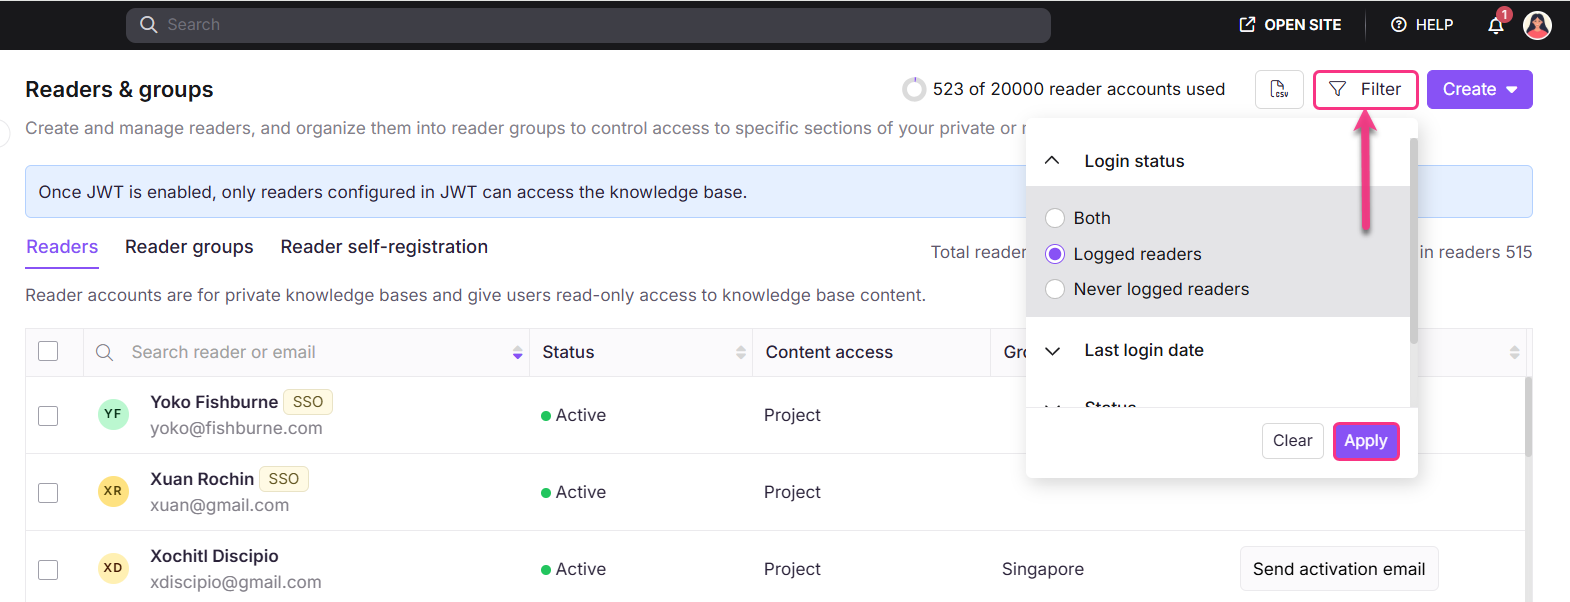
Filtering Readers
To narrow down the list of users:
Click the Filter button.
Use the following parameters to refine your search, then click Apply:
Login status: Both, Logged readers, and Never logged readers.
Last login date: All, 7 days, 30 days, 3 months, 1 year, and Custom date.
Status: All, Active, Inactive.
Account types: Select All, Document360 User, SSO User.
Exporting users
Click the Export button to download the filtered list of users as a CSV file to your device's local storage.
.png)
Purchase more users
If you need more users than your current plan offers, you can buy them as an add-on. The total number of available users and the total number of used users are displayed at the top of the page.
Click Upgrade your plan.
The Choose your plan and billing cycle page will appear.
Enter the number of users required or use the plus (+) icon and the minus (-) icon to select the number.
The total cost is displayed below.
Click Confirm payment, and an Email with the purchase information will be sent.
NOTE
For more information, read the article on Purchasing add-ons.
Troubleshooting
Encountering an error while adding a user
Error: Error adding following emails
This error typically occurs due to one of the following reasons:
Unsupported characters in the email address
Document360 only supports email addresses that include standard characters. Among special characters, only underscore (_) and hyphen (-) are allowed.Example:
Trying to addtom&34@barny.comwill result in an error because the ampersand (&) is not a supported character.Email already associated with a Reader SSO account
If the email ID you’re trying to add as a user is already linked to a Reader SSO account, the system will block the addition and display the same error message.
Steps to resolve:
Ensure the email address does not contain special characters other than underscore (
_) and hyphen (-)Update the email address to follow standard email formatting
Retry adding the user or the reader with the corrected email
Confirm that the email is not already used in a Reader SSO account
FAQ
Is it possible to assign a user who is already assigned to a reader account?
In Document360, a user cannot hold both a reader and a user role at the same time. However, you can convert between these roles efficiently.
To convert a user to a reader
Navigate to Settings () > Users & permissions in the left navigation bar in the Knowledge base portal.
In the left navigation pane, navigate to Users & groups.
Select the desired user and click Convert to reader.
Choose the appropriate Content access, then click Confirm to complete the process.
To convert a reader to a user
Navigate to Settings () > Users & permissions in the left navigation bar in the Knowledge base portal.
In the left navigation pane, navigate to Users & groups > Users.
Readers & groups.
Select the desired reader and click Convert to user.
Choose the appropriate project role, content role, and content access.
Once done, click Confirm.
Why am I unable to add a user to Document360?
This usually occurs when the user is already part of the project in a different role, such as a Reader (SSO Reader), Reviewer, or an existing user. In such cases, you won’t be able to add the same email address again as a new user.
To resolve this, check if the user exists under Readers and groups. If they are listed as a Reader, you can convert them to a user with the desired access. If the user is assigned as a Reviewer, remove them from that role before assigning them the appropriate role and content access. Also, ensure the email ID entered is valid and free of typos.
Who can add or delete a user?
Admins and Owners of the project can delete a user. Those with the Manage users permission can also add users.
Only an Owner can add or reassign another Owner.
Admins can add users, but cannot add or assign the Owner role.
Can I update a user's email ID in the project?
No, you cannot update the email ID of other users in your project.
Who can change the access permissions for a user?
Users with Admin or Owner portal roles in a project can change the access permissions for a user.
Users with the Manage users permission can also change the access permissions for a user.
Users cannot change their access permissions.
Why do I get an ‘Error verification error’? How do I resolve this error?
You will get this error when you click an expired project invitation link. The activation email usually expires in 24 hours. Project Owner(s) and Admin(s) can resend the activation mail.
Navigate to Settings () > Users & permissions in the left navigation bar in the Knowledge base portal.
In the left navigation pane, navigate to Users & groups.
Under the Users tab, you can view the existing users in the project.
Hover the mouse pointer over the user to whom you want to send a project activation email. The Send activation mail icon appears on the right.
Click the Send activation mail icon, and the activation mail will be sent to the user's email.
How do I create a user who can only manage content reuse?
Create a custom content role to grant a user permission to manage content reuse, such as variables, snippets, glossaries, and templates, exclusively.
Creating a custom content role
Navigate to Settings () > Users & permissions in the left navigation bar in the Knowledge base portal.
In the left navigation pane, navigate to Roles & permissions.
In the Content role tab, click New content role.
The Create content role panel will appear.
Enter the desired role name and description.
In the Features section, scroll down to Content reuse and select the checkboxes for View, Update, Delete, and Publish.
Click Create role.
NOTE
For more information, read the article on Roles and permission.
Creating a user to manage content reuse only
Navigate to Settings () > Users & permissions in the left navigation bar in the Knowledge base portal.
In the left navigation pane, navigate to Users & groups.
In the User tab, click Add and select User.
The New user dialog will appear.
Enter the email address for the user. Enter the email IDs separated by a comma. You can add up to 5 email addresses at once.
Select the SSO user checkbox to add the user as an SSO user.
Set the Project role to Contributor.
In the Content role field, select the custom content role you just created.
If needed, restrict Content access by selecting None, or select All for full access to content reuse.
Click New user.
This will create a user who can view, update, and delete content reuse elements only.
How do I create a user that can only manage users & security settings?
You can create a custom portal role to grant a user permission to manage Users & Security exclusively.
Creating a custom portal role
Navigate to Settings () > Users & permissions > Roles & permissions in the Knowledge base portal.
In the Portal role tab, click New portal role.
The Create portal role panel will appear.
Enter the desired role name and description.
In the Features section, scroll down to Roles, Accounts & groups and Site visibility, select the View and Update checkboxes.
Then, the View option in Project settings will be selected by default.
Click Create role.
NOTE
For more information, read the article on Roles and permission.
Creating a user to manage users & security only
Navigate to Settings () > Users & permissions > Users & groups in the Knowledge base portal.
In the Users tab, click Add and select User.
The New user dialog will appear.
Enter the email address for the user.
In the Project role section, select the custom portal role you just created.
Select your desired Content role.
Click New user.
This will create a user who can only view and update the Users & permissions section.
Updating an existing user to manage users & security only
After creating the custom portal role for managing Users & Security section:
Navigate to the Settings () > Users & permissions > Users & groups in the Knowledge base portal.
Hover over the desired User and click the Edit () icon.
In the Project role section, click Manage project role.
Select the previously created custom portal role in the Portal role tab.
Click Update.
This updates the user, restricting its permissions to view and update the Users & permissions section only.
How do you add a user with edit access to one Category and read-only access to the rest?
You can achieve this by creating a custom content role and assigning appropriate permissions to the user.
Creating a custom content role
Navigate to Settings () > Users & permissions in the left navigation bar in the Knowledge base portal.
In the left navigation pane, navigate to Roles & permissions.
Under the Content role tab, click New content role.
In the Create content role panel:
Enter the desired role name and description.
In the Features section, select the View checkbox for Categories and Articles.
Click Create role.
NOTE
For more information, read the article on Roles and permission.
Creating a user with specific permissions
Navigate to Settings () > Users & permissions in the left navigation bar in the Knowledge base portal.
In the left navigation pane, navigate to Users & groups > Users.
Click Add and select User.
In the New user panel:
Enter the email address for the user.
Select the appropriate Project role.
In the Content role & access section:
Content role: Select Editor from the dropdown.
Content access: Choose Category and select the desired category/categories you want the user to edit.
Click Add another content role to set read-only access for other categories:
Content role: Select the custom content role created in Step 1.
Content access: Choose the desired category/categories that the user can view only.
Click Create user.
This creates a user with edit access to specific categories and read-only access to the remaining categories.
Updating an existing user
Navigate to Settings () > Users & permissions in the left navigation bar in the Knowledge base portal.
In the left navigation pane, navigate to Users & groups > Users.
Hover over the desired User and click the Edit () icon.
In the Content role & access section, click Manage content roles & permissions.
Assign two content roles as follows:
Editor role: Assign this to categories that the user should edit.
Custom content role: Assign this to categories that the user should only view.
Select the respective categories for each role and click Update.
This updates the user to have edit access for specific categories and read-only access to the remaining categories.
Why can’t I access the invitation email link?
If you’re seeing the error message Email verification failed when trying to activate your account, it usually means the invitation link has expired.
The activation link is valid for 7 days from the time it is sent.
If the link has expired, you will not be able to activate your account with that email.
How to fix it:
Contact your project owner.
Ask them to resend the activation email from the Knowledge Base portal.
Use the new link to activate your account within the 7-day validity period.