You can easily manage readers on the Readers & groups page. It allows you to add new readers, edit or delete existing ones, and even convert readers to users. You can also control what content readers can access, deactivate or activate accounts, and filter or export reader details.
Managing a Knowledge base requires seamless access control and efficient account management. Flexible user roles allow you to grant access to relevant content while protecting sensitive information. As needs evolve, you can easily upgrade readers to contributors, ensuring a smooth transition. For audits or reporting, filtering and exporting user details help analyze activity and optimize permissions. This streamlined approach keeps your Knowledge base organized and accessible.
NOTE
You can add and manage Readers and Reader groups only if your Document360 project’s Reader access is set to Private or Mixed.
Overview of Readers & groups page
Navigate to Settings () > Users & permissions in the left navigation bar in the Knowledge base portal.
In the left navigation pane, navigate to Readers & groups > Readers.
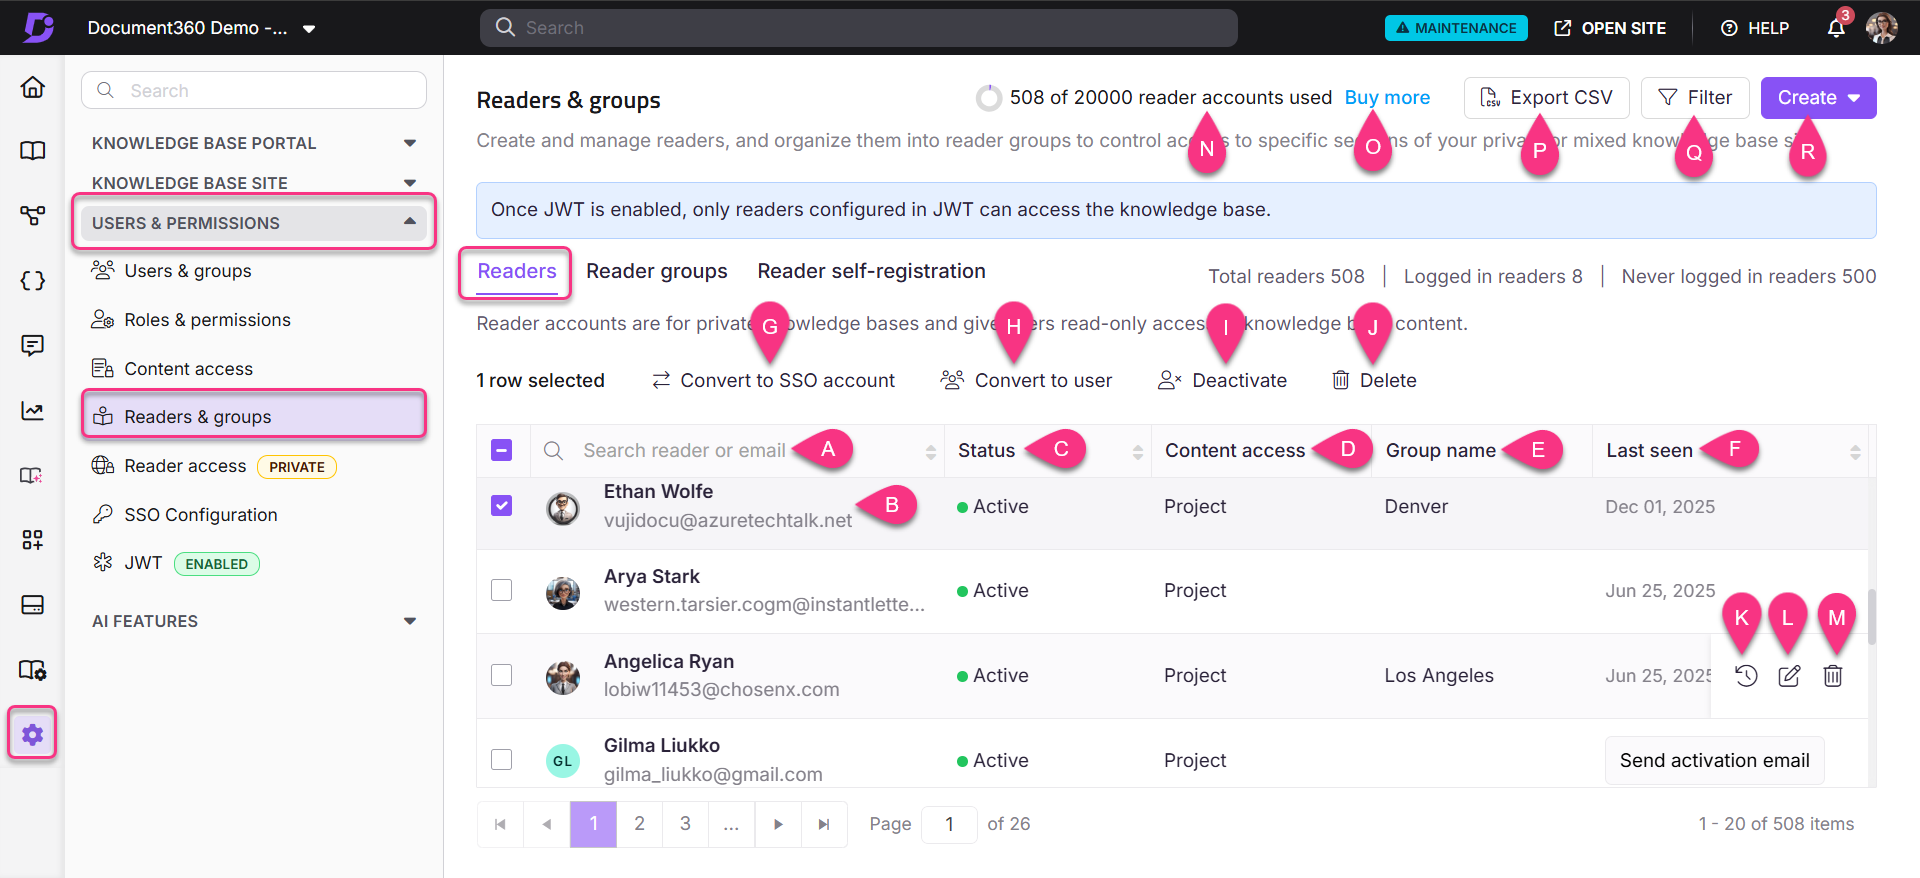
Key elements of the Readers page:
Reader search: Search for a reader by name or E-Mail
Reader list: Displays all readers for the project.
Status: Shows whether the account is active or inactive. An inactive status indicates the account has been deactivated.
Content role & access: Shows the content role and content access assigned to the account.
Group name: If the account belongs to a group, the group name will be displayed.
Select the desired reader, and the following options will appear:
Last seen: Displays the date when the reader last accessed the knowledge base site.
Convert to SSO account: Convert the reader to an SSO account.
Convert to user: Convert the reader to user.
Deactivate/Activate: Deactivate or activate the reader.
Delete: Delete a reader.
Hover over a reader to access:
Email notifications (): View the E-Mail activity history for the past 30 days.
Edit (): Edit the configuration of the reader.
Delete (): Delete the reader.
Other features:
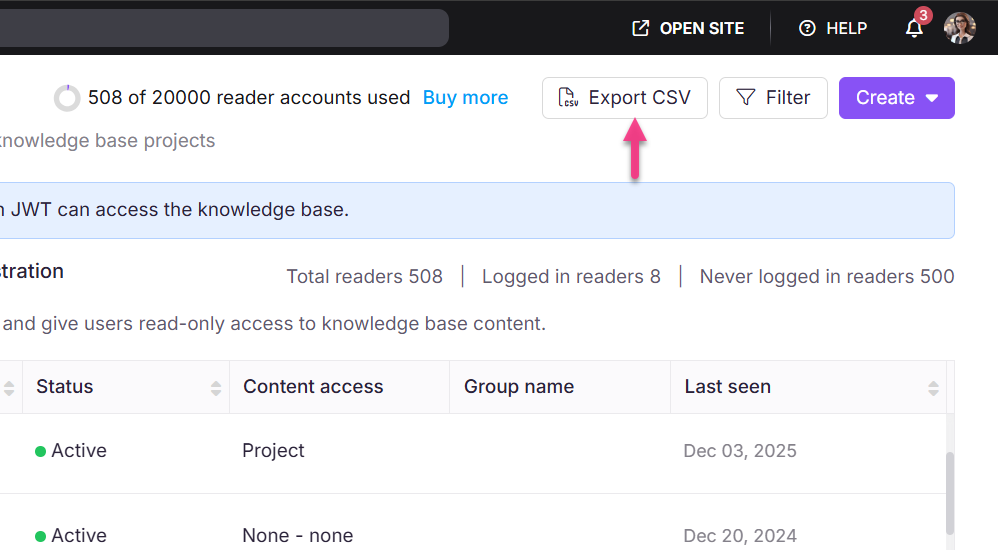
Reader account utilization: Shows the total reader accounts included in your plan and how many are currently in use.
Buy more: Purchase additional reader accounts when you need more access.
Export CSV: Export the list of readers as a CSV file.
Filter: Use filters to narrow results by Login status, Last login date, Account types, or Status.
Create: Create a new reader.
Creating a new reader
To create a new reader:
Navigate to Settings () > Users & permissions in the left navigation bar in the Knowledge base portal.
In the left navigation pane, navigate to Readers & groups > Readers.
Click the Create dropdown at the top right and choose New Reader to open the Create reader account panel.
In the Email field, enter the desired E-Mail addresses of the accounts you wish to add.
NOTE
You can add up to 5 emails separated by a comma at the same time.
Select the SSO user checkbox to add the reader as an SSO user.
If you selected the SSO user checkbox, select an SSO configuration from the Select SSO dropdown menu.
Click on the Skip invitation mail checkbox if you don't want your new readers to receive an invitation mail.
Select the desired Content access for the new readers.
In Assign groups, you can assign the readers to any existing Reader groups. This field is optional.
Once done, click Create reader account.
NOTE
Users with Admin and Owner portal roles in a project can add and delete a reader. Also, custom roles with Manage user permission can also add readers.

Importing readers
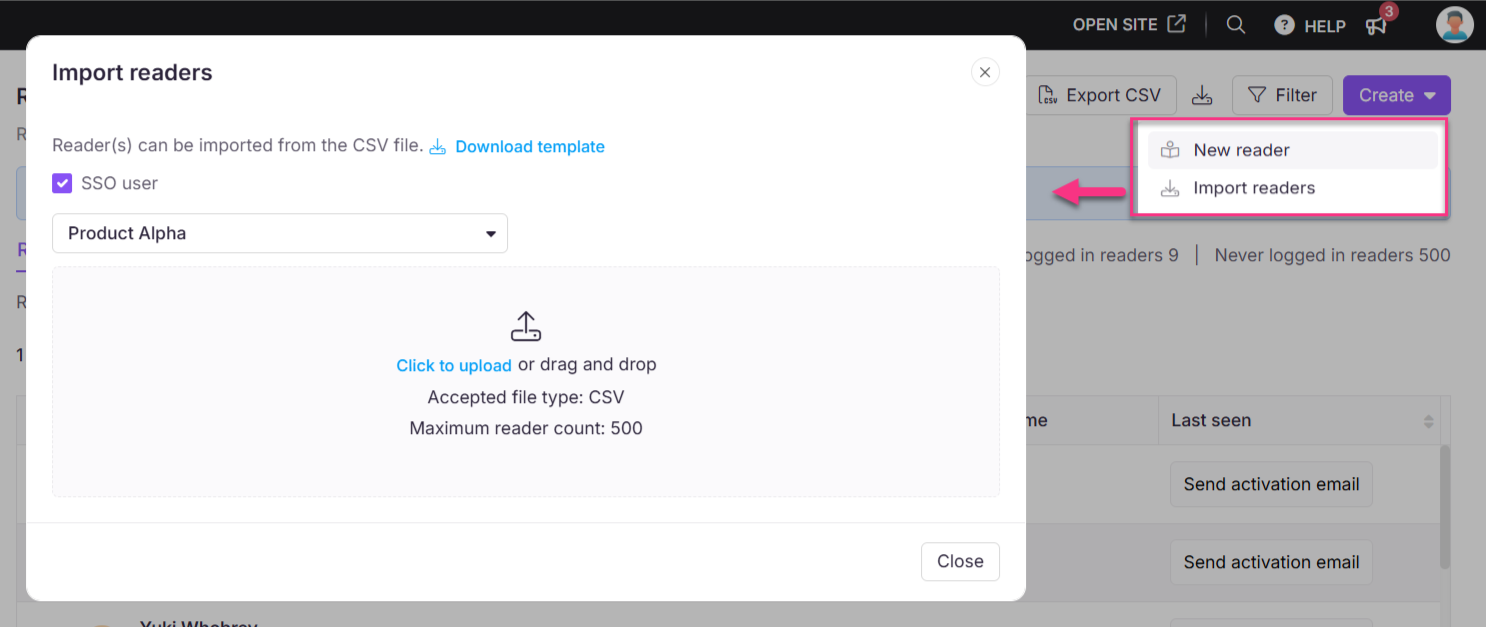
You can use the Import readers feature to add more than five readers in one go. (maximum of 500 readers)
Navigate to Settings () > Users & permissions in the left navigation bar in the Knowledge base portal.
In the left navigation pane, navigate to Readers & groups > Readers.
Click the Create dropdown at the top right and choose Import readers to open the Import reader panel.
Select the SSO user checkbox to add the reader as an SSO user.
If you selected the SSO user checkbox, select an SSO configuration from the Select SSO dropdown menu.
Download the CSV file template by clicking the "Download template" option.
Open the downloaded CSV file in a local application, such as Microsoft Excel, and enter the new account emails and first and last names.
Save the file and upload the CSV file in the Document360 panel by clicking on Click to upload. You can also drag and drop the file into the designated drop frame.
The data will be validated, and the Valid emails and Invalid emails will be listed in the Validation summary table.
Click on Skip invitation mail if you don't want your new users to receive an invitation mail.
Assign the Content access and Group for the imported readers using the respective dropdown.
Click the Import button.
Managing readers
Editing a reader
To edit the configuration of a reader:
Navigate to Settings () > Users & permissions in the left navigation bar in the Knowledge base portal.
In the left navigation pane, navigate to Readers & groups > Readers.
Hover over the desired reader and click the Edit () icon.
A page will appear with detailed information.

Hover over the reader name and click the Edit icon to configure basic details such as the first name and last name.
You can view the Last active date and Reader account created date under the reader name.
Click Manage content access to manage content access for the reader.
Select the desired content access:
None: Cannot access any Knowledge base content.
All: Can access all Knowledge base content in any workspace and language.
Workspace/Language: Can access content in specific workspaces and languages.
Category: Can access certain categories in specific workspaces and languages.
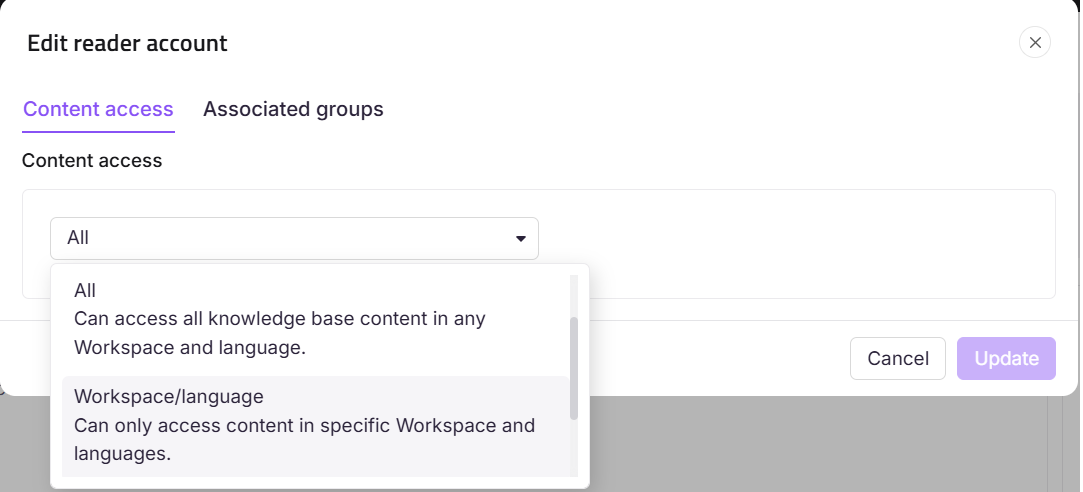
Click Update.
In the Associated groups tab, add the reader to any reader groups.
NOTE
Readers can only see the specific categories they are given access to and do not get automatic access to parent categories or other levels of sub-categories.
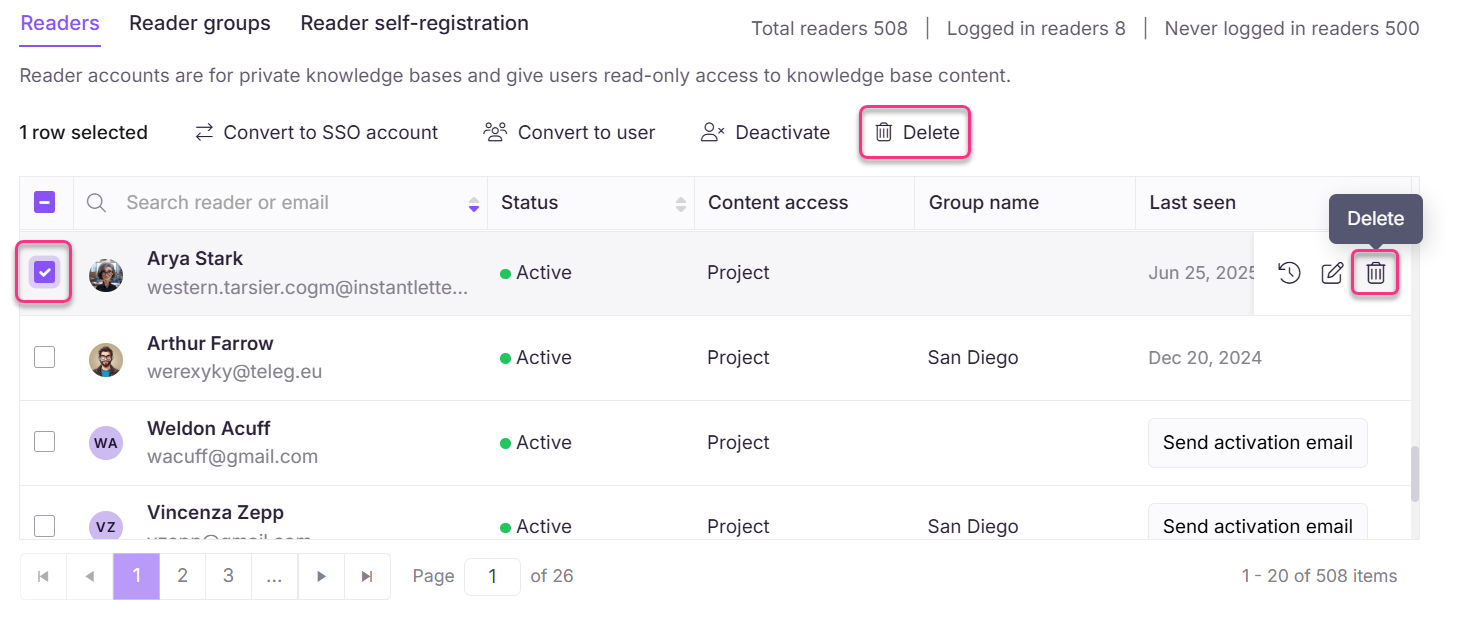
Deleting a reader
You can delete a reader by following the steps below:
Navigate to Settings () > Users & permissions in the left navigation bar in the Knowledge base portal.
In the left navigation pane, navigate to Readers & groups > Readers.
Hover over the desired reader and click the Delete () icon.
Alternatively, select the checkbox next to one or more accounts and click Delete () at the top.
Click Yes in the delete confirmation panel.
Converting a reader to an SSO account
To convert one or more readers:
Navigate to Settings () > Users & permissions in the left navigation bar in the Knowledge base portal.
In the left navigation pane, navigate to Readers & groups > Readers.
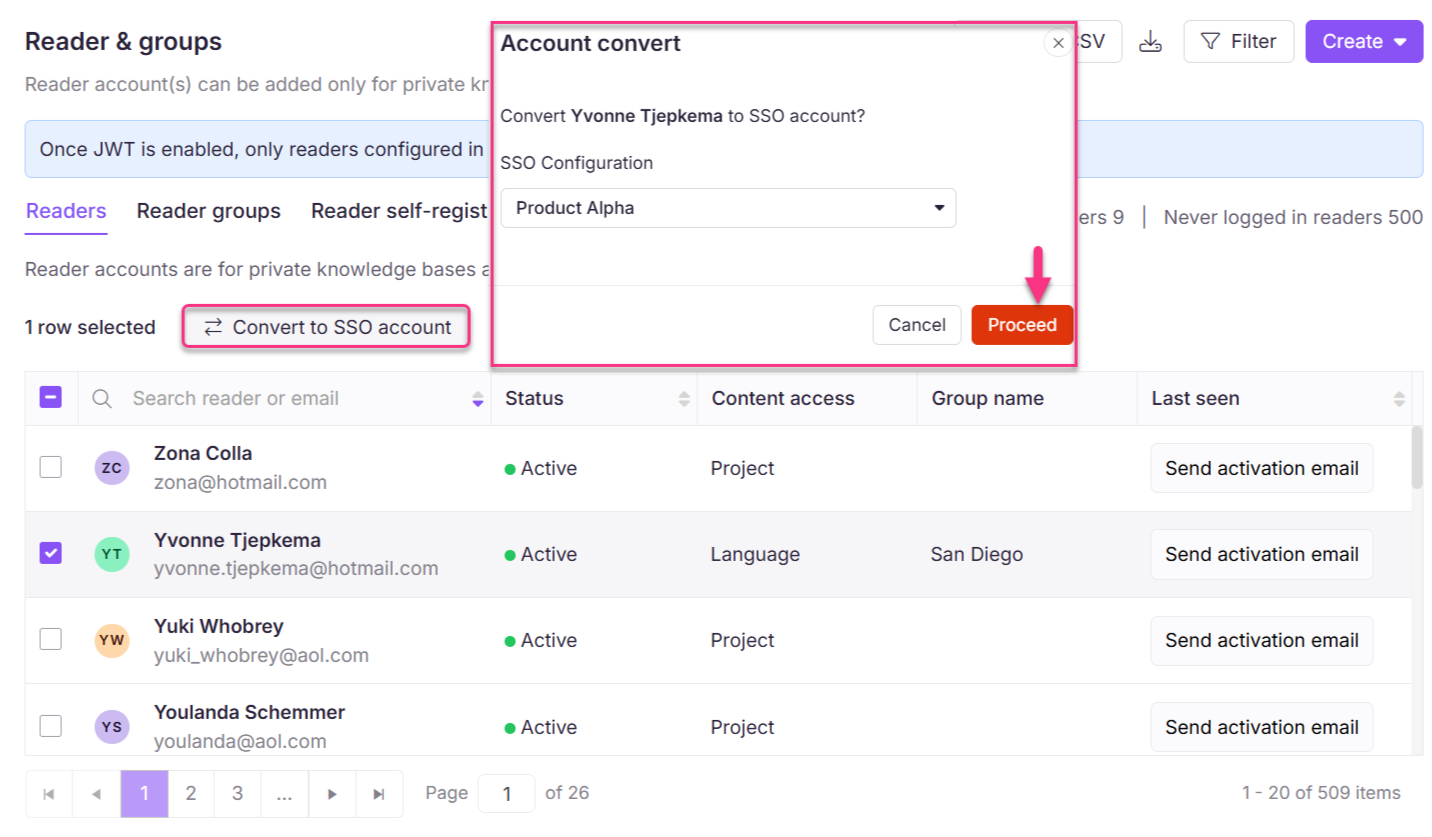
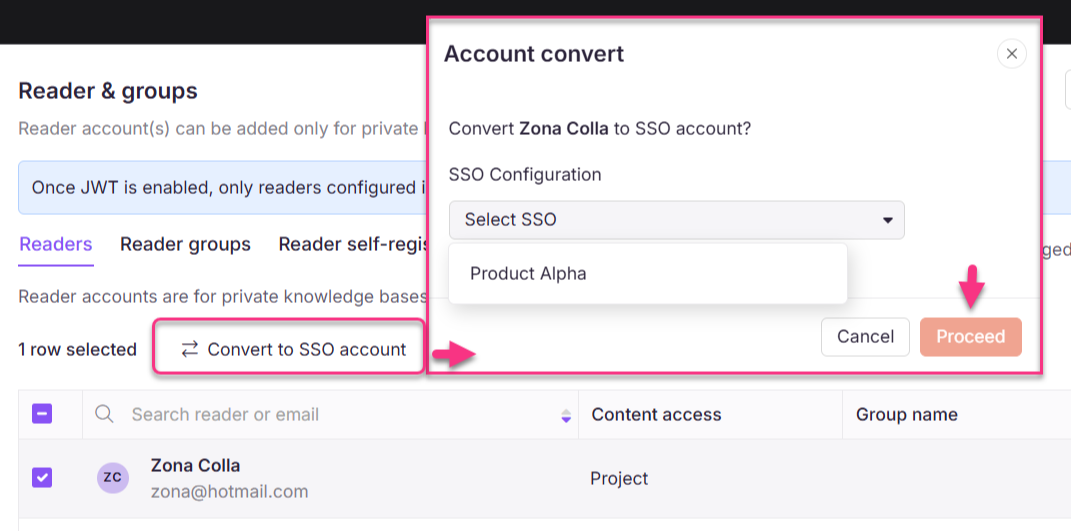
Select the desired readers and click Convert to SSO account.
The Account convert panel will appear.
Select the desired SSO Configuration.
Click Proceed.
The SSO accounts can be identified with an SSO badge next to the username.
NOTE
When a reader is converted to a user, all contributions made by the reader (e.g., analytics data and feedback) will be retained.
Converting a reader to user
To convert one or more readers:
Navigate to Settings () > Users & permissions in the left navigation bar in the Knowledge base portal.
In the left navigation pane, navigate to Readers & groups > Readers.
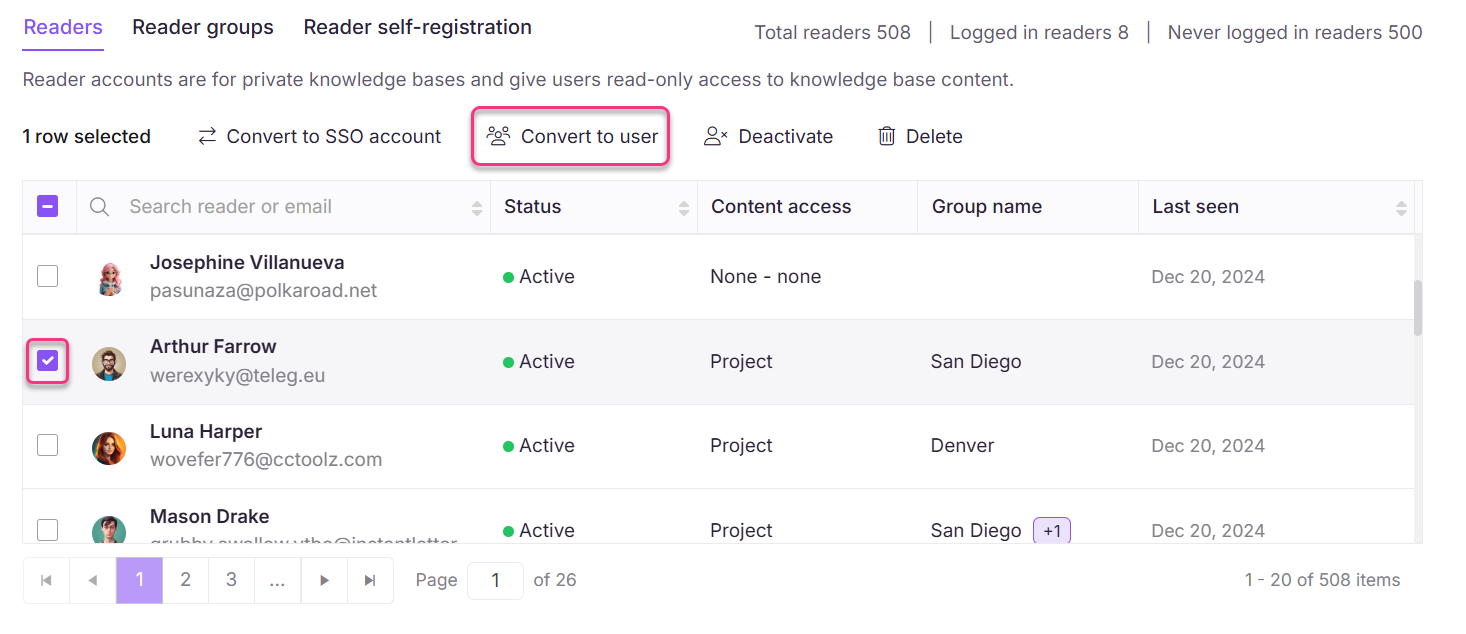
Select the desired readers and click Convert to user.
NOTE
If you select an SSO reader, the account will be converted to an SSO user.
Assign portal access permissions from the Portal role dropdown.
Assign content access permissions from the Content role and Content access dropdown.
As an optional step, map the reader to any existing reader groups from the Map with existing user group dropdown.
Click Confirm to convert the reader to user.

NOTE
When a reader is converted to a user, all contributions made by the reader (e.g., analytics data and feedback) will be retained.
Deactivating and reactivating a reader
To deactivate a reader:
Navigate to Settings () > Users & permissions in the left navigation bar in the Knowledge base portal.
In the left navigation pane, navigate to Readers & groups > Readers.
Select the desired reader and click Deactivate at the top.
The Confirm reader deactivation panel will appear.
Click Deactivate.
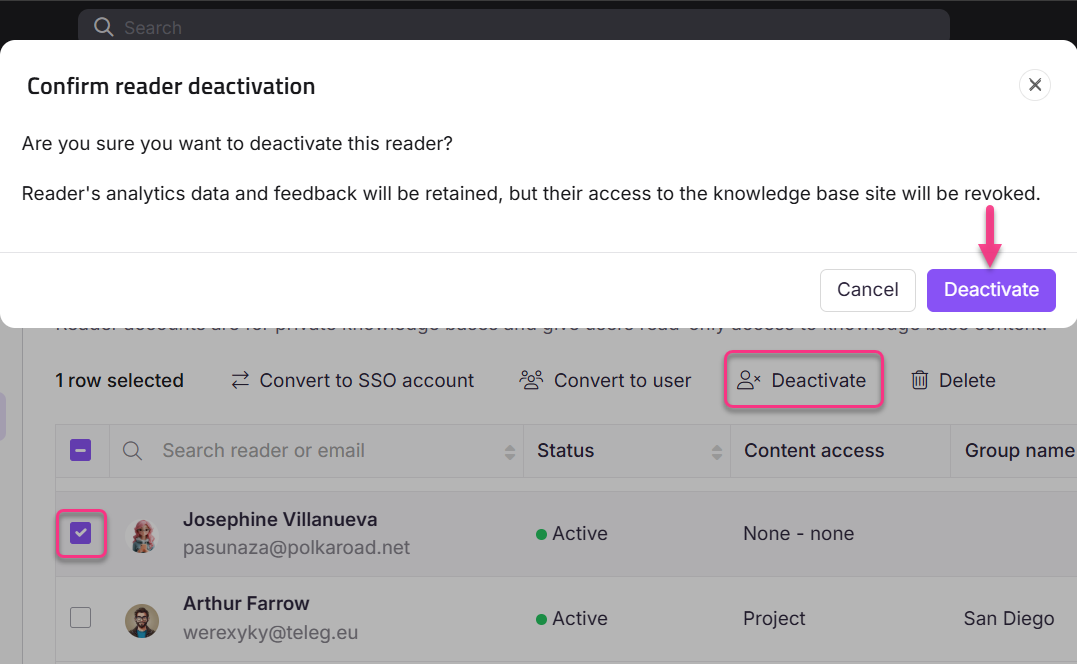
NOTE
When a reader is deactivated, their analytical data and feedback are retained, but access to the Knowledge base site is revoked.
To reactivate a reader:
Select one or more deactivated reader.
Click Activate.
Click Confirm in the Confirm reader activation panel.
Filter and export reader information
In the Reader & groups overview page, navigate to the top-right, where you can view Export CSV and Filter.
Filtering Readers
To narrow down the list of readers:
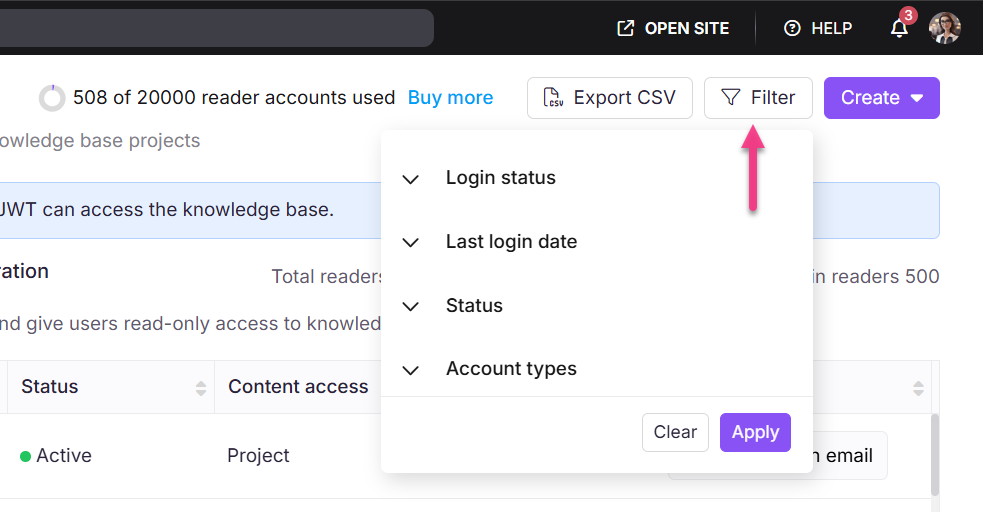
Click the Filter button.
Use the following parameters to refine your search, then click Apply:
Login status: Logged readers, Never logged readers
Last Login data: 7 days, 30 days, 3 months, 1 year, and Custom date.
Account type: SSO user, Document360 user.
NOTE
Selecting SSO Users filter displays a list of available SSO configurations.
Status: All, Active, Inactive.
Exporting a reader
Click Export CSV to download the filtered list of readers as a CSV file to your device's local storage.
Purchase more readers
If you need more Readers than your current plan offers, you can buy them as an add-on. The total number of Readers available and the total number of Readers used are available at the top of the page.
Click on the Upgrade your plan option and navigate to the pricing page.
Choose the desired plan, features, and number of readers.
NOTE
For more information, read the article on Purchasing add-ons.
Troubleshooting
Reader import issues
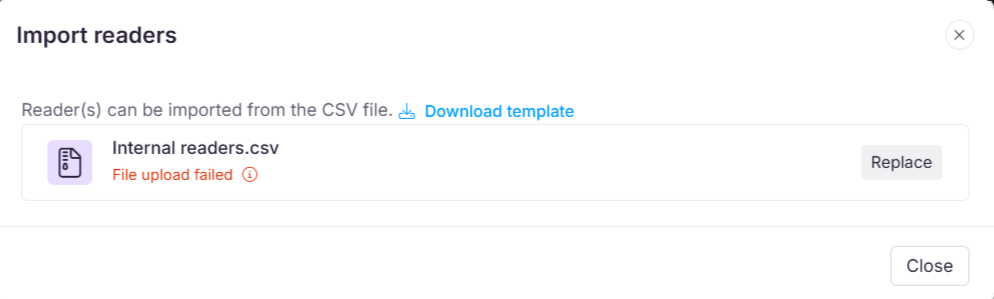
Error: File upload failed
This error typically occurs due to formatting issues, duplicate email addresses, or unsupported characters in the uploaded file.
When using the Import readers feature, if the upload fails, you will see a failure notification and a list of rejected entries.
Steps to resolve
Use the correct CSV format: Ensure the reader data is structured according to the provided CSV template.
Check for duplicate email addresses: Email addresses must be unique. Remove or update any duplicates.
Avoid special characters in name fields: The First name and Last name fields should not contain special characters or numbers. Use only letters (A–Z/a–z).
Clean and re-upload: After making corrections, save the updated CSV file and upload it again. This should resolve the error and successfully import the readers.
Reader is unable to access a published article or category
Readers might encounter this issue when they lack the necessary permissions to access the category or article. This could be due to security settings that restrict access for the Reader or their associated Reader Group.
Steps to resolve
Verify reader permissions: Ensure the reader has the correct permissions to access the category or article.
Check article security settings:
Navigate to the article.
Click the More () icon next to the Edit or Publish button.
Click Security > Knowledge base site.
Confirm that the reader is not explicitly denied access in the article’s security settings.
Check reader group permissions:
Go to the Reader group tab within the security settings of the article.
Verify that the reader group associated with the reader is not denied access to the specific article or category.
If the issue persists after following these steps, please contact the Document360 support team for further assistance: Contact Document360 Support
Resolving access restriction issues
Error: Sorry! You are not authorized to access.
This error occurs when the reader's access to the article is restricted due to security settings.
Steps to resolve
Locate the article in the category tree.
Click the More () icon next to the article name.
Select Security > Knowledge base site.
Click Assign article access.
Remove the reader from the Reader’s list by clicking the Delete () icon.
Go back and confirm that the reader is now labelled with the Inherited tag.
Now, the selected reader will be able to access the article.
Unable to access the associated projects
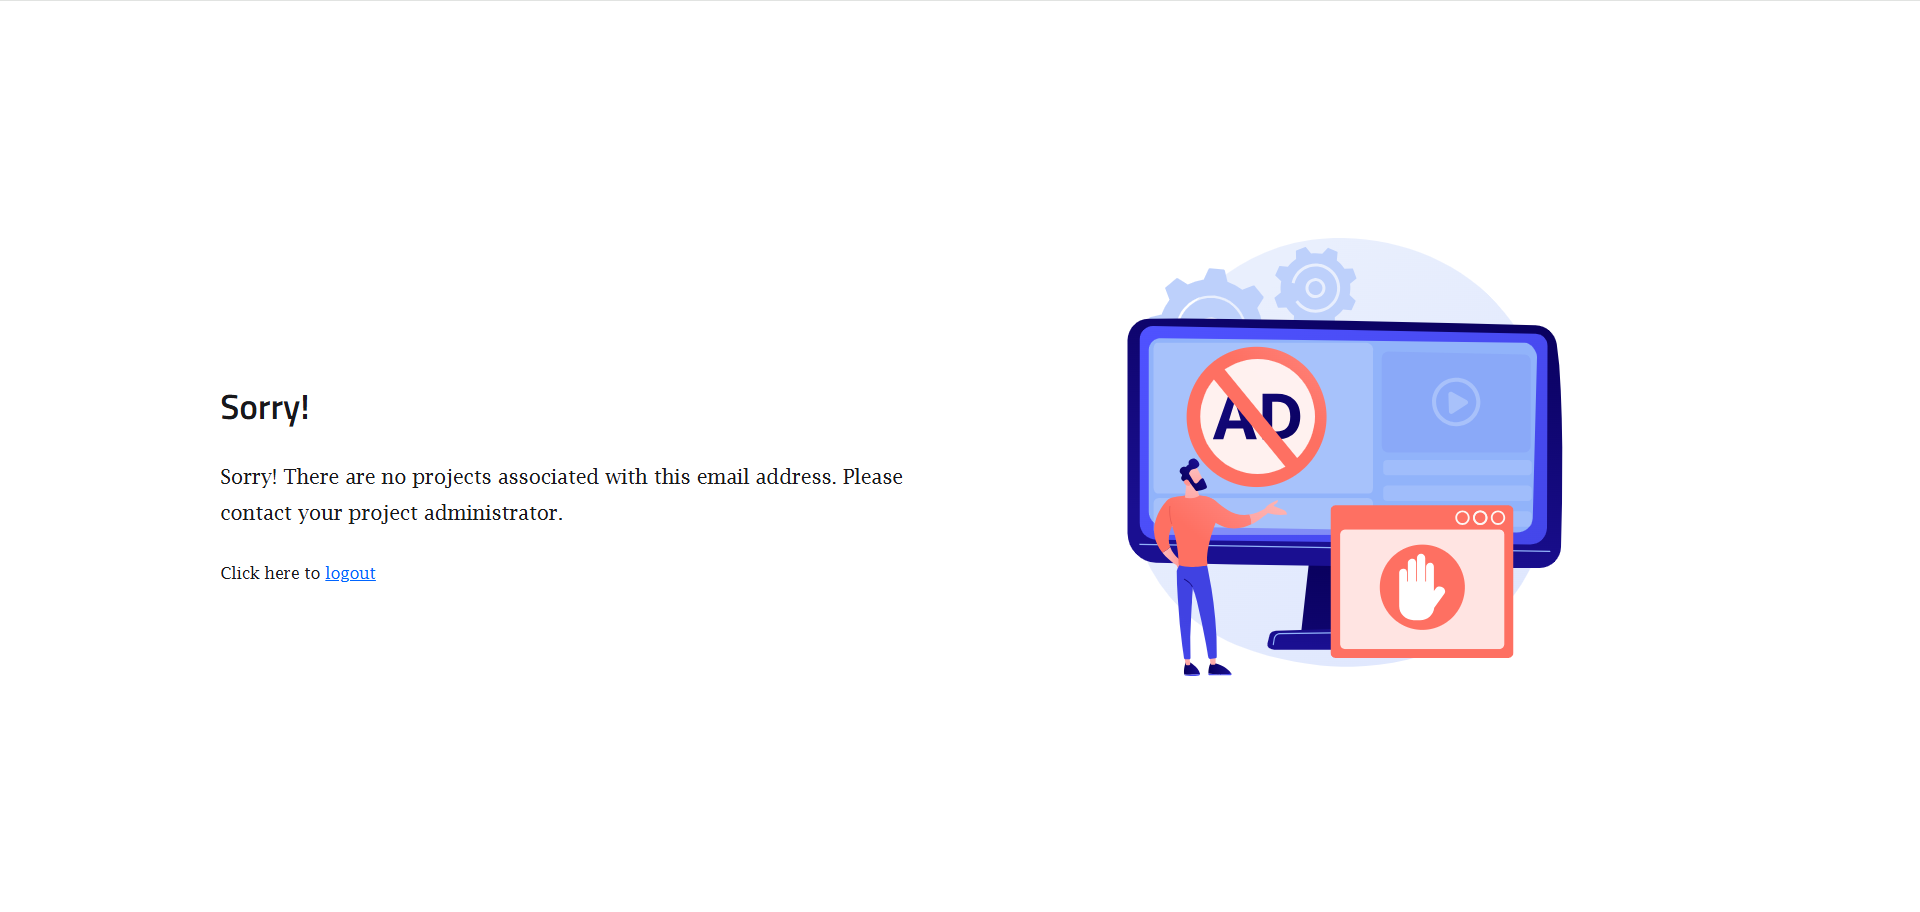
Error: Sorry! There are no projects associated with this email address. Please contact your project administrator.
This error occurs when a reader is not created as an SSO reader or has not been assigned the necessary content access in the project.
Steps to resolve
Convert to an SSO reader
Navigate to Settings () > Users & permissions in the left navigation bar in the Knowledge base portal.
In the left navigation pane, navigate to Readers & groups > Readers.
Select the desired reader and click Convert to SSO account to add them as an SSO reader.
Select the appropriate SSO configuration and click Proceed.
Assign content access
Hover over the desired reader and click the Edit () icon.
Click Manage content access and assign the required content access to the reader.
Click Update.
Once the reader is assigned the correct permissions, they will be able to access the project without any issues.
FAQ
Can I add a person as a user if they have already been assigned as a reader?
In Document360, a user cannot hold both a reader and a user role at the same time. To convert a reader into a user, use the Convert to user option.
How does the Reader session and logout behavior work?
Reader accounts do not have a 2-hour inactivity timeout like Users. Reader sessions follow a 24-hour rolling cookie expiry:
On initial login, a cookie is set with a 24-hour expiry
Every interaction on the Knowledge Base site refreshes the cookie expiry back to 24 hours
After 24 hours of continuous inactivity, the cookie expires and the reader will need to log in again
Users have a built-in 2-hour inactivity timeout. If a user is inactive for 2 hours, they are automatically logged out.
How does content access permissions work for a reader?
The highest level of content access assigned is granted to readers.
Can I purchase additional readers?
Additional readers can only be purchased with the Enterprise plan. You can buy an add-on for more readers.
What to do if the long verification link expires?
Inform the project owner to send the verification email, as they are the only ones who handle access.