Plans supporting this feature: Professional Business Enterprise
In your Document360 project, you can manage your Knowledge base site design and customization from the unified Site customization feature. Customizing the appearance and functionality of your knowledge base is crucial to creating a seamless experience for your users. Document360's Site customization feature allows you to tailor your knowledge base site to align with your brand identity and user preferences. Whether it's selecting themes, adjusting colors, or personalizing layouts, these customization options empower you to create a site that is not only visually appealing but also accessible and user-friendly.
Imagine managing a SaaS product’s support documentation. With Site customization, you can match your brand’s colors and logo, ensure accessibility using auto color contrast, and personalize layouts for better navigation.
For your information (FYI)
This enhancement is available in KB site 2.0. To migrate from KB site 1.0 to KB site 2.0, read the article on KB site 2.0 migration.
NOTE
Site customization is a project-level setting. The changes will reflect in the entire project.
Basic site customization
To perform the basic customization:
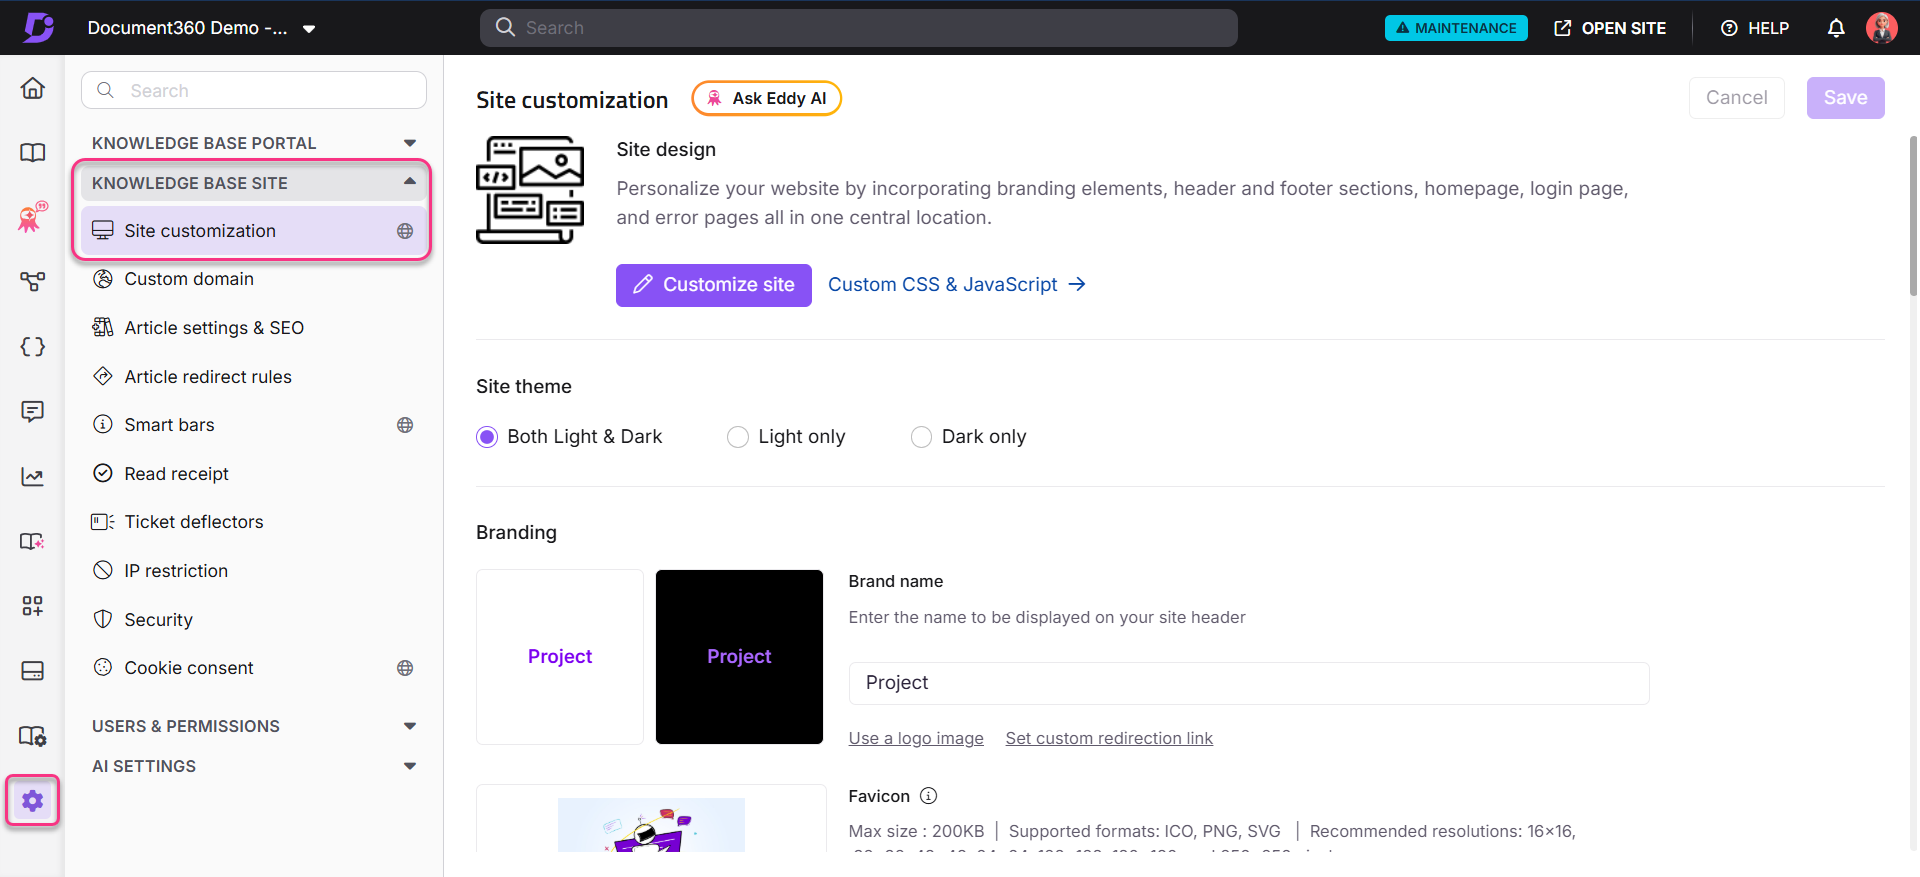
Navigate to Settings () > Knowledge base site in the left navigation bar in the Knowledge base portal.
In the left navigation pane, navigate to Site customization.
The page holds all the basic site design configurations.
You can choose one of the three options to set the theme for your knowledge base site from the Site theme field:
Both Light & Dark
Light only
Dark only
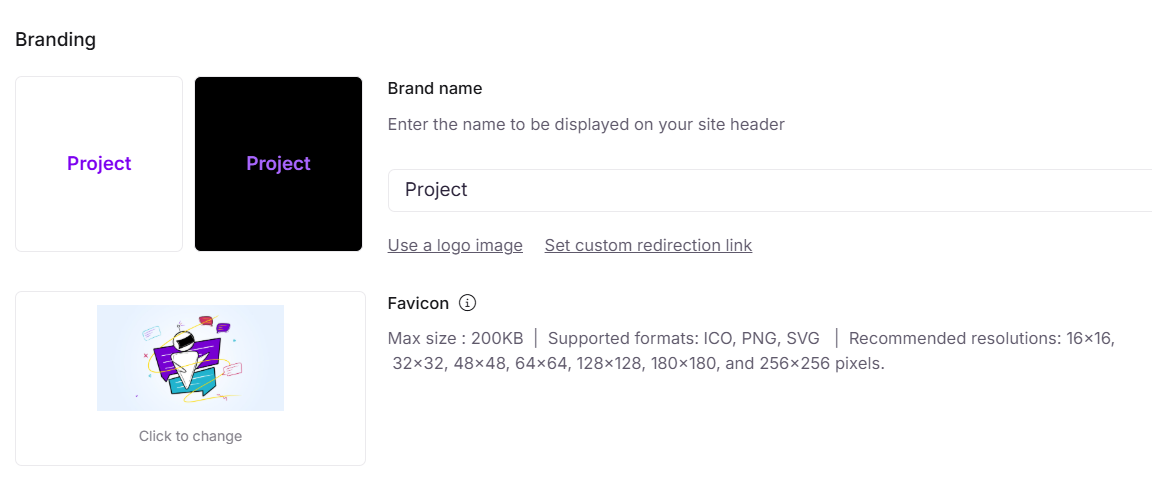
In the Branding section, you can choose a Logo and Favicon. You can upload separate logos for light and dark themes, ensuring that your branding remains consistent and visually optimized for different viewing modes.
If you haven’t set a logo for one of the themes, the logo assigned to the other theme will automatically be used by default.
This logo appears on the top-left corner of the primary navigation bar of your knowledge base site. The favicon appears on the browser tab and helps users identify your knowledge base site easily.
NOTE
The maximum accepted size of the Favicon is 200KB. Supported formats are ICO, PNG, and SVG. It must be square. Recommended resolutions are: 16x16, 32x32, 48x48, 64x64, 128x128, 180x180, and 256x256 pixels.
Images with transparent background should be converted to ICO first. ICO format is most reliable for search engines. After changing the Favicon, you need to do a hard browser refresh to see the updated icon.
While SVG favicons are supported, search engines may take significantly longer to index SVG-only favicons. In some cases, updates may take weeks or even months to reflect in search engine results.
Additionally, you can set a custom redirection link for the logo. Ensure that the URL begins with
https://to avoid validation errors. When a user clicks the logo on your Knowledge base site, they will be redirected to the specified link, such as your company website or a specific landing page.NOTE
Customers who already have a customized logo and favicon will not be affected until they navigate to the Customize site settings and save the changes.
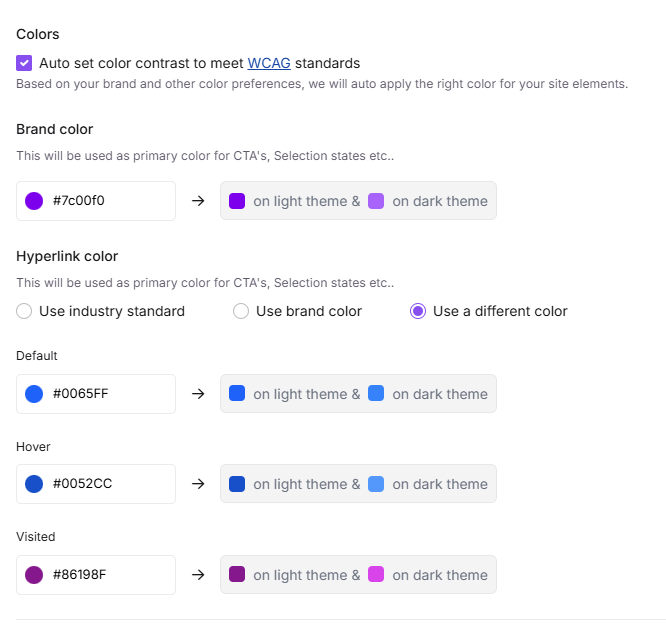
In the Colors section, select the Auto set color contrast to meet WCAG standards checkbox to apply the colors based on your brand to your site elements automatically.
NOTE
For more information, read the article on Web Content Accessibility Guidelines (WCAG).
In the Brand color section, you can select a color for CTA's, selection states, and more using the color picker, or enter its HEX code.
In the Hyperlink color section, you can customize the color of hyperlinks in your knowledge base to enhance the user experience. Under this option, you can choose from the three radio options:
Use industry standard: Apply a commonly used hyperlink color
Use brand color: Apply the same color you chose from the brand color
Use a different color: Select default, hover, and visited colors for hyperlinks.
NOTE
If you have chosen the option Auto set color contrast to meet WCAG standards, both light and dark theme colors will be set automatically. Otherwise, you need to manually set colors for each theme.
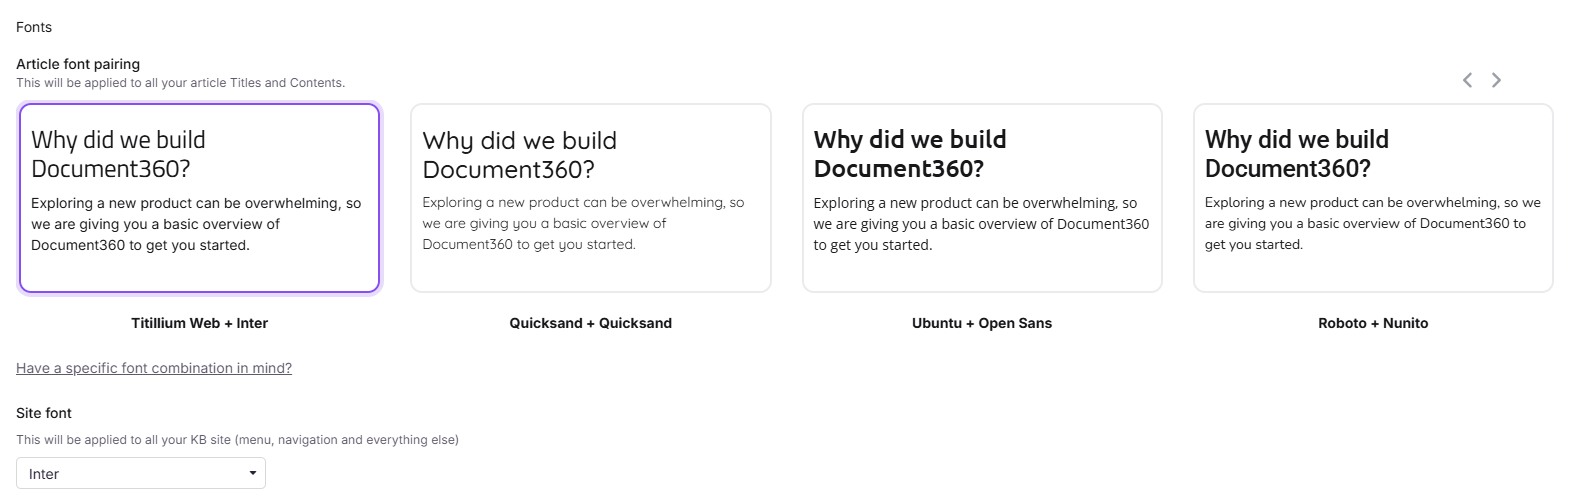
In the Fonts section, you can change the fonts of your Knowledge base content anytime.
There will be two sub-sections:
Article font pairing: This font will be applied to all your article titles and contents.
Click on Have a specific font combination in mind? to select more font options. Click this to choose the font for titles and content.
Site font: Select the font in the dropdown. This will be applied throughout your Knowledge base site. It includes the left navigation pane (categories, sub-categories, article titles) and the navigation for the header, footer, secondary navigation, and controls.
NOTE
The chosen font will be utilized on the Knowledge base site and within the editor. This will enhance the user's ability to visualize the article's appearance during its creation.
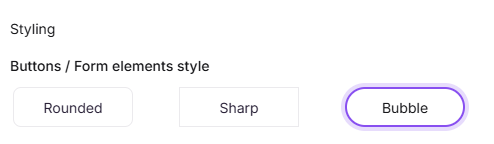
In the Styling section, you can choose the style for the buttons and form elements. The three options available are:
Rounded
Sharp
Bubble
In the Site layout section, you will find two options:
Full width: Full width extends your content to the edges of a browser window.
Center: The center layout positions content centrally and provides a wider reading area by optimizing the surrounding panels.

Once done, click Save.
Advanced site customization
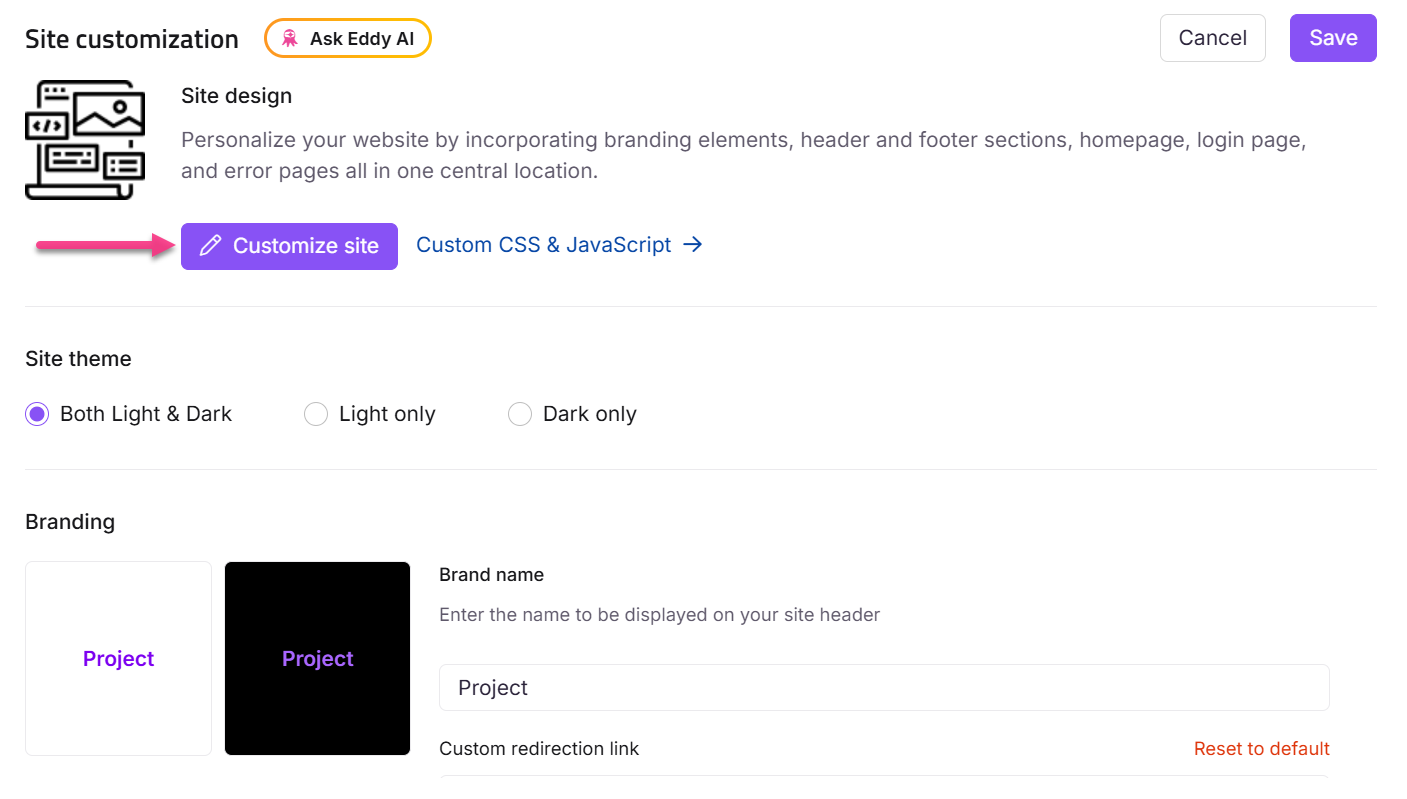
Personalize your website by incorporating branding elements, header and footer sections, homepage, login page, and error pages in one central location.
Navigate to Settings () in the left navigation bar in the Knowledge base portal.
In the left navigation pane, navigate to Knowledge base site > Site customization.
The page holds all the basic site design configurations.
Click the Customize site button.
From this section, you can configure the following site elements:
Site header & footer: Customize the Header, footer, etc..
Main pages: Customize the Home, Documentation, and Login pages
Error pages: Customize the 404 page, Access denied, Unauthorized, and IP restrictions pages
Custom CSS / JavaScript: Add advanced styling or interactivity to your site.
The changes you apply on the left section can be previewed on the right panel. To edit a specific element, click on the desired item in the Preview panel. The corresponding settings will appear in the left panel.
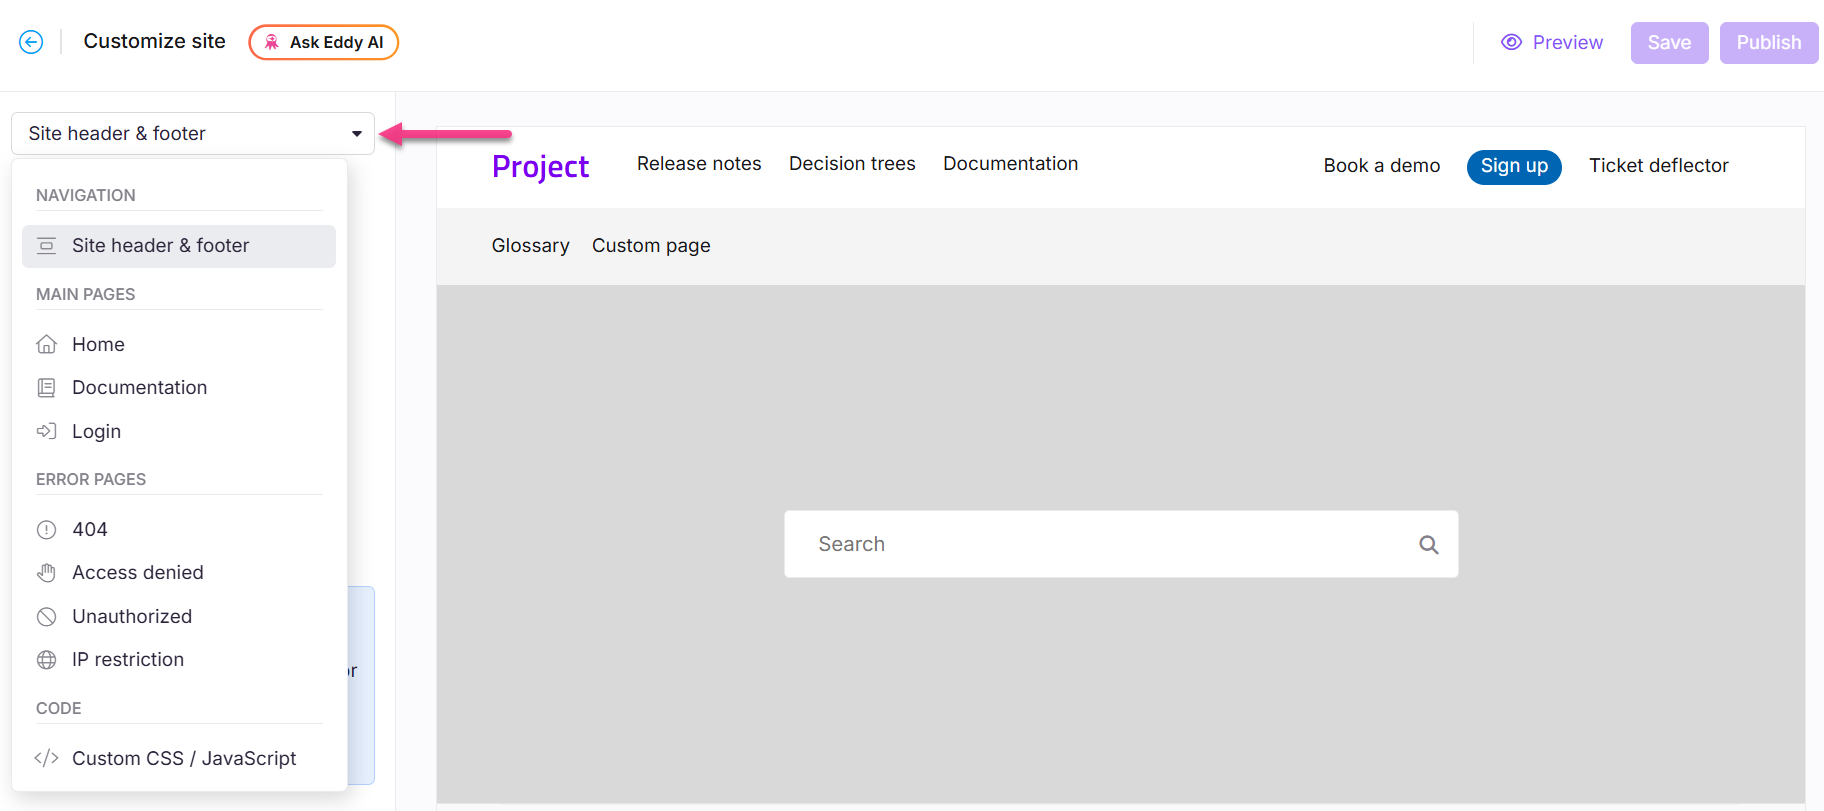
Use the dropdown to choose the different pages.
The new interface for the Home page builder provides easier navigation and customization for each section of the homepage.
Click Preview to see how your changes will appear on the knowledge base site.
Click Save to save your changes without applying them immediately.
Click Publish to make your recent changes visible to readers.
NOTE
Clicking Save stores your changes but does not make them visible to readers. You must click Publish to apply your changes to the live site.
If the homepage builder has unsaved or unpublished changes, visitors, including those navigating via header links, may be redirected to an older or beta version of your site, even if the Home article itself is marked as published in the portal.
Always click Publish in the Customize Site builder after making changes to ensure your live site reflects the latest version.
Click the More () icon and select Reset to published version to discard all saved and unsaved customizations and revert to the last published version.
NOTE
The Reset to published version feature is available only for new Knowledge base site 2.0 projects created after March 29, 2025.
FAQ
How do I change the site theme?
You can change the Knowledge base site theme by following the steps below:
Navigate to Settings () in the left navigation bar in the Knowledge base portal.
In the left navigation pane, navigate to Knowledge base site > Site customization.
In the Site theme section, you can choose from three options:
Both Light & Dark
Light only
Dark only
How do I change the Favicons?
Favicon (short for favorite icon) is a small icon, usually 16x16 pixels, used by web browsers to identify your website. The favicon appears in the browser tab for the website, the bookmarks list, the browsing history list, and search engine results.
Navigate to Settings () in the left navigation bar in the Knowledge base portal.
In the left navigation pane, navigate to Knowledge base site > Site customization.
In the Branding section, hover over the default favicon and click Click to change on Favicons.
Now, you can add a Favicon in one of two available options:
Using a URL: Paste the image URL from any external source and click Insert.
Upload an image: Choose your file from the Drive or upload an image from your local computer storage and click Insert.
Click Save.
PRO TIP
Always use an image with minimalistic and square dimensions (in pixels).
As a best practice, ensure your favicon is sized at 48 x 48 pixels for optimal rendering across platforms.
Why is the favicon not rendering on the Knowledge base site?
This issue could be faced when the favicon added does not meet the specified criteria, including size and format. Make the necessary changes to the favicon or try re-uploading it on your Knowledge base site.
How do Favicons work in Document360?
When you configure a favicon in Document360:
The favicon is referenced in the page <head> using a <link rel="icon"> tag.
Document360 automatically generates a root-level fallback favicon at: https://your-domain.com/favicon.ico
This root-level favicon is used by browsers, search engines, and crawlers that only check /favicon.ico
Even if you upload a PNG or SVG favicon, Document360 programmatically generates /favicon.ico to ensure compatibility. This behavior is by design and follows standard web conventions.
How does Google search handle Favicons?
Google uses specialized crawlers (including Googlebot-Image) to fetch and process favicons. According to Google’s guidelines, favicon display in search results is not guaranteed. Google may delay or ignore favicon updates based on factors such as crawl history, domain trust, and prior favicon signals. Even with a fully compliant setup, Google may show no favicon, display a default icon, or take time to update an existing one. Delays are common after recent favicon changes, with SVG-only setups, on newer or niche subdomains, or when Google continues to serve a cached older version. Domains without an established favicon history may also take longer to surface a favicon in search results.
You cannot dictate when Google re-crawls your site, whether a favicon is displayed at all, how long older favicons remain cached, or how favicon behavior varies across search engines. As a best practice, use ICO or PNG formats, and avoid SVG-only favicons by always providing a PNG or ICO fallback. After making changes, allow sufficient time, typically 2–4 weeks, for Google to reindex favicon updates. Submitting your sitemap through Google Search Console can help prompt re-crawling, though it does not guarantee updates. Finally, avoid frequent favicon changes, as repeated updates can reset Google’s evaluation cycle and delay visibility.
How do I change the site logo?
To replace the default Logo displayed on the top left of the knowledge base by uploading your desired logo,
Navigate to Settings () in the left navigation bar in the Knowledge base portal.
In the left navigation pane, navigate to Knowledge base site > Site customization.
In the Branding section, you will find the logos uploaded for your light and dark site themes.
Hover over the respective Logo and click Click to change.
Now, you can add a Favicon in one of two available options:
Using a URL: Paste the image URL from any external source and click Insert.
Upload an image: Choose your file from the Drive or upload an image from your local computer storage and click Insert.
Once done, click Save.
How do I add text as the logo?
You can add a text as the logo by replacing the default logo displayed in the top left of the Knowledge base.
Navigate to Settings () in the left navigation bar in the Knowledge base portal.
In the left navigation pane, navigate to Knowledge base site > Site customization.
In the Branding section, click Don't have a logo? Use name instead.
Enter the desired text in the input field.
For example, you can add a company name or tagline instead of a logo image.
Click Save.
NOTE
You can add up to 30 characters for logo text.
The maximum size for a logo is:
Height - 40 px
Width - 270 px
When you upload a logo with a bigger size, the logo size will be scaled down and kept within the maximum size.
For example, uploading a logo with a size 500x1000 px (height x width) will be scaled down to 40x80 px.
How do I add a custom logo URL?
Add a clickthrough URL to your logo with the Logo URL. When a user clicks the logo, they are redirected to the provided link.
Navigate to Settings () in the left navigation bar in the Knowledge base portal.
In the left navigation pane, navigate to Knowledge base site > Site customization.
Add the desired URL in the Logo URL field.
Click Save.
NOTE
The Logo URL must start with
https://.If the URL starts with
www.(e.g.,www.example.com) withouthttps://, it will show an "Invalid URL" error.If no URL is provided, clicking the logo redirects users to the Knowledge base home page.
Custom logo URL is an optional field.
How to choose the brand color?
To choose the desired brand color for your Knowledge base site, follow the steps below:
Navigate to Settings () in the left navigation bar in the Knowledge base portal.
In the left navigation pane, navigate to Knowledge base site > Site customization.
Under Colors, you can choose the Brand color. This will be the primary color for CTAs, Selection states, and more.
NOTE
If you have chosen the option Auto set color contrast to meet WCAG standards, both light and dark theme colors will be set automatically. Otherwise, you need to manually set colors for each theme.
Once done, click Save.
How do I choose the font family in the Customize site setting?
To change the fonts of your Knowledge base, follow the steps below:
Navigate to Settings () in the left navigation bar in the Knowledge base portal.
In the left navigation pane, navigate to Knowledge base site > Site customization.
Under the Fonts section, there will be two sections: Article font parsing and Site font.
Article font pairing: This font will be applied to all your article Titles and Contents.
NOTE
Click Have a specific font combination in mind?, to select more font options. By clicking it, you can choose the font for titles and content.
Site font: Select the font in the dropdown. This will be applied throughout the Knowledge base site. It includes the left navigation pane (categories, sub-categories, article titles) and the navigation (header, footer, secondary navigations, controls).
Select the desired font and click Save.
NOTE
Document360 provides a list of common fonts used in documentation. However, you can configure your desired font in the knowledge base. For more information, read the article on How to configure a custom font in the knowledge base?
How do I change the default paragraph style?
Currently, there is no direct option to change the default paragraph style. However, you can change the default article font in the Document360 editor.
To set the default font for your articles:
Navigate to Settings () in the left navigation bar in the Knowledge base portal.
In the left navigation pane, navigate to Knowledge base site > Site customization.
In the Fonts section, choose your desired font pair in the Article font pairing tile. This font will appear in the Knowledge base articles.
For instance, if you draft content in
Verdanain the Knowledge base portal, but selectUbuntu + Open Sansin the Article font pairing, in the Knowledge base site, the article title will appear inUbuntu, and the article content will be inOpen Sans.
NOTE
You can also select your custom font for your articles. For more information, read the article on How to configure a custom font in the knowledge base?
To change the paragraph style for individual articles:
Open the desired article in the Advanced WYSIWYG editor and select the text.
Click Format, then choose a font style in the Typography section.
How do I change the button styles?
To change the button styles of your Knowledge base site, follow the steps below:
Navigate to Settings () in the left navigation bar in the Knowledge base portal.
In the left navigation pane, navigate to Knowledge base site > Site customization.
In the Styling section, you can select the button style from the options, including rounded, sharp, and bubble.
How do I change the site layout in the Customize site settings?
To change the site layout in customize site, follow the steps below:
Navigate to Settings () in the left navigation bar in the Knowledge base portal.
In the left navigation pane, navigate to Knowledge base site > Site customization.
Under Layout, you can find Full width and Center.
Full width: Full width will extend your content to the edges of a browser window.
Center: The center layout will fit your content more in the center of a browser window.
Click Save.
How do I show only the active category and its sub-categories in the left sidebar?
You can achieve this customization using Custom JavaScript in your knowledge base site. This will hide all other root categories and show only the active category and its sub-categories/articles when a user navigates via secondary navigation.
To apply this customization:
Navigate to Settings > Knowledge base site > Site customization.
Click the Customize Site button
Select Custom CSS / JavaScript from the Site header & footer dropdown.
Click JavaScript on the left navigation bar and paste the code.
/*Left sidebar category start*/
let parent_data = null;
function client_tree_data(data) {
  parent_data = data;
  window.clientData = data;
  const slug = window.location.pathname.split('/').filter(Boolean).pop();
  if (slug === "docs") {
    return [data[0]];
  }
  return data.filter(item => markIfContainsSlug(item, slug));
}
function markIfContainsSlug(node, slug) {
  if (node.slug === slug) {
    node.found = true;
    return true;
  }
  return node.children?.some(child => markIfContainsSlug(child, slug)) || false;
}
/*Left sidebar category end*/
Click Save.
How do I set the default font for my articles on the Knowledge base site?
To set the default font for your articles:
Navigate to Settings () > Knowledge base site in the left navigation bar in the Knowledge base portal.
In the left navigation pane, navigate to Site customization.
In the Fonts section, choose your desired font pair in the Article font pairing tile. This font will appear in the Knowledge base articles.
For instance, if you draft content in
Verdanain the Knowledge base portal, but selectUbuntu + Open Sansin the Article font pairing, in the Knowledge base site, the article title will appear inUbuntu, and the article content will be inOpen Sans.
NOTE
You can also select your custom font for your articles. For more information, read the article on How to configure a custom font in the knowledge base?