Zendesk is een klantenserviceplatform dat teams helpt bij het beheren van vragen, klachten en andere serviceverzoeken.
Door de Document360 met Zendesk te integreren, kunnen supportmedewerkers het volgende doen:
Zoek en deel artikelen direct in Zendesk zonder van tabblad te wisselen.
Maak nieuwe kennisbasisartikelen zonder de Zendesk te verlaten.
Gebruik AI-gestuurde antwoorden en artikelsuggesties met Eddy AI.
Vereisten
Om Document360 en Zendesk te integreren, heb je nodig
Een Zendesk Enterprise- of Enterprise Plus-account voor gefedereerde zoekopdrachten.
Een Document360 met beheerdersrecht.
API-tokentoegang op beide platforms.
Installeer de Document360 op Zendesk
Installeer de Document360 in je Zendesk Support console zodat je je kennisbank kunt verbinden en direct artikelen binnen Zendesk kunt openen.
Log in op je Zendesk Support-console .
Ga naar de Zendesk Marketplace en klik op Apps.
Voer in het nieuw geopende tabblad Marketplace Document360 in in het veld Filters apps .
Klik op Document360.
Klik op het tabblad Hoe te installeren om de instructies te bekijken en eventuele pre-installatietaken uit te voeren.
Klik rechtsboven op Installeren .
Als je meerdere accounts hebt, selecteer dan het bedoelde account en klik op Installeren.
Om de installatie te voltooien, moet je de Titel, Token en beperkingsdetails in de respectievelijke velden invoeren.
Als je klaar bent, klik dan op Installeren.
Document360 configureren met Zendesk
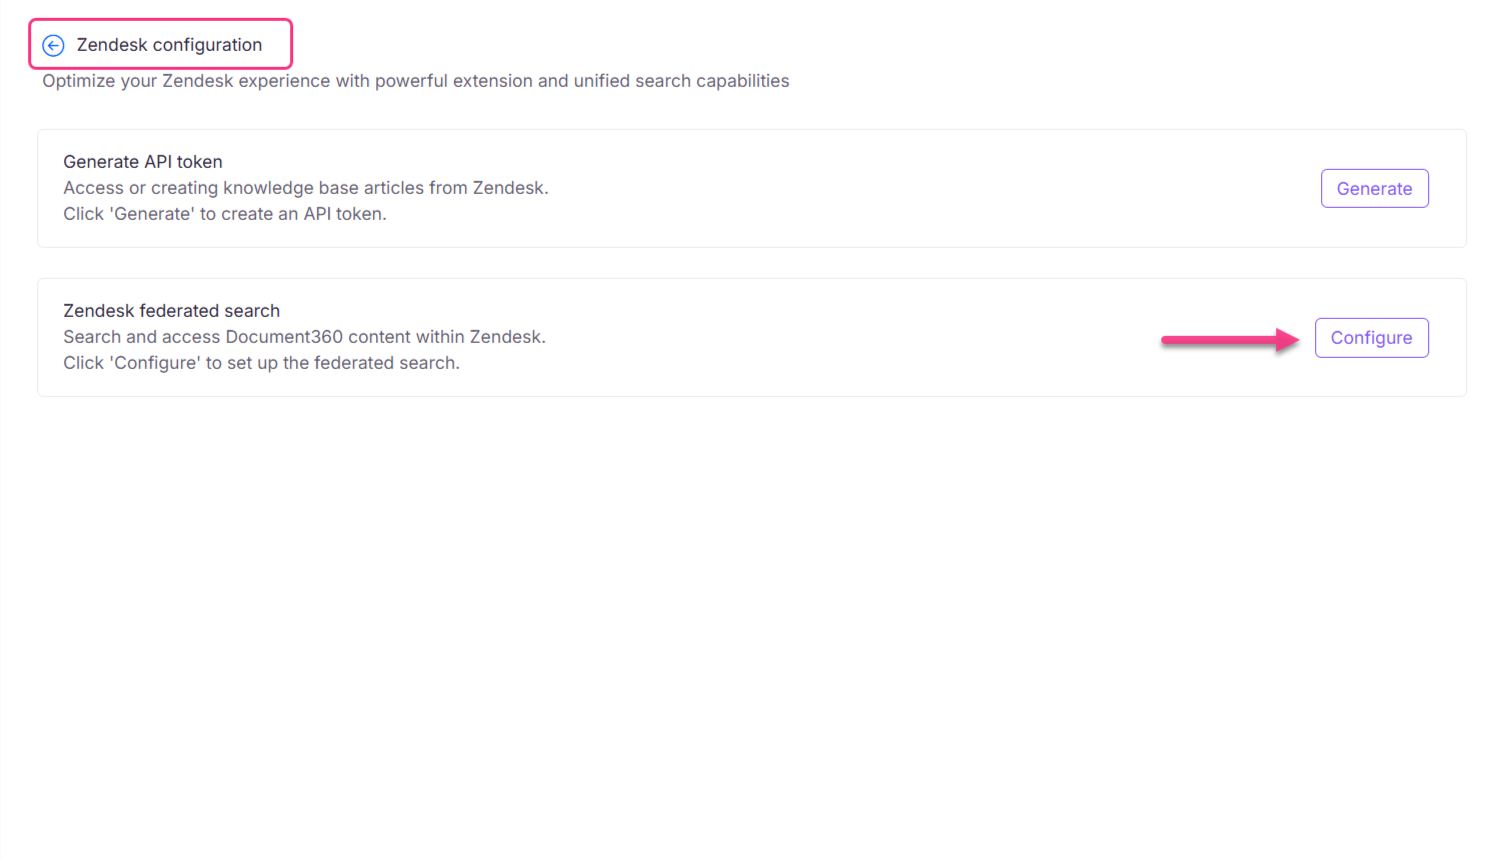
Om een API-token van Document360 te verkrijgen, volgt u de onderstaande stappen.
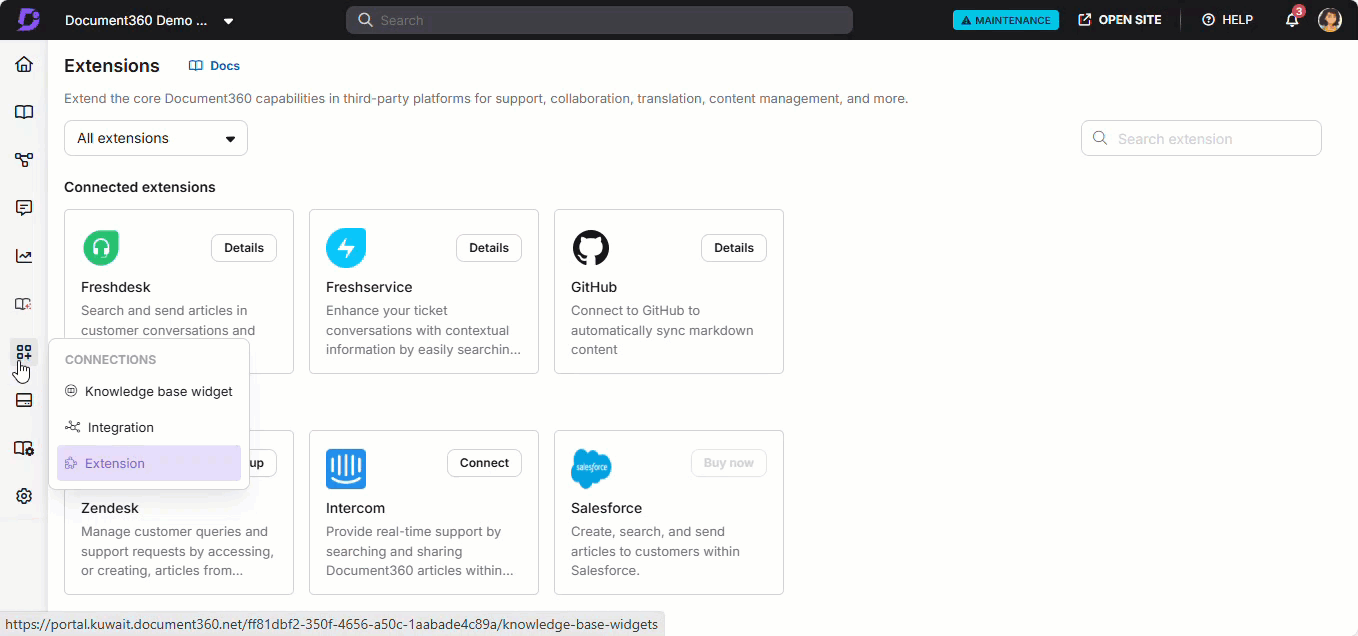
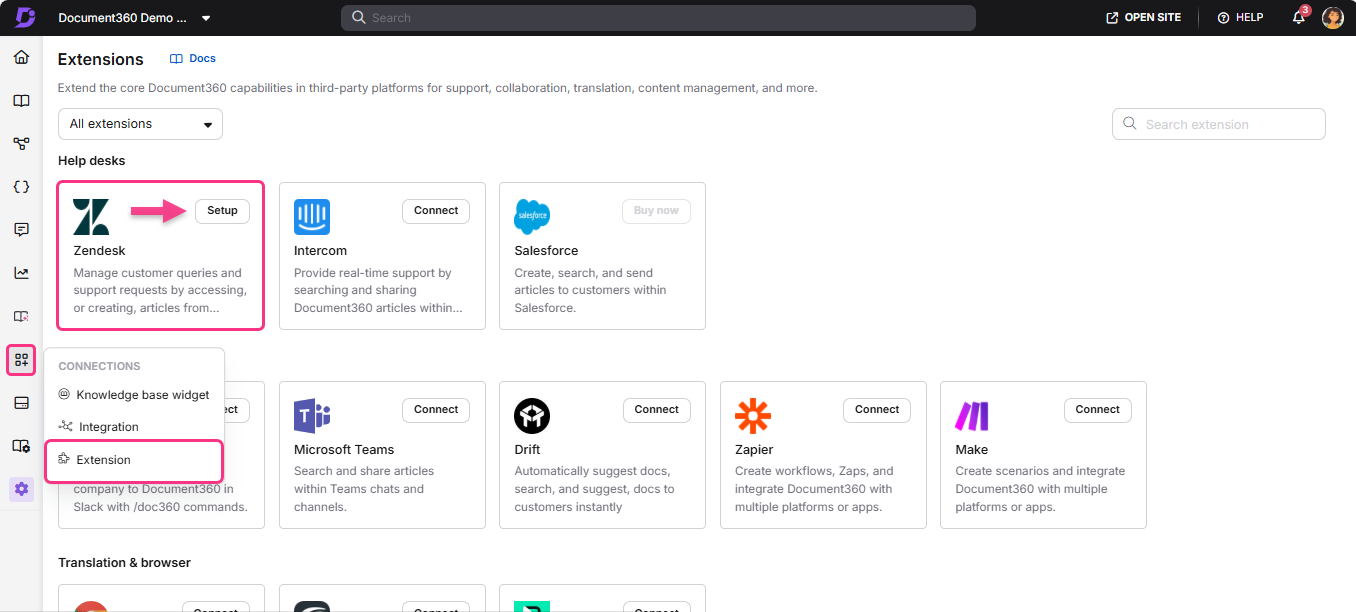
Navigeer naar Connections () > Extensions in de linker navigatiebalk in het kennisbasisportaal.
Klik in de sectie Help desks op Zendesk.
Klik op Setup.
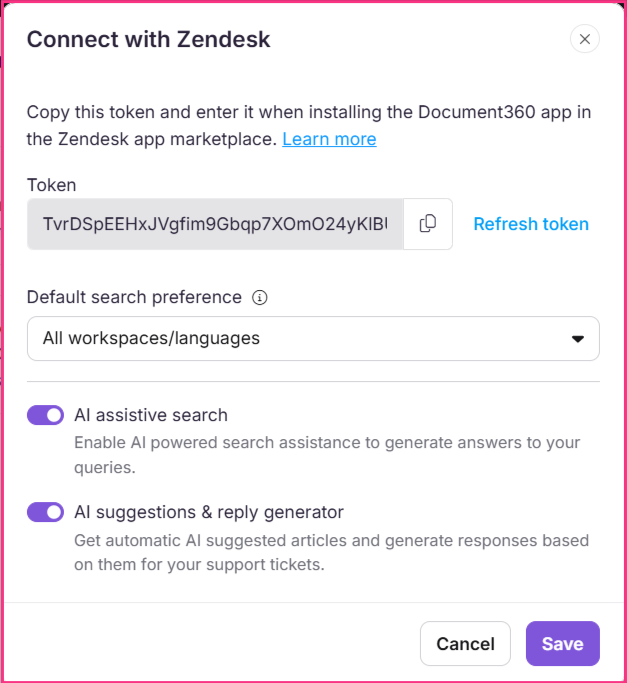
Klik in de optie API-token genereren op Genereren. Klik op Refresh token om het token opnieuw te genereren.
De dialoog 'Generate extension token ' verschijnt.
Klik op Ja.
De dialoogvenster 'Verbind met ZendeskZendesk' verschijnt, waarin je token wordt weergegeven.
Klik op het pictogram Kopiëren () om het token te kopiëren.
Klik op sluiten.
Ga naar het Zendesk en vul het Titelveld in.
In het Token-veld plakt u het gekopieerde API-token uit Document360.
Voeg je voorkeursbeperkingen toe. Standaard is deze optie uitgeschakeld.
Klik op Installeren.
Zendesk gefedereerde zoekopdracht configureren in Document360
Volg deze stappen om Zendesk gefedereerde zoekopdracht in Document360 te configureren:
Toegang tot Zendesk in Document360
Zendesk op te zetten via het kennisbankportaal, volg je de onderstaande stappen:
Navigeer naar Connections () > Extensions in de linker navigatiebalk in het kennisbasisportaal.
Klik in de Helpdesk-sectie op Zendesk.
Klik op Setup om de configuratiepagina van Zendesk te openen.
Klik op de Zendesk op Configureren in de Zendesk .
Zendesk gefedereerde zoekopdracht Instellen verschijnt.
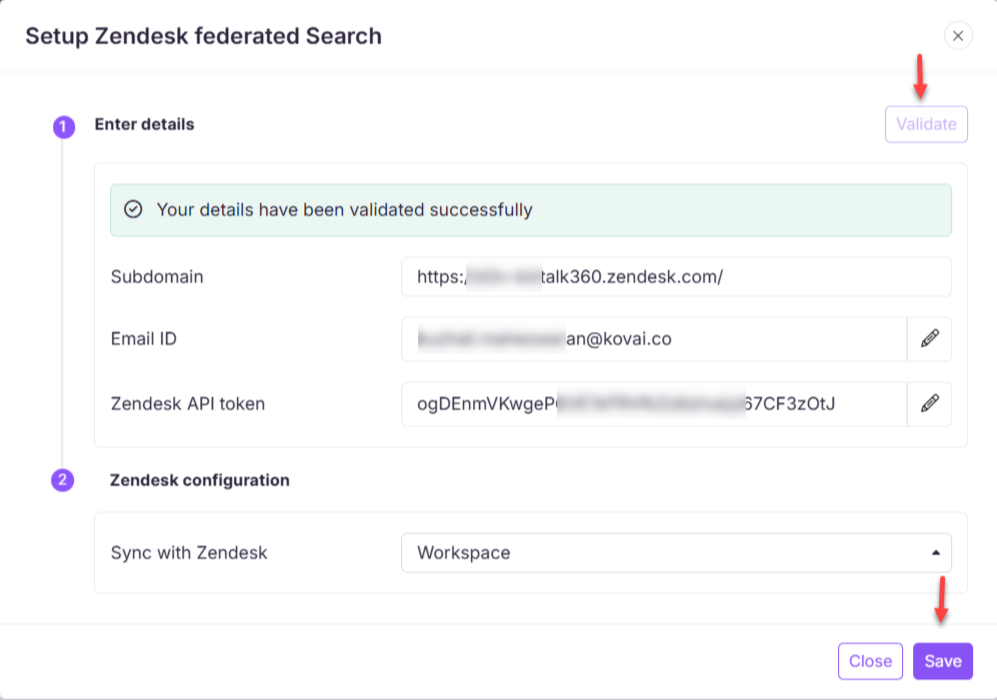
Geef de volgende details in het Zendesk-platform:
Subdomein:
Kopieer het subdomein van je Zendesk .
Voorbeeld: Voor de URLhttps://kovaico3776.zendesk.com/admin/apps-integrations/apis/zendesk-api/settings/tokens/, ishttps://kovaico3776.zendesk.comhet subdomein .E-mailadres:
Ga naar de Zendesk-overzichtspagina, klik op Instellingen (), en selecteer Ga naar Beheerderscentrum.Zendesk
Ga in de linker navigatiebalk naar Kanalen en klik op E-mail om e-mailconfiguraties te bekijken.
Zoek in het gedeelte Supportadressen het admin-e-mailadres van je Zendesk .
Zendesk API Token:
Klik vanaf de Zendesk op Instellingen (), en selecteer Ga naar Beheerderscentrum.
Ga in de linker navigatiebalk naar Apps en integraties > Zendesk API.
Klik op API-token toevoegen en kopieer het gegenereerde token.
Klik op Valideren om de gegevens die je hebt ingevoerd te bevestigen.
Selecteer in het dropdownmenu Sync with Zendesk de gewenste werkruimte en taal in je Document360-project.
Zodra de configuratie voltooid is, klik je op Opslaan.
Je kunt nu je Document360-artikelen zoeken en openen als externe bron binnen het Zendesk .
OPMERKING
Om naadloze synchronisatie te garanderen, moeten de taalcodes overeenkomen tussen het Zendesk-ticketingplatform en Document360.
AI-functionaliteiten voor Zendesk mogelijk maken via het kennisbankportaal
Door AI-ondersteunend zoeken voor de Zendesk in te schakelen, kunnen agenten naadloos AI-gestuurde antwoorden uit uw kennisbank ophalen zonder de Zendesk te verlaten, wat de efficiëntie en reactienauwkeurigheid verbetert. Om AI-ondersteunend zoeken op te zetten,
Navigeer naar Connections () > Extensions in de linker navigatiebalk in het kennisbasisportaal.
Klik in de Helpdesk-sectie op Zendesk.
Klik op Setup om de configuratiepagina van Zendesk te openen.
Klik op Wijzigen in de instelling API-token genereren . De dialoogvenster 'Verbind met Zendesk' verschijnt.
Voer de token in die wordt gegenereerd in het Zendesk.
Selecteer in het veld voor de voorkeur voor de zoekfunctie de optie om zoekresultaten op te halen in de Document360-app van Zendesk. De opties zijn:
Standaard werkruimte/taal - laat Eddy AI resultaten ophalen van de standaard werkruimte of taal.
Alle werkruimtes/talen - laat Eddy AI resultaten ophalen van alle werkruimtes en talen in de kennisbasis.
Schakel de AI-hulpzoekschakelaar in om toegang te krijgen tot AI-zoekopdrachten in de Zendesk .
OPMERKING
Om de AI-ondersteunende zoekopdracht voor Zendesk in te schakelen, moet je de hulpzoekfunctie voor KB-widget en extensies inschakelen in de instellingen van de kennisbank. Als je de instellingen niet hebt ingeschakeld, blijft de AI-hulpzoekschakelaar uitgeschakeld.
Schakel de AI-suggesties & reply generator in om automatische AI-voorgestelde artikelen te krijgen en antwoorden daarop te genereren voor je supporttickets.
Dit maakt het eenvoudig en handig om supporttickets op het Zendesk af te handelen.
Als je klaar bent, klik je op Opslaan.
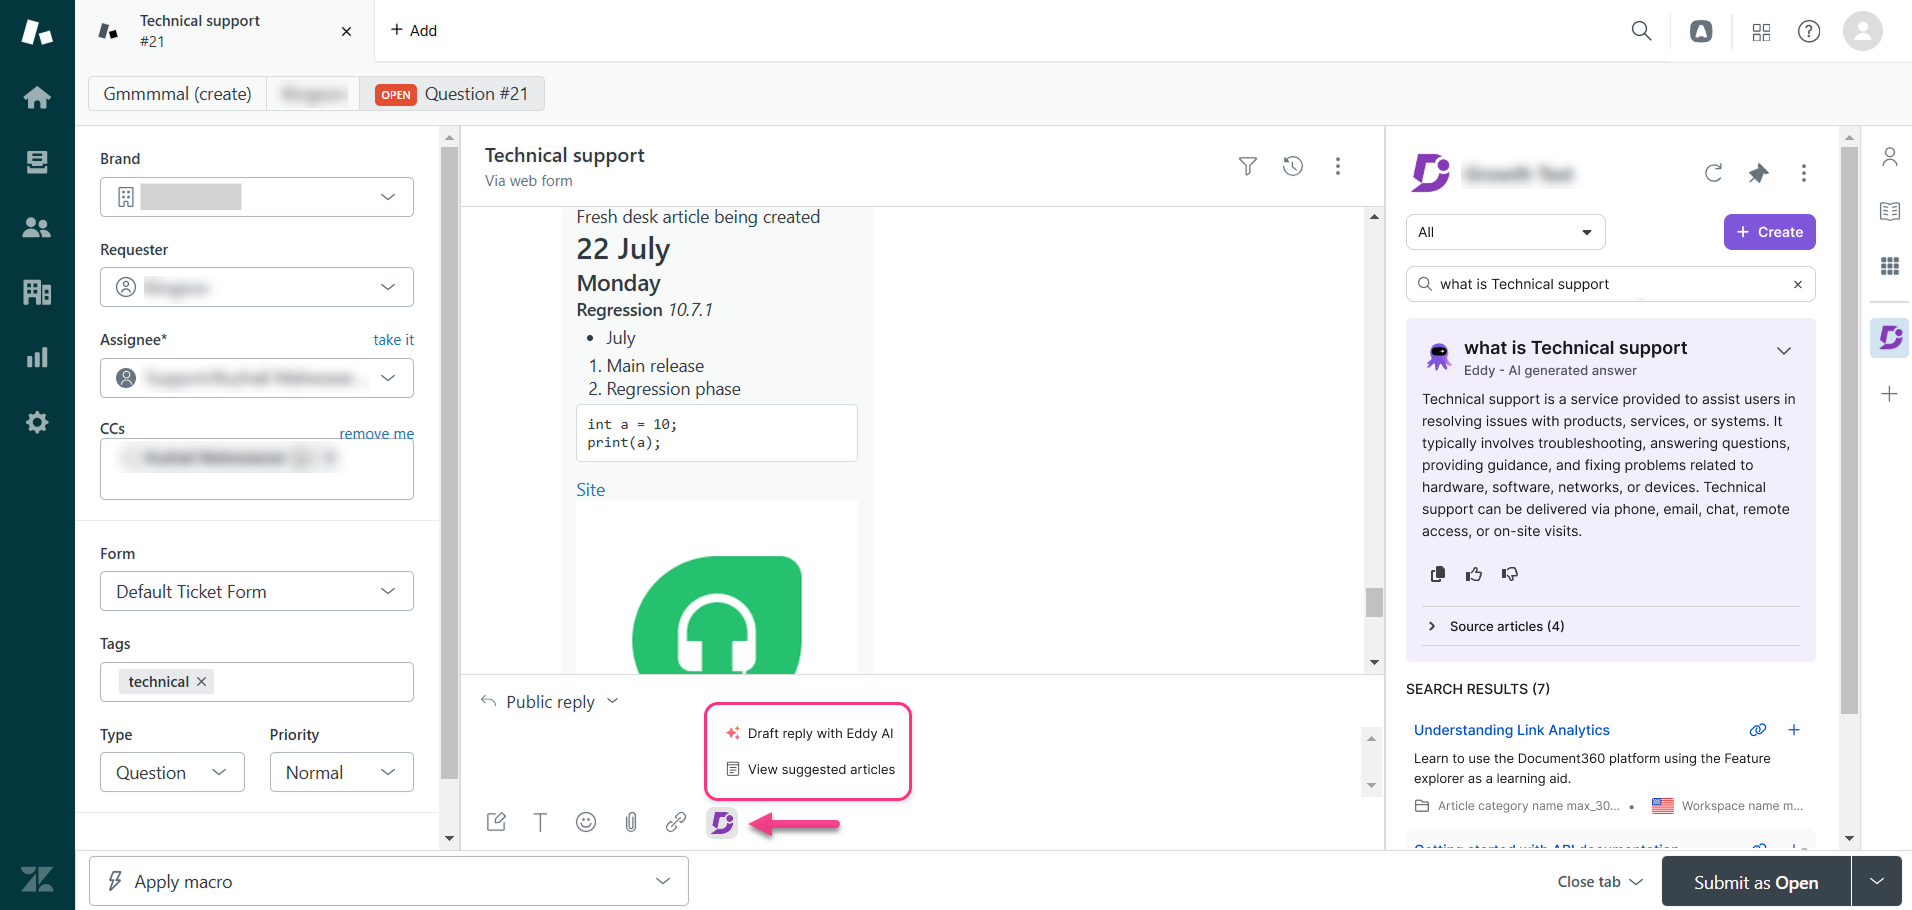
Zendesk verbeteren: Vind voorgestelde artikelen en conceptantwoorden met Eddy AI
Zodra je ervoor hebt gezorgd dat AI-zoekopdracht is ingeschakeld voor de Zendesk ,
Klik op het vastgezette Document360-icoon in Zendesk de Zendesk-zijbalk of open het in de zijbalk.
De door Eddy AI aanbevolen artikelen worden geladen in het Document360-paneel.
In het Document360-paneel , wanneer je begint te typen in de zoekbalk, wordt je gevraagd om de kennisbank te doorzoeken met Eddy AI.
OPMERKING
Eddy AI assistive search-analyses zullen voor deze extensie worden vastgelegd. Je kunt de analyses filteren door de Zendesk-extensie als bron te selecteren.
De workspace- en taalfilters verschijnen op basis van de contenttoegangsconfiguratie die in de extensie is ingesteld.
Klik op het Document360-icoon in het antwoordpaneel om de twee opties hieronder te vinden:
Een antwoord opstellen met Eddy AI
Bij het klikken op deze optie wordt een voorgestelde reactie gegenereerd op basis van de context van het supportticket.
Als Eddy AI onzeker is over het antwoord, zal het een noodoplossing bieden.
Het opgestelde antwoord wordt in dezelfde taal als het gesprek gegenereerd.
OPMERKING
Als AI-kredietgebruiksmeldingen zijn ingeschakeld in de instellingen voor meldingsmapping, ontvang je e-mailmeldingen wanneer het kredietverbruik 80%, 90% en 100% bereikt.
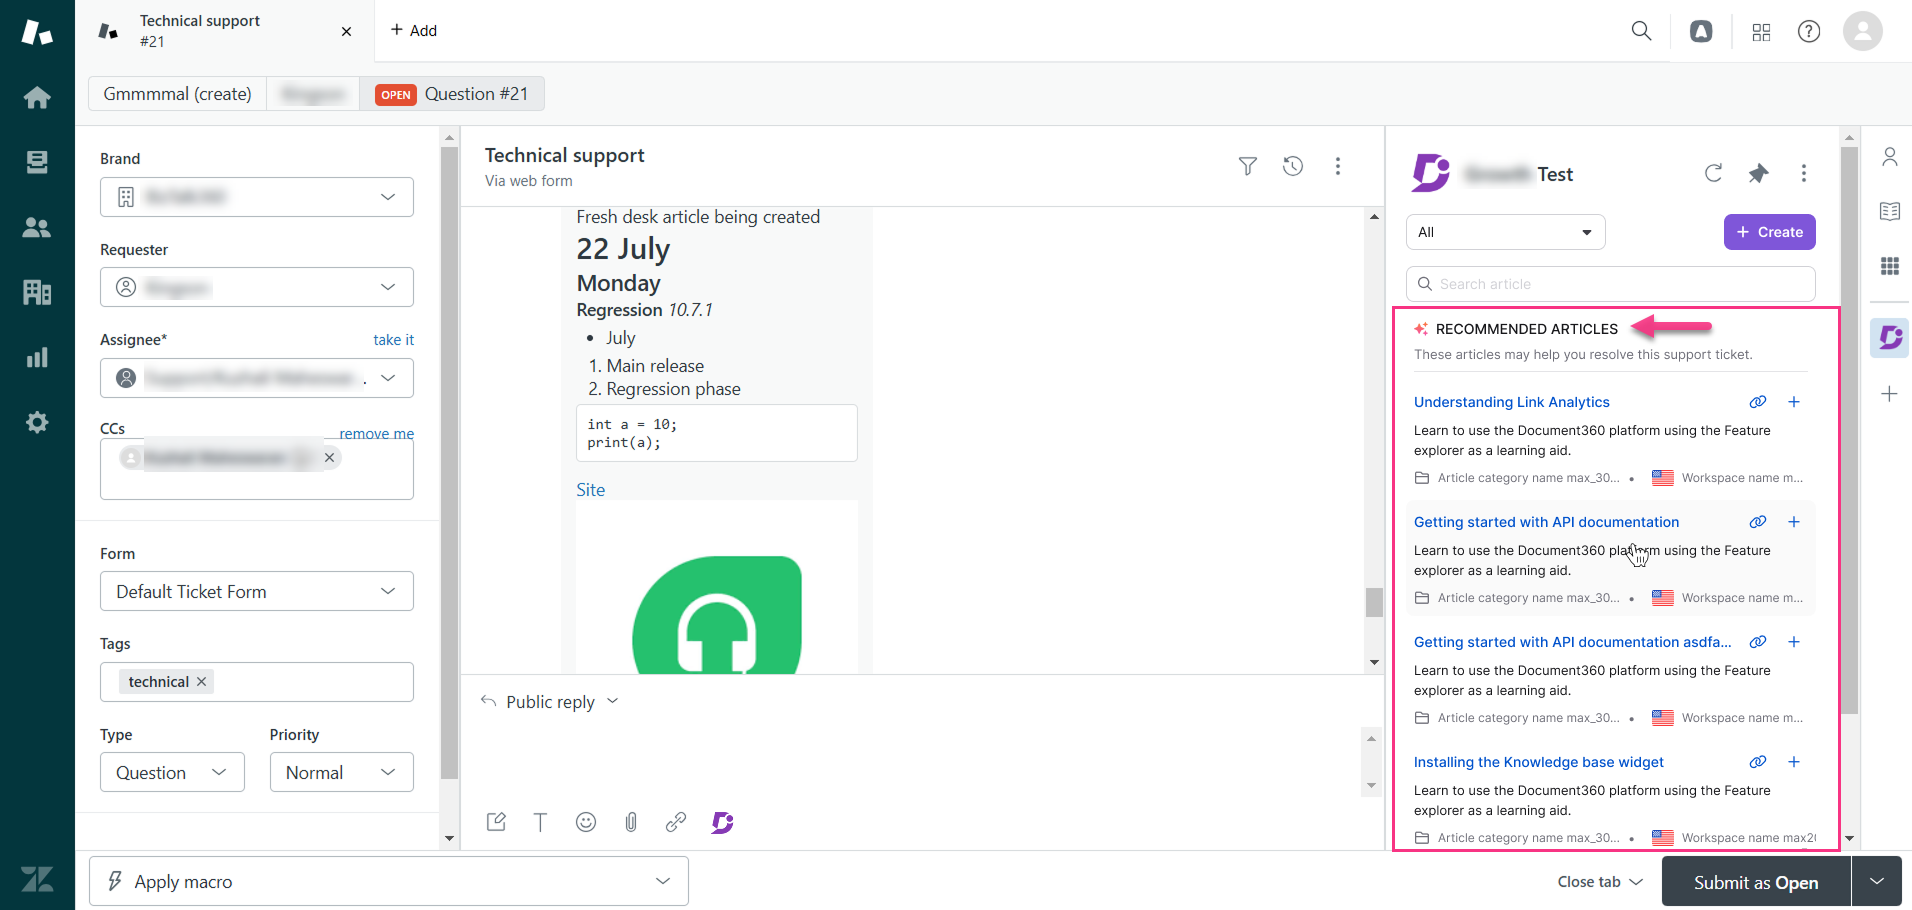
Voorgestelde artikelen bekijken
Bij het klikken op deze optie opent het Knowledge Base-venster met door Eddy AI aanbevolen artikelen.
Maximaal 5 artikelen worden weergegeven.
Bij het ophalen van artikelen houdt Eddy AI rekening met het toegepaste werkruimtefilter.
Ter Informatie
Bij gebruik van Zendesk's Messaging API verschijnen nieuwe berichten mogelijk niet direct. Om alles soepel te laten verlopen, verwerkt Zendesk berichten soms in batches, vooral als er veel activiteit is. Deze vertraging heeft alleen invloed op de Messaging API. Tickets via formulieren, live chat of andere methoden zijn niet vertraagd. Hierdoor kunnen functies zoals Conceptantwoord en Voorgestelde artikelen bekijken iets langer nodig hebben om met de nieuwste gegevens te worden bijgewerkt.
Artikelen zoeken en delen over ticketreacties
Tijdens het beantwoorden van supporttickets kun je de geïnstalleerde Document360-app gebruiken om klanten te beantwoorden. Je kunt direct toegang krijgen tot de kennisbank in de Zendesk .
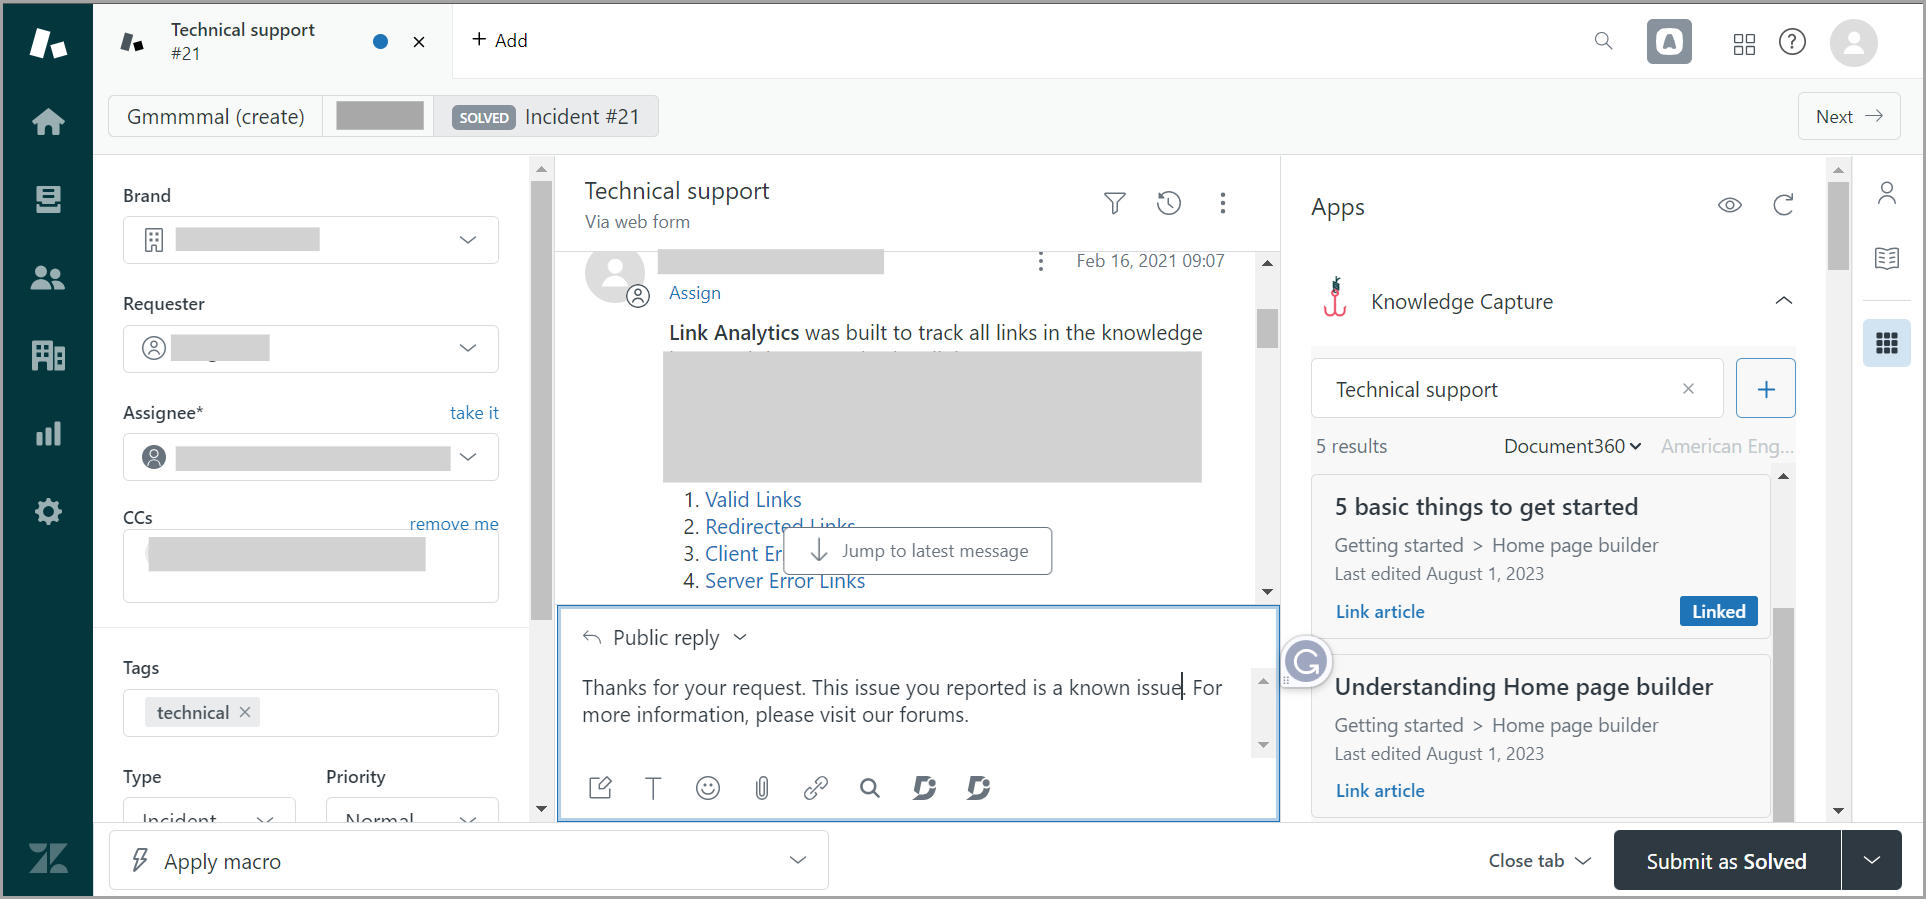
De geïnstalleerde app is beschikbaar aan de rechterkant van het open-ticket responspaneel.
Klik op de Document360 .
Naarmate het Document360 laadt, zoekt Zendesk automatisch naar artikelen op basis van de titel van het supportticket.
Je kunt altijd de zoekterm in het veld typen, en de relevante artikelen worden hieronder vermeld.
Klik op het artikel dat je wilt toevoegen.
Je kunt het artikel ook bekijken door op Voorzicht te klikken.
In de previewmodus zijn er drie opties,
Open Document360 - Het artikel opent in een nieuw tabblad.
Linkartikel - Voeg de artikellink in in je antwoordbericht.
Inhoud invoegen - Voeg de volledige inhoud van het artikel toe aan je responsbericht.
Dit maakt het makkelijker en directer voor agenten om klanten te beantwoorden, omdat ze niet hoeven te navigeren tussen de tabbladen Document360 en Zendesk .
Zodra je een artikel aan een reactie koppelt, staat het label Linked niet meer in de artikellijst. Dit helpt je het artikel te identificeren dat al aan het gesprek gekoppeld is.
Een artikel maken over de kennisbank van Zendesk
Op het Zendesk kun je artikelen maken in je kennisbank zonder extra teamaccounts.
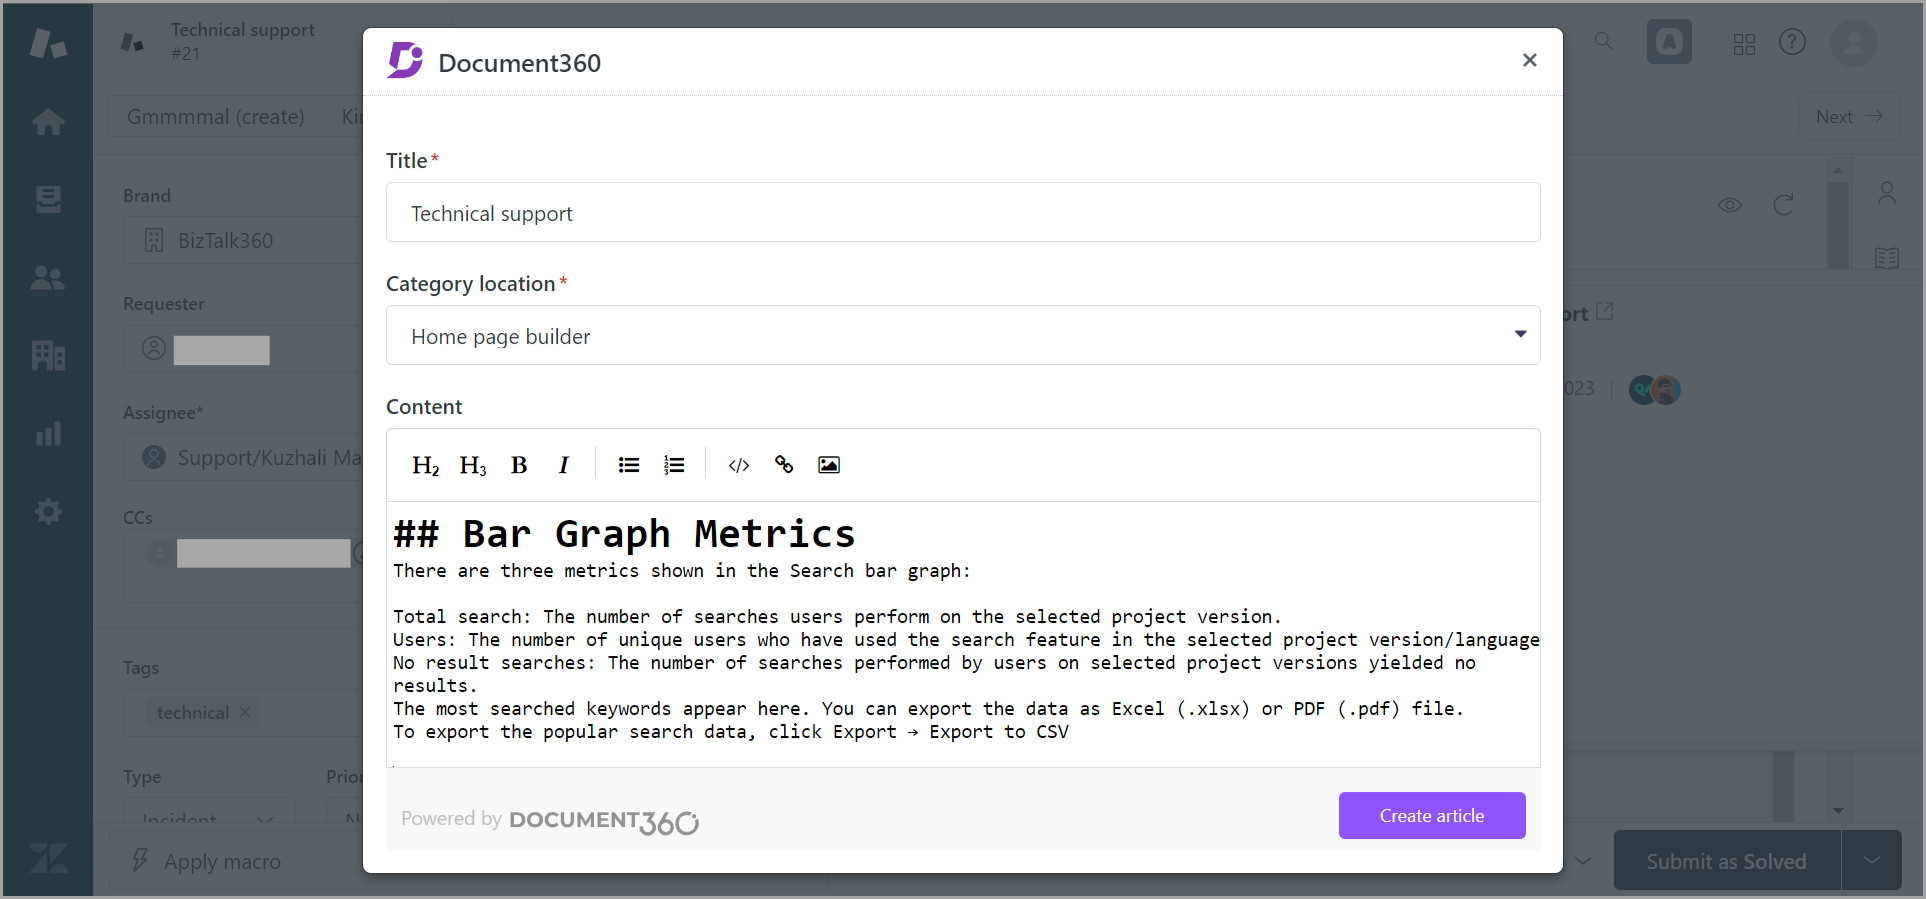
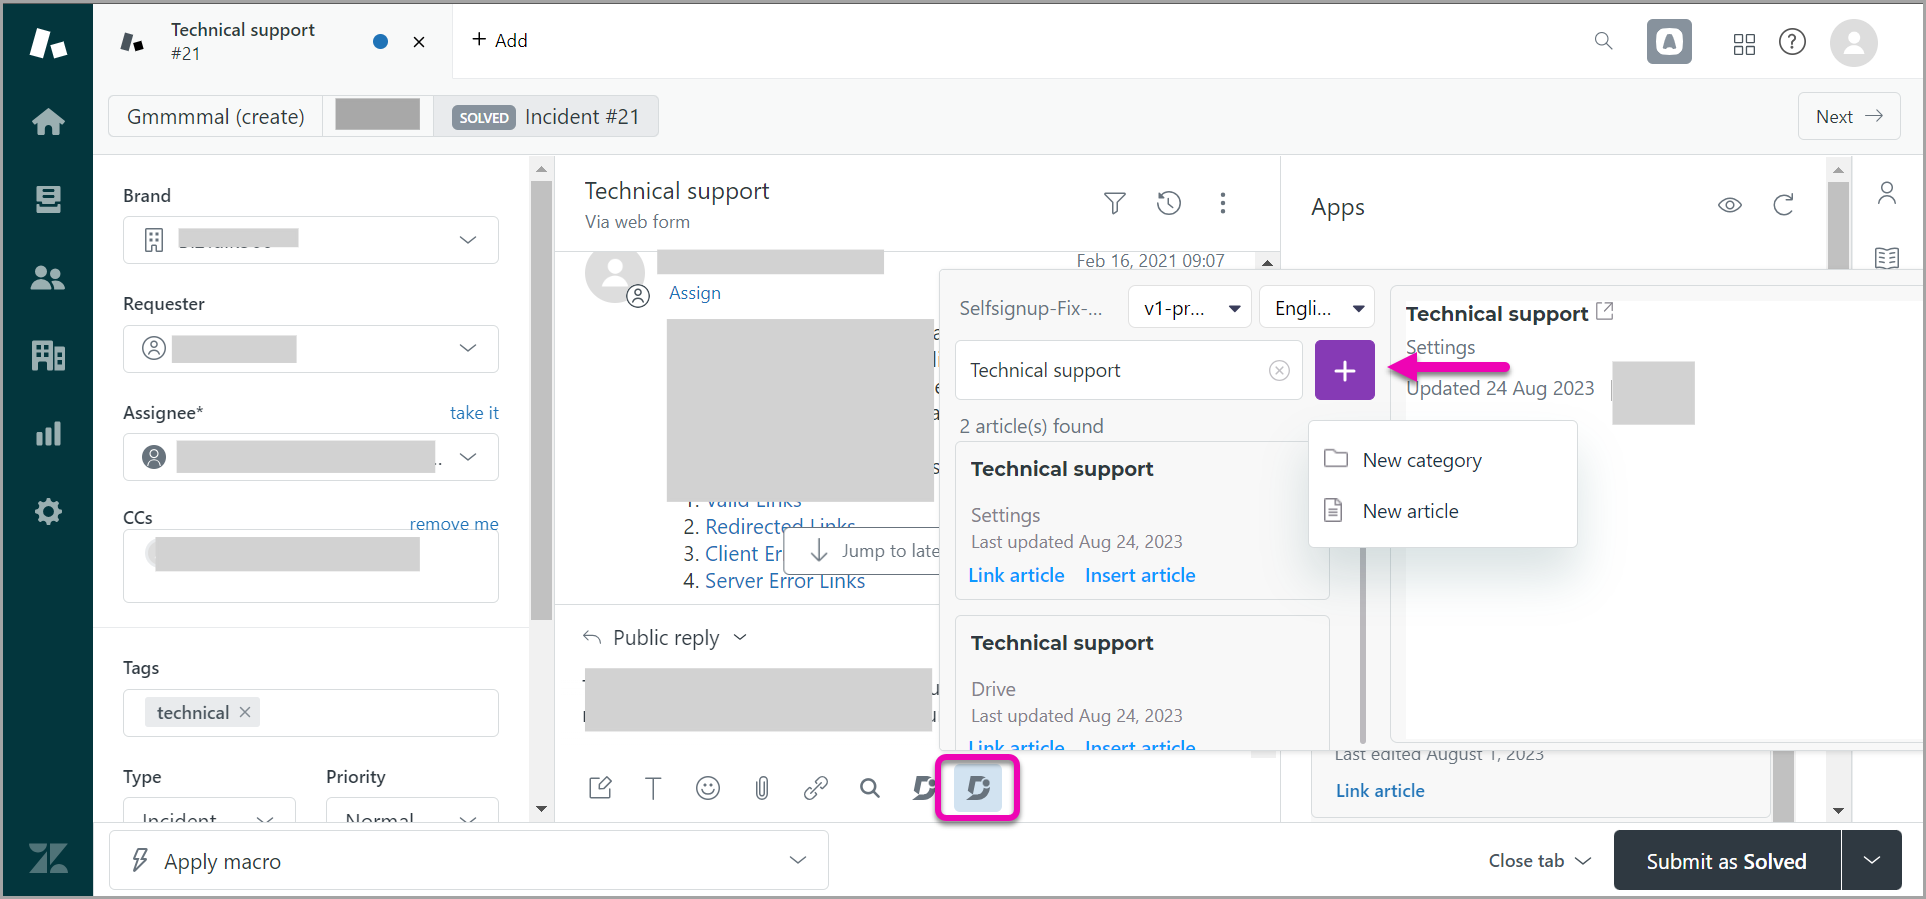
Klik op 'Een artikel aanmaken ' in het Document360 of klik op het plus-icoon (+).
Voeg de titel van het artikel toe en selecteer de categorie of subcategorie waarin je het nieuwe artikel wilt plaatsen.
OPMERKING
Je kunt root-level categorieën en subcategorieën aanmaken op je kennisbank vanuit Zendesk.
Je kunt de inhoud van je artikel schrijven in de Markdown-editor.
In de artikelbody-editor zijn basistekstopmaak beschikbaar zoals koppen (H2 en H3), Vet, Cursief, Geordende lijst en Ongeordende lijst, en Invoegen-opties zoals codeblok, hyperlink en afbeelding.
Als je klaar bent, klik dan op Aanmaken.
Het artikel wordt in een conceptstaat gemaakt, waardoor je redacteuren het kunnen beoordelen en verbeteren voordat het op de kennisbank wordt gepubliceerd.
Document360 snelle lancering in het antwoordpaneel
Klik in de chatbediening onderaan op het Document360 dat wordt weergegeven door het D-icoon om de module te openen.
Selecteer de Document360 en taal waar je naar wilt verwijzen.
De relevante artikelen verschijnen wanneer je de zoekopdracht gebruikt.
Vanuit dit paneel kunt u ofwel:
Linkartikel - om de Document360-URL van het artikel te delen
(of)
Artikel invoegen - om de inhoud van het artikel in de reactie in te voegenKlik op het plus-icoon (+) om artikelen aan te maken voor je Document360 Knowledge Base van Zendesk.
Document360 verwijderen uit Zendesk
Om een geconfigureerde Document360-applicatie van Zendesk te verwijderen, volgt u de onderstaande stappen:
Op het Zendesk navigeer je vanaf het linker navigatiepaneel naar Apps en integraties > Apps > Zendesk Support-apps.
De pagina Mijn Apps verschijnt.
Je kunt de lijst van apps vinden die momenteel geïnstalleerd zijn.
Beweeg je muis over de Document360 .
Klik op het instellingen-icoon () en klik vervolgens op Verwijderen.
Klik in het Startscherm voor de App verwijderen op 'App verwijderen'.
Probleemoplossing
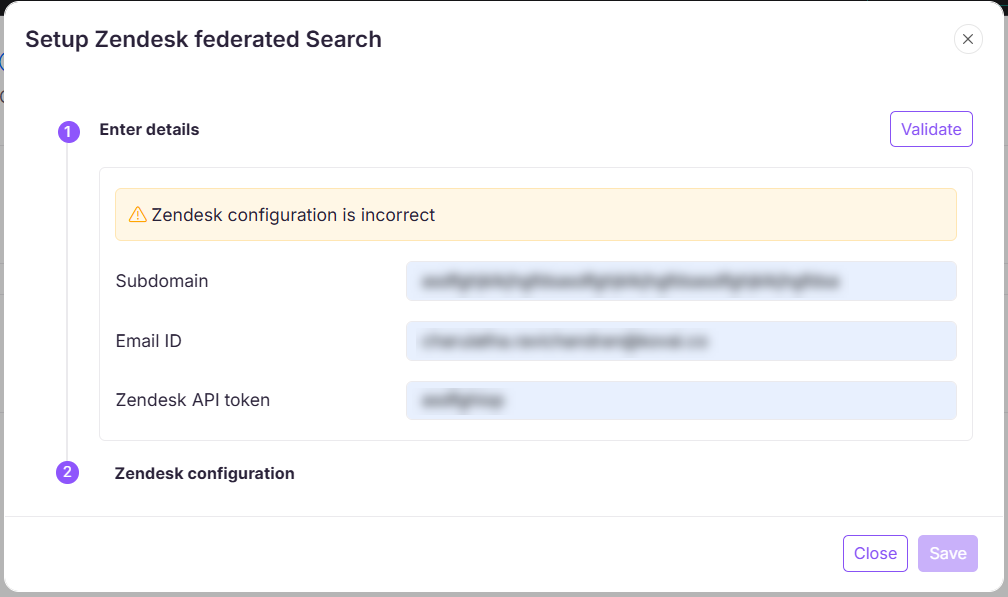
Zendesk federated search configuratiefout
Fout: Zendesk is onjuist
Deze fout kan optreden als je Zendesk geen federatiezoekopdracht ondersteunt of als het API-token, e-mailadres of subdomein verkeerd is geconfigureerd. Zendesk gefedereerde zoekopdracht is alleen beschikbaar voor gebruikers met Zendesk Enterprise en Enterprise Plus accounthouders. Zorg ervoor dat je abonnement deze functie ondersteunt door je abonnement bij Zendesk te verifiëren.
Stappen om op te lossen:
Controleer je Zendesk: Als je geen Enterprise-gebruiker bent, upgrade dan je Zendesk om toegang te krijgen tot gefedereerde zoekopdrachten.
Controleer configuratiedetails: Zorg ervoor dat het API-token, e-mailadres en subdomein correct zijn ingevoerd volgens de Zendesk .
Als je een Enterprise-abonnement gebruikt en nog steeds problemen ondervindt, neem dan contact op met de Document360-ondersteuning met de volgende details:
Een screenshot van het subdomein toegevoegd in zowel Document360 als Zendesk.
Het HAR-bestand registreert om verzoekgegevens vast te leggen. Lees het artikel over het genereren van een HAR-bestand voor meer informatie.
FAQ
Kan ik meerdere artikelen tegelijk vanZendesk naar Document360 pushen?
Je kunt artikelen van Document360 overzetten, maar het proces houdt in dat je artikelen één voor één en individueel pusht.