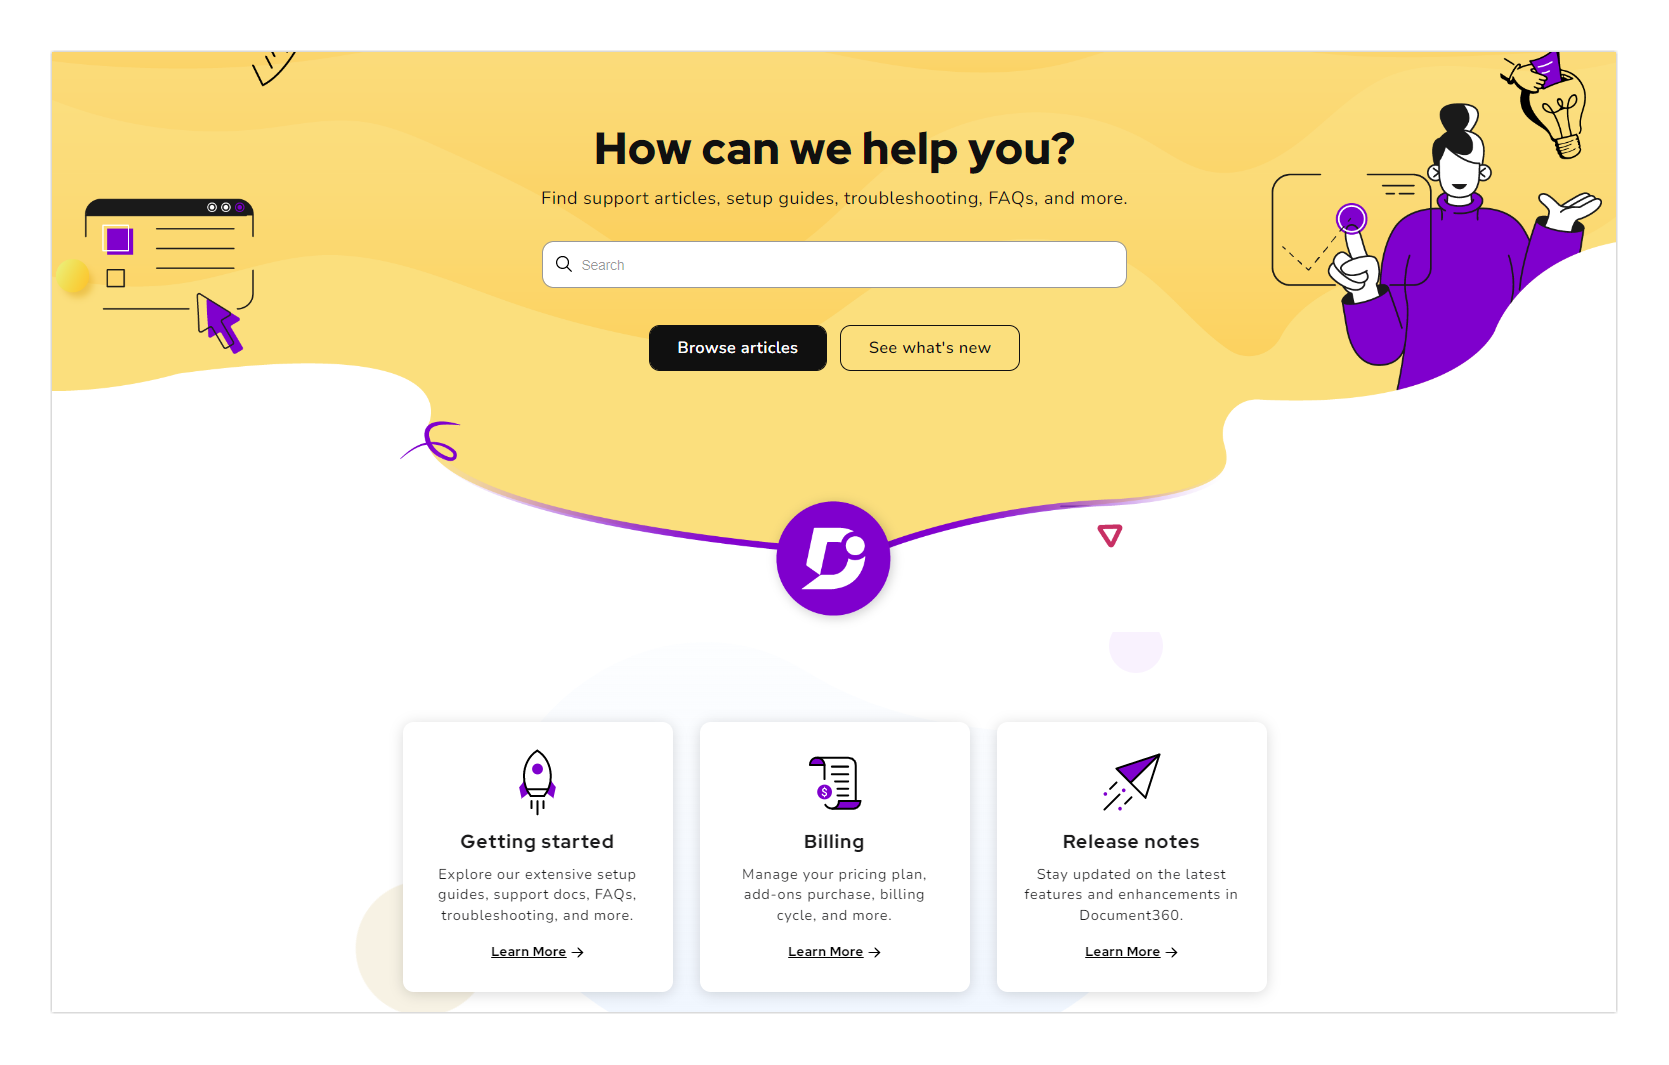
The Home page (previously "Home page builder") is the first page an end-user will see when they visit your Knowledge base. You can customize your home page by adding links, changing colors, including categories from your knowledge base, and more.
Home page
NOTE
The header, primary navigation, secondary navigation, and footer are displayed on the home page of the Knowledge base site. These can be configured in Settings () > Customize site > Site header & footer.
Watch: How to customize the Home page
Accessing the Home page design settings
To access the Home page design settings,
Hover on Settings () in the left navigation bar and select Knowledge base site.
In the left navigation pane, navigate to Site customization.
The Site customization page will appear, with all the basic site design configurations.
Click the Customize site button.
Select Home under Main pages in the dropdown on the left.
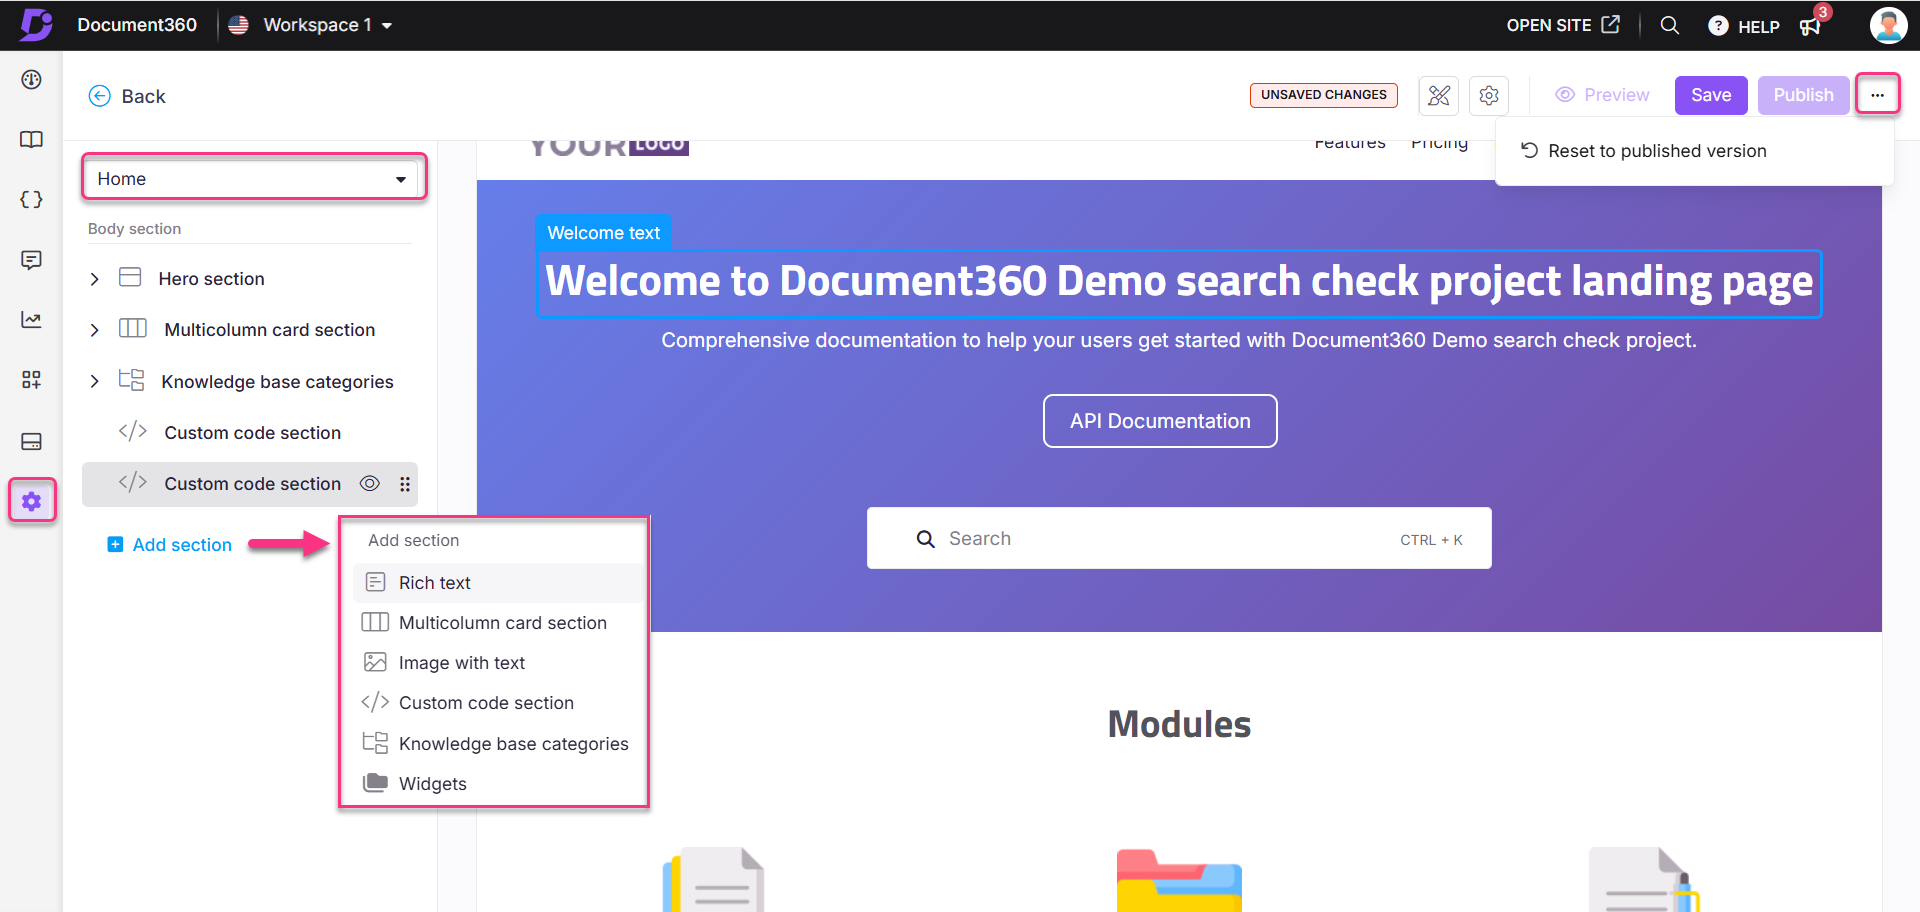
A default Home page design is available for you to customize. The different sections of the Home page are listed on the left, and a Live preview is available on the right.
You can customize the Hero section elements.
If needed, click Add section and choose from the available Body block options, each featured for specific content needs:
Rich text: Add and format textual content using Markdown for enhanced readability and structure.
Multicolumn card section: Display content in organized columns, perfect for showcasing multiple topics or features side by side.
Image with text: Combine visuals with textual descriptions to create a more dynamic and visually appealing layout.
Custom code section: Embed Custom HTML and CSS code for advanced content customization.
Knowledge base categories: Highlight key categories from your Knowledge base to improve navigation.
Widgets: Add interactive elements, such as surveys or contact forms, to enhance user engagement.
Body blocks allow Knowledge base admins to create visually appealing and intuitive Home pages that effectively guide users. Each block provides a unique way to display content, offering flexibility in designing an engaging and user-friendly Home page.
For example, a software company can use the Knowledge base categories block to display product guides. In contrast, the Image with text block can highlight key features or announcements, enhancing the user experience and engagement.
You can reorder the section on the left pane using drag-and-drop () and click the eye () icon to hide the desired element.
NOTE
The main Hero section at the top cannot be dragged and moved.
Click Preview to see how your changes will appear on the knowledge base site.
Click Save to save your changes without applying them immediately.
Click Publish to make your recent changes visible to readers.
Click the More () icon and select Reset to published version to discard all saved and unsaved customizations and revert to the last published version.
NOTE
The Publish button becomes active only after you save your changes.
The Reset to published version feature is available only for new Knowledge base site 2.0 projects created after March 29, 2025.
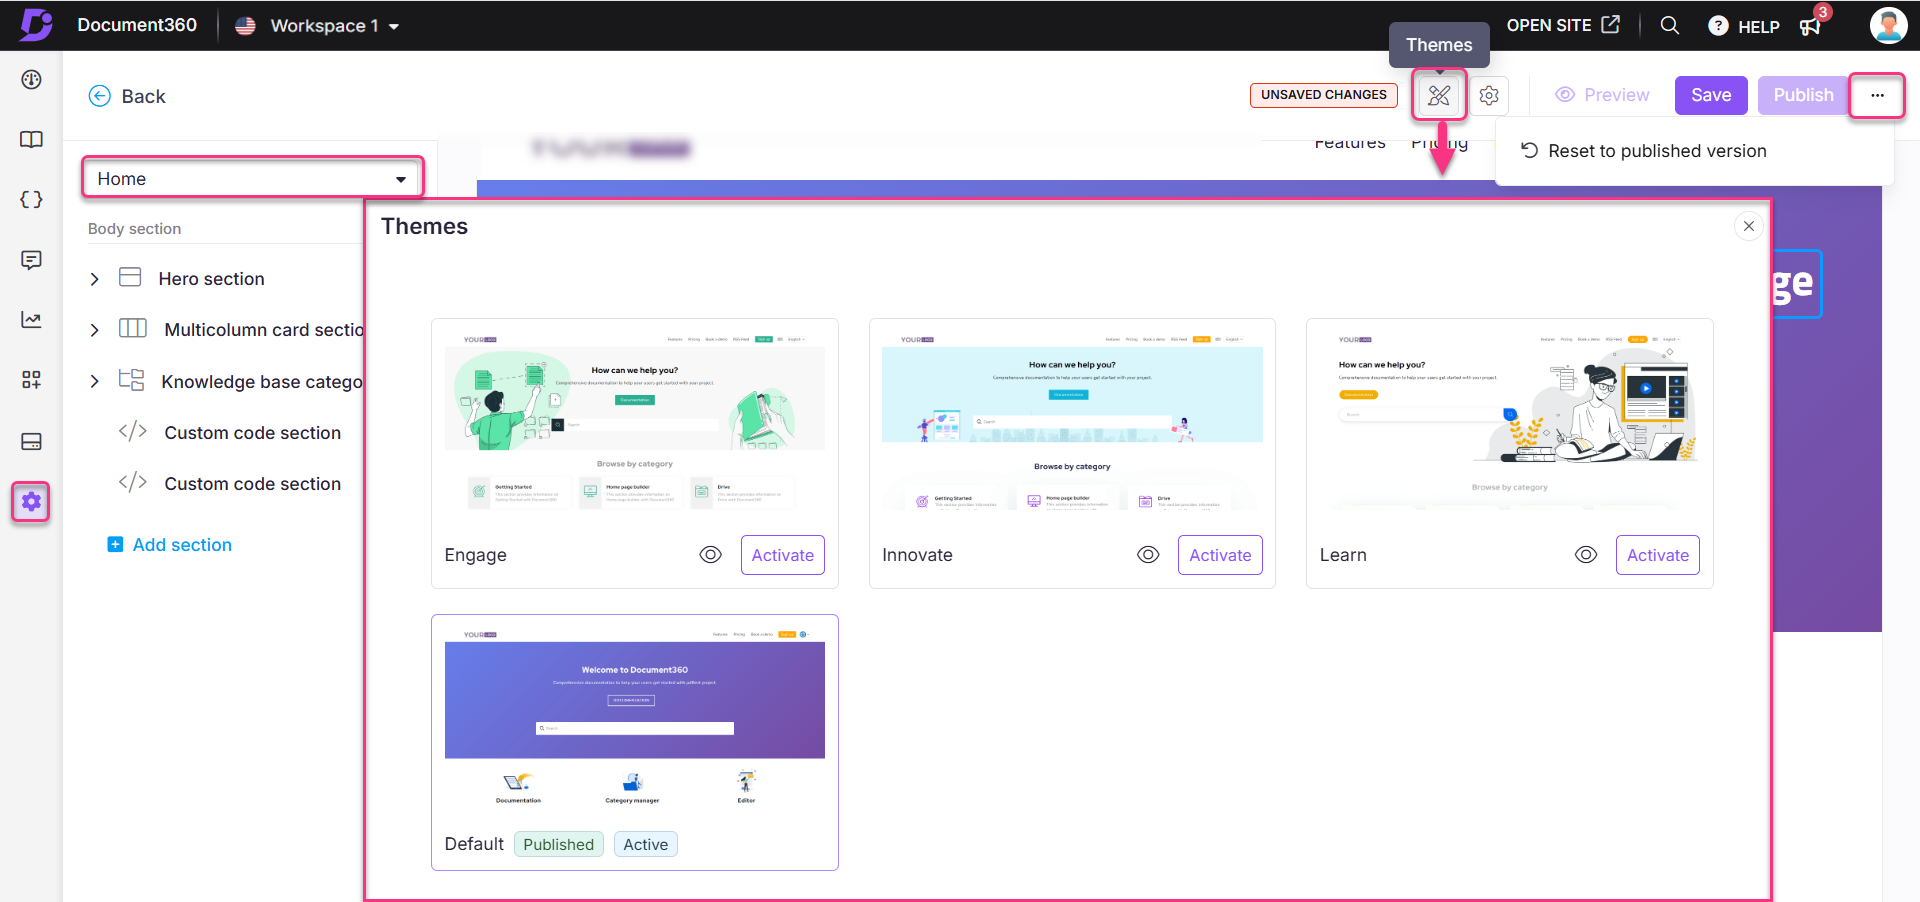
Home page themes
Customize your Home page with the Document360 themes. You can configure a unique theme for each workspace or language.
Click the Themes () icon on the Home page design page
Select one of the themes: Engage, Innovate, Learn, or Default.
Click the Eye () icon to view a static preview.
Click Activate to implement the selected theme.
NOTE
The recommended resolution for the homepage image is 1920x415 pixels (width x height). You can customize the resolution as needed.
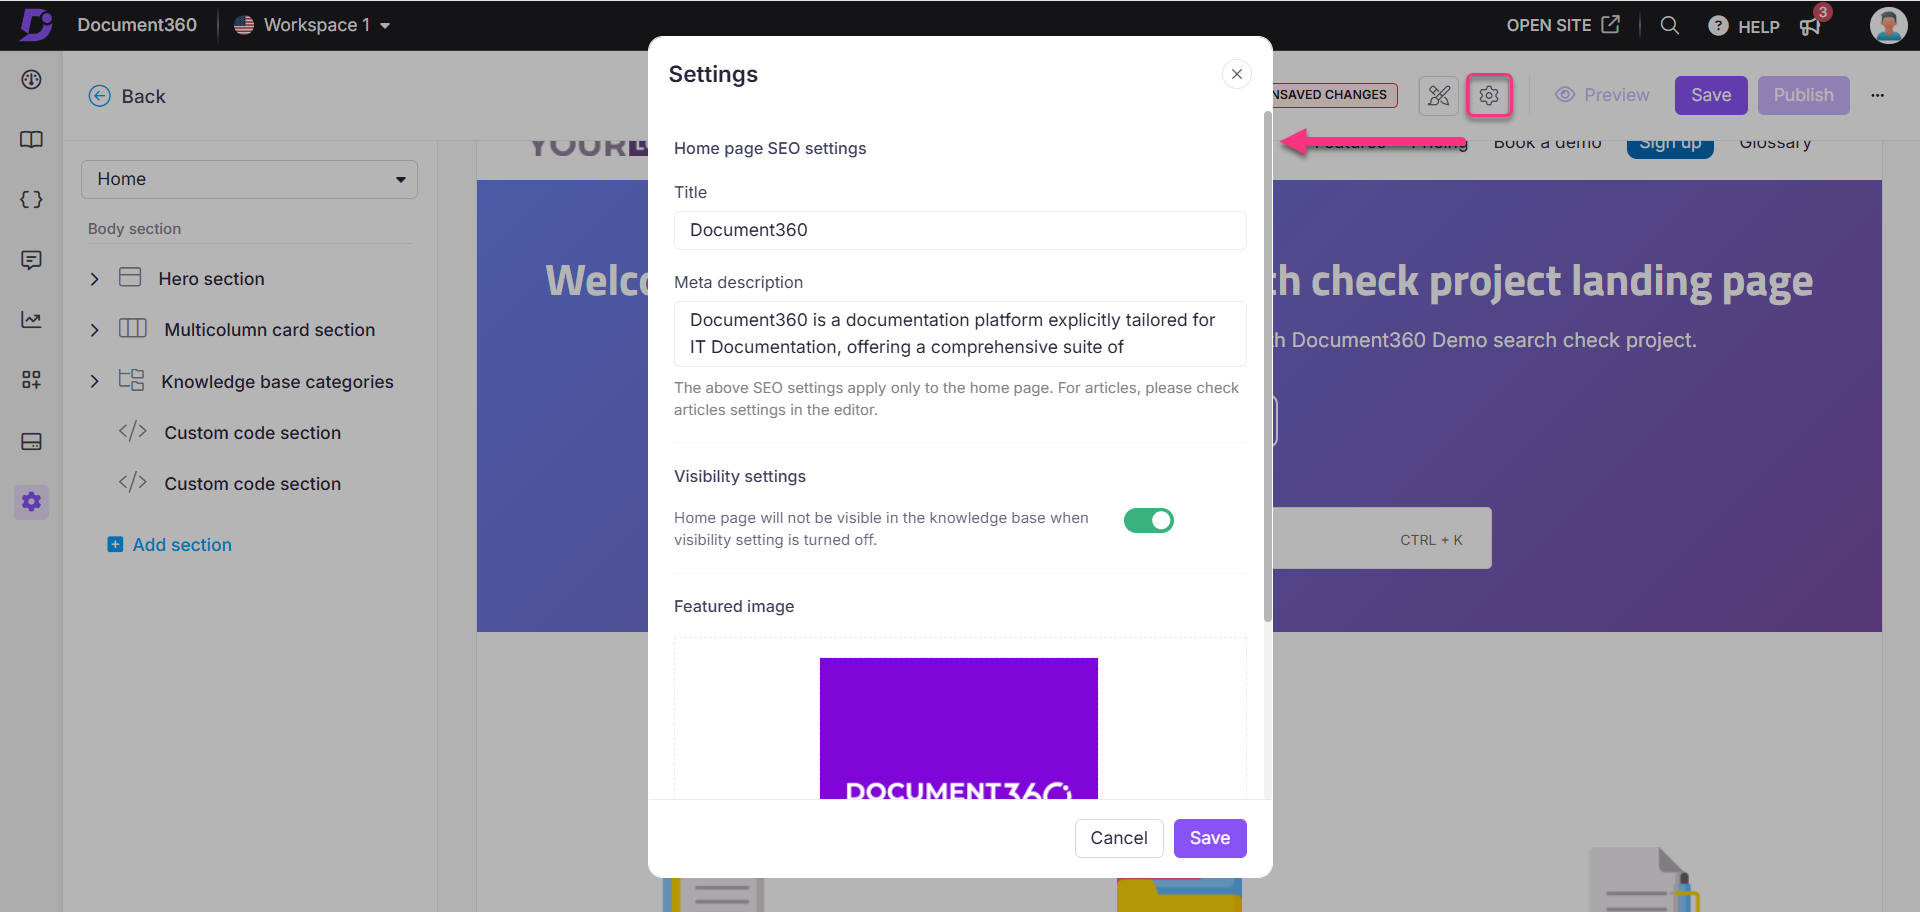
Home page SEO
You can use a meta title, meta description, and a featured image for your Home page.
To customize the Home page SEO settings:
Click the Settings () icon in the Home page design page.
The Settings panel will appear.
Configure the following settings:
Title: Enter the title that will appear in the browser tab for your Knowledge base home page.
Meta description: Provide a brief meta description for your home page. These SEO settings will apply only to the home page.
Visibility settings: Turn on this toggle to keep the home page visible in the Knowledge base site. If turned off, the home page will be hidden, and users will be directed to the documentation page instead.
Featured image: Click Choose image to upload a featured image from the Drive.
Click Save to apply your changes.
Documentation
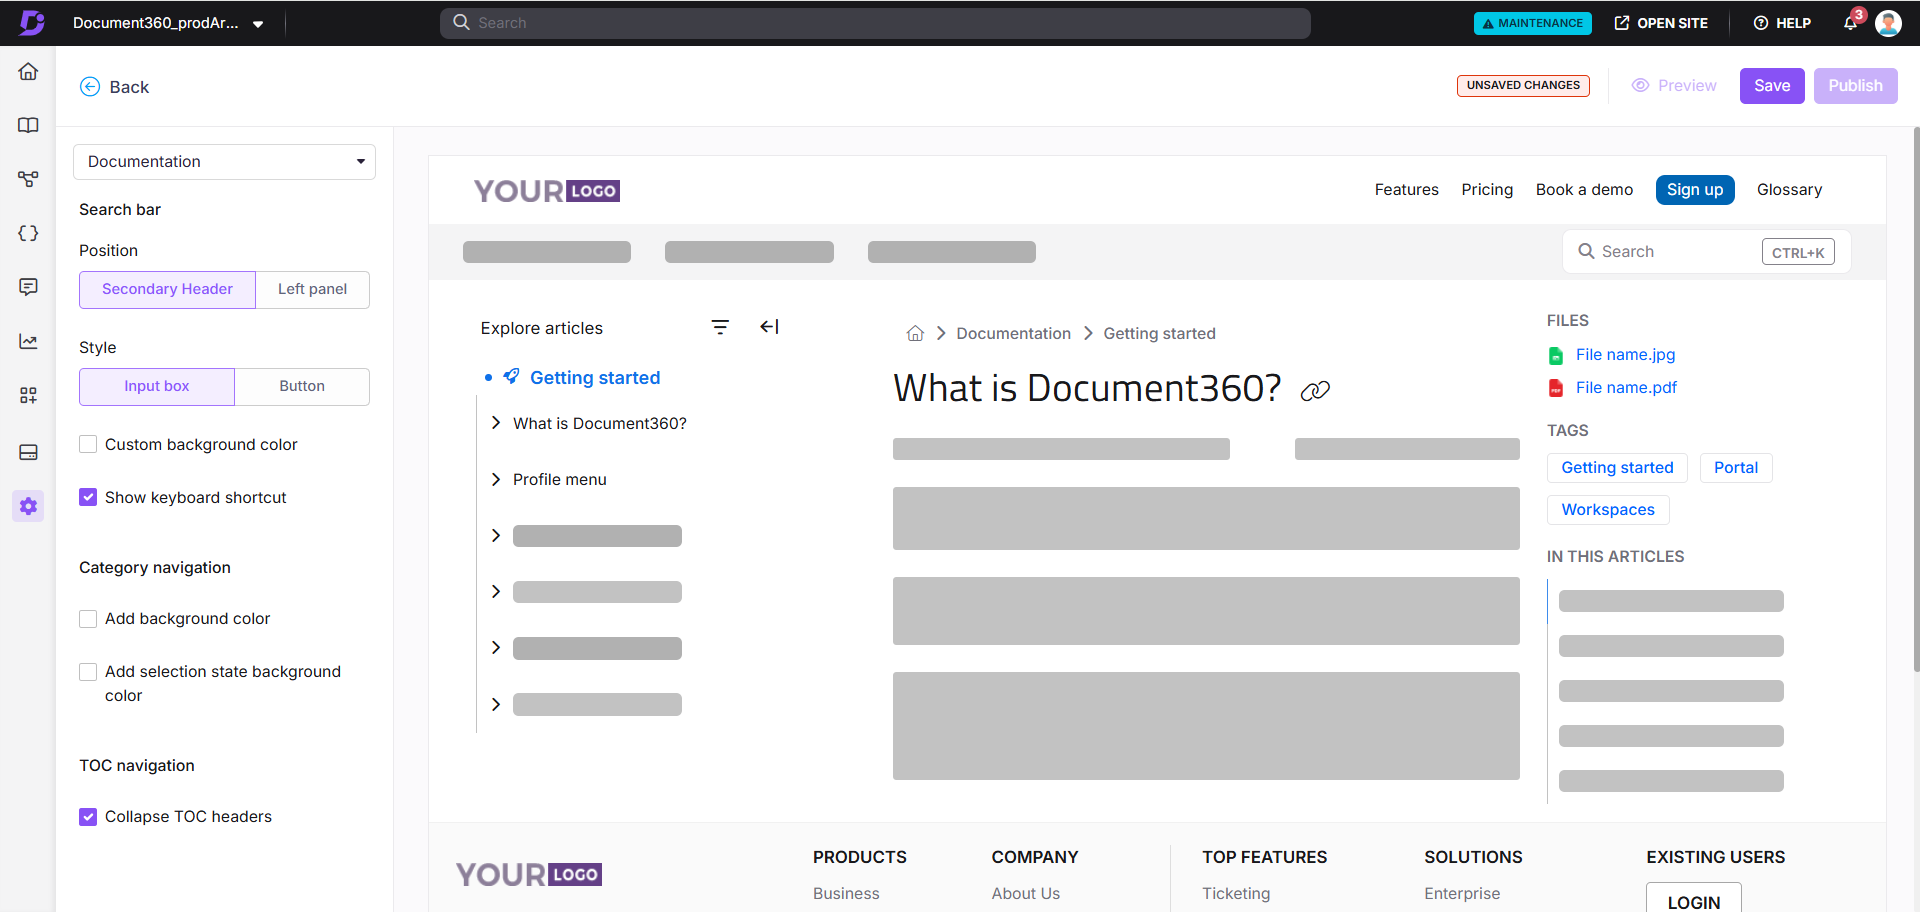
The Documentation page lets you customize the category navigation by adjusting the position of the search bar and applying background colors.
Watch: How to customize the Documentation page
Accessing the Documentation page design settings
To access the Documentation page design settings:
Hover on Settings () in the left navigation bar and select Knowledge base site.
In the left navigation pane, navigate to Site customization.
The Site customization page will appear, with all the basic site design configurations.
Click Customize site.
From the dropdown on the left, select Documentation under Main pages.
A default Documentation page design will be available for you to customize. Customization options are listed on the left, and a Live preview is available on the right.
Choose the search bar position:
Secondary Header: Position the search bar in the secondary header on the top right. By default, this option will be selected.
Left panel: Place the search bar at the top of the left navigation panel.
Choose the desired search bar style: Input box or button.
Select the Custom background color checkbox to apply a customized color to the search bar.
NOTE
When you select a custom background color, the primary color for both Dark and Light themes is automatically prefilled. You can customize these colors as needed.
The Show keyboard shortcut checkbox is selected by default.
If activated, Ctrl + K appears on the search bar.
This applies to both the left navigation search bar (inside articles) and the main home page search bar.
In the Category Navigation section, select Add background color to apply a background color to the category section on the Knowledge Base site. By default, a light grey color (#F4F4F5) is used, which cannot be customized.
Select Add selection state background color to apply a background color to the selected item in the Articles & Categories pane. By default, a light blue color (#E6F0F7) is used.
Select the Display titles in 2 lines checkbox to wrap long titles in the category tree into two lines. If a title exceeds two lines, an ellipsis (…) appears at the end of the second line. When disabled, long titles are restricted to a single line with an ellipsis on your knowledge base site.
In the TOC navigation section, enable the Collapse TOC headers checkbox to collapse all Table of Contents headers by default on the Knowledge base site.
For example, if you have chosen to display H2, H3, and H4, the H4 content will be nested under H3, and H3 under H2, with both collapsed until expanded by the reader.
NOTE
You can also enable this setting from Settings () > Knowledge base site > Article settings & SEO. Expand the Article right accordion and enable the Collapse TOC headers toggle.
Click Preview to see how your changes will appear on the knowledge base site.
Click Save to save your changes without applying them immediately.
Click Publish to make your recent changes visible to readers.
Click the More () icon and select Reset to published version to discard all saved and unsaved customizations and revert to the last published version.
NOTE
The Reset to published version feature is available only for new Knowledge base site 2.0 projects created after March 29, 2025.
Login page
If your Knowledge base is private or has mixed access, reader are required to log in with their credentials to view the content. You can customize this login page using the Customize site option available in Document360.
Watch: How to customize the Login page
Accessing the Login page design settings
To access the login page design settings:
Hover on Settings () in the left navigation bar and select Knowledge base site.
In the left navigation pane, navigate to Site customization.
The Site customization page will appear, with all the basic site design configurations.
Click the Customize site button.
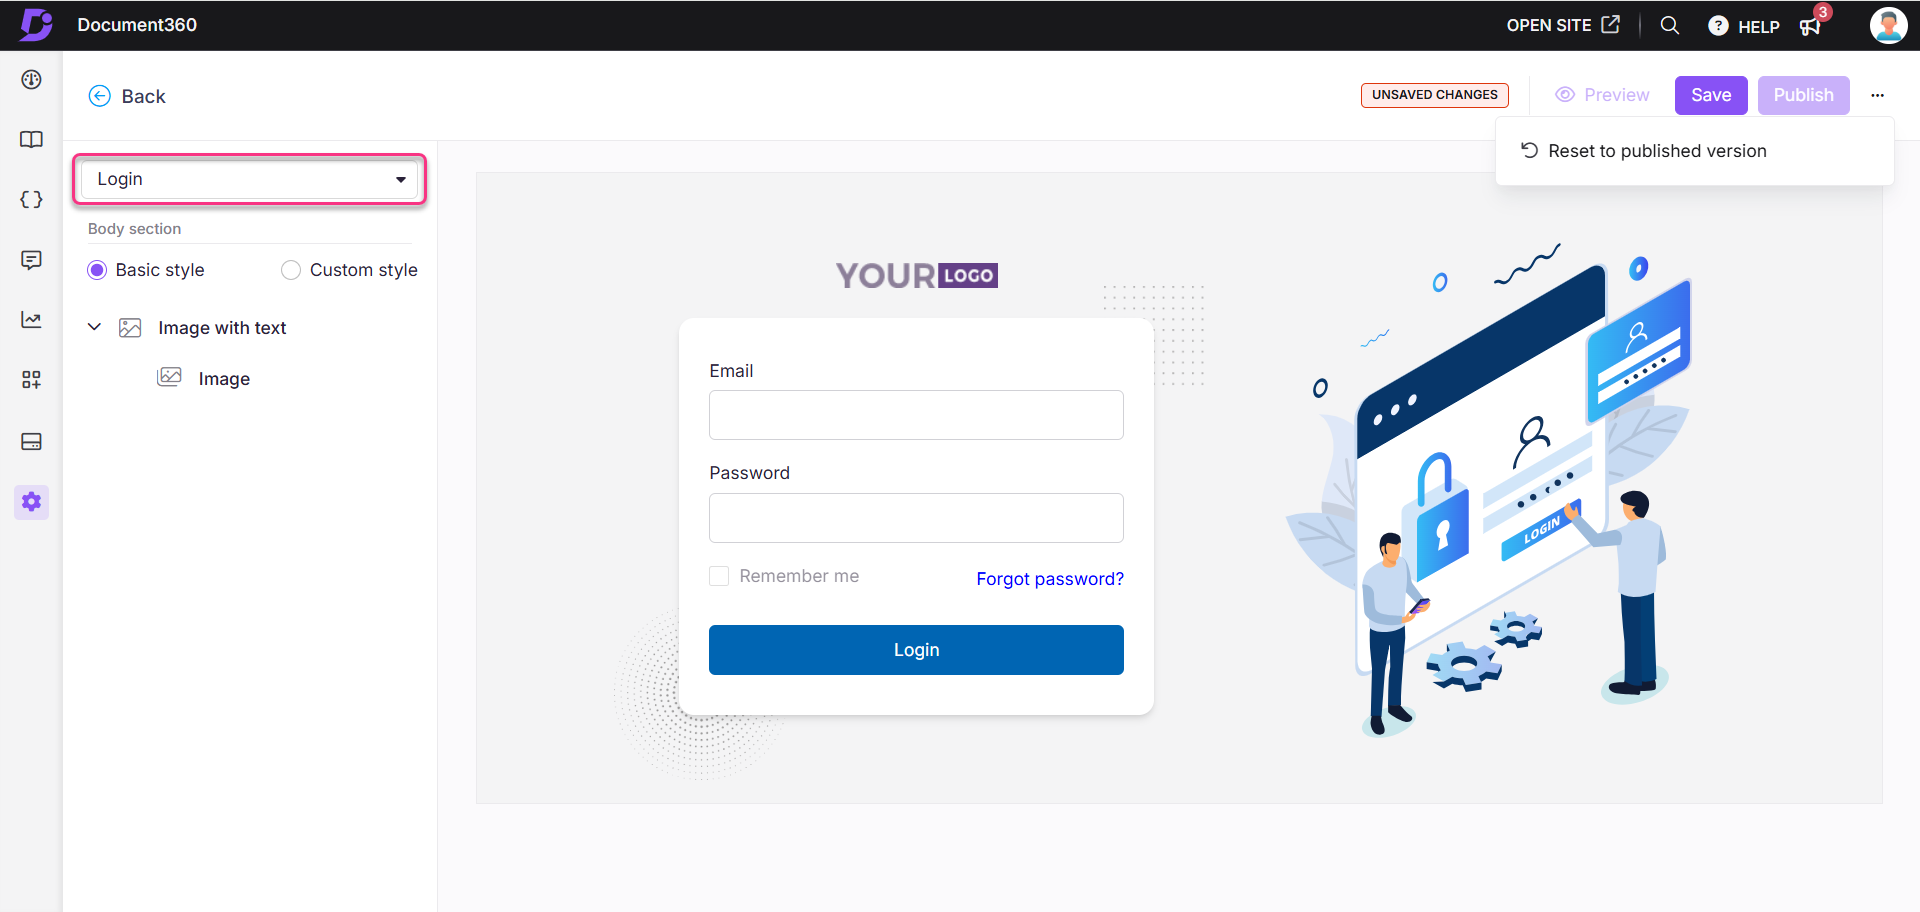
In the dropdown menu on the left, select Login under Main Pages.
You’ll see a default Login page design ready for customization.
Choose one of the following options:
Basic style: Customize the default image only. Expand the Image with text dropdown and select Image. The Image pane will open. Click Change and choose the desired image from the system images. In the Alignment section, select Left, Center, or Right to adjust the image alignment.
Custom style: Add Custom HTML and CSS. You can turn on/off the Preview toggle on the right to switch between the rendered view and the code view.
Click Preview to see how your changes will appear on the knowledge base site.
Click Save to save your changes without applying them immediately.
Click Publish to make your recent changes visible to readers.
Click the More () icon and select Reset to published version to discard all saved and unsaved customizations and revert to the last published version.
CAUTION
When customizing the Login page using custom HTML, ensure that the default login component is retained:
<div class="login-form">{{template:LoginCore}}</div>This component is required for handling the authentication flow. Removing or modifying it can result in:
Multiple login prompts
Redirects to the team portal instead of the Knowledge base site
Failed or incomplete reader authentication
Always include this component when designing a custom login page.
NOTE
The Reset to published version feature is available only for new Knowledge base site 2.0 projects created after March 29, 2025.
FAQ
How do I add images to the Home page?
To add images to the Home page, paste the following code in the Custom HTML:
<img src="paris.jpg" alt="Paris" class="center">For customizing the alignment, add the following CSS code in the Custom CSS & JavaScript section:
.center {
  display: block;
  margin-left: auto;
  margin-right: auto;
  width: 50%;
}
If I make changes to my home page, will they automatically update in all languages?
No. Changes made in your default language will not automatically reflect in other languages. In Document360, you need to manually update the content for each language, including the home page and other main pages.
How do I change the position of the search bar to reflect the knowledge base site?
To adjust the position of the search bar on your Knowledge base site, follow these steps:
Hover on Settings () in the left navigation bar and select Knowledge base site.
In the left navigation pane, navigate to Site customization.
Click Customize site. Select the dropdown, and click Documentation.
On the left panel, you have two options to switch the search bar position.
Left panel: Place the search bar in the category tree on the left side.
Secondary Header: Place the search bar on the right side in the secondary header.
If needed, check the Add background color box to apply the background color to the search bar.
Once done, click Save and Publish.
How do I change the browser tab title for my Knowledge base home page?
The SEO title of the home page appears as the browser tab name. To change the SEO title of the home page:
Hover on Settings () in the left navigation bar and select Knowledge base site.
In the left navigation pane, navigate to Site customization.
The Site customization page will appear, with all the basic site design configurations.
Click the Customize site button.
In the dropdown on the left, select Home.
Click the Settings () icon on the Home page.
The Settings panel will appear.
Enter the desired Title for your Home page.
Once done, click Save and Publish.
How to integrate a video loader into your home page?
Adding a visually appealing video loader to your homepage can create a sense of curiosity and interactivity for your visitors. Follow these simple steps to integrate a video loader seamlessly:
Hover on Settings () in the left navigation bar and select Knowledge base site.
In the left navigation pane, navigate to Site customization.
The Site customization page will appear, with all the basic site design configurations.
Click the Customize site button.
In the dropdown on the left, select Home.
Create a new custom code section and insert the following HTML code, replacing the
srclink with the video link from your drive:htmlCopy code<div class="video__loader"> <video muted autoplay loop> <source src="https://cdn.document360.io/560b3c6e-18a1-4ad6-babc-d0257662eab2/Images/Documentation/Revolving_Video.mp4" /> </video> </div>This code will seamlessly integrate the video loader into your homepage, enhancing its visual appeal and captivating your audience from the moment they arrive.
In the dropdown on the left, select Custom CSS/JavaScript and navigate to the CSS tab.
Replace
"Innovate"in the following code snippet with the name of your configured theme (e.g., Engage, Learn, Innovate, or Default):cssCopy codebody.innovate { position: relative; overflow: hidden !important; } body.innovate.custom--loaded { overflow: auto !important; } /* Loader */ .video__loader { width: 100%; min-height: 100vh; display: flex; align-items: center; justify-content: center; position: fixed; top: 0; left: 0; background: var(--color-dark); opacity: 1; visibility: visible; z-index: 9999999999; transition: all 1s ease; } .video__loader.remove--loader { opacity: 0; visibility: hidden; } .video__loader video { width: 100%; }This ensures that the CSS styling aligns with your chosen theme, optimizing the visual presentation for enhanced user experience.
Navigate to the JavaScript tab.
Replace
"innovate"in the following code snippet, with your theme name:javascriptCopy code/* Loader */ var elBody = document.querySelector("body.innovate"); var customLoaderVideo = document.querySelector(".video__loader"); document.addEventListener("DOMContentLoaded", function() { setTimeout(function() { elBody?.classList.add("custom--loaded"); customLoaderVideo?.classList.add("remove--loader"); }, 5000); });This customization ensures that the JavaScript functionality integrates seamlessly with your theme, enhancing the overall performance of your site.
NOTE
The video loader function will operate exclusively on the homepage and will not apply to the documentation pages.
How to deactivate the Home page on the Knowledge base site?
Hover on Settings () in the left navigation bar and select Knowledge base site.
In the left navigation pane, navigate to Site customization.
Click the Settings () icon on the Home page design page.
Turn off the Visibility settings toggle and click Save.
How do I add a contact/register button to my Login page?
Adding a support button to your Login page can simplify the process of reaching out for assistance. Follow these easy steps to integrate a support button into your login page seamlessly:
Hover on Settings () in the left navigation bar and select Knowledge base site.
In the left navigation pane, navigate to Site customization.
Select the Customize site button.
Select Login from the left dropdown under the Main Pages group.
Then choose the Custom style radio button to turn on modifications specifically for your login page.
In the HTML customization tab, add the following code to create your support button:
htmlCopy code<div class="login-form--support">
    <button class="support-button">
        <a href="Support portal button or registration button link">Contact Support</a>
    </button>
    <p>Click here to Contact Support</p>
</div>
Next to the HTML tab, find the CSS customization tab. Paste the following code to ensure the support button is centered on the page:
cssCopy code.login-form--support {
    text-align: center; /* Centers the content inside the element */
}
By following these steps, you will successfully add a support button to your login page. This enhancement allows users facing challenges to easily access support resources without leaving the login interface, significantly improving their experience. Providing quick assistance right where it’s needed can lead to higher user satisfaction.